How to make a fence with your own hands. How to make a decorative fence on a personal plot with your own hands
Today the wooden fence is gaining popularity again. Modern analogues made from other materials, of course, are no worse, but from time immemorial, mankind has appreciated and still appreciates naturalness. Nothing beats the naturalness of solid wood. On our site there are several types of wooden fences and fences for the house and detailed instructions on how to do it yourself.
The main types of wooden fences
For any owner of a private house, a hand-made fence is a special pride. But before proceeding with its construction, you need to choose the type of construction. Types of wooden fences for private houses and photos for them:
Wattle
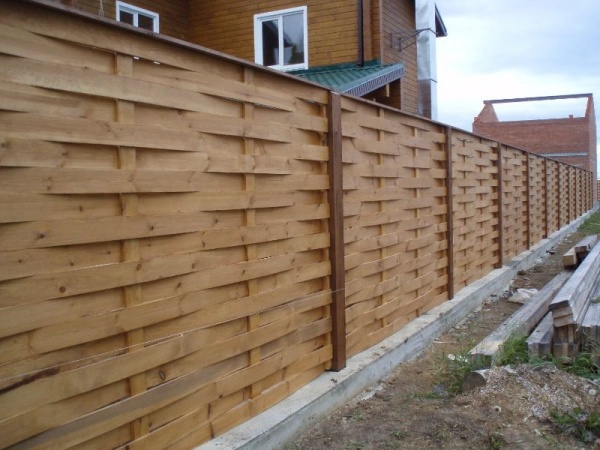
Wooden wicker fence. By type, this is the most ancient variety - rods intertwined with each other in a special way and knees driven into the ground. The semi-antique wooden fence wicker (in the photo below you can see in more detail) is very unusual, making it with your own hands is not difficult at all, but, unfortunately, its service life is short.

Ranch
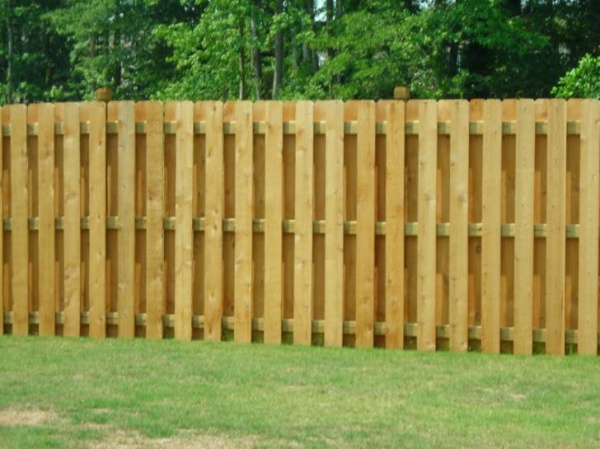
Although the name is reminiscent of American films about cowboys, it should be noted that on the territory of our country, such structures were erected a long time ago. They fenced gardens, vegetable gardens, in agriculture, animal grazing zones. By design, these are several boards (rail) nailed to a timber bar.

Palisade
This is also a kind of old fences that you can make with your own hands. The stakes are sharpened at the top at an angle of 40 degrees. Has an impressive appearance

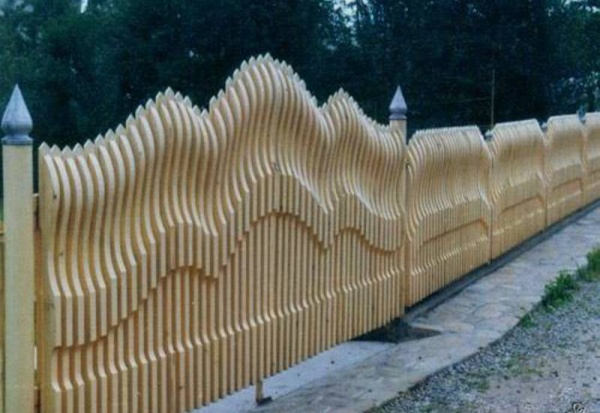
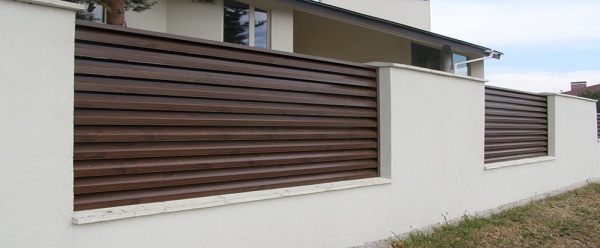
Lattice
An attractive appearance, such an openwork wooden one is easy to do with your own hands, most often serves as an element of the decor of a personal plot or for zoning it. The decorative wooden fence is not particularly durable. It can be done by crossing the slats or narrow boards straight or diagonally.

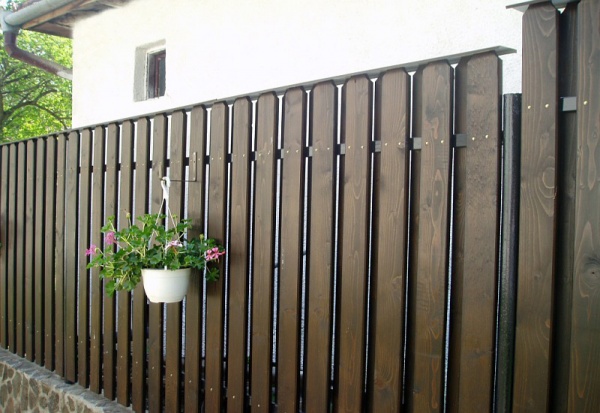
Fence
The traditional type of wooden fences is a picket fence. The simplest manufacturing option: the boards in an upright position are attached to the veins, and those, in turn, to wood pillars driven into the ground. This is the most economical and fast-growing way to fence off your property. Apparently, that's why it became so popular. Easy to operate, making it with your own hands is simple and quick, and with proper care, it will last a long time.

Another distinctive feature of this fence is that it clearly delineates the boundaries without shading the site itself.


Separation of wooden fences by installation technology
Fences made of wood, in the photo above you can see, there are:
- Without a foundation. In this case, only wooden posts or metal supports are needed.
- On the foundation. The ground part of the foundation is made simultaneously with a wooden beam.

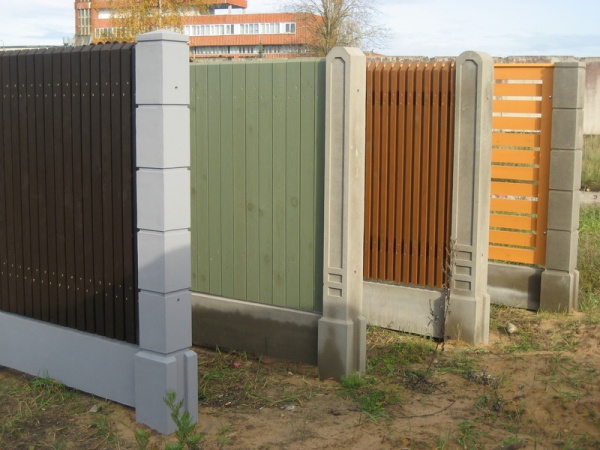
As for the decoration, it can be done using any material, taking into account your preferences: stone, corrugated board, brick. A solid wooden fence with a base always looks respectable, stylish, solid. To do it, you need to spend a lot of money, there is an option to reduce the cost of the structure - this is to make a wooden fence with your own hands from start to finish.

Stages of installation of wooden fences
Rustic style (Country) has always been and remains to this day at the height of fashion trends. Wooden picket fences are its striking element, and the simplicity of lines, even without embellishments, always looks modern and elegant. Making it with your own hands is not at all difficult. How to make a more complex wooden fence? First you need to decide on the material of manufacture.
Important ! When choosing a material for a wooden fence, make sure that the solid wood is free of decay and other damage. Treat the wood with an antiseptic. Or buy ready-made material.

Step-by-step instructions for installing a wooden fence
If you have already decided on the material, choose the proportions: shape, height of the wooden fence. Only after that it will be possible to proceed directly to the construction. How to make a wooden fence with your own hands, see drawings and detailed instructions below.

- The first step is to mark the territory.

- Next, you need to calculate the number of wood pillars, picket fences and veins.
- The ground part of the timber must be treated with tar.
- Then, the markings are carried out along a pre-stretched cord under the timber (the recommended distance is 3 meters).
- Holes are being pulled out. The depth of the holes should be equal to the depth of the soil - this is about 1.5 meters. Holes can be dug with a drill.
- Think about one nuance well: if you are planning to make a high and heavy wooden fence, then in this case, be sure to attach a metal plate to the base of the support. This is necessary for stability and so that the fence does not twist under the influence of gravity.
- Wooden supports are installed vertically on a 12 cm sand cushion, after which the hole is covered with small portions of soil and sand. Ram thoroughly. To make the structure more durable, the hole can be filled with concrete.
- After installing the supports, you need to calculate and determine the attachment points of the wood veins from above and below.
- The picket fence is selected according to a pre-selected template, but you can make it even by cutting it along a stretched cord.

To simplify the work, you can purchase a ready-made picket fence with or without drawings.

We offer you to watch a short video with a selection of beautiful wooden fences:
How to make a chessboard fence with your own hands
The next type: do-it-yourself wooden fences checkerboard in the photo, you can clearly see the difference with the previous one.


Compared to the previous one, a wooden checkerboard looks more decorative. The main feature of the installation is that you can make it in any execution: dense or with gaps.
The poles are installed in the same way as described above. After installation, you need to attach the beams. You can cut grooves in wooden pillars, in metal it is necessary to weld the corners by welding, on which the beams will be located.

Decide in what position you want to make the chessboard: horizontal or vertical, set the guides. With a vertical checkerboard, they are made horizontal and, conversely, with a horizontal one, they are made vertical.

Further, after installing the guides, you can proceed with the installation of the boards. Place them in a checkerboard pattern as shown in the illustration above (one on each side). You can fasten them either with nails or with self-tapping screws.
Very important ! Measure and mark the attachment points clearly, because small irregularities will give gaps, and this will significantly spoil the appearance of your fence.
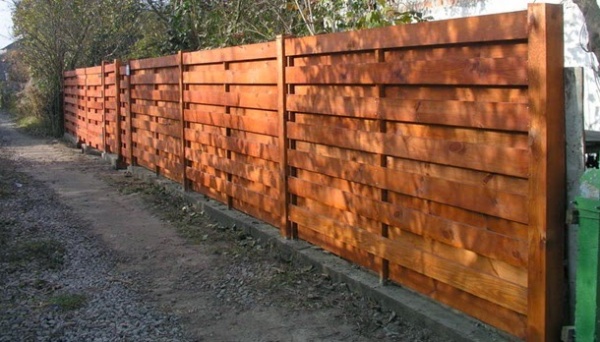
Do-it-yourself fence made of wood ladder
A wooden horizontal ladder fence is also very popular, therefore, we will dwell on it in more detail. Making such a structure with your own hands is as easy as the previous ones. Install the supports in a similar way (above).
Next, you need to fix decorative wood trims on both sides - these will be the guides. As a rule, a channel is used for this purpose; it is easier and easier to insert the board into it at an angle. In this case, it is up to you to decide at what angle you want to make the Christmas tree. The position is also chosen according to preference. The direction can be either vertical or horizontal.
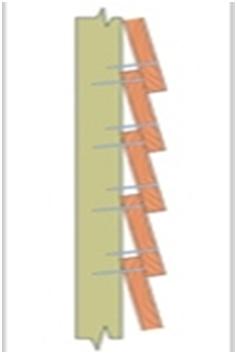

Important ! Remember to place cushioning material between the boards with the boards. This is necessary for ventilation and to keep the material from rot.
Do-it-yourself wooden fence for giving a ladder. The photo shows some models of already finished works.
At the end of the work, treat the fence with an antiseptic and paint the structure.
The guarantee of the longevity of the solid wood fence
As a material for the manufacture of wooden fences, you need to choose those types of wood that are characterized by strength: ash, mulberry, acacia, oak, aspen, Siberian larch.
By the way, the last option is a truly eternal material, it does not deteriorate when exposed to water, but, on the contrary, gets stronger. It is also worth limiting the use of pine species to create wooden blocks. You should not use birch, if you do not want to change it often, it has the lowest density among all the others.
Bars for fencing are used from wood and metal, or as an alternative to wood - overlays. The tree should not be discounted. Today, thanks to modern technology, there are special metal consoles. Therefore, supports made of solid wood do not have to be dug into the depths. The consoles are concreted, and then a timber bar is attached to them.
The most vulnerable areas of wood are those where the cut is cut across the grain. To extend the life of wood in fence blocks, lay the boards horizontally or make canopies. Wood is vulnerable if it directly interacts with air:
- At high humidity, it swells and is affected by fungal deposits.
- If the air is too dry, it dries up and cracks.
How to treat a wooden fence to reduce the risk of damage and deterioration? This can be done by impregnating with an antiseptic and painting with special materials: Swedish paint, soaked in hot linseed oil, yacht varnish.
You can make your own Swedish paint at home. To do this, you need to mix the following ingredients:
- Iron vitriol - 260 grams.
- Red lead iron - 260 grams.
- Common table salt is 260 grams.
- Rye flour will need 580 grams.
- Drying oil, you can also use linseed oil - 240 grams.
- The water is about 4.5 liters.
The consumption of this mixture will be approximately 200 ÷ 300 ml / m2. The expected color is golden. If you need a different color, then replace red lead with ocher or manganese peroxide.
Often, a fence for a summer cottage is erected temporarily, for the subsequent construction of a more solid structure. And often there is simply not enough money for a solid fence, so we are looking for the cheapest fence for a summer residence as an option.
To make the fence very inexpensive, we will build it with our own hands. Before installing the type of fence you have chosen, be sure to take an interest in the technology of its installation and consult with a specialist.

Cheap fence for a summer residence, options
The price of the fence is influenced by the size of the structure and the material from which it will be made. Accordingly, a high fence is more expensive than a low one, and a solid fence is more expensive than a transparent one. A structure that is attached to dug-in or concreted pillars will be cheaper than a fence mounted on a strip foundation.
Wooden picket fence - the most budget option

From such an inexpensive material, you can make a completely beautiful and original fence for a summer residence. An example of this is a photo of finished fences.
This is a very popular material for a country fence. A picket fence is made of wood, with a thickness of 18 to 22 mm and a width of 7 to 14 cm.
The height of the picket fence can be from 1.2 to 4 meters. To fix this material, horizontal girders are used, fixed on oak, metal or concrete posts.
The approximate price of a picket fence is 700 rubles / sq. M. The final cost of the fence largely depends on the chosen installation option. For example, installing a picket fence in a staggered or herringbone pattern increases the price of the structure by 15-20%. The strip foundation, instead of simply driving the posts into the ground, adds 20-25% to the cost.
Fences made of thin wicker boards and a blockhouse are more expensive (from 1000 rubles / sq.m). A fence made of wicker boards attracts attention with an original view, and a fence from a blockhouse wins the hearts of summer residents with the quality of a wooden frame.

The view of the Rancho fence came to us from the Wild West. For its construction, wide horizontal boards or beams are used, which are attached to low wooden posts. The disadvantage of such a fence is that it does not protect the site from the penetration of unauthorized persons and even small animals. It is quite understandable, since this fence was created for a vast area of pastures. But its installation does not take much time. And in terms of the cost of materials and work, such a fence is comparable to the price of a picket fence.
Wicker for fencing a summer cottage

Such a fence made of hazel or willow branches is popular with fans of the rustic style. It is original, strong enough and durable. With a strong desire, the technique of weaving branches can be mastered with your own hands in a matter of hours. If you have no time to engage in manual creativity, then for the manufacture and installation of wattle fence you will have to pay from 500 rubles per 1 square meter.
Anyone interested in building a cheap fence for a summer residence is advised to pay attention to an unedged board. Having freed it from the bark, sanded and varnished, you can get a beautiful fence for a summer cottage at a minimal price (about 550 rubles / sq. M.).
Regarding the longevity of wood fences ... The service life of autoclaved wood increases to 30 years. The service life of an ordinary painted board does not exceed 15 years.
Fence for giving from a chain-link mesh

The cheapest fence can be built from a chain-link mesh. It is produced in different heights (1.0-3.0 meters), lengths 10-18 meters and cell sizes 20-100 mm. To protect the wire from corrosion, zinc and polymer coating is used.
You can put such a fence by rolling out the mesh and fixing it to metal or concrete posts. The second option is the manufacture of mesh sections, that is, frames from corners or pipes and their installation on poles.
The service life of mesh fences reaches 30 years. Such fences do not shade the site and at the same time are reliable, as they create a serious obstacle for uninvited guests.
The average price of 1 square meter of a fence made of a turnkey chain-link mesh is 180-240 rubles.
Fence for summer cottages from euroshtaketnik

The popularity of wood picket fences prompted stamped metal manufacturers to create something similar. The result is a very aesthetic and durable material.
In terms of service life, wood cannot be compared with it. In addition, the Euro shtaketnik fencing does not require periodic painting and antiseptic treatment. The protective polymer film, which is used to cover galvanized steel, retains its color and integrity for 25-30 years.
Installation of a fence made of euro shtaketnik, taking into account the cost of materials and work, is from 800 rubles per 1 sq. M.
Country fence made of corrugated board

Today it is the leader in country fence construction. This is a blank fence. Its affordable price allows any summer resident to use it for fencing their site. No living soul can penetrate such a fence. Installation of a corrugated board fence is simple and therefore inexpensive. To this can be added a huge selection of colors and textured pattern of the profiled sheet.
- Use corrugated board with a thickness of 0.5 mm. It is not much more expensive than 0.4 mm thick flooring, but it will not be covered with dents and will not lose its attractiveness.
- The step of the supports should be no more than 2-2.5 meters, ideally 1.5 meters. And if we take the distance between the supports of 3 m, then under the influence of wind loads, the fence canvas will begin to bend and may lose its original appearance.
- Dig in the support pipes to a depth of at least 1.5 meters and be sure to concrete them.
- The fence posts should be made of 60-80 mm pipe, with a wall thickness of at least 2 mm.
- Take a corrugated board with a double-sided, polymer coating, since a galvanized flooring (without painting) becomes stained in two years, loses its shine and may begin to corrode.
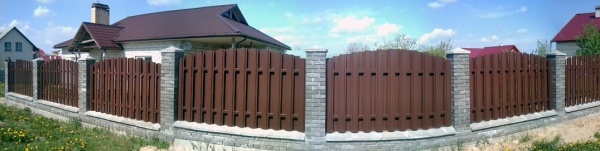
Slate fence

For the installation of such a solid fence, both flat and corrugated asbestos-cement slate are used. The first is stronger because it is thicker.
The installation of a large flat slate (1.5 x 3 meters) is faster than the installation of a smaller wavy slate (1.75 x 1.125 m). Slate is placed on steel profile girders, welded or bolted to metal posts.
The slate fence has high strength, as well as heat and frost resistance. It is more durable than wood and is not afraid of corrosion like metal. However, this material has a significant drawback - it is fragile and nondescript in appearance. And if nothing can be done about the first minus, then the second can be easily corrected - paint the slate.
Bottom line: the cheapest fence for a summer residence is a chain-link fence (200 rubles / sq. M.), The second place for the price is fences made of welded mesh, wooden picket fence and unedged boards (450-600 rubles / sq. M.) , the third place in our rating is given to fences made of corrugated board, slate, blockhouse and edged board (700-1000 rubles / sq. m.).
Fence posts
During the construction of the fence, much attention is paid to the installation of pillars - the supporting part of the fence. And the more reliable they are installed, the stronger the fence will be, which means it will last longer.

Installation of fence posts
During construction, 3 methods of installing support pillars are used.
- Direct driving into the ground
- Partial concreting. It is performed in two ways: pouring a concrete collar, or filling the well below the freezing boundary of the soil.
- Complete filling with concrete of the underground part of the rack, including the device of the strip foundation
Which method to choose depends on the quality of the soil on the site, its saturation with moisture and the degree of freezing. Also, the choice of installation option is influenced by the vertical and lateral loads created by the weight of the structure and its windage. If you decide to install a solid fence, then it must withstand well the wind, the load from which often exceeds the weight of the fence.
Direct driving of pillars into the ground speeds up and reduces the cost of building a fence, but it also has many disadvantages.
- If the soil is soft or loose, then the rack may loosen over time under the influence of the wind, since the fences have a lot of windage (if they are made of corrugated board, polycarbonate, boards).
- If the height of the pillar is planned to be higher than 2 meters, and even from the netting of the chain-link, then this method of installing the pillars will also not work - any strong wind will also swing the structure.
- If your site has a clayey moist soil that swells at negative temperatures, then the supports will crawl out of the soil by 10 centimeters already in the first winter.
That is, fence posts simply driven into the ground cannot bear a large weight load. Such an installation is suitable only for low fences with low windage. Or if the site is rocky solid ground.

Concreting a little more complicated and more expensive than the first method of fastening the supports for the fence. And it will take more time. It will take 3 weeks for the concrete to harden only. But this method is more reliable, since the concreted pillars will stand for 30-50 years without tilting. Moreover, reinforcement with a concrete mixture is suitable for all types of fences, including heavy ones.
Brick posts for a fence

A brick support without a reliable connection with the foundation, even in spite of its solid weight, will not stand for a long time. A strong wind load, acting on solid sections of the fence, inevitably leads to overturning of the column, which is not fixed in the foundation. In addition, you shouldn't forget about seasonal ground movements. Lowering and rising a couple of centimeters up and down during the year, the foundation must work in a single bundle with the posts and sections of the fence.
The optimal design of the foundation with brick pillars, designed for a fence made of corrugated board, is clearly illustrated by the diagram in the photo

You can see that there is a steel bar from a square tube or reinforcing cage installed in the brick posts. Embedded plates are welded to it. Steel girders are attached to them under the profiled sheet or picket fence.
Foundation type - strip rubble concrete or concrete. A trench is dug under it, and pits with a diameter of 15-20 cm are drilled in the places where the posts are installed. First, concrete is poured into wells with posts of posts installed in them. After that, layer-by-layer concreting of the trench begins.
The main parameters of the foundation (depth, width, degree of reinforcement) and the height of the fence are determined by calculating the strength and stability.
We used the following dimensions to install brick fence posts
- trench depth - 20-30 cm;
- the depth of the well for the installation of metal racks of brick pillars, counting from the surface of the earth - 90-100 cm;
- the height of the grillage (the upper part of the foundation, located above the surface of the earth) - 40-60 cm;
- foundation width - 20-35 cm;
- the distance between the posts is from 2.5 to 3 meters;
- the height of the pillars is from 150 to 180 cm (the cross-section of the masonry is 38x38 cm).
In wet soils, it is necessary to drill holes for racks below the freezing depth so that the forces of frost heaving do not deform the fence.
In weak and unstable soils, in the upper part of the foundation, before concreting it, it is advisable to lay a reinforcing cage of 4-6 rods with a diameter of 14-18 mm. It will preserve the integrity of the foundation and will absorb the loads that arise in the concrete when the soil subsides.
The laying of brick pillars begins no earlier than 2-3 weeks after concreting. Having laid the waterproofing under the posts, you can get to work.

Perfectly even seams are a guarantee of an excellent appearance of brick posts. Experienced bricklayers use to simplify the work of cutting off a square bar, which serves as a seam template.
In the photo there is a support post made of brick with a section of 38 x 38 cm.Two reinforcing bars are installed inside for reinforcement. The space between them and the masonry is filled with fine-grained concrete or mortar.
For fences with a height of two or more meters, the cross-sectional size of the column is increased to 51 x 63 cm or 64 x 77 cm. The dimensions of the reinforcing frame increase accordingly.
Metal fence posts

Steel supports are well suited for fences made of corrugated board, wood, plastic, metal mesh, welded and forged fences. These are some of the most affordable and durable solutions for the installation of any fence.
Iron pillars are of different types: made of round and shaped pipes, screw. They also differ in height, metal thickness and diameter. It is possible to make such fence supports from new materials, as well as from used ones.
The diameter of a post made of a conventional pipe is usually 57, 76, 89 mm. The wall thickness can be any, but the thicker, the longer its service life.
For difficult soils, screw metal piles are used. They have a cutting blade on the bottom, which allows the pipe to be inserted into the soil quickly, without the use of complex techniques. With this blade, the pipe is firmly held in the ground.
Distance between fence posts
Consider our experience when choosing metal posts:
- for a fence height of 2-2.5 meters, take the cross-section of a profile pipe 60 x 40 mm, for a 1.5 hedge, products measuring 40 x 40 mm are suitable,
- optimal diameter of a round pipe - 57 mm,
- the maximum size of the corners of channels installed one by one, take equal to 90 and 160 mm, respectively,
- the spacing between the posts should be within 2-3 meters. A smaller distance is impractical from the point of view of economy, but a larger one sharply reduces the reliability of the structure.
Our calculation of the pitch of the posts with a section length of 13.4 meters and a fence height of 1.5 meters
- Divide this distance into 4 sections, you get a length of 3.23 meters. With such an interval, the fence can be built from corpich or a chain-link mesh on metal pillars. It is undesirable to put a professional sheet or other solid material, since the racks are swayed by the wind.
- If you divide it into 5 sections, you get a step of 2.56 meters. This spacing is suitable for most designs.
- Splitting into 6 spans will give a pole spacing of 2.12 meters. You will get a reliable structure, but the price of the fence will increase. Although in this case you can save money if you take pillars with a smaller section.
The optimal distance between the posts of a solid fence with a height of 2 meters is 2.5 meters. This is an ideal option in terms of price / quality ratio when it comes to popular fences made of corrugated board on metal supports.
Often, among the questions about country fences, a fence between summer cottages is considered. Neighbors on the sites find out what kind of fence they can fence off, so that it does not contradict the rules. How high can the fence be placed and what it should be made of. The best option in this case is to use a fence mesh. Or make a decorative living fence of climbing plants. The main thing is not to forget that there should not be a deep shadow from the fence, which naturally will not please the neighbors in the country, since garden crops will grow poorly in this place.
Today, a person who has decided to build a house on his own must be prepared for significant costs. Most of the money is most often spent on the foundation and laying the walls, but in most cases you have to spend significantly on things that at first glance seem not obvious. It's about the fence.
The sensible future home owner is determined to save on such details. In addition, this is a completely justified and feasible solution.
A key way to keep your fence costs down is to do it yourself. Do not underestimate the importance of this process, since a fence is not only a decorative structure that hides the area from prying eyes, but also a protective fence designed to prevent suspicious persons from entering the site.

In other words, the structure must be reliable, durable and aesthetic. Only under such conditions will it satisfy all the requirements imposed on it. In our case, simplicity of installation should also be added to the list to the conditions.
Materials for building a fence

There are several basic materials that allow you to build an inexpensive and functional structure:
- wood;
- Rabitz;
- corrugated board;
- plastic.
The main limitation in the construction technology and the combination of materials is financial costs. First you need to choose the material that will become the basis for the fence, then find a suitable economical construction technology, and then make the basic calculations.
Wooden fence: pros and cons


Modern hardware stores offer a large number of wood options suitable for building a reliable structure. This material has some advantages over others, which makes it almost the most popular product.
Advantages of wooden structures:

Disadvantages:

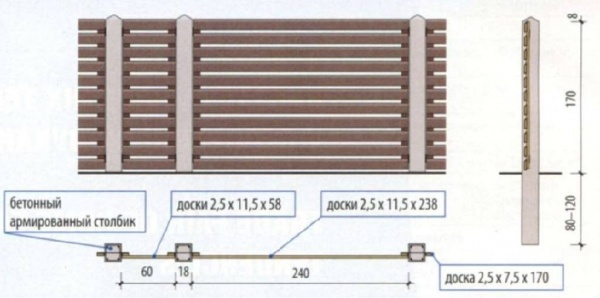
Materials for installing a wooden fence
For the construction of a standard fence made of wood, you will need materials such as: picket fence, transverse boards, support posts, pegs, ropes, cement, sand, a shovel, a saw, fasteners, and a special anti-rotting agent.

It is best if the entire set of tools is collected in one place within reach for easy access to components.

Construction of a wooden fence
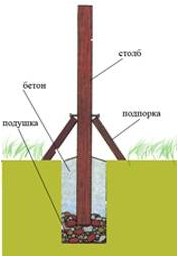
Stage 1. We mark the place for the structure, determine the location of the gate. We use pegs and rope. The distance between the posts is 2 meters. This is how the stability of the structure to external influences is ensured.
Stage 2. Take a shovel and dig holes for the support pillars.
Stage 3. We immerse the pillars in the ground for about one fourth of their length.
Stage 4. We put spacers to secure the posts and fill the pit with cement mixed with sand.
Stage 5. We drive in transverse boards.
Stage 6. Vertically fix the picket fence on the transverse boards.

Stage 7. Paint the finished fence in the selected color.

This completes the construction of a wooden fence. This is a relatively simple fence option that is usually installed as a temporary option.

Mesh fencing is considered the most economical option available today. Among the advantages of such fences, it should be noted:

Clarifying the last point, it should be noted that installation will require tools that are easy to find in every home. In addition, modern stores offer a wide range of nets in a wide variety of colors and sizes, which allows you to move away from the banal appearance of the fence.
Materials for building a fence:

For those who stick to more original solutions, there are vinyl coverings, but they have a tendency to lose color over time.
Erection of a fence from a chain-link mesh

Step 1. We carry out the markup.
Step 2. Digging holes for the support pillars.
Step 3. Place the pipes in the holes.

Mesh fence - chain-link
Step 4. Fill the pits with pre-prepared concrete mortar. In some cases, builders simply drive the pipes into the ground with a sledgehammer. This is possible provided the soil is sufficiently soft.
Step 5. Begin to fix the mesh. We fasten the beginning of the roll at the first pipe, which acts as the beginning of the future fence.
Step 6. Stretch the mesh around the rest of the supports, gradually securing it. It is important to ensure that the mesh does not sag, otherwise all work will be useless.


Stages of work in the sectional construction of the fence
Step 1. Laying the foundation.
Step 2. Construct the tensioning frame from metal corners.
Step 3. We fix the corners between the supports.
Step 4. We fix the mesh inside the corners by welding.
Mesh fences are very easy to erect without the help of specialists, which allows you to significantly save money and try your hand.
Fences made of corrugated board

This type of fence can deservedly be called the most common. Most often it is used for fencing summer cottages and private houses. To erect such a fence, you will need a welding machine and a little patience. In general, the installation technology is very simple, which can be attributed to the advantages of the design.
Modern construction markets offer corrugated board in various colors and sizes, so buyers should not be limited in their imaginations.
As additional components, you should purchase anti-corrosion paint, support structures, logs, shovels, self-tapping screws, and also make a cement mortar.
Installation of a fence made of corrugated board

Step 1. We carry out the markup for the future fence. It is important that the distance between adjacent supports does not exceed two and a half meters. Pegs and twine are used as auxiliary elements.
Step 2. We make indentations in the established places. In the future, support elements will be inserted into these holes. This task can be accomplished using a special drill, or simply dig a hole with a shovel. The depth of the pit is standardly one hundred and thirty centimeters.
Step 3. Install support pillars in the corners of the territory, and then around the entire perimeter.
Step 4. We strengthen the base of the pillars with cement.
Step 5. Install the logs, which are necessary for the further attachment of the corrugated board.
Step 6. We attach the sheets to the joists using self-tapping screws.
Step 7. We paint the metal elements with enamel. In some cases, a primer is used.
In the end, the fence turns out to be quite pleasant in terms of aesthetic characteristics, as well as durable and reliable. It looks much more solid than a fence made of wood or a chain-link mesh, and therefore can be regarded as a full-fledged fence.
Plastic fence

Plastic deservedly bears the title of one of the most affordable materials for the construction of a fence. This is a real salvation for summer residents who do not want to build expensive structures on their sites.
The positive aspects of such fences are as follows:
- strength;
- durability;
- ease of installation;
- low cost;
- nice appearance.
Installing a plastic fence


Stage 1. We carry out markings on the territory where it is planned to erect the fence.
Stage 2. We mark the places where the gate and the gate will be.
Stage 3. In the established places we drive the support pillars into the ground.
Stage 4. At the corners we fix piles made of durable metal.
Stage 5. We stretch the piles along the perimeter of the site.
Stage 6. We fix the pillars with spacers.
Stage 7. We attach the sections between the supports.

Thus, as a result of simple machinations, a beautiful and functional fence is obtained, which in its external qualities, although it cannot compete with structures made of decorative stone or forged elements, fully satisfies the owners of the territory.
This article covered the simplest ways to build fences, the choice of which is due only to your preferences. Now you can build a cheap fence with your own hands.
Video - Construction of a wooden fence
Video - Building a fence from a mesh
Video - Installation of a fence made of corrugated board
Video - Installing a plastic fence
If the time has come to change the fence of the site, or there is a need to fence a new territory, then the question immediately arises of how to install a fence with your own hands, without resorting to the help of various construction companies. This is especially true if the owner of the site has limited funds.
Will it be possible to carry out this process independently? It all depends on the type of fence and the material from which it is conceived to build it. But it is clear right away that in order to erect a fence of a site from brick, concrete or concrete slabs, it is necessary to do quite laborious work, so at least one assistant will be needed.
What do you need to consider?
Knowing all the advantages and disadvantages of various types of fences, it will be possible to evaluate your strengths and decide from what material to build a fence.
When choosing the type of fence, it is imperative to think about how the color and textured pattern of the fence will fit into the design of its entire site, if it is decorated in the same style.
Another criterion that needs to be taken into account is the openness and closedness of the fence, i.e. it will be solid or have a through pattern.
If there is a desire to isolate oneself from the outside world so that outsiders, including neighbors, do not interfere with rest or work on the site, then it is better to install a solid fence.
The territory open to the eyes of passers-by is suitable for those owners who want to show everyone what a beautiful house or wonderful flower gardens they have, as well as sociable people who cannot imagine their life in a space completely enclosed by a fence.
If the fence is installed on a new site, and it is planned to erect it from or concrete, then it would be nice to check how deep the groundwater goes underground. Otherwise, there is a risk, after a couple of years, to get subsidence and distortion of the structure.
Another important point is the cost of materials. It must be calculated, having found out the prices in advance, having withdrawn the total amount, another 15% is usually added to it. This is because, as a rule, it is impossible to foresee everything perfectly for sure, and in the process of work you will definitely have to buy any missing components.
So, first you need to familiarize yourself with the types of fences and the rules for their installation.
Concrete fence
A concrete fence can be safely called the most practical and reliable building of all the other types, but only if it is installed correctly.
 Concrete fence is not only "boring" gray walls
 Such a fence has several types, since thanks to modern technologies and developments in recent years, fences have begun to be produced and installed, which in themselves are already decorative elements that adorn the territory of the site.
The variety of types, colors and textured patterns allows you to choose an option that will be perfectly combined in style with the already erected structure of the house.
Reinforced concrete fences have a lot of positive qualities, so they are increasingly preferred to other fences. These benefits include:
- Durability and strength of the material in a properly installed structure.
- Any finishing material is perfect for a flat concrete surface, be it decorative plaster or decorative tiles.
- If a monolithic fence is being erected, then it can be raised to any height without gaps and joints.
- If a fence is chosen, consisting of individual narrow slabs, then its installation is done quickly enough - literally in one day the entire structure can be erected.
- The concrete structure is the most economical of all other solid fences.
There are, however, such fences, along with positive, and negative points:
Concrete structures are heavy enough that they cannot be installed on loose or loose soils, or they will require special reinforcement during installation.
Installing a concrete fence is much more expensive than lumber or corrugated fences.
When installing a fence consisting of separate sections, it is often impossible to do without special equipment for lifting and installing them, the call of which is also expensive.
If a monolithic concrete fence is being arranged, then a concrete mixer will definitely be required, since a very large amount of mortar will be required, which is simply unrealistic to make by hand.
For all concrete fences, without exception, a reliable foundation is required.
From all that has been said, we can conclude that the construction of a concrete fence is a rather troublesome and expensive undertaking, but such a structure will serve for many decades without much care, so this choice can be considered very practical.
Foundation for a concrete fence
Since you cannot do without a foundation for a concrete structure, you need to know what work will have to be done to arrange it.

A concrete fence is installed on, which is poured into following sequence:
- The first step is to mark the territory for further digging of the trench.
When marking, it is taken into account that the width of the foundation strip should be 100 ÷ 150 mm larger than the thickness of the fence. The depth of the trench to be torn off should be 800 ÷ 1000 mm.

- Further, moistened sand is poured into the bottom of the trench, which must be carefully tamped. The sand cushion layer should be 120 ÷ 150 mm compacted.
- A plastic film is laid over the sand, which will serve to protect the foundation from the effects of soil moisture. The film should come out of the trench by 500 ÷ 700 mm, since further along the excavation formwork will be erected to raise the foundation above the soil surface by 200 ÷ 400 mm.
- A layer of gravel is poured onto the film - 100 ÷ 150 mm is enough.

- A reinforcing structure is installed on the gravel, which will add strength to the foundation.
- After marking the distance between the fence posts, pipes or a reinforcing truss are welded to the reinforcement - this will serve as a support for the further construction of the posts.

- Further, along the trench, wooden formwork is exposed. A plastic wrap is left inside it and is later brought over the edges of the top boards to the outside. The film will not allow the concrete to flow out in the cracks between the boards, and thus moisture will not evaporate too quickly, and the concrete solution will evenly gain the required strength.

- Then the trench is filled with a concrete solution made from a gravel-sand mixture and cement, at a ratio of 3: 1.
- If the fence will enclose a large area, then the concrete is best ordered ready-made, since it is quite difficult to mix such a large amount of mortar on your own, given that the foundation must be poured all at once, completely from the bottom to the top of the formwork. Otherwise, unnecessary gaps may remain between the layers, and if water gets into them and when the temperature drops, the foundation may be damaged.
- The surface of the poured concrete is leveled and left to harden and harden.
- Usually intersection posts are laid out of bricks, but they can also be made from concrete. To do this, around the reinforcement structure or pipe, a corresponding formwork of boards is built, which is also filled with concrete.
- If the sections of the fence will consist of several prefabricated elements, then for their installation special ones are used that have side grooves, into which decorative plates are then inserted.

It should be noted that if this option of the fence is chosen, then for it you can arrange and, carefully marking the distance between the posts. Nevertheless, after their installation, the pillars must be tied together with a border. It is poured in the same way as with a strip foundation, it is also reinforced with reinforcement, but it is deepened by only 200 ÷ 250 mm.
Varieties of concrete fences
On the finished foundation, you can install various types of concrete fences. So, concrete fences are divided into monolithic, block, prefabricated and typesetting types, as well as self-standing.
Stacked fences
Type-setting fences consist of several sections, which in turn are installed in the grooves of the pillars already placed vertically. Usually fences of this type have several sections, the upper ones of which differ from the lower ones in that they are decorated with decorative elements in the form of balusters or relief patterns.
 Decorative type-setting concrete fence with an "openwork" upper section
 Such fences are installed on strip foundations, which will raise them above the soil to the required height, or on a columnar foundation with curbs installed between the posts.
Prefabricated fence
A prefabricated fence consists of individual elements, from which sections of the same shape are assembled. The number of elements in each section can be different, usually from three to five - it depends on what height of the fence is needed. Sometimes they acquire sections of different colors or having different relief patterns - this, to some extent, helps to make the fences more picturesque and less boring.

The foundation for the prefabricated fence can be either strip or columnar.
Block fences
This type of fence is laid out of concrete (foam concrete or aerated concrete) blocks, which are in the form of large bricks, and, accordingly, are laid according to the principle of brickwork. However, very often decorative elements can be additionally used in the building, which are of the appropriate size, ideally fit into the overall structure of blocks.

Elements designed for the construction of posts, for example, are put on support posts embedded in the foundation.
All elements are laid on cement mortar, which results in a solid structure.
Just like brick, block masonry requires special dexterity. It is not so easy as it seems to erect a flat wall from relatively small elements. That's why , doing work, you need to keep the building level close at hand and control the verticality of the fence along the plumb line.

Often, such a fence from ordinary blocks will require decorative plastering or tiling.
Such a fence will always cost more than the usual sectional reinforced concrete fencing, since in addition to the material itself, you need to take into account the considerable cost of masonry work and finishing.
Fencing made of monolithic slabs
Monolithic slabs are easy to install because the entire length of the fence can be installed on the prepared foundation in just one day. For the construction of pillars, elements are often used that are designed for block-type fences. Can .
If ordinary smooth concrete slabs are used for the fence, then in order for the fence to acquire an aesthetic appearance, it is decorated with decorative plaster in combination with artificial or natural stone.
It is possible to purchase already decorated slabs, but they will be much more expensive. In addition, they can be damaged during transport or unloading, and due to this, then they will have to be tidied up.
Self-standing fence
This type of fencing is most often used for temporary installation on the territory of various facilities under construction, since it does not require a foundation for them. Sections of such a fence fit perfectly on a wide lower part. When the need for fencing is passed, the sections are dismantled, loaded onto transport and transported to the next object.

In the practice of individual construction, despite the ease of installation, such fences are usually not used.
Brick fence
The brick fence has a very respectable look, and it looks especially harmonious if the house, which is located on the site, is also built of bricks.

The process of erecting such a fence requires a lot of experience in such work, since it may seem to an amateurish eye that laying a brick is a simple and accessible thing to anyone who wishes. In fact, each master has his own secrets that allow you to make the fence neat and durable.
The foundation for such a fence is arranged in the same way as for a concrete fence, because in general the entire structure is quite massive.
Brick fences are completely enclosed, or masonry can be combined with other elements, for example, with gratings. In the latter case, the entire site will be in plain sight, and the fence will only protect against the penetration of unwanted guests into the territory, but will not close the area from prying eyes.

Brick fencing has its advantages, as well as disadvantages that you need to be aware of before choosing this particular option.
Advantages of a brick fence:
- Correctly folded brick fence is strong and durable; it should serve for at least five to six decades without problems. And if, after this period, a competent restoration is carried out, then the fence will stand for the same amount.
- Such fences have a very aesthetic, neat look.
- The brick fence does not require special maintenance in the form of painting or cleaning, which saves time and effort for the owners of the site.
Disadvantages of brick fencing
- The complexity and duration of construction, especially without proper experience.
- Sufficiently high price of materials and the complexity of their delivery.
- Such a fence requires a reliable solid strip foundation.
To masonry the fence, you need to purchase either fireclay bricks - only in this case, the fence will not require additional cladding. If ordinary building bricks are used, the masonry will most often not be very beautiful, without clearly defined corners and edges. The masonry must be done with jointing, carefully making out the seams, otherwise the whole view of the fence will be damaged.
Cladding process
In order for the fence to be durable and have a respectable look, laying must be done immediately along the entire length of the fence. And the work must be carried out consistently.
Fence walls can be laid in half a brick or in one brick.
 Bricklaying a fence
 - Before laying the walls between the pillars, a thin rope that is horizontally aligned. This will help to keep the rows of masonry perfectly straight, as the first row sets the evenness of the rest of the masonry.

- The first step is to lay out the first three rows in columns.
- The columns are laid out around the supports embedded in the foundation, which serve as pipes or reinforcing trusses.

- Then, brick laying follows in the walls of the fence to the same height. Further, it is imperative to take into account the necessary bundle of pillars with walls laid out in the spans between the pillars. This is done using pieces of reinforcement, which are laid on top of the third row on posts and wall spans. Usually, two pieces of reinforcement are laid, on both sides of the column. At the same time, at least 500 ÷ 700 mm of reinforcement should be found on the laid out walls.

- For a bundle, you can also use a reinforcing mesh - it is laid in the same way as the pieces of reinforcement.
- The above-mentioned connecting parts are always laid (recessed) on the concrete mortar previously applied to the surface.
- The reinforcement procedure is repeated every three rows.
- Starting from the seventh row, the laying of the posts and walls is carried out at the same time.
- You can carry out a bundle in another way, when first all the columns rise completely, and then the walls.
In this case, holes will have to be drilled in the walls of the pillars to install reinforcing segments in them. Agree that this method is longer and more laborious. In addition, while drilling, you can accidentally damage the integrity of the brick pillars.
- It is easiest to achieve that the seams of the masonry have the same thickness along their entire length, using a metal wire with a diameter of 8-10 mm, the rods of which are laid along the edges of the masonry of the wall on both sides. These elements can remain in the masonry, but then a large amount of wire will be needed. It is better to remove them after the mortar has set and use them in the same way further. The photo clearly shows the segments that fix the thickness of the seams.

So, for example, you can prepare ten segments of the required length, which will be equal to the length of the span between the posts.
Then, using wire, five rows are laid. After that, from the very bottom seam, the wire is carefully pulled out and used already in the sixth row (during this time, the solution in the masonry should already grab, and subsidence will not follow). So gradually the segments are transferred from below to the upper rows.
After raising 4 ÷ 5 rows of masonry, while the solution has not yet grasped strongly, after pulling out the metal rods, it is recommended to immediately do decorative jointing. If necessary, the solution is added to the joints, and the excess concrete that has fallen on the brick wall is immediately removed.
 Processing of seams with "jointing"
 - In order for the fence to stand in its original form as long as possible, after the concrete dries out and gains the necessary strength, the brick surface, free from dirt and dust, is covered with a waterproofing impregnation. It penetrates deeply and protects it from moisture, imparting pronounced hydrophobic qualities to the material.

The surface is covered with a roller, and after drying it becomes invisible visually. When it rains, drops of water will immediately run down the wall without absorbing into bricks or seams.

You should not take on the work of building a brick fence on your own if you have no experience in laying bricks. The first time you never get a perfectly beautiful and even wall. It is better to trust an experienced bricklayer who has erected such fences more than once - he will do his job much better and faster than a beginner.
Prices for building and facing bricks
Building and facing bricks
Video - Masonry red brick fence
Wooden fences
Having prepared all the elements and tools, you can proceed to the process of erecting the fence. Installation work is carried out in stages:
- As with the construction of any fence, the territory is first marked. Along the marked line, determine the location of the support pillars.
- The installation of pillars can be done in two ways:
- Driving into the ground. When choosing this method of installing supports, the pipe must be driven into a depth of at least 1 ÷ 1.20 m;
-. In this case, the pillars can be installed at a shallower depth - usually ⅓ of the pillar height is sufficient, which remains above the soil surface. With this technology, before installing the posts, it will be necessary to drill holes with a diameter exceeding the diameter tr heat loss 3 ÷ 4 times. A sand cushion is poured at the bottom of the pit, which must be well compacted, and in a compacted state its thickness should be at least 100 ÷ 120 mm.
In the lower part of the pillar, in two or three places, pieces of reinforcement are welded perpendicularly, protruding beyond the pillar in both directions by 70 ÷ 80 mm.
After the post is installed in the pit, a coarse concrete solution is poured into it with crushed stone.
Then the post is placed strictly vertically and fixed with stones, which are firmly set in the concrete solution, in a spacer between the post and the ground.
Having thus established all the pillars, they are left to set for several days.
- Further, transverse crossbars are welded onto the installed pillars. They also need to be set in level, setting them to the ideal horizontal.
- The next step is the installation of corrugated board. Sheets can be fixed to the joists using rivets or self-tapping screws, which are selected according to color. In any case, you will have to drill holes in the sheet and welded crossbar for fasteners.
 Special "roofing" self-tapping screws for fixing corrugated sheets
 - Fastenings are made in the lower part of the corrugated board wave, at a distance of about 500 mm from each other.
Installation of the fence takes place quite quickly, especially if there is a skilled assistant nearby. It is quite possible to cope with this work even in one day, of course, with the support pillars already installed.
Find out by studying the step-by-step instructions for a home wizard in our article.
Prices for popular types of corrugated board
Corrugated board
Video: self-installation of a fence made of corrugated board
Other types of fences
In addition to those mentioned, ready-made fence sections are installed from galvanized metal rods, which have a protective PVC coating. This version of the fence is installed in the same way as the corrugated board - on the support posts, however, there are models that have their own special supports. For fences with supports, the installation of pillars is not required - it is enough to prepare a flat surface covered with fine gravel. The frames of such fences are fastened together.

The sections of the fence have sharp upper edges, therefore, despite the external lightness of the structure and her not too high, it is not so easy to overcome such a fence.
Such a fence is durable enough and should last 25-30 years.
Another option for a "budget" fence is a fence stretched on installed metal pillars, for rigidity, interconnected with metal rods. Installation of the chain-link is best done with assistants, since the mesh requires stretching and immediate fastening.

For its installation, columns are used with special welded hooks, which, immediately after putting on the mesh, are nailed to the support post.
Such a fence is usually installed in summer cottages or on the border between adjacent territories.
Video - The simplest chain-link fence
When thinking of installing a fence on your own, you first need to evaluate your own strengths, skills and financial capabilities. You should not undertake complex work, such as brickwork, in the absence of experience and sufficient knowledge. Efforts, time and money can be wasted, and an ineptly erected fence will have to be dismantled and another fence installed.
As a rule, such fences consist of sections and exist in two types: fences with supports from metal pipes or from brick posts. Profiled sheets on them can be located in one case at a short distance from the ground, and in the other - to lean on a foundation or a brick side connecting the fence posts.
The first option is more economical, since it involves the use of fewer materials and simplified installation. Another type of fence allows you to make it more respectable, but requires more materials and labor.
The use of a profiled sheet in the metal fencing of the site is quite justified, since it has a number of advantages:
- The fence installation process does not cause technological problems;
- The profiled sheet is strong enough;
- If such a fence is correctly assembled and then maintained, it will stand for a very long time;
- The appearance of the corrugated board fence is quite modern.
Fence installation technology from corrugated board
The entire production process of installing a fence made of corrugated board can be divided into several stages. Let's consider them in order.
Preparatory work before installing the fence

Before purchasing basic materials, you need to prepare tools and equipment for work. You will need a building level, a concrete mixer, a welding machine, pegs and a cord for marking the territory, an electric drill with drills, electrodes with a diameter of 2.5 mm. You should also organize the supply of water to the place of concrete work.
It is not recommended to build any fence without a diagram or drawing. Markup data is required to compose any of these documents. It should start by defining and measuring the perimeter of the site. To do this, in its corners, you need to hammer in the pegs and connect them by pulling a cord between them. Using a tape measure, you need to determine the length of the future fence and the required number of its supports, which are located in increments of 2-3 m, depending on the length of the sheets. The location of each pillar must be marked with a peg.
In addition, it is necessary to determine the dimensions of the foundation, the width of the entrance gate and entrance gate. The width of the base, in order to save costs for earthwork and concrete work, can be made uneven. Then, under the supports, it is performed in their size, and under the sheets - narrower. Gate dimensions depend on their purpose. All pegging data will have to be transferred to the schema to calculate the required amount of materials.
If the facing of the supports with bricks is not planned, then a powerful foundation for a light fence structure will not be required. In this case, a hole 15 cm wide to a depth of 1.5 m is dug under each rack. You can use a hand drill. The immersion depth of the supports in the ground depends on the height of the fence. The higher the fence is planned to be made, the deeper it is required to dig in its supports.
For a heavy fence with brick posts, you will need a more massive foundation. To prepare it, you need shovels, a supply of polypropylene bags for removing excess soil and time.
A trench, for example, with a volume of 4 m 3 is dug by a couple of workers within 4-5 hours with smoke breaks. Its depth for the foundation depends on the level of soil freezing in a certain region, on average - 1-1.5 m.
The most important thing in this type of work is soil sampling to the required depth. The level of foundation laying, its immobility and the normal functioning of the entrance gate depend on it.
The choice of materials for the fence from corrugated board

The main material of the fence is a professional sheet. It is made from durable zinc-coated steel. All sheets have a ribbed shape, as well as markings A or C followed by numbers from 8 to 35, which indicate the wave height of the product in millimeters. For example, C10 corrugated board used for fences has a wave height of 10 mm. The larger it is, the stiffer the profiled sheet. In regions with strong winds, it is recommended to use C20 corrugated board for fencing.
The thickness of the profiled sheets should be selected depending on the height of the fence. If it is, for example, up to 3 meters, the optimal value will be 0.5 mm. For a higher fence, sheets of 0.6 mm are suitable.
When buying, you should pay attention to the covering of the flooring. Powder spraying is more resistant. Sheets should be double-sided. Their outer side has a brighter color. The inside is gray corrugated board.
For the manufacture of a fence from corrugated board, in addition to steel sheets, you will additionally need:
- Pipes and bricks for supports... Steel pipes are taken of rectangular or circular cross-section 60x60 mm with a wall thickness of 3 mm and a length of 3 m. The brick is used silicate, clay or facing. To lay the posts from it, you will need a mortar.
- Lags... These are transverse elements of the fence, designed to reliably tie the supports into a single frame. In addition, they serve as the basis for attaching profiled sheets. The material for the crossbars will be steel pipes of rectangular section 40x25 mm with a wall thickness of 2 mm and a length of 6 m.
- Fasteners... It is needed for the installation of fencing sheets. These are roofing screws or metal rivets measuring 3.2x10 mm.
- M200 concrete for installation of fence posts... If its self-preparation is envisaged, cement, crushed stone and sand will be required.
Pouring the foundation for the fence

Formwork assembly is an extremely demanding undertaking. The fact is that after pouring with concrete, the defects in the formwork can no longer be corrected. Therefore, in addition to a semi-edged board, a drill and screws, you will definitely need wooden jumpers and brick supports for additional fastening of the entire structure.
The assembly of the formwork panels is carried out in the trench and starts from the top board, which marks the level of the foundation. Its upper part should be 10 cm above the surface of the earth in order to avoid accumulation of dirt on it during rains.
Reinforcement of the foundation is carried out using a volumetric frame made of metal rods with a diameter of 10 mm. In the frame, horizontal reinforcement is represented by two lower and two upper reinforcement bars. Vertical reinforcement - four short bridges connecting horizontal rods at equal intervals of 1.5 m. The reinforcement is connected with knitting wire.
After installing the frame, pipes or powerful corners are lowered into the formwork to strengthen future brick posts. Installation of these elements is carried out using a plumb line and a building level. Then they are fixed in it with short boards. After fixing the formwork with lintels and props, concrete can be poured into it.
When installing a fence made of corrugated board, the preparation of concrete is carried out manually or using a concrete mixer. The composition of the mixture is used as follows: cement - 1 part, crushed stone - 6 parts, sand - 3 parts, water - 0.7 parts, additives to concrete (liquid household soap) - 0.1% of the amount of cement.
Mixing 100 liters of concrete by hand takes 30-40 minutes. After concreting, it is advisable to cover the formwork with a film to avoid drying out the top layer of the coating, and it can be removed after a week in the presence of warm weather.
A massive strip foundation for brick posts is poured in the usual way. If the pillars are not planned to be lined with stone, the bottom of the recesses under them is covered with a layer of crushed stone 200 mm, then the pillars are installed and concreted with a cement mixture.
So that over time the soil between them is not washed out, the pipes of the supports can be connected instead of the foundation with a buried concrete tape with a total height of 20 cm. For its manufacture, a wooden box is made along the bottom of the metal racks. Its boards are fastened with wire or scraps of timber, and then lined with waterproofing from the inside. After pouring concrete into the box and setting it, the formwork is carefully disassembled. The resulting side will serve not only as protection against soil washout, but also as an obstacle for pets to enter the territory under the fence.
Installation instructions for a fence made of corrugated board

The frame of the fence made of profiled sheets is assembled from a metal pipe with a section of 20x40x2 mm using manual welding. Pieces of a profile pipe cut to the required length in a horizontal position are slightly welded to vertical posts in 2-3 rows, the accuracy of installation is checked by a building level. This is followed by the final welding. The 15 m long fence takes about 2 hours of welding.
After their completion, the anti-corrosion treatment of the frame elements and the places of its welding is performed. For this purpose, primer GF-020 is suitable, which can be applied to the metal with a brush or paint spray.
For the installation of brick posts, facing brick is used. Usually, experienced bricklayers are involved for such work, because the quality requires it. When laying bricks, a mortar is used in a cement / sand ratio of 1 to 3 with the addition of a small part of liquid soap for the plasticity of the mixture. The masonry of the posts is carried out alternately in 1 day to a height of 0.5 m.
The gaps between the masonry and the metal rack are filled with mortar while working on the post. Each row of masonry is reinforced with a 50x50x4 mm mesh. To protect the upper end of the post from rain and snow, decorative caps are installed on it. This gives the fence a special expressiveness.
As an option, the racks can be faced not with brick, but with artificial or natural stone. The appearance of the fence will only benefit from this. However, such a procedure will require considerable investment.
Installation of corrugated board is the last stage in the manufacture of a fence. In order not to damage the end face of the profiled sheet during installation, it is recommended to lay cardboard on the foundation. Products are fixed on a shaped tube through a wave at the base of the corrugation. The connection is made with an overlap with self-tapping screws using an electric drill with a nozzle. You can take rivets, but they must be steel.
Aluminum fasteners can create a galvanic pair between different materials of construction, the appearance of which causes electrochemical corrosion of steel.
Profiled decking sheets in the same fence can be easily combined, for example, with forging. In order for such a fence to have an attractive appearance, you can use a different arrangement of its enclosing elements: the deck can cover the upper, lower part of the structure or the gap between them.
To maintain the good and attractive condition of the fence made of corrugated board, a lot of effort will not be required. It is quite enough to periodically clean it from dirt. Any solution containing soap is suitable for this. It is important that the emulsion does not contain solvents: they can damage the coating.
How to make a fence from corrugated board - look at the video:

