How to collect sewers. Sewerage scheme in a private house: how to do it yourself correctly, the device and types of sewer systems
Do-it-yourself sewage system in a private house requires special care and responsibility. The degree of comfort during living and the ease of operation of structures (the absence of constantly arising blockages, freezing of communications, an unpleasant smell and loud sounds in the room) depends on how accurately all the conditions and established rules are met.
Sewerage systems for a country house are complex schemes for the collection, disposal and treatment of wastewater. As a rule, two types of sewage systems are organized in the house.
- Household is the collection of waste water from the toilet, bathroom, kitchen sink and water-consuming household appliances (dishwashers and washing machines).
- designed to collect rain and melt water. It prevents flooding of cellars and basements, damage to the foundation, the appearance of excessive soil moisture and decay of the roots of cultivated plants.
Since there are no oil and oil products in the storm drains of a private house, it is allowed to combine storm and household sewers into one system, however, such a solution will require a larger volume of the receiver (local treatment plant, septic tank or cesspool) and the associated high equipment costs , therefore, the feasibility of such a combination is decided by each homeowner individually.
Sewer system composition
Any sewer system can be roughly divided into three main parts:
- in-house communications, representing the union of wastewater from each point into a single collector,
- external (or external) pipelines connecting the place where the collector leaves the house (in some cases, the outlet pipes from the bath or are cut into the pipeline) and the receiving device,
- actually receiving device.
When setting up as a sink for sewage, it is the most important issue.
And for the installation of storm drains, an important element is, about the types of which there is information in a separate article.
You may also need for risers and 50 mm for subsequent wiring.
The receiving device can be a storage device or a purification facility.
- carries out partial soil filtration of wastewater, however, bacteria living in the soil are capable of processing inclusions only if the amount of wastewater does not exceed one cubic meter per day. As well as sealed models with a bottom that require pumping out the contents using a sewage machine, this design is more suitable for a summer residence than for a house with permanent residence.

- Ready septic tanks well-known manufacturers - these are carefully designed and operation-tested designs that require cleaning much less often than simpler devices. You can save money by building.

- Local treatment plants (LOS)- rather expensive and complex devices requiring connection to the mains, which at the same time are able to remove from wastewater and process up to 98% of impurities, forming water and sludge suitable for irrigation, which can be used as an organic, environmentally friendly fertilizer.

Selecting the location of the sink for drains and its parameters
Regardless of the type of receiver (processing device or storage device), it the volume must be at least three daily norms of water consumption for all residents of the house... The existing standards determine the average value per person - 200 liters, on the basis of which the volume of the tank is calculated as 600 liters (200x3), multiplied by the number of people. When using treatment facilities with several tanks connected in series, their total volume is taken into account.
The installation location of the receiver is determined taking into account certain requirements.
- The structure is installed at the lowest point of the site, if the latter has a complex relief.
- Distances to important objects must comply with accepted standards:
- to the source of drinking water - up to 50 meters (depending on the type of receiving device, groundwater level),
- to the road - at least 5 m,
- to a reservoir or other open reservoir - 30 m,
- to a residential building - 5 m.

Drawing up a diagram
It is best to take care of the sewerage scheme at the design stage of the house. At that time premises that have a drain of water are trying to be placed in the same sector in such a way as to reduce the length of the pipes. This makes it possible to purchase fewer pipes. In addition, short distances and fewer connections simplify circuitry and reduce the likelihood of malfunctions.
In order for the sewerage scheme in a private house to be drawn up with your own hands, fully comply with the requirements, and during its development important points were not missed, you should use a ready-made house plan or draw it on a sheet of graph paper.
- The first step in drawing up a diagram is to put all the drain points on the plan. If there is more than one floor, a plan with the location of plumbing fixtures is drawn up by floor.
- After that, the location of the common riser is applied to the diagram. Since the diameter of the toilet outlet is usually 110 mm and the riser has similar parameters, the latter is most often located in the toilet. This allows you to fulfill one more condition - the length of the branch from the toilet bowl to the collector should not be more than 1000 mm. It is recommended, if possible, to locate the drain points the closer to the riser, the larger their outlet.
- The line of the collector pipeline is applied to the diagram to the point of exit from the house, which, during the construction phase, is arranged in the foundation of the building and is equipped with a protective sleeve (a piece of pipe, the diameter of which is so much larger than the diameter of the collector to ensure its free entrance and the presence of gaps).
- The lines for the supply of wastewater are drawn from each point of the drain to the collector. Taps located nearby (for example, from a bathtub and a washbasin) can be combined into one line. An exception is the drain line from the toilet, which, under any conditions, should not have a tie-in from the rest of the drain points.
It is important to remember that the sewerage system in a private house with your own hands must be performed with a certain slope (3% for pipes with a diameter of 50 mm, 2% for pipes with a diameter of 110 mm).
- In addition to pipelines for transporting wastewater, the installation site is marked on the diagram.
- An external sewerage scheme is similarly applied to the site plan, taking into account the location of buildings, trees (optimally, communications should pass at a distance of at least 3 meters from them). For every 10-15 meters of the highway, as well as in the places of turns and inserts of additional lines, an inspection well is arranged.

Features of the choice of pipes and fittings
The main aspect of pipe selection is the type of material. Despite the strength of cast iron products, sewage systems for a private house are less and less made of such material due to their large weight, which makes transportation and installation difficult. Preferred are modern polymer materials.
- Flexible and durable polypropylene withstands high temperatures of drains well, therefore it is excellent for indoor sewerage. Usually these pipes are painted gray.
- Polyvinyl chloride is not as resistant to high-temperature exposure, but it has high strength. Orange pipes made of this material are easily visible in the ground, they are used for external sewage, and gray ones for internal.
Installation of internal sewerage
Do-it-yourself sewerage device in a private house is recommended to start with the installation of an internal sewerage system and ventilation for it.
When the sewage system is organized with your own hands in a country house, the laying of pipes, including the riser, can be hidden and open. In the first case, communications are located in walls, niches or boxes. It is imperative to arrange inspection hatches for the possibility of inspection and repair. Pipes are attached to the walls using special devices (hangers, clamps, etc.). During installation, the above principles for selecting the parameters of the system elements are observed (pipelines 110 mm for the collector and drainage of the toilet bowl, 50 mm for sinks, showers and bathtubs, oblique tees and crosses at the joints), but experts also recommend installing collectors of a larger diameter (100- 110 mm) at the connection points of the outlets (for example, sinks and bathtubs).
Docking of pipes with different diameters is carried out using adapters. For every drain point install water locks preventing the penetration of unpleasant odors into the room. Throughout all communications inside the house, special revision tees are installed at each turn of the pipes.

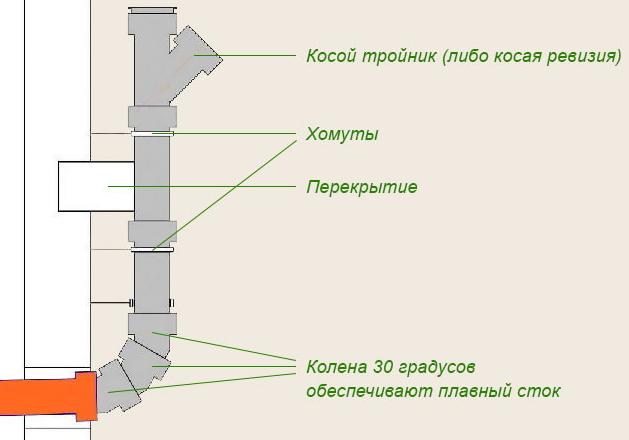
Tip: To reduce the risk of blockages, it is recommended to use not one 90 ° fitting, but two 45 ° or three 30 ° fittings when installing bends.
For those who find it important to find the most complete answer to the question of how to carry out a sewage system in a private house , information on ventilation device.
The installation of external sewer pipes is shown in the video.
Sewerage in a private house is absolutely necessary if you live there permanently, and it is highly desirable if you only bring the summer months there. I will help you figure out the basic diagrams of the sewerage system, and together we will analyze the algorithm for performing the key stages of the work.
Sewerage scheme
Sewerage for a private house is an essential condition for a comfortable stay. It is possible to use the street and cesspool only temporarily. Sooner or later, the question of creating an integrated system is understood.
Before making a sewage system in a private house, you need to decide on its configuration. The easiest way to do this is consistently:

- Analysis of existing communications. If there is a centralized sewerage network in the settlement, then the work is simplified by an order of magnitude. It will be enough for us just to get to the collector pipe and connect to it.
To connect to a common collector, you need permission from the local administration, and it is better to entrust the work itself to specialists. But in any case, it will be much cheaper than making a sewer tank yourself.
- Determination of the type of tank. Here we have only two options: a septic tank or a cesspool. It is more difficult and more expensive to make a septic tank, but it needs pumping less often, a cesspool - on the contrary. The optimal choice is a septic tank combined with a biological treatment station, but the high cost acts as a limiting factor.

- Choosing a location for the tank. In this matter, you need to be guided by the current regulations, which determine the minimum distance from a pit or septic tank to various objects. It is advisable to find a point in the lower part of the relief (to dig less) at a distance of at least 10 m from the house and at least 15 m from the well / well.
- Allocation of a room. The sewerage system of a private house should link together all the water discharge points. It is worth collecting them as close to each other as possible, therefore we determine where the bathroom will be located. It is advisable to place it against the outer wall, on the side of the house where the reservoir will be - this way we will spend less effort and money on laying pipes.

- Pre-planning. Based on the information received, we build a plan for the entire system and preliminarily calculate how much and what materials we need. According to the calculations, we plan the budget (we immediately put in it an excess of 30%) and assess whether the project will be "lifting".
If the preliminary stage has ended successfully, you can proceed to purchasing and performing preliminary work.
Materials for creating an autonomous sewage system
An independent sewage system in a private household is a rather resource-intensive project. What is the minimum of materials required for its implementation?
The main items of expenditure are shown in the table:
| Illustration | Structural element |
 |
Ready septic tank.
The optimal solution for an autonomous sewage system is the installation of an industrial septic tank (Tank, Triton and analogues). Such products are equipped with multi-chamber reservoirs of sufficient volume and all the necessary devices for the primary treatment of effluents, so we just have to install them. The main disadvantage- high price. |
 |
Plastic container for a septic tank.
As a reservoir, you can use a plastic (polyethylene, polypropylene) tank to accumulate waste. You can also purchase the so-called "Eurocube". A plus- complete tightness of the system. Minus- rather high cost and the need to install additional cleaning devices. |
 |
Concrete rings.
If saving money is a priority when creating a sewer system, then reservoirs for the accumulation and treatment of wastewater can be made from standard concrete rings. Flaw- the need to additionally seal containers and the complexity of installation. Perhaps, one cannot do without attracting a crane. |
 |
Pipes for outdoor sewerage.
To connect the cesspool or septic tank with the house, special outer pipes (orange paint) are used. They tolerate temperature changes well and do not deform even under significant pressure when laid at depth. |
 |
Pipes and fittings for internal sewerage.
Internal sewerage wiring is formed from polypropylene (gray) pipes with a diameter of 110 to 40 mm. Together with the pipes, it is advisable to purchase the required number of fittings for registration of turns, bends, revisions, etc. |
 |
Pipe insulation.
When laying the outer part of the network, as well as when installing communications in unheated rooms (basement, basement), there is a risk of pipes freezing. To avoid this, it is advisable to insulate the sewer system using casings made of mineral wool, polyethylene foam, polyurethane foam, etc. |
In addition to the basic materials that are used directly to create the system, additional ones will be needed:
- gravel and sand for excavation and drainage;
- cement mortar;
- sealant based on moisture resistant silicone;
- revision wells - if you need to lay a long or winding pipeline.

Outdoor work
Stage 1. Principle of operation and calculation of the volume of the septic tank
Sewerage installation in a private house includes two types of work:
- outdoor- consist in the device of the reservoir (cesspool or septic tank) and laying a pipe to the house;
- internal- presuppose the installation of piping in the house and the connection of water consumption points to it.

If possible, then these works are performed in parallel, but if not, then you need to start with the device of the outer part.
The most effective design for an autonomous sewage system in a private house is a septic tank. Unlike a cesspool, it does not accumulate waste, but ensures its processing. At the exit, relatively pure water is obtained, which is filtered into the soil, polluting it with organic matter at a minimum level.

The septic tank works quite simply:
- Upholding... First, wastewater enters the first tank - a sump. It separates wastewater into fractions: solid particles precipitate (sludge), light organic matter floats on the surface, and clarified liquid is collected in the middle part. Here, bacterial decomposition of waste takes place with the release of gaseous reaction products and mineralization of the residues.

- Overflow... An overflow hole is made in the wall of the first tank, which is located at the filling level. Through the overflow pipe, the clarified water flows from the sump into the second chamber, and solid residues are retained.
- Filtration... In the second chamber (filtration or drainage well), the clarified wastewater passes through the drainage layer at the bottom. Drainage also retains some of the pollution, so almost pure water enters the soil.

Almost all septic tanks work according to this principle, both homemade and factory ones. The difference lies in the design of the tanks, as well as in their number. Sometimes a septic tank has not two, but three chambers - then another tank is added between the sump and the filtration tank for more effective cleaning.
Before you arrange a septic tank, you need to calculate its optimal volume.
The calculation of the volume of the septic tank is carried out according to the formula:
V = n * Q * 3/1000, where
- V- the required volume of the septic tank in cubic meters;
- n- the number of people permanently residing in the house;
- Q- rate of water consumption per person, liters per day;
- 3 - average duration of wastewater cleaning, days.

If we take 200 liters approved in SNiP as the consumption rate, then, for example, for 4 people the volume will be as follows:
V = 4 * 200 * 3/1000 = 2.4 m3.
Stage 2. Installation and equipment of a sewage tank
Now let's figure out how to properly make the sewerage system in a private house. The algorithm of work on the device of a septic tank in the table:
| Illustration | Stage of work |
 |
Digging a pit.
In the selected place, we apply markings to the site, after which we dig a foundation pit to install the tanks. We select the dimensions of the pit with a margin - so that a layer of bedding and waterproofing / drainage can be laid on the bottom, and a clay castle can be made on the sides. For septic tanks of a small volume, the pit is dug manually, for large-scale structures it is better to use the services of an excavator. |
 |
Preparation of the base.
We level the bottom of the pit, after which we lay the sand bedding up to 20 cm thick. A waterproofing pad made of clay or a concrete disc, the diameter of which will correspond to the diameter of the well, can be placed under the installation site of the sump (the first tank). |
 |
Installation of containers.
We lower concrete rings to the bottom of the pit, from which we form two wells. We seal the joints between the rings in order to exclude the ingress of untreated wastewater into the ground. |
 |
Tank bottom device.
We make the lower part of the sump airtight, pouring a layer of concrete up to 10 cm thick. Additionally, you can treat the base with bitumen mastic and lay a waterproofing roll material. We fill in the drainage at the bottom of the filtration well: pebbles, gravel, broken ceramic bricks, etc. You can also make holes in the bottom ring of this tank or use a special perforated reinforced concrete blank. |
 |
Overflow decoration.
We connect both tanks with an overflow pipe, which we insert into the holes at a distance of about 1.5 m from the bottom. To prevent organic waste from entering the filtration tank from the sump, we install a T-shaped fitting on the pipe. Due to the presence of the lower branch pipe, such a fitting allows the selection of the clarified liquid under the surface organic film. The installation locations of the overflow pipe are carefully sealed. |
 |
Overlap and necks.
Floor slabs with holes for hatches are installed on the wells. If the septic tank is located deeply, then necks can be additionally used - narrower rings that provide access for cleaning, revision and repair. |
 |
Ventilation and hatches.
We build a ventilation pipe into the ceiling. It is desirable to make it higher - this way the unpleasant smell will evaporate faster. We cover the wells or separately withdrawn necks with hatches of a suitable diameter, securing them with cement mortar. |
If the septic tank is below the groundwater level, then it is advisable to seal it outside using roofing material or bitumen mastic. Also, laying a dense layer of clay around the perimeter of the tanks - the so-called clay castle - will help prevent moisture from seeping into the chambers.

Stage 3. Laying pipes from the tank to the house
The next element of the external sewage system is a pipe that connects the tank to the house. Through it, wastewater will flow into the treatment / storage facility.
Pipe laying technology:
| Illustration | Operation being performed |
 |
Digging and preparing trenches.
We dig a trench between the house and the septic tank with a depth of 50 cm to 1.5 m (the deeper the soil freezes in winter, the more you have to dig). For the most efficient drainage, we form a slope towards the septic tank of about 2 cm per 1 m. At the bottom we put sand bedding up to 15 cm. We moisten the bedding and ram it. |
 |
Pipe laying.
We put a pipe in the trench to drain the waste. The optimum pipe diameter for the outside of the sewer system is 110 or 160 mm. |
 |
Thermal insulation of the pipe.
If the septic tank is located relatively shallow, and the pipe cannot be buried more than 1 m, the circuit requires additional insulation. To do this, we wrap it with rolled material based on glass wool or mineral fiber, or we use cylindrical casings of a suitable diameter. |
 |
Entering the septic tank.
We see one end of the pipe into the septic tank through a hole in the concrete wall of the well. As with the installation of the overflow, the hole is carefully sealed. |
 |
Entering the house.
The place of entrance to the house can be decorated in different ways, but most often the pipe is wound through a hole in the basement or foundation. It is advisable to insert a metal sleeve into the hole, which will protect the sewer from damage during movements and subsidence. Also, the input node should be insulated. |
After the completion of these works, we fill up all the trenches and pits completely, and then we lay fertile soil or a layer of sod over the backfill.
It is also advisable to make marks on the wall of the house at the entrance. These marks will be needed when we look for exactly where the sewer pipes are laid.
How to make a sewer wiring correctly
Stage 4. The main elements of the internal network
The next stage is the arrangement of the internal sewerage system. Its configuration directly depends on where the sources of sinks are located, so here I will give a description of its main elements:

- Riser- central vertical pipe, large diameter (at least 110 mm), which unites all circuits together. As a rule, one riser is made in a private house, but in large buildings there may be several. In the lower part, through the knee, it is connected to the outgoing sewer pipe.
- Fan pipe- mounted in the upper part of the riser, it serves to remove gases accumulating in pipes from the system to the outside. It is discharged into a separate ventilation shaft or connected to a ventilation pipe located above the roof level.

Without a waste pipe, the pressure in the system will increase, which can lead to incorrect operation of the shut-off valves. In addition, accumulated gases cause unpleasant odors.
- Trunk branches- pipelines with a diameter of about 50 mm (2 inches). Used to connect plumbing fixtures and other sources of drainage to the riser. Since the local sewage system is usually done by gravity (i.e., working without additional pressure), the pipes are laid with a slope towards the drain. For two-inch pipes, the optimum slope is about 3 cm per 1 m.
- Supply pipes- are used to connect the outlets of plumbing fixtures with highways. The diameter of such a pipe cannot be greater than the diameter of the line.

- Revisions- special fittings, which are a single branch tee equipped with a closing hatch. The revision is placed at the base of the riser, at bends, forks and at the ends of highways. It provides access to the inside of the pipeline for removing blockages or maintenance work.
Step 5. Connecting pipes

All pipes are connected to each other using fittings that allow you to make turns, bends, branches, etc. When installing the system, it is advisable to avoid turns at sharp and right angles, forming smooth arcs - this way we reduce the risk of blockages in the place where the flow rate decreases.
Typical modern pipes equipped with sockets and elastic cuffs are easily assembled by hand :
| Illustration | Assembly operation |
 |
Cutting the pipe.
Using a fine-toothed hacksaw, cut the straight end of the pipe to the desired size. |
 |
Chamfering.
We clean the cutting site, removing burrs from the outer inner side - they can cause a blockage. |
 |
Socket preparation.
Insert a rubber O-ring into the socket. We level the seal by placing it in the groove and making sure there are no bends and creases. |
 |
Pipe connection.
We insert the branch pipe into the socket and push it in until it stops. If necessary, turn the pipe so that the branch or inspection hole is in the desired position. |
After assembly, all pipes are installed on supporting surfaces. The instruction allows both hidden (in the grooves or behind the casing) and open gasket. In the second case, plastic clamps with a snap or screw fixation are used to fasten the pipes.


Stage 6. Connection to plumbing fixtures
At the last stage, the plumbing equipment is connected:

- Toilet bowl- usually installed in the immediate vicinity of the riser. The outlet of the toilet bowl is connected with a corrugation or a piece of pipe, either with a riser outlet, or with a short line with a diameter of at least 110 mm.

- Bathroom or shower- connected to the sewerage system using compact siphons, which are placed under the drain holes. The optimum outlet pipe diameter is at least 50 mm.
Some models of shower cabins and toilets require a vertical sewage supply - this must be taken into account in advance when designing the system.

- Sinks in the kitchen and bathroom- built into the system using siphons with water traps. The siphon is usually in the shape of a flask and is located under the sink, and it is connected to the sewer outlet with a flexible corrugated pipe.
- Washing and dishwashers- also mounted using flexible corrugated hoses. To connect such devices, a separate sewer pipe branch should be installed, equipped with a socket with a rubber sealing collar.

Conclusion
The sewerage system installation technology includes a number of nuances that directly affect the final result. Now you know them. You can get acquainted with the intricacies of the topic clearly in the video in this article. You can get answers to any questions that arise in the comments to this material.
How to properly make a sewage system in a private house so that it will serve for many years? It is advisable to involve professionals in this issue, but if you have some skills, you can do everything yourself. Also, despite the fact that the basic requirements for the sewerage system are individual, it is necessary to involve specialists in its design. Only compliance with all technological and technical standards will provide a private house with a high-quality drainage system.
What does the sewer system consist of?
How to make a sewage system in a private house, taking into account all the requirements of regulatory documents in the field of construction? For a one-story or two-story building, it is necessary to make a system that will consist of the following components:
- Ready-made or homemade septic tank (cesspool). Designed for storage and filtration of effluents. Set up outside the home and has a rather complex scheme.
- Pipes for outdoor sewerage. Any home septic tank must be connected to the building, which is carried out using these elements. Such pipes withstand temperature extremes well, are distinguished by increased strength and wear resistance, which allows them not to collapse under the pressure of water and soil.
- Pipes and fittings for internal sewerage wiring. Consists of elements with a diameter of 40 to 110 mm. Fittings are also necessary for arranging the sewage system in the house, since with their help bends, revisions and turns are made out.
- Thermal insulation for pipes. A sewage system in a private house with your own hands is impossible without modern heaters. With their help, pipes are insulated, which prevents them from freezing. The installation of pipe thermal insulation should be carried out not only outside the building, but also inside in unheated rooms (basement, basement of the building).

Varieties of septic tanks
When installing a sewage system for a country house, what to choose as a septic tank? There are many options for the device of this element of the system.
Cesspool without a bottom
The sewerage device in a country house using a cesspool has its advantages:
- low cost. A cesspool is a kind of well that has no bottom. Its walls can be made of monolithic or prefabricated reinforced concrete, brick;
- simple working principle. After the sewage enters the cesspool, clean water seeps into the soil, and solid waste settles at its bottom;
- no difficulties during the installation of the structure. There is no need to carry out large earthworks.
The disadvantages of this design scheme include that it is suitable only for those houses where the average daily volume of waste does not exceed 1 cubic meter. m. Otherwise, the surrounding soil and groundwater are contaminated with household waste.

Sealed tank
The sewerage system of a country house with your own hands can be formed from large-volume hermetic tanks, which are made of plastic, metal or other materials. They can be bought ready-made or made yourself. In this case, a sewerage project in a private house involves the use of prefabricated. The bottom of such a septic tank will be formed of monolithic concrete, and the lid is made of metal.
The disadvantage of this design is that the container will fill up over time. After the accumulation of a certain amount of waste, it is necessary to call a special machine that pumps them out. The advantage of a sealed tank is that it can be used when there is a high level of groundwater.
Single chamber septic tank
Sewerage installation in a private house very often occurs using a single-chamber septic tank. It is a cesspool, the bottom of which is filled with rubble by 30 cm and sand at the same thickness. The advantage of this design is that water, penetrating through the so-called "filtration field", is purified by about 50%.
Two-chamber septic tank
How to properly drain the drain to prevent contamination of the site with household waste? In this case, it is recommended to use a system of overflow settling wells.
The structure of such a sewage system in a private house includes two tanks. One of them is hermetic, the other is without a bottom, but sprinkled with a layer of rubble and sand.
Waste from the house goes into the first container. After a while, they defend themselves there. All solids sink to the bottom of the septic tank, and fat rises to the top. The waste in the middle is relatively clean. It is they who fall into the well without a bottom. This happens through a pipe that connects two tanks and is placed at a slight slope at the level of 2/3 of the height of the septic tanks.
Over time, too much waste is collected in the first well and needs to be pumped out. This should be done once every 5-6 months.
DIY septic tank
What is the easiest way to make a septic tank?
How can you make a sewer system in a private house with your own hands so that it works as efficiently as possible? First of all, you need to take care of the septic tank. To arrange a local sewage system in a private house, you should adhere to the following instructions:
- Digging a pit. The dug hole should be of a size that slightly exceeds the dimensions of the tanks. It is necessary to count on the fact that a layer of rubble and sand should be poured at the bottom of the septic tank, and a clay castle should be equipped on the sides. If the sewage system for a country house is foreseen for a small number of people (1-3), then the pit can be dug manually. Otherwise, it is recommended to use the services of an excavator.
- Arrangement of the base. When installing a sewage system in a private house, the bottom of the dug hole must be leveled, then covered with sand and tamped. On the site where the first tank (sump) will be installed, waterproofing must be installed. For this purpose, a clay or concrete disc should be used.
- Installation of containers. The sewage system in a private house with your own hands should consist of two separate reservoirs, which are formed from concrete rings. In order for the system made to work effectively, all joints must be sealed without fail. Such a sewerage scheme in a private house will exclude the ingress of drains into the soil and groundwater.
- Arrangement of the bottom of the tanks. This sewerage scheme provides that the bottom of the first tank must be airtight. To do this, it is concreted, and the top is treated with bituminous mastic and a layer of roofing material is laid. Also, to build an effective sewer system, the bottom of the second well is covered with rubble or pebbles.
- Overflow decoration. In order for the sewerage system of a country house to work correctly, the installed tanks must be connected with an overflow pipe. It is installed at a distance of 1.5 m from the bottom. A T-fitting is also mounted on the pipe. It allows the intake of the liquid itself, which is separated from the organic matter.
- Installation of overlap. For the device of a local sewage system for a private house, reinforced concrete slabs are mounted on top of each tank.
- Installation of hatches and ventilation. So that there is no unpleasant smell on the site, a ventilation pipe is installed in the overlap of the tanks. Also, each well is closed with hatches, which, if necessary, must be opened.

Laying pipes on the street
Should be carried out according to the following scheme:
- Digging a trench. A small groove is made from the septic tank to the house. Its depth should be greater than the depth of freezing of the soil (the water supply system is also being laid). When constructing a trench, it is necessary to provide a slope from the house to the storage tanks for a good outflow of liquid (about 2 cm 1 m).
- Pipe laying. How to carry out the sewerage system in a private house, which pipeline to pick up? It is recommended to choose one that has a diameter of at least 110 mm.
- Thermal insulation. If the pipes are laid shallowly, then they can be prevented from freezing by insulation.
- The final stage. One end of the pipe is inserted through the concrete wall, carefully sealing the joints. Also, in order to carry out the installation of the sewage system in a private house with your own hands, you must not forget at the stage of its construction to leave a small hole in the foundation or basement. A pipe is introduced through it, after inserting a metal washer.

Internal network design rules
The device of the internal network is considered an important stage in the installation of a sewage system for a private house, how to do everything correctly? Do-it-yourself sewerage wiring in a private house occurs with the installation of the following structural elements:
- riser. It is a central tube with a diameter of 110 mm, which is installed in a vertical position. It connects all the existing circuits in the house together. For a small building, one riser is usually enough;
- ... Installed on the top of the riser. Such a pipe is necessary to remove accumulated gases into the environment;
- trunk branches. Pipes with a diameter of 50 mm are used to connect plumbing fixtures with a riser. This system does not have forced circulation, therefore, it is necessary to provide for the drainage of wastewater (3 cm by 1 m);
- supply pipes. They are used to connect outlets of devices with highways;
- revisions. They are a tee, where one branch is closed by a hatch. Revisions are necessary to carry out repair and maintenance work of various kinds. They are usually installed at all bends, branches, at the base and at the end of the riser.
If you adhere to this scheme for the device of the sewer system, it will work efficiently and without failures.
In order for the wastewater disposal system to function flawlessly, several nuances must be taken into account when arranging it. Today we will tell you what a sewerage system is for a private house, how to install it correctly and what mistakes should be avoided.
Pipe routing
Sewerage wiring is one of the most difficult processes, therefore, its arrangement should be given the utmost attention. Its assembly must fully comply with the requirements of SNiP.Installation of the sewerage system is carried out in stages:
first fits release(pipe connecting the external street and indoor system);
Release device
Further mounted riser- a central pipe located vertically; to facilitate maintenance, it is better if he is alone in the house; as a rule, it is located in utility rooms or a toilet; do not install it in living rooms or kitchens; it is installed openly or fits into a special shaft;
The last to connect bends, starting with the crosses, only flared upwards; at the same time, the toilet bowl is connected to the riser only separately with a pipe of 100-110 mm, the rest of the devices can be connected to a single common supply with thin pipes of 50 mm.
Advice... Liquid soap can be used to make it easier for the pipes to slide into the fasteners.
Installation of the outlet
1. For him, it is better to mount a special hole during the construction of the house. If it is not there, then a hole is made in the foundation 200-250 mm wider than the very diameter of the pipe.2. Hole waterproof using bituminous mastic.
3. Next, a special sleeve is inserted into it (a segment with a diameter of 20-40 mm larger than the outlet pipe). It serves to prevent the main pipeline from collapsing. The sleeve must protrude 150 mm from the foundation on both sides.
4. The outlet pipe is placed in the sleeve. The space between them is carefully filled with foam.
5.With the domestic sewer pipe, the sleeve is connected oblique tee(tee 45 °) and by diversion.

Sewer crosses, tees and bends
Slope angle
Since the wastewater flows through the pipes by gravity, in order to avoid blockages, the angle of their slope should be correctly determined. It is calculated based on the diameter of the pipeline. Moreover, for each plumbing fixture, it is selected separately:40-55 mm - from 3%;
85-100 mm - from 2%.
Naturally, the further the device is from the riser, the more the slope should be increased. Let's say the drain hole is 200 m from the riser itself. To obtain the required angle of inclination, the pipe should be displaced in height by 60 mm.

Angle of inclination of pipes
Advice. When choosing pipes for sewage, please note that outdoor pipes are always painted orange, and pipes intended for indoor installation are always gray.
Installation of a riser
1. He is only going to upwards... For such a pipe, appropriate openings are prepared in the ceilings and roof. To reduce the noise of the passage of water from the wall or groove, you should retreat 20 mm.2. The riser is mounted only strictly vertical... Minor deviations of up to 2 mm for every 2 m are allowed.
3. So that the joints do not interfere with the passage of liquid, the sockets are mounted above.
4. When assembled, gradually connect side bends and inspection hatches. For this, oblique tees and crosses are used.
5. When connecting bends, pipes running parallel to the floor are laid on special supports.

Sewer system diagram
6. Excessive turns of pipes should be avoided, if they cannot be dispensed with, it is better to use two tees at 45 °, or even better three at 30 °; if you choose one at 90 °, then the waste in it will be stagnate; in addition, when connected at a right angle, the pressure in the riser will be limiting, which will lead to excessive noise in room.
Advice. Since blockages occur most often in places of turns, be sure to provide inspection or inspection hatches next to them.
7. The riser is fixed to the wall with clamps, which must be located under the sockets. The distance between the clamps is up to 4 m. In order not to damage the system, the holes for them should be prepared in advance or, during their preparation, disassemble the riser for a while.
Riser assembly diagram
Hood arrangement
In order to avoid the ingress of odors into the room, a curved pipe is provided at the bottom of all plumbing fixtures (sinks, toilets, etc.) - odor trap... However, with intensive use of the sewage system, a vacuum is sometimes formed in the riser. In this case, there is a "breakdown of the water seal" - gases without water resistance begin to penetrate into the house.To avoid this, it is necessary to provide for their removal to the atmosphere. The waste pipe for ventilation of the sewer system is led out through the roof. Its diameter is always equal to the diameter of the main pipe. If the waste pipe runs through an unheated attic space, it must be insulated.
With a small sewage capacity sewerage equipment without hood is allowed... However, in this case, the riser must necessarily end with a cleaning or inspection hatch.

Inspection hatch and cleaning hole (equipped with a plug)
Basic wiring rules
So that during operation there never arose problems with the sewage system, when arranging it, the following rules should be followed:In order to prevent the splash of sewage, all plumbing is connected above the toilet;
To avoid blockages, strong bends and unnecessary tight pipe bends;

Sewer system installation
connection pipe diameter is selected equal to or slightly larger than the size of the largest pipe from the plumbing fixture;
If there is a toilet in the house common riser diameter must be greater than or at least equal to 100 mm - the diameter of the toilet bowl pipe;
The lead to it should not exceed a meter; from other plumbing fixtures allowed eyeliner length up to 3 m; if for some reason it is made larger, then its diameter is increased to the size of the common riser (at least 100 mm); in order not to increase its diameter, it is possible to equip a vacuum valve at its upper end;
To service the system, provide inspection and cleaning hatches; they should be placed every 10 m;
To prevent the pipes from freezing in winter, in the places where they pass underground, they should be carefully insulate.
Without a working sewer system, a country cottage instantly transforms from a comfortable home into a slum shack. But in order for the drain in the sink and toilet to function correctly and without breakdowns, the sewerage wiring in a private house must be made in strict compliance with the norms of the relevant SNiPs. It is important from the very beginning to correctly assemble the riser and select the slope of the pipes to it from the plumbing fixtures. The choice of the material of the pipe products themselves and shaped parts for them is also important.
Requirements
It is customary to work out the sewerage wiring diagram in the cottage even at the stage of designing a residential building. It is better to determine in advance the location of all plumbing and pipes in the house. Directly installing sewage pipelines with your own hands or with the involvement of plumbers is performed after the walls have been erected, but before finishing.

Sewerage wiring diagram in the house
In order for the domestic sewage system to work properly and without blockages, it is necessary:
- observe the proper slope of the drain pipes from the plumbing to the riser;
- to minimize the number of bends and bends in the sewer pipes;
- choose the size and material of pipe products correctly;
- provide for the possibility of removing gases from the sewerage system (fan outlet);
- put siphons for the formation of water locks;
- install hatches for inspection and cleaning in the right places;
- insulate the sewer pipe on the street and in the basement (if necessary).
The two main documents regulating the wiring of sewage pipelines in a private house and the discharge of drains into the village sewer network or septic tank are SNiPs 2.04.01-85 (SP 30.13330.2012) and 2.04.03-85 (SP 32.13330.2012). It is in them that all the nuances of the design and installation of a system for removing domestic wastewater from a cottage are described.
Sewer wiring principle
Regardless of the number of storeys in a private house, the sewerage system wiring diagram in it is built around the main vertical riser. Horizontal drainage bends from plumbing fixtures are already being supplied to it. From the bottom to this central pipe, an outlet is connected to the street to a septic tank or a village drainage network. And on top of it is equipped with a fan ventilation outlet to the roof.
If the house is one-story, and there is only a toilet bowl and a sink with a bathtub from the plumbing, then you can refuse the riser. However, a vertical pipe for ventilation will still have to be made, otherwise all the smells from the sewer will somehow end up in the cottage. Even siphons will not help in this situation. Pressure drops during the discharge of water will cause the breakdown of the hydraulic locks, as a result of which the sewer sludge will go from the pipes to the kitchen and bathroom.

Sewer pipes in the house
To independently install the sewage system in a private house, you will need:
- pipes with a diameter of 50 (for bends) and 110 mm (for a riser);
- tees and elbows;
- stubs;
- revision hatches;
- siphons for sinks, bathtubs and shower cabins;
- fasteners (clamps).
It is recommended to take plastic pipes made of PVC or polypropylene for the sewage system in the cottage. The former are cheaper, while the latter are more resistant to household chemicals and high temperatures. Also for a country house, you can take cast iron counterparts. They are more durable, but more difficult to work with. If the plastic is cut with an ordinary hacksaw, then a grinder or a gas autogen is required for cast iron. Plus, for the pressure system, a sewage pump will be needed (installation with a small storage tank in the basement).

Natural sewerage scheme of a private house
Wiring diagrams
The distribution of sewer pipes in a private house is carried out according to one of two schemes:
- Natural (by gravity).
- Forced, pressure (with a pump).
It is better and more correct to give preference to the first one, with the gravity flow of the drains. The forced wiring option should be resorted to only as a last resort, when it is impossible to ensure the natural drainage of wastewater from the building. Such a system is volatile; in the event of a power outage, the sewerage system will stop working. The internal storage of the pumping unit can take in a certain amount of sewage, but it is limited.

Forced sewage scheme
Installation procedure
The sewerage system in the house is assembled from the bottom up. First, a release is made in the basement (output through the foundation of the cottage) to connect the street and internal parts of the drainage system. Then the riser rises upward with the installation on each floor above the floor of a tee or a cross for connecting horizontal branches.

Features of installation of pipe connections for sewage in a private house
The opening in the foundation is 400x400 mm or more. A free space of about 150 mm should be left from the pipe to the edge of this hole. It is necessary so that during the subsidence of the cottage and the swelling of the soil during the winter, the release is not deformed or destroyed. The remaining gap is closed with clay and tow.
Installation of risers
Installation of the riser consists in the sequential installation of individual parts on top of each other. Connecting them and fixing them together is done due to the presence of a bell at the end of these elements. From the floor on the ground floor, a tee is first placed on the branches. Then comes a pipe about a meter high. Then the revision is installed. And then another pipe is mounted for the passage of the floor to the next floor. There again a tee and everything is repeated.

Installation of drainage system
From the floor level to the revision hatch, it should be about 1–1.5 m. If the pipeline is made of plastic products, then the riser must be attached to the wall using clamps on the dowels. Moreover, a gap of 15–20 cm should remain from the wall surface to the pipe. And the clamps should be placed under the sockets and with a distance from each other in height of 4–5 meters.
The passage through the ceiling and the space above it after the installation of the pipe is filled with cement mortar 2-3 cm thick from the pipe and 8-10 cm high above the floor. This concrete edging is made to protect the riser, provide sound insulation and prevent the spread of fire in case of fire.

Installation of a branch pipe using adapters
Installation of bends
Bends are mounted at a slope from plumbing of 25–35 mm per linear meter. If the slope is made less, then the waste water will stagnate in the sewer pipeline. And with less drains, the drains will flow too quickly, as a result of which heavy particles and fat will settle inside, gradually forming a blockage.
The length of the horizontal line should not exceed 10 m. If it is laid in an open way, then the pipeline can still be increased by a couple of meters. However, for sewerage pipes closed with a screed, this is unacceptable. And in any case, for every 8 m of the horizontal section, it is necessary to provide for a revision for cleaning. Fixation of the slope bend is made with clamps to the wall in increments of 1–1.5 m. If this distance is increased, the plastic line will sag.

Features of the sewerage installation scheme in the house
Features of the arrangement of the sewage system in one and two-story houses
In a one-story cottage, sewage wiring is usually performed with one riser in the bathroom and two horizontal outlets to the bathroom and kitchen. But if the house is large and has two or three floors, then the sewerage system scheme will be more complicated. It is often necessary to install a couple of separate risers here. But in general, the principles of organizing the collection of household waste from plumbing are the same - the slope of the pipes and the supply of wastewater at one point to the outlet from the building.

Sewerage scheme in a one-story house
In order for the sewage system to work properly for many years, when designing and installing it, you should:
- bends with a riser should not be connected with straight crosses, but with elements with branch pipes at an angle of 30–40 degrees;
- to fix the branch lines at a slope, use clamps with a step of no more than 1.5 meters;
- the places where vertical risers pass through the floors must be sealed with cement mortar;
- clean the burrs at the ends of plastic pipes after cutting them with a hacksaw into parts of the required length;
- use siphons to form water seals;
- divert fan output away from windows and balconies.
According to SNiPs, in a private house, the distribution of sewer pipes can be carried out in open and hidden (in mines or boxes made of non-combustible materials) methods. The first option allows you to constantly monitor the condition of the pipelines and, if necessary, simplifies their repair, and the second is more aesthetic.

