How to install swing gates with your own hands. Do-it-yourself brick gate posts
The concreting of the pillars must be approached responsibly, because the reliability and service life of the entire fence depend on it.
How to install fence supports, what materials are better to choose? Consider the main points of the construction of the fence.
Why concrete fence posts?
Advantages:
- The posts will not loosen in the ground. If the pillars are not concreted, when raising the level ground water they simply can not withstand the load and fall.
- Protection against corrosion processes is carried out.
- You can extend the operating time.
Minus - if the pillars are concreted, they eventually begin to bulge out of the ground due to precipitation. This situation will arise with closely lying groundwater, which pushes the supports from concrete base from the ground cover. There is also the possibility of cracks in the concrete.
The tape base is one of the most reliable
How to prepare a construction site?
Take these materials:
- shovel, crowbar, concrete mixer;
- fittings;
- drill;
- cement, crushed stone, sand;
- roofing material;
- level, plumb, tape measure;
- theodolite, cord;
- tes for formwork;
- wheelbarrow;
- polyethylene bags.
 First you need to prepare the surface and only then install the supports for the fence. Cut off the rhizomes and sod with a shovel so that there are no obstacles during drilling. The size of the well may vary depending on the diameter of the drill. Install it as deep as possible. Remove the earth from the pits immediately so that it does not interfere with construction work.
Drill the soil to a freezing depth (about 1.5 m), then install the expander on the plow and arrange the anchor expansion at the bottom of the hole. Thanks to this, winter frosts will not affect the position of the pillars, they will remain in place.
What fence posts to choose?
The main selection criteria are not only external characteristics, but also technical, as well as installation methods that include additional elements.
Types of poles:
- from wood- short-lived. They will last an average of 10 years. If you stop at this option, treat the supports with antiseptic preparations or a solution blue vitriol. This will extend the service life.
- Asbestos-cement pillars characterized by practicality, ease of installation, affordable price. Suitable for summer cottages or business area. The disadvantage is the emptiness of the pipe. When it rains, water accumulates inside, and during frost the pipe may burst. The legs are hard to attach to the base.
- - the most practical and popular. Pros: ease of installation, reliability, can be used for all types of fences, have a long service life.
- Concrete. Finished goods expensive, often made independently, as it does not require large investments. They are often used, but require skills to pour the design qualitatively the first time.
- Pillars of brick- best decorative material. They are expensive and hard to work with. Laying of the foundation is required, mutual dressing, decorative processing and preventive methods, but the view is attractive.
Choosing the Right Pole Type
Follow these tips when choosing supports:
- For corrugated board fences those supports that are able to reliably stand in the ground and hold the structure without problems are suitable. The weight of such a fence is small, so even wooden posts can be used. Although best option – concrete types, as well as from metal and brick. To make the structure more durable, use iron corners as a frame along the fence.
- Are you planning to install chain-link mesh? Buy small-diameter iron poles. This option will not be expensive. Bury deep so that the mesh in the taut state does not bend the supports. Place a reinforced concrete pole in the corner area.
- For brick fence take pillars made of brick, concrete with the correct dressing and with a high-quality foundation. The remaining options will not be able to withstand heavy loads and spoil the overall appearance.
- For concrete structures- pillars made of concrete, metal (wide in diameter).

Metal supports - the most practical option
What type of concreting to choose
A wooden pole does not need to be poured with concrete, since if the wood is damaged, it will simply be impossible to replace the pole. We'll have to break the concrete and start the process again. It is better to mount a steel or asbestos glass, this will allow you to replace the beam in the future. But for a metal support, use cement compositions.
Filling supports is of the following types:
- Inexpensive is the type spot concreting.
- Option partial concreting used to fill the top layer of the earth. The disadvantage is the deformation of the support due to the effect on the soil low temperatures. The structure is weakened.
- Mounting strip base- an expensive way, but reliable.
- At dry type there is a possibility of poles swinging during the wind, this weakens them.

Concreting scheme for corrugated fencing
Preparatory stage for concreting pillars
Measure the future fence. Based on its length, calculate the number of supports. When using slate (flat, wave) as a fence, it is necessary to keep a distance of less than 2 m between the posts. If it is corrugated board, 2 m is enough. With light structures (chain-link mesh), the gap will be 3 m or even more.
The next step is to markup. Measure the area where the fence will be mounted. Its length is divided by the length of the fence sections and 1 is added - this will be the number of columns. Is it a non-integer number? Reduce flying distance. For example, width - 10 m, material - corrugated board, between sections - 2.5 m. The calculation is this: 10 / 2.5 + 1 = 5 pillars.
Measure and mark where the structure will be installed. Consider if a gate or gate will be installed.
Their length usually does not correspond to the marking of the sections, so the number of supports will fluctuate. Standard entrance gate- about 3 m, and the gate - 1 m.
Now start drilling or digging recesses for installing the column. If your site is located in a humid area, which is characterized by very coldy, give up such a view as partial concreting. Replace with tape mount. 
Partial filling process
 You can drill neat holes with a mobile motor-drill, or work with an infantry shovel (hoe). The hole should be 2 times the diameter of the support in diameter, lie at a depth of more than 1/3 of the entire height of the main structure. So, if the height is 2 m, the depth of the pit is 1.2 m.
Insert the pole evenly into the dug hole, use a level or plumb line to control it, fill it up to half with earth and tamp it down. Then pour concrete. Install a plug at the top so that when it rains, water does not get inside and does not destroy the structure.
Point mounting method
The pit is dug similarly to the previous method. Cover the bottom with a layer of gravel-sand mixture. Weld a heel on one side of the post to increase its stability. As a support, there can be a sheet of a flat type, wider in diameter than the pillars, or a lattice of reinforcing bars.
Lower the structure all the way into the pit, level it and fill it with concrete to the top. In the process, tamp with a steel bar.
At high humidity the site should be sealed at the base of the pillar (for example, with roofing felt). Twist the roofing material into a ring, 18-20 cm larger than the depth of the pit. So water will not get into the concrete when pouring. Close one edge in the "glass" with a plastic bag, isolate with tape. Place the structure in the pit and follow the normal post mounting pattern.
The video shows in more detail this species concreting pillars:
How to mount a pole in a tape way?
Use the following instruction:
- It is necessary to dig holes for the posts and a trench (40 cm deep, 15-40 cm wide) around the entire perimeter where the fence structure will be mounted. Installing slate or corrugated fencing? The width of the moat will be small, but for a brick structure it will be much wider. The main support does not have to be buried deep, because thanks to the strip foundation, wind and weight will not damage or loosen the structure.
- Formwork is needed, at the bottom of the moat and pits under the pillars, fill in a pillow (use crushed stone, sand, etc.) by 10 cm. Drive in steel bars every 50 cm (checkerboard pattern). Choose the length so that they are stable after immersion in the ditch, and their upper ends are not visible after pouring concrete. Set the posts straight.
- Put on a pillow metal carcass in the form of 2 rods placed in parallel with jumpers (after 20 cm). Jumpers in contact with the main pole must be welded or wrapped with wire. Place the second frame perpendicular to the bars 20 cm higher.
- Pour concrete. It turns out a multilayer base for the pole, which is designed even for the heavy weight of the fence.
On the video - how to concrete the strip foundation for the fence:
What is the essence of dry concreting?
Drill a hole, make a ruberoid "glass" without an insulated bottom. Place this kind of cylinder in the hole, then sink the post with the heel pointing down. Level with a level, fill sand, gravel or other material between load-bearing structure and a “glass”, periodically adding water so that the layer is more compacted.
Important! For any type of concreting, first of all, install the extreme pillars, stretch a rope between them, which will help to evenly set the remaining intermediate components of the fence.
Pole Installation Basics
For mounting fence posts, it is better to use types frost-resistant crushed granite, and both for falling asleep in a drilled hole, and for adding to a concrete base. Then you need to follow these steps:
- Pour crushed stone to the bottom, tamp. Next, fill the hole with water and place the post in the hole. It is advisable to have an assistant so that one holds the support and monitors the verticality, and the second fills the solution. Water for pouring the hole is needed so that moisture from the concrete does not leave the soil, otherwise it will turn out to be a skinny and fragile foundation.
- It will be good if you have a concrete mixer. This will greatly facilitate the work. You can immediately add crushed stone to it. In the absence of such equipment, pour concrete mortar and crushed stone in small layers.
- The next step is to fix the post in an even position on all sides with props for a while until the material “grabs”. You can continue the direct installation of the fence cloth after 4 days. Can't wait to finish the installation as soon as possible? Buy an additive, the so-called quick-hardening concrete. Place plugs at the top of the supports - weld or put on plastic caps.
- Use ruberoid. When pouring the solution, the roofing tube will push the collected moisture to the surface. This will provide complete protection of concrete from deformation. A bottomless bucket can serve as the basis of the funnel, and periodically bayonet the concrete with slats.
- The solution should not reach the top edge of the pit. In fresh, uncured concrete, insert several reinforcing bars with a length that is lower than the main pillars. To limit the height of the support, pull the rope along the fence. Measure how much space there is from the cord to wooden box, which stands in the middle of the pit. Mark the width on the asbestos-cement tube. Count from the top.
- Drill through hole, then the installation of a king pin made of steel bars is required. Put the pipe on the reinforcing cage, looking out of the hole. With the help of the king pin, the pipe will be held in a suspended state and rested on the formwork box.
- Align all pillars. You can do this with bubble level. Fix their position with struts, concrete the upper part of the well. At the final stage of pouring, remove the kingpin.

Concreting Options
- First of all, concrete the corner post or support near the gate. Insert it into the finished well in a vertical position, fill the cavity with concrete mortar. After tamping the material, pour a little more to the top, installing additional clamps that will help keep the posts level until the concrete mass hardens.
- Wedged a support in the pit with stones in an upright position. Pour the concrete composition, constantly monitoring the verticality. Additional braces are not needed, and tamping must be done carefully. If you are working without a helper, use a couple of levels, attaching them along and across the post. Fill in the first and last column. Then, using a cord, stretch a landmark between them, which you will adhere to during the entire workflow.
As you can see, you can also build an excellent fence with your own hands. Technology is not complicated, but requires care and accuracy. Follow all the tips, and the fence will serve you for many years, and you will not need to worry that the structure will simply fall apart when it rains.
When erecting fences around your land or when building a garage, the question will definitely arise how to make a gate with your own hands. Before purchasing materials and getting to work, you need to decide which of the existing species gate is optimally suited for installation in a particular case. Don't miscalculate in in all the nuances in advance, and choosing not the most best design, you can doom yourself to a completely unnecessary laborious process of clearing the territory for their installation.
That is why you need to start by studying the information and features of their design.
Today, there are three main types of gates - these are retractable, swing and up-and-over. All of them seriously differ from each other constructively, so it is worth considering each type separately.

The simplest scheme to implement is swing gates
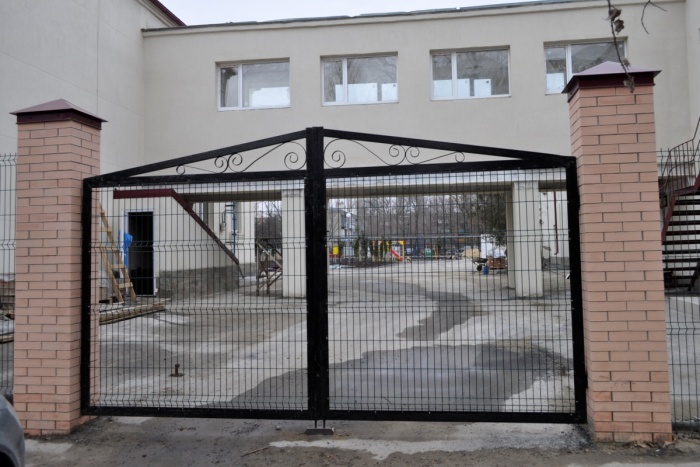
Swing gates with a gate built into them or installed next to them are a traditional scheme that is most often used in private homes. It is based on pillars, two of which are set to the width of the gate, and the third, if necessary, determines the width of the gate if it is arranged next to the gate.

Gate leaves and wickets in this design are mounted on hinges welded to the support posts. They can be fixed to the outside of the supports or the inside. It will depend on this and on the hinge system in which direction the gate leaves will open - inward or outward.
Swing gate leaves are most often metal frames welded from a corner or profile pipe, which can then be sheathed different materials- thin metal sheets, corrugated board or wood.
The hinged version of the gate can also be made entirely of wood. In this case, on a reinforced frame made of timber, located with inside sashes, boards are fixed.
In the manufacture of sashes, it is important to remember that they should not be too heavy, so as not to put a large load on the supporting posts and hinges. The nodes and details of the suspension themselves in size and strength must correspond to the weight of the valves.
A closing device is installed on the gate leaf - it can be a deadbolt or hinges for a lock, and sometimes a powerful latch. When closing the gate, the leaves in the lower part, in the middle of the entrance width, abut against the installed limiter, and when they are wide open, they can be fixed with spring clips.
The disadvantages of this design include the possible tilt of the supporting pillars and sagging of the wings, but this can only happen if the installation technology is violated or the weight from the leaves is incorrectly calculated. Therefore, it is necessary to properly deepen the foundation of the supports, not to use too heavy material for the canvases and to install the hinges corresponding to them in size.
The advantage of swing gates can be called the relative compactness of their placement. The design does not require clearing additional space along the fence, as it will be necessary to do for other types.
Swing gate installation
If swing gates are of moderate weight, for example, if they are made of corrugated board, then metal poles made of pipes with a diameter of 80 ÷ 100 mm or a profiled pipe with the same side size of its square section are well suited for them. Such supports will quite cope with their task. However, more massive pillars will do if they are easier to find.
Pillars-supports for gates are installed in two ways - by hammering and concreting.
- Pillars are usually hammered to a depth of 1.2–1.3 m. This method has many advantages, the main of which are sufficient reliability and speed of work.
Installation is as follows:
- a hole of the required diameter is drilled, approximately half the planned depth of the pillars.
- now the pillars must be fixed to or to stationary buildings located in the yard;
- after that, loops are welded to the posts, to the places previously marked by level;
- the assembled sashes are hung on the welded hinges, the correctness of their convergence in the center is checked.
- Concreting of pillars for installing gates gives increased rigidity and stability of the structure. Such supports will be required for wide or heavy sashes.
This method of installation is carried out without reinforcement or with the use of a reinforcing cup. Work is carried out in stages:
- first, a hole is drilled with a diameter of not less than 200-250 mm and a depth of 1.5-1.9 m. Exact size holes will depend on the section of the column
- layers of sand and gravel are poured into the bottom of the pit and carefully compacted. Each of the layers should be about 100 mm;
- then a pole is installed in the pit, on a sand and gravel pillow;
- concrete is poured around it, and until the mortar has hardened, the column is set strictly vertically, fixed in this position with the help of props.

- If a reinforcing structure is used to fix the post, then the installation is carried out in the same way as without reinforcement, until the cushion is rammed for the installation of the post.
On the pillow, in the drilled hole, the so-called reinforcing glass is first laid, and a pole is inserted into it. Then concrete is poured into the hole. In this case, supports for the pole may not even be needed, since the reinforcing structure will hold it.
After the concrete has completely solidified and gained due strength, massive loops are marked and welded on the pillars. We must not forget about leaving gaps that will allow the doors to open and close freely, even with a possible slight tilt of the pillars due to ground movement during snowmelt or long rains.
To avoid such deformations of the structure, it is possible to additionally fasten the pillars together with a beam welded to the lower parts of the pillars (it can be sunk into the ground). The frame will be even more rigid if equip it with an upper jumper, but in this case it will restrict the passage for trucks or a minibus.
Video: device and installation procedure for swing gates
sliding gate
Sliding gates are subdivided into several subspecies, and from them you can choose the one suitable for certain conditions. But almost each of them will require free space along. Therefore, you may have to work harder to make room for the free movement of the movable sash when it is opened.

Sliding gates are cantilevered, suspended and retractable, which run along a rail or other metal profile (channel, I-beam, etc.).
Video: types of sliding gates
1. Suspended version not very popular for installation in the private sector, since the height of the entrance is limited by the profile installed on top, on which the door leaf is suspended and moves along it.
2. Sliding gates that run along a rail installed in the opening and along the wall are also not a very popular option, especially in snowy and cold regions. The gate will move freely along the rail if it is cleared of ice and various debris, but in winter, with snow drifts or icing, the leaf will not be able to open and close without prior clearing. This version of the gate is rather good for the southern regions where there is no snow for a long time and there are no severe frosts.
This is the only, but very important design flaw. Otherwise, it is very convenient in that it does not require a vast territory for opening and closing.

On the rack from the side into which the sash will open, rollers and brackets holding the canvas are installed in the upper part.
Rollers are also installed at the bottom of the mobile gate leaf, along which it moves along a rail or profile mounted on the surface of the earth.
3. Console - the most convenient option of all types of sliding gates, especially since they have several different designs from which you can choose the best one.
Such gates are rigidly fixed on the beam, which, moving in the cantilever assembly, moves the leaf leaf along with it.
Cantilever gates are more complex in design, but they work best in snowy winters, since their leaf never touches the ground. Another positive quality of this species can be considered that it does not have a height limiter, i.e. The site can be accessed by both cars and trucks. In the design of cantilever gates, powerful pillars-supports are installed not on two sides, but only on one side - it is in this direction that the sash will move when the passage is opened.
The cantilever beam can be located in three different positions - top, middle and bottom.

- by the most widespread an option is the location of the movable beam in the middle of the door leaf. Due to its location, it enhances the rigidity of the structure. The console mechanism with guide rollers is located at a sufficient height so that it is not covered with snow, which means that the gate will be in working condition at any time of the year.

- Cantilever gates with a movable beam installed at the bottom of the leaf are more vulnerable to winter period and will require constant care in the form of cleaning from snow drifts and icing. Otherwise, this is also a convenient option, since the canvas does not come into contact with the ground, and it does not need to install a guide rail for it.

- In the third case, the beam passes along the upper part of the canvas and will always be safe from snow blockages, water, and debris. But this version of the cantilever gate requires a particularly rigid reinforcement of the frame and leaf, otherwise it may deform in the lower part.
Cantilever gates are quite affordable for manufacturing on their own, but only if the owner has certain skills in such work. understands assembly drawings, has basic knowledge in physics and mechanics. With maximum effort, you can make such a gate that will be impossible to distinguish from factory products.
Any cantilever gate can be opened if equipped with an electric drive and an electronic system remote control. This will allow the owner, without leaving the car, using the key fob to open the passage.
Installation of sliding cantilever gates
Installation of sliding or sliding gate- a much more complex event than the installation of a swing version.

On the sides of the passage, when arranging this type of gate, as a rule, brick pillars are installed on which rollers, supporting brackets and catchers will be mounted.

The main load always falls on the channel, which is installed on on the a securely arranged foundation on the side of the gate where the leaf will be attached (if the console is located at the bottom) or on metal supports if the console is located in the center of the dense gate or at the top.
- The foundation for the installation of the channel can be solid or consist of 2-3 pillars. The second option is more economical. A pit is dug for the foundation - it can consist of one pit or two or three for a columnar type. The depth should be from 1.2 to 1.5 m, width - 40 ÷ 50 cm, and length - at least 1.5 m.
- Further, two pillows of sand and gravel are arranged in the pit, each 10 cm thick.
- Then, formwork is installed in the pit and placed in it waterproofing material- roofing material or dense plastic film.
- A reinforcing structure is fixed in the formwork, and then a ready-made concrete solution is poured with a strength grade of at least M-300
- A channel with fittings welded to its shelves is installed over the filled surface. The channel is pressed into the concrete with the shelves down until they are completely immersed. After the final hardening of the concrete, a reliable metal platform should be obtained. The gate can be installed no earlier than a month after pouring the foundation.
- Manufactured load-bearing frame. For it, you need a metal corner or a square pipe with a cross section of 60 × 40 mm.
- Additional cross members are welded to the frame of the carcass, giving the required rigidity to the structure. At the location of the console (in this case, from below), a guide cantilever beam must be welded to the frame, with the help of which the gate will move along the rollers.
- Welded seams of the structure must be carefully cleaned of slag. The entire supporting frame must be primed and covered with paint for metal, which will keep it from corrosion.
- fastened, sheet metal or boards, depending on the chosen design of the door leaf.
- When the structure is ready, and the foundation with the installed cantilever channel has fully gained strength, you can proceed to the installation of the components and parts necessary to move the gate.

- Cantilever blocks equipped with rollers are installed on the finished foundation with a channel.
- Then the gates are rolled up on them, aligned strictly according to the level, and after that the blocks are welded to the channel.
- Then, the top and end rollers are installed and fixed.
- The lower and upper catchers are fixed to the opposite support post. They must be accurately calculated according to the location of the rolling rollers installed on the door leaf.
- Further, if planned, an electric drive is installed, but the gate may well open manually.
Video instruction for installation of cantilever sliding gates
As mentioned above, the cantilever beam can be installed not only from below, but also in the middle or at the top of the door leaf.
In the manufacture and assembly of this type of gate, accurate calculation of all parameters and careful observance of dimensions are especially important, since any error can cause deformation of the structure.
Overhead gate
This type of gate is well suited for equipping a garage with them. They are not suitable for driving into the yard, as they will limit the height. Such gates should be easy to close and open by lifting and sliding the leaf to a horizontal position up, under the garage ceiling.

Up-and-over doors are the perfect solution for your garage.
During opening or closing, the lower part of the sash protrudes slightly forward, outside the garage, that's why By installing a similar type of gate, you need to calculate how close you can fit the car so that it does not interfere with the opening process.
The fabric is made from metal frame, which is sheathed, most often, with metal sheets, wood or composite impact-resistant materials. The positive qualities of this type of gate can be called reliability and compactness in open position, unlike options with two swing doors.
To make this design yourself, you must have drawings with all the necessary parameters.
- To install the gate, you will need to make not only a frame for closing the passage, but also another one on which the gate will be mounted. Sometimes it is framed by the entrance to the garage, but more often additional guides are added, along which, when the gate is opened, rollers mounted on the canvas will roll. They also perform the function of a device that supports the canvas from above in an open position.

- In this case, inside the garage, the frame will be L-shaped on both sides of the entrance. Its dimensions must provide the necessary space for the passage of the door leaf between the ceiling and additional guides.
- On the canvas on both sides, top and bottom, rollers are installed that will walk along the guides when moving the gate.
- On both sides to the frame installed in the opening, two levers are mounted that will lift the canvas when opened. Shock absorbers are required - they will soften the blow when closing. The levers are connected to springs that are adjusted to the desired force - they should not be overtightened or loose, but at the same time, the sash should tightly close the entrance opening.

- The supporting stationary frame must be securely fastened to the opening anchor fastenings, as it will be subjected to significant stress all the time.
- Further, when the entire structure is mounted, it is possible to equip the gate with fittings and fix additional elements.
If you plan to install an electric drive, then this process is carried out last, and it is better to entrust this work to specialists. An electric opening system is a rather expensive pleasure, so it’s better not to risk it if you don’t have the skill in installing and debugging such equipment.
Video: an example of hand-made up-and-over doors
Having carefully studied the instructions and drawings, having prepared all the necessary materials, and also having sufficiently high work skills, you can assemble any design from the presented ones yourself. But it is better if the work is done in conjunction with knowledgeable master- then it will go much faster and better.
Gates are constantly subjected to heavy loads. Skewed input structures are quite common. Many gates that can be found on the streets of any city have rickety racks. It does not take much experience to figure out that the cause of the collapse of the support poles is improper installation. There is no rigid connection between these elements. The foundation under them was poured incorrectly. Before building a gate, it is necessary to understand the intricacies of installing supports, for example, how to mount mortgages for gates in brick pillars.
Necessary materials
To make reliable gate posts in a suburban area, you will need to prepare a number of materials. The parameters of various parts of the structure are calculated taking into account the expected load. To create a gate you will need:
- a pipe having a diameter of 100 mm;
- corner 100x100 mm;
- Bulgarian;
- cement powder;
- carpentry tools;
- apparatus for welding;
- sand;
- timber and edged board- formwork will be erected from them.
Having prepared such tools, you can begin work on the creation and installation of gate posts.

Fabrication of the foundation and metal racks
First, blanks are cut off from which the gate will be made. For racks, pipes with a diameter of 100 mm are prepared in advance. The length of the elements depends on the sum of the height of the wings and the depth to which each support will be buried. The last indicator is 0.8-1 m. If the height of the gate is 2 m, blanks for poles are made 3 m long.
The jumper, which serves to connect the racks, is made from a corner of 100x100 mm. The length of this element must be equal to the width of the gate. For standard structures, it is 3 m long. When choosing a metal pipe for supports, one corner shelf will have to be cut off and then slightly bent so that the edges of the corner better fit the poles during welding.

Then the following actions are performed:


When performing work, the racks should be strengthened. For this, stone supports are placed under them. Then the pillars must be strengthened with stops. In order for the foundation to be strong, it should be reinforced with profile trimmings. They are fastened with knitting wire.
Then the concrete mixture is prepared. It should contain four parts of sand and one part of cement powder. Then the formwork is filled with mortar. Broken bricks and stones are used to save the mix. The solution must harden before the gates are hung on the posts. You have to wait about a week.

Installation of metal gates
When the site is fenced, you need to think about installing a gate. They can be of several types - retractable or swing, lifting or opening in one direction. With your own hands, you can install only swing gates or a structure that opens in one direction.
Before work, you should prepare:
- welding machine and bolts;
- hinges;
- flat bar;
- supports.

In country houses and cottages, swing gates are most often installed. Such structures have two wings. They are welded from iron. If desired, you can build Forged gates. To mount the gate, dig in the pillars, determining the size of the leaves. Both wooden and iron supports can be installed.
The hinges are attached to the posts with bolts. Store-bought products are not suitable for this purpose. This is due to their low reliability. You should purchase powerful hinges made independently by the master of the turning organization. Such designs must have a ball mechanism. This will allow the gate to open fairly easily.

Difficult is the work of installing and securing the gate. One person is unlikely to be able to carry out this procedure, since the sashes are quite heavy. They are hung at a certain height above the ground.
To create an opening under the gate between the supports, a bar should be laid, and then the sash should be installed on it. Now you can weld the hinges - first the upper ones, then the lower ones. The second sash is installed at the same level as the first.

Wooden gate installation
The owners of suburban lands want to install the gate in such a way that they are conveniently operated and have aesthetic appearance. Wooden structures are the most affordable and easiest to manufacture.
For those who want to make wooden gate with your own hands, first you need to make a drawing of the future product. This will help calculate the amount necessary materials and also find out the scope of work. When drawing a drawing, it is necessary to compare the dimensions of each element.

Installation of supports
From wooden beams vertical columns are created. Their dimensions are calculated quite simply - a meter is added to the height of the structure for immersion in the ground. The greater the depth, the more stable the gate will be. This will eliminate the possibility of distortion of the structure.
Debris should be removed from the installation site of the support poles. It is necessary to dig holes with a diameter exceeding the diameter of the pillars by 20 cm. The part of the pillar that is filled with cement mortar must be processed in advance bituminous mastic. This will protect the wood from decay. A plumb line checks the vertical position of the pillars. Pit pits with installed supports should be poured with concrete, and then wait until it hardens.

Production of wooden gates
To create one of the posts for a wooden gate, you will need to prepare bars for the bottom and top, 2 bars for the side supports and two for creating the middle lintel. Dimensions are calculated based on the dimensions of the car owners of the land. Each wooden element must be impregnated with an antiseptic.
The elements of the gate frame must be laid out on a flat area, and then, using a drill, make holes for the dowels. Such details will give the structure reliability - they fasten the nodal connections. In the center of the frame, it is necessary to install jumpers from the bars. In the corners, jibs are attached, which are located at an angle of 45 degrees.

When calculating the height of the frame, it should be noted that the boards for sheathing should protrude 20 cm above and below it. Before starting sheathing, the boards should be prepared. They are processed with a planer.
There are several ways to sheathe the frame with boards. After installing all the elements in their places, the top is trimmed and processed with sandpaper. Now you can install hinges on the sashes. For this purpose, self-tapping screws should be prepared. They are also used when fixing mounts on racks.
There must be a distance of at least 5 cm from the ground to the bottom of the leaves. When closed, the gates are fixed with latches, locks or latches. Staining is more reasonable to carry out after the installation of wooden gates.
Fence post concreting
Thanks to the concreting of the pillars, the fence becomes much stronger. At the same time, the service life of the structure is also increased. Metal supports are excellent protection against rust. There are several types of concreting. They have certain differences that should be taken into account.

Full concreting
The first thing to do is to prepare the site for the installation of the fence. In places where the supports will be concreted, all plant roots should be removed and the fertile layer should be cut off. With help garden drill you need to make a hole with a depth below the freezing level of the soil. If the drill is equipped with a special expander, you need to make a slight broadening at the bottom of the pit. This will prevent the foundation from being pushed out by the soil during frost heaving.
The site is marked around the perimeter. In the plan, it is necessary to indicate the places for mounting the pillars. In the case of a strong susceptibility of the soil to frost heaving, soil should be removed within a radius of half a meter around the installation of the supports and sand should be poured into the pits.
Metal poles are prepared in advance. They must be thoroughly cleaned of rusty spots. Then metal elements treated with an anti-corrosion compound. When possible, use welding machine two transverse rods should be welded at the bottom. Thanks to this, the poles will become more stable.

The supports are installed in the hole and fixed with braces. It is necessary to check with a level how vertically the pillars are located, and align if necessary. The cement mortar is poured using an old bucket without a bottom. It is better if a mixture of cement and gravel is poured. When choosing this option, you must first mix all the components, and then simply pour the mixture into the pit. When pouring the solution, the vertical arrangement of the supports is simultaneously checked.
Partial concreting
If a light fence is being mounted, it makes sense to carry out partial concreting. When choosing this option, the territory is first marked out, and then the supports are driven into the ground with a sledgehammer. In the case of heavy soil, it is pre-drilled with a drill. The diameter of the funnels should be slightly smaller than the diameter of the pillars. Then the supports are aligned on a plumb line. The space around the pillars is filled with a cement mixture.

Partial concreting is suitable for areas with low groundwater levels. Otherwise, in the spring, the gates may squint. When the soil absorbs water well, and the fence is not too heavy, this method is optimal.
Conclusion
As you can see, you can install the gate yourself, if you correctly fulfill all the conditions of the technology. Metal supports are more reliable. Wooden crafts are also set in accordance with certain rules.
How to install gate posts is a much more difficult task than it might seem at first glance.
If it is quite enough for the fence that the pillars simply stand and do not fall, then the gate is a mechanism for the coordinated operation of which, it will be necessary to observe a certain position of both of its wings.
Therefore, the installation of pillars for is the most difficult and important task in their construction.
According to the rigidity to the pillars, all the gates can be divided into groups:
- Gates that are locked with a deadbolt, electronic lock; gates with heavy doors; gates that can be damaged by passing trucks.
- Gates that are locked with a chain or barrier.
Products of the first type are usually placed where they often need to be opened and closed - for example, at the entrance to a large trading base. Usually such a passage has a significant width - about five.
And in some cases - and more, so that two cars can easily pass, up to eight meters wide. The sashes in this case can weigh from 500 kg to four tons.
Yes, and in a private house, many will want to have gates that close with an electronic lock - they can be opened and closed without getting out of the car or just look out the window who has arrived and open the gate for him without leaving.
Before you install gate posts, you need to know that the most stringent requirements are imposed on them here. They must ensure the reliable operation of the bolt mechanism, the stable position of both wings relative to each other.

Gates that are locked with a chain do not impose any special requirements on the rigidity of the pillars.
The chain, although it does not provide sufficiently reliable protection against penetration, will still be an obstacle to the penetration of thieves.
Here it will be enough to ensure sufficient strength of the pillars themselves - after all, when using the gate, it is still possible that they will be hit by a trailer when.
It will not be superfluous to also ensure the maintainability of the pillars. Barriers also do not impose any special requirements on the poles. An exception is electronic barriers with beam fixation when lowering on the stop.
In this case, the same requirements are imposed on the pillars as for the gates of the first type. In addition, they should be stronger - the barrier at the entrance is easier to miss in the dark than closed gates. The disadvantage of gates that are locked with a chain is that you have to open and close them manually.
Gate material
- Definitely the most best material for pillars today is a metal pipe - round or square. It has not too much mass so that the pillar can be put up by one or two people without the use of technology. Pouring concrete inside the pipe or filling with lime will create an electrochemical positive potential on the surface of the pipe and increase rust resistance by several times, in addition, products from galvanized pipes can be ordered.
- The second option is reinforced concrete. For heavy gates, this is not very good - constant bending, cyclic loads, the likelihood of an accidental dynamic impact by the side of the trailer or wheel will quickly render them unusable. Reinforced concrete poles are much more suitable for a fence. Brick pillars have the same drawback - except when there is a metal pillar inside, and the loops are attached directly to it with the help of remote anchors, through the thickness.
- Finally, the third option is wood poles. Wooden giants will be rather exotic and are used quite rarely - due to low resistance to decay and low bearing capacity.
Installation of posts for gates with deadbolts or heavy gates
Install gate posts so that they do not walk, you can only do solid foundation and ensuring their rigid connection with each other. Communication can be made at two points - at the bottom of the entrance, at the crossing through the gate and at the top of the pillars. Usually they are welded together at these two points, laying two I-beams between them.

But for the upper fasteners there is a rather serious limitation - sometimes it may be necessary to pass vehicles that exceed the dimensions of the pillars and the upper beam in height. Therefore, the latter is made removable.
When equipping the entrance to your own site, when you plan to drive only your car, it is quite possible not to make a solid foundation for the gate, but to make separate ones for each pillar. At the same time, the pillars are simply welded in the lower part with a thick I-beam, and the same beam is made on top, but removable, inserted into the welded sockets and having welded pins for insertion.
Thus, you can safely enter and exit on your own, while good stable operation of the electronic lock and opening mechanism will be ensured, and skew of the pillars can be avoided.
However, this does not negate the laying of the foundation for each pillar separately, which must go below the freezing depth for such gates. In the entry zone, they usually do concrete pad. It will be very good if the I-beam, which is welded between the pillars below, will be thicker than it. In a layer of concrete, it will be reliably protected from rust, since concrete gives a slightly alkaline reaction of the environment and prevents the oxidation of the metal.
For heavier gates, it is necessary to make a solid foundation. Usually it is made in the form of the letter "H" with a cross bar strongly elongated horizontally.
The foundation is usually poured solid,. Its depth should be below the freezing depth. Everything is done according to the same rules as the construction strip foundation for home. The thickness of the foundation grillage is about 50 cm. Theoretically, 30 cm will be enough, however, a width of 50 cm allows you to save on formwork and pour the foundation into a gap with the walls of the trench.

Near the pillars, extensions-buttresses are made in both directions, perpendicular to the entrance. Usually, even for heavy gates, a buttress in the area of \u200b\u200bthe column with a total length of one meter is enough. The foundation is reinforced before pouring.
Between the pillars at the bottom of the entrance, near the surface, an I-beam is welded. Then it is poured into concrete, together with reinforcement - the concrete will be for it reliable protection from .
At the top of the pillars, it is desirable to install an I-beam. Considering that usually heavy gates require large and heavy posts, the beam must match.
It will be difficult to remove and put it in place - you will have to adjust the crane every time. Therefore, it is better to immediately lay a significant margin in height in the pillars and simply weld the beam tightly to them, once and for all.
Poles for the gate

Using the same technology, you can install posts for gates and gates - with the difference that the posts here can be taken thinner, it is enough to put round ones with a diameter of 50 mm or square ones with a width of 50 mm, wall thickness - 3 mm.
It is undesirable to take a smaller wall thickness - it will be difficult to weld hinges to thin metal, and this will affect the durability of the gate.
Considering that 2.5 meters is enough for a person to pass, the poles can be connected without any fear at a height of 2.5 meters by welding a cross member.
The second bundle is at the bottom, where the entrance is. It is desirable to concrete it so that it does not rust. Standard Width gates - 90-120 cm. You can freely pass through such a passage in winter clothes, and with a baby stroller, and even bring a wheelbarrow with earth.
How to concrete gate posts - on the video:
Skewed poles are a fairly common occurrence in most villages and provincial towns. It is easy to understand why the supports deviated from the vertical position. The reason lies in improper concreting or its complete absence. Also, the problem may lie in an erroneous approach to strengthening the supports. Brick pillars for gates are particularly difficult to install. They should be mounted in compliance with certain rules.
Choice of poles
During the operation of the gate, the pillars are constantly subjected to intense loads. They hold the sashes during opening and closing, as well as during strong gusts of wind. Also, the supports must constantly keep the gate in the position in which it was installed. The weight of each sash exerts a constant static pressure on the posts. For these reasons, for gate supports and wickets of any type, it is required to use only high-quality materials.
Most often, when installing the gate, metal, brick, asbestos cement or concrete is used. Such supports are quite strong and reliable, they serve for a long time and are able to withstand the effects of environment. Using metal racks it is worth paying attention to the pillars with a section of 80x60 mm. It is also necessary to take into account the thickness of the metal. It must be at least 3 mm.

Asbestos cement pipes can be the same around the entire perimeter of the fence. However, the pillars used to support the gate should be reinforced with reinforcement, and also placed in the ground much lower than the rest. Brick supports are reinforced with reinforcing cage. Fence and gate posts can be installed quickly enough. The main thing is to prepare all the tools and materials in advance.
Marking for supports and required dimensions
To carry out the installation of pillars, it is worth taking accurate measurements. The main indicators that you will have to decide on are the width of the gate, as well as the height of the pillars and the depth to which they are immersed in the soil. The average opening width for swing structures is 3-4 m. Also, the gate should be located along the fence line.
Marking the place for the gate is quite simple:
- first note the position of one support;
- then the distance to the second column is measured from it, taking into account the required width of the opening;
- after that, the installation of the second support is carried out.
Regardless of the weight of the gate, the supports for them cannot simply be driven into the ground. For the installation of pillars, they will need to be dug in or concreted. The depth at which the lower part of the pillars is placed must be at least 1.5 m. This is necessary so that the supports do not lead during heaving of the soil.
If you place the pillars at a shallow depth, the soil will simply push them up. As a result, the gate may stop functioning. To install the supporting structures, it is necessary to drill wells, or dig holes in the marked places. Then it is worth placing pillars in them and concrete. The diameter of the pits should not be much larger than the diameter of the dug-in products. This will reduce the consumption of concrete mix and not loosen the soil around the pillars. To figure out how to properly install the pillars, you will need to perform a number of preparatory steps.

Preparing for installation
Supports made of asbestos-cement pipes and concrete do not need special preparation before instillation or concreting. They are installed immediately. FROM metal products before installation, they clean off traces of corrosion, small irregularities, scale. After that, the pillars are degreased and primed. When installing brick supports, you should take care of several nuances at once - laying the foundation, the composition of the mortar for masonry and installing reinforcement.
The main task is to prepare the right tools. It is necessary that everything be at hand in advance:
- spacers;
- trowel and tape measure;
- a hammer;
- level;
- rebar bars.
Also, in the process of installing products of any type, you will need sand, crushed stone, brick and waterproofing.

Mounting racks
The process of installing gate posts differs little from the method of installing other supports, but certain nuances of the procedure should be taken into account. Before installation, a hole is dug, then sand is poured into it (to create a pillow) 15 cm thick, and then a pole is placed and leveled with a level. As soon as the support takes a strictly vertical position, it is fixed with spacers.
The next stage of installation is concreting. It is necessary to pour the solution in stages, regularly tamping with a reinforcement bar. This allows you to expel excess air from the solution. Hollow products must also be filled concrete mix. This measure will increase bearing capacity gate supports. To strengthen asbestos-cement pipes, reinforcement is placed inside the supports. It is driven into the ground and then concreted.
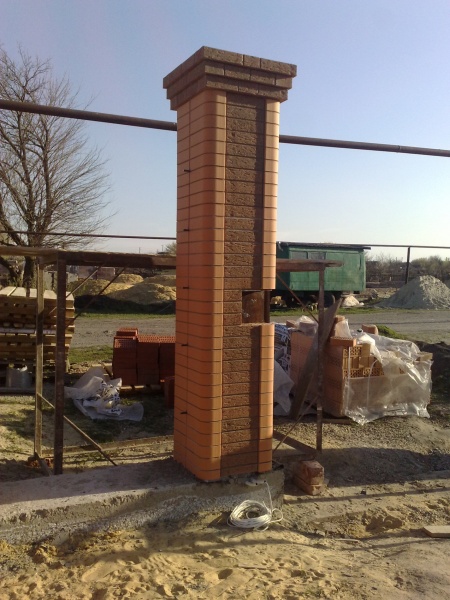
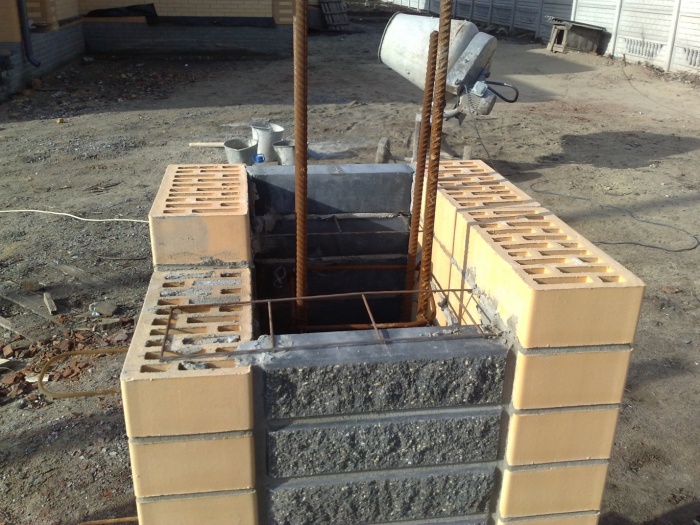
Brick supports are erected using a special technology:
- first, crushed stone should be poured into the pit;
- then concrete is poured into it (not reaching the level of the soil surface of 20 cm);
- the completed base is covered with waterproofing, and then again filled with mortar and the first layer of bricks is laid;
- bricks must be tapped with a hammer for alignment.
Inside the masonry must be placed steel pipe, and then continue the construction of the masonry. Do not forget about mortgages for gates in brick pillars - the gate posts will be connected to them.
After pouring the pillars with concrete, you must wait for the solution to completely harden. At the next stage, hinges are welded to them, and then the gate is mounted. This technology is sufficient if the gate is not used too often.

However, in the case of everyday heavy traffic, it is worth doing the job a little differently.
Supports with foundation
Not always the usual installation of supports provides high reliability and stability of the structure. It is especially important to take care of their strengthening during heavy traffic on the site. Regular vibration contributes to the loosening of the supports, which can lead to deformation of the gate.
To prevent this situation, the poles are installed on the foundation, which connects them to the fence. For such purposes, according to pre-made markings, it is necessary to dig a trench up to 50 cm deep and 30 cm wide.
The supports are placed in pits 1.5 m deep. After installing and fixing the pillars, they must be tied together with a steel corner. The trench is then filled with concrete. At road level, it is worth making a bunch again and pouring the remaining centimeters with concrete.
Features of laying bricks
In order for the masonry to be as strong as possible, a number of conditions must be met:
- along the perimeter of the future masonry, it is necessary to lay out square bars;
- after that, concrete is applied inside the surface of the bars in such a way as not to exceed their level;
- the building level checks the horizontal position of the solution;
- any irregularities are eliminated;
- 4 bricks are placed on top around the perimeter, also taking into account the dressing of the seams;
- the bars are removed and cleaned of concrete;
- each seam between the bricks is filled with mortar;
- the inside of the column is covered with pebbles, and the solution is poured on top.
Care must be taken that the concrete is not too liquid. Using a rod, it is necessary to pierce the pebbles so that the solution penetrates into it. When performing each next row, the series of these processes is repeated.
Important nuances
The most effective is masonry, which is performed around a metal pipe concreted into the foundation. Gate posts are equipped with pipes for the entire height of the support. For the rest of the columns, it will be enough to set metal pipes, which will rise above the ground by only 50 cm. The gate supports must have a larger diameter than the rest.
After that, perform the following work:
- Along the perimeter of the column, bricks are laid on the concrete mortar, periodically bandaging the seams.
- Pebbles are poured inside, and then it is poured with concrete. Bricks will serve in this case as formwork.
- For the bottom 3 rows worth choosing solid brick. The rest can be made from hollow.
The work will go faster if you put the solution immediately under the entire row.

Mounting gates on poles
For attaching gates to brick pillars you will need to hang loops on them. For round poles, it is better to use end-to-end products. Also, channels can be inserted into the supports from 2 sides, and gates can already be hung on them. The hinges are simply welded to the metal poles.
The gates are attached to brick pillars with a channel. It can be selected according to the length of the wings. There is no need to mount the channel along the entire height of the column.