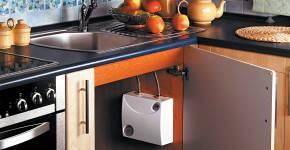
Connecting the washing machine to the sewer. Drain hose for a washing machine Organizing the drainage of a washing machine
This article was written for those who are ready to connect the washing machine to the sewer with their own hands. This decision is certainly worthy of respect, but has its own nuances. I will tell you about 3 options for implementing this simple task.
Preparation is the key to success
Connecting the drain is important, and we will talk about it in great detail, but first I will briefly tell you how to install washing machine.
Of course, every new unit has detailed instructions, I will not retell it, but will only outline the most important, fundamental points:

- If the machine is brought into the house from the cold, give it a couple of hours to warm up to room temperature. Modern electronics are quite capricious and can malfunction;
- Any new unit of this size is equipped with various types of seals and stands. They are needed to avoid damage to the equipment during transportation. In the washing machine, in addition to the cardboard box and the foam seal, there are often several more supporting wooden blocks at the bottom, like a mini-pallet. So it needs to be completely removed;
- It doesn’t matter whether you bought a front-facing or vertical machine, the working tank in these units is, figuratively speaking, in limbo. And to prevent these hangers from breaking during transportation, the tank is secured with several rebolts.
They must be unscrewed, otherwise the device will break at the first start and the warranty will be invalid, since this point is specified in the instructions. By the way, the instructions must contain a diagram with the locations of these bolts. The holes from the bolts are plugged with plugs included in the kit;

- The outlet should be, as they say now, European type, that is, with grounding;
- At the last stage preliminary preparation The legs are screwed in, and the device is aligned clearly on the horizon. It is advisable to set using a level.

Do not rush to throw away everything that you removed from the device during preparation. This is especially true for bolts for fixing the working tank. After all, perhaps the time will come and you will need to transport it somewhere again.
Since we have to do plumbing work, we need to prepare the necessary minimum tools.
As a rule, any good owner always has this minimum somewhere in the pantry.

- You will definitely need pliers and a pair of high-quality screwdrivers, Phillips and straight;
- The above mentioned repair bolts, in different models washing machines may differ in head configuration. Therefore, if you do not have a complete set of keys, it is better to inquire about this point in the store and immediately buy at least 1 of these keys;
![]()
- If you are planning a major drain installation, you may have to cut the sewer pipes to size. Professionals use a pipe cutter for this, but personally, when I encountered such a problem, I cut the pipes with a hacksaw;
- Of course, all parts are supplied with gaskets and seals, but I always recommend lubricating these seals additionally silicone sealant. There is no need to spend money on a large construction tube with a gun; a small tube is enough.

Drain connection options
Now in stores you can buy drain hoses of different lengths for washing machines. So, I don’t advise you to buy a hose that is too long. The fact is that the pump that pumps the wastewater is optimally designed for the length of the hose that comes with the machine.
The relatively safe maximum is 3m. If you put a longer hose, the pump can quickly burn out.
Option number 1: for the lazy and in a hurry
For people absolutely far from plumbing, who are in a great hurry to connect a washing machine, there is the easiest way that does not require any financial or labor investments. Now all caring manufacturers equip their units with a semicircular nozzle for the drain hose.

All you need to do is take this nozzle, place it on the edge of the drain hose and simply throw this “hook” over the side of the sink, bathtub or toilet. But in the literal sense of the word connection, this option cannot be called more like alternative way plum.
In addition, it has whole line unpleasant disadvantages:
- With constant, active use of the machine, your snow-white plumbing fixtures will need to be washed frequently. After all, drains with washing powder eat into acrylic or enamel quite quickly;
- Small bathroom sinks may not be able to withstand strong pressure and large volumes of waste. And while you, for example, are watching TV, dirty water from the sink will pour onto the floor;
- During draining and spinning, the pump operates in jerks and it is possible that, due to these shocks, a light plastic hose simply jumps off the edge of the plumbing. Plus, children or pets can help this hose come off;

To those who this moment This method of draining is suitable, I can recommend using a chain to tie a plastic nozzle on the hose to the faucet in the bathroom or sink. The nozzle has a special hole for such fastening.
- Do not forget that while washing is in progress, at a minimum, it will be very inconvenient or even impossible for you to use the plumbing fixtures for their intended purpose;
- And then, it's just not pretty.

I think you are convinced that this one is simple and quick way Only suitable as a temporary option. For those who are accustomed to doing everything conscientiously, I suggest considering the following two methods.
Option number 2: connection to a siphon
Connecting the washing machine to the siphon under the sink is not much more difficult. To do this, you will only need to buy a faucet with an outlet for such a drain and a small three-quarter-inch tightening metal clamp. Moreover, now most faucets already come with such a pipe.

You will need to remove the plug from the outlet pipe and lubricate it with silicone. Then pull the end of the drain hose onto the pipe with a pre-installed clamp and tighten the clamp with a screwdriver or pliers.
But this method of insertion also has a couple of disadvantages, although they are not as radical as in the previous version:

- Firstly, when draining the water, a loud gurgling noise will constantly be heard from the sink, and nothing can be done about it. You may not believe it, but I know from my own experience that there are people who are very annoyed by this;
- Secondly, it is desirable that the diameter of the sewer drain pipe be at least 50 mm. The fact is that in the kitchen, according to modern standards, it is possible to install a drain with a diameter of 40 and even 30 mm. And with such a volume, when water is discharged, your drains will rise, and after leaving, leave a dirty sediment at the bottom of the sink.
Option No. 3: tapping into the sewer
Connecting the washing machine drain to the sewer directly is considered perhaps the most the right decision. But with this option you will have to tinker a little. If you or the person who installed the sewer system in your house previously installed a pipe with an extra branch for the drain for the machine, then everything is simple.

You need to buy rubber sealing ring and remove the plug from this branch. Then lubricate this ring with silicone and insert it into the sewer pipe. Next, the edge of the drain hose from the machine is inserted into the central hole of this sealing ring, only you need to insert it to a depth of no more than 50 mm.
If there is no extra branch from the sewer pipe, then you will have to buy a plastic tee that has this branch and install it yourself. Don't be scared, it's not scary.
As a rule, the sewer branch that goes to the bathroom and kitchen has a diameter of 50 mm. Next you will need to decide where exactly the tie-in will take place and replace the tee.

That is, you disconnect the siphon pipe, pull out the old pipe, change the rubber gasket and insert a new tee in place of the old pipe. Naturally, after this, put the drain from the siphon in its place and, using the technology described above (through a rubber ring), cut the drain into the sewer washing machine.
Important little things you need to know
Let's start with the fact that the hose from the machine should not lie on the floor. WITH back side in the upper corner of almost any machine there is a special ring or hook to which the hose should cling after exiting the unit. And from there the drain is sent to the sewer connection.
The edge of the drain hose, whether you hang it on the bathroom or cut it into the sewer in another way, should be no lower than half a meter from the floor level. This requirement is mandatory for all units that do not have a so-called check valve.

Many new models are already equipped with such a valve. For all other devices it must be purchased and installed separately. Don't worry, the price of this important detail, even from the most greedy traders it does not exceed 100 rubles, and if you walk around the market, you can find it for 60 - 70 rubles.
Now there are several types of such valves. Personally, I prefer to buy models with a locking ball. Below is general scheme such a mechanism.

Most often, such valves are used for direct insertion into a sewer pipe. But there are devices for installation next to the siphon. Moreover, in this case it does not matter at what level this connection occurs; here you can connect to the sewer pipe even at floor level.
I had a case when a friend bought a new washing machine. And inserted the drain hose in the same place where it was embedded old typewriter, that is, into the sewer outlet located under the bathroom.
The old device worked like this, but for the new one I had to buy it separately check valve. Otherwise, water from the working tank immediately went into the sewer. Agree, it’s easier to pay a maximum of 100 rubles for a valve and install it in a few minutes than to make a separate new conclusion.

There is a common misconception that if you bend the drain hose of the washing machine in the shape of the letter “S” and secure it like that, you can do without a check valve. Don’t believe me, you’ll just make an extra water seal, it won’t be worse, but it won’t be better either.

Conclusion
I've told you about options that suit different professional skills and financial capabilities. Now you have the right to decide for yourself what suits you best. The photos and videos in this article show this information clearly. If you still have questions on the topic, write them in the comments, I will help as best I can.

To do it is a much more complex and multifaceted task than connecting it to the water supply system. Almost every case requires an individual approach here. But, again, everything can be solved, and if you intend to arrange the water drain for your washing machine by not simply hanging a hose on the sink or in the bathtub, then so be it, everything is in your hands. How to do it?
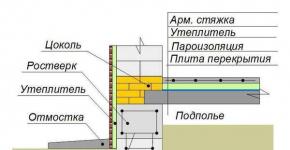
Sewer EURO tee for draining a washing machine
If you have a modern plastic sewerØ40 or Ø50 mm - everything is simple and there will be no problems with organizing the drainage. We purchase an appropriate elbow or tee with an outlet angle of 45° (if we place it under the sink), and a cuff for it with an internal diameter of 25 mm.
When installing the cuff into the tee, do not remove the o-ring from the tee socket, which is often the sin of people inexperienced in plumbing - it will create an additional guarantee of the tightness of the connection. If the cuff is too tight, warm it up in hot water for a couple of minutes. After this heat treatment it will become soft and elastic and fit easily into place. All that should remain visible from the side is the thin three-millimeter limiting edge of the cuff.
If you have any problems with the operation of your washing machine, we are ready to provide the service on extremely favorable terms.
Sometimes a very interesting effect happens: your sewage system is the most modern, the pipe diameter is 50 mm, you buy a corresponding tee Ø50 mm in the store, but it, as they say, does not fit the fitting size. It is hindered by two extra millimeters of its diameter from entering the pipe. Usually this is not a completely new design, which suggests that there was once a production that had its own standards, different from others. And the standard O-ring does not fit them either.

 If such a situation occurs, you can go to extremes: remove the o-ring, fill its seat with sealant, and also coat the lead-in part of the tee. The tee will fit into the pipe with the sealing ring removed, but no more than a couple of centimeters. However, its fit is very tight (you will have to force it into the pipe with good effort), and together with the sealant, it will never let water through. If it stands vertically, this option would never have worked, but if horizontally, it’s better to take a Ø40 mm tee and join it through a 50x40 transition collar. Using this method, you will not even suspect that the pipe is somehow different.
The diameter of the corrugation coming from sinks and sinks in 99% of cases does not exceed Ø40 mm, so the use of a tee with this diameter will not affect the bandwidth pipes. If at the end of the corrugation there is a socket with a diameter of 50 mm, carefully cut it off. It is usually fragile, so we do not put pressure on the cutter, but with light pressure we make rotational movements, and in three or four turns we finish the cut.
Attention!
When purchasing a 50×25 cuff, please note that in nature there are also cuffs with an internal diameter of 32 mm. To the untrained eye, it is extremely difficult to distinguish them from cuffs with a diameter of 25 mm, and more than once I had to rebuke sellers who handed me 50x32 cuffs instead of 50x25 cuffs. I always bought goods in the same store (due to the presence of a very serious discount), and these sellers have been working in this store for several years - what I mean is that this was not a random department store for household goods, but a serious plumbing store, and the sellers there had a great understanding of the product, and did not undergo student internship. But, nevertheless, they regularly gave me the wrong thing. And they even tried to convince me a couple of times that the cuff with Ø32 mm is great for attaching the drain hose from the washing machine, instead of going 3 steps to the tray with the cuff that I needed.
No. Doesn't fit great. The hose enters it without proper force, and one day it may simply be knocked out of the cuff. By the way, I often heard from people that someone’s drain hoses flew out somewhere. Often we came across 50×32 cuffs on the drainage system for a washing machine when people purchased a new washing machine and needed to install it. That is, the installer of the previous washing machine installed a 50x32 cuff. And this installer came from the official service center, as it unobtrusively turned out. Why are people's hoses flying out, I wonder..? Mystery…
Draining the washing machine through the sink siphon
 Another option for organizing the drainage of water from a washing machine is a siphon equipped with a special fitting. You replace the old siphon with a new one, and you're done. The fitting is usually two-dimensional - tapering towards the end. If the hose fits on it too loosely, cut off the thin end using rotary movements of the cutter with light pressure (plastic is fragile). To drain water through a siphon, it is not always necessary to completely change it. If your siphon is not from Soviet times, but is Euro-compatible, you can simply modernize its design by adding a spout insert for a washing machine (see photo). They are available in several types, depending on the designs of siphons and the sizes for which they are intended.
If the drain hose is the only option to lead to kitchen sink, and around it is too wide wooden platform, which is not covered by the bracket intended for fixing the hose, you can also make a circular saw of small diameter on the surface of the platform with a miter saw and take the hose out of it into the sink. In this case, one end of the hose bracket will go inside the hole and will securely hold the hose, which will look like the spout of a small faucet. We select the diameter of the saw according to the diameter of the bracket-holder plus a couple of millimeters for free movement (the holder expands slightly when a hose is inserted into it).
An old cast iron pipe is a window to EUROPE
 If you have a cast iron sewer pipe, we will first have to adapt it to the modern plastic EURO standard using a 73x50 cuff. Typically, the water drainage pipe from the sink is sealed in old installation sewer systems cement mortar. Sometimes this is a rather weak solution, which easily yields to gentle blows of a hammer on an impact screwdriver, sometimes not very easily, but without much resistance. One day, however, a difficult case came across. Judging by the fact that the solution was removed crumb by crumb, and even required the use of a hammer drill in places, it was real concrete. Using a hammer drill to remove mortar from cast iron is not very advisable, because the impact energy of the hammer drill is very serious, and it produces it in series of several blows per second. To avoid the transmission of vibrations from the place where they are created further to other connections of this pipe, which are very capricious to vibration, and even more so to avoid the creation of resonance effects, it is preferable to work with a more primitive instrument. Longer, but calmer.
When starting to work with cast iron pipe, you should take into account the fact that the connections of these pipes are sensitive to vibration. If this is a pipe in the kitchen, then, as a rule, it is in the tight embrace of the wall, and the force on the pipe is not dangerous for everything located behind this wall. The maximum that can be damaged is the connection of the pipe coming out of the wall with the outlet, which, in fact, is what we are working with. If this is a branch in the bathroom, then we risk creating a lever that swings other nearby connections on this pipe. Plus, old cast iron tends to crumble and crack simply from disrepair. So, before starting work, we evaluate the condition and integrity of the pipe connections, the presence of cracks in the sockets. We examine the places where the pipe is fixed - in order to imagine the amount of leverage from our manipulations with it. If you are not sure that there will be no problems, it is better not to undertake it. Or just be prepared for these problems. Methods for dealing with problems will be described below.
So, the sequence of actions to transform the bell of the old cast iron pipe compatible with all modern materials system is as follows:
At a height of 2-3 cm above the cement level, we cut off the pipe/corrugation from the sink, insert something inside that prevents pieces of the splitting solution from falling irretrievably into the sewer, and at the same time so that this “something” itself does not disappear into the sewer abyss. Any large bag from a grocery supermarket will do - a small part of it remains sticking out, ensuring its return, and what ends up inside creates a fairly high cushion right in the section of the pipe, without contact with the bottom. In this case, it is advisable, just in case, to ensure that there is no water in the pipe from water points located further away from the riser (so that our package does not get washed away).
The piece of corrugation sticking out of the cement is a strong reinforcing element of the connection. Therefore, we remove it, processing it along the diameter with a screwdriver and a hammer until it becomes mobile - the plastic willingly moves towards the center, yielding its bed to the screwdriver, after which the segment can be “bitten” with pliers and forcefully pulled out (usually a hammer and screwdriver are not even required).
 Next, we knock out part of the ring along the radius, as shown in the figure. The direction of the blows is from the edge to the center, we need to break the integrity of the circle. Do not confuse the concept of “direction of blows” with the blows themselves - we start them from the center, gradually moving away to the outer edge. After knocking the strip out of the radius, the cement quite easily leaves the pipe in sectors 4-5 cm long - we carefully knock them down with an impact screwdriver, again from the outside towards the center. There’s no need to put unnecessary weight on our package “airbag” - we pick up everything we can during the process and put it in a pile next to it. The cement is held in the socket not so much by adhesion to the pipe, but by tensile forces acting outward. Therefore, if we had the opportunity to strike from inside the pipe, it would be much faster and easier. This factor should be taken into account when choosing a cement plug removal strategy. When everything is removed, carefully knock down small irregularities inside the bell, aiming for the most even surface possible - the tightness of the cuff fit will depend on this.
Now we take the cast iron/plastic cuff 73×50 (if we want to adapt cast iron to Ø50 mm), and install it in the prepared place. As a rule, it does not go without effort, but if you doubt the compatibility of the cuff and the bell (sometimes there are bases), cut off the lower seal ring with a utility knife. If the cuff falls freely to the second ring, then everything is fine with the dimensions, and we just apply more force - it’s not a sin to tap lightly with a hammer in the end. If the cuff is kept in hot water for a couple of minutes, it usually becomes a little more accepting of its fate. Sometimes there are actually bells of a slightly smaller diameter - trying on a cuff with the lower ring cut off gives a little resistance. Depending on this resistance, select the size of the cut of the remaining rings - either half along their height, ensuring the evenness of the cut, or completely. Then the cuff sits in place, and if you coat it with sealant first, then this will not be at all superfluous.
EURO-socket for old plastic
It is often not cast iron, but old-style plastic sewers that are found. As a rule, it only complements cast iron at some point and has the same socket diameter. The cement is removed from it more easily, without impact. After removing the section of the washing pipe/corrugation, we compress the socket with a pipe wrench in several places along the diameter. Since plastic is elastic and has little tendency to adhere to cement, we can easily free the socket cavity from physical contact with the cement ring, while simultaneously creating radial cracks in the ring during this compression. The ring, divided into segments, is not glued to the bell and is held in it by the compressive force of the plastic. All that remains now is to simply pull the pieces out, creating a force from the bottom up. Using the same pipe wrench, we engage the sectors from the inside, or use other lever systems.
It is not uncommon for a situation where plastic pipe there is no bell. Apparently, at one time someone did not bother removing the cement when replacing the siphon and simply cut the pipe. The recipe in this case is simple, but somewhat unusual. We take a 50×40 cuff, warm it in hot water and put it on a tee (or bend, depending on the situation) Ø50 mm. He dresses reluctantly, but gets dressed. Next we have to do something else painstaking work- carefully cut off three thin sealing rings, which are oh so capriciously cut due to their small height, but we are not on our way with them, they stubbornly do not want to let the tee into the socket. However, try it on first - who knows, you might be lucky, although I was lucky only once. We also cut off the upper sealing ring (not the edge, but the RING) - under the cone, in the direction of the lower part of the cuff.
Now, using rotational movements, we connect our structure with the pipe until it expands at the cuff. It's tight, but that's good, considering the fairly small contact area. However, the connection is strong and reliable.
Draining water for a washing machine: extreme solutions
State cast iron sewer doesn’t inspire a bit of optimism, but I really want the dirty water from the car to pour out not into the sink, but into the sewer. The method is also useful when replacing a siphon or corrugation, with other equal hopelessness.
Typically the corrugation has a diameter of 40 mm. But we will work with it using Ø50 mm material with transition cuffs 50×40. Why don't we just take suitable size pipes? The sealing tube ring of the Ø40 series components has too small a contact surface area, and the use of a 50x40 adapter collar provides an advantage both in terms of space and in the fact that the inside of the adapter collar has three sealing collars. We need to ensure vertical retention of water at the junction of the coupling and corrugation. Install the cuff into the coupling using sealant. Next, we fill the internal cuff cavities with sealant, and also apply sealant to the seating part of the corrugation. We insert the corrugation into the coupling. We mean that various debris will get into the gap between the walls of the coupling and the corrugation from the sink, which may one day contribute to the creation of a blockage. Therefore, we fill this gap with sealant (sealant with a spout, used in a mounting gun, will come in handy here).
Actually, we converted a piece of corrugation sticking out of the sewer pipe into a Euro connector. Then everything is standard. The sealant has sufficient viscosity not to be washed off with water, so the compound can be used immediately, but try not to overuse it. If possible, it is better not to disturb him for at least the next couple of hours. But if you can’t wait to check, you can do it right there. Please note that we are talking here about an extreme option, which can only be used in a completely hopeless situation, because this piling up of cuffs is not good, and is only suitable as a temporary measure. Very temporary.
During the installation process you purchased automatic washing machine at the place of its constant operation, the problem of supplying all necessary communications to it immediately arises, including the following types of connections:
- draining dirty water;
- connection to the cold water supply system;
- connection to the electrical network.
In this article we will look at how to connect a washing machine to the sewer different ways.
Methods for connecting to the drain line
The connection of the washing machine to the apartment drain line can be done in two different ways: one of which involves a temporary organization of drainage, and the second is stationary.
With a temporary connection option, the waste water outlet pipe is fixed to the edge of the sink or bathtub. In this case, the hose must be secured to the edge of the selected container in such a way as to prevent the possibility of it accidentally falling.
The stationary option involves inserting into the existing drainage system by attaching an additional siphon to it, which avoids the leakage of unpleasant odors from the sewer.
The vast majority of users choose, of course, the stationary connection option, which in some cases requires extending the drain hose. Its maximum length (limited, as a rule, by the power of the built-in drain pump) is usually indicated in the instructions supplied with the washing unit.
Note! Some experts advise leaving a small gap at the junction of the drain with the siphon, eliminating the possibility of water being “sucked in” and getting stuck. operating system machine when performing certain operations. In this case, one mandatory condition must be met, which is the following: location air gap should be slightly above the level of permissible water rise in the sink or bathtub when their drain is clogged. Otherwise, water may leak through this “bleeding” gap.
Connection procedure

You can, of course, entrust the most critical operations related to connecting a washing machine to employees of specialized services who can organize them quickly and high-quality execution. But if you have certain skills, the option of connecting the washing machine to the drain line yourself is not excluded. Let's consider the difficulties that you may encounter when connecting yourself.


- The second reason why this type of drain connection is undesirable is the possibility of spreading unpleasant odor from the sewer through the washing machine (this does not happen if there is a siphon).
- To prevent water from pouring out of the washing device by gravity, its drain hose should be located at a height of about 0.6 meters from the base of the floor. On the back wall of the machine there is a special mount, from which the hose is diverted down and then rises again to the siphon.
And in conclusion, we will consider the features of connecting a washing machine to a sewer in a private house (where there is most often no sewerage system as such). If you don’t have a special one at your dacha sewer system– drainage is organized in the simplest way called “overboard”.
Note! When organizing overboard drainage, it is not allowed to use a hose longer than 4 meters. At longer length hose, an amount of water will accumulate in it, in volume commensurate with the water supply in the machine itself, which will lead to its constant flow out of the system (regardless of the height of the hose on the rear wall).
Video
Find out what consumables you will need to connect your washing machine.
The inlet hose is the product on which your peace of mind and safety of repairs in the apartment of the neighbors below depend. The fact is that inlet hose, sold complete with a washing machine, does not always have the appropriate length. The compression sleeve may be poorly compressed, and the reinforcing film made of polyester threads may have breaks. The top layers of low-quality PVC can burst at any time and cause a water spill. In this regard, the inlet hose for a washing machine must meet a number of strict requirements so as not to let the consumer down.
Types of inlet hoses
The inlet hose for the washing machine is polyvinyl chloride tube, reinforced with nylon braiding with nuts and fittings, one side of which is connected to the water supply system of a private house or apartment, and the other to the washing machine. Nuts and fittings are made of plastic, so they must be tightened by hand or they may crack. At the junction of the fitting with the pipe, a high-quality inlet hose is equipped with metal pressed sleeves. Each product is marked with numbers indicating operating pressure and temperature. Standard inlet hose can withstand pressure at 4 Bar. To prevent the hose from expanding under water pressure, its base is wrapped in several layers of reinforced threads. Inlet hoses for washing machines are:
- with a fixed length of 1−5 m;
- in a bay (length up to 10 m);
- telescopic hoses, which due to the corrugated wave, the hose increases in length;
- hoses with the Aqua-Stop system, protecting the washing machine from leaks;
About the system Aqua-stop need to be told separately. The fact is that when water is supplied to the washing machine, a lot of pressure is applied to the hose, so it may not withstand and burst, flooding neighbors and damaging property in the apartment. Aqua system - stop will not allow this. It is a double inlet hose that can withstand pressure up to 70 bar, with a knob filled with a special powder or equipped with a solenoid valve.
If the hose suddenly breaks, water begins to flow into the knob. The powder expands, thereby cutting off the water supply from the tap. Or the valve is triggered and stops the flow of water. The valve control sensors are securely hidden under the outer sheath of the flexible hose. The sheath envelops the entire hose until it ends inside the washing machine. Even if the hose breaks at the very exit, the water will still not flow out, but will collect in a special pallet located at the bottom of the washing machine. The pan is equipped with a sensitive float, which rises when water appears and closes the microswitch contacts. In addition, the valve is triggered when the working tank is overfilled, the machine pipeline is damaged, or foam appears due to an overdose of washing powder. beyond the working tank out.
 In some models, the Aqua-stop system is equipped emergency pump, which begins to pump out water if the emergency valve fails. It is worth saying that the inlet hose with the Aqua-Stop system operates only once in the event of an accident. Once the system has been activated, the hose cannot be reused and must be disposed of. However, maybe this particular case will help you avoid flood and major property damage yourself and your neighbors. The inlet hose with the Aqua-stop system is sold in the same department as Appliances. Every self-respecting brand produces to its washing machines, in addition to conventional hoses, hoses with the Aqua-stop system. With such a hose, you don’t have to worry about flooding in your absence.
Technical characteristics of inlet hoses
| Company manufacturer | Specifications | Manufacturer country | Length | Price |
| Uglich Polymer Plant |
|
Russia | 3m | 66 rubles |
| Cotali UDI-BLACK |
|
Italy | 2 m | 358 rubles |
| Electrolux |
|
Sweden | 1.5 m | 806 rubles |
| Reflex |
|
Italy | 1.5 m | 165 rubles |
| SCANPART 11.200.901.23 |
|
Germany | 2.5 m | 599 rubles |
| CODO |
|
Russia | 1.5 m | 155 rubles |
How to connect the inlet hose to the washing machine?
 There is only one limitation regarding the length of the inlet hose: that the total total length from the hose to the drain did not exceed 15 meters. It means that maximum length the inlet hose should not exceed 3 m. Otherwise, the load on the drain pump will be too great and it may break. The inlet hose has a standard ¾ inch thread and connects to a stopcock. The connection to plastic water pipes is inserted easily and simply. In new houses and during major renovations, the location for installing the faucet for the washing machine is designed in advance.
If in the house major renovation was not carried out, and water pipes are not designed to connect a washing machine, then in this case the inlet hose is installed in front of the bathtub faucet or screw onto the float valve of the drain tank. For this:
- Unscrew the flexible water supply hose from the float valve;
- screw onto the inlet valve;
- a flexible hose is attached to it.
To seal the float valve outlet thread, wrap FUM tape. If the inlet hose is attached to the mixer, the mixer itself is removed, and the eccentric with cold water the tap connecting to the washing machine is screwed on, and onto the eccentric with hot water- coupling. The mixer itself is installed on top of this. Of course, this is not the most the best option, but you never know, it will also come in handy. There are even special taps for connection to float valves toilet cisterns, as well as wall-mounted faucets.
 The drain hose as well as the inlet hose are included in the kit. It serves to drain the water used during washing into sewer drain. However, the length of the hose offered for the washing machine does not always allow you to reach the drainage point, so drain hoses are no less in demand among consumers than inlet hoses. They have pipes at both ends, and such a hose can be stretched in length. The pipes provide hermetic connection at the junction points. Drain hoses do not have technical characteristics and are designed only for the natural pressure of drained water. The material for their manufacture is rubber, which, under the influence hot water and detergents chemicals and bleaches cracks and bursts, despite the reinforcement with a wire spiral.
How to connect the drain hose?
Using a plastic guide, the drain hose is attached to the edge of an acrylic bathtub or sink. You can use a siphon from a washbasin as a drain, or buy special double siphon with an additional outlet for the washing machine drain hose. If you do not have enough length of the hose to drain the water, then this situation can be easily corrected. You need to purchase a plastic extension, another drain hose and two clamps. The hose coming from the washing machine is inserted into the plastic extension, and the second hose is inserted into the other side of the extension. Both hoses are secured with clamps. That's it, the extended hose can be connected to the sewer.
Replacing the drain hose is easier than replacing the fill hose. This is due to the fact that in order to get to the base of the drain hose, you need to slightly disassemble the washing machine and climb inside it. Some brands of washing machines have a drain hose attached at the top of the body, and some at the bottom. To find out what the connection is in your washing machine, you need to remove the cover of the washing machine. Although some brands, for example, AEG, Siemens and Bosch, need to put away front part of the body .
However, let’s focus on replacing the drain hose through the back of the case, as is done with the brands Indesit, Ariston, LG, Candy, Ardo, Beko, Samsung, Whirpool. For these models, the drain hose is located at the bottom of the rear housing cover. After removing the panel (this is done easily):

Replacing the drain hose is done completely differently in models where the hose is located on the front panel.
Let's get it dispenser container. Then we remove the base panel, loosen the clamp securing the door cuff, and detach the cuff from the door wall. Then the drain pump filter is removed (you also need to prepare a rag and a bucket first). After the residual water has flowed out, remove front end panels. To do this, screw the screws using a screwdriver. The bottom of the panel wall must be moved towards you until a gap of 5 cm is formed. We put our hand there and look for it by touch. hatch blocking device. We detach the connector with wires from it. After that, pull the panel towards you and remove it.
We had access to the drain hose. The fixing elements are removed from it, and the hose is disconnected from the pump. We remember the location of the hose and fasteners. Disconnect and remove the hose. We connect the new hose, secure it and assemble the machine, having first checked the tightness of the connection of the hose to the pump.
For washing machines with vertical loading The drain hose is located on the side. To replace it, you need to do all the steps that were described in previous cases, only you remove not the back or front panel, but the side one.
Drain hoses for washing machines
| Company manufacturer | Specifications | Manufacturer country | Length | Price |
| Uglich Polymer Plant |
|
Russia | 3m | 77 rubles |
| Orio |
|
Russia | 3.6 m | 60 rubles |
| Helfer |
|
Germany | 2,5 | 190 rubles |
| VIR Plast |
|
Russia | 4 m | 71 ruble |
| TSG |
|
Italy | 2 m | 110 rubles |
Video of connecting hoses to a washing machine
Correctly installed washing machine drain hose is the key to its successful operation. This must be done so that waste water flows freely into the sewer pipe. It is not difficult to do this work; it is quite possible to do without inviting a specialist. We will tell you in this article exactly how to select components and assemble them into one system.
Connection methods
There are several methods for connecting the washing machine drain to the sewer system. Each has its own advantages and disadvantages. These are the methods:
- Insertion into the sewer.
- Draining water through a nozzle with a drain, which is located above the siphon.
- Direction of washing waste through a siphon with outlet.
- Draining waste water over the edge of a toilet, bathtub or sink.
Important! The location of the washing unit plays a decisive role in choosing a drain arrangement method. Most often it is found in the bathroom or kitchen. In the kitchen, the drain is directed through a siphon or tie-in, no matter how far the communications are located. It is unacceptable to install a drain over the edge of the sink for sanitary reasons.

There are much more options in the bathroom:
- Next to the bathtub - over the edge of the bathtub.
- Near the toilet or washbasin. Options are available through a siphon or insert. Most inexpensive way- over the edge of the toilet or sink.
- Instead of a washbasin - through a cut-in or siphon.
In all of the above cases, there is an opportunity for optimal drain connection.
Tools, consumables
The choice of tool largely depends on the material of manufacture sewer pipes. The classic set of tools is:
- Wrenches, adjustable wrench.
- Screwdriver, drill.
- Pipe cutter - when working with a metal-plastic pipe.
List Supplies depends on which drainage method you choose. It usually includes:
- Hose. Its length depends on the distance at which communications are located from the washing machine.
- Ball valve.
- Seals.
- For connection over the edge of the bathtub - self-tapping screws.
- Tee.
- Siphon equipped with a pipe.
- Liquid rubber, silicone-based sealant.

In the sink, toilet or bathtub
When organizing drainage using this method, a curved drain hose is hung on the edge of a sink, toilet or bathtub, and returned to its original place at the end of the wash. The disadvantage of this method is that the drain may accidentally break, and then a flood cannot be avoided.
Important! This method of organizing drainage is considered the most economical and simplest. The set of tools and consumables here is very minimal, since the washing unit is equipped with almost everything that is needed for work.

The procedure for organizing a drain is extremely simple:
- Drill a hole above the bathtub for the plug so that the edge of the mounted hose is in the bathtub.
- Screw a self-tapping screw into the resulting hole.
- Disconnect from back wall Corrugated hose washer with plastic bracket and mounting hole.
- Hang the hose on a self-tapping screw.

Important! This fastening allows the hose to hold well without coming off or moving due to vibration of the washing machine or careless movements.
The method also has quite significant disadvantages:
- You cannot bathe in the bathtub while doing laundry.
- Waste water after washing contributes to the contamination of the bathtub or sink, and also destroys the coating.
- Cleaning the bathtub after finishing washing is mandatory.
Through a tee
In this case, a special nozzle equipped with an outlet is installed under the sink. The procedure is as follows:
- Disconnect the drain pipe that comes from the sink.
- Install the tee as high as possible (it’s good if it’s right under the hole in the sink). This is necessary to prevent the backflow of water.
- Return the equipment to its place.
- Connect the nozzle to the extension hose.
Important! To prevent the appearance of bad smell, twist the hose near the connection point in the shape of the letter S, without creating an obstacle to the free movement of water. To prevent damage to connections, place and secure tubing so that it does not interfere with free movement.

Siphon equipped with a check valve
If you install such a system correctly and find out how it is produced, you can forget about such a problem as the appearance of foreign odors. And the built-in check valve creates an obstacle to the reverse penetration of wastewater.
The connection details are as follows:
- The tee is replaced with a new siphon. A hose is put on the outlet of the tee.
- The connection to the pipe is secured using a sealing coupling - it can be included in the kit. If not, it must be purchased separately.
- The insertion site is treated with a sealing compound. This is additional protection against sewer odors.