How to make a wooden floor using joists with your own hands. Step-by-step instructions on how to make a wooden floor Do-it-yourself wooden floor construction
When a developer is faced with the question of how to install a wooden floor in his home, not everyone knows about the existence of several designs. They differ from each other in structure and additional materials. Any professional uses exactly the option he was trained in and in which he is proficient. We decided to combine all the structures in one material and cover each of them in detail.
Let's start with the classification of methods. Wooden floors can be laid:
- Along the floor beams.
- According to the lags.
- On a concrete base.
We have identified the second option as a separate type, although all wooden floors are installed only on joists. In this case, we will have to talk about the technology of using the log system as the basis of the floor structure, so we’ll start with it.
Wooden floor with joists
Imagine a private house built without floors. For example, the first floor. What do you see in front of you? The basement part of the foundation on which the walls of the building are erected. But part of the base is free in width. This is done specifically so that the base can act as a support for wooden floor structures. It is on it that the logs will rest with their edges, so that the foundation will become the basis and support for them. It’s good if the rooms in the house are small, and the logs lie quietly from one edge of the room to the other, without sagging too much. Such elements can withstand heavy loads.
But if the room is large, then even the strongest joists will sag. Therefore, it is necessary to install supports in the form of small columns under them. The material for them can be brick, various blocks, stone, metal pipes, logs, large-section beams, double or triple boards, reinforced concrete products, etc. Here it is important to choose a simple and inexpensive option, for example, brick supports, or fill the columns with concrete mortar, installing a reinforcing frame made of metal reinforcement inside. The first option is simpler because it does not involve concrete mortar, which will take a very long time to dry.
It must be taken into account that the supports must stand on a solid foundation. Therefore, pay attention to the installation diagram.
How to install supports correctly
First, the location of the supports is determined. Here everything will depend on two factors. The first is the distance between the joists, and the second is the distance between the supports along the joists. The first indicator is determined by the parameters of the floorboards used. The thicker they are, the greater the distance between the elements. For example, with a board thickness of 40–50 millimeters, the logs can be 1.0–1.2 meters apart from each other. The same is true with the second indicator, which depends on the lag cross-section. There is a standard range - 80–120 centimeters. So there shouldn't be any problems in this regard.
Now, as for the installation itself. You need to start by pouring the foundation for each support. To do this, make small square-shaped indentations with dimensions of 40×40 centimeters and a depth of 20 centimeters. You make a sand or gravel backfill 10 centimeters thick, compact it, install a reinforced mesh frame and fill it all with concrete mortar.
After drying, roofing material is laid on each foundation, which will perform waterproofing functions. It is better to lay the roofing material in 2 layers crosswise.
Now you can assemble the support pillars from brick. The more powerful the wooden floor structure, the wider the supports should be, so a stand of one and a half bricks is quite enough. The bricks are laid with a sling on a cement-sand mortar.
Attention! It is necessary to construct the columns in such a way that their surfaces are horizontal and in the same plane. This is an important point that will ultimately determine the evenness of the wooden floor.
So, the supports are ready, and you can install the logs. Today, new building materials and fasteners are increasingly appearing on the market, which simplify installation processes. In the case of wooden floors, there are also such simplifications. For example, a fastening metal corner, which is installed on supports and attached to them with dowel anchors. And it is fixed to the joist with a regular wood screw. In addition, with this device you can smooth out small differences in the plane by raising or lowering the edges of the joists.
At this point, the joist structure is ready, and you can install the wooden flooring from the boards. But we'll talk about this later.
Wooden floor on floor beams

How to make a warm wooden floor
This is a simpler design than the previous version, but also more reliable. After all, firstly, the floor beams themselves are wooden beams of large cross-section that can withstand significant loads. And, secondly, a joist structure is installed on them, making the floor base even stronger and stiffer. This results in a dual system.
What are floor beams, and what sizes do they come in? Let's start with the fact that they can be laid on the foundation and on the walls, for which special nests are built. Their size depends on the material of the beams. If these are double or triple boards, then the length of the nest will be at least 100 millimeters. And if these are beams, then no less than 150 millimeters. The span of such a beam can vary from 2.5 to 4.0 meters, and in the case of beams made of laminated veneer lumber, up to 12 meters. Currently, manufacturers offer floor beams with a rectangular or I-beam section.
And a few words about the cross-sectional dimensions of the elements and their relationship with the spacing of the beams in space. For example, if the cross-section of the material is 75×150 millimeters, then the distance between the elements is 1 meter with a span of 2 meters. The section is 100×200 mm, the pitch is 0.6 m, the span is 4.0 m. That is, for any house, by choosing a certain section of the beam, you can accurately select the distance between the beams and vice versa. All these parameters are defined by GOSTs and SNiPs, so selection will not cause problems.
Now to the issue of constructing the wooden floor itself. It won't be difficult to make them. The floor beams, although made of wood, are quite heavy. So you will have to invite assistants who will install them at the installation site. Beams are usually not fastened due to their significant weight, but you can simply fix them with metal fastening corners, which were already mentioned above when we discussed the option of installing logs on supports. There is no need to align these elements in one plane, because such a process is easier to carry out using lags. The only thing you should pay attention to is the waterproofing of the ends of the joists, which you just need to wrap with roofing felt.
Now the joist structure is being installed using the technology already discussed earlier. The logs are attached to the beams with self-tapping screws or metal corners. By the way, this fastener turned out to be simple, very convenient, reliable and versatile, so other fastening methods are gradually moving into the background. Before you begin fastening, it is necessary to align the entire joist system in the same plane horizontally.
To do this, you need to install two extreme logs at opposite walls in the same plane so that they are horizontal. This is easy to do if you use a laser level and a rule or metal ruler. Set the level in the middle of the room and turn it on. Then place a ruler on the edge of one of the two joists, along the body of which you make a note. This size must exactly match the other edges of the same joist and the opposite one. Somewhere you will have to lower one edge, somewhere raise it, so you need wood spacers. Then you stretch several rows of threads between these elements so that they do not sag, and align the intermediate logs along them. Afterwards, carry out fastening, insulating the floor and installing floorboards.
Wooden floor on concrete

How to make a wooden floor over concrete
This design is one of the most common, especially in city apartments. Such a floor can be mounted either on a reinforced concrete floor slab or on a concrete base poured onto the ground. In any case, it will be a durable concrete floor. It is very difficult to achieve high evenness of such a base, so leveling will have to be done using a lag structure. The technology here is identical to that described above, so we will not repeat it.
The only thing you need to pay attention to is the methods of installing and fastening the logs. There are three of them:
- Directly to the concrete base through through holes in the joists. For this, long self-tapping screws or metal dowels are usually used.
- Installation on a metal mounting bracket or wooden bosses.
- The use of special self-leveling mechanisms, which have the form of a bolt-nut connection.
The first two methods are performed in almost the same way as in the case already described. But the third option is an innovation that appeared not so long ago. For it you will have to buy special devices and install them on the ends of the joists. True, today many lumber manufacturers themselves install these mechanisms in the factory, saving consumers from possible errors during fastening. The design is so simple and original that using it to level a wooden floor will not be difficult. Here you do not need to raise or lower the logs, performing any complex maneuvers with them. It is enough to tighten the nut or bolt with a wrench to raise or lower the end of the joist. This is truly a simplified leveling system.
After this, the log is secured between two nuts and washers, and the mechanism itself, using the support platform, which is its basis, is attached to the concrete base with anchors. Many may doubt that such a small device can withstand heavy loads. Have no doubt - all this has been tested and verified for a long time. Moreover, the tests were successful, and the time during which the self-leveling logs are in use speaks volumes about their reliability.
How to lay wood flooring

Wooden coverings in the house
As you can see, building a wooden floor with your own hands, or rather, a base structure, is not so easy. The same can be said about plank flooring, because there are several nuances in such technology that deserve attention.
Let's list the stages of construction and note these very nuances:
- Nuance No. 1 is a 1 centimeter gap between the wall and the floor. Wood is a “breathable” material, so with changes in humidity and temperature it will certainly expand and contract. The gap is compensation for expansion. By the way, it will be covered with a plinth, so it will not be visible.
- Point No. 2 - it is recommended to install floorboards along the room. Then shadows will not be cast from the junction between the elements. And it is better to use tongue and groove boards - the floor will be monolithic.
- Point No. 3 - wooden floors need to be insulated. To do this, the insulation is placed in the space between the joists and covered on both sides with protective moisture-resistant films. In addition, all wooden elements of the floor base must be treated with antiseptics and fire retardants.
- Nuance No. 4 - the first board is mounted against the wall parallel to it with the ridge in its direction. Fastening is done with a wood screw into the groove of the lock along the joists.
- Nuance No. 5 - the second board is installed next to it and pressed firmly against the first one, hitting it with a mallet. It is important here that the joint is tight and without the slightest gap.
- Nuance No. 6 - the fastening is done in a groove, and all the boards are fixed in this way. The last element of the plank floor is not attached to the groove, but to the edges closer to the wall. The fastening points are covered with a plinth.
Conclusion on the topic
Of course, the construction of wooden floors is not finished yet, because they will still have to be sanded, painted or varnished, that is, brought to perfection. But our goal is information about how wood floors are built, not how they are finished.
How complex are the processes described? Of course, it's not that simple. But if you take into account the nuances and important points, as well as choose the right materials, then you can handle such work with your own hands. True, this will take more time than professionals, but you will save on paying for their labor.
Publications on the topic
Construction of a private house is a long process that requires a lot of time, labor and finances. Many, in an effort to save money, decide to carry out some of the work themselves. How to make floors in private homes without resorting to the services of builders? Making the floor yourself is quite possible if you have the necessary materials, tools and knowledge.
Which floor design to choose?
Before you begin work on the construction of floors in a private house, you need to decide on the type of construction of the future coating. Experts distinguish three types of structures:
- Single;
- Double;
- Concrete floor.
The choice of one type of construction or another depends on the characteristics of the building in which the floor is laid. The operating conditions of a private home can be considered the determining factor. A single floor is the simplest design; erecting such a floor does not require a lot of time and materials, since the floorboards are nailed directly to the joists. The main disadvantage of a single plank floor is the limited use of it: such a covering would only be appropriate in small summer houses and dachas. For a house where year-round living is planned, a single structure is not suitable.
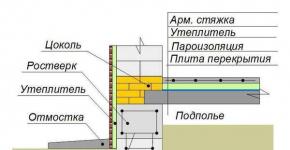
 Scheme of the possible implementation of a “double” floor and a concrete one.
 If you want to make a private house suitable for living at any time of the year, then you will have to arrange a double floor. This type of construction is warmer, reduces heat loss and ensures comfortable living in the house during the cold season. A double floor consists of several layers, the main ones being rough and finishing coatings. Between these two layers, hydro- and heat-insulating materials are additionally laid, protecting both the floor itself and the entire house from destruction.
Most often, the subfloor in a private home is assembled from an unedged board, and the finished floor is made from a tongue-and-groove floorboard. All work, including laying thermal insulation from sawdust or expanded clay, can be easily done with your own hands.
 Boards for the subfloor.
 The third possible type of floor construction in a private house is pouring a concrete screed. Compliance with all the rules for carrying out preparatory work, laying waterproofing, pouring cement mortar and drying times will allow you to get a solid, high-quality floor, ready for finishing with any decorative coating.
Installation of wooden floors
When building a private house, many people prefer to make the floor out of wood. This desire to have high-quality wooden flooring under your feet is explained by the desire to use environmentally friendly materials, which include wood. In addition to being highly environmentally friendly, such a floor has a number of other advantages.

Wooden floors are easy to install and easy to repair during use. Due to the low thermal conductivity of the material, such a floor will retain heat inside the house without letting it out. Plank flooring made from high-quality wood has a long service life and an attractive “natural” appearance.
To make a floor in a private house, you need to choose the right wood. The choice of source materials should be based on the design features of the structure itself. The installation of a floor in a country house must necessarily include the presence of a subfloor that acts as an air gap. If such a layer is missing, the wooden floor will quickly become unusable due to exposure to moisture. In addition, for a good floor, it is important to have all the layers of the structure, including joists, rough flooring, hydro- and thermal insulation, and a finishing coating.

The floor in a private house is subject to significant mechanical loads, so for its construction it is necessary to choose wood with good technological characteristics. The boards must be well dried, the recommended moisture content is no more than 12%. Any chips or cracks on the surface of the material are not acceptable. Experts recommend giving preference to coniferous wood; pine, larch, fir, and cedar are suitable. To increase the service life of the future floor, all boards must be treated with an antiseptic and fire retardant.
Installation of a wooden floor begins with determining the locations for the support posts and their installation. The fertile layer of soil around the entire perimeter of the house is removed and removed, gravel is poured in its place, and sand is poured on top of it. Layers of gravel and sand must be compacted well. Waterproofing material is laid on the ends of the support pillars; most often, ordinary roofing felt is used for these purposes.
 Backfilling with gravel.
 Next, we make beams that need to be secured to the posts with metal corners. It is better to make floors in a private house with double insulation. Experts suggest first laying plywood sheets on the sides of the beams, and then placing mineral wool or other insulating material on them.

When the insulation layer is ready, you can begin laying the rough covering. The boards of this layer should fit well to each other; ordinary screws can be used to attach them to the beams. It is better to leave some distance between the flooring and the walls of the house: a gap of 1.5 cm can be considered the norm for this part of the floor. These gaps provide ventilation to the entire floor structure and protect the walls from expansion of the floor boards as they subsequently dry out.

A layer of vapor barrier made of polyethylene film with a thickness of 200 microns is laid on top of the subfloor. The joints of individual pieces of film must be taped, and the edges must be folded onto the walls to a height of about 20 cm - the height of the final coating. When the film is laid and secured, you can proceed to assembling the finished floor.

The finished floor is assembled from solid wood boards or plywood sheets. Plywood sheets are easier to attach, but in the end they don’t look very attractive. Therefore, if you want to leave wooden floors in your house, then it is best to immediately assemble the final covering from a tongue-and-groove board, and if you plan to cover it with decorative material, just secure plywood sheets. After assembling the finished floor, plank floors must be coated with varnish, which will not only protect the material from external influences of a mechanical and chemical nature, but will also emphasize the decorative qualities of natural wood.

Pouring a concrete floor
The installation of a concrete floor in a private house begins with preparatory work. First, markings and gravel filling are made on the site of the future floor. The soil is first cleared of plants and the top layer, and then compacted. Next, a layer of gravel is poured, which also needs to be compacted well. In the construction of a concrete floor in a private house, gravel will act as thermal insulation. Sand is poured on top of the gravel. After compacting it, a thick polyethylene film is spread on the surface, acting as a waterproofing material.
How to make a concrete floor in a private house? After installing the waterproofing layer, you can begin pouring the screed. A cement screed in a country house is poured in the same way as a screed in an apartment: levels are set and the mortar is poured, which is leveled from wall to door according to the rule.
When pouring a concrete screed, several features should be taken into account. The solution for pouring must be fresh; for its preparation it is recommended to use cement of a grade not lower than M-300, screening out sand and water. To increase the strength of the concrete layer, you can add special compounds to the solution - plasticizers, which will give the future coating additional strength.

When pouring a screed with a height of 5 cm or more, you can use reinforcing elements or a reinforcing mesh, which is laid on the waterproofing layer before pouring. In the case of installing warm water floors in a private house, the use of reinforcing mesh and the addition of plasticizers to the cement mortar are mandatory procedures.

When the concrete hardens a little after pouring, you can remove the beacons. The voids left after their removal are filled with the same solution. After filling and leveling all the cracks, the floor is covered with polyethylene and left to dry. Drying a concrete floor is a long and responsible undertaking. The concrete must dry on its own within a month; if you have a heated floor system, heating should not be turned on until the screed is completely dry. By turning on the heating elements, you will help the concrete crack before the room is used. When drying, it is recommended to periodically moisten the concrete screed with water and cover it again with polyethylene: if this requirement is met, the coating will gain maximum strength and will not crack.
In order to correctly fill the cement, remove the beacons and dry the concrete, it is recommended to look at photos of the work of builders who specialize in arranging floors in private homes.
Finishing
It is quite simple to make just a finished floor in a private house from scratch, but sometimes additional installation of a decorative coating is required. You can also cope with this problem yourself. How can you cover the floor in a private house?

The best option for a private home can be considered a double floor made of boards. The finishing coating of this design does not need to be coated with anything additional. This option is practical and beautiful, and also has a long service life with proper care. Before use, the boards should be treated with protective compounds and varnished to protect them from sand, dirt, water and chemicals. For coating, you can choose either a transparent varnish, leaving the natural color of the wood, or a colored one, giving the floor a different shade.

A concrete floor in a private house requires a top layer of decorative coating. Parquet or parquet boards will look chic as a floor finish. This coating is quite expensive, but is highly environmentally friendly, has good antistatic and thermal insulation characteristics. It makes no sense to make parquet, but in a house where you plan to live permanently, such a covering will look appropriate.
As analogues to parquet, you can consider more affordable laminate, linoleum, carpet and ceramic tiles. Laminate is suitable for the living room and bedrooms, ceramic tiles will look appropriate in the kitchen, bathroom and hallway. It is also better to place linoleum only in the kitchen or hallway. The use of carpet is more limited: the material is suitable for finishing floors in bedrooms.

The range of modern colors and textures of the listed materials allows you to choose a coating to suit every taste. In a private home, floors with natural patterns that replicate the texture of wood or natural stone would look appropriate.
It is quite logical to lay a wooden floor in a wooden house, but in an ordinary brick house or apartment it will look great and can play an important role in creating a suitable microclimate. There is no difficulty in laying a wooden floor with your own hands. This is a fairly simple process and you can even do it yourself. The main thing is just to take into account the important points and prepare a little in the theoretical part before starting work.
This article will consider two options for constructing a wooden floor:
- A floor with the formation of a rough layer and insulation placed on a soil base or floor beams.
- Wooden floor on a concrete base with insulation.
The first option is the most common for creating floors in private homes. At the same time, it is suitable for placement on the ground floor or basement, and for forming floors on the second and above floors as a ceiling on beams.
In the case when the basis for a wooden floor is a concrete screed or reinforced concrete floor slabs, its design is significantly modified and can be modified in order to reduce the cost and facilitate installation.
Below we will take a closer look at the implementation of each option. Before this, it is worth mentioning the same points for any wooden floor.
General rules for constructing a wooden floor
It is best to carry out all work at the end of the heating season. This is due to the humidity of the air and wood. During this period, the likelihood is that the floorboards will absorb too much moisture. If you still need to lay a wooden floor in the summer, then it is better to wait until the weather has been sunny and dry for at least a week or a week and a half.
Important: All lumber that is used in flooring is the same as any wood used in construction, and is fire retardant.
Materials for arranging wooden floors
The following options can be used as materials for a wooden floor:
- uncut board;
- sheet material (chipboard, OSB, plywood);
- board made of laminated veneer lumber;
- folded board.
Of the first two options, the so-called rough wooden floor is laid. It involves further installation of the floor covering. The last two options are used to form a finishing layer, which is subsequently painted or varnished and left as the base of the floor in the room. It is advisable to select a solid board for the entire width of the room. The board is most often meant to be made of pine, larch, cedar, and less often of hardwood.

A wooden floor looks great not only in a country house or country house, but also in a city apartment.
Preparing the base on beams or unprepared base
If the wooden floor is laid on a soil base, then it is necessary to ensure that the joists are securely fastened. In addition, waterproofing and thermal insulation of the space under the floor should be ensured. To do this, you need to prepare the groundwork. Along the entire perimeter of the room, a layer of soil is removed so thick as to go 20-25 cm lower than the ground level around the house. Next, an embankment is made of crushed stone and river sand on top of it. All layers are one by one moistened with plenty of water and compacted.
On a prepared sand base, it is necessary to build a series of brick columns on which the logs will rest. The width of the columns is usually taken to be two bricks. The height of the pillars is in the range of 20-40 cm. When erecting the pillars, the bricks are placed on the mortar and placed along the upper edge in one level. To check the level and its compliance, you can use a laser level or stretch a net of rope or fishing line attached to the walls. When distributing the columns, it is taken into account that each joist requires at least two columns along the edges. If necessary, if the lag is long, pillars are added in the middle. The distance between the supporting columns for each of them should be calculated based on the size of the board that is used in the form of logs and the design load that they must withstand. Any design organization or certified builder-designer can help with the calculations. You can also calculate it yourself using GOST and SNiP data. Speaking roughly, for a living space it is enough to use 100x50 mm boards as joists, distributed at intervals of 600 mm. In this case, the posts are attached at the edges, and if the length of the lag is over 3 meters, an intermediate one is added in the middle.
Important: If the floor is laid on beams between floors, no preparatory work is required and the installation of the joists can begin immediately.
A waterproofing layer in the form of roofing felt sheets is laid on top of the columns or beams. Next, logs are laid on wooden plates 2-3 cm wide. The logs are attached to the posts using anchors. Using wooden plates that are placed under the logs, it is necessary to bring the upper edge of the logs into a single plane.
Initially, two logs are laid on opposite edges of the room. And on two extreme supports each. They are leveled, checking for correct installation using a laser, bubble or water level. Alternatively, it is best to use a laser or water level to draw a level line along the perimeter of the room on the walls in advance at a distance of 1 meter above the level of the proposed floor and, in relation to this line, check the position of the control logs. The bubble level is still less reliable and in such work often gives inaccurate results due to low accuracy.

A fishing line is stretched between the leveled outer logs and all other logs are laid in relation to it.
Along the lower edge of the joists, it is necessary to fill 50x50 mm bars to form a rough flooring. In the case of a soil base and the location of the logs on posts, the bars are nailed across the logs at a distance of 40-60 cm from each other along the entire length of the room. In the case of laying on beams, the bars are nailed to the side of the joist along the bottom edge on both sides. The bars should be secured either with nails or self-tapping screws with a length of at least 100 mm.
As insulation for wooden floors, a material with high vapor permeability is required, that is, one that can allow air and moisture to pass through. Options such as mineral wool or basalt slabs are suitable. In the case of lags located every 600 mm, there will be no problems with laying the heat insulator at all. The standard size of mineral wool rolls is either 600 or 1200 mm. Under no circumstances should the insulation material be cut to fit the gap between the joists to a millimeter. The strips are inserted tightly into the gaps so as not to leave any gaps anywhere. The height of the heat insulator is selected so that there is a small gap of 2-2.5 cm between it and the edge of the joist for ventilation. The heat insulator, among other things, serves as a sound insulator.
A vapor-waterproofing membrane is spread over the joists before laying the wooden floor. The film strips are laid with a mandatory overlap of 20 cm. The joints are taped. In various versions, the vapor barrier layer is reinforced with slats nailed along the joists, or simply secured with staples on the joists. The choice of fastening method depends on the material of the floor covering. Under specially produced flooring boards that have a ventilation channel, you don’t have to put slats in them.
Video: do-it-yourself rough wooden floor
Preparing the base on a concrete base
A wooden floor can easily be installed on a concrete base or on top of reinforced concrete floor slabs. In this case, the installation of a wooden floor is much simpler and easier to implement. It is no longer necessary to prepare the base and it is possible to strengthen the logs very often, which reduces the bending load. Thus, it turns out that using large cross-section logs does not make sense. As a material, you can choose timber measuring 50x50. As will be seen later, the process of setting the log by level is also significantly easier.
To secure the logs, construction studs with a diameter of 8-10 mm are used. Using a nut, the lower part of the stud is limited, which is fixed in the concrete base of the floor. Also, the level of the lower end of the joist is limited by a nut and a wide washer.
The studs are strengthened along the lag installation line every 50-60 cm. Holes for the studs are drilled in the bars. At the same time, the holes on the upper edge of the block are also widened enough to hide the fastening nut and washer.
Two logs are installed on opposite sides of the room and leveled on studs at the edges. Next, using the fishing line stretched between them, the installation of all other lags is adjusted. After securing all the joists, the excess protruding studs are cut off with an angle grinder (grinder). Next, you can begin covering with floorboards or the required sheet material.

If a wooden floor is laid as an intermediate leveling option before the finishing coating, then it is reasonable to use it as a “buffer”
Laying the boards
You can begin laying the boards on the prepared logs. The first board is attached near the window opposite the entrance to the room. You should leave a gap of 10-15 mm between the wall and the array of boards.
You can fasten the boards using self-tapping screws; their length should be chosen equal to at least two and a half times the thickness of the board, or with nails 4-5 times longer than the width of the board.
Nails are driven at an angle onto each joist or at an angle into the groove at the end of the board, if such fastening of the boards is provided.
Next, two or three more rows of boards are laid. Stepping back a little from them, an ordinary metal bracket or Smolyakov bracket is driven into the joists. Wooden wedges are driven between the bracket and the laid boards, thereby joining them tightly to each other. After this, the boards are secured with nails. Thus, they continue to lay the wooden floor until the very end.
The vast majority of floors in both private and apartment buildings are made of wood. The support for a multi-layer, pie-like wood structure is most often logs. Logs are long bars made of wood (less often metal and reinforced concrete) laid transversely to the finishing flooring, serving as its solid foundation. This structure is installed both on a monolithic concrete floor and on supporting posts and beams. Installing floors on wooden joists is very profitable due to the relatively low price of materials and ease of installation.
Advantages of installing floors on joists
Logs installed as a support on a wooden floor are very functional. In addition to their direct responsibilities, they also:
- create a uniform load on the ground in a private house and the floor (if the floor is laid in an apartment building);
- level the surface under the covering (adjustable floors can be raised or lowered with your own hands to create a perfectly flat surface, regardless of the initial parameters of the room);
- create a free, ventilated space between the ceiling and the floor in which communications that are undesirable for public viewing can be hidden;
- increase the sound insulation of the room;
- facilitate the procedure of floor insulation.
In addition, individual joist bars can be easily replaced if necessary, without spending money on large-scale renovations in the house.
Structural features of floors on joists
The installation of a finished wooden floor on joists is somewhat reminiscent of a multi-layer cake, in which it is necessary to lay boards, joists, a waterproofing layer, insulation, and a finishing floor covering over the floor in layers.
 Installing a floor on joists involves laying waterproofing and insulation
 Moreover, regardless of the type of flooring, the insulated floor pie includes additional elements:
- a layer of waterproofing between the ceiling and the joists;
- lag bars;
- subfloor (preference is given to plywood boards);
- waterproofing insulation coating;
- the insulation and vapor barrier itself;
- boards - finishing coating.
This design of floors on joists is relevant for the first floors of private houses. All subsequent floors do not need such serious insulation; installation of a waterproofing layer of the pie in this case is only necessary in direct contact with concrete and brick.
 It is necessary to insulate the floors of the first floors and concrete or brick foundations
 Technology for self-production of logs and selection of wood
Logs can be purchased at the store, or you can make them yourself. The second option will be relatively cheaper. Wood with a moisture content of no more than 15-17%, 2nd or 3rd grade, is best suited for these purposes. Logs can be made from pine, fir, spruce, aspen and larch.
If you make the logs yourself, keep in mind that the cross-section of the beam should be rectangular. The height is approximately twice the width. The required size is determined based on the parameters of the room, to be more precise: based on the exact distance between the links of the timber frame.
 The size of the bars depends on the distance between the strapping links
 In addition, it is necessary to take into account the thickness of the insulating layer and the size of the spans. In the illustration you can see approximate calculations with laying lags at a distance of 70 cm from each other.

If your room has an intermediate size between the indicated values, you should take a larger value as a basis. This way you will have a certain supply of material, which will allow you to lay it without gaps and make the structure more durable.
To make a wooden floor with your own hands, you can use both edged and tongue-and-groove boards. The second option is much preferable, because its design involves a groove and a tenon, therefore, installing a fine finishing coating is no longer so relevant.
 It is preferable to use tongue and groove boards due to the tongue-and-groove system
 You can use floorboards made of cedar, larch, spruce, aspen and pine. The most expensive and durable materials are solid oak and pine: provided that the installation is carried out correctly, they will last for several decades. In turn, larch is excellent for rooms with high humidity, because it is not susceptible to rotting, and healthy aspen and alder boards are great for sleeping areas.
 Oak and pine boards will last a long time
If you purchase first-grade floorboards, you don’t have to spend money on the final flooring, and at the final stage simply sand the boards and varnish them.
The main thing is that before laying, be sure to treat the boards with antiseptic antifungal preparations and impregnate them with a water-repellent composition.
If you are installing a wooden floor with your own hands, be careful when choosing wood: the boards should be dry, but not overdried. Wet wood, after drying and under the pressure of furniture, can become deformed. Always buy boards with a margin of 15-20% in case of need for trimming, mistakes and defects.
How to independently calculate the required distance between lags?
When you install a floor on logs, use the rule: the thicker the floor board, the wider the installation and the farther apart the logs are located.
For example, for a board whose size is 5 cm, you can make a step (the distance between the lags) of one and a half meters.

If you use thin boards, you can take small steps so that the board does not sag. The most common step length between joists is 50-70 cm.
 The distance between the lags is most often 50-70 cm
 Also keep in mind that you will need additional space to make it convenient to lay the insulation inside. If the size of the base does not correspond to the values in the table, then it is calculated upward.
Basic rules for installing joists
When installing logs yourself, you should strictly follow the following rules:

Installation of wooden floor joists
Wood is a flooring proven by time and centuries of experience. When laid correctly, it can serve for decades without losing its visual appeal. In addition, this is the most environmentally friendly, “breathable” floor, guaranteeing a high degree of heat and sound insulation of the premises of both a private and apartment building.
 Wooden floor construction with joists
 To make laying a wooden floor on joists quick and comfortable, you will need the following tools: level, hammer drill, saw and axe, hammer, nail puller, drill, screwdriver and keys. And also the following materials: floorboards (sometimes the role of the subfloor is given to plywood boards), logs, insulating material, fasteners (anchor bolts, screws and nails).
If all the necessary materials for installation are available, you can begin laying the logs on top of the soundproofing material. As already mentioned, the surface must be leveled, checking its horizontalness with a building level. The boards are attached to the joists using dowels.
Now it’s worth taking a closer look at the entire technology of installing floors on joists in a private house.
The first step is marking the work area and preparing the base. First, you should compact the soil and secure the formwork with ten-centimeter sides. A reinforced mesh is placed at the bottom and then the concrete mixture is poured. You need to wait a couple of days for the concrete to dry. After this, a waterproofing polyethylene film is laid on top of the concrete floor, and then supporting structures are constructed.
If the floor is cold, the space that remains under it after its construction must be filled with sand or expanded clay (do not fill it to the top, you need to leave about 5 cm of free space).
 You can insulate the floor using expanded clay
 The second step will be to ensure normal ventilation of the space under the floors. For these purposes, small holes are made along the perimeter of the plinth (for every 15 sq.m.), which, in order to prevent mice from entering the house, are covered with a non-ferrous metal mesh.
The next step is insulating the floor. Expanded polystyrene, isospan or thermal insulation roll material are perfect for these purposes. This material is laid on a waterproofing layer of isolon, which is attached to the joists in advance using an industrial stapler.
After laying the insulation, you can begin laying the plank covering over the joists.. Installation must begin from the corner of the room. The boards are screwed directly to the joists using self-tapping screws.
 Scheme of a wooden floor
 If the boards are processed and well sanded, they can play the role of finishing, finishing flooring. If a layer of finishing coating is expected (laminate, parquet, linoleum, etc.), you can begin laying it immediately after finishing the work with attaching the boards to the joists.
Thus, installing a floor on wooden joists has many advantages over laying the floor directly on top of a concrete or soil floor. In addition to the fact that it smoothes out all the unevenness of the floors and distributes the load evenly, it also perfectly insulates the home and promotes sound absorption.
Wooden flooring, as in the photo, is very common in apartments and private houses, because they not only have a decent appearance, but are also reliable. To make a wooden floor in an apartment not only beautiful, but also durable, you need to choose the right material and install it according to the technology.
Features of wooden floors
Wood is considered one of the most ancient floor coverings. Despite its centuries-old history, this material is still widely used in construction and home decoration. This is due to the special qualities of natural wood.

The main ones are:
- Attractiveness. The wood pattern is never repeated, it remains unique every time. In addition, various types of trees are used, each of which has its own unique texture and color. Thanks to this, you can choose the type of wood that best suits the interior. Wood is a universal material that suits rooms decorated in a wide variety of styles.
- Environmental cleanliness and safety. If trees grow in a region with normal ecology, then the material is absolutely safe. That is why wood is considered the cleanest and most environmentally friendly building material.
- Low thermal conductivity. Such floors excellently retain thermal energy and are pleasant to the touch.
- You can lay wood floors yourself without using the services of specialists. Installation is simple and does not require special skills or tools.

But this material also has some disadvantages:
- Since wood transmits noise well, it is recommended to use sound insulation when installing floors made of this material.
- Any wooden products are susceptible to damage by fungi and microorganisms, so they must be treated with antiseptics and other protective agents.
- Wood burns, so it must be impregnated with fire retardants. If the wood is not treated, it will quickly ignite.
- Wood absorbs moisture well, so it must be covered with drying oil, varnish or paint. The fact is that this material, when exposed to moisture, changes its geometric parameters (swells, bends), and with further drying the problem only gets worse. But even if the tree is coated on top with varnish or another composition, it still cannot be installed in rooms with high humidity.

Despite the fact that wood has as many disadvantages as advantages, it still does not lose its popularity. All negative aspects will not cause any concern if the wood is properly treated with all the necessary types of impregnations. If you purchase material that has not been treated with the necessary means, the floor covering will not last long.
How to choose material
The floorboard in the apartment serves for a long time and decorates the home. But this is only if the material has been processed correctly. Doing this on your own is inconvenient and difficult, so when purchasing, you need to pay attention exclusively to boards that have been treated with antiseptics, fire retardants, and also dried, cut, polished and profiled. In other words, they must be fully prepared for installation.

You need to pay attention to the price - once upon a time, wood was cheap, and wooden floors were found everywhere. Currently, wood has become more expensive, but nevertheless remains a fairly popular finishing material. High-quality wood cannot be cheap, so you should not save.
When choosing a material you need to pay attention to:
- the presence of defects: knots, cracks, chips, irregularities are a good reason for refusing to purchase;
- the material belongs to the same batch - floorboards from different batches may differ in shade and fiber pattern;
- the presence of fungus or mold, even in small quantities. If at least one board from a batch is damaged, it is better to refuse the purchase, since fungus and mold will quickly spread to the entire material;
- quality of processing, namely: the presence of right angles at the ends, an even profile, the absence of burnt and other damaged areas, fringes of fibers on the cut;
- availability of certificates confirming compliance with SNiP and GOST standards, as well as documents on processing and impregnation of the material, age of wood, humidity, species, etc.

If at least one of these points is not met, it is strongly recommended to refuse the purchase. Replacing plank floors in an apartment is time consuming and expensive, so small savings will ultimately only lead to greater expenses.
For installation you will need:
- Solid board, selected taking into account the above points.
- Timber for logs, treated with antiseptic, antifungal agents and fire retardants.
- Plywood sheets (preferably impregnated). They are also cut independently and then treated with stain, copper sulfate, and used machine oil. Plywood is required to create linings when installing level logs (more details: " ").
- If you plan to create heated floors, then you also need an unedged board of the third grade for arranging the rough covering, as well as materials for heat and vapor barrier.
- A roll of roofing felt to isolate the joists from the concrete. Strips of material are placed between the concrete base and the bars.
Wooden floor installation
Now about how to make a wooden floor in an apartment. Despite the fact that this work is simple, you should still carefully follow the instructions. The installation process for each specialist is different, but the main points are unchanged - they must be strictly observed.

Procedure:
- First, determine the direction in which the boards will be laid. It is desirable that it coincides with the daylight falling from the windows. In other words, the boards should be positioned so that the wall with the window is perpendicular to them.
- They dismantle the previous covering down to the concrete base, remove debris, and vacuum the room. If there are flaws in the screed, they are leveled using a self-leveling mixture or putty.
- The level of the finished floor is drawn on the walls, which will be equal to the thickness of the coating (or rather, the bars for joists and floorboards) with a small margin of about 5 millimeters.
- The first joist is attached along the wall with the window opening, and the second – near the opposite one. They must be strictly horizontal and lie in the same plane. We must not forget about laying a double layer of roofing felt. Twine (rope) is pulled between the logs at a distance of 70-100 centimeters from each other.
- Using them as beacons, the remaining logs are placed at a distance of 40-70 centimeters, focusing on the thickness of the boards (more details: ""). The larger they are, the wider the step is allowed. You can set the level using pieces of plywood of various thicknesses, pre-impregnated with an antiseptic composition and lubricated with a special wood glue. The logs are fixed to the floor with anchors and dowels.
- Gaps of 5-10 millimeters must be left between the walls and joists.
- They stuff the boards. First, attach the first row of floorboards against the wall using headless nails, driving them into the tongue or bottom of the groove at a 45-degree angle.
- Lay out 4 rows of floorboards, but without fixing them. The floor board in the apartment is only compacted with a wooden mallet or hammer using a block.
- The fifth row is placed and the planks are pressed with wedges or staples. In addition to the staple, a clamp or other similar tool is sometimes used as a stop. The boards should fit tightly, without gaps. The row is fixed with nails.
- The entire floor area is covered with boards, every fifth row is nailed down.
- The surface is processed using a parquet sander or scraping technique, covered with paint or varnish (read: "").

This completes the installation of wood flooring. The floors can be used as usual and furniture can be placed.