How to repair a crack in a sewer pipe. How to glue a plastic pipe
Previously, only wooden windows were installed in houses, but nowadays they produce not only wooden windows, but also.
And in the modern world, people often began to install plastic windows in their houses or apartments. So you, at some point, decided that wooden windows no longer keep heat so well, freeze through and look, say, not very attractive, and for this reason you decided to change wooden windows to plastic ones.
Installation of plastic windows is not easy, so it is best to entrust this work to specialists. But, if you are sure that you are able to carry out the installation of windows on your own or you have some experience in the installation of such windows, you can carry out the installation of windows yourself.
Here's how to properly install a plastic window, and we will tell you further.
The positive quality of installing plastic windows yourself is that you will do it more carefully than many specialized workers. Still, if you do not have the skills to install such windows and have never seen how they do it, then it is best to use the services of specialized workers.
What is the best time to install plastic windows?
Installation of plastic windows can be carried out in winter, but if the outside air temperature is at least minus five degrees. Otherwise, you need to install a special heat shield.
Measurement of windows
Before purchasing a new plastic window, you need to make measurements of the window opening and, according to the data obtained, buy a finished window or place an order for the manufacture of a window. When you order a window according to your size, it will fit perfectly into the opening of your window.
The window should not be closely inserted into the opening, there should be a small gap between the window and the opening, as it needs to expand or contract, this will depend on temperature changes.
Clearance requirements
The minimum clearance dimensions should be as follows:
- Window up to 1m 20 cm, the indent should be 15 mm;
- Window up to 2 m 20 cm indent 20 mm;
- Window up to 3 m indention is 25mm.
When you replace a window, you must take into account that the window must enter the opening for the window, only by a certain number of centimeters. This is necessary so that the double-glazed window is not in the wall and in order to make the slopes.
All measurements were made, all the nuances were taken into account, and as a result, the required size of the window profile was obtained. Now you can go to the company and order a window or take a ready-made one that suits your parameters.
Dismantling the old window and preparing the opening
After you have already bought a window and the weather allows its installation, then you can do its installation. It must be borne in mind that all work will be rather dusty, so it is better to remove all things or cover with a film.
After you have done all the preparatory work, start dismantling the old window, and in order to remove the old window, use a chisel, pry bar and hammer.

Before installing a plastic window, it is necessary to remove dirt from the window opening well and moisten it a little.
Then you can start preparing the window for installation.
Installation of a plastic window
Before installing the window profile, the sashes are removed from the window and the double-glazed windows are removed from the blind parts of the window. Then it is necessary to peel off the protective tapes from the outside of the profile and install the protective caps in the drain holes. We attach fasteners for the mosquito net to the self-tapping screws.
Insulation of a profile
If you decide to make an anchor as fasteners, then the profile is drilled through and therefore the chambers are depressurized. Also, fastening windows to anchors requires more labor and skill and for this reason such fastening is not suitable for beginners. If the profile is not properly fixed, it can be led, and if it does, the window will be damaged.
But the anchorage also has positive qualities, for example, the design will be strong. But the negative quality of the mounting plates is that they do not provide good structural strength. But mounting plates are the easiest type of fixing plastic windows. Very often, experts use both types of fasteners.
- Usually we start fasteners from the corner and make the first fasteners at a distance of 120-150 mm and then make the next fasteners with a distance of 700 mm. Three fasteners are installed on each side.
- Before installing the profile in the opening, it is necessary to check all the planes using a level, then using wooden blocks it is necessary to raise the profile and adjust it vertically.
- It is necessary to start vertically from the top of the window opening and raise the profile from the bottom using the materials described above. The next step is to horizontally align the profile. Fixing the profile in the opening from the side and from the top is made of wood blades. After you have done the alignment on all sides, you need to make a profile and if everything is in order, then you can fix it.
- If you fix the window profile on the mounting plates, then they are first fixed on one dowel with a nail. The next step is to check the window profile using a level and only after that the mounting plate is fixed with a second dowel with a nail.
- In the event that the windows are attached to the anchor, then through the holes that were previously made and then using a special tool, make holes in the wall and screw in the anchor without tightening them.
- The anchors are not tightened in order to check the level of the window installation and only then can the anchors be tightened, but very slowly so as not to disturb the balance of the profile. When the profile is fixed, we remove the blades from the wood from the sides and from the top, and the lower blades remain, because they are the basis of the window profile.
How to install ebb windows on plastic windows?
The next step in the work is the installation of the ebb.
We measure it and use metal scissors to cut out the desired size, then a special tape is glued to the bottom of the frame, it is needed to protect the seam between the wall and the lower part of the window.
After the tape is glued, a layer is applied to it. Also, a layer of polyurethane foam is applied to the edge of the slab, this is necessary in order to ensure and seal the ebb. The ebb must go into the grooves of the profile and is attached with self-tapping screws.
Sealing of seams
Then we close the seam with polyurethane foam between the wall and the window (first from one side, then from the other and from above). After the foam has dried, another insulation tape is glued on top of it. On the inside of the window, it is necessary to remove the protective tape and use special linings when installing the glass unit.
Using the strips, hold the glass unit, hammer the strips into the grooves and install the sash, fix it in the awnings, then fix the handle and adjust the sash horizontally and vertically. After all the work, a mosquito net is installed.
How to properly install a window sill on plastic windows?
After all the work, we begin the installation of the window sill.
- First, we fill the lower assembly seam well with foam, and tape is glued on top of it.
- Then, wood blocks are installed, on which the window sill will be attached.
- Wooden blocks must be at least ten centimeters long. Also, the window sill should be tilted five degrees towards the room, and the window sill should not obscure the battery.
- It is necessary to check whether the window sill is securely attached and it is necessary to solder it from below and, best of all, with foam.
In this article, we told how to make the installation of a plastic window and we hope that this information was useful to you. Good luck and patience!
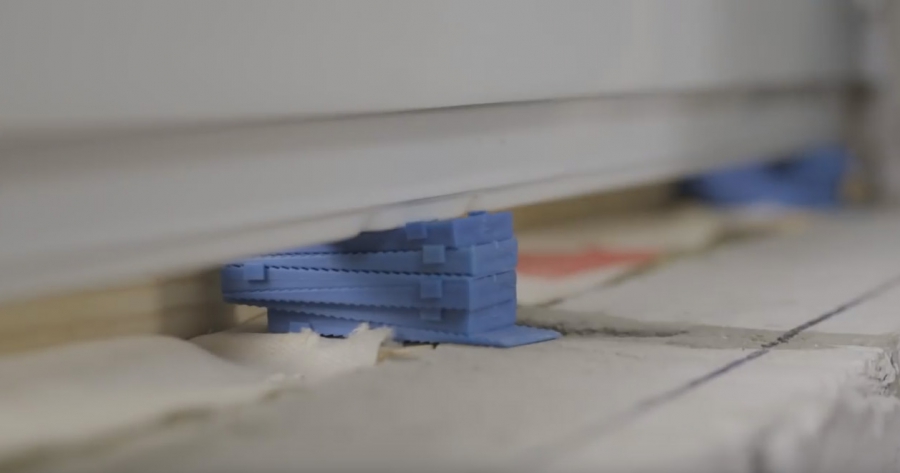
Rice. No. 4
Mounting wedges are installed under all vertical elements of the window frame - these are vertical straps and vertical imposts. Distance (side) pads are installed at a distance of about 200 - 250 mm from the corners of the window box, the dimensions of the side pads are selected similar to the dimensions of the lower support pads. Installation of distance blocks in the very corners of the window box is unacceptable, since the blocks will prevent thermal deformations of the window during seasonal and daily changes in the air temperature and the window itself.
10. Aligning the box of the window block vertically and horizontally, temporarily fixing it in the required position
The window frame, together with the tapes glued to it, is placed in the opening and, using plastic wedges, is vertically and horizontally aligned and pre-fixed.
11. Final fixation of the window block box in the opening
Holes are drilled in the wall for fasteners. The window frame is finally fixed with fasteners to the wall. When installing the fasteners, make sure that the box is not stretched by the fasteners!
12. Bonding tapes at the bottom of the window structure
Carefully remove dust from drilling holes in the wall. Prime those areas of the opening surfaces to which the tapes will adhere. Wait for the primer to dry. A vapor barrier tape "ROBIBAND VM V 100" is glued to the bottom surface of the opening. When gluing, the tape should be directed towards the room. The length of the tape should be sufficient to cover the bottom horizontal assembly seam along its entire length, taking into account the formation of gaps or beads at the corners to reliably seal the corners. On the outer plane of the support profile or the outer plane of the fold, intended for installing the ebb, a narrow adhesive strip is glued tape "ROBIBAND NL 120". When gluing, the tape should be directed towards the street. The length of the piece of tape should be sufficient to cover the lower horizontal gap along the entire length, taking into account the formation of gaps or flanges at the corners to reliably seal the corners.
13. Filling assembly joints with polyurethane foam insulation
A cylinder of polyurethane insulation (PPU) is prepared for work, in accordance with the instructions for use of a particular foam. It is recommended to use polyurethane foam with high initial and low secondary expansion. Before filling the PPU mounting gap, it is necessary to moisten the mounting gap surfaces with water by spraying. Do not wet the areas where the tape will adhere, as nothing will stick to a wet surface! After moistening, the mounting gaps are filled with polyurethane foam. The degree of filling the gap depends on the degree of expansion of a particular PU foam. Test releases are recommended. The amount of polyurethane foam in the seam should be enough so that the PUF, when expanding, pulls the tape, but does not tear it off.
Before gluing the tapes to wet foam, re-wet the foam surface, otherwise large voids may form in the foam!
14. Bonding tapes "ROBIBAND VM" to the opening
The protective paper is gradually removed from the adhesive strip of the ROBIBAND VM 120 vapor barrier tape glued to the vertical and upper horizontal sections of the window frame, and the tape is glued to the surface of the window opening. Make sure that the polyurethane foam, when gluing, does not get between the tape and the surface of the opening. The protective paper is removed from the ROBIBAND VM 100 vapor barrier tape located in the lower part of the opening, and the tape is glued to the frontal plane of the support profile or to the frontal plane of the fold intended for installing the window sill. In the corners of the opening, beads (sides) are formed for reliable protection of the joint. The protective paper is removed from the ROBIBAND NL 120 tape, and the tape is glued to the bottom of the window opening. In the corners of the opening, beads (sides) are formed for reliable protection of the joint.
15. Installation of low tide and window sill
An ebb and a window sill are installed on the window block. All operations must be carried out carefully in order to avoid displacement of the window frame.
16. Hanging sashes and installing fixed glazing
Sashes are hung, and fixed glazing is installed. The leaves are closed. All operations must be carried out very carefully in order to avoid displacement of the window frame.
17. Quality control
Quality control is carried out after 24 hours. Quality control consists in checking the density of adhesion of tapes along the entire perimeter of the assembly seam, both from the side of the room and from the side of the street. If the tape is glued tightly, without delamination and gaps, then we can assume that the installation is done with high quality.
The PSUL tape should expand and cover the gap completely.
18. Finishing of slopes
The finishing of the slopes is carried out in accordance with the adopted constructive and design solution.
Need more information?
You can watch an educational film on the installation of window structures on our website, which shows the entire process of a high-quality installation of a window unit.
How is the installation of plastic windows; what nuances should be paid attention to during measurements and installation; common errors, as well as ways to identify them - we will consider these and other pressing issues in this article.
Why are problems with plastic windows so common?
Many people think that PVC windows are as good as they are installed. In many ways, this is true. The fact is that the manufacture of plastic windows is carried out using automated systems, and calculations and design are carried out on computers using specialized software. That is why defects in the assembly of translucent PVC structures are extremely rare, and the notorious "human factor" is at the forefront. It should be noted that in addition to high-quality installation, it is very important to correctly choose a window system that is optimal for certain conditions. And yet, an incorrectly measured window simply cannot be properly installed.
 Consequences of poor-quality installation
Opening preparation
Carrying out work on the installation of windows, you always have to spend some time preparing and restoring the opening. This problem is especially relevant when replacing window blocks in old buildings due to extensive damage to dilapidated structures. In an amicable way, it takes two or three days for a high-quality solution, which is simply impossible in residential premises. Quick-hardening cement-based compounds, polyurethane foam in combination with sheet insulation come to the rescue.
After dismantling the old window, the opening must be freed from moving, crumbling particles, protruding elements of the old internal slopes. All surfaces are cleaned of dust, dirt, oil stains. Loose areas should be fixed by filling with a waterproof binder.

Large voids formed when replacing window blocks, for example, between the rows of facing and bearing brickwork, are sealed with dense insulation, all through holes are foamed.
In addition, it is necessary to remove the build-up of mortar, repair cavities and chips on the inner surfaces of the quarters, exceeding 10 mm in height. Such attention to this area of the opening is due to the fact that a hermetically sealed tape seal will be placed here.
Installation of plastic windows
Placing and Temporarily Fixing Window Blocks
Windows can be installed in a pre-prepared opening, both assembled and with the shutters and double-glazed windows removed. In any case, the window unit must have an installation profile designed for the installation of the window sill and ebb.
With the help of a level or a plumb line, the windows are exposed in compliance with the required mounting gaps within the permissible deviations - up to 1.5 mm per meter, but not more than 3 mm for the entire length of the product. The difference in window diagonals should not exceed 8 mm. If the opening does not have a quarter limiting the location of the window block, then it is recommended to install the product at a certain distance from its outer edge - at least 1/3 of the thickness of the load-bearing wall. If the wall is heterogeneous, with insulation - in the zone of the insulation layer.

With the help of plastic mounting wedges, the window is fixed in the opening. Such wedges are installed in pairs in the corners of the window block, the thickness is adjusted by moving them relative to each other by several intermeshing teeth. The prefabricated plastic shoe has an air chamber, therefore it is not a cold bridge, like a homemade wooden block, and moreover, it does not deform with changes in temperature and humidity. The recommended wedge width is 100-120 mm. After fixing the window with fasteners, all mounting blocks are removed, except for the lower support wedges. It is they who transfer the load to the supporting base, and not the lower assembly seam.
Attention! If the window has a vertical central bulkhead - impost, then the supporting wedges should be placed directly below it.
Fastening PVC windows
Depending on the design and density of wall materials, the weight and dimensions of the product, the strength of wind loads, the size of the mounting clearances, the optimal type and number of fasteners are selected. For fastening windows to openings, plastic or metal anchor dowels, construction screws or mounting plates are used.
Polymer dowels are used for walls made of materials of low strength - lightweight concrete, hollow brick, wood, as well as to avoid contact corrosion in aggressive environments. Plastic frame dowels provide good thermal insulation of the connected elements.
Self-tapping screws fasten windows to wooden bases - rough frames, embedded elements, wooden frame racks.
Flexible anchor plates are used for multi-layer wall structures, if there is insulation in the area of the window block, and the attachment point must be moved outside of it.

Metal expansion dowels provide excellent resistance to shear loads arising in solid mineral substrates such as concrete, solid brick, natural stone.

The length of the fasteners is selected in such a way that the expansion element of the anchor is immersed in the base by at least 40 mm. The diameter of the dowels should not be less than 8 mm.
Fasteners must be located in the range of 150-180 mm from the inner corner of the window block and 120-180 mm on both sides of the impost. If there is no mullion connection, then one dowel should be located along the line of the shtulpal narthex of the two doors. The distance between the fasteners should not exceed 700 mm for white and 600 mm for tinted windows, therefore an anchor is almost always placed in the area of the middle of the side profile of the window.
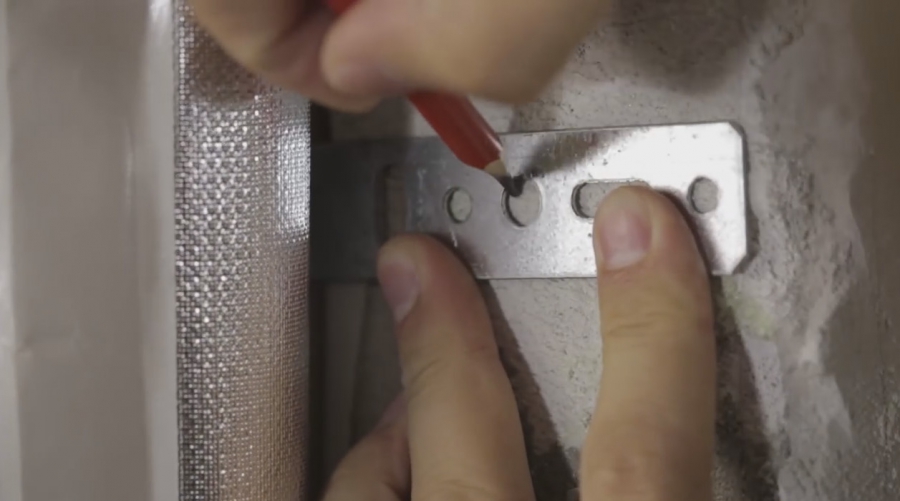
Through holes are drilled in the pre-determined places in the window frame, so that the heads of the dowels and locking screws are recessed into the rebate of the window profile and can be closed with decorative plugs or caps. Depending on the features of the wall materials, anchor holes in them are drilled or drilled with a perforator in a mixed mode - drilling with a blow.
Attention! The drilling depth of the holes in the walls must be at least 10 mm deeper than the length of the base part of the anchor.
Flexible anchor plates are attached to the windows before they are installed in the installation opening. To do this, they are snapped into the grooves outside the plastic profile and screwed to it with screws with a drill, the diameter of which must be at least 5 mm and at least 40 mm long. After fixing the window in the opening, the plates are bent and are attached to the wall using plastic expansion dowels with a diameter of 6 mm.
Attention! Each plate should have two attachment points.
Mounting gap filling technology
According to the current GOSTs, when installing plastic windows, a three-layer system of assembly seams must be used. This design was based on a rather simple idea, which was once implemented by German specialists. The main component of the installation gap is the central layer in the form of polyurethane foam, which performs a sound and heat insulation function and must remain dry under all circumstances for correct operation. The inner layer protects the insulation from moisture penetration from the inside of the room, in other words, it is a vapor barrier. Self-adhesive tapes or vapor-proof mastic sealants are used for this. The outer layer is a pre-compressed self-expanding sealing tape (PSUL), which allows moisture to pass from the foam insulation, but is waterproof from the outside.
The device of a complex seam begins with the installation of the PSUL on a quarter of the opening, 3-5 millimeters from its edge. Thus, a front mounting gap is formed, the size of which is regulated by the working thickness of the sealing tape compressed by at least 25% - in practice, this is about 3 to 20 mm. In some cases, for example, if a quarter of a brick has joining or other minor irregularities, the tape is glued directly to the window profile.

Attention! The current GOST 2007 in article 5.1.9. permits the embedding of the outer layer with plaster compounds, while the previous standard forbade this, allowing only the use of profile details: cover strips, false quarters, ebb tides.
Note that the use of an ebb tide is a prerequisite for ensuring reliable protection of the assembly seam from atmospheric moisture. The ebb tide should extend 30-40 mm beyond the facing of the outer walls; noise-suppressing pads can be installed under it.

Further, after the final fixing of the window in the opening with the help of anchors or flexible plates, the assembly seam is filled with a layer of foam. Foaming is carried out with a fully assembled window unit. Please note that expansion gaskets must be installed between the glass unit and the profile.

As we have already said, the central layer, depending on the dimensions and features of the windows, can vary from 15 to 40 millimeters. The foam sealant should be applied in a continuous uniform layer, without the formation of voids, tears, cracks. That is why, with a large width of the window profile, or if the width of the installation gap significantly exceeds the standard, polyurethane foam is applied in stages, observing technological breaks for drying the layers. It is recommended to do a test foaming of a small area before filling the joint in order to determine the expansion of the polyurethane sealant. The foam should not extend beyond the outer plane of the window profile.
Attention! Cutting off excess foam makes the central layer too hygroscopic, so this operation is performed only in extreme cases and only from the inner surface of the assembly seam.
On top of the dried foam insulation, a vapor barrier tape is glued onto the opening or mastic is applied. An important stage in the construction of the inner layer of the assembly seam can be considered the treatment of mating elements of the window system with silicone or acrylic sealants, such as the cladding of the slope, the window sill, as well as the joints of individual window blocks with each other and with pedestal, pivoting, expansion profiles.

At the end of the installation of windows, the protective film must be removed from the frames and sashes.
The main mistakes when installing plastic windows
The first thing worth paying attention to is the deviation of the details of the installed window unit from the vertical and horizontal lines. Let us recall that modern standards allow inaccuracies of installation up to 1.5 mm per linear meter or 3 mm for the entire product. The vertical, perhaps, is best checked using a plumb line and a tape measure fixed near the window, measuring the distance from the thread stretched under the weight of the cone to the window profile. When using this method, the dimensions of the product do not matter, because we are able to measure along the entire length of the profile. The horizontalness of the parts can be checked by placing on the vertical profiles of the window, including imposts, control marks using the hydro level and subsequent measurements of the distance from them to the edges of the product. Note that only expensive rack levels make it possible to study deviations more or less qualitatively, but in most cases their length is clearly not enough to understand the overall picture.
If there are deviations only vertical or only horizontal, then this means that the box is skewed and has no right angles. The lengths of the diagonals are checked with a tape measure - the maximum allowable difference can be 8 mm.
Next, you should check the window for deformations of the window profiles. For these purposes, along the lines of the outer edges of the window profiles, from corner to corner, pull the cord - the deviations are determined visually. A very common problem is the curvature of the middle of the side profiles towards the center of the window. This happens when the installation is carried out on flexible anchor plates that are not able to contain the pressure of the expanding foam, or if there are no spacers between the glass unit and the profile. The deflection of horizontal profiles occurs for the same reasons.
It is very important to check the correctness of the choice and technology of application of a certain type of fasteners. Very often, installers completely unreasonably prefer to use anchor plates for all occasions, since it is much easier to display a product with their help, moreover, they do not need to remove the sashes and remove the double-glazed windows. You should be as serious as possible in meeting the requirements regarding the number and location of fasteners.
The absence of support blocks under the installation profile (most often under the vertical impost) or the use of homemade wooden wedges instead. As a rule, this error is paired with a more serious one - too small or zero mounting gap at the bottom of the window.
Violation of the technology of the installation of assembly seams is mainly in the too small dimensions of the gaps, the discontinuity of the insulating layers or their absence. The most common mistake can be considered overflowing foam material, which entails deformation of the profiles and the need to cut off excess gasket.
A related problem causes the blowing of the joints of the elements of the window system - the window sill, the facing of the slope, connecting, expansion, turning profiles. This is a banal lack of sealing their joints with self-expanding tapes or acrylic, silicone.
Installers often incorrectly mount connected window units, for example, on glazed balconies. The windows are not located in the same plane - "little book". It is quite simple to check this, you should pull the cord in front of the front line of the window, from corner to corner, and take measurements with a tape measure.
Also, there are often cases of placing adjacent windows not along one horizontal line, or without reference to the geometry of the facade. For example, this is very important on a bay window, panoramic glazing, where one complex window sill can be used with several window blocks. And again, the water level will come to the rescue, making it possible to put mutually located horizontal marks at a sufficient distance.
Problems arising from errors in the assembly of PVC windows, and how to solve them, we will definitely consider in the following articles.
How to avoid poor-quality installation of plastic windows?
- Use the services of a large company, it is better if it is a manufacturer of window systems, and not an intermediary.
- Study in detail the technology of installation of PVC windows. No wonder they say: "Aware is then armed."
- Prepare a storage area for materials. Free up space near window openings as much as possible, cover pieces of furniture and household appliances with polyethylene, isolate the rest of the premises, and fence off the working area outside.
- Discuss all the technological nuances with the measurer, be constantly present during the installation - do not forget about the large number of hidden works.
- Before and after installing windows, check the integrity of the profiles and glass unit, the performance of the fittings.
- Do not sign the acceptance certificate for new windows until you check the quality of their installation.
- If you still find problems later - blowing, mashing, then feel free to contact the contractor with a request to eliminate the malfunctions. In the overwhelming majority of cases, all problems are promptly resolved by the manufacturer.
The PLASTOK company manufactures windows and installs them according to the highest standards in accordance with GOST and with a 5-year warranty. We offer installation of plastic and aluminum windows, as well as glazing of balconies.
Prices for the installation of plastic windows
* Dismantling is carried out free of charge only when ordering and installing windows
** The minimum cost of installation is 2500 rubles.
** The cost of installation for non-standard windows is calculated individually.
To get a durable and high-quality installation, you need to call a measurer who will measure the window opening, not only taking into account your wishes, but also taking into account the characteristics of the building itself and the increase in the opening after dismantling. If you follow all the rules for dismantling and installing a plastic window, you will get durability, quality, reliability, warmth and comfort in your home.
Video of the installation process
The main stages of installation of plastic windows
PLASTOK company performs high-quality installation using modern tools and materials... Assembly teams are composed of trained qualified specialists... The company conducts systematic refresher courses for its employees.
PLASTOK is quality assurance performed installation work.
Preparing access to the window opening
Checking the size of new pvc windows and preparing them for installation
Before starting the installation, a control check is carried out for the conformity of the window dimensions to the window opening, the order is checked and its compliance with the terms of reference is checked.

The sashes are removed from the hinges and the blind windows are opened. Holes are drilled in the frame or the anchor plates are fixed in accordance with the requirements approved by GOST, taking into account the type of house and the indicators specified in the measuring sheet. When determining the location of fasteners, installers are guided by the following requirements:
- distance between fasteners - no more than 700 mm,
- distance from the inner corner of the window block box to the fastening element - 150-180 mm (but not less than 2 fasteners on one side),
- the distance from the mullion joint to the fastening element is 120-180 mm.
Dismantling old window frames
After knocking down the slopes, old frames are removed from the window opening. During installation, the workspace is kept clean and large debris is removed.

Before installing the frame in the opening, 3 types of tapes are installed on it, which provide hydro, heat and sound insulation of the room.
- PSUL tape- self-expanding pre-compressed sealing strip. The material is a self-adhesive polyurethane foam tape impregnated with a special neoprene compound. It is easily glued and tends to expand, filling all the defects and irregularities of the window opening. The tape not only hides these defects, but also perfectly protects the assembly seam from the effects of weather. The PSUL tape is glued to the side and upper parts of the frame, taking into account the approach to the quarter.
- Vapor barrier tape made of aluminum foil reinforced with high-strength synthetic thread, intended for internal vapor barrier of assembly joints.
- Waterproofing tape will reliably protect the external assembly seam from aggressive atmospheric influences. It is made on a polypropylene base with a butyl adhesive strip that firmly adheres to the opening or slope, and the adhesive mounting strips are easily fixed to the window or door profile.

Preparation of the window opening and installation of the frame and sashes
Before installing a new window, the opening is thoroughly cleaned and prepared. After that, with the help of technological wedges, taking into account the gaps on the sides, the frame is set relative to the vertical and horizontal. Plates or dowels are fixed on the sides of the window frame. During the installation process, a control measurement of deviations is required. Window sashes are installed and blind parts are glazed.

When the frame is fixed, the installation seam between the frame and the wall is sealed with foam sealant.

back
Buying and installing new windows is not a cheap pleasure, and a significant part of the costs falls on installation costs. You can reduce costs by doing this part of the work yourself. We will tell you how to install a plastic window yourself, giving step-by-step instructions with a photo.
Measurements required for the manufacture of a plastic window
The ease with which you will succeed or not will subsequently depends on how correctly you make the measurements. After all, having made a larger window block, you will be forced to increase the opening, and if you make a mistake with the dimensions downward, you will have to increase it.
It is necessary to determine the dimensions of the future frame based on the type of windows, which are:
- with a quarter, that is, with a ledge in a half-brick, which is located outside the opening and against which the window box rests. Such windows are present in almost all typical buildings;
- conventional, that is, without protrusions. This design is used in custom-built buildings.
Measurements of a regular window
Measure the length and width of the window opening with a tape measure, add 5 cm to these indicators (on mounting foam) and write down the data obtained. In addition to the dimensions of the window box, you need to measure the depth of the slopes, as well as the depth and length of the window sill. The last parameter is calculated based on the distance between the boundaries of the vertical slopes, to which 8-10 cm are added.
Window measurements with a quarter
In this case, you will have to measure the distance between the horizontal and vertical edges of the protrusion and add 5 cm to the resulting figures on the mounting foam.
The video will tell you more about the nuances of measurements:
When ordering a plastic window, do not forget to discuss with the manufacturer the number of glass units and the size of the profile, as well as the list and quantity of fittings and fasteners. If the climate in your area is not harsh, and the windows do not overlook the roadway, feel free to order two double-glazed windows and a 6 cm wide profile. The lower the temperature outside the window and the more noise on the street, the greater the number of double-glazed windows and the size of the profile.
The procedure for dismantling the old frame
To install the plastic window yourself, you need to get rid of its wooden predecessor. Dismantling should be done carefully so as not to turn half of the wall, which will then have to be restored, wasting time, money and effort. At the same time, remember about safety precautions, because working with glass is very traumatic, and the slightest mistake can lead to a hospital bed.
First, remove the opening parts of the windows from the hinges. Remove the glasses after removing the glazing beads. Using a grinder or a hacksaw, make cuts of the box and the rest of the window block.
Using a pry bar, remove the elements of the old structure from the opening, which is then thoroughly cleaned of construction debris and dust.
Now it's time to learn how to install a plastic window yourself.
Do-it-yourself plastic window installation: instruction
To install a plastic window yourself, prepare the tools and materials that will be needed during installation:
- self-tapping screws (4x35 mm, 4x25 mm);
- screws (5x60 mm, 3.8x25 mm, 3.9x25 mm);
- anchor plates;
- polyurethane foam;
- waterproofing and vapor barrier tapes;
- mounting wedges;
- ebb;
- windowsill;
- plumb line;
- level;
- PSUL;
- puncher;
- screwdriver;
- screwdrivers;
- a hacksaw with a fine tooth for trimming the window sill;
- metal scissors to cut the ebb.
Remove the sashes from the window unit before installation.

Install the mounting plates. The procedure is as follows: place the plate along the end of the window block, then turn it with its other end towards the room, fix it with a self-tapping screw (4x35 mm).

Please note: the distance between the plates must not exceed 600 mm.

Before proceeding with the installation of the structure in the opening, you need to apply marks for the fasteners and PSUL. Align the position of the structure in the opening (this is why a plumb line and a level are needed), taking into account the following: the maximum deviation from the horizontal or vertical should not be within 1.5 mm per 1 m of the structure, but not exceed 3 mm for the entire length or width of the product. Secure the frame using the mounting wedges.
Bend the plates and mark with a pencil the places on the slope where they will be attached.
If your window is with a quarter, then on the outside of the frame, mark the outline of the adjacent opening.

Remove the frame, and drill holes in the places you marked, where the anchor wedges will then be inserted.

Drive dowels into the holes.

Remove dust with a brush and vacuum cleaner. Stick the sealing tape on the frame. In the case when you are dealing with a window with a quarter, the tape is glued to the outer part of the frame at a distance of 3-5 mm from the previously marked contour of the opening.

In quarter-less windows, the outer seam is insulated using special moisture-proof sealants after the structure has been installed.
Fasten the window unit in the opening using mounting wedges and remember to check the correct position.

Fix one top side plate and measure the diagonals of the window unit. Their difference should be within the following limits:

Screw on the remaining plates and remove the wedges, leaving only the bottom and diagonal ones, and then proceed to foaming.

Cut off excess foam and apply vapor barrier tape from the side of the room, making an overlap of 10-20 mm on the wall.

Attach waterproofing tape to the outside.

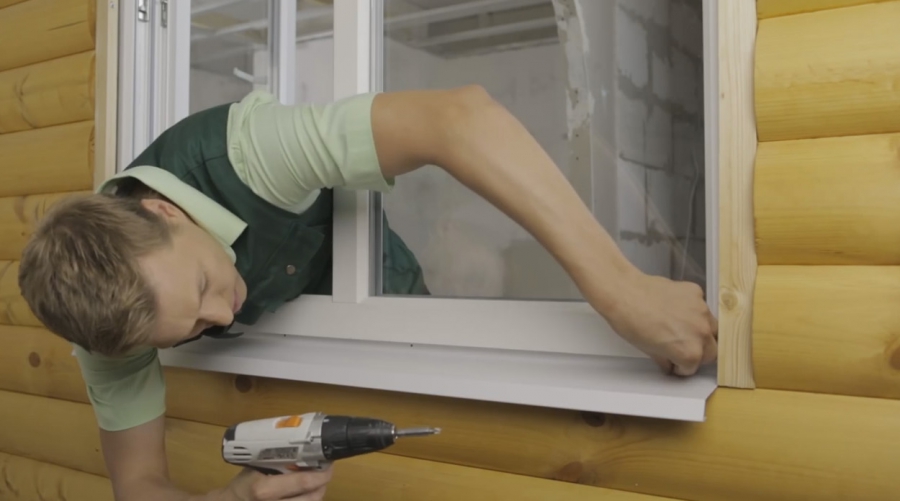
Install the ebb. Insert it into the groove and screw it using self-tapping screws (4x25 mm).
Hang the sashes, then install the window sill. Adjust the knobs if necessary.

You see install the plastic window yourself not that difficult. The main thing is to be willing and follow our advice.
Take it for yourself, tell your friends!
Read also on our website:
show more

