DIY construction table. How to make a table for a summer residence: ideas, materials, drawings with dimensions, step-by-step instructions, photos and videos
if you have small garden on the site, it means that a comfortable place to relax must be equipped there, and the epicenter of this place must be a table. Big table for a friendly company of friends or a modest table for secluded gatherings over a cup of coffee - it does not matter. If you are interested in this topic, you must have already visited more than one site garden furniture and visited all the surrounding furniture stores, but did not find anything suitable. Often good tables with stylish design They are overpriced and you don't want to buy anything. That is why we offer the most best option for hardworking owners - make a garden table with your own hands.
You may be surprised, but furniture can be made from a variety of materials at hand, which, it would seem, have long been awaiting their last trip to the landfill. We propose to start the article with a list creative ideas to create a garden table with your own hands from boards, pipes and other "unnecessary" materials, of which there are plenty in any country house.
So, for example, an excellent and comfortable table can be obtained from a pallet for bricks. You can buy it or look for it at the nearest construction site. The furniture turns out to be very stylish and suitable not only for the garden, but also for home interior in eco, loft and country style.
Useful advice: Since we will talk about making a garden table made of wood with our own hands, it should be understood that if such material is not protected from moisture, then it will not last long outdoors. Therefore, before assembling any wood structure, carefully treat each element with an antiseptic stain, and then cover with 2-3 layers of weather-resistant varnish (tinted or not) or paint. Mordant in this case can act not only as an antiseptic, but also as a toner, coloring the wood in darker tones (you can create an imitation of rare and expensive wood species).
By the way, pallets can be used most different ways, collecting literally anything from them, as from a constructor:

And if an unnecessary wooden coil catches your eye at a construction site, then to get a stylish round table for the garden, it will be enough just to cover it with varnish and put it on the end:


And the last example, how construction pallets you can create comfortable garden tables and benches with your own hands, without putting much effort:

Manufacture of furniture from pallets recent times has become quite a popular pastime, so get suitable materials free or cheap is not always possible, but every owner wants to save money ... next option garden table, this problem is not observed, because old used tires can easily be found in the nearest tire shop! The table turns out to be low, but stable and very comfortable. To increase the aesthetics, the tire can be carefully wrapped with twine and varnished, and the plywood countertop can be decorated with mosaics or artistic painting.


The option in the image below will appeal to adherents of eco-style. To make such a table, you only need a thick clay mortar and wooden table top. The base can be given any shape, including making storage compartments in it. If there are no clay deposits nearby, you can mold such a table from thick concrete mortar and then paint in any color.

A great place to relax with a table and comfortable seats can come from the most ordinary metal barrels. Under the seats there will be room for useful things, and soft pillows can be taken into the house at night or in bad weather so that it does not get wet.

Very unusual and beautiful garden tables are obtained from large old stumps. If there is such a stump on your site that you are still not going to uproot, maybe you shouldn’t do it? Check if there are insect colonies inside (if there is already an anthill, then the stump is most likely rotten and brittle), soak the wood well with an antiseptic, varnish it and attach the countertop on top. For the manufacture of countertops, it is best to use wood, but you can also take thick glass or metal. Also, an old countertop from a broken table or interior door. If the stump is large enough, you can do without a countertop altogether, simply by carefully leveling its surface and covering it with stain and varnish.

Wooden garden table
Wood is the most popular material for making furniture. It is environmentally friendly, strong enough and durable, easy to work with. Due to the light weight wooden table It is convenient to transfer the IR to places in place and, if necessary, quickly clean it under a canopy. And to make transportation even more convenient, the design can be folded. In this part of the article, you will learn how to make a folding garden table with your own hands.

Manufacturing instructions:
- tall folding table will be 55 cm long - 85 cm and wide - 50 cm. To make a solid frame that will hold the tabletop and legs, you will need wooden planks 2x6 cm. The frame is 62 cm long and 35 cm wide. All its corners must be brought to the end and drilled with self-tapping screws, since the frame will be tightly attached to the tabletop.

- For the manufacture of legs, you will need similar planks 2x6 cm 50 cm long. For greater aesthetics and safety, they should be rounded at both ends. In order for the table to unfold clearly and conveniently, the legs must be fastened in a certain sequence. Work on the first pair of legs first. Step back 5 cm from the outer edge of the carrier frame, make a mark and draw a vertical line. Then measure 4 cm up the line from the countertop and make a second mark. At the intersection of the lines, make a hole with a diameter of 8 mm - here the legs will be connected to the frame with 8 mm bolts. Alternatively, an aluminum tube of the appropriate diameter can be used, as in this case. Pass the tube through the hole, cut off the protruding ends and flare on both sides. Attach the second leg to the frame in the same way.

- The next step is to fix the bottom of the legs with each other to give stability. It can be done wooden slats or with a piece of chipboard. In this case, a 38x8.5 cm chipboard was used. Mark the center of the width of a piece of chipboard, departing from the edges by 7 cm, then measure 2 cm from the center in each direction, cut off the excess and round off the corners. This is necessary in order to slightly "drown" the fixing spacer into the legs and the supporting frame - so the second pair of legs can cover the first and not stick out when the table is folded. To drown the spacer, attach it to the legs and frame, circle along the contour and in the indicated places make cuts as deep as the thickness of the chipboard. Then, using a chisel, select the appropriate areas to make indentations.

- To assemble the second pair of legs, you need to slightly adjust the frame, or rather add small pads to increase the distance between the legs. If the distance between the legs of the second pair is the same as that of the first pair, the table will not be able to fold. Make overlays of wood 2.5 cm thick and 8x6 cm in size.

- Closer to the edges of each lining, drill 2 holes and screw them with self-tapping screws to the supporting frame. Now you can install the second pair of legs and make spacers for them. Please note that the spacer in this case will be longer (44 cm) because the distance between the legs has been increased.

- Next, for each pair of legs, it is necessary to install a limiter so that the table cannot open too much and is as stable as possible. To make the limiter, take a wooden plank 3x2 cm, the length of which is equal to the distance between the legs. Lay the plank over the legs, stepping back 5 cm from the frame so that the legs are slightly apart.
- The folding table is almost ready, and it remains only to attach the table top to the frame. This can be done using steel corners or simply screw the countertop with self-tapping screws, as in this case.


- The easiest way to make a do-it-yourself tabletop for a garden table is from chipboard. Clear all corners sandpaper, with putty on wood, cover the fasteners. Next, the table can be covered with paint or pasted over with wood imitation paper. To glue the paper to the surface with high quality, spread it and the parts of the table to be glued with PVA glue, attach the paper and immediately go over these places with a hot iron. It remains only to trim the excess around the edges.


- To protect the paper from getting wet and dirty, coat it with a weatherproof varnish. In this case, the first coat of varnish was tinted. When it dries, go over the surfaces with fine sandpaper to create a roughness and increase adhesion for a good hold of the second coat of varnish. It can be made transparent. Before application, wipe the parts to be treated with a damp cloth to remove dust.
- Finally, when the second coat of varnish has dried, frame the tabletop with furniture plastic tape suitable color.

Now the table can be taken out into the garden and used for its intended purpose. There are a lot of options for folding structures, and at the end of the article you will find drawings of a transformer garden table. With your own hands, even a novice carpenter can make such furniture with the simplest tools.
Metal garden tables
Working with metal is much more difficult than with wood, since it requires special equipment, not to mention professionalism. Besides, hardware they weigh several times more and are not as mobile as light wooden tables. However, the service life of such furniture is much longer, and the resistance to external negative influences is stronger. If you protect the metal from corrosion, it will stand in the open for many years.

In most cases, profile pipes are used for the manufacture of furniture. This is a versatile and very convenient building material that has the right geometric shape making it easy to work with. To make a garden table with your own hands profile pipe, you must have a special pipe bender and welding equipment. Below are examples of such products and drawings that you can use to make your own table.

Helpful Hint: In the case of wooden tables, all elements should be treated with stain or other antiseptics. Metal also needs protection, so every detail must be coated with an anti-corrosion compound or special paint. If metal furniture is constantly standing outdoors, once a year (in spring) the anti-corrosion coating should be renewed.
As a rule, metal parts serve only to create a strong and durable frame, while the countertop and various decorative inserts can be made of wood, plastic, stone or glass. Various combinations allow you to realize comfortable places to relax. The most elementary structure made of wood and metal can look spectacular if decorated appropriately and properly fit into the landscape. To do this, you can use mosaic, multi-colored glass or decorative glass pebbles.

The countertop lined with ordinary sea pebbles also looks very nice. And if you use the same pebbles to decorate elements garden paths or porch, you can connect the exterior with the landscape in a harmonious composition.

The main advantage of garden furniture on metal frame is weather resistance - you do not need to worry that in case of bad weather the table will suffer and it will have to be restored. Can be covered for the winter plastic wrap, and every spring just update paintwork to prevent rust. To make a garden table made of metal, wood or improvised materials with your own hands is within the power of any hardworking owner, and if you attach a little imagination to this, you can get a real work of art.
DIY garden table: photo


We will send the material to you by e-mail
Not everyone likes to buy finished goods for home use. The soul of some people requires creative and practical self-realization. The editors of the online magazine, the site invites those who wish to learn how to make a wooden table with their own hands, what is required for this, and whether there are pitfalls in such work.
beautiful wooden product for the kitchen or living room, made with love
Professional carpenters are unlikely to need our step by step recommendations, but for beginners, advice will come in handy. To begin with, consider what products you can make with your own hands from wood.


Of course, the more skills a person has, the more complex the model he can make. But in order to build a table with your own hands from wood, there are ready-made drawings and photos to help beginners.
How to choose material for self-production of a wooden table for home and garden
What to make dinner table with your own hands? The best is wood. The most malleable for the newly-minted master will be pine. Poplar products will look more solemn. For the street, you can take mahogany.
If you want an option for the home and easier, then you should consider laminated chipboard with optimal thickness in 25-35 mm. You can take it on the table wooden planks, birch plywood with a thickness of 35 mm. Legs can be made of metal or wooden beam(about 50 mm thick).
In order not to be mistaken with the amount of material, a preliminary drawing of the future design is made with exactly the specified dimensions.
Advice! Suitable product height varies between 750-800 mm.
Related article:
DIY furniture made of wood: for garden, children's room, kitchen, sauna, garden, arbor; how to restore pieces of furniture, useful tips and recommendations from experts - read our publication.
What tools are needed to make a wooden table with your own hands
It doesn’t matter what shape the future table will be: a certain set of tools is required to work with wood. You can’t do without a jigsaw, and it will be much easier to work with electric model. To fix all structural elements, either a drill with a multi-stage drill for holes, or confirmations is used. To grind the product to perfection, you need either a special nozzle for a drill.

For greater fastening strength, carpentry glue is included in the tools.
How to make a wooden table with your own hands - step by step instructions
We have selected four types of structures that you can make on your own, even with a minimum of carpentry skills. We offer you to learn about the stages of manufacturing round and rectangular table, coffee table and models for garden gazebo.
Making a wooden round table
It is easiest to make a round table top and a binder ring from either 1500 × 1500 mm and 1280 × 1280 mm. You will also need two strips of chipboard (1110 × 120 × 25 mm). We will make the legs from four wooden bars measuring 120 × 50 × 750 mm.

How to make a tabletop
How to draw a circle perfectly even? On a sheet of plywood in the center, place your own thumb with a string attached to it with a pencil. The length of the rope from the base to the top should match the radius of the future tabletop. Holding your finger in one place, draw a circle with a pencil around the full length of the rope. It remains to cut it with a jigsaw.
The circle-underframe is cut out in a similar way.


Leg manufacturing
A round table made of wood or chipboard will look charming if done consistently. You don’t have to mess with the legs if there is no excessive originality in the plans. The bars are divided into 4 parts according to the desired table height minus the thickness of the table top. First, one leg is cut off, and the other three are already aligned along it.
All processing grinder carried out immediately.
Advice! Sanding should not be rushed, as the first coating with varnish will give out all the shortcomings.
Assembly of the structure and processing of the finished product
Assembly is carried out in stages. First, the strips are aligned groove into groove. Then the crosspiece of the slats is connected with the legs with confirmations, as in the figure below:

If you want to make the structure stronger, before connecting the legs to the tabletop, their upper base is smeared with glue.
Advice! Nails are not used in such work: a self-tapping screw or confirmation can be unscrewed without problems, and the connections will be much stronger.
Making a rectangular wooden kitchen table
The rectangular design is classic and very useful in everyday life: it is convenient to cook on such a table and you can comfortably dine at it.

How to make a tabletop
The tabletop made of wood for the table is made either from a whole sheet of plywood, or from individual processed to perfect smoothness. edged boards.

Having fastened the boards with screws and glue, they begin to manufacture the frame.
Production of wooden legs for the table and frame
At the heart of quadrangular models is a frame. It serves to securely fix the legs, ensuring the stability of the entire structure. The tabletop is turned over, measured 3-4 cm deep on each side and the measurements are transferred to the boards. As a result, you will need two boards of smaller length and two larger ones.

The frame is made of four elements: according to the approximate ratio, these are two boards of X cm and two of 2X cm. They are overlapped with each other in turn, building a rectangle. In order not to break the angle of 90 °, any board is used while working with a screwdriver: they press the structure with it while tightening the screws.
As soon as the frame box is ready, they begin to make legs. You can take ready-made balusters for the table, buy metal supports or cut them out of the bars according to the desired length according to the drawing.

Both the frame and the legs are subject to obligatory thorough polishing!
Product assembly and finishing
The frame is screwed to the countertop with glue or self-tapping screws. Then the product is turned over and the legs begin to be attached.

Important! It is better to make holes for the screws in advance. This eliminates the possibility of splitting the tree.
Why not use nails and a hammer? Not everyone has the skills to work with a hammer - here it is dangerous not only to hit your finger. From excessive zeal, it is easy to damage the wood by splitting it. Confirmates and self-tapping screws hold the tree much stronger.
As soon as the leg is fixed, the angle is immediately checked: there should not be any deviation from 90 °. The operation is repeated with other legs. You can attach the legs directly through the countertop, but this will affect the aesthetic component of the product.


Related article:
: a photo best ideas. What can be done from a pallet for an apartment, office and cottage; rules for the selection and processing of pallets; master classes on making a table, sofa, bench, armchair and shelving - read in our publication.
Making your own wooden coffee table
Not only a beautiful element of the interior, but also useful. No need to look for where to put a book, gadget, glasses, TV remote control in a conspicuous place. Such necessary structures are made from different materials: metal, glass, plastic, chipboard, wood. But let's leave other materials alone and concentrate on working with wood.


Choice wooden tabletop for the table depends on the expectation of the owner of the product. Someone wants something massive, while someone prefers lighter options. Let's go with a simple solution.
We buy five boards 30 × 150 mm and process them to perfect smoothness. We immediately saw off the desired length on the countertop: you should get 6 identical canvases. We take four bars on the legs, 6 canvases of shorter length on the lower tabletop, 4 narrow slats for the frame.
| Illustration | Action Description |
|---|---|
 | For brushing wood, use a grinder with a brass brush head. The procedure will expose the structure of the tree, giving the product a special flavor. |
 | We pass back and forth on each board from the side that will be the front. |
 | We process wood with fire. The flame is gradually moved from place to place: the board will acquire a beautiful darkish tint. The procedure will finally destroy unnecessary soft wood fibers. We actively wipe the entire surface with a felt boot or a piece of felt. |


Let's start the build process small table handmade from wood.
- The lower and upper tabletops are stacked on work surface wrong side towards you. The boards are laid tightly to each other, gluing them together. As soon as the boards grab, slats are attached to the top tabletop. They will serve as a frame and a fastening element. They can be glued or screwed with screws. The self-tapping screw is screwed in the center of the rail into each of the boards.
- The legs are screwed to both the table top and the rails. You can use furniture corners.
Video: the process of making a wooden coffee table
Making your own wooden table with benches in the gazebo
It's time to take the time and build a garden wooden table.


It is best to take boards standard sizes. Studs are purchased at a hardware store (suitable with a length of 16 cm), washers (24 pieces). Long nails (8 cm) will fit for a garden gazebo.

To paint a product or just varnish it is already a matter of taste.

In the conditions of modern small apartments it is quite difficult to give free rein to imagination and purchase pieces of furniture that would suit everything. Among other things, it is quite difficult to find such interior elements that would be attractive not only in design, but also in price. These two problems can be solved by self-manufacturing wooden furniture. It could be, for example, a table. You can complete it by preparing everything necessary materials and tools. You can use this piece of furniture both in the kitchen and in the living room.
Preparatory work
In order to make a wooden table with your own hands, you will need to prepare some materials. It will take furniture board, whose thickness is 19 mm. This material is highly durable and looks very attractive. Shields on preparatory stage it will be necessary to mark, and then cut blanks out of them. It is important to stock up on the necessary fasteners for assembly. Thus, it will be necessary to prepare 6 boards that will make up the lower support. Their size is 19 x 100 x 965 millimeters. There will be 4 legs, their dimensions are 19 x 215 x 680 mm. The molding of the legs will also come in handy in the same amount, however, the dimensions of these elements should be equal to 1938 x 470 mm. The tabletop supports will be blanks with dimensions of 19 x 125 x 610 mm. A wooden table for a gazebo with your own hands can be made according to the same dimensions. The master must prepare two dowels for legs with dimensions of 10 x 32 mm. Two jumpers with dimensions of 19 x 140 x 1100 mm should also be distinguished.
Additional elements

You will need a steel coupler in the amount of two pieces, its size should be equal to 150 mm. The table top will be limited to the following dimensions - 19 x 1020 x 1900 mm. The worktop plank must be cut in two pieces and have dimensions of 19 x 19 x 1750 mm. Screws, washers, ties, and dowels will be used as fasteners.
Instrument preparation

It will be impossible to make a wooden table with your own hands if you do not stock up electric jigsaw, circular saw, hacksaw, drill with drills, planer, milling machine, file, clamps, brush. To fasten the parts, you will need carpentry glue; you can process the wood with sandpaper. The table will look good if it is treated with polyurethane varnish, which can be glossy or matte.
Manufacturing technology

If you decide to make a wooden table with your own hands, then you need to know that each support structure has 3 blanks glued together. An opening should be formed in the central part. Immediately you need to cut out 6 elements for two supports. Next, the master must make straight cuts using a circular saw for this. The corners must be rounded. In two blanks, it is necessary to cut the central part so that the groove falls on the central part of the support. The width of the groove should be slightly less than the thickness of the spike in the leg. This will prevent loosening of the structure during swelling and drying.
The next step is to glue the supports. After applying glue to the surface of the parts, they must be folded so that the upper edges are flush. Reliability of fastening will provide clamps. After the supports are dried, it is necessary to get rid of excess glue. After the clamps are removed, you need to plan the lower and upper edges.
Work on the legs

When a wooden table is made with your own hands, you need to prepare four legs. After the vertical edges, it is necessary to plan and round them with a milling machine. At the ends of long blanks, it is necessary to mark and then cut the spikes, placing them from above and below. This can be done with a circular saw, which must be equipped with a combination disc. After the moldings are cut out and brought to the required dimensions, all 4 ribs can be rounded. On the reverse surface of the moldings, it is necessary to make grooves for glue.
Work on supports

If you decide to make a wooden table with your own hands, a design photo will help you decide what features this piece of furniture will have.
The next step will be cutting blanks for supports. For gluing, a 10 mm groove should be selected in each blank. It is preferable to perform these manipulations immediately. In order to simplify the task, it is necessary to prepare a cardboard template by marking the location of the grooves on it. Further, pairwise gluing can be carried out so that the cut is located in the central part. Everything must be tightened with clamps. Once the glue has dried, you need to clean the saw cuts with an emery cloth.
Leg mounting

If a wooden table is made with your own hands, the photos must first be reviewed by you. It is important to initially fit all connections without using glue. From the wide edges of the connection should be tight. On the side, it is necessary to provide a gap of 1.5 millimeters to compensate for changes in the size of the wood. When edging, these elements will be decorated.
The walls and spikes must be treated with glue, after which you can proceed to pair the legs with vertical supports. Without waiting for the glue to dry, it is necessary to make holes and strengthen the pairing with dowels. If you decide that you will make a wooden table with your own hands, it is recommended to prepare the drawings at the initial stage. For the legs, moldings of the required length should be cut. They need to be glued and pulled together with clamps. The glue is applied, and then left until dry.
If you decide to make a wooden table with your own hands, the drawings can be borrowed from the article. The jumper should be installed high, so that those sitting at the table do not touch it with their feet. It is necessary to glue using two strips, which are preliminarily edged with a molding.
After the glue dries, you need to remove the clamps, and then chamfer. Holes must be made on the short sides for installing fasteners. The tabletop can be made independently, its dimensions may differ from those presented above. At the ends, you need to select the spikes using a jigsaw.
Next, the saw cuts are cleaned with a file. Along the long edges of the workpiece, it is necessary to install strips that are attracted by clamps and dried. By using edge cutter you need to align the edges of the moldings. They should be fixed to the planks, and then dry and clean the joints with a grinder.
When a wooden table is made for a summer cottage with your own hands, the drawings will make it possible to understand how the table top and legs are connected. To do this, use U-shaped brackets. On the long sides of the base, quarters should be chosen to fix the sidewalls. The ends of the last elements must be rounded and cleaned. After that, everything is glued and compressed with clamps, and then left until the moment of drying.
Final works
Before you make a wooden table with your own hands, you need to familiarize yourself with the technology of work. At the next stage, with a deviation from the edges of the base by 100 millimeters, it is necessary to make holes, the diameter of which should be equal to 20 millimeters. A through groove should be placed between them. Holes are required so that the base does not split. If you will be making a wooden table for giving with your own hands, the drawings should help in carrying out the work.
Now the master can assemble the table, for this it is necessary to fix the jumper to the legs. Using a pencil, you need to mark the position of the legs so that they are perpendicular to the ends of the lid. Brackets should be installed according to the markup. In the countertop, you need to make 10 holes for installing screws. Next, you can strengthen the brackets. A washer must be placed under each screw, this will compensate for shrinkage, this is the only way to make a folding wooden table with your own hands.
You can change the technology and dimensions of the table at your own discretion. However, it must be remembered that the design should be as strong and reliable as possible. It is important to protect wooden elements from the negative impact external environment, especially for those pieces of furniture that are supposed to be used in the kitchen or outdoors.
How to make a table for the country. garden table and benches with their own hands. We will talk about installing a new table with benches in the garden at the dacha. To unite the family, it was decided to carry out the installation of a new table by collective efforts. The old wooden table, according to the rapidly erected scheme, ceased to suit, it had to be updated every 5-7 years. In the construction of the table and benches, new and traditional Construction Materials- metal and wood. The table turned out to be reliable and compared to previous options it will last a long time. Detailed step-by-step instruction with photos and videos.
How to make a table with benches with your own hands

The design of the table has been worked out by collective efforts, taking into account material possibilities, skills and the availability of tools. The table is made and probably the choice of design option is no longer worth discussing. old table was built from wood. Raw poles were buried in the ground in the open air and bench boards and tabletops were attached to them. The lifetime of the pillars is 5-7 years, depending on the thickness, the boards withstood up to 10-12 years. The table and benches were actively used from April to early October. Table and benches all year round exposed to precipitation in the form of snow and rain. New table made on a metal frame, and the flooring of the table and benches from the boards. The boards are dismantled in October and removed to a protected place, and in the spring they are fixed back to the frame. In this way, the life of the flooring and the entire table is extended. For critics, I want to say that there is a place to rest under a canopy in the garden ( ).

 Pile "Juventa"
Materials for the construction of the table and benches:
- Six screw piles "Yuventa" for installing a fence, 2400 mm long, head with a section of 50 × 50 mm;
- 10 - 12 edged boards 2000 mm long with a section of 150 × 50 mm, to speed up work it is better to purchase planed ones, pay attention to the thickness of the boards - it should be the same;
- metal pipe of square section 60 × 60 mm, 4 m long;
- metal corner with a shelf 40-5o mm 3.5 m long;
- paint for metal 1 liter;
- yacht varnish 1-4 liters;
- paint brush;
- solvent for paint and varnish 0.5-1 l;
- self-tapping screws for fixing boards 50 pieces;
- cement, sand
Table structure construction tool:
- welding inverter;
- a circular saw;
- laser level, tape measure, bubble level;
- electric planer;
- grinder with cutting and cleaning discs;
- screwdriver with a set of drills and bits.
Instructions for making a table with benches with your own hands


A drawing was prepared to install the table. See photo. The width of the table is 1100 mm (6 boards 150 mm wide and one 200 mm wide). When changing the width of the table, pay attention to the distance between the posts of the bench and the table.
- The location of the table was chosen long ago, under the crowns of apple trees and next to artificial pond with fish. Places of installation of piles are marked with pegs.
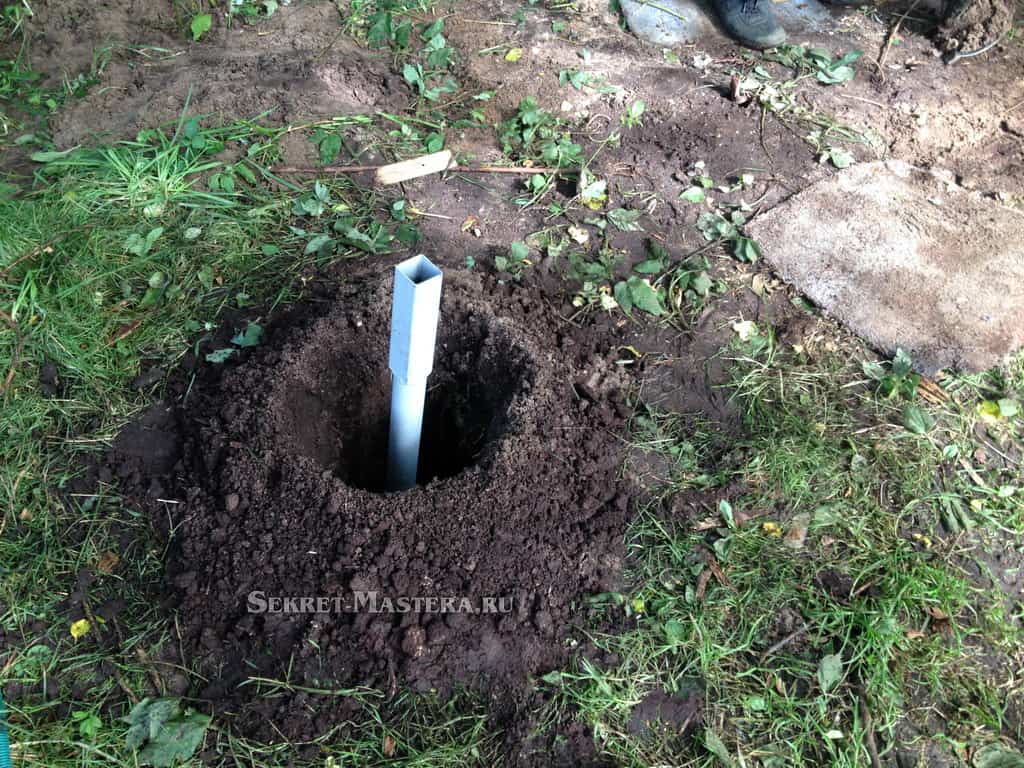
- We install piles "Juventa". For this, a device for wrapping was made from a piece of pipe 60 × 60 mm. See photos and videos. In view of the peculiarities of my area, which are detailed during construction on sandy soil, I had to make recesses for each pile. Without this deepening, the pile would have collapsed before it was completely twisted. recess done petrol drill
. The recesses for the piles of the bench are dug at a right angle. And for two table piles at a certain angle towards each other. This is done deliberately for greater stability of the table.

 Digging a hole with a drill
 Piles "Juventa" for the table
 - The twisting of the Juventa piles took place according to the standard scheme. Watch the video. Be sure to control your efforts so as not to destroy the pile until it is completely twisted. In my case, it was a team effort. When twisting, you must try to observe the intended location of the pile and their slope. Small flaws in accuracy can be compensated for during subsequent assembly. See details of work video example
.


 Pile "Juventa" twisted
 - After twisting the piles of the pit covered in layers of sand with humidification and tamping.
- For a long service life of piles, the internal space of the pile is necessary; small-scale mechanization was used. After concreting, we close the heads from the effects of precipitation and let the concrete harden. Immediately it is necessary to clean the piles from contamination.

 Pile concreting
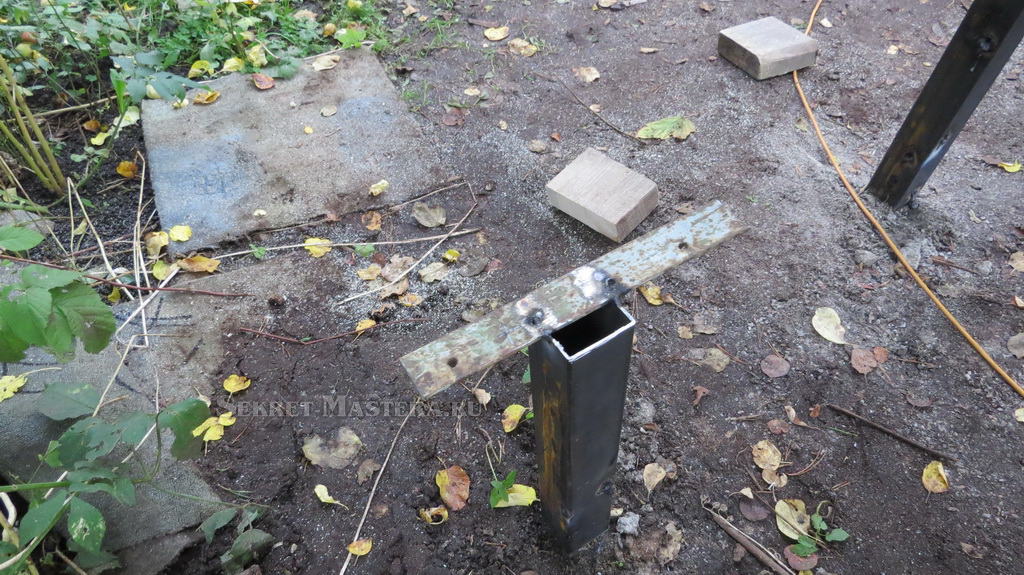
 - We cut square pipes 60×60 mm into 4 pieces of 550 mm and 2 pieces of 900 mm.
- We insert the pipes into the pile heads at a distance of 10-20 mm from the ground.
- We weld pipes 60 × 60 mm on the heads, while using the mounting gap, we eliminate the inaccuracies in the installation of piles. Try to install the racks of the benches strictly vertically, and the racks of the table coaxially to each other. Welding was carried out at 6-8 points at the points of contact between the head and the rack. We immediately clean the welding spots from scale.

 Racks welded to piles
 - mark the pipe cutting lines. Do it exactly. The cutting level from the ground surface of the bench legs is 500 mm, the table legs are 760 mm.
- We cut the racks according to the marking with a grinder with a cutting disc. Cut carefully and accurately. The surface of each cut must be horizontal. Corners will be installed and welded on the ends of the racks.


- We cut corners. The size of the corners for fastening the boards of the bench is 250-300 mm, only 4 pieces are needed. The table will require two corners of 1000-1100 mm (determined by the selected table width). The edges of the corners in the vertical plane are cut into a cone, and all edges are rounded. The surface must be smooth and free of burrs.
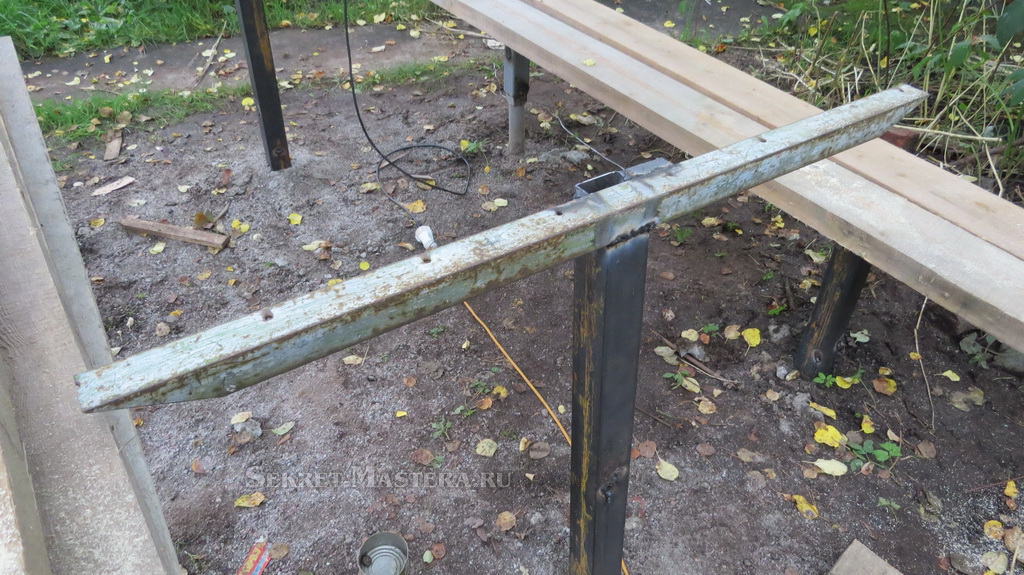
- We weld the corners to our racks, controlling the horizontal plane of the shelf along two axes using bubble level. Just in case, scarves are welded to reinforce the place of welding to the rack. When welding the corners of the benches, you can slightly shift the center of welding of the corner to compensate for errors in the installation of the pile (distance of the table post from the bench post).

 Welding corners
 Corners welded to posts
 - Boards for the table and benches I used from the remnants of construction frame house. The boards were uncut. Therefore, half a day was devoted to partial planing and sanding of the boards.
- We try on the boards, put them on the corners. The boards of the benches should be parallel to the boards of the table. Boards are marked for subsequent assembly. The position of the boards on the corners is also marked.

 Trying boards
 - We mark holes on the corners for the screws for fastening the boards. A total of 14 holes per table corner and 4 holes per bench corner. We drill holes.

 Drilling holes in the corner
 Holes in the corner of the bench
 Holes in the corner of the table
 - The boards are impregnated with an antiseptic and, after drying, covered with paint or varnish. I covered the boards with yacht varnish.


- Simultaneously with the varnishing of the boards, the racks and corners are painted with a protective paint. Plugs are made to prevent water from getting inside the racks ( polyurethane foam) on the ends of the pipes.
One of the advantages of giving - the opportunity to spend time outside. And you can’t do without a table, because how else to dine on fresh air? Yes, and kebabs are more pleasant to eat right by the fire, without entering the house. Therefore, a table in the yard is a must! And since we are in crisis times, and you can’t buy everything, it’s better to make a table with benches for a summer residence with your own hands. It’s cheaper, and the thing will turn out to be unique, and it will be about a hundred times more pleasant to use it.
Table with benches: design options
Basically, there are two ways to make a table with benches. The first way is to make a monolithic product in which the table and benches are a single whole. 
The second option involves the manufacture of benches as individual items. Then you can use them on your own. But no one forbids these approaches to combine.

We make a table with benches with our own hands
Wooden table with benches
We will focus on the first method and show you the easiest way to make a table with benches made of wood.

First of all, the table cover is assembled. As you can see, its design is extremely simple. Boards are simply fastened with self-tapping screws to three crossbars.

Then the legs are attached to the crossbars on the lid. Please note that the legs must be made of a thick board (40mm or more) or timber. They must be durable, because with such a design of the product, it is they who carry the weight of not only the table and what is on it, but also the weight of all the people who are sitting at this table.

Next, we attach the crossbars to the legs, on which the boards of the benches will be laid. They perform a dual function: on the one hand, they carry the benches, and on the other, they give rigidity to the entire structure. They must also be durable. And it is better to fix them not with self-tapping screws, but with 10-12mm bolts (two or three bolts on each leg), because it is this fastener that will take on the weight of those sitting.

It remains to attach bench boards to these crossbars, and the table with benches is ready.

We paint with transparent paint to be able to see the beauty of the texture of natural wood.

Admittedly, this design has some drawbacks. Firstly, if people sitting on one side suddenly stand up together, then those sitting on the other can outweigh and overturn everything that is served on the table. In addition, the crossbars on which the benches are held make it difficult to disembark and board. Such is the price of simplicity.

But the table in the photo below is devoid of these shortcomings, because. firstly, the table supports are on the same vertical with the center of gravity of people sitting on the bench (which, moreover, has its own legs and therefore does not load the table supports at all), and secondly, the benches are attached to the table in the middle, and not on the sides which makes it easy to sit down and get up from the table.

This photo shows how the frame of a similar table is arranged, though without supports under each seat, but here they are not needed, because. the table supports are again almost on the same vertical with the center of gravity of those seated.

If among your loved ones there are people with special needs who move in a wheelchair, you can take this into account when making your table. They will appreciate it!

Bench with a table on a metal frame
If you're a bit of a welder, you'll probably find it easier and faster to weld a metal table frame than to fiddle with wood.

Metal frames are thinner and more reliable, so the whole structure takes on a less bulky, almost elegant look. At the same time, you can get rid of the shortcomings that are inherent in our very first design.

In addition, the strength of the metal allows you to move away from the usual forms and give free rein to fantasy.

And of course, you can go the way of benches not attached to the table.

Table with benches metal frame without welding
If you liked the idea of a table on a metal frame, but you don’t have welding or you don’t know how to use it, don’t rush to get upset!

These tables are assembled without a single weld! All metal elements simply bent into shape and fastened with screws.

We have shown you several ways to make a bench with a table for your garden. Which of them should be preferred? Wood has its own special charm; metal is easy to work with and allows for more practical and less bulky shapes. This choice is yours!  In any case, your table with benches will turn out to be unique in its own way, because handmade things always bear the personal imprint of the master who has put his soul into them.

We hope that at your leisure you will also think about how to make your own project of a table with benches for your favorite dacha.