Garden gazebo with your own hands. How to make a gazebo with your own hands, photos of different designs How to build a garden gazebo
The gazebo is a great opportunity to spend time outdoors in comfort. And it is almost impossible to imagine a personal plot without this small architectural form. Now you can buy a finished standard product and assemble the structure yourself or hire specialists. But much more in demand. This trend is quite understandable, because this is the only way to build the gazebo of your dreams, realize your creative plans and save a lot.
In this article, we will analyze the step-by-step construction of a garden gazebo with our own hands, starting from and ending with the arrangement.


Constructive
Before proceeding with practical work on, it is necessary to decide on, with and the functionality of the building.

The construction of closed gazebos allows you to arrange a comfortable resting place both in summer and in the cold season.
Modern gazebos can be divided into categories:
- open: canopies, portable and collapsible structures, classical buildings, rotundas, tents - these are the most common structures, the only difference is in the materials from which they are made.
- semi-closed: usually, it is, less often, the side walls of which are made of or forged openwork mesh;
- closed mini pavilions, wooden houses, or, often insulated and, or wooden and metal structures, or tempered glass.
We are building a gazebo, the video tells how to create a cozy corner quickly with your own hands.
Shape and dimensions
The problem with corrosion is solved with the help of modern means for processing, if the parts are covered with a protective compound, primed and painted, then no rust is terrible. But the metal heats up quickly and cools down quickly - and this is perhaps the main drawback of such structures.

Collapsible gazebo-tent during installation does not require preparation of the base
Tree
In practice, most craftsmen prefer wood. Of course, it must be impregnated with antiseptics and refractory agents, and properly dried material must be chosen, there are many preparatory measures. But wood is easier to work with and no special equipment is required.
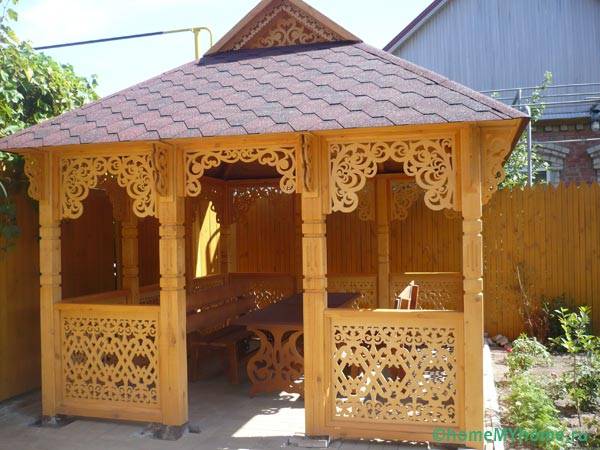
In fairness, it must be said that they look somewhat more massive than metal ones, but at the same time they are not inferior in elegance and aesthetics. Any arbors can be built from wood, ranging from mini to combined large structures, but medium-sized log cabins and semi-open arbors decorated with carvings and lattice are in demand.
We offer you a video on the construction of a gazebo with your own hands, it tells you step by step how to quickly make a gazebo.
We build a gazebo ourselves
Where to begin
Make a drawing of the site plan, select a place for the future building. Consider where the entrance will face, how the paths will be placed, you may want to build a children's corner nearby. Pay special attention to the analysis of the terrain: whether other buildings, large trees will interfere, whether the terrain allows you to organize a flat area or additional land work will be required, etc.
Important: or for fire safety purposes, it is not recommended to place closer to the house than 8 m.Foundation device
We build a gazebo with our own hands, in our case it will be a wooden structure 2 * 4 m, under, with a soft roof.
Construction begins with marking. We transfer the scheme to the terrain, mark the contour with pegs, pull the rope. We clear the site of debris, remove the top fertile layer of soil. We dig holes in the corners, divide the long side into equal parts and also dig 2 holes on each side.

Photo of the construction of a gazebo with your own hands, the stages of preparing the base
We fill the bottom with crushed stone and sand, ram each layer, install a crate of boards and plywood. We lower the reinforcing frame inside, let one rod out in the middle, fill it with concrete. Complete formation of the solution 28 days.
Good to know: The pillars can be made of asbestos, homemade ruberoid, you can lay out red brick, or buy ready-made blocks.Building a frame
We lay waterproofing on the finished pillars, 2 layers of roofing material. Along the perimeter we lay a beam with a diameter of 150 * 150 mm, the ends for joining are cut into the log floor, we tighten the base with anchors.

Photo how to properly assemble the frame
Parallel to the small side (along the pillars), we lay logs. Before making the floor, we impregnate the parts with antiseptics. We sew up the floor, board 40 * 150 mm.

For the floor, you can use a grooved board and decking
We cut racks with a beam of 100 * 100 mm, on one long side they are 600 mm longer, we make recesses for attaching subsequent parts. We install on each pole, check the vertical, fix it with jibs. At the height of the railing, we fasten the intermediate strapping.

The assembly of the frame must take place under constant control of the geometry of the structure.
We make the upper trim, first we connect the opposite posts on the smaller side, then we fasten the large sides and the protruding part, as shown in the photo below.

How to build a gazebo with your own hands, photo of a wooden frame
Building a roof
On the high side, at the level of the upper trim, perpendicular to the vertical posts, we build up bars 400 mm long to support the rafter system.

How to build a truss system
On the ground we make one truss truss, try it on, this will be the template by which we make all the other rafters. We lift the finished trusses up and fix them to the frame on special metal corners.

For the crate, you can use a beam with any section, choose a non-behaved tree
From the bars 40 * 20 we make a crate. We sew it with sheets of plywood, always moisture resistant, you can use OSB.

When building a gazebo, it is not necessary to sew up the roof with plywood, but then a hard roof will be required
We cover the plywood with a waterproofing membrane, fasten it to the brackets, and a bituminous roof is laid on top, in our case, soft tiles.

Choose a breathable membrane for roof waterproofing
Finishing
We strengthen the lower part of the parapet with bars, criss-cross, plywood. The lining and wooden decorative lattice look just as beautiful.

During construction, do not forget about ergonomics, a comfortable parapet height of 900-1000 mm
For a comfortable stay, from a bar. For convenience, the back is made at an angle. Seat height 450 mm, depth (without backrest) is the same.

Furniture can be made separately, but it is more practical to equip it during the main construction, so you will protect it from intruders
We sheathe the frame with a well-polished board, treat it with antiseptics and cover it with a finishing layer.

When building a gazebo, pine or larch is most often used, this wood has a beautiful texture and is less hygroscopic compared to other inexpensive species.
Near the entrance, we dig a small pit under the porch, 300 mm deep, fill it with broken bricks, gravel, sand, and rammers. We lay metal samples or reinforcement, pour concrete.

The porch can be built not only from concrete, but also from wood
We carry light into the gazebo, always in a special corrugated hose, choose shades for outdoor use.

What could be more comfortable than a warm family circle, when after a working day everyone dine at the same table or have tea on a day off, and even in the fresh air? What could be more carefree than a friendly party with wine and barbecue in the depths of the cottage, under the dense crowns of trees? Where can you be alone with yourself, relax in seclusion and enjoy the silence? Nothing will create such a variety of scenarios for relaxation as a garden gazebo, the very name of which contains the most joyful moments of life - conversations - communication with family and friends, unity with nature. It will be especially pleasant to spend time in a place lovingly built with your own hands.
Stage # 3 - roofing and roofing work
The easiest way is to cover the gazebo with shingles, as shown in this video example:
The technologies for building a shed roof - and a gable roof - are also very well described.
Extraordinary design ideas for garden gazebos
You may be interested in how to build a gazebo from the simplest materials that are literally lying under your feet. Take a closer look at ordinary plastic bottles, which, it would seem, cannot be used anywhere, but it’s a pity to throw them away - it always seems that they will come in handy somewhere. You can easily use plastic bottles as a building material, and you can easily build a structure yourself.
Here, of course, one cannot do without the mandatory stages of arranging the foundation, frame and roof, which will require both financial and labor costs. The walls of such a gazebo, made of plastic bottles, not only cost free, but also serve as a good option for protection from the sun and precipitation.

The contrasting combination of transparent and brown plastic bottles emphasizes the unusualness of a colorful country-style gazebo
Simplify the task of building the creation of a foundation of ready-made metal screw piles, which can be screwed into the ground on their own, equipping the base for the gazebo in just one day. The frame will be easiest to make from a metal profile - a corner, a square or a pipe, by welding structural elements with a welding machine.
Plastic bottles are strung on metal rods, which are then placed between the lower and upper frames of the frame. An important condition for the formation of a harmonious structure is the selection of bottles of the same shape and size, while the color can be varied - this will give the gazebo a unique flavor.
The material on creating decorations and crafts for the garden from plastic bottles will also be useful:
Option # 2 - glass bottle gazebo
In addition to plastic bottles, another non-traditional material for construction can be glass containers, which can be purchased for almost nothing at recycling centers.

Art Nouveau garden arbor with flowing forms and plenty of glass, vividly reminiscent of the famous Gaudí gardens
So, we are building a gazebo from glass bottles. The principle of building a building is the same as that of a brick - the bottles are stacked in rows, which are fastened together with cement mortar.

Having splashed out your imagination, combining glass bottles of various shapes and colors, you can build an unusual gazebo both outside and inside.
The bottles are located with the bottoms outward, and the necks - inside the structure. Given that the bottles are difficult to dock at the corners of the building, they can be used to lay out individual fragments of the walls, giving the structure an unusual sound - iridescent glass surfaces will sparkle in the sun like a crystal.
Option # 3 - construction from old tree trunks
An interesting and fairly economical option for a gazebo for a summer residence can be a building using the trunks and branches of old trees.
In the garden there are always obsolete trees that have already ceased to bear fruit and require sawing. Removing logs is often difficult and expensive, but don't be in a hurry to get rid of fruit wood - it has beautiful trunk curves and texture, which makes it an excellent building material.
The trunk and branches can be cleaned of bark, which, when crushed, is also useful on the farm - it can be sprinkled with bushes of plants prone to freezing in winter. The trunk of the tree will be used to create support columns, and large branches - for fencing, railings and balusters. Most likely, one tree will not be enough, you will need two, or maybe three trunks to form four columns with a height of 2.5 m or more.

The twisted trunks of old trees with knots and a raw surface, used to build a gazebo, give it the appearance of a forest hut.

For the construction of this colorful gazebo, not only the trunk of the tree was used, but also the stumps used to create the columnar foundation
Wooden columns are fixed at the corner points of the columnar foundation and fixed with the help of the lower and upper trim of the timber. It is desirable to treat old wood with moisture-resistant primers, as well as open it with varnish to give the desired color and protect it from further drying out. A logical continuation of the style decision of the forest “hut on chicken legs” will be a roof made of plant materials - shingles or reed mats.
Option # 4 - from cement mortar
An unusual solution for a garden can be the construction of a gazebo using ordinary cement mortar. The most difficult thing in this variant of arrangement is the creation of a rigid frame from reinforcement, chain-link mesh or ready-made reinforcing structures that need to be bent and welded. At the stage of preparing the frame, you can turn to specialized specialists, and then give free rein to your imagination.

An unusual tented gazebo made of stone and cement mortar resembles a bizarre piece of rock that blends seamlessly into the forest landscape
Having prepared the solution closer to a thick one, you need to gradually, in small portions, throw it on the reinforcing structure, and after drying, form the bizarre shapes of the columns and walls of the gazebo. With the help of the solution, you can imitate the trunks of intertwined trees, lianas, fantastic plant forms, creating the image of an exotic plant, as if invented by nature itself.

On hot summer days, a gazebo in the depths of the garden near a murmuring waterfall will give you the long-awaited coolness and solitude.
Such a design can also take on fantastic unearthly forms, resembling a spaceship, if metal parts are used or the reinforcing cage is fragmentarily exposed. The roof in this case should be made of metal or plastic - corrugated board or transparent polycarbonate will do.
Option # 5 - from reed mats and vines
A wonderful decoration of a pond, lake or artificial swamp on your site will be garden structures made of reeds, reeds, vines.

A great solution for a gazebo is the use of natural materials such as reeds and vines.
From these plant materials, both walls in the form of wicker weaving and the roof, which is a plane made of ready-made reed or reed mats, can be made. Such a building will naturally merge with the natural environment, especially with water, because reeds and reeds are traditional inhabitants of this environment.

A gazebo on the shore of a reservoir with a reed roof is an example of a harmonious combination of landscape design with the environment
The use of such plants with a hollow stem for construction is the key to a comfortable microclimate in the gazebo - balanced humidity, protection from heat and effective ventilation.
Option # 6 - "live" gazebo for the garden
Looking around your garden plot, you may ask yourself how to make a gazebo without introducing any other elements into the landscape of the garden, except for plants. The most affordable, but at the same time, the most time-consuming solution would be to create a structure only with the help of plants - trees or shrubs.

Specially shaped and trimmed crowns of trees create original roofs for garden arbors
Such an interesting design does not require complex construction preparation in the form of a foundation, frame and roof, as it consists only of specially grown species of dwarf, undersized or weeping tree-like plants. Various types of willow, mountain ash, willow are planted, most often, in a circle. The trunks and crowns of such plants are formed and directed, as they grow, in the right direction - to the center, creating a vegetative roof of the gazebo.

Openwork frames of arbors in combination with climbing plants give garden landscapes completeness and harmony.
Such a gazebo will naturally fit into the landscape design of the site and will be a shady place to relax on a sunny open lawn in front of the house. The only thing is that the creation of such a plant composition will require a lot of patience and time. A simpler option for a “living” structure can be planting - grapes, ivy, roses along the outer perimeter of its frame, formed from a wooden beam, metal profile or trusses. In this case, it is important to achieve complete concealment of the structure in the thickets, so that the impression of its absence is created.

A bright accent that adorned the garden gazebo on a solemn day can be “clusters” of balloons imitating grapes
Option # 7 - from wooden pallets
An extraordinary solution is the use of euro-pallets made of wood for arranging walls. Such wooden pallets, painted in bright colors, will not only create an original flavor, but will also be a good solution for walls - environmentally friendly, contributing to good air access to the interior of the gazebo.
If you buy ready-made - how not to be mistaken?
An analysis of 10 popular mistakes when choosing a finished gazebo can be viewed in the video above.
The gazebo on the estate is an integral part of modern landscape design. The beauty is that a gazebo with your own hands can be made in absolutely any style. Many people ask the main question after they decide to build a gazebo with their own hands - where to start? We will give a clear answer to this question in today's material, and we will also analyze no less important points regarding the construction of a wooden gazebo with our own hands.
Before starting work, you need to realize that the gazebo is a fairly simple structure that does not require special skills and knowledge in the field of construction. If you understand the simple technology and sequence, which will be discussed below, then the gazebo can be built in a couple of days, with a minimum of effort, because in the end, you are not going to build a country house.
Moreover, having studied the detailed manual for building a gazebo with your own hands made of wood, you will save not only time and effort, but also money. If you don’t like the gazebo design below, you can choose a slightly different shape, because you will now be familiar with the main stages and principles of construction. Who knows, maybe you will be able to make yourself such a masterpiece, shown in the photo below. The main thing is to believe in yourself.
Gazebo with their own hands. What to do?
We will immediately decide on the material for the future design. Most experienced builders assure that the best gazebos are made of wood. This choice brings many advantages:
natural look;
Ease of construction
Simple woodworking
Can be made in any style.
In addition, during the construction process, you will need the most common tool that lies in the garage of each owner. Materials for the design will take just as little, which will save significant funds. Do not forget that if you wish, you can build such a gazebo from wood, at the sight of which guests will not want to leave your site. This is sarcasm, of course, but there is some truth in it.
What about the foundation?
A wooden gazebo is quite plastic, elastic and weighs little. Thanks to these qualities, you can start its construction without a pre-prepared foundation. It is enough to treat the wood with special chemicals to protect it from contact with the ground. This will protect it from the effect of decay. Moreover, there are such types of gazebos, for example, wicker ones, which would be simply stupid to put on the foundation.
Initial stage of work
The first thing to do is to work out in detail the plan for future construction. If you can't find your bearings regarding design, then today there are a lot of magazines and websites dedicated to construction topics. There you can see examples of the most unusual, and at the same time, the simplest arbors for the estate. Making a plan includes:
The purpose of the building
shape of the gazebo
The shape of the structure can be square, round, rectangular, octagonal, hexagonal, and so on. The owners of the site with creative thinking and wild imagination can experiment by building a gazebo in the form of Baba Yaga's house, a fairy-tale palace or a spaceship. Below is a very creative and unusual example of a gazebo.

Or you can give preference to a more classic style that will look simple and tasteful.

Arbors also differ in their purpose. It is necessary to decide from the very beginning whether you just want to relax in the shade in the fresh air or a large company will have fun in the gazebo.
If the first option, in this case, you can start building an ordinary gazebo with your own hands with several benches.

If you plan to build for a fun pastime of the company, give preference to a large platform and a canopy.

For those people who cannot imagine a vacation without a barbecue in nature and a field kitchen, a gazebo with a Russian stove or will be an ideal option.

Advice! Before choosing the shape of the future structure, you should pay attention to the existing buildings on the site, as well as landscape design in general. The chosen style of gazebo should be in harmony with the surroundings.
Deciding on a place
Once you've made your final design decision, it's time to choose the right location. Regarding the proximity of the location of the gazebo from the house, this question remains at the discretion of the owner. Proceed from the following - whether you want to take a break from the hustle and bustle of your home or want to spend time sitting outside with your family.
Do not place the building in a lowland, this cannot be done for obvious reasons - it is in the lowland that water will accumulate over time, which will lead to rotting of the wood.
Advice! Position the gazebo near trees, flower beds, or other vegetation. So you will achieve the maximum aesthetic effect, because it's nice when you have a view of the wonderful plants from the gazebo.
Gazebo with their own hands. Photos, drawings
After the above preparatory activities, we proceed to the design. The drawing will take into account:
· height;
· the size;
· components;
fastening methods, etc.
The drawing should also take into account the amount of necessary building materials that will need to be pre-purchased.

For example, we settled on the standard square shape of a building with a roof. It is about such a design that will be discussed in today's practical guide. We remind you, taking into account the information and examples below, you can choose any other gazebo design you like.
Necessary tools and materials
To start building, you need the following materials:
concrete for the process of mounting racks;
timber 15x15 cm for making the base and racks;
timber 10x10 cm for roofing elements and upper lathing;
bars for log 5x15 cm;
board for flooring;
plywood or boards for roofing;
Roofing materials, depending on your choice, it can be metal tiles, slate or corrugated board;
boards for railings and other decorative structures;
lining for side cladding;
frames with glasses (if these elements are provided for in the plan);
· paint, varnish;
Self-tapping screws, screws, nails.
It is worth recalling that changing the project will also affect the list of materials, it can either decrease or increase, keep this in mind.
Also take care of the availability of the tools that you will need during the construction process:
hatchet;
shovel
hacksaw for wood;
Electric or chainsaw
a hammer with a nail puller;
planer
· chisel;
roulette;
· stairs.
Armed with the above tools, you can build almost any wooden gazebo on your site.
How to build a gazebo with your own hands
After all the above recommendations are fulfilled, it's time to start the main thing - building a gazebo with your own hands. To begin with, it is necessary to treat the wood used with moisture-proof and antiseptic agents. This must be done to keep the tree from rotting.
The next step is to install the supports. Mark the location of the future building with pegs and ropes.

Advice! In order to get a perfectly even rectangle or square, it is necessary to observe the symmetry of the diagonals.
We will focus on the option when the foundation is not poured, but. This option is much easier to implement. Dig holes for the posts about a meter deep.
Pack the bottom of the pits with gravel, approximately 5 cm, after which, pour a 10 cm layer of concrete. Wait for the moment when the concrete hardens a little, and place the anchors in it. It is on them that the racks will subsequently be attached.
You can do it a little easier. Place a post upright in the hole and fill with concrete. It is important to ensure that the rack is installed exactly, strictly vertically. Racks should be dug into the ground in such a way that their strapping is a perfect square.

After installing the racks, it's time to start building the frame. This action must begin with the bottom strapping. For the floor, you can use a regular beam, which must be laid every 50 cm. This design is guaranteed to withstand the weight of the flooring.
Next, install the remaining frame structures - racks. They are responsible for supporting the roof and the top trim. The location of the racks should be strictly symmetrical, the number of which depends on the dimensions of the gazebo.

After the construction of the frame, we are engaged in flooring. The floorboard is fastened with ordinary screws or nails.
Roof installation is a critical stage of construction. First of all, the upper strapping of the entire structure is carried out from the bars, which must be attached to the supports with nails. Subsequent construction depends on what form of roof you have chosen for your future gazebo. More often, a four or gable roof is chosen, due to its practicality, reliability and ease of execution.
The hipped roof looks very original, we will focus on it as an example. To make the structure stronger, it is necessary to install additional rafters fixed to the upper and main harnesses. You should follow the symmetry of the rafters, this is very important.
Important! It is necessary to fasten the material to each other every 20 cm along the entire length of the rafters.

It is worth paying your attention to the fact that you should follow the safety rules for working at heights. Make sure that the stepladder does not wobble and that there are sharp and dangerous tools under you.
The final stage is the decoration. It's time to show your imagination and decorate the walls, roof and railings of the gazebo. Usually they use a standard beam for the railing, then sheathing the structure with clapboard.
If you get a little confused, you can apply carvings to the wooden surface of the railings and walls. This adds color and originality to the finished design. However, for wood carving to look really spectacular, there must be certain skills in this matter.
After, you can open the wooden surfaces with varnish or paint them.

The next steps depend on your preferences. You can fill the gazebo with comfortable and spacious sofas, install a deck chair in it, or give preference to ordinary benches and a table.
By the way, you can also arrange tables, benches and chairs for a gazebo with your own hands. This will complement the overall design. Provide light, install mosquito nets, take care of the path from the gazebo to the house and enjoy outdoor recreation with close friends and family.
Weaving from rods - we simplify the process
If you like simple but tasteful, then you will definitely love our next idea. Moreover, it will greatly simplify the construction process. Arbor made of rods is very popular today. It not only looks spectacular, but is also quite practical.

The process of building a gazebo from rods with your own hands is quite simple. It is necessary to drive rods into the ground to a depth of 35 cm. The main thing is that the rods form a symmetrical square or rectangle, although it is possible to make a design in the form of a hexagon or octagon.
You can also sheathe the installed wooden racks of an ordinary gazebo with wattle. This also looks spectacular. If your gazebo is located near the sea or river, you can use ordinary ropes for weaving, it will look quite appropriate.

It is worth emphasizing that weaving is a very painstaking process, although not expensive. According to the principle of the above weaving patterns, you can choose the most acceptable pattern for your gazebo.
Do-it-yourself gazebo made of wood step by step video
Surely, you have seen from your own experience that it is not difficult to build a gazebo with your own hands from wood on your site. We figured out how to build a gazebo with our own hands. Choose your favorite gazebo design and decide on the place of construction. The main thing is to follow the above recommendations and use our methodology. Don't worry, you will definitely succeed. We recommend that you watch the following video of the gazebo construction process on your own, for a better understanding of the construction process.
We will send the material to you by e-mail
B a gazebo is an indispensable attribute of a private house, a country cottage and just a dwelling, in which there is a separate land plot. It will protect from the rays of the sun, rain and other adverse weather conditions. Under the roof of the gazebo, it is always comfortable to spend time with friends or settle down with your family during an evening tea party. However, not everyone knows how to make a gazebo with their own hands from wood step by step. Let's look at the rules for building a gazebo: what to make it from, what materials are needed, and, finally, the stages of its installation.
wooden gazebo
Arbor made of wood: what are the advantages?
To date, there are many materials from which you can make a gazebo. The most common of them are metal and wood. In this article, we will look at how to make do-it-yourself gazebos from wood step by step. Why wood? Because this material has a lot of advantages:
- easy to install, as wood is a relatively light material;
- Wood is an environmentally friendly material, so it will not be able to harm the environment;
- Wood is a fairly durable material: it is immune to ultraviolet rays. To prevent the wood from rotting from exposure to moisture, it should be coated with a transparent varnish for wood;
- Wood goes well with stone, concrete, metal and other materials. In terms of decor, it is universal;

- Wood carving is also popular now. Exquisite relief drawings will become a kind of decor for the gazebo.


- Iron or wooden pegs pegs - will be needed to mark the area where the gazebo will be installed. Also, for convenience, a fishing line is used, which is pulled between pegs installed along the marked edges of the structure;


- Auxiliary materials: saw, planer, nails of various calibers, etc.
The amount of materials needed depends on the size of the planned gazebo.
Stages of building a gazebo made of wood
The choice of design and drawing of the gazebo
Before construction begins, you need to decide what kind of gazebo you want. Here the flight of fancy is unlimited. Designs can be rectangular, hexagonal, round, square, etc. Having decided on the form, you need to set the dimensions of the future building.


Below is a plan for the construction of an octagonal wooden gazebo. This design is very convenient because inside the gazebo it will be comfortable and convenient: up to 12 people can easily accommodate there. Its area may be different depending on the location and your desires. The height of the gazebo is 2.5 meters.
Construction stages
markup
The site selected for construction is cleared, and in accordance with the above dimensions, iron pegs are installed in the corners. Line is stretched in the corners. Mark the place where the entrance will be located.

Foundation preparation
According to the marking, he digs holes, at the bottom of each of them we make a sandy base. It is highly desirable to compact the sand before laying the foundation to avoid excessive settlement. We install concrete blocks or bricks on the bottom, fill it with gravel, tamp it down and fill it back with soil. All blocks must be set strictly according to the level.

Instead of blocks in each pit, formwork can be made and cement mortar can be poured.

Base device
After the foundation is ready, we install a wooden base in accordance with the drawing. This can be done in two ways. The first way: we expose the base of wooden bars using internal jumpers, sew up the floor and only after that we expose the wooden racks, attaching them to the floor with nails and metal plates.

The second method involves placing wooden racks directly on each pillar of the foundation between the base lintels.

The fastening of the bars is carried out using metal corners.


For the reliability of the structure, at the stage of erecting the foundation, it is possible to lay a metal rod in each pillar, onto which the base of the wooden rack will be inserted.

Strapping installation
Further along the edges of the gazebo (except for the place where the entrance to the structure is planned) we install a strapping made of a wooden beam, made in the form of some kind of pattern. We fix the bars with nails and screws. Leave the entrance open.

Roof device
Now we equip the roof of the gazebo. If you want to make a roof with a sloping slope, install 8 rafters on the supporting pillars, connect them with a horizontal cross member. The end result is an "A" shape. If you prefer a single-sided gazebo made of wood with your own hands step by step, then we equip one continuous rafter on the pillars.

We lay the roof, and only after that we lay the tiles on its surface.

To understand how to make a wooden gazebo with your own hands, a step-by-step drawing is simply necessary. Having calculated and planned the entire structure from the very beginning, the installation process will be an easy and exciting experience.

