The simplest do-it-yourself brick oven. The simplest oven: from improvised means, brick without mortar and mortar
1.
2.
3.
4.
5.
6.
For a long time, stoves for heating a house have been traditional heating structures and not only boilers, but also various other heaters cannot be compared with them in many respects. They provide "live" heat, in addition, they are distinguished by practicality and unpretentiousness in the use of solid fuel. In addition, a do-it-yourself stove built will last for many years.
Stoves for heating a private house are considered an ideal choice for suburban real estate. A well-designed heating structure is able to provide residents with a comfortable stay in each of the premises of the building. See also: "".
Do-it-yourself stove: how to do it right
At a time when stoves were the main method of heating in houses, master stove-makers were engaged in their construction and repair. Now, with certain skills, home craftsmen have the opportunity to fold the stove with their own hands. In the absence of experience in construction works, it is advisable to entrust the arrangement of such a heating structure to professionals. It should not be forgotten that the furnace belongs to objects of increased danger.Before proceeding to self-construction brick heating units, it is necessary to understand their main types and features of operation:
- heating stoves - they are intended exclusively for heating the house. Their masonrycarried out quickly, since their device is simple (in more detail: "");
- heating and cooking stoves - today they are considered the most popular and in demand. In addition to heating rooms, you can also cook food on them, saving good money on gas and other modern coolants (read: "");
- for cooking, a special stove is built into the heating structure, and if desired, even an oven;
- fireplace stoves - thanks to the installation of such units, you can save space in the house, thereby creating more comfortable conditions residence and provide efficient room heating (read: ""). It takes a little time to fire them up. Fireplace stoves have a presentable appearance that can decorate any room, both in a small country house and in a luxurious country villa (read also: "").

In addition, regardless of the type, type and size of the fuel used, the furnace must meet certain requirements. fire safety. The base for a brick heating structure must certainly be concrete. See also: "".
Location of heating stoves
At self-arrangement furnace heating it is necessary to provide the most optimal location for the installation of the heating unit. If, for example, the structure is placed in the middle of the room, then its heat transfer will be the maximum possible, since it will heat the space from all sides, while evenly giving off heat to the air.In the event that the stove is placed near the wall, the convection currents of cool air emanating from doors and windows will actively move around the house. As a result, with such an arrangement of the heating structure, residents will constantly feel cold, “stretching” along their legs.
Before laying the furnace device, it is required, according to the installation rules, to provide for the location of the combustion chamber door (read: ""). This is necessary so that you do not have to carry armfuls of firewood across the room, spreading dirt and soot. You can avoid such problems if you install the stove in the kitchen or in a sparsely visited room.

Types of base for heating structures
The drawings of furnaces for heating provide for the arrangement of a concrete floor or the presence of their own foundation. In the latter case, the base is made in such a way that it is designed to install the body of the structure and the walls of the leaning chimney pipe, as shown.Main components:
- fireman. When a stove is created in a house with your own hands, this element is one of the main parts of the heating unit. It must hold the maximum volume of firewood or other fuel to ensure the greatest performance of the structure. The size of the firebox may be different, because given parameter depends on the type of solid fuel (so for firewood, the height of the chamber ranges from 40 to 100 centimeters), volume, performance. The firebox is laid out exclusively from refractory bricks, and the thickness of its walls should be at least half a brick.
- Ash pan. This chamber is equipped with a door and is located directly under the grate. It is designed to collect ash and supply air to the fuel. The height of the ash pan is three bricks.
- Chimney. One of the main elements that are available in every modern brick oven. Outwardly, it is similar to a coil, through which flue gases move, heating the air in the room. When a stove is created for heating a house, such as in the photo, when designing a chimney for a modern heating structure, experts do not recommend providing big number turns and bends, since they create additional resistance to the movement of flue gases, resulting in a decrease in the efficiency of space heating.

Solution preparation
The stove can serve without fail for a long time, if the mortar is properly prepared for masonry. It is made from sand, clay and water. It must be tough, strong and durable at the same time. Preparing a clay-sand solution is simple: it will require clay, which is poured with water and soaked for at least a day. Then the mixture is passed through a sieve and stirred until the consistency of "clay milk" and only then added required amount sand (read also: "").Do-it-yourself stove will be durable and robust design, will last more than a dozen years, if the solution is done correctly. In the event that the building materials turn out to be of poor quality, and the bricklaying was carried out without observing the technologies, the heating unit will quickly fail and may even collapse.
Features of the furnace masonry process
Before you make a stove with your own hands, you should first make a foundation for it. Usually, bricklaying begins a month after the creation of the foundation. It is necessary to withstand a certain time in order for the furnace to turn out to be efficient and of high quality, and the heating structure to last for a long time, without major repairs and alterations, while maintaining functionality and high performance.
- First of all, lay out the ash chamber and the bottom of the first cap with a lid. Usually, a clay-sand mixture is used for masonry, which has high viscosity and strength.
- Doors are mounted in brickwork, and they are fastened using galvanized wire.
- A grate is installed above the ash pan. Then they proceed to the installation of the firebox, which is lined with fireclay bricks from the inside, placing it on the edge. In the manufacture of the solution, sand and fireclay clay are used. The furnace door is fixed with wire and a steel plate having a thickness of 2.5 mm. See also: "".
- On the 12th row brickwork it is necessary to block the combustion chamber and after that, using the level, mount a cast-iron stove with burners. In the left part of the structure, the laying of the first cap and the channel intended for the summer course is carried out.
- After the installation of the plate is completed, the walls of the cooking chamber are laid out. On the left side, the construction of the lower cap continues.
- In the cooking chamber in the inner row, a summer stroke valve is installed, which is necessary for kindling furnaces.
- In the 20th row, the first of the caps and the cooking chamber are blocked. In solid brickwork, it is necessary to leave holes for the vent of the cooking compartment, the summer run and the lifting channel. To do this, the bricks are supported on steel corners in order to strengthen the heating structure and thereby increase its reliability.
- At the cooking chamber, the portal should be closed with hinged fireplace doors. good decision there will be a supply of doors with inserts made of heat-resistant glass. With their presence, it becomes possible to control the combustion process and at the same time observe how the flames look. See also: "".
- After overlapping the cooking chamber and the lower hood, with the help of two brick rows, they begin to lay out the upper hood. Cleaning doors are installed in convenient places to help remove soot.
- The walls of the cap are erected almost to the top of the wall opening. At the top, the oven is covered with two rows of bricks. For the purpose of additional thermal insulation, the hole between the top of the unit and the overhanging jumper must be filled with mineral wool.
- If a stove is made with your own hands, a decorative belt is placed along its upper perimeter and the installation of a pipe that removes flue gases begins. The ideal solution counts brick chimney, because over time, metal and asbestos pipes often burn out. See also: "".
Cooking ovens include cookers various designs. They come in various sizes and serve only for cooking. Connect kitchen stoves to root or tube pipes.
Brick cookers
Kitchen stoves according to their design can be divided into simple, medium complexity and complex.
A simple stove has a furnace and blower door, a grate and a smoke damper. It is the simplest of all household stoves.
Cookers of medium complexity have, in addition to the above stove appliances, an oven, and complex stoves also have a hot-water box. Ovens are made of black steel with a thickness of at least 1 mm, and hot-water boxes are made of galvanized steel. The casing of the hot water box is made of black steel with a thickness of at least 1 mm. The thicker the steel, the more durable the instruments.
Stove with double camphor stove and oven
In a simple kitchen stove, hot flue gases from the firebox are directed under the cast-iron stove, and then through the hole under the pipe they are discharged into the chimney.
In the rest of the stoves, hot flue gases are directed under the cast-iron stove and then, descending, heat the walls of the oven or one wall of the hot-water box, and then are discharged into the pipe, while heating the bottom wall of the oven, the bottom and other wall of the hot-water box.
The above stoves do not have a cooking chamber, so during cooking, steam and smell are released into the room, which negatively affects the microclimate of the room. In this article, drawings of cuts and ordering of an improved design cooker are provided, in which a cooking chamber is provided, connected to the pipe by means of a ventilation duct blocked by a ventilation valve.
simple cooker
A simple kitchen stove has dimensions, mm: 1160x510x630 (without foundation, i.e. without two rows of brickwork on the floor).
For laying the stove, the following materials are needed:
- red brick - 120 pcs.;
- red clay - 50 kg;
- sand - 40 kg;
- grate - 28 × 25 cm;
- furnace door - 25 × 21 cm;
- blower door - 25 × 14 cm;
- cast iron stove for two burners - 70 × 40 cm;
- plate binding (corner 30x30x4 mm) -3.5 m;
- roofing steel sheet under the slab - 1160 × 510 mm;
- construction felt - 1 kg;
One stove-maker can fold a simple kitchen stove within 3 hours (not counting the laying of the chimney), in addition, it takes 1.5 hours to bring the material and prepare the clay-sand mortar. Additional time is required to build the chimney: depending on its height, you need to calculate the time from calculating half an hour per 1 m of pipe laying (when laying a pipe in a quarter of a brick).
The heat output of a simple stove with two meals a day is about 0.7-0.8 kW (660-700 kcal / h).
The figure below shows vertical and horizontal sections of a simple kitchen stove. Next, masonry drawings will be given in rows (ordering). From the sections and drawings of the masonry in rows, it can be seen that the masonry of a simple stove does not present any difficulties.

Sections of a simple kitchen stove: a - facade; b - section A-A (longitudinal vertical section of the furnace); c - section B-B (transverse vertical section). Designations: 1- firebox; 2 - ash chamber; 3 - grate; 4 - smoke damper; 5 - cast iron plate (flooring).
Before you start laying a simple kitchen stove, you should purchase the necessary stove appliances.
Having prepared a clay-sand mortar, they begin laying a simple stove. If the slab is placed on the foundation, then level it up. When laying a slab on a wooden floor, it is necessary to cut a sheet of roofing steel to the size of the slab. Put a layer of sheet asbestos on the floor, and in its absence - two layers of building felt, well soaked in a clay-sand mortar, cover everything with a sheet of roofing steel and nail it to the floor. Then, from a whole brick, a platform is made in two rows of masonry on a clay-sand mortar. After that, they start laying the slab from the first row strictly in order.
First row lay, observing the rules for dressing seams from selected whole bricks, as indicated in the figure below. The completed masonry is checked for squareness.

The first row of a simple kitchen oven
During laying second row they arrange a blower, install a blower door, which is attached to the masonry with the help of furnace wire. Temporarily, the front blower door can be supported with bricks, which are stacked on the floor in front of the blower door. The bottom of the ash chamber is 380 × 250 mm.

Second row kitchen oven
Third row similar to the previous one, but the seams should be well bandaged.

Third row
Fourth row covers the blower door, while leaving only the opening of the ash chamber with a size of 250 × 250 mm, on which the grate is laid. If possible, laying from the fourth row is preferably made of refractory bricks, as shown in the figure below.

Laying of the fourth row. Shaded bricks are refractory. The arrows indicate the directions of movement of hot flue gases in the heating furnace.
Fifth row forms a firebox with a size of 510 × 250 mm. The brick adjacent to the grate at the back is cut off to form an inclined plane along which the fuel will roll onto the grate (see section B-B along A-A). When laying this row, you need to install a furnace door, after attaching paws from roofing steel to it with rivets.

Masonry of the fifth row of the furnace
Sixth row stack in the same way as the previous one, but the seams should be bandaged.

Masonry of the sixth row of the furnace
Seventh row placed as shown in the figure below. This row leaves the chimney under the stove, connecting the firebox to the chimney.

Seventh oven row
Eighth row perform strictly horizontally, this row closes the furnace door. A cast-iron slab is laid on the laid out eighth row with a thin layer of clay-sand mortar. Factory-made cast iron slabs have protrusions or stiffeners on the underside, which recede 15 mm from the edges of the slabs.

Eighth row oven
The internal dimensions of the masonry of the eighth row should be such that the slab freely enters it with its ribs and has a gap of at least 5 mm on all sides, designed to expand the metal when it is heated. If this is not observed, then the cast-iron plate, expanding, will destroy oven masonry. In order for the masonry to be strong, a corner steel harness is laid on the eighth row. It is desirable to cover the frame with a refractory varnish, which protects the steel from rust.
After masonry ninth row using a thin layer of clay-sand mortar, a smoke damper is installed. This row is the final one, followed by the laying of the chimney.
The final row of a simple kitchen oven
Cooker works as follows. Flue gases from the firebox enter under the cast-iron stove, then through the hole under the chimney through the flue valve are discharged into the chimney.
There is no cleaning hole in the stove, since you can clean the chimney through the hole under the pipe, where it is easy to put your hand through the burner of the cast-iron stove.

Example of laying a hob
Firstly, in the stove, the furnace door is installed flush with the grate. In the stove, flue gases are constantly maintained in the chimney high temperature, as a result of which it is not necessary to lay fuel of great thickness on the grate. Secondly, with such an installation of the furnace door, the distance from the grate to the cast-iron stove will be only 280 mm, which makes it possible to quickly cook food even with low fuel consumption.
After finishing the laying of the furnace, it must be dried by opening the furnace and blower doors and the valve in the pipe.
The longer the oven dries, the stronger the masonry will be. The stove can be dried with small test fires, but after test fires, the valve in the pipe and the blower door must be left open.
After complete drying, the stove is plastered with a clay-sand mortar, followed by whitewashing.
Exterior finish is best done as follows: after laying the eighth row and installing a cast-iron slab, as well as before installing a corner steel piping, the kitchen stove is walled up on all sides in a roofing steel case (galvanized steel can be used). Pre-cut the corresponding holes according to the size of the furnace and blower doors. The case near the floor is fixed with a plinth, which is nailed around the stove. The outer surface of the case is cleaned and covered with oven varnish, which withstands high temperatures well.
In front of the furnace door, a pre-furnace sheet is nailed to the floor with nails 50 mm apart from each other. If the plinth was nailed earlier, then the pre-furnace sheet must be bent onto the plinth.
Cooker with oven
The kitchen stove with oven has dimensions, mm: 1290x640x560 (without foundation, i.e. without two rows of brickwork on the floor).
For laying a stove with an oven, the following materials are needed:
- red brick - 140 pcs.;
- red clay - 60 kg;
- sand - 50 kg;
- grate - 26 × 25 cm;
- furnace door - 25 × 21 cm;
- blower door - 14 × 25 cm;
- cleaning doors 130 × 140 mm - 2 pcs.;
- cast-iron stove of five composite plates measuring 53 × 18 cm with two burners;
- smoke damper - 130 × 130 mm;
- oven - 45x31x28 cm;
- plate binding (corner 30x30x4 mm) - 4 m;
- pre-furnace sheet of roofing steel - 500 × 700 mm;
- roofing steel sheet under the slab - 1290 × 640 mm;
- building felt - 1.2 kg;
- metal box for collecting ash in the ash chamber - 350x230x100 mm.
One stove-maker can fold this oven within 3-4 hours, additionally it takes about 2 hours to bring the material and prepare the clay-sand mortar. The heat transfer of the stove during two-time cooking is about 0.8 kW (770 kcal / h). The figure below shows general form, longitudinal and transverse sections of a stove with an oven. The following are drawings of the order of each row. Laying a stove with an oven is also not difficult and is similar to laying a simple stove, but here you have to install an oven and cleaning doors.

Cooker with oven: a - general view; b - sections A-A, B-B (vertical sections), C-C, G-D (horizontal sections). Designations: 1 - ash chamber; 2 - grate; 3 - firebox; 4 - cast iron plate; 5 - oven; 6 - smoke damper; 7 - furnace door; 8 - blower door; 9 - cleaning holes.
When laying the slab on an independent foundation, before starting work, its top is leveled with a layer of clay-sand mortar.
When installing the slab on the floor, before laying the first row, it is necessary to carry out the same work as when laying a simple kitchen stove.
masonry first row made from selected whole bricks, while strictly adhering to the rule of dressing the seams. The length of the stove should correspond to the length of five bricks, the width - to the length of 2.5 bricks. Using a cord, check the equality of the diagonals.

Laying the first row of a stove with an oven
Second row spread, strictly following the order. Here they leave an ash chamber measuring 380 × 250 mm, install and fix a blower door, on back wall leave cleaning holes (the width of the holes should be equal to the width of the brick, i.e. 12 cm). If possible, install cleaning doors with a size of 130 × 140 mm. At the cleaning hole extreme from the ash chamber, a brick is laid on the edge, as shown in the laying order. For better fixing of the oven in the middle of the place of its installation, put half a brick on the edge.

Laying the second row of slabs
Third row similar to the previous one, only the rule of dressing the seams should be observed.

Masonry of the third row of the slab
Fourth row covers the blower and cleaning doors. After finishing the laying of the fourth row, an oven is installed on a thin layer of clay-sand mortar at a pre-marked place. After that, a grate is installed. The same row of bricks installed on the edge block the chimney into the chimney.

Masonry of the fourth row of stove with oven
During laying fifth row the furnace door is installed and fixed, the brick is cut off before being installed behind the grate so that the fuel gradually rolls onto the grate during the combustion process.

Masonry of the fifth row of the slab
Sixth row similar to the fifth.

Masonry of the sixth row of the slab
Seventh row laid out in order. The resulting chimney channel from the front side is laid with the help of three bricks, as a result of which the internal size of the formed channel under the chimney will be 130 × 130 mm. In the image of this row, a steam outlet pipe with a diameter of 10 mm and a length of 160 mm is visible at the oven, which connects the oven to the ascending channel. This pipe is designed to remove steam and odor.

Masonry of the seventh row of a stove with an oven. The arrows indicate the directions of movement of hot flue gases in the heating furnace.
Eighth row
perform strictly horizontally in level. This closes the oven and the furnace door. The upper wall of the oven is coated with a layer of clay mortar up to 10-
15 mm, which will protect the oven from rapid burnout.

Laying the eighth row of a brick oven (before installing a cast-iron stove)
In this case, it is necessary that the distance between the top of the clay coating and the cast-iron plate be at least 70 mm. After that, a cast-iron slab and brickwork made of angle steel are installed on a thin layer of clay-sand mortar.

Eighth row of a brick oven (after installing a cast-iron stove)
After masonry ninth row only the laying of the vertical channel remains. The ninth row is laid according to the image below.

Ninth oven row
After masonry tenth row install a smoke damper.

Tenth oven row
Masonry eleventh row start the chimney. Further laying of the pipe is not difficult.

The final row of the furnace (does not take into account the laying of the chimney)
A stovetop with an oven works like this. From the firebox, flue gases are directed under the cast-iron stove, from where they, heating the oven from the back on both sides, fall under the oven and are directed to the hole under the chimney. Rising along the vertical channel, they enter the chimney through the smoke valve and are removed into the atmosphere.
Cooker with oven and hot water box
For laying a cooker with an oven and a hot water box measuring 1290x640 mm, the same materials are needed as for the previous stove. Additionally, you should purchase a hot water box with a size of 510x280x120 mm.
The figure below shows a general view, a horizontal section along A-A and a vertical section along B-B of the slab.

Cooker with oven and hot water box: a - general view; b - cuts. Definitions: 1 - firebox; 2 - cast iron plate; 3 - oven; 4 - hot water box; 5 - smoke damper; 6 - ash chamber; 7 - piping made of angle steel
The cooker with oven and hot water box is placed in the same order as the cooker with oven. The only difference is that after laying the third row, instead of a brick partition, a hot-water box in a case is installed on the edge between the oven and the vertical channel. The height of the hot water box must correspond to the height of four rows of flat brickwork. Otherwise, the masonry is completely similar to the masonry of a stove with an oven.
Improved Design Cooker with Oven and Hot Water Box
In the kitchen stoves in the countryside, not only food is prepared for people, but also feed for livestock is cooked, and linen is boiled during washing. During the firebox, a lot of steam enters the room and extraneous unpleasant odors. Because of this, the humidity in the room increases, which negatively affects its microclimate. Therefore, in order to remove foreign odor and steam in cookers, it is desirable to provide a cooking chamber, which is connected to the chimney using a ventilation duct. A ventilation valve must be installed in the ventilation duct.
Installation double door in the cooking chamber allows you to keep the food in it hot long time and thus prevent its souring.

Cooking chamber in a brick oven
The firebox and blower (ash chamber) are closed from the outside with the corresponding doors. top surface oven protect from hot gases with a layer of clay mortar 10-12 cm thick. It is advisable to lay a kitchen stove from the fourth to the ninth row from refractory bricks (especially the firebox).

An example of an ash pan cover
It is desirable to make a kitchen stove up to the ninth row of masonry from sheet steel, and to enhance its strength, after mounting the frame on a clay-sand mortar, install a trim of angular steel. Since the mass of such a plate will be more than one ton, it is installed on an independent foundation.
If the device is not possible independent foundation the floor must be reinforced with additional beams, which are mounted on brick columns. Instead of brick pillars, you can use pillars made of hardwood logs, reinforced concrete pillars, iron pipes with a cross section of at least 180-200 mm.
The cooker of an improved design has a “forward” stroke valve. During prolonged heating of the stove, evaporation of water in the hot water box is possible. To stop this, you need to add a little cold water and open the forward stroke valve. At the same time, flue gases from under the cast-iron stove do not go down, but immediately go into the chimney. As a result, the hot water box ceases to warm up, the evaporation of water in it stops.

Example of a "forward" stroke valve
For the convenience of cleaning the ash chamber from ash, a special box made of roofing steel with a size of 350x230x100 mm is installed in it. This prevents contamination of the room when cleaning the ash chamber from ash.
A cooker of this design has the following advantages compared to the previous cooker with an oven and a water box:
- during cooking, steam and foreign odors do not enter the room, which are removed into the atmosphere through the vent;
- food cooked on the stove in the cooking chamber remains hot for a long time and does not turn sour during the day;
- With the help of a “direct” stroke valve, it is possible to cook food without heating the hot water box and thereby preventing further evaporation of water in it.
The figure below shows a general view of the stove from the front, here are also drawings of the cuts of the stove in the most difficult places. Drawings of masonry in rows will be further, and they give a comprehensive idea of the internal structure of the slab. Using the orders and drawings in rows, you can fold the slab yourself, without the help of a stove-maker.

Stove with an oven and a hot water box of an improved design: a - facade; b - sections A-A, B-B, c - cuts B-B, Y-Y, D-D, E-E. Definitions: 1 - blower door; 2 - furnace door; 3 - oven; 4 - door of the cooking chamber; 5 - smoke damper; 6 - ventilation valve; 7 - valve of the "direct" stroke; 8 - hot water box; 9 - cleaning holes; 10 - cast iron plate.
The kitchen stove with an oven and a water-heating box of an improved design has dimensions, mm: 1290x640x1330.
The following materials are required for laying:
- red brick - 250 pcs.;
- refractory brick - 80 pcs.;
- red clay - 180 kg;
- sand - 90 kg;
- furnace door - 250 × 210 mm;
- blower door - 250 × 140 mm;
- grate - 280 × 250 mm;
- oven with a size of 250x280x450 mm;
- cast iron stove with two burners - 700 × 400 mm;
- hot water box - 250x140x510 mm;
- pre-furnace sheet - 500 × 700 mm;
- steel strip size 400x250x6 mm;
- door to the cooking chamber - 750x350x5 mm;
- corner steel for strapping a plate measuring 30x30x3 mm - 4.1 m;
- steel strip for overlapping the cooking chamber with a size of 450x45x4 mm - 4 pcs.
A stove can be put together by one stove-maker within 18-20 hours, an additional 6 hours are required to prepare the solution and bring the material.
To fold the stove with the firebox on the left side, you need to consider the drawings with the help of a mirror placed with an edge on the drawing.
The kitchen stove is laid out as follows. masonry first row produced on a foundation erected to floor level. The first row defines the main dimensions of the slab. The length of the slab is equal to the length of the laying of five bricks on a clay-sand mortar, and the width is equal to the length of 2.5 bricks.

First row of improved cooker with oven and hot water box
During laying second row two cleaning doors and a blower door are installed in front. They are attached to the masonry with the help of furnace wire.

Masonry of the second row of the furnace; 1 - blower door, 9 - cleaning holes.
masonry third row produced according to the order, it is similar to the previous row. After laying the third row, a water-heating box is installed.

Masonry of the third row of the furnace; eleven - steel sheet 3 mm thick.
fireman fourth row they are laid from refractory bricks, in its absence, sorted first-class red bricks are used. The fourth row covers the cleaning holes and the blower door, forming the beginning of the hearth. After laying the fourth row, a grate and an oven are installed.

Masonry of the fourth row of the furnace
masonry fifth row presents no difficulty. The brick adjacent to the back of the grate is cut halfway to form an inclined plane.

Masonry of the fifth row of the furnace; 3 - oven.
Before masonry sixth row the furnace door is prepared, for which strip steel is attached with rivets above and below, which should be 10 cm longer than the furnace door in both directions. For greater strength, the ends of the strip steel are screwed with furnace wire, the ends of which are embedded in the masonry. The door is installed on a clay-sand mortar, having previously wrapped the frame of the furnace door with asbestos fiber.

Masonry of the sixth row
Masonry seventh row fix the base of the furnace door.

Masonry of the seventh row
Eighth row covers the water box.

Eighth row masonry
Ninth row covers the furnace door and oven. The top of the oven is protected from burning with a layer of clay mortar 10-12 mm thick. It is desirable to lay this row entirely of refractory bricks.

Ninth row masonry
After the completion of the laying of the ninth row, a cast-iron stove is installed above the firebox on a clay-sand mortar. The large burner of the stove is placed above the firebox. Next to the main plate, an additional one is placed, made of steel sheet measuring 400x200x6 mm. After that, angle steel is laid, to which the lower frame of the cooking chamber door is welded. For strength, it is advisable to tie angle steel through special holes in it with furnace wire, which is attached to the masonry.

Installation of a cast-iron stove on the ninth row; 12 - steel sheet 6 mm thick; 13 - angle steel.
Tenth row made of ordinary red brick. On the right side, a window is left for cleaning the channel of the “direct” stroke. Part of the bricks that cover the slab are hewn with a pick before laying, so that in the event of a slab breakdown, it can be easily replaced.

Tenth row masonry
masonry eleventh row does not present difficulties, it is only necessary to follow the rules for dressing the seams.

Eleventh row of the furnace
Twelfth row covers the purge window.

The twelfth row of the furnace
After masonry tthirteenth row on a clay-sand solution, a “direct” stroke valve is installed.

The thirteenth row of the furnace; 6 - ventilation valve.
masonry fourteenth row must correspond to the level of the upper frame of the door to the cooking chamber. Next to the upper frame of the door to the cooking chamber, an angular steel measuring 45x45x800 mm is installed.

The fourteenth row of the furnace
Fifteenth row closes the door to the cooking chamber.

Fifteenth row of the furnace
Sixteenth row blocks the channel of the "direct" course.

Masonry of the sixteenth row of the kitchen stove
masonry seventeenth row provides ventilation duct to remove odor and steam from the cooking chamber.

Masonry of the seventeenth row of the kitchen stove
After finishing laying eighteenth row four pieces of strip steel 4x45x500 mm in size are installed above the cooking chamber to cover the cooking chamber.

Masonry of the eighteenth row of the kitchen stove
Nineteenth row covers the cooking chamber. After the laying of this row is completed, a ventilation valve is installed.

Masonry of the nineteenth row of the kitchen stove; 6 - ventilation valve.
masonry twentieth and twenty-first rows is not difficult, only the seams should be well bandaged.

Masonry of the twentieth row of the kitchen stove

Laying the twenty-first row
masonry twentysecond row reduces the size of the chimney, it will be 130 × 130 mm.

Laying the twenty-second row
twenty third and twenty fourth ranks put in order.

23rd oven row

twenty-fourth row
After masonry twenty fifth row install a smoke damper, which is also an adjustment valve.

Laying the twenty-fifth row of the furnace; 5 - smoke damper.
Masonry twenty-sixth row start the chimney. Laying a chimney is not difficult.

Masonry of the final row (not counting the chimney)
After finishing the laying of the furnace, before coating it, the chimneys are cleaned from the fallen mortar residues and crushed stone through the cleaning holes. Holes for cleaning are then laid with brick halves on a clay-sand mortar.
When installing the cleaning doors, they are tightly closed, the leaks are covered with a clay-sand mortar.
After that, the stove can be dried in two ways: by opening the furnace and blower doors and valves or by small trial furnaces. After complete drying, the slab is plastered with a clay-sand mortar, and after the plaster has dried, a double whitewash is made. In front of the furnace door, a pre-furnace sheet is nailed to the floor.
Do-it-yourself brick cooking oven: step-by-step instruction masonry + photo
Comfort country house, built far from gas supply networks, is unthinkable without a stove. In the cold season, it gives us pleasant warmth, ridding the air of dampness.
The market today offers customers all kinds of metal "bourgeois" designs. Despite this, many summer residents prefer classic version- a heating stove made of bricks. Its advantages are obvious: due to its large weight, it accumulates a lot of heat and gives it away for a long time, warming up the room well.
The service life of a brick structure significantly exceeds the resource of a metal one. The minimum cost of materials and ease of arrangement attract the attention of home craftsmen to a simple stove for giving.
Our article will help you test yourself as a stove-maker. In it, we will consider several options for simple wood stoves and give practical advice by their laying.
You will see that there is nothing complicated in the drawings of these structures. Having learned to read “orders” - brick layout schemes, you can build a full-fledged heat-generating device with your own hands.
How to fold the simplest brick oven?
First you need to decide what you want to get from the future stove. If you only need to heat rooms, and you use bottled gas or electricity for cooking, then choose the option without a stove and oven. Anyone who loves soft healing warmth chooses the option with a couch.
For regular cooking of a large amount of food and pet food, a simple oven with a hob will be just right.
We will consider three examples of ovens with step by step guide according to their laying:
- Simple straight-through;
- With hob;
- Heating.
Let's say right away that it is impossible to expect high heat transfer from a simple design, devoid of gas revolutions. For this reason, such stoves are placed in garages and other small spaces with an area not exceeding 16 m2.
We will consider this option so that beginners get the first simple lesson in practical masonry.

Direct-flow heating design is designed to heat a small room
Under such a stove does not need a strong foundation. Having poured out large gravel with a layer of 15-20 cm, filling it cement mortar and having leveled the surface, after a couple of days you can start laying.
The dimensions of the furnace in terms of: width 2 bricks (51 cm), depth 2.5 bricks (64 cm). Since there is no blower chamber in it, holes for air intake are drilled directly in the furnace door.

The sixth row covers the combustion chamber door. The top view helps to better understand the way the bricks are laid out.
The orders of such a design are simple. The main condition during work is to observe the dressing of the seams so that the upper brick closes the seam between the two lower ones.
On the eighth row, the firebox is narrowed, using halves and “three-quarters” for this - ¾ of the whole brick. The exit from the furnace is thus obtained with a section of 1 brick (125x250 mm).

The next row (ninth) is laid out in the same way as the seventh, using a whole brick.
After that, the brick tier is placed on the edge flush with the inner edge of the bottom row. The new tier is laid flat, using two whole bricks and four three-quarters. In this way, the smoke channel is again narrowed in order to trap gases and increase heat transfer.

On the next tier, the stones are placed on the edge. A brick is placed in the middle of the smoke channel. In this way, the stove is raised another five rows (one tier on the edge and a brick in the middle, the other tier flat).

The remaining four tiers are laid flat. With the last two rows of masonry, the smoke channel is narrowed to a size of 12x12 cm (half a brick). At this level, a smoke damper is placed in the furnace. A steel pipe is inserted into it from above.

Stove with hob
In the very simple version this design has small dimensions (width 2, and depth 3 bricks - 78x53 cm). However, even on such limited area you can place a single-burner stove.
Work goes smoothly when everything you need is at hand.
Therefore, purchase the following materials and accessories in advance:
- Solid red brick - 107 pcs;
- Blower door - 1 pc;
- Grate - 1 piece;
- Single-burner cast-iron stove - 1 pc;
- Furnace door - 1 pc;
- Pipe valve - 1 pc.
Refractory bricks are not needed for a wood-burning stove. Buying it is a waste of money. But red should be chosen carefully, rejecting cracked and uneven.
Solution preparation
The masonry mixture is made by mixing four parts of clay with one part of water and adding eight parts of sifted sand to them. The normal consistency is determined simply: the solution easily slides off the trowel, leaving no streaks on it. When laying, it should not flow out of the seams.
The volume of the solution is determined, focusing on the number of bricks. At optimum thickness seam (3-5 mm) one bucket is enough for 50 pieces.
Having prepared the masonry mixture, you can start laying the foundation. Its width is made 10 cm more than the width of the furnace. The height of the foundation is chosen so that the bottom of the first row of bricks is at floor level.

Approximate prototype of the stove
If the underground is deep enough (50-60 cm), then it is not necessary to dig a hole under the foundation. It is enough to make a formwork on the ground with a size in terms of 76 x (51 + 10 cm). Two layers of roofing material are laid on its bottom to protect it from moisture. After laying the concrete, he is given a week to gain strength and then proceed to masonry.
The dimensions of the stove we are considering with a hob are 3 x 1.5 bricks (76x39 cm).
Master's advice: lay out each new tier of brick without mortar (dry). After adjusting the bricks to size, you can start laying.
The first row is placed on a layer of clay mortar (4-5 mm). Having leveled the base, lay out the second one, leaving room for the blower door.
Before mounting the door, you need to screw a soft wire to it and lay its ends in the seams for better fixation.

There are four holes in the frame of the cast-iron door for the wire that serves to fix it in the masonry.
To compensate for the thermal expansion of the metal, a gap is left between the door and the brick. Before installation, its frame is wrapped with a wet asbestos cord.
The laying of the third row is carried out, overlapping the seams of the second. At this level, a grate is installed in the firebox.

Ordering scheme from 1 to 8 row
The fourth row is placed on the edge, observing the dressing of the seams, and the walls of the combustion chamber are formed. Behind it there will be the first and only smoke circulation (see section A-A in diagram No. 2). To clean its bottom, a so-called knockout brick is placed in the back wall without mortar, periodically removed to remove ash. Inside the chimney, two supports are made from pieces of brick to support the internal partition.
The stones of the fifth row are placed flat, leaving room for the furnace door. In the back of the furnace, in order, we see the walls of two smoke channels. Their surface during operation must be thoroughly cleaned with a wet cloth from clay protruding from the seams. This important condition to ensure good traction.
Helpful advice! Focusing on the ordering drawings, do not forget to look at the two sections of the stove. They will help you better imagine its design and not make mistakes when laying out bricks.

Ordering scheme from 9 to 11 row
Having raised it into the masonry up to the eighth row, they close the furnace door, laying a wire in the seams that fixes its frame. At the same level, a brick with a beveled end is placed in the back of the fuel chamber - a smoke tooth. It improves heat transfer by preventing the rapid exit of flue gases into the chimney.
Having finished the ninth row, an asbestos cord is laid on it in a clay solution. It is necessary for sealing the joints of the cast-iron plate and brick. On the tenth row, the firebox is covered with a hob.
At the eleventh, a smoke damper is installed in the pipe. It is also sealed along the contour with an asbestos cord dipped in clay.
12th and 13th row - the formation of the walls of the pipe. After their completion, a light pipe made of sheet metal, displayed on the roof.
heating stove
And now let's see how to fold a brick oven with your own hands, designed to heat a small country house.

Approximate prototypes of the considered version of the heating stove for a country house
Its dimensions:
- width - 2 bricks (51 cm);
- depth - 3.5 bricks (90 cm);
- height - 2 meters 38 cm.
For construction, the following materials and accessories will be required:
- Red solid brick - 390 pcs;
- Clay - 9 buckets;
- Sand - 18 buckets;
- Grate (25x40 cm) - 1 pc;
- Furnace door (20x30 cm) - 1 pc;
- Blower door (14x20 cm) - 1 pc;
- Cleaning door (14x20 cm) - 1 pc;
- Gate valve -1 pc;
- Pre-furnace steel sheet (50x70 cm) - 1 pc;
- Roofing felt for waterproofing (100x60 cm) - 1 pc.
Sequence of work
The first row is the base of the oven. It should be laid out especially carefully, checking the horizontal position with a level.
corners are the most hard part for newbies. In order for them to be even, we recommend that you immediately install four template racks on the edges of the masonry. They can be made from planed boards, knocking them down in pairs at a right angle.
By installing such a “formwork” from floor to ceiling, you can easily derive ideal angles.

Homemade template for masonry corners
On the second row, from the end of the furnace, two bricks are laid with a beveled edge that goes into the ash chamber. The laying of the third row begins with the installation of a blower door, fixed with wire in the seams of the side bricks.

Sequence diagram from 1 to 10 and cross sections of the heating furnace
4 and 5 rows continue the formation of the walls of the ash chamber. In the sixth row, they begin laying the walls of the fuel chamber and put a grate in it.
At the level of 7 and 8 rows, a furnace door is mounted. Beveled bricks are placed in the back of the chamber, which serve to improve traction. The ninth row closes the firebox door.
From the 10th to the 16th row, the laying of the fuel chamber and the vertical chimney channel is underway. On the seventeenth, a cleaning door is placed in the oven.

18-30 rows form smoke circulation channels. They need to be laid out as evenly as possible, rubbing the inner walls with a wet rag.
31-32 rows form a vault that covers the furnace.
33 and 34 form a chimney.
After finishing the masonry, the oven is left for a week with the doors open and the pipe to dry. After that, they make a trial firebox, burning small portions of chips, branches or straw.
late autumn and in early spring there is not enough comfort in the country house - it becomes damp and cool in the house. The problem can be solved with an electric heater, but in a country house it is better to give preference to a traditional wood-burning hearth. The heat from the stove or fireplace warms not only the body, but also the soul, filling the room with a special aroma and comfort. To build a mini-oven with your own hands, you do not need high costs - cost homemade unit will cost much less than ready-made devices.
Heating and cooking country stove: where to start and how to build
Small-sized furnaces, despite their small size, are installed on solid foundation. Only in some cases it is possible to do with strengthening the floor. Experienced craftsmen they work without diagrams and drawings, and it is recommended for beginners to take the orders of reputable stove-makers as a basis.
Construction scheme and materials
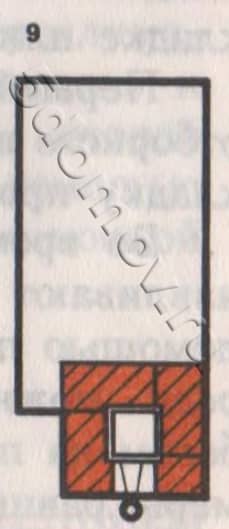
Ideal for a small house, this square mini brick oven is simple, compact and good efficiency. The design includes a low chimney with a channel section of 13 * 13 cm. The stove has an oven that allows you to cook and heat dishes. The cabinet is made of steel sheet, but if desired, it can be replaced with a finished oven suitable sizes.
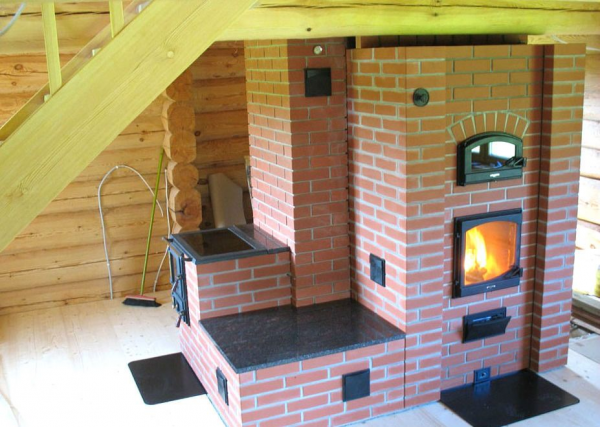
Appearance and oven device
For laying a mini-oven on wood, a refractory mortar is required. You can make it from clay yourself, but it will take more time, and the result will depend on the quality of the clay and the correct determination of its fat content. It is much easier to trust the manufacturers and purchase a ready-made heat-resistant mixture in the store - in this case, the product will remain diluted clean water in the proportions indicated on the packaging.
The dimensions of the compact design: 51 * 51 cm, the height of the hearth is 175 cm. Fireclay bricks are required to strengthen the firebox - it is not afraid of direct contact with the flame and does not crack. The walls of a mini-oven for a country house are laid out with red brick.
Consumption of materials:
- ceramic bricks - 170 pieces;
- refractory masonry mortar - 35-40 liters;
- firebox door size 23*25 cm;
- blower door (13*14 cm);
- cleaning door (13*9 cm);
- grate (25*18 cm);
- valve (12*34 cm);
- steel sheet;
- steel wire - about 2.5 m;
- roofing material for waterproofing.
Masonry scheme and drawing of the oven
The first row, as always, is laid out without mortar. On the second row, a blower door is mounted, using steel wire for fastening, and an ash pan is laid. On the fourth row, a grate is laid, providing a gap of about 4 mm between the grate and the masonry.


Laying the fifth row begins with the installation of the furnace door. The door frame is wrapped with asbestos cord, and the door is walled up in masonry with the help of steel wire. Then follow according to the scheme: they form an oven, a smoke channel, a pipe.

Baby oven with stove and oven
Another mini-oven for a summer residence has dimensions at the base of only 51 * 64 cm, while the depth of the firebox is 50 cm. The model is great for a country house or summer kitchen. As fuel, you can use firewood, coal, peat, briquettes.
Design features and materials
Despite its small size, the compact stove is quite functional and is equipped with a hob and oven, which allows it to be used not only for heating the room, but also for household needs. According to the reviews of those who have already built this assistant in their country house, the kettle boils on the stove in just minutes.
It was possible to maintain compactness due to the vertical placement of all elements. The chimney has a section of one brick. The exhaust gases pass through the channels located behind the cooking chamber, then enter the horizontal chimney, bypass the oven on both sides and go into the chimney.

Scheme of a mini-oven for a country house or summer kitchen
Materials required for construction:
- red brick - 220 pieces;
- clay masonry mortar or ready-made - about 50 liters;
- grate;
- steel sheet (pre-furnace) 50 * 70 cm in size;
- steel strip 4 mm thick with parameters 350 * 25 cm;
- slate sheet 51*30 cm;
- valve - 2 pieces;
- firebox door;
- 3 cleaning doors;
- blower door;
- oven (32*38*42 cm);
- stove (38*35 cm) with one burner.
Masonry order
The first row of a brick mini-oven is laid without mortar. After the second row, a blower door is installed, the next row is laid and the firebox begins to form. The grate is laid without mortar. The order diagram clearly shows where and how to install the doors, stove, oven and valves.


For protection ceramic brick lining is carried out from fire - fireclay refractory bricks are laid in a separate row. It is important to remember that different types of bricks cannot be tied up with each other - they have different expansion temperatures. Neglect of this rule leads to cracks.

Option for beginner stove-makers: a stove with a cast-iron firebox
A brick mini-oven can be built with your own hands based on a finished cast-iron firebox. Cast iron fireboxes are durable - they do not crack or burn through. This option is more suitable for beginners, since the design already provides for all the basic elements. The combined furnace heats up quickly and cools down for a long time, thereby significantly increasing the efficiency of the hearth. If desired, you can choose a hearth of a fireplace type with a fireproof glass door - such a model will not only warm, but also decorate the room.
Before starting work, prepare a solid and even base. To do this, you can pour a small concrete podium. The lining of the cast-iron firebox is made in half a brick, leaving an air cushion between the walls and the lining with a thickness of 1 to 10 cm. Additionally, it is necessary to provide small ventilation holes at the bottom of the building - they will ensure the exit of heated air and improve heat transfer.

An example of a cast iron firebox
You can start building a mini-oven with your own hands only with firm confidence in your knowledge and skills. Any doubts are a good reason to postpone independent work and entrust the construction to a professional stove-maker.
Video: do-it-yourself laying a small country stove
What is a brick oven country house? This is an opportunity to heat the house all winter long without using either gas or electricity. Moreover, the feeling of comfort that comes from the stove is hard to confuse with anything. There is nothing better than leaning against its hot wall at the end of the day, enjoying the warmth.
Modern construction technologies allow you to fold the stove in such a way that one good kindling will last you until the morning. In addition, a properly created design retains internal heat for 10-12 hours.
If you keep the fire in the stove a little bit, then you can heat it 24 hours a day with minimal wood consumption. In addition, it is not necessary to put firewood in the firebox. You can use special charcoal. But for this, the stove must be folded in a special way. Using a refractory stone that can withstand high temperatures.
It is also worth noting that furnaces can have many modifications. For example, the structure can be folded in such a way that a fireplace will also be attached to the stove. It will not take up much space, but will give even more warmth and comfort to the house. In addition, one pipe is quite enough to extract smoke from two fireboxes.
Types of ovens
The history of the evolution of furnace structures goes back many centuries. It is not surprising that putting together a heat-efficient and reliable stove is a real art. But with proper preparation and diligence, you can do it yourself, here is a good video instruction:
The oven can be folded using a variety of methods. At the same time, there are a number of parameters that determine the specifics of the future stove:
- Purpose.
- The temperature to which the walls must be heated.
- The time required to heat the walls and the amount of fuel needed for this.
- The design of the chimney.
- heat transfer level.
- Scheme of the movement of gases in the channels.
- Form.
- Material for finishing the outer walls.
- Main material.
Based on all these parameters, you will fold the stove of your dreams. The main thing at the initial stage is to draw up a drawing, with detailed diagrams. In the project, you need to describe in detail all the features of the future design. But before that, you need to decide what kind of stove you need.
Folding the heating stove is the easiest. It performs the main function - it gives warmth to people and the house. Such designs do not carry any additional functionality, but are reliable and easy to use, for which they have won many sympathies among summer residents.
Naturally, everything heating furnaces are classified according to heat transfer, the time required for kindling and the degree of heating of the walls. It is on these parameters that you need to rely first of all, before folding the oven with your own hands.
If you expect to get a stove with moderate heat, you can fold it into one brick. Such furnaces heat up slowly and also cool down slowly. average temperature walls about 60 degrees.
Heating stoves cannot be called a refinement of architectural thought. But the massive design and simple forms create a sense of monumentality. In addition, if you skillfully lay down a brick in this stove, it can become an excellent element of decor.

Moreover, do not forget about the external decoration. After you fold the stove, you can plaster it and put tiles on top. Firstly, it will protect the structure from destruction, and secondly, it will give it a beautiful and aesthetic appearance.
Important ! Before you fold a brick heating stove with your own hands, keep in mind that it requires an extremely large amount of material.
Typical representatives of the family of heating furnaces include such designs as:
- "Dutch",
- OPT-3,
- triangular oven,
- Grum Grizhimailo oven,
- OTP-11
- Rectangular heating,
- T-shaped.
These ovens are rarely very popular. The fact is that in order to put them together it takes a lot of time and materials, and the functionality turns out to be poor as a result.

Very often in country houses the owners decide to lay down the heating and cooking stove. This structure has a lot of advantages in comparison with a conventional stove. On it, without any problems and even with comfort, you can cook food using pine, birch or yew firewood.
Important ! About 90% of orders from stove-makers are for heating and cooking structures.
The main element of such a stove is a hob, which is made of cast iron. The oven is not built in everywhere, since in order to fold it, you need to show considerable skill. The most advanced designs have the following additional features:
- chamber for baking bread,
- couch,
- niche for drying firewood,
- water heating boiler.
Actually, the amount additional features depends solely on your capabilities and desires. In fact, a real multifunctional combine can be folded from a simple stove, which will become the main decoration of the kitchen. It's not even worth talking about the economy. In addition, food made on such burners always tastes better.
Attention ! The level of efficiency in heating and cooking structures reaches 65%. The heat capacity is about 4 kW.
Such ovens are able to keep heat for a long time. Not only that, they provide powerful traction. The main thing is to put everything together correctly so that the smoke goes directly into the pipe, and not into the room. The most common designs:
- "Swede",
- Volkov oven,
- "Housekeeper",
- "Teplushka",
- "Baby".
As you can see, there is a huge variety of heating and cooking stoves, on which you can cook something tasty without any problems and for the benefit of the family budget.
Designs with heating shields are a cheap solution that includes all the functionality necessary for giving. To fold such a structure, you need a minimum of materials and physical labor. Enough 175 bricks for a full-fledged masonry.
Despite the minimal construction costs, the efficiency of the furnace is more than high. This type of stove is very popular among elderly summer residents because of its convenience and low cost.
To the side are the stoves for the bath. Usually these are simple heaters, not distinguished by any architectural delights. Them the main role- heat the water in the bath and effectively raise the temperature. Such heating furnaces can store heat for two days.

Advice ! The main advantage of heaters is the ability to fit any room.
Of course, the classification of furnaces is not limited to these types. In fact, there are a huge number of them, which are classified according to many parameters. The most popular systems have just been described.
What kind of brick is better to lay down the oven
It is necessary to distinguish ordinary heat-resistant brick from the stove. Firstly, the latter can withstand temperatures above 1000 degrees. Secondly, if it is sharply cooled, cracks do not form in the structure.
For the construction of stoves, four types of stove bricks are used:
- Quartz. This brick is the result of firing sand and clay.
- Carbon - made up of graphite.
- Fireclay. Best for fireplace. But you can not discount its unique thermal insulation qualities. It can withstand temperatures up to 1600 degrees. At the same time, it does not crack and does not lose its qualities. The only negative is the yellowish tint.
- The main one is used when you need to fold a metallurgical furnace.
In reality strict rules regarding the choice of materials for masonry during construction, no. Nevertheless, there are some recommendations that are better to follow, the main one concerns fireclay bricks. It must be placed in the hottest places, namely in the area of \u200b\u200bthe firebox and chimney. For all other zones, the grade must be at least M-200.
Attention ! The best brick for the stove is the M-500 brand.
We make a stove with our own hands
Location selection

To fold a good heating structure, you need to choose the right place. The following standards must be taken into account:
- From the smoke channel to wooden structures must be greater than 37 cm.
- The minimum distance of the pipe from the ridge is one and a half meters. The height above the ridge is half a meter.
- If it is 1.5-3 meters from the pipe to the ridge, it can be placed flush with it.
It is best to fold the stove in the middle of the house. This will ensure even distribution of heat and ease of use.
Materials and tools

In addition to brick, you will also need a number of other materials to fold the stove. These include:
- clay,
- sand,
- fittings.
These are the main materials without taking into account the components, but you still need to take care of the vent doors, blower, firebox, and so on.
To fold a good stove you need to mix the right solution. It is best to use special refractory clay, in extreme cases, you can use red. Grains of sand should be no more than 1 mm. The optimal ratio is achieved empirically. Usually it is 1 to 1 or 1 to 2. Plus 25 percent of the water of the total volume of clay.
Metal objects play a fundamental role in the construction of the furnace. To put together a decent structure, you need doors and half-doors, grates, cast-iron dampers, latches and views. All these elements, if necessary, can be made by hand, but you will need to purchase iron sheets.
Of course, without good tools folding the oven will not work, you will need:
- pick hammer specially for the furnace,
- Master OK,
- ruler-rule,
- wash brush,
- roulette,
- plumb line,
- level.
With this simple toolkit, you can fold any oven.
The process of building a stove
For the foundation, a foundation pit is dug, backfilling and a reinforced frame are made. The resulting structure is poured with concrete. Before you fold the stove, make sure you have brick patterns in front of your eyes.

When working, it is very important to keep order. Otherwise, it will not work to fold a high-quality oven. The slightest deviation in the design will lead to the fact that one of the channels will be blocked. The result is more than deplorable. Smoke instead of going outside through the chimney, will go into the room.

The first row is placed along the cord. Each next masonry is checked with a level. Corners are controlled by body kits. After the masonry is completed, furnace equipment is installed, for example, burners. The pipe is brought out at the very end. To find out in more detail, how to fold oven watch the video below:

