How to make a glass ceiling. Glass ceiling with your own hands What to make a transparent ceiling from
Glass ceilings - modern solution ceiling surface design. Such designs can transform any room, giving it additional volume, sophistication and creativity.
The variety of materials on the market allows you to solve the most complex design problems.
Glass ceiling: advantages and disadvantages

The pluses of glass coatings include:
- Nice appearance.
- They fit organically into any space.
- A wide range of colors and textures.
- They can be combined with other materials on the ceiling, built-in lighting fixtures.
- A suspended glass ceiling (for example) allows you to hide wiring and communications.
- Hide the blemishes of the rough ceiling.
- Reflecting light, glass visually enlarges the area of the room.
- Ease of installation and maintenance. Such surfaces can withstand dry or wet cleaning using special means for glass care, and also do not require preliminary preparation ceiling surface before installation.
- Ecological cleanliness and hypoallergenicity.
- Resistant to high or low temperatures.
- Long service life (up to 50 years).
- Increased moisture resistance.
- Does not absorb dirt.
- Individual parts of the ceiling can be dismantled and replaced with new ones.
Despite the positive properties, these ceilings also have disadvantages.
The disadvantages include:

- All installation work with glass should be carried out with certain skills and abilities due to the fragility of the material.
- Silicate glass is heavy, therefore, the base under it must withstand the stated loads. Therefore, more often organic glass or plexiglass is used in the design of the ceiling.
- Installation of glass plates on the frame takes the height away from the room.
- Fragility. To protect the glass from scattered fragments, a special film is glued to its surface.
Important! In case of any violation of the glass surface, it must be changed immediately so that people are not injured by fragments.
All glass ceilings differ in texture. Choosing, for example, transparent ceiling tiles, you need to take care of the installation hanging frame... In addition, the surface of the material in some cases is subject to additional processing.
![]()
There are several types of glass for finishing the ceiling surface, and each has its own positive and negative sides.

The main material used for glazing windows. It contains only natural materials, therefore it has increased safety from an environmental point of view.
Other advantages of this type of glass include:
- Good light transmittance.
- Smoothness, no scratches.
- When used as ceiling covering this type of glass can be combined with decorative lighting.
- Ease of care, resistance to aggressive chemicals.
- Not afraid of temperature fluctuations, does not deform over time.
However, as a material for finishing ceiling surfaces, silicate glass is used much less frequently.
This is due to the following points:
- Fragile.
- Difficult to machine. Cutting the material can only be done with special tools.
- Heavy.

Another name for this species is organic glass or plexiglass. The basis of the glass is plastic, the lightness of which puts it in first place among the materials chosen for finishing ceilings.
The pluses of acrylic glass also include:
- Strength and ability to withstand heavy loads.
- Good sound and heat insulation. Due to the low thermal conductivity, the cavity between the draft glass-clad ceiling is filled air gap, which prevents the escape of heat from the room, as well as the penetration of cold air currents into it.
- Ease of processing. It can be cut with a grinder or a hacksaw, and the edges can be filed.
- Due to its low weight, it is very easy to install an acrylic glass ceiling.
However, such surfaces also have some disadvantages:
- Mechanical stress on acrylic boards can cause scratches. Therefore, cleaning with abrasive cleaning agents is not recommended.
- Melts when exposed to high temperature.
- Of the lighting elements, it is forbidden to use incandescent lamps that increase the temperature above the permissible level. This can cause deformation of the material.
- New slabs give off a pungent plastic odor that will dissipate over time.

A frequently used material whose matt finish is achieved by sandblasting. Light penetrating through such glass is scattered, creating the feeling of a delicate flickering glow.
Important! Thanks to the rich palette of color shades, with the help of frosted glass, you can create an original design of the ceiling.
If we talk about the production of frosted glasses, they are made on the basis of an acrylic or silicate surface. The acrylic base makes the appearance of the product matte and opaque. To make silicate glass matte, it is sandblasted.
Stained glass
It is an expensive finishing of the ceiling surface. Different shades and images can be applied to such plates.

The main disadvantage of this type is its high cost. But there are also budget options for stained glass execution. In this case, a film with a pre-applied and painted pattern is glued onto a silicate or acrylic board.
You can also make a stained-glass window on the ceiling yourself, when, after installation, patterns or geometric shapes are drawn using paints and brushes.
The main advantage of stained glass is to recreate an individual and unique ceiling.
Different types of glass ceilings can be included in a single combination. For example, matte slabs or mirror modules, as well as stained glass in symbiosis with matte surfaces.
Glass-covered ceilings will make the interior non-standard, divide the room into zones, increase the volume and give a sense of airiness to the space.
Glass ceilings: types by mounting method
Depending on the chosen mounting method, the ceilings are divided into:
Frameless
With this type, the glass is fixed directly to the rough ceiling. But even in this case, it is worth installing a low crate. For example, made of wood. The disadvantage of a frameless glass ceiling is the lack of the possibility of embedding lighting fixtures.

The glass is fastened to the ceiling with special glue or dowel-nails. You will have to work very carefully so as not to damage the fragile surface. In addition, you must first take care of the alignment of the rough floor.
Framed glass ceiling
The most popular are modular floors. They are presented in a combination including: hangers equipped with height adjustment mechanisms, profiles (base - steel or aluminum), glass plates (acrylic or silicate).
In turn, frame glass ceilings are divided into the following types:
- With square modules. The advantage is the ability to replace the cassette in case of damage to a spare one. For this, the old part is removed from the grill and a new one is inserted. The structure can be easily dismantled and moved to another room.
- WITH wooden crate... Visible elements natural material in combination with a smooth reflective glass surface create a unique design decoration... The texture of the glass ceiling looks especially harmonious with wood.
- With hidden frame. In this case, the installation of the modules to the frame is carried out using decorative screws. The main difficulty is to drill a hole in the slab of the required diameter without damaging the glass surface. For such solutions, it is better to use acrylic glass.
- With stained glass inserts. Such elements are predominantly included in the middle of the ceiling surface on a pre-assembled frame.
Before deciding which frame to use, you need to familiarize yourself with the features of the base material. Glass and wood should be combined in apartments, houses, office premises or restaurants. Where high humidity, it is better to use an aluminum frame. It is not afraid of corrosion and water. The best option for private houses with one floor would be the installation of frameless glass ceilings.
DIY glass ceiling installation: step by step instructions

The easiest way is to mount an Armstrong-type suspended ceiling with your own hands, while observing a certain sequence of actions:
Ceiling surface marking:
- Find the lowest corner in the room and mark. This will be the base for the bottom edge of the frame.
- Using a level, determine the position of points in other corners.
- With an upholstery cord, connect all the marks together with a horizontal line.
- Connect opposite corners with diagonals. The intersection will represent the central part of the ceiling surface.
- Measure the length of the walls and find their midpoints, from which draw a line to the central ceiling.
- From the midline, retreat on each wall 120 cm in both directions, draw a straight line to the opposite wall.
Important! If the room is narrow and long, then retreat from the lines that resulted from the indentation by the same distance, draw a line. Thus, you get a ceiling divided into rectangles.
- Outline the attachment points for future suspensions. To do this, take the middle of the ceiling as a basis and make it the center of a circle with a diameter of 180 cm. Draw a circle. You can use a nail and thread. The intersections will be the attachment points for the suspensions.

Installation of the corner profile and retaining hangers.
- Drill holes for dowels in the corner profile every 30 cm.
- Attach the plank to the wall surface so that its base coincides with the horizontal line.
- Using a bump stop through the profile, mark the points of its attachment to the wall surface.
- Use a puncher to expand the holes in the wall and insert the dowels.
- Fix the corner profile to the wall.
- Mount the suspensions using hammer-in dowels. In this case, the hooks on them should "look" in one direction, and the lower bases of the suspensions should be located at the same level with the base of the profile.
- If it is necessary to adjust the height of the hangers, special displacement springs can be used.
Fixing profiles
For convenience and ease of installation, you can purchase a ready-made ceiling, which is enough to assemble under the ceiling according to the scheme.
An important point! First of all, the guide parts are mounted, after that - the transverse ones.
- Fix the guide profile to the hangers so that it adjoins the corner as much as possible.
- Install cross-sections connecting the guides every 60 cm.
Important! For luminaires, it is necessary to additionally mount separate suspensions.
Lighting installation

Before finally installing the glass ceiling, you need to mount the light sources. The best option- installation of luminaires along the ceiling in one line. It is better to mount the backlight away from the glass surface, so the devices will be practically invisible externally. It is necessary to buy opaque tiles for lighting.

They must be inserted into the wireframe cells in one sequence. If you intend to put a glass ceiling with an ornament or image, you need to constantly check the ceiling with sketches.
Thus, it is possible to install the glass ceiling yourself. The main difficulty is cutting the material to the desired size. But this task will be feasible if you act correctly.
Video illuminated glass ceiling
Once upon a time, glass ceilings played the role of decor for concert halls, halls and other entertainment venues. However, these elements soon began to penetrate into living quarters. Today, acrylic glass ceilings can be found in bedrooms, living rooms, kitchens and bathrooms. Glass increases the volume of the room, thereby creating the illusion of high ceilings. Light rays passing through frosted glass or stained glass give the interior of the room a new, mesmerizing sensation. In living quarters you can find different types glass ceilings. They differ in material, texture, pattern and fastening method. Our article will cover each of these points in detail.
DIY glass ceiling and its types
Glass ceilings are made of two materials that differ in their characteristics. We are talking about silicate and acrylic glass.
Silicate glass is the material from which windows are made. Differs in its naturalness, ecological properties and absence of unpleasant odors. Of course, silicate glass has a number of advantages and disadvantages.
The advantages of silicate glass ceilings include:
- Good throughput Sveta.
- Smooth surface (no scratches).
- Easy care even with detergents and cleaners.
- Environmental properties.
- Ceiling lighting versatility: incandescent lamps, fluorescent lamps, LEDs, etc.
- Resistance to high temperatures and humidity.
- No deformation.
Disadvantages of silicate glass:
- Quite fragile material that can shatter from a slight blow. And, given that the glass is under the ceiling, then it will fall down on the head. Safety measures: gluing to the glass surface protective film... It will prevent the debris from spreading, but it will not completely solve the problem. In case of damage, the glass will have to be replaced.
- The material is difficult to process - you will need it special tool which is not easy to find. Of course, you need a lot of experience to cut silicate glass tiles and not spoil the material.
- Heavy stuff. But on the other hand, the structure of silicate glass prevents deformations of various forms.
Acrylic ceiling glass is a modern material, another name for which is "plexiglass" or "plexiglass". Transparent plastic allows for high strength. Acrylic glass constructions will delight you with their reliability.

Advantages of acrylic glass ceilings:
- The frame is difficult to break - with any strong impact, the following happens: the plexiglass itself may crack, but it does not split or scatter.
- Acrylic glass is non-destructive.
- Excellent sound insulation.
- High heat-insulating properties - acrylic glass practically does not conduct heat. At the same time, an air layer is located between the ceiling and the plexiglass slabs. It is she who prevents the ingress of cold masses from the ceilings into the room.
- The material is easy to process - you can cut it with a regular hacksaw or grinder. The edges of the glass will not crack or shatter.
- The weight of acrylic glass is quite small, so it is quite popular.
Disadvantages of acrylic glass ceilings:
- The surface can be scratched by dust and dirt. The material does not allow the use of abrasive cleaning agents for cleaning. It is also not recommended to experiment with detergents.
- Armstrong glass ceiling is afraid of high temperatures.
- It is not possible to use the backlight in the form of incandescent lamps and other lighting fixtures that cause temperature drops.
- Due to the fact that the material is not natural, it can give off unpleasant odors (especially sensitive when heated).
- High temperatures can deform and curl the edges of the tiles.

Thus, acrylic glass has both advantages and disadvantages. Therefore, before making a choice between silicate and acrylic glass, think a few times, weigh everything and study the photo materials.
The texture of the glass ceilings is also different. For example, it is not rational to use transparent glass, since the very idea of a suspended ceiling implies hiding flaws. Under these conditions, the glass is processed.
- Glass for ceiling with matte surface- the most popular design option for residential premises. The glass is processed with sandblasting, after which it becomes frosted. Of course, translucent ceilings allow light to pass through, diffuse it and direct it into the room. So you can see the illusion - the absence of a ceiling (read also: ""). Glass besides standard white can be pink, blue, green and other shades of colors. Thus, an unforgettable composition is created, and a pattern is formed on the glass. Frosted glass ceilings can be made of silicate or acrylic glass. Silicate glass is sandblasted, while acrylic is initially opaque. In both cases, opacity is of the highest grade.
- Mirrored ceiling - appeared in the middle of the 20th century and already then won the sympathy of many owners country houses... Mirror plates are made of silicate glass (amalgam is applied) and acrylic glass (with a special film). The mirrored ceiling visually changes the volume of the room. The surface expands it and makes the ceilings much higher. This does not require overhead illumination.
- Stained glass ceiling is quite expensive. It is possible to apply a multi-colored drawing on glass with significant financial costs or be limited budget option... For example, casting stained glass from glass different colors- "Murmansk casting". In terms of cost, they are distinguished by their high cost, and only respectable people can afford it. However, do not despair - you can create and alternative ways using regular clear glass.

The first option is to glue a film with multi-colored stained glass patterns on the glass surface. This method is notable for saving finances and personal time.
The second option - the composition is drawn by hand with special paints for glass. However, the outline of the drawing should first lie on plain paper or cardboard. Only after the successful execution of the sketch can the drawing be transferred to the glass. This method will be to your liking. creative people, dreamers with out-of-the-box thinking - there is an opportunity to embody their ideas on glass and do it colorfully. The rest of the drawing methods are distinguished by their complexity.
Stained glass creates an unforgettable atmosphere. A high-quality drawing or composition + good lighting will create a cozy room.

The cost of glass ceilings is related to the material of execution and the complexity of the pattern (engraving). In terms of cost, acrylic and silicate glass differ within 30%. Let's clarify: acrylic glass is more expensive than silicate glass. However, there is a nuance here: during processing and installation, part glass tiles usually falls into disrepair - and this levels out the difference in price. Also, the cost is related to the color if it is a mirror finish. Accordingly, the complexity of the pattern is if it is sandblasting on the surface (or stained glass).
Glass ceiling with photo printing and methods of fixing it
The option for attaching a glass ceiling is associated with the type and possible illumination of the ceiling.
So, a mirrored ceiling does not require top lighting. Therefore, such a structure is fixed to the floor surface.
- Bonding - Mainly used for acrylic glass tiles, as their material is strong. Due to the imperfection of the surface of the ceilings, it is better to glue not to the ceiling itself, but to plywood or drywall sheets... The latter must be fixed in advance on the ceiling. Ultimately, the surface will be flat and the mirrors will not distort.
- Fastening to rails or profiles. Crammed along the ceiling wooden slats or are getting stronger aluminum profiles... Then, mirror tiles are screwed to them using special screws.

Arrangement of glass ceilings is carried out to create a unique atmosphere with diffused light. In the design described above, a backlight is needed, which is fixed above ceiling panels... Let's talk about several ways that will help bring the design to life.
- We mark the ceiling
The surface of the ceiling must be in a strictly horizontal plane. First of all, mark the lower level of the future ceiling in one of the corners. Do not forget that it will eventually drop by 20 cm. Further, the marks are transferred to the other corners. At the same time, the evenness of their arrangement is being checked using a laser level. After finishing the markup, connect the marks together with lines. Carry out a final check of the flat plane of their location.The lines on the walls are a guide for the installation of the corner profile. Next, we need to find out where the middle of the room is.
Important : The optimal start for marking the ceiling with a cassette system is from the middle of the room.
Connecting points in opposite corners with lines, find the point of their intersection. They will be the center of the room. Then you need to measure the walls, find their middle and connect the resulting point to the center point of the ceiling. The shortest line connecting points on opposite walls will be the reference. On its basis, the fastening of the guide profiles will take place. Taking it as a basis, set aside 120 cm in both directions and draw a line. If the room is long, then set aside another 120 cm from the lines obtained and draw the lines again. Ultimately, the ceiling should be marked every 120 cm, and the line closest to the wall should be no further than 60 cm from it. Mark the places for attaching the hangers. To do this, draw a circle with a diameter of 180 cm around the center point of the ceiling. The points of intersection with the guides will be the attachment points for the suspension. Next, we expand the circle.
- We mount corners and hangers for a false ceiling
The installation of a glass ceiling is, first of all, the installation of a corner profile. At the beginning of work, drill holes for dowels in the profile (step 300 mm). Then attach the corner profile to the wall - the bottom edge should line up with the line on the wall. Using a bumper, mark the holes in the wall. Remove the corner profile and drill the dowel holes in the wall using a punch. Insert the dowels themselves into the wall, and then attach the corner profile and secure it.
The second stage is to fix the suspensions using hammer-in dowels. The hooks on the hangers should be turned to one side. These are measures for convenience during installation work and when attaching the profile.Check that the lower edges of the hangers are in the same plane. They must coincide with the plane of the corner profiles. To adjust the hangers, use springs to help move the elements.
- Installation work with false ceiling profiles
The purchase of the Armstrong system will help to simplify the installation (the kit contains required profiles). When assembling the frame, start with the guide profiles, and only then the transverse ones. The guide profiles must be fixed to the hangers (hung on the hooks). Their edges provide a secure fit on corner profiles. If the length of one guide profile is insufficient, connect it with a piece cut from the other profile. A special lock, which is located on all profiles of the system, will help you with this.
Important : In the places of the future location of the luminaires, fix additional hangers.
After collecting the guide profiles, fasten them with the cross profiles. In turn, their installation should take place at a distance of 60 cm from each other. They must also be securely positioned on the corner profiles. If necessary, lengthen them. You will end up with a wireframe mesh from the profiles. Do not forget to make a final check of the horizontal structure and the even arrangement of the cells. Remember that all angles must be exactly 90 degrees.Types of glass ceilings, in detail on the video:
- Installation of electrical wiring and lighting devices
Do not rush to fold the work and fix the glass tiles. We have at least important stage- installation of communications: electrical wiring and ceiling lighting. Considering the fact that we are installing a glass ceiling, place the lighting fixtures along the ceiling. It is important not to bring them too close to the slabs, as they will be visible even through frosted glass. Under these conditions, some of the tiles will be glass (located in the center of the room), and some will be ordinary ceiling tiles. Lighting devices should be hidden behind opaque tiles. Our main task is to prevent the lamps from being visible from the room. The light will be reflected from the ceiling surface and scattered over the entire area of the room. The process of whitewashing the ceiling surface will not be superfluous. After that, the luminaires are attached to the suspensions.
- We put glass tiles in the frame
The final stage is the laying of glass tiles. Take them very carefully in your hands and then insert them into the sections of the profiles. Remember to follow the correct sequence. When placing does not different tiles, and the drawing, check the sketch before final fixing the tile.
That's all. The process of installing a glass ceiling is not difficult at all. It is enough just to thoroughly prepare for the work, view photo and video materials, and also tune in to the long editing process. All operations, except for cutting glass, can be done by hand. Well, the most hard work entrust to professionals.
12290 0
Until recently, glass ceilings were the prerogative of concert and exhibition halls, premises for celebrating celebrations and holding official ceremonies. Today, schemes and materials have been developed for the construction of such ceilings in rooms of any type and purpose.

What is a glass floor?
Any approach to interior design has its fans and opponents. The use of glass in load-bearing structures such as ceilings is no longer a surprise or rejection. Today glass is one of the most modern materials, which allows it to be used in the installation of any structures.
The glass floor is a transparent sheet that completely replaces the floor slab. The point of using these products is to create high-quality and effective lighting, in which light penetrates all levels of the building. This effect has its own name: "second light".

Despite the visual fragility and weightlessness, glass for ceilings is a very heavy material. Even physically strong man it will be difficult to single-handedly lift a 12 mm thick sheet of durable glass. Therefore, the installation of ceilings from this material is a difficult and time-consuming process. The main requirement for such structures is the correct calculation of the weight load.

V different countries there are requirements for the installation of glass ceilings in public and residential areas. But the kind of glass used is always the same. This is a laminated tempered glass, triplex. The thickness of the glass is calculated depending on the function of the floor and the load on it. So, in multi-storey public buildings glass ceilings have to withstand significantly higher loads than low-rise ones. This is where the features come from. constructive solutions devices of transparent floors.
SNiP 23-01-99. Construction climatology. File to download.

Types of glass ceilings
With the help of glass ceilings, you can give modern look any interior, as well as decorate the room in high-tech style. Glass to their appearance resembles such semi-precious materials as rock crystal and transparent amethyst. Therefore, it is able to create an atmosphere of luxury in any interior.

Mirrored ceiling "Solar system"
There are the following types of glass ceilings:
- stained glass (colored glass);
- backlit;
- without backlight;

By type of installation:
- rack made of steel beams (both welded and bolted connections are permissible);
- cassette (raster, modular);
- on a lattice frame.
The gaps between the canvases are closed either with a transparent sealant or using special T-shaped layouts. The disadvantage of the second method is that the layout creates a small but visually noticeable sill on the ceiling surface.

There are glass support structures (gratings) that allow you to create a seamless ceiling surface.
Table. Glass ceiling manufacturers.
| Manufacturer | System type |
|---|---|
| Cassette frames, Grilyato |
| Glass and mirror panels |
| Straight, stepped and curved glass ceilings |
| Stained glass and sandblasted panels |


Types of glass panels for ceilings
Glass ceilings are prefabricated. Their main element is panels of a certain size.
These panels can be:
- matte;
- transparent;
- tinted;
- mirrored;
- stained glass.
Matte allows you to create spectacular diffused lighting, which is relevant for recreation areas, bars and restaurants. This is the most comfortable type of lighting for residential and public spaces.
Glass ceiling prices
glass ceiling

Stained-glass panels are the most expensive material. The price depends on the type of glass used to create these slabs: one-color or multi-colored.
Stained glass panels can be made in different ways:
- by sintering (fusing);
- by gluing special films;
- using ultraviolet printing;
- using the Tiffany technique.

Master class: DIY Tiffany stained glass
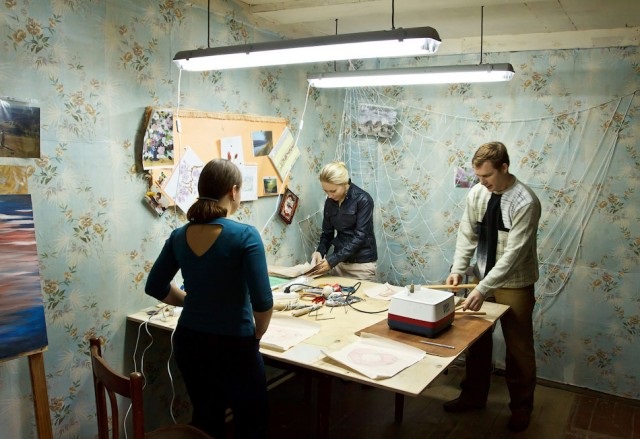

Scraps of glass are not thrown away - they can be useful for further production of stained glass.


Making a stained glass window begins with a sketch. We nail the sketch to the table, creating a "frame" around the future stained-glass window.


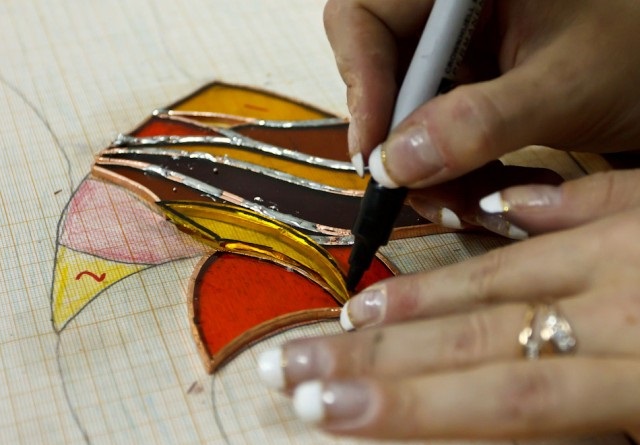
After wrapping, the tape must be pressed against the glass. To do this, you can use anything (in our case, a pencil)


Soldering "fish".


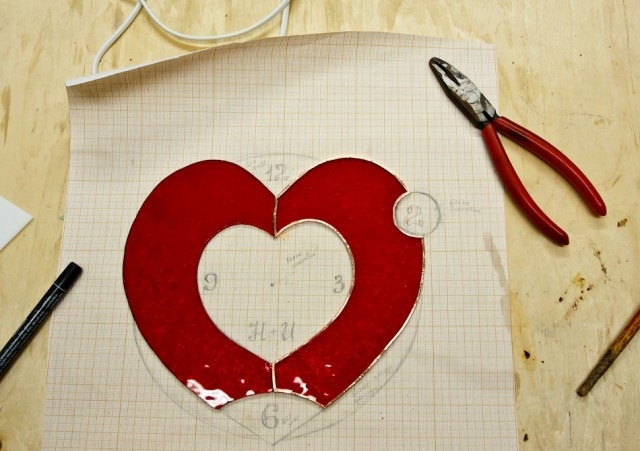
The stained glass "heart" turns into a dial.

"Fish" stained-glass window is welded. Carefully tear off the wooden frame.

Two stained glass windows. If you look closely, then the stained glass window with a fish is turned towards us. reverse side- the joints of the stained-glass window are not soldered yet.

As you can see, Tiffany stained glass windows require painstaking work, therefore stained glass ceilings are one of the most expensive.
Mirror tiles - inexpensive and affordable facing material... It is traditionally used for finishing ceilings in bathrooms, halls, reception rooms. A mirrored ceiling cannot be considered a full-fledged glass ceiling, since a reflective surface can be achieved using special film glued to any flat panel.

Pros and cons of glass ceilings
The advantages of glass ceilings are obvious. This is the possibility of a spectacular lighting device, including the one that creates the impression of a volumetric space. It is the ability to create an atmosphere of luxury and respectability. This is durability and absolute safety for human and animal health.
The benefits of glass ceilings include:
- resistance to ultraviolet radiation and any chemicals;
- fire safety;
- simplicity and ease of maintenance.
But these designs also have their drawbacks, most of which can be called relative. First of all, the disadvantages of glass ceilings include the laboriousness of installation. Despite the fact that modern panels are made of laminated high-strength glass, their lifting and installation require utmost attention and accuracy. Therefore, the installation of such structures is carried out slowly and thoughtfully.

Another disadvantage of glass ceilings is their significant weight. This fact determines a solid list of requirements for the quality of the supporting base and frame elements.
Types of glass ceiling fixings
There are several types of mounts, let's consider the features of each of them.
Cassette
The cassette mount of glass ceilings is analogous to the mounts. With this installation method, glass plates are installed inside the cells that make up the frame. A cell with a slab is called a module, which gave rise to the second name of this type of fastening - modular.
Ceiling profile prices
ceiling profile

The frame of this design consists of metal beams having a T-shape. The glass plate is placed into the cell from above and rests on the side shelves of the beams. The cassette mount allows you to easily carry out the self-assembly of the glass suspended ceiling.

Lathing
The battens can be made of any material that is strong enough to support the weight of the panels. These can be aluminum or steel beams, high-strength glass strips. But regardless of the type of material, the plates are bolted.
The panels can be installed both from above (as in the cassette installation version) and from the bottom of the frame beams. Glass slabs for such ceilings have special holes. The bottom mount is rarely used, since the top one is more reliable for this mounting method. The lathing cells can have different shapes: round, square, oval.

Point
This is the most modern type of glass plate fixing. The panels are laid from below, covering the frame with them. The advantage of this method is that it allows you to completely hide the supporting structure and create the effect of a solid glass sheet. For this installation method, spectacular fittings are chosen, since they will be in plain sight. Ornamental screws are usually used.
Spider
This is an innovative way of installing glass ceilings. It is carried out using special brackets - spiders. They allow you to minimize the presence supporting structure and create the impression of a seamless ceiling. The spiders are attached to the base ceiling and frame and are located above the glass slabs (viewed from below).


Video - Modern glass ceilings
Glass ceiling installation
At self-assembly glass ceiling, first of all, you will need to solve two issues:
- frame type;
- type of glass plate.
The easiest to install is the Armstrong T-type system. There are manufacturers who offer different variants glass ceilings with such a frame. Basically, you can find two sizes of slabs: 29.5x29.5 cm and 59.5x59.5 cm. Accordingly, two types of T-shaped frames with cells of different sizes are offered for their installation. The T-15 and T-24 systems are popular.

The package includes:
- profiles;
- fasteners;
- suspensions;
- installation instructions.

According to the masters, the optimal thickness of the frosted glass is 2 mm. Such plates scatter light well and hide the LED strip above them, as well as the frame beams. Stained glass panels are ordered from specialized workshops, since such ceiling tiles are not launched into mass production. They require manual work.
Many manufacturers glass panels offer spectacular types of glass processing: sandblasting, photo printing. Such enterprises have their own designers who will help you choose the most suitable drawing for a particular interior.
Plates with a matte surface obtained as a result of sandblasting look spectacular. For the installation of ceilings in residential premises, glass panels of white, bronze, gray (graphite) colors are often chosen. Combinations of glass and mirror plates are also used. Often, to reduce the weight load, glass ceiling manufacturers replace natural glass with acrylic.

Preparatory stage
No prior preparation is required for the installation of a glass ceiling base surface... However, since the suspended structure will be heavy, it is necessary to ensure that the overhead floor is able to withstand significant loads. If there are deep cracks on the ceiling, you need to find out what led to their formation and eliminate the cause. Otherwise, there is a great risk of collapse suspended structure, which in the case of glass panels threatens not only property, but also health.

On the preparatory stage it is necessary to decide in what way the frame will be attached to the base ceiling.
There are two options:
- by means of anchor fixation;
- by installing dowels.
The first option is preferable for any floors, especially for those whose reliability there are doubts. The anchorage method involves a deeper immersion into the base ceiling. Therefore, it is considered more reliable for the installation of heavy suspended structures.

Frame installation
Step 1. Markup. At this stage of the work, it is necessary to determine the level of the suspended glass ceiling. In most cases, it is sufficient to retreat a few centimeters down from the base surface. But they take into account the dimensions of the lighting fixtures that will be installed above the frame.
Often the illumination of glass ceilings is carried out with the help of fluorescent tubes. is also possible, but it is necessary to take into account their power. When switched on, these devices generate significantly more heat than LEDs. Therefore, the degree of resistance to high temperatures of those materials that are located near such lighting points is also taken into account.

It is most convenient to mark using a laser level. But if such a device is not available, you can determine the level of the false ceiling. the traditional way- using a tape measure, bubble level, marker.
In this case, the following actions are performed:
- using a tape measure, measure the height of each corner of the room;
- from the lowest angle, the distance that is needed to install the backlight is measured towards the floor;
- make a mark with a marker and screw in a self-tapping screw;
- tie a thread to a self-tapping screw;
- go along the wall to another corner and pull the thread;
- using a bubble level, the horizontal position of the thread is found;
- screw a self-tapping screw in the second corner and attach a thread to it.

In the same way, markings are made on all walls of the room. Along the thread, draw horizontal lines with a marker and unscrew the screws from the corners.

Step 2. Installation of guides. T-shaped systems are attached to the base surface using special hangers. But the ends of the longitudinal and transverse profiles of the frame are fixed using guide strips, which are attached along the horizontal marking lines.

It goes like this:
- holes are drilled on the walls along the marking lines of such a depth that is required to install the selected dowels ( optimal length dowels 40-45 mm);
- drive the dowels into the holes;
- using a screwdriver and self-tapping screws, they fasten the guides around the perimeter of the room.

Step 3. Ceiling markings. The marking of the ceiling is carried out in accordance with the dimensions of the cells of the frame. If the system involves the installation of profiles at a distance of 60 cm from each other, a similar marking must be done on the ceiling. Its surface should be drawn into squares or rectangles that follow the contours of the suspension system.
Stretch ceiling prices
stretch ceiling
Step 4. Installation of suspensions. The T-system profiles are held at a certain height by means of hangers. These components are two metal knitting needles, one end of which is bent. The spokes are interconnected by a thin metal plate. The suspensions are installed along the marking lines on the ceiling using the method selected at the preparatory stage.


Installation of hangers on a ceiling anchor
The number of anchors and hangers must be the same. When installing suspension systems, an anchor with a diameter of 6 mm and a length of 4 cm (6x40) is most often used. All ceiling anchors have a hole through which hangers are attached to them. To install the fasteners, you will need a drill and a 6 mm drill.

The subsequent steps are as follows:

Step 5. Installation of electrical wiring for the backlight device.
Step 6. Installation of lighting devices. If used led strip, they can be attached directly to the frame slats. In this case, the installation of the tapes is carried out after the installation of the sheathing profiles. The luminous flux of diodes can be directed upward or to either side. When attached to the slats, it will not be possible to direct the light flux downward. If there is a need for this type of lighting, the tapes are attached to the base ceiling.
Another option - raster LED ceiling panel Volpe ULP-Q101 6060-33W
Step 7. Installation of frame profiles. The profiles of T-shaped suspension systems have special holes through which they are attached to the suspensions. At this stage of work, it is important to install the planks so that they are all located in the same plane. To check the correct installation, you can use laser level... If there is none, you can pull the threads between the guides. Focusing on them, the profiles are suspended from the suspensions.


Step 8. Laying glass plates. Glass panels are inserted into the cells of the frame and placed from top to bottom on the protrusions of the profiles. At this stage of work, it is necessary to observe safety precautions: work on a stable step-ladder with anti-slip legs, prevent the slabs from wetting (they will become slippery), and provide high-quality lighting of the room.
Rack ceiling prices
rack ceiling

Installation of panels (in this case - gypsum fiber, not glass)
The suspended glass ceiling must be ventilated. Therefore, in the right places, not glass, but ventilation mesh plates are installed.

Installation of cassette glass ceiling "Albes"
The Albes company produces different types of glass panels: stained glass, with photo printing, matte, transparent. Plates are installed on cassette systems, the cells of which have a square or rectangular section... The manufacturer offers 11 standard sizes of panels: from 30x30 cm to 180x60 cm. The installation technology is the same for all cassette systems, regardless of the size of their cells.
Albes cassette ceiling installation scheme (as you can see, it differs little from Armstrong)
Step 2. Installation of electrical wiring. Wires and sensors are attached to the rough ceiling, with the help of which the backlight will be performed.
Step 3. Skirting the level of the false ceiling. To install the guide profile at the required height, horizontal markings must be applied around the perimeter of the room.
It is performed using a water level, a level-rail at least 150 cm long, chop laces as follows:
- find the lowest point of the base ceiling, install one of the water level flasks in it;
- a second water level flask is applied to any of the corners of the ceiling;
- find such a position of the second flask so that the water level in both points to the same values;
- make a mark in the corner with a marker;
- retreat from this point downward as much as is required to hide the lighting and communications system;
- using the water level, the corresponding points are found in other corners of the room;
- connect all points with a chopping lace.
Step 4. Installation of the perimeter profile PL 19/24. The profile is fixed along the marking lines by screwing in self-tapping screws in increments of 40-50 cm.

Step 5. A mounting cord is pulled through the holes in the perimeter profile. The lines of this marking should correspond to the position of the frame profiles. If the cell of the system is 60x60, the lace is pulled in 60 cm increments.
Step 5. Fastening hangers to the base ceiling.

Step 6. Lighting system installation.
Step 7. Installation of T-profiles on hangers. The manufacturer offers profiles in lengths of 370 cm, 120 cm and 60 cm. Each rail is equipped with a lock that prevents bending and deformation due to thermal expansion of the material.
There are three types of cassette systems from this manufacturer:
- Albes Economy;
- Albes Norma;
- Albes Euro.
The highest rigidity of fastenings is provided by Albes Norma. This is important for the installation of heavy glass ceilings.
Ceiling prices "Armstrong
ceiling "Armstrong"

Step 8. Checking the angles between adjoining profiles. Using a metal square, it is checked whether all the corners at the intersection of the profile are straight.
Step 9. Installation of glass panels.

False ceiling Bathroom false ceilings Wooden ceiling


Glass ceilings as an original and sophisticated way of decorating space in Lately has become very much in demand. There are more than enough reasons for such popularity: frosted glass ceilings allow you to visually expand the space, create an atmosphere of airiness and lightness in the room being trimmed, and fill the room with light.
Glass ceiling construction
The design of these suspended ceilings includes metal carcass as well as tiles made of glass. Tiled matte panels are mounted on suspension systems T-15 and T-24. Original design glass ceilings and unique fixings make them easy to disassemble and reassemble when needed.

Application
The area of use for frosted glass ceilings is quite extensive. Their ceiling structures able to become a spectacular, stylish decoration of the interiors of concert halls, nightclubs, shopping centers, restaurants. Often, glass ceilings are also installed in office and residential premises - in the bedroom, living room, bathroom, hallway, and in the kitchen.

Advantages
Frosted glass ceilings have large quantity advantages over standard ceiling structures.Environmental friendliness.
The material does not contain or emit harmful substances.
Aesthetics.
The colorfulness and light transmission of matte ceilings allows them to harmoniously fit into any interior, making it light and light. Original designs applied to glass make them even more attractive, graceful and elegant.
Lighting.
Frosted glass, which is used to create these ceilings, perfectly diffuses light, which allows us to speak of a soft glow effect. Moreover, over glass construction you can install spot or fluorescent lamps of various power, achieving original color, lighting effects.
Moisture resistance.
The design of the ceilings is based on natural glass with protective coating providing high moisture resistance, therefore they are a great solution when decorating rooms with high humidity.
Wide range of products.
In the modern market, glass frosted ceilings are represented by a wide choice. colors, thanks to which there are simply no restrictions for design imagination. In addition, matte glass slabs can be very well combined with mirror tiles.
Easy care.
Glass ceiling structures can be cleaned both wet and dry. You can also use special glass cleaning agents.
Fast installation.
Glass panel ceilings can be installed without prior preparation of the ceiling surface. Depending on the configuration of the room, the installation time of the suspended ceiling system may vary - the fewer depressions, protrusions, complex decorative element, the less time the installation process will take.
The TMT-Group company offers to buy glass ceilings, which make the room brighter, visually expand the space and create a wonderful light effect. like that, which gives a plexiglass ceiling.
Why glass ceilings are good
Environmentally friendly. Glass, whether acrylic or quartz, is an inert material that does not emit harmful substances and environment... It is non-toxic and completely harmless, belongs to the highest quality and environmentally friendly materials.
Features of light scattering. Frosted glass helps achieve soft, flickering lighting, hiding lights from view, or at least making them unobtrusive. Plus it is an endless field for the embodiment of the most unusual fantasies, plexiglass ceiling allows you to make a significant contribution to the design of the premises.
Resistant to moisture. The glass and the base are not afraid of moisture in any amount and successfully resist its effects. The protective coating also helps to withstand even the highest water content in the air. Therefore, suspended glass ceilings are like no other suitable for bathrooms and kitchens.
Fast installation. Plexiglass ceilings are prefabricated structures that are easy to install and do not require much time and labor. The exact installation time depends on the size and shape of the room and the complexity of the structure. As a rule, in ordinary square or rectangular rooms, the procedure does not take much time.
Large assortment of available color solutions and models. Acrylic glass suspended ceilings allow you to achieve a variety of effects, many shades are available that are simply combined with mirrored tiles.
Easy to care for. Glass is a material that does not require special care behind yourself. It is easy enough to wipe it with the use of special products designed specifically for glass.
Attractive appearance. Glass that transmits and diffuses light looks extremely aesthetically pleasing and harmoniously fits into any interior.
Work examples

Glass ceiling price
Glass slabs are mounted on T15 suspension systems and T24 suspension systems, depending on the tasks. Like acrylic glass ceilings, they do not require preliminary preparation of the ceiling space before installation.
Suspension system characteristics
Suspension systems are made of durable material, as standard for this sheet steel coated with zinc and a protective coating is used. Flame retardant, environmentally friendly and practical, they allow the ceiling to serve for a long time and do not bring any inconvenience. The system is assembled as a constructor and allows you to install lamps and other additional elements without any problems.
Most often, in the practice of installers, there are systems numbered 15 and 25. They have certain differences and are used in different cases. They belong to the category of open suspension systems.
The color of the systems can be different, the standard version is painted in white, but there are also options with chrome or gold protruding parts.
TMT-Group offers the services of designers who create sketches of glass ceilings for individual orders.

