How to make a paper trailer. DIY paper train - different options for making and using paper crafts
Prototyping is a very interesting activity.
I have always dreamed of making a model of a railway since childhood, in reality I made only a few spans of the experimental tracks. Unfortunately, during my work, I encountered many problems and scarce details, in this article I want to discuss with you the most frequent questions when creating a layout of a railroad bed and transport.
In the second issue of ModelMen magazine, I published an article and several photos from the site of an experienced modeler, he builds models of railways and participates in exhibitions with his creations. Even looking at the photos of the layout, you can already determine the amount of work for yourself, make a list of tools and materials. I will not give the entire list of necessary things at once, because it may not be complete, let's better analyze together what is made of what.
Base
The model of the railroad track must stand on something, therefore, at the very beginning, it is necessary to design the base (table) for the model. The base can be solid and collapsible. It's easier to make a solid base, but then you need to decide in advance on the room for the layout, it should be a spacious room in case of expansion.
For the base, you need legs; you can take them from old school desks or make them yourself. The entire structure can be easily made from plywood and wooden blocks. For fasteners, you will need screws, metal corners. To make a collapsible model, you will have to smash your head over the base device and how to transport it.
Tool
To work, you will need many different tools:
A hammer
- screwdrivers
- nippers and pliers
- chisels
- files
- spatulas
- scissors
- knives
- brushes
- soldering iron
- and etc.
Railroad bed
In order for the trains to move in the right direction, we need rails, they can be purchased ready-made in specialized stores for modelers. If you, like me, do not have such stores in your city, then you can buy them through online stores or go for them yourself. As a last resort, you will have to make the rails yourself.
The easiest construction option is to use ready-made rails, they are glued or nailed to the base with small nails, the joints can be soldered and cleaned with a file.
If there are no ready-made rails, then you need to think about how to make them yourself, you can take the dimensions of the rails that are sold in stores and make your own. For sleepers, you will need to saw a lot of thin pieces, this can be done on a small machine. The rail itself must conduct current, so it is advisable to make it from thick copper wire, which can be rolled on a hand-held machine to a rectangular section. You can attach the rail to the sleepers using good glue or solder it to the nails driven into the sleepers, this can be done after 3-4 sleepers.
Electrical equipment
For the movement of the train, an electric current is piped, unless of course you are making a steam locomotive. Factory and home-made power supplies are used as a power source (see diagrams, radio engineering), the output voltage should not be dangerous, usually a power supply unit up to 16 volts is used, for small models 6 - 9 volts are enough.
The train is driven by an electric motor; it can be taken from broken toys or purchased at a radio store. Electricity is supplied to the engine from two rails, the voltage is removed from them with the help of two or more counters or from the metal wheels of the train itself.
Copper wires and connectors will be needed for wiring electricity to the layout (base).
In addition to the trains themselves, the layout can contain traffic lights, barriers, lanterns and other elements that need electricity. Before wiring, carefully think over every detail, after installation it will be too late to lead the wires, you will have to chicken the layout.
Landscape
Landscaping is an integral part of a good layout and should be given special attention. To be similar to reality, you need to work hard on imitation of hills, vegetation, buildings, little people, vehicles, etc.
Many parts can be used ready-made, i.e. take toy cars, figurines of people, also in children's stores you can buy figurines of animals, trees ...
To imitate hills, mountains, etc., you will need plywood, plaster of paris, papier-mâché, fiberglass, acrylic paints and other finishing materials.
Building
Models of buildings can also be purchased at toy stores or made yourself from wood, cardboard, papier-mâché, plywood, etc.
Modelers often take real train stations as a model, photograph them and turn them into miniatures on the table.
On the site, I will periodically publish my own and the developments you sent, you are probably interested in information on how to make a model of a train, traffic lights, trees, bridges and other elements for the railway. And also I will publish electrical diagrams, photographs and drawings of old and new trains.
Recently, there are not so many people who want to make a train out of paper. The abundance of toys of various formats, quality and complexity has practically supplanted paper toys, which, moreover, must also be made by hand. However, paper-making is a very interesting activity, and, moreover, a useful one. Spatial thinking develops, fine motor skills, logic, in the end. That is why in elementary grades and kindergartens you can still see a variety of voluminous paper crafts on the stands.
How to make a do-it-yourself paper train step by step: practical application
The paper train is a fragile thing, unstable to deformation, and it is almost impossible to adapt it to active games. But even such a thing has a practical application in the nursery. For example - a photo train, in the form of a train carrying a photo of a baby. It can be a composition with photos from the first month of life to a year, or just favorite and touching family photos. Such paper craft will not only be appropriate, but also useful in the nursery - bright colors and volumetric details for the development of the baby are very useful.
To make such a train yourself, you don't need any special skills or tools. All you need to work is: a clerical knife, glue stick and scissors. In order to hang the train on the wall, you will additionally need a suitable braid or thick thread, two paper clips and two buttons that can be driven into the wall.
The templates are printed on a color printer, the inner windows are cut out with a clerical knife. A little advice - it's better to print not on office paper, but on drawing paper. It is great with the printer, but more dense, and does not deform so much from the glue.

From the seamy side, photographs are glued into the frame. Optionally, you can additionally decorate the train - for example, stick buttons on the wheels on top, or add printed cute details - animals, stars, flowers - to the photos themselves, depending on the gender of the child and your imagination.
To hang the composition on the wall, you must first assemble it on a string. On the back of each carriage, glue the thread along the entire train, fix paper clips at the ends, and hang the entire structure on buttons driven into the wall.
Developing craft.Artistic work is included in the primary school curriculum for a reason. There they teach and show the main and most common areas of manual labor. Working with plasticine, clay, appliques, and the like. However, the school curriculum is strongly limited by both the hours and the topics themselves. And the number of people in the classes does not have an individual approach to each student. Another thing is at home, not in a hurry and not in a hurry, to engage in independent creation of a train from improvised, and often completely junk materials.
For such a train you will need:
- white or colored cardboard - 2-3 sheets
- chenille wire (fluffy sold in stationery departments)
- glue, scissors, ruler, pencil
- lids from plastic bottles and 2 lids from five-liter bugs.
Working process. Cut each piece of cardboard into two equal parts - these are future cars. Roll each piece into a pipe and glue the joints. Glue wheels to each carriage - plastic bottle caps. The covers must be glued in such a way that half is glued to the cardboard, and the other half is free.
At each end of the trailers, make holes, cut the wire into small pieces, roll up double-sided loops - one edge clings to the hole of the trailer, the second clings to the same loop of another trailer. Thus, the wagons are combined into a train.
The train must have a lead locomotive. It will differ from the rest of the trailers in that it will have not only small wheels, but also large ones, as well as a pipe. Cardboard, by the way, is replaced with toilet paper rolls, but then they need to be refined with colored paper or stickers.

Paper modeling has existed as an applied art for a very long time. More than one generation of boys enthusiastically glues models of airplanes, steamers, tanks and trains. The result of such efforts directly depends on the skills and abilities of the master, and his diligence. An important role in this is played by the scheme according to which the model is assembled. There are actually a great many such schemes, and their complexity is designed for very different ages - the child will cope with some of them - this is, in fact, the layout of the box, which only needs to be cut and glued correctly.

Some are more complicated - there are an order of magnitude more parts, they are numbered and signed, and the assembly requires a certain amount of care and effort.
However, the first two options cannot be compared with those patterns, or even patterns, which are used by real professionals in their field. These diagrams show real models of real trains, from the first steam locomotives and locomotives to ultra-modern and high-tech models.
It would seem that art, long gone into oblivion, has received a new impetus with the new possibilities of modeling programs.
Videos about which models are embodied from paper in a scale of 1: 87, etc., are not uncommon, and are very popular among fans of this type of creativity.
Videos on the topic of the article
"Making a train from colored paper with your own hands." Master class with step by step photos
Degtyartseva Natalya Vasilievna, teacher of MAU DO DDTT
Vladikavkaz, North Ossetia - Alania
The work is intended for children aged 7 and older, teachers and parents.
Purpose: toy, interior decoration, a gift for family and friends, an exhibit for an exhibition of technical creativity.
Target: make a train from colored paper with your own hands.
Tasks: educational - to master the technique of manufacturing a steam locomotive and a trailer; developing - to develop the practical skills of learning children when working with scissors, to develop fine motor skills, imagination and fantasy of the child; educational - to bring up an aesthetic taste.
Materials and tools: colored paper, scissors, glue, ruler, pencil, eraser, compasses.

Riddles for children.
Brothers have equipped themselves for a visit,
They clung to each other
And they rushed off on a long way,
They only left the smoke.
(A train)
Far far away
On the railroad track
Maybe this fellow
Take the whole village away.
(A train)
Behind the haze
Behind the whistle
The brothers run in single file.
(Wagons)
V. Struchkov
Iron Already creeps
Passengers are transported into the distance.
(A train)
Iron Snake
Wriggles in the steppes.
Lost in the steppes.
A clear voice
Runs after the drizzle.
I ran a thousand miles.
She unhooked the long tail.
Fifteen Brothers
They love to ride.
First with a pipe
Leads everyone behind him.
(A train)
One hundred barrels
Leads Gudochek.
(A train)
Steel Mare
Rushing across the azure steppes.
I ran a hundred miles
She unhooked the long tail. (A train)
On steel tracks
The Centipede is racing.
Knock knock knock.
Round heel clicks.
With a funny song
On an iron ladder.
(A train.)
V. Tunnikov
Every day there and back
Carries goods carefully.
In the rain, blizzard, heat, frost
The hard worker is racing - ... (steam locomotive)
A step-by-step process for making a train.
Manufacturing of a steam locomotive.Departing from the narrow edge of the A4 sheet by 1 cm, bend the sheet on both sides of the ruler. Putting the ruler with the left edge on the second bend, bend it again. Let's make four bends this way.

Having received four wide strips, cut off the excess part of the sheet along the last bend. Bend the edge of the sheet, stepping back 1 cm from the left edge, and then bend the sheet on the other side of the ruler.

Cut off the excess paper, leaving 1 cm fields for gluing in the middle square. Cut the edges of the square to the line, as shown in the photo.

We glue the side parts of the square. Let's shorten the main part of the locomotive cabin by cutting it to the width of a ruler on the right side of the part.

We glue the edges of the long strips, getting a column. We glue the roof to the post. The locomotive cabin is ready.

To make a window, we will prepare a square with a side of 2.5 cm from colored paper, and a square with a side of 1.5 cm from white paper. For the door, cut out a 7x2.5cm rectangle and 1cm strip for the handle. For the front part of the locomotive, bend it, stepping back from the edge by 1 cm above and below a square with a side of 4 or 5 cm. Cut the folded parts of the sheet for gluing.

We glue the prepared square into a tube. We will glue a window and a door on the locomotive booth.

On a 6x5cm rectangle we will glue a colored strip, 1.5cm wide. On a previously prepared wide pipe, stick along the edges of a strip, 0.5 cm wide.

Glue the small pipe in the center of the large pipe. Glue the large pipe, bending the edges, to the locomotive cabin. On the free edge of a large pipe, glue a piece of paper in the shape of a square.

Let's make a strip of 3x7cm. We twist the edges of the strip in different directions with scissors, getting an eight.

We will make wheels for wheels with a radius of 1.5 cm and 0.7 cm.

Cut off the extra edges of the square on the large pipe of the steam locomotive, glue the wheels and the figure eight, as shown in the photo. The locomotive is ready.

Carriage manufacturing.
Departing from the top edge by 1 cm, bend the sheet on both sides of the ruler. Then the sheet on both sides, putting a ruler to the right and left of the edge of the sheet. Cut the lower part of the sheet to the width of the ruler. To do this, draw a line at the bottom of the sheet. Let's make cuts as shown in the photo.

From the second of the same sheet, we will leave only the middle part, cutting off the excess bends, as shown in the photo.

Cut off small rectangles from the sides of the first piece.

We glue the side parts on the first part, as shown in the photo.

Glue the second piece to the top of the first piece.

We glue the side parts of the car to each other.

Let's make a 11x5 cm rectangle for the door and two 7x5 cm rectangles for the windows. From white paper we will make a rectangle for the door window 3x6cm and for the car windows - two rectangles
3.5x5.5cm. Let's make a strip for the inscription of the direction of the train 1.5x9 cm.

We will glue the details of the door and windows to the carriage.

Let's make six wheels according to the previously proposed sample. The diameter of the large circle is 5cm, the small one is 3cm. We glue the wheels along the edge of the car and in the middle. The car is ready.

We glue the car to the mounting eight on the locomotive.

Our train is ready.
"Dedicated to folk crazy people"
If your desires in building a model of a railway exceed the capabilities of mass production, it's time to think about making your own models. There are different materials and technologies - here we are considering making from cardboard.
First of all, you should stock up on everything you need.
First you need a good white cardboard (preferably 0.35 - 0.5 mm - determined by eye with a ruler).
You also need the right tools:
- mechanical pencil with a 0.5 mm shaft,
- PVA glue,
- ruler 30 cm,
- corner,
- eraser,
- threads (preferably not very fluffy),
- transparent plastic, double-sided tape,
- emery of two types (large and small),
- paper knife, ordinary scissors,
- manicure scissors,
- clothespins (preferably plastic with flat surfaces),
- and also something else on the little things, which will be indicated below.
And most importantly, you need a sincere desire to make a layout!
Here we will consider the production of a model on an already finished chassis. Carriages from TT-model or VTTV can be used as a donor.
When producing any model, reference materials are required in the form of drawings and illustrations of the modeling object. To save time, I also used the CMV from the TT model.
So, let's begin. If a drawing is used, then all dimensions must be recalculated in the appropriate scale, in my case - 1: 120. Next, on a sheet of cardboard, you should draw a basic scan of the car WITHOUT a roof (as a result, you should get an elongated parallelepiped without a floor) ( Rice. one).
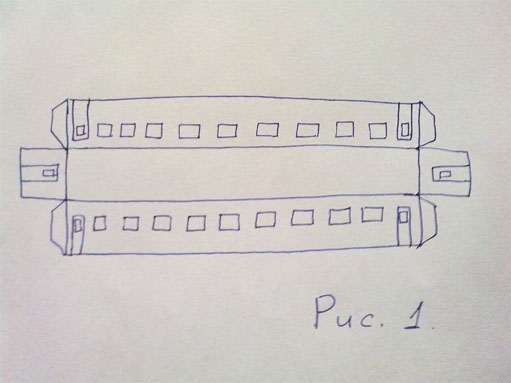
On it we draw everything that should be on the walls of the car, that is, windows, doors, lines where stiffeners should be, etc. After everything is drawn, we cut through all the windows with a knife.
Now it is necessary to increase the rigidity of the future body- on the reverse side, you need to glue on the walls a second layer of cardboard with already cut windows so that the windows coincide with each other ( Rice. 2).
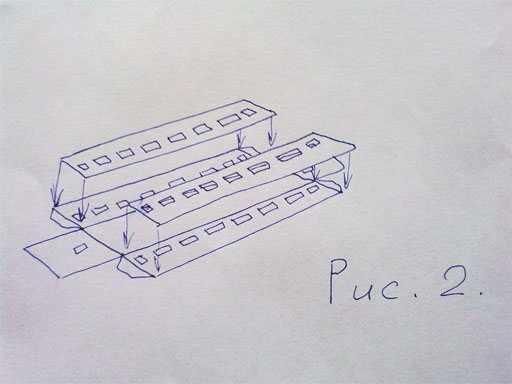
Since the cardboard when wet has a bad property to swell, it is not necessary to smear a lot of glue, but it is necessary to quickly and with a thin layer spread on one side and immediately press firmly and put it under the press.
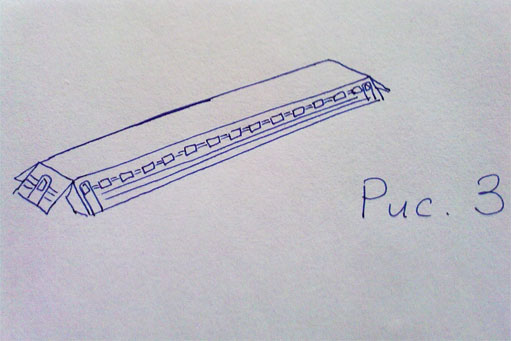
Now let's move on to the stiffeners. They are made from threads that are glued along the drawn lines: first, a glue strip is applied, on which the thread is then applied and pressed with a finger. The bottom line is to saturate the thread with glue and remove excess glue from the surface. With all the ribs glued on, it's time to outline the doors. To do this, cut a thin groove along the door contour with a knife. After that, we coat the cut out contours of the doors and the already glued threads. When everything is dry, you need to gently walk over the surface of the threads with fine emery and once again grease with glue. For all coatings, we try to leave as little glue as possible, so that later unnecessary irregularities do not come out. The handrails are made from thin strips of cardboard.
Now it's time to start assembling. We press the folds on the back with scissors. Then we cut out, carefully bend and glue ( Rice. 3).
Carefully sand the roughly protruding cardboard at the gluing points.
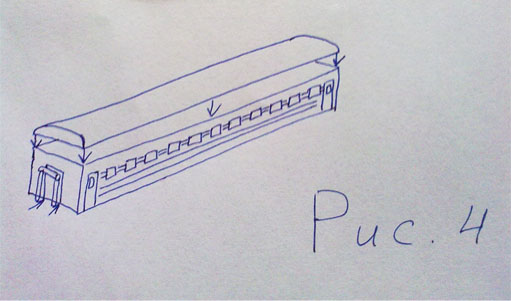
Roof. To get a roof of the desired shape, you first need to create a parallelepiped of layered cardboard, the height of which is equal to the height of the roof itself (usually painted gray). The width and length should be 1 and 2 mm higher than the width and length of the car blank, respectively (these are approximate figures). This is necessary so that after gluing the roof (by the way, it is also desirable to glue it with a press), it can be sanded from the sides and thereby adjusted to the size of the car. Next, the roof needs to be given a convex shape - for this, we draw a roof profile from the ends and cut off the excess lengthwise. After that, we first grind with a large emery, and then with a small one. After that, coat the roof with glue and wait until it dries. We process it with fine emery and repeat the operation. Now you can glue the roof. If you find something to press it while it dries, it will be good. If in the original there are stiffeners on the roof, then they are made in the same way using threads. We coat the joint of the roof with the body with glue. The air intakes can then be attached to the roof. We glue cardboard from the ends of the car to hide the joint, although, depending on the situation, you can do without it. Transitional soufflés ( Rice. 4).
Let's talk a little about the insides. First you need to make a floor of 2-3 layers of cardboard. Further on it we mark the scheme of the partitions, which, after cutting, "put" on the glue. The total height of the internals with the floor must be matched to the height of the undercarriage. We glue the upper shelves to the walls, and the lower ones will most likely have to be glued to the floor. After that, a strip of cardboard 1 cm wide and 2 cm long less than the length of the carriage is glued on top of the partitions.
Now you can paint. It is advisable to use water-indelible paints. Spray paints, regular oil paints, or special model paints can be used. Then we use scotch tape and brushes of different sizes to get the desired color.
When everything is dry, we glue strips of transparent plastic on the inside of the walls of the car using double-sided tape. From the inside, we glue double-sided tape on the roof, and then press the insides of the car to it. From the bottom to the floor of the car, we again glue double-sided tape and press the chassis to it ( Rice. five).
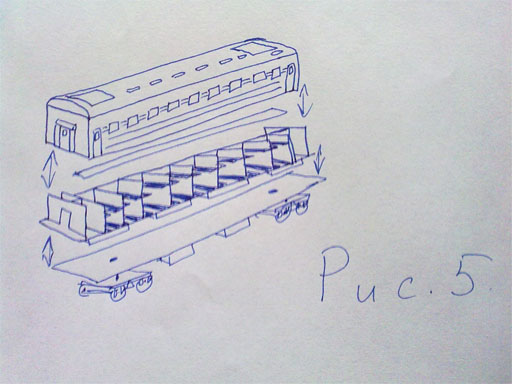
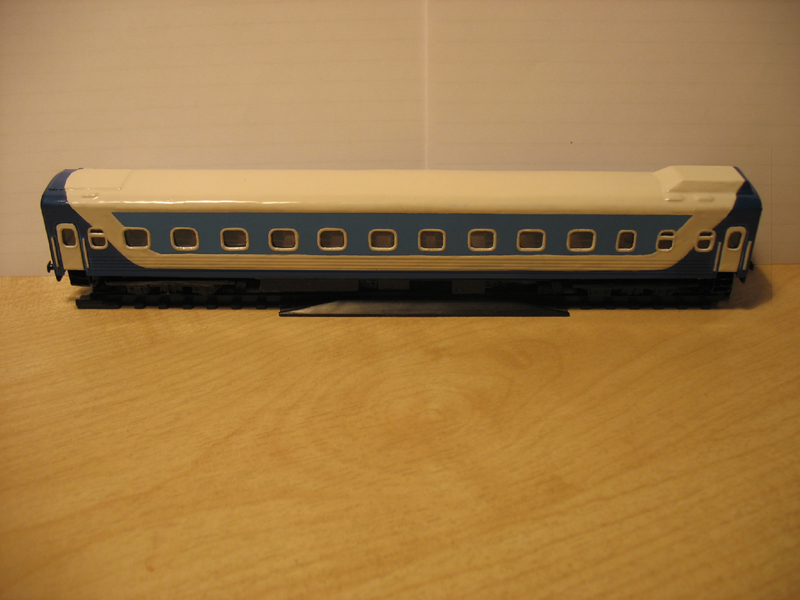
The car is ready!
Watch also the video on how to make a freight car from cardboard.

