What is the easiest way to write text in a circle in Photoshop? Writing text in a circle in Photoshop is perhaps one of the easiest tasks. But nevertheless, such a text looks very impressive.
Let's say we needed to write text around some object in the picture. Photoshop has a plethora of ways and tools to accomplish this task. In Photoshop, text can be written along a closed and open path. It is possible to set the beginning and end of the text, height, direction, alignment, by moving the mouse cursor, the text can be flipped.
In this article, we will consider writing text using the Pen Tool (Pen Tool, a group of tools is turned on with the P key).
Select this pen tool and create a smooth curved line. The pen must be in Paths mode.

Then we will create a closed oval-shaped vector shape using the Ellipse Tool (the tool group is turned on with the U key). I got this picture:

In the figure below, I showed two types of cursor, a regular text cursor and the same cursor when moving to the contour line

Working with text bound to a path is much more difficult than working with regular text due to the introduction of many new options and settings. When working with such text, you should carefully move the mouse and carefully monitor changes in the appearance of the cursor. But even if an erroneous action is committed, you should not be upset, since you can always press the Ctrl + Z key combination to undo the last action or Ctrl + Alt + Z to undo several actions.
We continue to create text. Move the text cursor over the contour line and click on it. A blinking cursor in the form of a perpendicular segment appears on the contour.

Now we print the text. It is advisable to enter text in such a way that its length does not exceed the length of the line, i.e. it is necessary to immediately select the font size in pixels so that all the text fits in the right place. Otherwise, you will have to adjust the text size, and it is better to do this a little later. Now you need to pay attention to the pointers at the beginning and at the end of the text, in the figure below they are circled in red circles.

These pointers can be moved and the text will move accordingly. To move the limiters of the beginning and end of the text, select the Path Selection Tool.

When you move the cursor over the text, it will again change its appearance to this:
If we hover over the initial limiter, hold down the left mouse button and move it along the line, the text will move behind it. The distance between the text and the end stop appears. However, if we change the text alignment mode, for example, choose "justify right", then the text will "stick" to the right limiter. This is what I showed in the picture:

We can flip the text upside down if we want. To do this, move the cursor to the text, it will take the following form:
Then hold down the left mouse button and drag the cursor down, under the line. After the text is flipped, the arrow on the cursor will be directed in the opposite direction, as can be seen in the figure.

Do not forget that in order to move the limiters and flip the text, not the "Text" tool, but the "Path Selection Tool" must be active !!
Now you can move on to drawing text on the oval. The method is the same. Select the "Text" tool, move it to the outline, click with the mouse, enter. But there are also nuances. On sharp contour transitions of the figure (in our case, on the right sharp bend of the oval), the text will break, individual letters may disappear. Therefore, in the test in the figure, several spaces are inserted between the words "Text surrounding" and "oval shape".

If we want to "tip" the text, then all the letters will be inside the oval, and the beginning and end of the text will change places.

Therefore, if you want the letters to have a normal (not inverted) position on the entire surface of the figure, then the text must be entered in two or more layers. The concept of a layer in Photoshop layer, separately for the top and lower parts figures.
Instruction
To write text on circle in Microsoft Office Word, use WordArt objects. To do this, open the "Insert" tab and find the "Text" toolbar. Select suitable style inscriptions from con text menu called by the WordArt thumbnail button. In the window that opens, enter your text. When finished entering, press the OK button.
The inscription will be placed in the document. Select it - it will become available text New menu "Working with WordArt objects". Make sure you're on the Format tab and look for the WordArt Styles toolbox. Click on the "Change Shape" thumbnail button and select text Nom menu group "Trajectory". Click on the icon in the form of a circle with the caption "Ring". Your inscription will be placed on circle. Edit the boundaries of the object as needed.
Another way: open the "Insert" tab and select the "Shapes" tool in the "Illustrations" block. In con text From the menu bar, click on the Oval layout. Press the Shift key and, holding it down, create a circle on the document stage. On the "Insert" tab, select the "Shapes" tool again and click on the "Inscription" item. Set the area for the inscription and enter your text.
On the "Format" tab in the text in the "Drawing Tools" menu, adjust the borders and fills for the shapes to your requirements, select text and click on the Animation button. In the drop-down menu, set the "Transform" command and the "Circle" property. Edit the font size, if necessary, correct the contours of the figure.
In order to write text on circle in editor Adobe Photoshop, create an inscription in the usual way, in con text From the Text tool menu, click on the curved line and T thumbnail button. This tool allows you to deform text. In the dialog box that opens, in the "Style" field, select "Other".
Set the degree of bend and apply the selected settings. Using this method text can be placed in a semicircle. Enter the inscription in parts to set the settings first for the fragment that will be located on top, and then for the fragment located below.
Sources:
- how to write do
Very often we need to print text not just horizontally or vertically, but, for example, along the contour of a shape. Fortunately, most graphics editors support this feature.
You will need
- - Adobe Photoshop or other image editing program with similar functionality.
Instruction
Download Adobe Photoshop, the best latest version. Install it on your computer following the instructions in the installer menu. Take advantage of a trial period or buy a license to use the program from the manufacturer. It can also be any graphic editor that supports this function, the scheme of further actions will be approximately the same as in the case of the Photoshop application.
open installed program Photoshop. Select the "Create a new file" item, set the name and size in its initial parameters. You can also open any image you have on your computer using the same menu. On the toolbar on the left, select Draw Circle.
Draw a circle of the text diameter you need, which will be located at the edges. If you don't want the outlines to be visible, make the circle the same color as the background of the image itself. You can also choose any other shape or draw your own, along its outline the text will be located in the same way as in the case and the circle.
Select the letter tool, right-click on it, select horizontal or
In this tutorial for beginners, I'll show you how to write text in a circle using the Paths tool in Photoshop. By the way, instead of a circle, you can use any other shape with more complex shape. But the essence is this, first we select a round area. Then we transfer it to the working circuit. Then we print the text around the work path and edit the text settings. We will get the text written with outside contour. For the text to be written with inside, use the Path Selection tool. At the end, we will see another alternative way to write text in a circle using a filter.
Step 1.
In a new document, use the Elliptical Marquee Tool to select the circle while holding Ctrl. 
Step 2
Select Window > Paths from the top menu and open the container. Then click on the icon at the bottom of the container “Make Work Path From Selection” (Make Work Path From Selection). 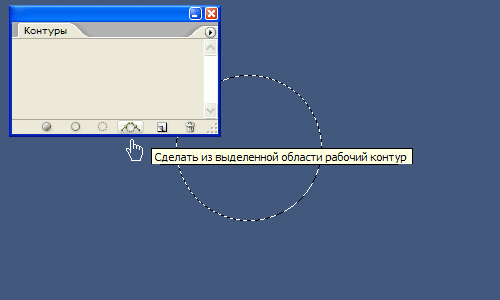
Step 3
Got a working circuit. In principle, this result can be immediately obtained using the Ellipse Tool, after clicking the Paths icon in the top menu. The first two steps will come in handy when you need to make an inscription along the contour not of a circle, but of a more complex shape. 
Step 4
Now select the tool “Text” (Type Tool), move the cursor to the contour, and when it becomes like in the figure below, we start typing the text. 
Step 5
We got this result. Here you can adjust the text size and letter spacing. 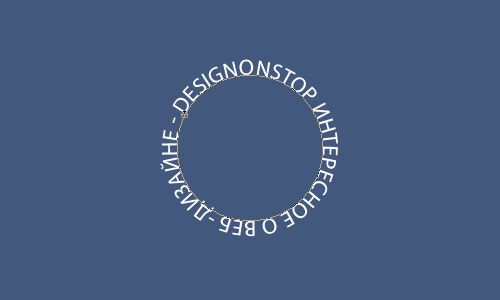
Step 6
Press Ctrl+H to disable the outline line. The same key combination turns on the outline. 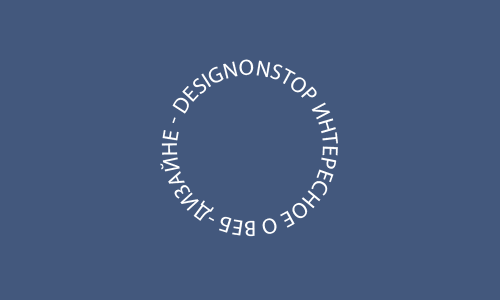
Step 7
In order for the text to be written along the inside of the path, we need to use the Path Selection Tool. After the tool is activated, move the cursor to the text. When it has become like in the picture below, press the mouse button and move it across the outline. 
Step 8
At some point, all text should jump to the inside of the path. 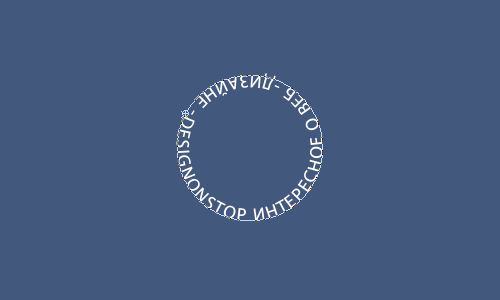
Step 9
Press Ctrl+H to disable the path. We got the text written on the inside of the outline. 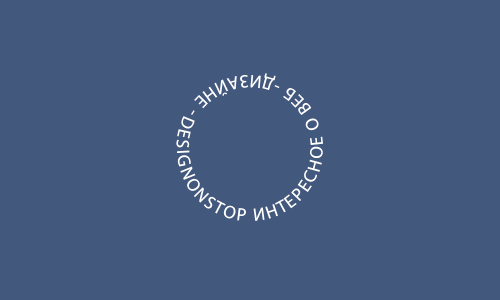
PS.
There is another alternative option, how to write text in a circle in Photoshop. To do this, create a square document, for example 400x400 pixels. If you create a rectangular document, then the text will be written not in a circle, but in an oval. Write the text in the center of the document. In the text settings, it is better to set the "Vertical Scale", for example 200%, stretching the text vertically.
After that, select “Filter” (Filter)> “Distortion” (Distort)> “Polar coordinates” (Polar Coordinates) and then mark “Rectangular to polar” (Rectangular to Polar), click OK. At the intermediate stage, the service will offer to rasterize the text, click "Yes". After that, the text will be written in a circle.
Hello! Photoshop is a very powerful graphics editor. In addition to pictures, it allows you to process textual information. For example, a common task is to write letters in a circle using special tools. Do you know which ones? Everything is done is not difficult, and today we will make sure of this on illustrative examples.
There are two options for how to write text in a semicircle in Photoshop, depending on the task. In one case, the words will be located inside the circle, in the other - along its outer circumference. I'll talk about this later, but now there is good news.
I would like to provide you detailed information about working with a graphic editor, and not just answer one question on the topic of this article. My line of work does not include the creation of such training courses. But I know where you can find really good Photoshop training. If you want to look for yourself, there really is plenty to choose from.
We continue the main topic of the publication, move on to specifics and examples.
Procedure
To write in a circle, you need to follow a few simple steps.
In Photoshop, use the ellipse tool to draw a shape.
Select "horizontal text", hover over the perimeter of the circle.

Press the left mouse button and type the necessary words.

Move the inscription to the right place.
Select "outline selection" and move.
To do this, select the text layer, use the "outline selection" tool, move the mouse pointer over the letters so that the corresponding arrows appear, press and hold the left mouse button and move.

As you can see, you can make an inscription in a semicircle along the outer contour in a few simple steps. What if the inscription is required to be placed inside the circle? In this case, too, nothing complicated. During the move, you only need to drag the inscription inside the shape.

I'll show you the end result.

The circle itself can be hidden or deleted if necessary.
To do this, the corresponding layer can be made invisible or moved to the trash.

Alternative
There is another way to make text a semicircle in Photoshop. To do this, you need to write the necessary words and rasterize the text layer.

Now select the text layer and go to the "edit" menu, apply "free transform".


As you can see, the text also turned out in a circle.
To perform the actions described in the main and alternative way It took me no more than 30 seconds. This is not surprising, because everything is relatively simple.
This concludes this short post. Was she useful? Leave your comments.
Do not rush to close the site. There are a lot of interesting things here - normal, professional secrets, business ideas and much more. New materials appear regularly. Subscribe. See you soon on the Workip blog.
Hello everyone, dear friends! How is your mood? I have a wonderful: the weather is super, in two weeks I have a vacation, a birthday, etc. But now is not about that. Tell me, have you often seen some text that is written in a circle? I think yes. Indeed, today such pictures are often used, for example, in any logos, etc.
And today I just want to show you how to write text in a circle in Photoshop using the most simple methods and without any hiccups. It is very easy and most importantly fast. So, launch our editor and go!
- Let's create with you, for example 800 * 600, although this does not play a special role.
- Now select and make a circle, well, that is, a round selection ... Well, in general, you understand me.
- Next, in the top menu, select "Window", and then "Contours". In general, this menu is responsible for displaying all the panels in Photoshop, so if you lose the History palette or something else, you can activate it again in the Window menu.

- Got a new panel? If not, then look somewhere near the layers panel. It happens that it can be attached to it. In general, now you need to click on a small button "Make Selection Workspace" on this little board. See what happened? The selection has become a path. This is what we need.

- Now we take it in our hands and move the cursor to our resulting round work path. When the cursor changes on hover, it will mean that you can press the left mouse button. Clicked? Well done. Now all the text you write will go in a circle. Of course, the text won't always match the size of the circle exactly, so adjust it yourself here to make sure everything fits properly.

- Now you can delete or hide ( CTRL+H) work path, otherwise it will interfere with you if you want to reduce or write by you. And of course, you can play with for your text to make it more beautiful.

Alternative option
Well, since we started doing this action in this way, we wanted to show a slightly alternative option. The method is exactly the same, it just helps to save a little time, since steps 2,3 and 4 are replaced by one.
You need to select the tool "Ellipse", and at the top set the mode "contour". And now, when you draw this ellipse, you will also be able to write any texts in a circle in the same way.

Well, why not always use the second method? The fact is that thanks to the original method, we will be able to make inscriptions not only in a circle, but also in a square area, or even along a curve. Here, try to do everything the same as in the first option, only make the selection using . What can we do? Cool, right? It turned out rough and ugly, but this is just an example.

You can even flip the text on this path so that it is inside this circle. To do this, you need to select a tool "Outline Selection", hold down the left mouse button and drag the text inside the selected area. But to be honest, I never practice it. 
Well? It was difficult to? I think it's lighter than easy. Now we just need to put something inside so that our writing does not look empty. You can stuff even a planet (as I did in the title picture), even a coin, even a logo, even if not something round. You decide.
Photoshop is such a lifesaver that I don’t know how I could manage without it. And if you want to master Photoshop in the shortest possible time, then I recommend that you view full video course on photoshop from scratch. These are the clearest tutorials I have ever seen. Everything is wonderfully presented and grasped on the fly. So be sure to check it out.
Well, that seems to be all that I would like to tell you in this lesson. I hope you liked it. Therefore, I look forward to seeing you in my next articles. and in order not to miss anything, be sure to subscribe to my blog updates. Good luck to you. Bye Bye!
Sincerely, Dmitry Kostin.


