Diagram of connecting the accumulator to the pump baby. Accumulator connection diagram for water supply systems
The water supply chain is a key point in the device of an autonomous water supply system.
This device is designed to solve not only the issue of creating a small water reserve, but also to relieve the owners of summer cottages and private houses from variable pressure in the network.
Due to its design, the hydraulic tank also makes it possible to reduce the work of the pumping station, thereby extending its service life.
Equipment
As practice shows, the minimum possible volume of accumulators for installation in a private house or summer cottage should not have a volume of less than 24 liters.
It is desirable that this value be slightly higher than the required requirement to create a small stock.
The main point when choosing will be the peak value of water demand, as well as the power of the pumping station. At the same time, the amount of water that will be in the hydraulic accumulator should be enough so that even at maximum load, the pump turns on no more than 30 times in one minute.
Usually the volume of the required hydraulic accumulator is determined based on the number of consumers (bath, Washer, etc.). The more there are, the correspondingly higher should be the volume value.
And in the case of installing a variant with a smaller volume than required, you can buy another hydraulic tank and install it in addition to the first, their volume will be summed up.
It's important to know: the diaphragm material must be suitable for the intended load on it.
Also, during the selection, it should be borne in mind that the volume of water inside the tank will occupy no more than half of the total volume. It should also be borne in mind that to combat water hammer small options gyroaccumulators are ineffective, and if installed too large, then stagnation of water is possible in them.
For models of significant size, there must be a reliable base so that it can withstand the considerable weight of the device and the water in it.
In order to more optimally choose a hydraulic tank, it is advisable to carry out the calculation by contacting specialists.
Accommodation
 Some options can be placed in the basement or on the ground floor, everything here will depend on the power of the option, and at what height the water will have to be supplied.
It is best to install the accumulator at the highest point of the house in order to create maximum pressure in the network. In this case, you can use both the attic and the second floor (in the case of a two-story house).
The place of installation should not have high humidity. The reason is that in this case, condensation will form on the surface of the tank. In time it will first destroy paintwork hydraulic tank, and then lead to metal corrosion. The surface on which the installation will take place must be secure and level.
Before installing the unit, you must first check the air pressure level, whether it corresponds to desired values... Because in the future, after installing it, in order to make such a measurement, you will have to drain the water and turn off the pump.
Procedure
 The wiring diagram for connecting this device should be determined by different design features the system to which it is connected, as well as the type of pumping station used to supply water.
In total, there are several connection options, which depend on the type of pump used:
- submersible option, which must be placed in water;
- surface, attached closer to the accumulator.
Due to the peculiarities of their design, the connection diagrams of storage systems differ.
So, using a surface pump, the procedure will be as follows:

Everything threaded connections sit on the FUM tape, according to the generally accepted rules for such connections. After that, you can start operating the installed accumulator.
Take into account: it is desirable to install such units closer to pumping stations for greater efficiency.
Connection using a submersible pump is done as follows:
- First of all, the pump itself must be immersed in water. After that, the pressure hose coming from it is connected to the same manifold as described above.
- Further from the same collector, we make a branch for the accumulator.
- The last step is to connect another pipe to the water supply, and the rest to the pump control system.
 But, there is one peculiarity in the connection.
It is necessary to place a check valve between the collector and the pump to prevent water from draining back into the well after the water supply is turned off.
It is advisable to install it directly at the neck of the pump nozzle. And the water from this whole system should flow into the tap after the filter. (You can read more about connecting a hydraulic accumulator to a submersible pump in).
Watch a video in which a specialist explains how to install a hydraulic accumulator for a water supply system with your own hands:
To organize normal work water supply in country house from a well or similar source, a number of special equipment must be installed. The package includes a pump, automation, hydraulic accumulator and other equipment. In this article, we will tell you about how the process of connecting and installing a hydraulic accumulator for do-it-yourself water supply systems takes place. We will offer you several working wiring diagrams. But first, let's find out what this equipment is.
Hydroaccumulator - why is it
There are several main purposes that a hydraulic accumulator serves in a water supply system. First of all, its installation allows you to create the necessary pressure in the network. Also, a small supply of water is stored in the accumulator. For example, if for some reason the pump cannot pump water, then you can use it. The volume of water determines the internal volume of the accumulator. Well, and most importantly, its presence in the water supply system of a private house prevents the formation of water hammer.
A hydraulic accumulator means a special metal tank. To maintain a stable pressure inside it, it is equipped with special equipment. The water supply scheme for a well with a hydraulic accumulator is relatively simple and if you follow all the instructions in this article, then you can do the connection yourself.
In most cases, the hydraulic accumulator for water supply systems uses the principle of operation of compressed air energy. It consists of a partition, for example, it can be a rubber membrane or a rubber bulb. So, the essence of the work of the entire water supply system with a hydraulic accumulator is as follows. The pumping equipment pumps water into the tank. As the tank fills, pressure builds up inside it, as the water presses on the pear. This entire process is monitored by a pressure sensor. It is important that the pump can shut down. As soon as the tap is opened in a room filled with water, the water is pushed out through the energy of a rubber bulb or membrane.

As soon as the pressure in the accumulator drops, a sensor is triggered, which sends a signal to the pump, and it turns on. Thus, the accumulator is filled with water again. Pumping is carried out until the shutdown signal is triggered.
As you can see, in addition to connecting the accumulator itself, it is important to correctly calculate the pressure in the water supply accumulator. For this purpose, you can use the manufacturer's recommendations, which are indicated in the passport.
Today there are two types of accumulator design:
- Open type.
- Closed type.
Concerning open type then it is rarely used. And this is not surprising, because he has a number negative sides, among which:
- High evaporation rate of water. As a result, it is necessary to constantly pump up water.
- Moreover, installing a hydroaccumulator for do-it-yourself open-type water supply systems will cost much more. This is due to the fact that it is necessary to take measures to exclude the possibility of water freezing. Moreover, it is necessary to install additional automation, which will exclude the possibility of water overflow.
- An important minus comes down to the fact that when water comes into contact with oxygen, its aggressiveness towards metal parts increases. As a consequence, this leads to the formation of corrosion on the metal, and this significantly reduces the service life.
Among other things, the models differ, which are placed in a vertical or horizontal position. If the area of the caisson or other room where the accumulator is installed and connected to the water supply system is minimal, then the vertical direction is chosen. For horizontal, a special platform is required. The tank itself has special mounting feet for mounting.
Important! On sale you can find a hydroaccumulator for a water supply system in blue and red. Blue color for cold water supply. It differs from red in that the tank itself is capable of operating under conditions of much higher pressure. Plus, food grade rubber is used inside the structure.
Placement method

Before connecting, it is necessary to understand the installation method, or rather, the location. The choice of location will depend on the capacity of the unit. To create the best possible pressure, it is recommended to select the highest point in the house, for example, an insulated attic.
The selected place must be dry and free from air humidity. Otherwise, condensation will appear on the surface of the accumulator for the water supply system, which can provoke the formation of corrosion. And although the tank is covered paint and varnish material, sooner or later the rust will take its toll. Plus, the surface you choose must be solid and level.
Connection diagrams
Now let's take a closer look at the scheme according to which you can install a hydraulic accumulator for do-it-yourself water supply systems. Consider two schemes with a submersible and surface pump.
Connecting a hydraulic accumulator with a surface pump

First of all, the pressure level in the tank is checked. As a rule, it should be less than that of the pump, which is set on the relay to 1 bar. To connect, you need a special fitting, which has 5 different outputs. Each outlet is dedicated to a specific purpose. Plus, you should buy a pressure switch.
As for a special fitting for five outputs, the following elements are connected through it:
- To connect the pump.
- Pressure switch.
- Pressure gauge.
- To connect the water supply.
For starters, the connection can be made through a rigid hose. After that, a pressure switch and a pressure gauge indicating the pressure level are screwed to the fitting. You should also connect a pipe that will be directed to the pump.

When connecting a pressure switch, it is extremely important to consider the following points. The device itself has a top cover. It should be carefully removed. Under it you will find four contacts. Each contact will be labeled pump and network. This greatly simplifies the connection of the device to the network of wires coming from the pump. The connection is made strictly according to the indicated labels.
However, not all manufacturers put such signatures on relays. This is done on the assumption that the installer understands this completely. If you are new to this business, then be sure to consider this factor. For example, when buying, make sure the labels are available. In this case, you will not need to call a specialist in this profile.
Important! Every connection on the device must be made with a sealant. It is necessary that each joint is sealed. Usually a FUM tape or tow is used for this purpose.
Upon completion of these manipulations, you just have to turn on the pump to the network and adjust the pressure level in the accumulator. Plus, you should make sure there is no leakage at all joints.
Connecting a hydraulic accumulator with a submersible pump

In this case, the pumping equipment is lowered into the water. All water coming from the well will be pushed out through the vertical pipeline by the pump. With this design, the water supply circuit of the well with a hydraulic accumulator must include a check valve. As a result, water will not leave the membrane to the pump. In most cases, a check valve is installed immediately after the pump. Further there is a pressure pipeline to the surface.
Some pumps may have a female union. In this case, you need to purchase a special adapter, which will have two external threads of the corresponding diameter. This is important, because the check valve also internal thread... The rest of the connection is the same as in the previous case. A special adapter for five outputs is used.
Determine and set the pressure in the accumulator

Regardless of the method and variant of the installation diagram of a hydraulic accumulator for a water supply system, important role plays correct adjustment pressure in the entire system and in the tank itself. So, in one part there is compressed air, in the second there is water. At the time of purchase, at the factory, the pressure in the chamber with air is set to 1.5 atmospheres by the manufacturer. It is important to note that this is the basic setting regardless of the type of model and the cost of the accumulator.
Checking and correcting pressure
So, immediately before connecting, it is recommended to check the pressure level in the accumulator itself. Due to this information, you will be able to carry out correct setting pressure switch. Moreover, it is extremely important to monitor the pressure level in the future. A pressure gauge is intended for this purpose. Some DIYers temporarily use a car pressure gauge. Its error is minimal, so it is quite a normal option.

If necessary, the pressure level can be reduced or added. For this purpose, there is a nipple on the top of the accumulator. A car or bicycle pump is connected to it. Due to this, the pressure rises. If the air pressure, on the contrary, needs to be reduced, then there is a special valve in the nipple. You should take a sharp and thin object and press on it.
What pressure should be
So, it is important to determine what pressure should be in the accumulator. If in a private house will use Appliances, then the pressure range should be in the region from 1.4 to 2.8 atmospheres. To exclude the possibility of a membrane breakthrough, the pressure in the system should be slightly higher than in the tank itself, at least by 0.1 atmospheres. That is, if 1.8 atmospheres is set in the accumulator for the water supply system, then the system should have about 1.9 atmospheres. To expose this, a special device known as a pressure switch is used.

When determining the pressure level, it is important to take into account the number of storeys in the building. If you have cottage, then the pressure will be lower than if you had to raise water to the second floor. The fact is also taken into account how many water intake points are in the house, how many people live and what is the probability that several taps will open at the same time.
If all these nuances are not taken into account, then the following picture may occur. You are showering while someone else is washing dishes or using the water for other purposes. As a result, the level of pressure and water pressure in the tap will drop sharply. Agree, not a very pleasant situation. To prevent this from happening, it is important to correctly set the pressure on the accumulator and other equipment. And this will be possible if you take into account all the listed details and not only.
Conclusion
So, here we have reviewed with you the features of using a hydraulic accumulator in a water supply system. We also brought you simple schemes connecting the accumulator. As you can see, there is nothing complicated in this matter. The most important thing is to correctly calculate the pressure level and select the tank itself for the needs of the house. We hope that this article will help you understand this difficult matter. We are confident that you can handle this work yourself. To consolidate all the theory provided, we offer you to watch the prepared video material. It will help you visually see everything how the process of connecting the accumulator to the water supply system is going on. If you already have personal experience in this case, then be sure to share it by leaving comments on this article.


In a country house, it is not enough just to make an autonomous water supply system. The water supply scheme should provide for the trouble-free operation of the equipment included in it, even with pressure drops in the system, because if the water supply is unstable, it is likely that household appliances will simply fail. Connecting the accumulator to the water supply system allows you to solve this problem, but for the right choice device you need to know its features.

Hydraulic accumulator connected to the water supply system in a wooden house
Why do you need a hydraulic accumulator, its difference from an expansion tank
Hydraulic accumulators are often confused with expansion tanks, even despite the fundamentally different problems that these devices solve. An expansion tank is needed in heating and hot water supply systems, since the coolant, moving through the system, inevitably cools and its volume changes. The expansion tank is adjusted with a "cold" system, and when the coolant heats up, then its excess, which is formed due to expansion, there is where to go.
The accumulator is needed for completely different purposes: if it is not installed in the water supply system, then the pump will be activated every time a valve is opened. If this happens often, then not only the pump, but also the entire system wears out faster, since every time the pressure rises abruptly - a so-called water hammer happens.
As a result, the accumulator is installed in order to get rid of water hammer and extend the service life of the system as a whole. In addition, the accumulator has other functions:
Creates a certain supply of water (useful if the power is turned off).

If there are frequent interruptions in water, then the accumulator can be combined with a storage tank
Decreases the pump starting frequency. The tank is filled with a small volume of water. If the flow rate is low, for example, you need to wash your hands or wash your face - water starts flowing from the tank, while the pump remains off. It is activated after very little water remains;
Maintains a stable pressure in the system. In order for this function to be performed properly, an element called a water pressure switch is provided, capable of maintaining a given pressure within a strict framework;
All the advantages of accumulators make this device mandatory element any autonomous plumbing system in country houses.
Design and varieties
The hydraulic accumulator is a special sealed metal tank, which is internally divided in two by an elastic membrane. The membrane itself is made in the form of a diaphragm or a balloon. The first is attached across the tank, and the pear is at the inlet near the inlet pipe.

Hydraulic accumulators are equipped with two-level protection - pressure gauge and mechanical valve
On our website you can find contacts of construction companies that offer the service of design and installation of water supply and sewerage. You can communicate directly with representatives by visiting the Low-Rise Country exhibition of houses.
Accumulators have miscellaneous purpose... First of all, the devices are divided into those intended for hot and cold water supply, heating systems. The latter are colored red, while the tap ones are blue. Heating tanks are usually smaller in volume and more affordable. It is not due to this quality material membranes, because in a regular water supply there is drinking water, and in heating it is technical.
Accumulators are also divided by type of placement - devices located vertically or horizontally. In the lower part of the vertical models there are legs with which they are placed on the surface, and some models provide special plates that allow them to be fixed to the wall.

Connecting a hydraulic accumulator, as well as selecting its characteristics, is not an easy task.
Accumulators installed in heating systems, are equipped with radial membranes that look like plates. For plumbing systems, devices with a rubber bulb are more often chosen.
Principle of operation
The work cycle is divided into several stages:
If there is only air inside the accumulator, then the pressure will be standard - 1.5 atm (factory or set independently, depending on the pressure in the system).
When the pump is activated, water is drawn into the pear, which makes it larger in volume. The air between the membrane and the tank wall is compressed as the tank is filled.
When the air pressure reaches the set pressure, the pump turns off and the system stabilizes.
If you open the tap, the pressure in the system will drop and the air will begin to push water out of the accumulator. It will flow until the air pressure drops below a predetermined mark. Then the pump will turn on again and the cycle will repeat.
The system is configured in such a way that at high water flows, for example, if you need to fill a bath, the pump starts pumping water in transit, that is, without pumping it into the tank. The latter will be typed when all the taps are closed. Turns on and off the pump such an element as a pressure switch.

Installing the battery
The connection diagram of the accumulator to the pump and the water supply system may differ, since during the work they use not only a submersible, but also a surface pump. Each of the schemes has its own connection characteristics.
Surface pump circuit
If water is pumped to the plumbing system through the plumbing (that is, it is not necessary to submerge the pump), it is mounted right next to the battery. The connection diagram has nothing complicated, but you should familiarize yourself with the nuances.
Before installing the device, an accurate calculation of the operating and minimum pressure is required. V different systems different pressures are set, but if a standard, small system is considered, then the standard here is a pressure of 1.5 atm. It happens that a device is connected in the systems, which needs high pressure, therefore, the parameter increases up to 6 atm, but not more, as this can adversely affect the pipes and their connecting elements.
Submersible pump circuit
Installation diagram of a hydraulic accumulator in a water supply system using a submersible pump model. This case is relevant if the water for the system is drawn from a well or pump installed underground.

The described scheme has a key feature - a check valve is installed in the system. This device prevents the backflow of the pumped water. The check valve should be installed before the subsequent elements of the system are connected. It is mounted directly to the pump (at one end), and a pipeline leading to the accumulator is connected to the other.
The procedure for connecting the battery to the pump is as follows:
First of all, they measure the depth where the pump will descend (it should be located 30 cm above the surface of the bottom of the well or well). It is convenient to measure the distance with a rope to which the load is attached;
The pump, to which the valve is already connected, is lowered into the well and fixed with a safety cable;
The pipe from the pump, which goes to the surface, is brought to the water pressure switch, for which a special fitting is used;
A hydraulic accumulator is also connected to the fitting, which consumes water supply and a control system. Based on this, the most optimal fitting is with five connectors. It is important that all joints are sealed, for which FUM tape or ordinary tow, which must first be impregnated with a sealant, is excellent.
Video description
How the submersible pump and hydraulic accumulator are connected, see the video:
If you plan to install a hydraulic accumulator, then it is important to know how to determine the critical pressure. Based on the operating value, you first need to determine the minimum pressure, that is, the one at which the pump starts to work. The pressure switch is set to this value. Next, the pressure in the empty accumulator is measured. The result should be below the critical parameter by about 0.5 - 1 atm. Then the system is assembled. Its center, as in the previous situation, is a fitting with five connectors, where they are connected in turn: a battery, a pipe from a pump (it is connected to a water source), household water supply, a relay and a pressure gauge.
How to set up plumbing equipment
How to install a hydraulic accumulator for water supply systems is understandable, but it is necessary to carefully adjust all the equipment for the resulting system to function effectively. The key element to look out for is the pressure switch. Outwardly, the device looks simple, but it can take several hours to set it up. As a rule, a specialist copes with the task quickly, but if there is no special knowledge, then you can ruin the device.
Video description
How the accumulator is being adjusted, see the following video:
To set the pressure switch, first of all, the cover is removed from the device. There are four bolts and four springs underneath. It is these bolts that are responsible for turning the pump on and off when a certain pressure is reached. The norms noted in the instructions for the device state that the difference between the modes is 2 atm. A pair of screws should be adjusted to set the value. This is done as follows:
The pump is in working order, while one of the nuts is rotated until it turns off;
To effectively regulate the pressure, you need to open the taps in the house. Here it is important to pay attention to the indicators of the pressure gauge - it is necessary to fix the mark at which the pump starts;
If necessary, the minimum pressure in the pipes is adjusted - for this, the upper nuts are rotated. It is very important to rely on the readings of the manometer and the norms stated in the instructions;
The lower pair of nuts is responsible for the pressure indicator at which the pump is turned off;
The adjustment should be carried out until the difference between the on and off state of the pump is 2 atm.
Adjust the pressure switch - enough difficult task, but if this is done correctly, then the adjustment work can be considered complete.

To correctly adjust the pressure switch, you need appropriate knowledge and experience, therefore it is better to entrust this procedure to a specialist.
In addition to direct adjustment of the hydraulic tank, a lot depends on the correctly selected connection scheme. And if everything is done correctly, then in a country house there will always be a stable water pressure.
Conclusion
A hydraulic accumulator is a special device whose task is to stabilize the pressure in the water supply system. It is important to correctly install the accumulator for water supply systems, but you should also carefully consider the choice of the device. In the process of work, many different parameters are taken into account, from the place of installation of the device and ending with the choice of the volume of the container. It is also important to understand how the unit itself works. This knowledge will allow you to build a reliable and stable plumbing system.
The most important element of the pumping station is the hydraulic accumulator.
The scheme for connecting it to the well depends on the degree of autonomy of the water supply and the absence or presence of a water heater in the water supply network.
Consider possible options installations, as well as the device and types of accumulators.
 In the very simple execution a hydroaccumulator (GA) is a tank installed at a certain height (above any of the consumers) and equipped with level sensors.
An example of such a device is a water tower that feeds a water supply network in a rural settlement.
In autonomous water supply systems for private houses, such a GA is usually installed in the attic.
The pressure in the taps is provided by the weight of the liquid column, level sensors or a float switch control the operation of the pump.
In modern pumping stations, more advanced HA are used, which can be installed at any level - even below the points of water intake. The volume of such a device is divided into two parts: one is pumped with water from the water supply system, the other contains air with some excess pressure (pumped by a pump through a conventional spool).
Both parts are separated by an elastic element, therefore, when one of them is filled with water, the volume of the second decreases, respectively, the pressure of the air in it increases. It is the air pressure that performs the same function in such a HU as gravity in a water tower - it provides the pressure in the system.
Structurally, GAs are divided into two types:
- Membrane: the volumes for water and for air in such tanks are separated by a rubber membrane. There are membrane tanks designed for use in closed systems heating. They are designed for lower pressure than HA for water supply, besides, they use technical rubber, not food grade rubber. To avoid confusion, it is customary to paint HA for heating in red, and for water supply in blue.
- Balloon: a rubber bag with a flange is inserted into such a storage device, which is connected to the water supply. Thus, in balloon HA, water does not come into contact with the metal walls of the body at all. In addition, the replacement of the cylinder is not difficult and can be easily carried out by the user, while in some models it is necessary to contact the service center to replace the membrane.
In terms of volume, GA can vary greatly - from 24 to 1000 liters and more. It should be borne in mind that the passport contains the total volume of the tank, including the air chamber.
As for the volume of water that the tank can hold, it will depend on the settings of the pressure switch for the amount of air injected.
So, when the relay is set to 1 atm / 2 atm (on / off pressure) and an air pressure of 0.8 atm (checked with an empty cylinder), 30 liters of water will fit in a 100-liter HA.
If the shutdown pressure is raised to 2.5 atm, the storage capacity will increase to 38.5 liters.
In a HA with a volume of more than 100 liters, a valve is installed in the upper part of the water chamber to release air, which is released from the liquid during operation and gradually accumulates. Tanks with a smaller volume do not have such a valve, and in order to get rid of the accumulated air, they have to be emptied periodically.
GA can have horizontal and vertical design. The device and principle of operation for both varieties is completely identical, the choice of one or another model depends solely on the ease of installation.
 The accumulator has an extremely simple device, you can also connect it yourself. - recommendations for selection and installation, read carefully.
Place in the water supply system
 If the work of the domestic water supply system was provided with only one pump, it would have to be turned on every time as soon as one of the users opened the tap.
Such a mode would lead to a speedy depletion of the resource of the electric motor, since the starting moment is the most difficult for it.
The pump passport even indicates such a parameter as the maximum permissible switching frequency.
Even for the most durable electric motors, it is no more than 15 starts per hour, for all others - 10 or less.
This is precisely the reason for the use of GA. It accumulates not only water, but also the pressure required for comfortable use of the water supply. At the same time, the operating mode of the pump looks completely different: it works longer, but - most importantly - it turns on less often.
Along the way, a membrane or balloon accumulator performs another important function: it acts as a damper that smooths out water shocks.
However, in water supply systems, HA is not always needed. Here are the cases in which you can do without it:
- If water is consumed in long cycles: a typical example is watering a vegetable garden. Here GA is not just not needed - it is contraindicated. The available water supply will be consumed very quickly and the pump will have to be turned on frequently to replenish it. In the absence of a GA, the unit will work quietly in a stable mode.
- If the pump is equipped with the latest automation, which provides for the function of soft start of the engine and regulation of its power depending on the pressure in the system.
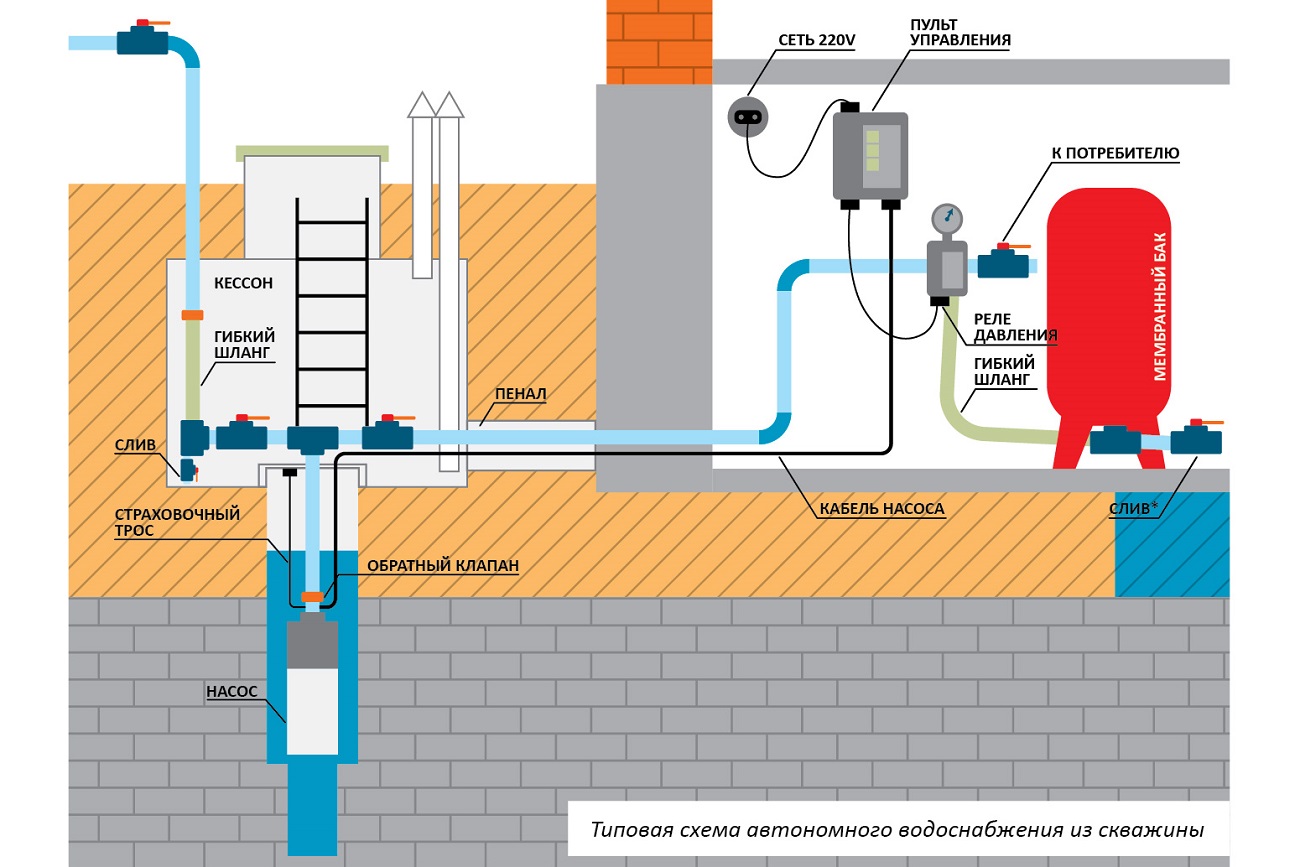
Accumulator connection diagram for water supply systems
The way of connecting the GA will depend on the features and purpose of the pumping station. Let's consider three options.
Option 1
 The pump delivers water from a well, borehole or storage capacity, while only cold water supply is organized.
In this case, the GA is installed inside the house in any convenient place.
Usually it, a pressure switch and a pressure gauge are connected using a five-outlet fitting - a piece of pipe with three branches, which cuts into the water supply system.
To protect the GA from vibrations, it is connected to the fitting with a flexible adapter. To check the pressure in the air chamber, as well as to remove the air accumulated in the water chamber, the HA must be periodically emptied. Water can be drained through any water tap, but for convenience, the drain valve can be cut through a tee into the supply pipeline somewhere near the tank.
Option 2
The house is connected to centralized water supply while the pumping station is used to increase the pressure. With this method of application, the GA station is connected in front of the pump.
In this case, it is designed to compensate for the decrease in pressure in the external line at the time of starting the electric motor. With such a connection scheme, the volume of the GA is determined by the pump power and the magnitude of the pressure surges in the external network.

Installation of a hydraulic accumulator - diagram
Option 3
A storage water heater is connected to the water supply. The GA should be connected before the boiler. In this embodiment, it can be used to compensate for the increase in water volume in the heater due to thermal expansion.
Wiring diagram of a hydraulic accumulator to a submersible pump
In the event that the pressure characteristic of a submersible pump allows maintaining an acceptable pressure at the water points in combination with sufficient capacity, the GA is connected according to the usual scheme using a five-outlet or three-outlet fitting.
However, wells are very deep and are often not large enough to accommodate a pump of sufficient capacity (eg 3-inch wells).

Connecting a hydraulic accumulator with your own hands
In such cases, the following scheme is used:
- A submersible unit is installed in the well, the power of which is enough only to raise water to the surface.
- Near the well, on the surface or in the ground, a GA is installed in the form of a simple container equipped with level sensors. These sensors control the operation of the submersible pump.
- A self-priming pump is installed near the storage tank (if it is buried in the ground) or normal suction (if the HA is installed on the surface), which supplies water directly to the domestic water supply system. In this case, a membrane or balloon GA is installed in the house, and the pump is controlled by a pressure switch.
Wiring diagram for connecting a pressure switch to a hydraulic accumulator
Usually in the pressure switch of domestic pumping stations there are two groups of contacts, but sometimes models with one come across.Each group consists of two pairs, with both pairs closing or opening at the same time. The pins in each pair are labeled, for example, "Line / Load" or "Line / Motor".
In principle, it is not necessary to follow these designations. It is even possible, for example, to connect the cores of the wire from the network to the “Line” contact of one pair and the “Load” contact of the other.
The main thing is that both cores are not connected to the contacts of one pair - this will lead to short circuit... Connect the conductors of the wire leading to the pump motor to the remaining two contacts. It is desirable that the colors of the braids of the conductors connected to the same pair match. Before connecting network wire, make sure it is not plugged into a power outlet.
To connect the grounding conductor (usually it has a yellow-green braid), there is a screw on the relay case, marked with the corresponding sign.
When connecting the wire from the relay to the pump motor, the core in the blue braid should be connected to the "zero" contact, and in the red or black - to the "phase" contact.
Often, for reliability, the grounding contacts of the pump and the relay are interconnected, but this is not necessary.

Pressure switch in the water supply system with a deep pump
Square cross section conductors of the wire must correspond to the power of the electric motor. For a copper wire, the cross-section is selected at the rate of 1 sq. mm for every 8 A of current. To determine the current strength in single-phase network it is necessary to divide the power of the electric motor by 220. So, for example, a current of 1500/220 = 6.8 A will flow in the circuit of an electric motor with a power of 1.5 kW.
It is important not to confuse the values of the diameter of the wire core and its cross-sectional area, since these values can be comparable. So, for example, the cross-sectional area of a core with a diameter of 1.5 mm is 1.76 square meters. mm.
It should be noted that the connection of the electrical part must be carried out only after connecting the pressure switch to the water supply.
 Nowadays, the lack of centralized water supply is no longer the same a big problem... Big variety pumping equipment allows you to arrange an autonomous water supply system without much difficulty. , installation and repair, read on.
You will find a water supply scheme for a private house with a storage tank in the topic.
Video on the topic
Traditionally, accumulators are in demand in the private sector and in settlements with problematic water supply. This device allows you to make any water supply system more efficient. Installation and operation of a hydraulic accumulator is a simple matter, but, as elsewhere, there are nuances here, which should be understood in more detail.


Appointment
This device allows you to reduce the load on the water pump: when pumping from a well, well or other container, part of the water enters the accumulator tank. Thus, the water from the tank will be used first, and the pump will only turn on again when the tank is empty. V general outline, the accumulator allows you to reduce the number of turns on and off of the water pump. And this device minimizes the likelihood of water hammer, which increases the period of maintenance-free operation of the entire water supply system. In heating systems, the accumulator is used as " expansion tank»: The excess of heated water goes into the capacity of the hydraulic tank, reducing the total pressure in the system.
It is not difficult to connect a hydraulic accumulator with your own hands, for example, through or deep, if you take into account the recommendations of specialists.


Device, principle of operation and types
Regardless of brand, configuration and purpose, practically all accumulators are similar in design, including the following:
- body on a rack (legs or reinforcing "shoes");
- membrane or rubber "bulb" for pressurization, which is located inside the body;
- nipples for air supply, which are completed with protective caps.


By the type of housing location (configuration), accumulators can be as follows:
- horizontal models are used to connect to external pumps;
- vertical models, as a rule, are connected to a water supply system with submersible pumps.

Depending on the type of destination different models accumulators can have such additional elements constructions like:
- to bleed excess air, horizontal models are equipped with special valves;
- hydroaccumulators for drinking water equipped with pears made of chemically neutral rubber, which prevents the accumulated water from imparting an unpleasant aftertaste;
- heating casings are used as "expansion vessels" and play an important role in pressure regulation.


The configuration of the accumulator is determined based on considerations of space saving, intended purpose, local characteristics of water supply.
Criterias of choice
For long-term operation, experts recommend purchasing models with a pear. Diaphragm accumulators are more susceptible to corrosion, since the diaphragm is not able to isolate the walls of the body from the effects of water. However, for models with a pear, repair is more difficult than for membrane counterparts. When choosing a storage device, you also need to take into account the future water consumption.
If the number of permanent residents in a house or apartment is no more than three people, plumbing fixtures - at least, then a capacity of 24 liters is quite enough.


If there are more users, then a corresponding accumulator is required. Before installation, consider the following:
- number of users;
- number of water points;
- number of household plumbing fixtures;
- the presence of heating elements.

If preliminary calculations were not final, for example, another person appeared in the family or the number of plumbing fixtures increased, the best way out will be the installation of a larger tank or the installation of an additional tank.
Both procedures have approximately the same complexity and comparable equipment costs.


Installation: options and connection diagrams
Depending on the internal features plumbing installation methods may vary. It is worth considering the most popular options.
Connection to a pumping station
In this case, the work on connecting the accumulator to autonomous system water supplies are carried out simultaneously with the installation of automation and adapters. The most common installations require the following components:
- pressure gauge;
- five-way fitting;
- switching hydraulic relay (pressure switch).


If water is used for submersible pump, the well piping must be equipped with a non-return valve and a dry entry relay. If a simpler surface centrifugal pump is used for pumping water, it is cheaper and more expedient to buy pumping station assembled, not mounted individual elements... The second option is preferable for those who have little experience, but want to install the pump on their own.


Two hydraulic tanks to one pump
Connecting two (or more) hydraulic tanks is a common problem for people who are faced with a forced increase in water consumption. If the volume of one tank is too small, the installation of an additional accumulator is not a very cumbersome business.
Additional elements can be installed in parallel with the existing system: just use another adapter connection, flexible hose or water pipe... A system with two (or more) tanks is and rational decision, and an excellent safety net. If a membrane fails in one of the tanks, it will still be possible to use the pump, but not in intensive mode. Such a system will provide sufficient time to replace the faulty unit.


To submersible
You can guess that we are talking about a pump that is submerged in the aquifer of a well or well. For uninterrupted water supply, such a system must be equipped with a check valve: this device will not allow the pumped-out water to return to the bottom of the well after use. Accordingly, the pump will not run dry and will last much longer.
Check valve in most cases it is already installed on the pump, additional installation may be needed during the repair process. In order not to be left without water indefinitely, it is recommended to purchase a pump with a spare valve, which is sold separately or supplied with the pump.
One more important point- this is the quality of the pressure pipeline: since the pipe lies at a rather large depth, possible breakdown not immediately visible.


The first sign of problems with the pipeline is a sharp drop in pressure, the accumulator takes longer to collect water, over time this interval may increase.
Superficial
Connecting a hydraulic accumulator to a system with an external centrifugal pump also has its own nuances, namely:
- the first step is to check the internal pressure of the tank: it should not exceed the 1 bar mark;
- to prepare for connection, you will need a five-way fitting. This small, but very important detail integrates the accumulator itself, the pipeline, the pressure switch, the pressure gauge and the external pump. Before the direct installation process, you must stock up on sealing materials (sealant or plumbing tape);
- to connect the fitting to the tank, use a rigid hose or flange with a check valve;

- after installing the tank, it is worth installing the remaining elements: a pressure gauge, a relay, a water supply system leading to the pumping unit;
- Before starting operation, a series of on and off cycles should be carried out in order to identify possible leaks;
- if something went wrong, you need to find out the cause of the problem and, if necessary, repeat the entire installation cycle again.

To the water heater
A hydraulic accumulator in a system with a storage water heater acts as an expansion tank. During the heating process, water increases in volume, which also increases the load on the water supply system. Since in confined space the pressure rises, the process can become very critical, and the temperature decrease is unacceptable. It becomes necessary to transfer this excess pressure somewhere. This is where the hydraulic accumulator comes to the rescue. Excess heated water will go into the hydraulic tank, which will normalize the pressure in the system. Further, the water from the expansion tank can be used for domestic purposes.


Relay setting
To understand the principle of operation of a pressure switch on a hydraulic accumulator, you do not need to have special knowledge - everything is quite simple. Until full filling, water is supplied under pressure to the tank with a membrane (or pear), which causes an increase in pressure in the system. When it becomes maximum, the relay is activated and the water supply is stopped. During operation, the pressure begins to drop, and when the minimum threshold is reached, the relay is again triggered and the water supply is activated. The above cycle is repeated as long as the system is in good working order.
Many people mistakenly imagine the process of installing a relay as something transcendentally complicated. In fact, this is far from the case. Any homeowner in the private sector who has a well or an artesian well at his disposal can easily cope with this task on his own. The main thing is to treat this with intelligence and patience. After all, a private home's water supply is vital.


It should be understood that the relay is an "intermediate link" between the water supply system and the power supply system. Obviously, this device has a huge responsibility. For this reason, all the nuances (and there are not so many of them) should be treated with the greatest possible attention. In order to secure the system, it is recommended to provide a separate power supply line. For connection it is worth using a two-wire copper cable... The wires must be grounded and well insulated: we are talking about the interaction of current and water, and this combination is always dangerous for a person.
The wiring must be connected to the terminal block through the perforations on the housing. Further, according to the instructions, you should connect the phase, neutral wire and ground to the corresponding terminals. You need to be careful and careful, the whole process of installing the relay must take place in a de-energized environment. You need to take care of this in advance. In no case should you neglect basic safety rules.

To adjust the pressure switch on the accumulator, you will need a high-quality, high-precision pressure gauge capable of measuring pressure exactly up to a tenth of a bar. The more accurate the gauge, the faster the adjustment will take place. To avoid mistakes in further work, you must adhere to the following sequence of actions:
- it is necessary to turn on the system, record the manometer indicators in the cycles of switching on and off the relay. At this stage, it is possible and necessary to identify malfunctions of the pressure gauge;
- the spring of the lower pressure level should be adjusted (it is the largest). For a fit, you should use an ordinary wrench the right size(it is best to have a wrench);
- you need to test the set level. If something went wrong, repeat the previous step;
- further, you should tighten the spring nut top level pressure (it is smaller);
- it is necessary to conduct full testing of the system. If you find any shortcomings, then repeat the entire setup cycle again.