We change the toilet in the apartment with our own hands. How to replace a toilet bowl with your own hands - dismantling, installation and connection How to change an old toilet bowl
It may be necessary to install or change a toilet under a variety of circumstances: moving, repairing, or its unexpected breakdown. If there is no time to wait for a plumber or you want to save money, then it is quite possible to do it yourself.
Tool and accessories
Before replacing the toilet, you need to make sure that everything you need is at hand.
- Toilet with cistern. It is better to opt for monoblocks, in which the toilet bowl itself is fastened to the tank. They are well fitted to each other, you can not be afraid of leaks. Rubber compressor- a trapezoid - between the tank and the toilet is included in the kit. If the tank and toilet are purchased separately, then it must be purchased. Bolts for screwing the toilet to the floor are also often included in the kit, if they are not there, then choose fasteners of a suitable diameter, usually 10 cm long.
- Hoses and pipes. You will need a flexible hose in a metal braid of sufficient length to connect the tank to the water supply, as well as corrugated pipe to connect the toilet to the sewer. To them it is necessary to pick up rubber gaskets and a sealing cuff for the corrugated pipe. Flexible pipes allow you to slightly vary the installation location of the toilet and facilitate this work, although the supply of water and the removal of wastewater can also be performed using polypropylene pipes, .
- Thin a piece of thick rubber 1-2 mm thick for the toilet underlay to prevent cracking of the tiles on the floor.
- Tool: perforator with a 10 mm concrete drill, keys, screwdriver, pliers. If the pipes are metal, then you will need a grinder or a hacksaw.

Preparation: remove the old toilet
Before work, do not forget to shut off the supply cold water and empty the drain tank. The water supply pipe and the sewer pipe are disconnected.
The old toilet is unscrewed from the floor. If the joint was smeared with cement or glue, you need to clean it off as much as possible with a screwdriver or chisel. In the case where the toilet is very firmly glued to the base, it may be necessary to gently break it with a sledgehammer. To finally remove all the water from the toilet siphon, the device is tilted back.
If others are planned repair work in the toilet, then the toilet is installed after they are completed. When replacing only this device, you still need to try to level the floor under it with rubber pads or cement mortar.

Installing the toilet
First you need to mark the installation location. Most toilets come with a paper template that makes this easy to follow. If it is not there, then you can simply make it yourself, and already drill holes through it and insert dowels into them. A thin layer of rubber is placed under the base of the toilet bowl, the toilet bowl itself is placed and screws with a hex head are tightened. It is important not to overtighten them so that the tile does not crack. The toilet must stand firmly, without staggering and displacement. The junction of the toilet bowl and the floor is glued with silicone sealant to prevent water and dust from entering it.

The junctions of the toilet bowl and the sewer pipe with the corrugation are smeared with sealant, then gaskets moistened with water are placed, and a pipe is attached to them. The end of the pipe can be connected to the toilet outlet before installing the device, this will facilitate further work in a cramped room. You can also connect the toilet to the sewer inlet using only a cuff, if you place it close to the wall.
Models of toilet bowls come with 3 types of location of the drain pipe: parallel to the floor, at an angle of 30-40 degrees and to the floor. The latter are rare and are installed mainly in private homes. When choosing a toilet, you need to consider what type of connection the sewer pipe is designed for, then installing the toilet will be easy.

When the toilet is securely fixed, you can install it on it. A rubber trapezium is superimposed on the platform in the back, and the tank itself is attracted by bolts using rubber washers. First, the bolts are inserted inside the tank, and then they pass through the holes in the toilet bowl and are tightened with nuts from below. The drain hole of the tank must exactly match the hole in the toilet bowl.
The internal structure of the tank is different various models, and, assembling it, you need to be guided by the manufacturer's instructions. In conclusion, using a flexible hose with nuts at the ends, water is connected from the water pipe to the tank fitting. The joints are glued with sealant or FUM tape, tightened with a wrench and checked for leaks.
After installation, several test flushes should be performed to ensure that no water leaks.
Advice. If you plan to replace the toilet in an old house, then make sure that the water in the apartment can be turned off. Otherwise, you will have to wait for the help of a plumber and turn off the water in the basement.
How to install a wall hung toilet.
Reading time ≈ 4 minutes
Sooner or later, the time comes when the old toilet in the apartment becomes unusable, and it has to be replaced with a new one. Most often, replacing a toilet bowl can seem expensive to the average tenant if a plumber is called. However, armed with a certain set of tools and using some skill, you can replace the toilet on your own, and the recommendations below will help you carry out this procedure efficiently and at minimal cost.
Before replacing the toilet, do not forget to drain the water!
First of all, you should decide whether it will be a complete replacement of the unit, or, say, a partial replacement of the toilet cistern. In the first case, it is worth starting with the choice of a model of a new toilet bowl, namely with the selection of a unit suitable sizes and configuration. Just like the old toilet bowl, the new device should provide users with maximum comfort conditions, therefore, immediately before replacing and installing the toilet bowl, it is necessary to measure the toilet, and already taking into account these indicators, choose the model that will fit into the room correctly. Namely:
- distance from front door to the toilet should be at least 60 cm;
- the distance from the unit to the side walls must be at least 20 cm on both sides.

It should be borne in mind that when replacing a toilet bowl in an apartment, some models will move forward significantly due to the fastening features.

In the event that only the replacement of the toilet cistern is required, it becomes impractical to purchase the entire set (toilet plus cistern). One way or another, any plumbing store can offer flush tanks of any configuration: built into the wall, mounted on the toilet shelf, and also installed under the ceiling. It is worth choosing from the presented assortment based on the characteristics of the room and your own preferences.

Now directly about replacing the old toilet. The whole process begins with the dismantling of the old unit. If we are talking about replacing a relatively new device connected to the sewer system from plastic pipes, there shouldn't be any problems here. And if, for example, a toilet bowl in Khrushchev is to be replaced, then everything is much more complicated here.

In this case, a variety of difficulties may arise. So, the dismantling of the tank can be complicated by the poor condition of the fasteners. Over the years of service, the fixing bolts rust, which makes it difficult to remove them. When dismantling the toilet itself, as a rule, there are similar problems with fasteners, as well as difficulties with disconnecting the outlet from cast iron sewerage. In those years, such connections were made by sealing with tow, followed by sealing cement mortar. Of course, the undocking of such connections is a very time-consuming process.

If, when replacing an old toilet bowl with a new one, there is no need to maintain the integrity of the old unit, then the old toilet bowl can simply be broken into several parts with a hammer. Dismantling the toilet bowl while maintaining its integrity can only be performed by a qualified specialist. After all fasteners are disconnected, the most difficult task- disconnection of the outlet from the sewer pipe - overcome, you can proceed with the installation of a new toilet bowl.

As a rule, the entire installation sequence of a new unit is described in the attached instructions, and the video on replacing the toilet presented on the site further clarifies the installation picture, so we will focus only on the key points.

So, do-it-yourself toilet replacement at the stage of installing a new device includes the following steps.
Thus, this short guide with a photo on how to replace a toilet will help you not only do the whole range of activities on your own, but also save on plumbing services, as well as gain invaluable experience in replacing plumbing.
Toilet replacement may be required when changing design toilet room or in case of a banal breakdown of a plumbing device. The work of professional plumbers is quite expensive. In addition, it is difficult to coordinate the time of the operation. To avoid such problems, you can change the toilet on your own. How to do this, read on.
Removing an old toilet
The toilet can be:
- floor, that is, installed on the floor of the toilet room;
- hanging, that is, attached to one of the walls of the toilet room.
The choice of dismantling method depends on the type of toilet bowl installed.
Removing a floor standing toilet
Before proceeding with the installation of a new plumbing product, it is required to dismantle the toilet bowl installed earlier. The work is carried out according to the following scheme:
- the water flowing into the drain tank is blocked. To do this, just close the valve on the water pipe;
- the water supply is disconnected from the toilet bowl. A key is required to complete the job. right size or adjustable plumbing wrench;

- all water is drained from the tank. The rest of the liquid is soaked up with a soft cloth to avoid spillage;
- the toilet bowl is removed. To do this, unscrew the fixing bolts located in the bottom of the drain tank;

- at the next stage, it is necessary to determine the method of connecting the outlet of the toilet bowl and the sewer pipe. Currently, the connection is equipped with a rubber cuff sealed with sealant. Previously, the joint was sealed with cement mortar:
- if the joint is equipped with a cuff, then for dismantling it is necessary to carefully cut the sealant layer and remove the seal from the sewer hole;

- if the joint is smeared with a cement screed, then a hammer and a chisel will be needed to disconnect the toilet from the sewer. Cement strainer with the help of tools it is crushed into small pieces and gradually removed.

It is necessary to carry out the work of removing cement very carefully so as not to damage the sewer inlet. Otherwise, when installing new plumbing pipes need to be replaced.
- after disconnecting the toilet bowl from the sewer, you can proceed to the direct dismantling of the sanitary ware. The toilet can be fixed to the floor:
- with fixing screws. In this situation, a screwdriver and a wrench are enough to remove the toilet. Decorative caps are removed from the bolts, after which they are quite easy to unscrew;

- with help epoxy resin. In this case, it is practically impossible to dismantle the plumbing without damage. To remove the toilet, you need to slightly swing the product in different sides until partial destruction of the retaining adhesive seam. When doing work, you can slightly help with third-party tools, such as a knife;

- using taffeta (wooden lining). Removing the toilet bowl from the taffeta is quite simple. It is necessary to unscrew the fixing bolts. However, after dismantling the plumbing, it is required to remove wooden spacer and fill the vacated space with a cement-concrete mixture.

You can start installing new plumbing after the solution has completely hardened, which takes up to 7 days.
- the installation site of the toilet bowl and the connection of plumbing with the sewer pipe is cleared of debris and other contaminants.
Removing a wall hung toilet
You can replace the wall-mounted toilet with your own hands in the shortest possible time. To dismantle the old plumbing product, you must:
- slightly loosen the bolts fixing the toilet on the installation;
- disconnect the plumbing device from the drain tank and sewer;
- completely remove the toilet from the fixtures.

It is more convenient to dismantle the hanging toilet bowl with two people, since it is impossible for one person to simultaneously loosen the fixing bolts and maintain the plumbing device at the same level.
Installing a new toilet
The method of installing a new toilet, as well as dismantling old design, depends on the type of sanitary ware.
Installation of a floor toilet
How to change the toilet floor type and install a new product in place of the dismantled plumbing? The work process consists of the following steps, which are recommended to be carried out in the specified order:
- toilet assembly. It is necessary to attach a drain tank to the bowl and install its fittings:
- during installation, you must be guided by the attached diagram;

- the tank is installed on a rubber sealing ring;

- the tank is fixed with special screws included in the plumbing kit. Each screw must be equipped with an individual rubber gasket to seal the connection;

- a rubber cuff is attached to the toilet outlet, which is necessary to connect the plumbing to the sewer inlet. When installing the cuff, it is recommended to use silicone sealant, allowing you to get a stronger and more durable connection;

- assembled plumbing is placed in the selected place. The possibility of correct connection of the device to the sewer network is checked. Marking is made on the floor for fixing bolts;

In order not to install the toilet bowl in the future in the wrong place, it is recommended not only to determine the location of the fasteners, but also to circle the body of the toilet bowl leg with a marker. Additional markings will allow you to clearly install the toilet in the selected place.
- in the marked area, holes for fasteners are drilled;
- dowels are installed;

- produced final assembly the toilet bowl in place and the connection of plumbing to the sewerage and water supply. After installation, it is recommended to seal the joint between the floor and the foot of the toilet bowl with sealant.

Replacing the toilet on video step by step instructions performance is shown below.
Installation of a wall-hung toilet
Installation, subject to pre-installation of the installation, is carried out in a few simple steps:
- the toilet is connected to the sewer and drain tank;
- the toilet is fixed on the fixing bolts.

Knowing simple rules and the instructions presented in the article, it is possible to replace the old toilet with a new one without difficulty.
Installation largely depends on the type of toilet you choose, so let's start with that. , produced today, differ in many criteria that are worth remembering. These include: the design of the tank and bowl, the type of drain, the material of manufacture, the method of installation, and so on.
Table 1. Types of toilet bowls
| Tank type, photo | Description |
|---|---|
| This type is the most common. Him flush tank goes separately from the bowl, and is attached to it with two bolts. These bolts are equipped with rubber gaskets to protect the ceramic from damage. Such a toilet is easy to repair, thanks to its design. It is very easy to replace the drain fittings in it or change the entire tank if necessary. | |
| As you can see, the tank with the bowl here form one whole structure. Such a structure gives the toilet more reliability - there will never be a leak between the elements, as is often the case with composite models. However, if the tank is damaged in any way, the entire device will have to be changed at once. |
| Installations today are gaining great popularity among users due to their unique appearance. It comes with a rigid steel frame, which is hidden behind the wall trim - usually it is sheathed with drywall. A bowl is attached to the frame, which at the same time remains hanging, and inside, also behind the finish, there is a tank - only drain buttons are displayed outside. Repair of such a toilet is accompanied by great difficulties. The fact is that the frame sheathed with drywall is glued ceramic tiles, which makes it difficult to get to the insides. As a result, you have to roughly dismantle everything at once, that is, the repair of one tank will entail the repair of almost the entire bathroom. |
| In fact, the installation is a kind of separate toilet bowl, in which the tank is not rigidly tied to the bowl, but is connected to it only through drain pipes. Few people put such toilets now, but in the distant past they occupied a leading position. Of the advantages of the design, it is worth noting the powerful pressure of water when draining, but this creates a lot of noise. Repairing the system as a whole is not very difficult, the main thing is to have convenient access to the tank. |


Types of drain outlet
The next feature that you should pay attention to when buying is the direction of the drain outlet, through which the toilet is connected through the corrugation to the sewer pipes.
Vertical outlets were used mainly before, when the sewerage was mounted strictly under the floor. Today, a similar design is useful in private houses and cottages. It saves a lot of space, but it requires plumbers to accurately calculate the position sewer runoff, otherwise the new toilet may simply not fit.

Oblique releases used primarily in high-rise buildings, where sewer pipes pass in the corner of the toilet, and the neck coming out of them “looks” into the room at an angle of 45 degrees. The connection of the toilet bowl with pipes is carried out using a corrugation, cuff or eccentric - they are selected in place when adjusting the position of the device.

Horizontal releases became widespread not so long ago and today they are actively used in various buildings - mainly frame houses, which are very popular in Europe and America and gradually find their fans in Russia as well. With this connection, the pipes must pass inside the walls, as shown in the picture above. Frame buildings pipes of almost any size are allowed to be hidden in this manner.
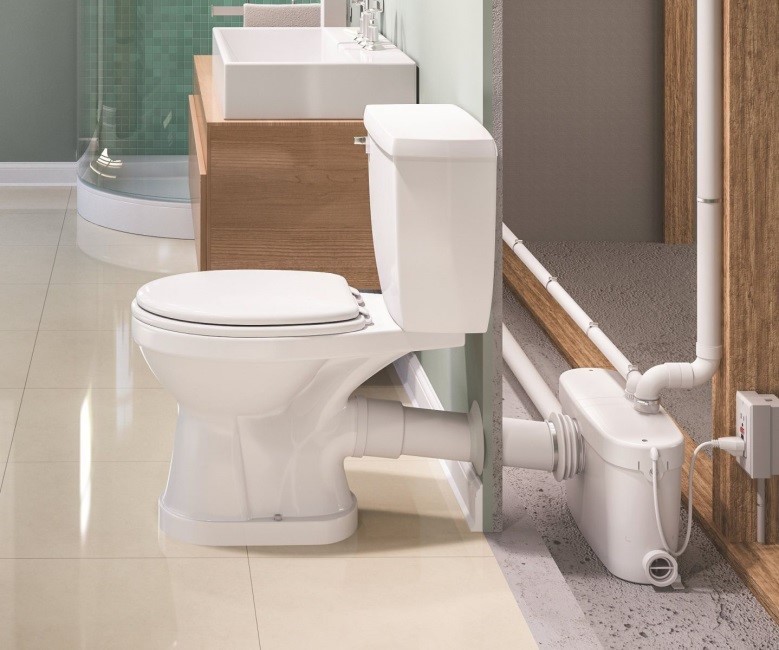
Interesting to know! The diameter of the sewer pipe for the toilet is 110 mm. If the walls are not hollow, they can be replaced with smaller ones - 50 mm, but then, in addition to the main device, it is necessary to install a pump with a grinder, otherwise the pipes will very quickly become clogged with drains.

The horizontal outlet is connected similarly to the oblique one - the same adapters are used. If necessary, such a conclusion can also be connected to other sewer outlets, but such a connection will definitely not be compact, so find out all the necessary information in advance so that you do not have to return the purchase to the store.
Toilet bowls also differ in the installation method, in principle, we have already touched on this issue when we talked about installation. There are two options here - hanging and standing. In both cases, metal bolts are used as fasteners. Sometimes they are replaced with glue or sealant. In the Soviet past, they used to fix concrete mortar, with which they coated the base, then painted it the same color as the floor - in general, it’s scary to remember. Dismantling such a connection often leads to the fact that the toilet must be broken. By the way, this is also possible if the device was put on glue.

Suspended design is good because it saves a lot of space in the room, at least even purely visually. Free access appears under the toilet, which means that it will be much easier to clean the room. It is not necessary to make the installation in the form of a false wall. Very often, people mount a neat box in size, which, in fact, turns into a very convenient shelf on which it will be convenient to keep a freshener, paper and other accessories.
Prices for toilets, urinals, bidets
Toilets, urinals, bidets
Materials for the manufacture of toilet bowls
If you think that all toilet bowls are made of the same material, then you are mistaken. There is a choice here too.
- Faience- This material is the most inexpensive and low-quality. Products from it do not serve more than 15 years. Soon enough, they begin to become covered with small cracks that will spoil appearance the entire product, even if it is still capable of service.

- Porcelain sanitary ware– The service life of this material is at least 30 years. It looks attractive, but it also costs more. Porcelain will also be stronger than faience and will better cope with mechanical stress - this parameter is especially important when choosing suspended plumbing.

- Metal- such products are made either from steel or cast iron. They are very strong and reliable, but they have considerable weight, especially the last option. Their appearance is not attractive, so they are used in public toilets, where durability comes first.

- Acrylic- today a lot of things are made from this material, even sweaters are knitted. In order for the products to be durable, they are reinforced with fiberglass during the production process. They are warmer, very light and beautiful. With a strong impact, they can be deformed, but not cracked. Among the shortcomings, it is worth noting the fear of abrasive cleaning agents - they can worsen the appearance of the product by scratching the glossy surface.

Prices for popular cleaning products for tiles, plumbing and pipes
Cleaning products for tiles, plumbing and pipes
How to dismantle an old toilet
We seem to have sorted out the choice of new plumbing, now let's slowly move on to the process of its installation, which will begin with the dismantling of the old product.
If you need to remove modern toilet, which was fixed only with bolts, then you should not have any difficulties, but if it was fastened adhesive method, will have to approach the matter wisely.
So, if the toilet is planted on silicone, then it will just need to be carefully cut from all sides with a sharp clerical knife, slowly loosening the product. If on cement, then we act like this.
Find out and check out useful tips, in a special article on our portal.
Table 2. Dismantling the old toilet
| Steps, photo | Description |
|---|---|
| First, the tank must be disconnected from the water supply. To do this, turn off the corresponding faucet at the water supply outlet and unscrew the nut at the base of the tank manually or with a wrench. If you don’t see the tap, then you may have to turn off the water in the entire apartment or even the entire riser - such situations often happen in old houses where there are no taps at all or they simply cannot hold water. Advice! In this case, after overlapping, the output can be drowned out for a while so that there is water in the house. Drain all water from the tank. |
| Next, the toilet needs to be disassembled. We remove the toilet seat from it, then the tank cover, which is usually held by a screw at the base of the button. Remove the armature by removing all fixing screws. Unscrew the two bolts that hold the tank, remove it and put it aside. On this the most easy part completed. Advice! When carrying out all these manipulations, a lot of cold water will fall on the floor and on you, so get ready in advance - dry rags, buckets, and so on. |
| Cement used to cover not only the base, but also the neck. It just won't pull it out. You will need to hit it with a hammer near the connection with the sewer pipe. We beat until the neck breaks off. Hit only ceramics, do not touch the pipe, as it may crack, which will add trouble. |
| Next, we take a chisel and a hammer and begin to free the base of the toilet bowl from the cement mortar. Try to loosen the toilet with movements from side to side - if you're lucky, it will budge. If it does not give in, then we intensify the blows and try to go deep under it, chipping off the adjacent tile. If you have a puncher available, then do the work with it. |
| Once the bowl is free, carefully lift it up and pour the water into the bucket. To avoid accidental injury, clean the room. Look at the photo - it shows that a piece of the neck remained in the sewer, which must be removed. |
| The sewer tee is cleaned with a screwdriver or chisel. Do this carefully so as not to damage the pipes, unless, of course, you plan to replace them with new ones. |


If the premises are planned overhaul, then the tile on the floor must be replaced with a new one before proceeding with the installation.
How to assemble and install a toilet
Now that the room is completely ready, let's take a closer look at how to install a new toilet. We will consider the installation of floor and suspended options.
floor version
Let's start with the classics. All work can be divided into two stages: assembling the tank and the entire toilet bowl, and fixing it to the floor.
Table 3. Tank Assembly
| Steps, photo | Description |
|---|---|
| When you open the box with the toilet, you will find many different details inside. At first glance, it may seem that it was necessary to graduate from the university as an engineer in order to understand all this diversity, but everything is much simpler in reality. Sort the parts according to their purpose, and everything will not be so sad. |
| Starting with installation drain fittings. In principle, it is assembled from the factory, so we only need to connect it correctly to the tank. Take it in your hands and put on a black rubber gasket from the side of the thread. |
| Next, lay the tank gently on the floor and push it into it drain device so that the thread goes through the hole in the base. Wind up with reverse side large plastic nut. You can tighten it by hand or with a special key that comes with the kit. While doing this, hold the armature with your hand so that it does not warp. Under the gum, you do not need to apply silicone sealant, as it can destroy it. If you tighten the nut tightly, there will be no leaks. |
| Now we can connect the tank to the bowl. Between them is placed such a gasket. By the way, it may differ in shape depending on the model of the toilet, but the essence of this does not change. Next, a tank is placed on top so that the mounting holes on it and the bowl exactly match. Silicone also does not need to be used, because if necessary, you will not be able to disassemble the toilet normally. |
| Now the tank needs to be fixed. We will do this with two bolts, on which plastic washers are first put on, and then rubber cone-shaped seals. Then they are inserted into the holes and screwed from below with plastic nuts, which are tightened by hand. If the screws are turning, then inside tank, they must be fixed with a slotted screwdriver or a wrench. |
| Next, we put the locking device. It is immersed by the threaded part into the hole at the bottom of the tank. Gaskets are mounted, and the part is also fixed from below with a plastic nut. |


Table 4. Installing the toilet
| Steps, photo | Description |
|---|---|
| So, we put a corrugation on the toilet and put it the way it should be installed. Outline it with a marker. We also mark the attachment points by inserting the marker into the holes until it stops and twisting it a little around the axis. |
| To prevent the drill from slipping on the surface of the tile at the beginning of drilling, the points must be punched. We use for this special tool or an ordinary dowel, which needs to be carefully tapped on the marks until chips form on them. |
| Next, we take a pen drill with a diamond coating and drill a tile with it. Attention! do not use the impact mode, as ceramics can crack. Having passed the thickness of the finish, we take a puncher with a conventional concrete drill and deepen the holes to the desired level. The diameter of the drill should be slightly wider than the mounting dowels included in the kit. |
| We sweep the floor and carry out a light wet cleaning so that there is no dirt left under the toilet. We carefully hammer plastic dowels into the holes so as not to break them. |
| We return the toilet bowl to its place, connect it with a corrugation to the sewer pipe and fix it on screws with a turnkey cap. First, they need to be put on a special plastic spacer, which will protect the toilet from squeezing. We tighten the screws until the device is completely fixed, after which we put decorative caps on top of them |


If the tile on the floor is laid strictly according to the level, then the work ends here, the toilet will stand securely. But often the opposite is true. In this case, it is recommended to apply white or transparent silicone under the toilet bowl. It levels out the differences and additionally connects everything. It is also reasonable to use it when, when drilling a hole, you got into voids and the dowel-screw cannot fix the device.
Video - Assembly and installation of the toilet
Installing a wall hung toilet
Now let's see how the installation is assembled and mounted. Difficult, in principle, also nothing.
Table 5. Installing a wall-hung toilet
| Steps, photo | Description |
|---|---|
| Work begins with unpacking the product and sorting its parts, as in the previous case. Next, a frame is assembled, which consists of several constituent parts. The parts are assembled using a coupling, which is inserted into the racks and tightened with four bolts. Everything is simple here - do not get confused. |
| The delivery set includes a tank and special fasteners for fixing it on the frame. We carry out their installation, tightly driving into the seats. Light tapping with a rubber mallet is allowed for a tighter connection. |
| Next, a pipe is attached to the tank, through which water will be supplied to the toilet for draining. |
| We fix the tank on the frame, first fixing the drain, and then himself. |
| Then a clamp is attached to the frame, which will hold sewer outlet. Actually, at this stage it can be installed next. We also fasten the adjusting legs to the bolts to the lower ends of the frame. This system allows you to quickly and efficiently set the desired height. |
| A mounting jumper is inserted into the upper ends of the frame and fixed with 2 bolts. Two screw studs are threaded into it, on the ends of which the mounting sole is wound from the side of the wall. Such a system allows you to adjust the indentation of the entire structure. Studs are attached to the jumper with nuts and locknuts. Advice! All parts are tightened tightly and securely, since then there will be no access to them. We adjust the frame, setting the height and indent. At the same time, it is guided by the level so as not to get distortions. |
| Next, on the floor and wall, we make markings and remove the frame to the side. We drill holes of the required diameter for fasteners. We install the dowels, return the frame and fasten it to the screws until it is completely fixed. We recheck the level again and make adjustments if necessary. |
| We attach a flexible hose to the tank and the outlet on the pipe. |
| We put on transitional sockets on the pipe outlets, through which we will connect the toilet bowl. Here there is already a real need to insure yourself with silicone. Two screw studs are screwed into the frame, over which a silicone sealant is put on, which will protect the ceramics. |


Prices for wall-hung toilets
Wall mounted toilet
Then the inside of the drain button is mounted on the tank. It is attached to it with two bolts.
The wall is sheathed with drywall and tiled. In this case, all the conclusions and studs remain outside. An inspection hatch is made on top of the installation, although many people prefer not to install it, as it worsens the appearance. But do not forget that access to taps is always required. Otherwise, they should be taken to another place.
At the end, the toilet itself is hung and a button is assembled.
You always want to keep the plumbing in its original form, so with frequent use of the toilet, you should pay attention to Special attention washing it. In we consider the most effective methods of cleaning the structure from limescale and urinary stones, we will talk about popular and effective cleansers.
Video - Installation of wall hung toilets on installation systems
Properly installed plumbing equipment can work for years. However, everything has a certain service life and there comes a time when it becomes clear that the replacement of the toilet bowl is inevitable. For many, this procedure does not cause much trouble: you just need to call one of several dozen companies involved in the provision of plumbing services, and the masters will carry out all the work in a matter of hours. However, for a number of reasons this may not be possible and then the equipment will have to be changed independently.
What needs to be prepared before work?
First of all, you should buy a new toilet. To do this, you should understand the design and dimensions of the old one. We measure the room in detail and carry out a simple drawing, on which we indicate installed toilet and sewer and water pipes connected to it. We check the angle of the drain neck. It is usually 45°, but it is better to check this again. If such work is to be carried out for the first time, and there is very little experience, you can take a picture of the structure with your phone before going to the store in order to consult with the seller regarding the type of new device.
Choosing a new toilet based on the drawing and photo will be much easier. We pay attention to the dimensions of the device, the shape and design features. On sale you can find devices with different depth and shape of the bowl, the slope of the drain hole and flush designs. Let's not forget about design. Among the various shades and materials, you should choose the best option for your room. With other identical parameters of the device, it is worth giving preference to equipment from well-known companies that produce better products.
A marker will be needed to mark the design. It is lowered into the mounting holes and marked on the floor for the holes, then the device is circled around the contour
In addition to the toilet, you should purchase a small set of items necessary for installation:
- Water hose. Its length is measured according to the old part, the new one is taken with a small margin.
- Toilet mounts. They may come with the equipment, but if not, they need to be purchased.
- Flexible corrugated pipe or corrugation that connects the toilet to the sewer.
- Cistern. You should check the contents of the tank. If the drain system is not included, it will have to be purchased separately.
You will also need silicone, but not acrylic, sealant, white or transparent, as well as fum-tape and gaskets for water pipes. Of the tools, you can not do without a puncher with a set of drills, it can be replaced with an impact drill with drills, a hammer, a set of screwdrivers and wrenches, marker, sharp knife and chisel. Having prepared everything you need, you need to think about how to remove the old toilet.
Dismantling of the old structure
Before starting work, it is worth preparing buckets and a large amount of rags. We start by disconnecting the water pipe from the drain tank from the device. Drain as much water as possible and open the tank. The toilet is ready for dismantling. If he is already very many years old, then most likely he was installed on the solution. In this case, you need to prepare for the fact that it will not be possible to remove the device whole. Especially if its neck is packed with rags with paint.
Among the recommendations on how to remove the toilet easier, you can find advice to start work from the drain neck. It really is. It is best to hit the neck hard and, splitting it, disconnect the device from the pipe. In addition, the vibration from the impact will slightly shake the base of the structure, fixed in the solution, which will facilitate further work. Important note: Do not hit directly on the sewer. If it is cast iron, which is the case in most cases, it is very easy to split it, which will lead to additional problems.

Shards of the old toilet should be carefully removed. We clean the neck of the sewer pipe from dirt, otherwise it will be impossible to carry out high-quality sealing of the new device
Having broken the neck, we begin to disconnect the device from the floor. If it does not lend itself to swinging and does not move, we take a hammer and with a chisel we begin to chip the structure from the base. It is possible that as a result of these works, water will flow from the broken device. It must be collected with rags in a bucket. We break off the fragments of the toilet bowl, remove the remnants of the solution in which it was fixed and, if possible, equalize the floor. We clean the edge of the sewer from fragments of the neck. It is best to do this with old screwdrivers or use a chisel. The operation is carried out very carefully so as not to damage the pipe.
Ways to install new equipment
After dismantling the old toilet, you should repair the floor, if it was supposed to, or just level it as much as possible before installing new equipment. There are several ways to install a toilet bowl.
Method # 1 - installation on taffeta
This traditional way toilet installation. For him, you need taffeta, the so-called hardwood board, carefully oiled. It is laid in the floor under the base of the device so that it is flush with flooring or slightly raised above him. The wooden base should be securely fastened to the anchors and the resulting recess should be filled with cement mortar. After the surface has completely dried, you can proceed with the installation of the device.

Taffeta, a carefully oiled hardwood board, is installed in the floor in place intended for the toilet. A layer of solution is applied over it
Equipment outlet connects with fan pipe, then with a pipe socket sewer system. All connections are treated with sealant and sealed with tow. The equipment is installed in the right place and firmly fixed with screws, under the heads of which rubber washers must be laid. The drain tank is mounted and the tightness of the system is checked. The device is ready to work. It should be noted that this method of dismantling and installing the toilet is perhaps the most time-consuming compared to others.
Method # 2 - glue connection
As practice shows, plumbing equipment can be installed using epoxy glue. To do this, the contact surfaces must be carefully prepared. They are cleaned and degreased with white spirit, solvent or acetone. They make them rougher, re-degrease and dry.
After connecting the outlet of the device and the sewer system, an even thin layer of epoxy adhesive is applied to the supporting surface. The toilet bowl is installed on the prepared place and pressed to the floor with force. After that, they are kept until the glue is completely cured, which will happen no earlier than after 12 hours.
Method # 3 - mounting on dowels

Mounting the toilet on dowels involves fixing the device directly to the floor, without first installing any structure under its base
by the most practical way how to change the toilet can be considered the method of fastening to the dowels. During the work, the following operations will be performed:
- Sample device. We install a toilet bowl on the prepared base and check the coincidence of the height of the neck and the sewer pipe, the angle of inclination, etc. If there are discrepancies, we make the necessary adjustments.
- Let's mark up the structure. We measure the width of the room, find the middle or axis of the toilet bowl. We install a device on it at a distance of 10-15 cm from the socket of the sewer pipe. We insert the marker into the mounting holes and make marks for the holes, circle the base.
- We collect the drain tank. In accordance with the instructions, we assemble the device, after which we attach it to the toilet bowl. For complete confidence in the quality of the work carried out, you can re-install the device in place, connect it to the sewerage and water supply and conduct a test run. After making sure that everything is in order, we drain the water and continue to carry out work on replacing the toilet with our own hands.
- Preparing mounting holes. Via impact drill or a puncher, we make holes in the intended places. We hammer plastic dowels into them.
- We seal the corrugation. We wipe the pipe dry with a rag and apply silicone with a richly wavy strip on the ribs of the gum, which will be hidden in the sewer. We carry out a similar operation from the opposite end of the corrugation, lubricating the area that is put on the toilet neck.
- We connect the device to the sewer. We insert the corrugation to the edge of the elastic band into sewer pipe, and on the other hand, we firmly put on the release of equipment. On the toilet seat, which was previously outlined with a marker, we lay a special rubber gasket or apply a thick layer of silicone.
- We install equipment. We put the device on the prepared place, press it and fasten it to the floor. We remove the excess silicone squeezed out during installation with a wet finger, passing it along the contour of the device.
Installation completed. It is possible to carry out a test run of water. If the work is carried out correctly, the tank is filled to the desired level and the flow of fluid stops. Overflow does not occur. After draining the water, the cycle repeats. You should also check that the equipment is not leaking anywhere. If so, then the installation can be considered successfully completed.
Recommendations on how to change the toilet with your own hands are quite simple. Even a novice plumber can perform them. You need to carefully study the instructions, prepare everything you need and without haste to carry out all the installation steps. The result will delight all households. A properly installed toilet will serve you well for many years to come.

