MDF wall panels do-it-yourself installation: mounting options for MDF wall panels on glue and frame. Do-it-yourself installation of mdf panels on walls Do-it-yourself mdf panels installation
MDF is one of the most popular finishing materials to date. In many ways, this is due to its relatively low cost, but for many consumers, the installation process looks much more important. If the finish can be installed with your own hands, this is already a huge plus.
That is why, in this article, we decided to talk about how to attach MDF panels to the wall, and if you are even one hundred percent confident in your abilities, we strongly recommend that you read this material to the end and watch the videos posted in this article.
Preparatory work

Any repair, including fixing MDF panels to the wall, begins with careful and thoughtful preparation. It is necessary to take into account a lot of nuances, and first of all, to calculate the number necessary materials. Fortunately, today it is much easier to do this than 10 years ago, just use the calculator on one of the construction sites on the Internet.
Important! The calculation of materials using an Internet calculator may have an error, which can be compensated by simply adding 10 percent to the result. Thus, you will not only correctly guess with necessary quantity, but also leave a margin in case of marriage during the installation process.
It is not difficult to calculate the number of panels on your own, but only if the room in which the renovation is planned has straight walls, without communications and architectural frills. So, everything is bought and delivered, in principle, you can get to work, but there is one little trick - before attaching the MDF panels to the wall, they need to lie down with room temperature at least a day in open form i.e. taken out of the package.
This is necessary in order for the material to pick up moisture and produce all the deformations that inevitably occur when changing temperature regime. In the meantime, our panels are getting used to the new room, it's time to prepare the tool. It is very important that everything you need is at hand, often it takes much more time to find a hammer or a nail than to repair directly.
To make it easier for you to prepare the tool, we present full list what may be needed during the installation process.
Set of tools

So:
- Tape measure and pencil for marking. This one important tool should always be in stock home master, and moreover, be at hand. For the entire repair, you will have to use them more than once, so it is better if they always lie in your pocket.
- Hacksaw for wood, but with a small tooth. If possible, this tool can be replaced with a jigsaw, but if your repair is not planned in a huge room, then buying it is simply pointless. MDF panels and batten material are easy to cut by hand, and it does not require any special physical strength.
- Building level. A simple tool that no repair can do without. In the arsenal professional builders there are high-tech laser levels, in the everyday life of a home master you will not often meet him. The fact is that the price of this tool can reach 10 thousand rubles or more, so buying it for the sake of one repair is simply not profitable.
- Thunderstorm of neighbors - perforator. A very loud tool, but without it you are unlikely to be able to drill holes in stone wall. A drill will also be needed for a puncher, and it is better if it is with a diamond tip.
- Construction stapler. If you are still unfamiliar with this tool, then it's time to get acquainted. In many situations, it is able to replace a hammer and nails, and it is much easier and more convenient to work with it. You simply put the gun on the attachment point, and press the handle, and the metal clip itself penetrates the base and holds the materials together.
- A hammer. They say that any repair can be done with just a hammer and a strong word. Like it or not, we will not argue, but the fact that the fastening of MDF panels to the wall without it cannot be done, this is a fact.
So, the whole tool is prepared, and you can take a break before the next step, but for now we suggest you see how to fix the MDF panels to the video wall, so that you understand from the very beginning what to expect in the future.
Foundation preparation

Our panels are still getting used to the new place, and it's time for us to start preparing the walls.
Instructions for fastening panels implies two options:
- Fasten the panels directly to the wall. Let's make a reservation right away that this option does not suit us, and most often it is offered to their ignorant customers, negligent and extremely lazy workers. Over time, such a finish will begin to gain moisture, and for MDF this is certain death, and sooner or later, you will realize that the repair needs to be completely redone.
- On the prepared crate. Only in this way can the panels be protected from moisture. MDF is mounted at a distance from the wall, so this finish lasts much longer. Further, we will describe this particular option, and if sometime, the workers will try to convince you that the crate is not important, just look for other performers, these are clearly trying to cheat you.
Wall preparation begins with removal old finish, moreover, the more carefully it is removed, the better the foundation will turn out. It is not necessary to expose the wall to the very brick, just remove it old paint or wallpaper (see How to remove wallpaper from walls correctly and without pain).
It is very easy to do this with a plaster spatula, and if in some places the paint stubbornly does not want to leave its place, just leave it there, which means that it has become related to your walls and will not interfere with a new repair.
The next step is priming. It is necessary in order to protect the walls, and subsequently the entire finish, from the appearance of mold, which inevitably forms due to the constant accumulation of condensate. Primers and impregnations of deep penetration, in this case, work as antiseptics, that is, they do not allow fungus and mold to spread.
MDF panels are one of the most affordable and easy-to-install finishing materials for wall decoration. It will take a minimum of components, a little skill and a desire to decorate the room beautifully. And, of course, the most important thing is our installation instructions for slats.
After finishing the wall with MDF panels, it may look like this. It's pretty, isn't it?
What are MDF panels
MDF or MDF (Medium Density Fibreboard) is a fibreboard produced by dry hot pressing. As raw materials, fine-grained sawdust of technical wood species, binders and some additives are used, which provide the material with plasticity and relative moisture resistance.
MDF boards are convenient because they can be produced in any thickness, easy to process, cut, mill, veneer. Therefore, wall panels with a thickness of 6 to 16 mm are produced from them. The width of the products varies from 12 to 37 cm, length - from 2.4 to 3 m. The surface is most often decorated with plastic or paper-resin films with a wood grain design, natural stone, ceramic products, fabrics, leather.
MDF panels are equipped with a tongue-and-groove connection system, that is, there is a spike on one side of the plank, and a groove on the other. As components, manufacturers (Kronostar, Soyuz, Kronospan, etc.) produce thin outer and inner corners from the same material with decorative surface under a tree, a stone and other materials.
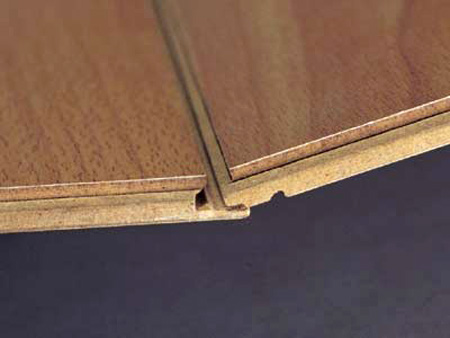 The tongue-and-groove system allows you to connect the panels firmly and without gaps
 The main method of mounting panels is frame or adhesive. The first is more complex, but reliable. The second requires more careful preparation grounds, respectively, time, labor and material costs can increase significantly.
What is required for the installation of MDF
For the installation of MDF panels with your own hands, you need the following set of tools and accessories:
- Panels and fittings made of MDF or plastic (outer, inner, finishing F-, U- or T-shaped corners).
- U-shaped steel profiles for gypsum plasterboards and components for forming a frame. An alternative is timber 30x50 mm, 40x40 mm, 40x60 mm, etc.
- Strengthening primer for concrete or antiseptic impregnation for wood.
- Self-tapping screws for metal or wood, nails or special clamps.
- Insulation (isolon, polystyrene, mineral wool, EPPS and others).
- Hacksaw with blades for wood or electric jigsaw, scissors for metal.
- Roulette and construction pencil.
- Gyro level and metal corner.
- Hammer, screwdriver or drill. Alternatively, you can use a construction stapler or Liquid Nails glue.
Step-by-step instruction
Consider the most common way to install panels with your own hands on walls - frame. The point is that from wooden slats or steel profiles for gypsum boards, a “skeleton” is formed on the walls, to which decorative lamellas are subsequently attached.
In the case of mounting MDF boards on a frame, the wall does not need to be carefully plastered, puttied, leveled, or removed the old coating in the form of wallpaper or paint.
Mineral crumbling bases (concrete, plaster, brick, cement) are sufficient to be treated with a deep penetration strengthening primer, wooden ones - with fire-retardant impregnation or an antiseptic indelible primer to prevent the development of mold, fungi, bugs.
Installation of MDF is carried out in the following order.
Step 1. Preparing the walls
The surface must be treated with a protective and strengthening composition. Fasten if necessary thin insulation with plastic dowels or construction stapler- ordinary or foil-foamed polyethylene (Izolon, Penoizol), XPS up to 7 mm thick (Pufas, QS) or others.
At this stage, work is also carried out with electrical wiring and other communications. Outlets of sockets, switches, cables are marked.
Step 2. Forming the frame
The main rule when installing planks with your own hands is that logs or profiles are attached perpendicular to the direction of installation of the panels. As a rule, MDF is mounted vertically, respectively, the rails must be fixed horizontally.
First of all, you should check the evenness of the wall with a level and mark it. Particularly protruding areas are desirable to be cut off, pits and depressions are marked with a pencil, so that when installing the crate in these areas, put thin dies of fiberboard, chipboard or plywood for leveling.
First, a frame is formed around the perimeter of the wall. The lower and upper beam or profile is installed at a distance of 3-5 cm from the floor / ceiling. Between them, the elements of the crate are placed in increments of 40-60 cm. Metal guides are fastened with metal screws or anchors; for wooden slats, you can use nails, dowel-nails or wood screws.

Along the perimeter of doors and window openings the crate is mounted with an indent of 3-5 cm from the edge. The distance between adjacent profiles should remain standard - 40-60 cm.
 Additional battens can be installed around door and window frames to increase rigidity
 Between the elements of the finished crate, you can install insulation boards - mineral wool, foam plastic, extruded polystyrene foam and others.
Step 3. Installing the panels
MDF must be carefully cut to size in advance. Installation starts from the corner. The panel is attached to the wall, verticality is checked with a hydraulic level and fixed from the side of the ridge to the crate using small nails or special clamps. The next lamella is inserted with a spike into the groove of the previous one until it stops and is fixed on the other side with hardware. The remaining panels are mounted in a similar way.
After finishing the work, the corners and edges around the windows and doors are decorated with MDF fittings. Folding corners made of MDF or plastic are attached with Liquid Nails, Titanium glue and their analogues.
 Initially, an MDF corner is not a corner at all, but a plank. Depending on the type of corner (internal or external), it is bent in the right direction
 Surplus adhesive composition should be removed immediately with a damp cloth. The upper part can be hidden under a decorative plastic or polyurethane cornice, while at the bottom, plinths are mounted with their own hands to match the color of the floor or wall covering.
The MDF paneling is ready. It is recommended to use a vacuum cleaner or a slightly damp cloth to remove dust and dirt. Do not use rags that are abundantly moistened with water, abrasive and aggressive detergents to avoid damage to the board surface.
Detailed video instructions for installing MDF panels:
Adhesive method of mounting MDF lamellas on the wall
With the adhesive method of installation, more stringent requirements are imposed on the base. The surface must be solid, even and dry. It is desirable to remove the remains of old coatings completely, then prime with a composition that increases adhesion.
On the reverse side the panel is applied with glue in zigzag movements, then the plank is applied to the wall and pressed. The next lamella is also smeared with glue, connected to the previous one and pressed. After installing all the elements, the corners and edges are decorated with corners, cornices, and other fittings.
MDF panels for wall decoration are not only easy to install, but also very practical to use. MDF panels for "dry" wall cladding are still as popular as they were two decades ago. We have prepared a guide for you correct finish walls with do-it-yourself MDF panels.
Which installation do you prefer?
In general, it is recommended to fasten wall cladding to a system of galvanized or wooden profiles. This avoids preliminary leveling of the wall surface and makes it possible to lay up to 50-70 mm of internal insulation or sound insulation. The choice between a wooden and a metal frame is determined by the specifics and conditions in the room, as well as for finishing GKL. In the modern variation of such installation, profiles and rails can be replaced or supplemented with plastic mounting strips, which provide for quick and technological installation with snap-on brackets.

A special case of the frame system is the device of a solid base as a rough preparation of the walls. The method is relevant in the case of using thin (5-6 mm) panels in rooms with a high operational load. If there is a sufficiently rigid substrate (OSB 6 mm, GKL), the panels will not be pressed through, and besides, their warpage during humidity changes is guaranteed to be excluded - a typical disease of cheap products. At the same time, the wall receives additional insulation and remains ventilated.

Sheathing without a frame is carried out by gluing the panels onto the walls after they have been pre-aligned. It could be plaster cement plaster or a draft base from the method described above. The method is recommended for mounting panels with a width of more than 160 mm, fastening over the entire plane gives a plus to the durability of the coating, but excludes fragmentary repairs and disassembly of the skin.
Frame system device
The principle of constructing a frame for paneling is the same as for gypsum boards, but the profile installation scheme is completely different. Depending on the method of fastening the panels, the configuration may vary.
In the most typical version, the panels are attached directly to the profile, respectively, the direction of the rack elements will be horizontal, this is the main difference from the GKL system. The removed skin allows you to give the room the correct geometry, but for this you must follow the correct assembly sequence.

Start with long walls: fasten vertical sections of the UD 28 mm guide profile in the corners. The two planes of the frame must be strictly parallel, so that the wall sheathed first is taken as the base wall. In the future, the distance for mounting profiles on the opposite wall will be postponed from it.
Between the guides, insert pieces of the rack-mount profile CD 60 mm. With a horizontal layout, you will most likely encounter a lack of molding length. In these cases, the crossbars can be spliced by inserting two sections of the guide profile inside and additionally strengthening with LM screws. Since the linearity of the frame is not critical, it is also not forbidden to fold the profiles with an overlap of 30 cm and fasten their adjacent shelves with self-tapping screws.

The installation step of the CD profile is 35-40 cm, the extreme ones are installed 10 cm from the floor and ceiling. To support the frame in a checkerboard pattern, direct suspensions are mounted with a step in one row of 60-80 cm, depending on the thickness of the panels, and hence the total weight of the skin.
The installation of the frame on short walls is carried out in exactly the same way, except that the guides are not attached to the pillar, but to the profiles of the frame of long walls. For this reason, the first "pawns" should be installed no further than 10 cm from the corners for their thorough strengthening.
If you intend to use mounting strips from PVC or to conduct a rough preparation of the walls, the frame is made exactly as for the plasterboard sheathing. The distance between the CD uprights can vary from 60 to 80 cm, direct hangers are installed every 80 cm. sheet materials horizontal bars are not allowed.

The installation of panels to the frame is extremely simple; for this, special plate brackets are used. They wind up in a groove concealed fastening and are fixed to the frame with a self-tapping screw with a hat under the sweat. With the use of PVC mounting strips, the situation is even simpler: just snap the clips into the mounting groove and press the next panel. Rigid fastening of panels with self-tapping screws is carried out only for the first and last strip.

Frameless installation - pasting the walls with panels
There are also alternative way installation, implying the use of glue "liquid nails". Panels can be glued both to the frame and directly to the walls, if the unevenness on them does not exceed 2 mm / m. Often, this method is chosen for cladding unennobled brick or block masonry, it is only important to choose the right adhesive composition.

It is recommended to use quality products. The adhesive must retain plasticity after drying, give preference to compositions based on rubber or polyurethane. For occasionally heated cottages, frost-resistant glue should be chosen, other features are determined by the surface material for gluing.
Don't forget about proper preparation walls. Masonry and plaster should be thoroughly impregnated with primer mixtures to increase adhesion.
Corners and junctions - we use a full range of fittings
The main charm of working with MDF panels is that the fittings for cashing corner mates are mounted superficially, that is, upon completion of the installation of the skin. Use plastic fittings with grooves for PVC panels is highly discouraged. Trimming of panels must be carried out accurately enough, the gaps in inside corners should not exceed 1.5-2 mm / running. m, which is quite enough to compensate for thermal expansion.
The main element of the fittings is universal corner profile. It consists of two thin MDF strips fastened with a laminated film, can be used to decorate both internal and external corners. For the correct and beautiful information of the overlays at the corners, their edges are cut in the miter box at 45 ° with a common bevel outward. When finishing corners on slopes, the angle will not be correct, so trimming in place is recommended. Installation is carried out on glue for wooden products based on polyvinyl concentrate.

Another piece of furniture is a docking bar. It is used for splicing sections of sheathing with insufficient length of moldings or for combining panels of different colors in one plane. At the place of installation of the connecting element, a lay-in rail should be provided.
Installation of skirting boards
Special mention is made of skirting boards for MDF panels. For the most part, they are used to cover the corners between the wall and the ceiling, or to decorate the upper end. wall panels. The plinth is installed in the same way as other fillets, landing is carried out on transparent silicate glue.

The issue of fixing the floor plinth remained unresolved. There will be no particular problems if the lower frame guide is lowered to 10-15 mm from the floor. In the presence of a draft base or pasting with wall panels, fastening can also be carried out using regular means. The practice of chemical fixing of skirting boards on liquid nails is common: the front surface of the panels has excellent adhesion.
Choice facing materials for walls may cause headache due to the huge range that the modern market offers. Consumers now prefer safe materials but not everyone can afford them. MDF panels are an environmentally friendly material and at the same time relatively inexpensive, so they are chosen quite often. How the walls are finished with MDF panels and what are the features of the material, we will consider in the article.
Planks are suitable for facing any room: kitchen, bedroom, corridor, living room. The panels are used for cladding in the presence of curved walls, since the design hides flaws and does not require careful preparation, which saves on the purchase of additional materials.  Planks are made by pressing under the influence of high temperature. This is how small particles stick to each other. If you install the strips on the frame, you can lay an additional layer of thermal insulation of the room. This is especially true for apartments with poor heating and private houses.
Another point of savings is the ease of installation. For installation, it is not necessary to call specialists, the work can be done on your own. After installation, the panels do not need to be further processed - they are completely ready. Where there are advantages, there are also disadvantages. MDF panels are no exception. Their surface can be scratched if not handled carefully. They also can't take heavy hits.  In the event of a fire, the planks will support combustion. Therefore, the wiring must be insulated very well. So that they do not undergo combustion, they are processed special formulations, but this is an additional cost and work.
But, despite this, the panels will last for many years.
The main thing is not to use brushes or detergents with abrasive components during the cleaning process. Finishing the slats of the cooking area in the kitchen is also not allowed.
Panel types
Like any material, MDF panels are classified into groups according to certain criteria: texture, size, shape, manufacturing technology.
There are several ways to make planks:
- Whole-faced;
- Laminated;
- Moisture resistant.
Whole-pressed, as the name implies, are made by pressing small particles of wood. Such planks will last a long time, they are durable and smooth. The decorative properties of such panels are immediately evident.  Laminated panels are also made by pressing, but after manufacturing, the bar is coated special film. That is why this type has a rich selection of colors. Only the finest wood fibers are used to make waterproof planks. They can be installed in rooms with high humidity: kitchen or bathroom.
According to their form, they are distinguished into:
- Rack;
- Tiled;
- Sheet.
Rack strips are very easy to install, so they are purchased most often. For installation, a frame is required, which is simply filled with panels. The length and width of the slats is different, you can choose required size for a room with any area.  Tiled strips are similar to ordinary tiles, only more larger area. Tiles are installed in the same way as slats - on the frame. It's kind of cassette ceiling. Leaves can be large. Most often they are decorated with drawings.
According to the texture, the strips are divided into:
- Veneered;
- glossy;
- Painted;
- 3D panels.
Veneered planks imitate natural wooden surface. MDF sheet is covered with veneer, which is made from different varieties tree. This type has a high cost.
Glossy panels are covered with a film to achieve the desired effect. As you know, glossy smooth surfaces are much easier to clean. However, any damage to such a surface will be visible to the naked eye.
Painted planks are not used as often for cladding, although paint adds variety, more often furniture is made from painted planks.
The surface of the slats can be glossy or matte. Drawings are applied on 3D panels that imitate various materials. They also apply volumetric drawings or photos. Such panels can be made to order, it all depends on your imagination. 
How to choose panels
Before work, you need to calculate the amount of material. However, you should not buy material back to back, buy a few panels in reserve in case they are damaged during work or during transportation.
Calculating the amount of material is simple. Measure the total area of the walls and divide by the size of the panels. This is how you get the correct number. The cost of the slats depends on the pattern and characteristics. Waterproof glossy panels with 3D drawing will cost the most. Do not buy thin panels, their thickness should be at least 1 cm. 
Preparing walls for paneling
Careful preparation for frame structure not required. The main thing is to treat the wall with an antifungal compound. Everything else depends on your personal desire. But still, if you spend anyway repair work, then it is better to put the wall in order. Moreover, over time, it will be much more difficult to do this. This is especially true for stains, the longer they remain on the surface, the more difficult it is to remove them.
The preparation process consists of several stages:

Necessary tool for the job
During the installation process, you will need plumb lines, which can be made from a rope and a weight. For marking you need a level and a tape measure. Screwdriver and electric drill for installation. If you need to cut the panels, then use a jigsaw. It is also suitable for cutting metal parts. 
Mounting methods
You can install the strips on metal or wooden frame as well as with glue. The choice of frame material depends on the room. So in a room with high humidity it is better to use metal, and in a private house wooden.
Installation on glue implies a flat surface, so the preliminary work on preparing the wall must be carried out completely and with care.
Glue
Installation on glue does not take much time. But later, if a separate bar is damaged, you will not be able to get one panel without damaging the others.
The glue is applied to the panel in thin lines in three or four rows and glued to the wall. It is not necessary to press hard, a little pressure is enough. So the whole wall is filled. Excess glue must be removed immediately before it dries.
frame
First decide on the method of installing the panels: horizontal or vertical installation. The frame profile is set perpendicular to the direction of the panels.
For a horizontal arrangement of the frame, marking lines are drawn using a level, and vertically using plumb lines. The guide bars of the frame are installed at a distance of 50 cm.
wooden frame
The bars are installed on the wall with dowels. A hole is drilled in the plank, a dowel is inserted into it and a self-tapping screw is screwed. Fasteners are placed in increments of 40 cm.
Metal carcass
The metal profile is also attached to the screws. First, it is pressed against the wall and the location of the screws is marked, then holes are punched and then the profile is screwed. After its installation, suspensions are attached to it.
Fastening MDF panels to the wall. The evenness of the subsequent installation also depends on the location of the starting bar, so check it with a level. Fasten the panel in the corner to the guide profile using the spike. Additionally secure it with self-tapping screws. Next, the spike is installed in the groove of the previous panel. Thus, the wall is completely filled. The last bar usually has to be cut. It is fixed with screws and subsequently closed with decorative corners.
AT modern world when you need to quickly finish the walls, wide use received MDF panels. First of all, this is due to the affordable price, as well as environmental friendliness. To install MDF wall panels with your own hands, you do not need much experience. It is enough just to be careful and be accurate in the calculations.
MDF panels are made from waste wood products. Do not confuse this material with a similar one: from fiberboard and chipboard. MDF panels are made by dry hot pressing, where the wood is pressed without taking into account the binder component. The essence of the method is as follows: wood consists of fibers (lignin), which, under the influence of high temperature and pressure, become pliable and connect to each other. The structure of the MDF material outwardly resembles a felt cloth, only it consists of wood fiber.
MDF panels are an absolutely environmentally friendly material, so they are widely used for interior decoration. The principles of working with panels are similar to wood.
MDF wall panels are significantly inferior in price to lining, but if we compare this material with similar "brothers" - chipboard and fiberboard panels, then MDF will be more expensive.
Installation of MDF wall panels are mounted on a frame or glue for wood products. Also, specifically for working with MDF panels, the Liquid Nails adhesive mass has been developed. This is an adhesive that contains a filler of sawdust. It is convenient to work with such glue both with MDF panels and for filling cracks. When working with liquid nails» Keep in mind that MDF wall panels have a color, so when buying glue, you need to ask the consultant to provide a sample of a frozen drop (usually available on the lid).
Panel Tools
Every man at home has a standard set of tools, you need to add to them:
- plumb line (made independently from a nylon thread and a nut);
- roulette;
- building level;
- electric drill with a nozzle for self-tapping screws (as a replacement for a screwdriver);
- metal square;
- hand saw or electric jigsaw.

Mounting Features
Fastening MDF wall panels is carried out in two ways:
- Wireframe.
- Kleev.
Both methods are equally practical. For example, if you need to hide any communications, then a frame fastening method is used. If it is necessary to finish a flat surface, then the installation of MDF wall panels is carried out using the adhesive method.
When attaching MDF wall panels, two frame methods are used:
- Fastening to a wooden crate.
- Mounting on a frame made of metal profiles.
The easiest way is to make a wooden crate, since for its assembly you will not need to install a large number of hardware. But a wooden crate is an expensive material. In addition, the tree must be pre-treated with agents that prevent the formation of fungus and mold.
You can fasten the wooden crate to the wall using self-tapping screws or mounting nails (dowels).
It is undesirable to use such a crate in brick house and a damp room, because fungus spores, as well as moisture, can penetrate through the pores of the brick. In such a "cushion" between the wall and the MDF cladding, pests will rapidly develop.
to install metal carcass, you need to purchase a profile, special fasteners("ears") and connecting elements. It is advisable to purchase them if you plan to perform a large amount of work in a short time. If you plan to sheathe one or two rooms with wall panels, then you can completely do without them.
The metal crate is attached to the wall only with self-tapping screws. To attach a metal profile to concrete base, a self-tapping screw with a diameter of 4-6 millimeters is used. If the wall is strong, then the diameter of the fastener decreases. In addition, you need to know that each fastener (screw or dowel) is attached together with a plastic "nest". Therefore, a hole in the wall is drilled according to the diameter of the “nest body”, and the protrusions are not taken into account.
The plastic base is hammered into the wall with a hammer, and the fastener itself should enter the wall by 30-40 millimeters. For example, if the layer of plaster is 12 millimeters, then for the crate you need to use an MDF wall panel measuring 16 millimeters, and the length of the hardware should be about 68 millimeters. This figure is calculated by the formula: the thickness of the plaster plus the length of the fasteners plus the thickness of the MDF. Accordingly, fasteners can be purchased in lengths from 70 to 80 millimeters. The depth of the hole should be another plus 15-20 millimeters, which are diverted “to the dust”. It turns out the final figure is 100 millimeters.
If you are working with a long drill, then you must first put a restrictive tube on it. Try to drill a shallow wall, as its thickness can be slightly less than 200 millimeters.
Wall insulation
Before finishing the room with wall panels, it is advisable to first insulate the walls. The cells of the crate are filled with sheet foam. It is very convenient to work with such material, especially to cut sheets of the right size. Additionally, foam insulation will protect the voids from condensation and from the appearance of wood pests. In the summer, when the building will heat up, the foam will protect the room from overheating. In addition, heat transfer to winter time will be significantly reduced.
How to install a wooden crate
The wooden crate begins to be installed from vertical rack. Each rack is placed in the corner of the room so that the corner is obtained. Then the racks are placed along the edge of the window and door opening, starting from the floor to the ceiling. Check the verticality of the racks with a plumb line.
Next, a rack is applied and marked on one side with a marker or pencil directly on the wall. According to the marks, drill with a drill in concrete wall mounting holes. The pitch of the holes is from 500 to 700 millimeters. Then “nests” for fasteners are inserted into the holes and their position is again marked with a pencil. Holes are drilled two-thirds of the diameter of the fastener and then it is inserted back. Experienced craftsmen they act differently: they pre-drill holes in the racks, and markup is done right through the racks.
The rest of the lags are mounted according to the same principle. On the top of the opening, as well as under the window sill, it is necessary to install logs, regardless of the “step”. In addition, the slopes of window openings are also “decorated” with slats: inside and outside.
When wooden crate ready, the ledges on the rails (their joints) are removed with a planer.

How to install a metal crate
The crate for MDF wall panels is installed according to the same principle as the wooden one. Attached to the wall first corner posts, then racks in the openings and transverse. The step of the metal crate is 500-700 millimeters. Racks are assembled from two types of profiles "UD" (narrow) and "CD" (wide). Narrow profile racks, and wide profiles are inserted or pushed into them. Then building level or a tape measure check the horizontal position and step. After that, the metal rails are attached first to the racks, and then to the wall. The details of the crate are connected to each other and the wall with self-tapping screws. Remember! Dowel nails cannot be used, because the profile can “lead”.
If you connect pieces of a metal profile to each other, do it in advance.

How to fix MDF wall panels
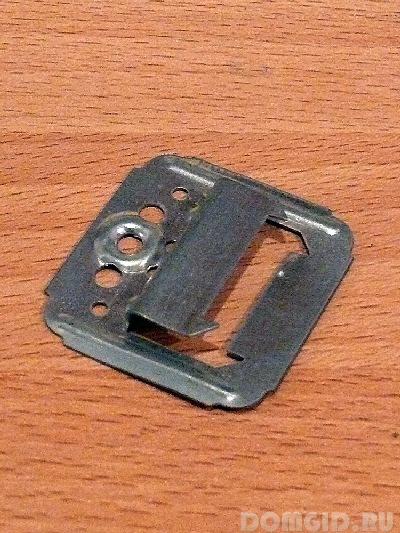
Installation of wall panels is very simple. After the construction of the frame, proceed to the installation of MDF panels. They are attached to the base with a special clamp - "kleimer". It is inserted into a hole in the panel (groove). It is a pleasure to work with such a fastener, because the kleimer provides a secure fixation of the panel to the frame. In addition, they are designed so that the next panel can be easily inserted into the groove.

Attaching MDF wall panels with glue is much easier. Firstly, it saves time, since there is no need to pre-install the frame.
What is the best glue to work with? Ordinary glue will not work, so tips for choosing an adhesive will be useful for beginners:
- glue must be plastic;
- should smooth small bumps on the walls to stick the panel even in a curved place;
- the texture of the glue should be thick, but at the same time, lie down in a thin layer.
Wall panels must be fixed with glue according to the following rules:
- first clean the surface of dirt and dust;
- be sure to prime the walls with a primer mixture;
- allow the primer to soak well.
When the wall dries up, you can prepare the panels: cut them according to size. Then apply glue to the panel "dotted" or "staggered". Try to keep the drops not meager, but rather large. After applying the adhesive, press the panel against the wall, “tap” well and tear it off. This is the technology of gluing. Thus, when tearing off the panel from the wall, the adhesive is weathered. The glued panel under the pressure of its own weight will not flake off the wall.
To save time, you can immediately apply glue to five to seven panels, glue them and tear them off the wall one by one. At a time when the glue is weathered, you can take a break, and after three to five minutes, return to work again and cling to each panel. Now you need to tap hard.

Panels MDF wall sheet, as well as MDF wall panels, laminated and standard panels are easy to glue, but cutting them evenly and neatly is much more difficult. In this case, due attention must be paid to any obstacles, such as slopes.
When working with glue, it must be remembered that the final result will depend on the accuracy of the work.
How MDF wall panels look in the interior can be seen in the photo:


How to install MDF wall panels, see the video: