Do-it-yourself wooden chair repair is interesting and economical. How to restore an old wooden chair at home with your own hands
In almost every house you can find a few old chairs, appearance which leaves much to be desired. Don't be in a hurry to throw them away. Restoration will help to breathe a second life into an old, but favorite piece of furniture.
Restoration gives the chair a second life and creates unique furniture.
Just a little effort, and old chairs or armchairs will turn into real works of art and will delight their owners for many years.
Give a second life
Restoring chairs with your own hands is not so much a difficult process as painstaking.
Before proceeding with the case, it is necessary to carefully inspect the product. Based on the results of the inspection, it will become clear what to do: just drag the seat of the chair, update the paintwork, or carry out a more serious repair.
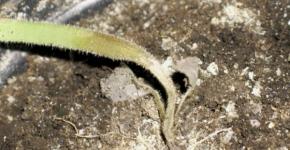
If the chair is loosened, then the cause should be sought in the spiked joints. Over time, the wood shrinks, the connecting elements begin to hang out in their nests. To eliminate this and strengthen the structure, it is necessary to increase the size of the spike, seal the sides and replace the power jumpers.

Scheme of assembly and constriction of the chair.
Restoration will require less effort paintwork. old paint you will have to remove, sand the surface of the parts and cover them with paint or varnish. For quality performance For work, the chair must be disassembled: remove the seat, unscrew the back and legs. If the design of the product is complex and has many small parts, then during disassembly, a diagram of the location of each part should be drawn up. This will facilitate the assembly of the chair after the restoration is completed.
The easiest way to update old chair— Replace the upholstery. Replacing old and worn fabric can change the appearance of furniture beyond recognition. If necessary, updating chairs with your own hands can be done in any one way or include all of the listed types of work.
Preparing for recovery
Before starting work, it is necessary to prepare tools and materials. If the chair needs serious repairs, then you will need:

Before restoration, the old chair must be disassembled.
- Screwdriver.
- Screwdrivers.
- Hammer.
- Mallet.
- Clamps.
- Clamps are metal.
- Sandpaper of various grain sizes.
- Construction stapler and staples.
- Acrylic paint and brushes.
- Scissors, pencil or felt-tip pen, cardboard, tailor's centimeter.
- Foam rubber.
- Thick fabric for upholstery.
- Bucket, rag and dishwashing liquid.
The first step towards restoring a chair is to clean it of dust and dirt. To wash it well, you need warm water, soft cloth and some dishwashing liquid. This solution will help to quickly clean the chair not only from dirt, but also from part of the old varnish. The washing procedure should be carried out promptly so that the wood does not come into contact with water for long, and then everything must be thoroughly dried.
The next stage of restoration is dismantling. First you need to remove the back and rear legs. The main thing here is to follow the rule: the assembly of the chair must be carried out in the reverse order. Only in this way will all the holes coincide with each other. In addition, all parts and fasteners must be marked. This will also make assembly easier.

Tools for restoring chairs: batting, upholstery fabric, stapler, staples, foam mounting adhesive, cardboard, screwdriver, scissors.
If the heads of the screws that fasten the parts are hidden in the sockets and they are covered with wooden plugs, then they can be removed using a chisel. If it does not work, then you need to use a drill, the diameter of which is equal to the diameter of the plug, and drill it out. The opened screw is turned out with a screwdriver. A drop of technical oil applied to the screw will facilitate the work.
If the chair was held together with epoxy, then removing it will help hot water. Wet a rag or napkin and put it on the place of gluing. Repeat the procedure until the glue is completely softened. Then you need to scrape it off with a knife and dry the parts. Hot steam will help soften the glue in tight joints. To do this, a rubber hose is put on the spout of the kettle, a jet of steam is directed to the connection.
Processing and assembly of parts
In order to qualitatively restore the chair, it must be carefully examined. All details must be processed sandpaper. Glue the large cracks found and tighten them with clamps. Glue the smaller ones and secure with paper tape. Excess holes and chips on the parts should be filled with a slurry of glue and small sawdust. You can continue to work only after the glue is completely dry.
To facilitate work with sandpaper, it must be cut into narrow strips and glued to wooden blocks 20-40 mm wide and 300-350 mm long. Paper must be used with different grain sizes. The surface after processing should be even and smooth. A grinder will help to facilitate the work and significantly reduce the processing time.
Be sure to check all connections. If the legs of the chair are inserted directly into the seat and eventually become loose in their nests, then to strengthen them, it is enough to wedge them. At the ends of the upper narrowed parts of the legs, a cut is made and a wedge is driven into it. Thanks to this technique, the end diameter will become larger and it will sit more tightly in the socket, which must be pre-lubricated with glue.
It will be more difficult to restore chairs with crossbars between the legs and drawers under the seat. In such designs, a tenon-groove connection and sizing are used to fasten parts. When the seam weakens, you need to drill a hole with a small diameter from the inside and drop a few drops of glue there with a syringe. When the spike is weakened, it must be strengthened with thin wedges. Matches or wooden chips that are dipped in glue are suitable for this purpose. They need to be hammered into the nest along with the spike.
If the chair is very loose, then in addition to gluing the joints, it is necessary to strengthen the structure with wooden blocks. They should be attached with screws to the sides, which are used to connect internal corners frame. Bars and tsargs should be perfectly fitted to each other. Even the smallest gap between them will cause the entire structure to skew.
Now you can begin to assemble the chair frame. All parts must be installed in their places. In order for the adhesive to grab, it is necessary to provide sufficient pressure. Tighten the elements to be glued with clamps or cords. A bucket of water can be placed on the seat. This will provide the necessary pressure. With such a load, the chair must stand for at least 24 hours. Excess glue should be removed immediately with a damp cloth.
Soft seat replacement
If the chair has a soft seat that needs to be replaced, it's time to get started. First you need to remove the old fabric and padding. If there are defects on the wooden surface, then they must be eliminated.
Marking should be done on the new foam rubber. The old seat is applied to the foam rubber and outlined with a felt-tip pen. To cut straight, you need to take a sharp knife. Then make a pattern on the fabric, taking into account allowances for hem and foam rubber. Next, lay the pattern face down on a flat surface. Foam rubber is placed on top, and then the seat. The allowances must be wrapped on the wrong side, pulled and aligned with the front side. Align the folds in the corners, bend the edges and attach the material with a stapler. If it is not at hand, then you can use small carnations, which have wide caps. Fix the updated seat on the frame with metal corners and self-tapping screws. If the chair has a soft back, then it is restored in the same order as the seat.
A fully restored and transformed chair will serve its owners for many years.
There can be a great many reasons to update old chairs or decorate new ones with your own hands. This is the need to adapt furniture to the interior, the desire to correct design flaws, restore chairs inherited from the grandmother or found for nothing at the flea market. In this article, we will talk about 4 ways to transform your “four-legged friends” (including office and garden chairs) beyond recognition, and also present 70 cool photo rework ideas.
Method 1. Painting a chair
Even the most old-fashioned or just ordinary chair, say, a "Viennese" wooden, plastic, folding or office chair, can be transformed with the help of staining. The main thing here is to choose the right color. Here are some inspiring examples where color alone saved furniture from landfill.


Old Viennese chair before and after renovation

A few more examples of reworking the most common bent beech Viennese chairs, which can be found in almost every house or cottage.

And here are a few cool ideas painting stools.

Inspired? Then let's get down to practice!
To paint a chair you will need:
- Acrylic paint, and preferably chalk paint in one or more colors;
- Synthetic flat brushes (separately for primer, paint and varnish);
- Protective gloves (it is better to buy at a pharmacy);
- Primer for wood / metal (depending on the frame material);
- Wax or matte varnish (polyurethane or acrylic);
- Sandpaper of medium and fine grain.
How to paint a chair with your own hands:
- Prepare the chair for painting: wash it of coarse dirt and dust, then sand it with medium-grit sandpaper to remove upper layer old varnish or paint. The surface should be slightly rough.

- If you want to update metal chair, then it is not necessary to sand it (although it is still more reliable to grind the top gloss), but before priming / painting the frame must be degreased with white spirit.
- Also, you can avoid the tedious sanding step if you use chalk paint, but you can’t do without a primer.
- If your stool is varnished, then it can be removed special tool for removing varnish.
- If the chair has damage, such as scratches, chips and cracks, putty them with furniture putty.

- Wipe the chair from dust, wait for it to dry and apply a primer on the entire frame in two layers, allowing each layer to dry for about a day. Between coats, it is advisable to sand the primer with fine-grained sandpaper (No. 220 is suitable).
- Take a new brush and paint the chair in 2-3 coats, letting each coat dry completely. Make sure that the paint does not form smudges.

- If you want to paint a chair with a scuffed effect, then first some places (for example, the edges of the seat, back and armrests) need to be painted with a dark paint, say dark gray or dark blue, and then waxed over them. Next, paint the chair with the main paint in 2-3 layers. And, finally, having slightly worked with a fine-grained sandpaper, expose the dark “substrate”.

- Do you want to achieve the effect of the perfect factory painting? Then be patient: each layer of primer and paint (with the exception of finishing layers) will have to be sanded with fine-grained sandpaper. So the coating will turn out to be as even and reliable as possible.
- To paint only certain parts or parts of the chair, use masking tape.
- Treat the chair with wax or matte varnish. Voila, your "four-legged friend" has found new life!
Helpful Hints:
- Don't know what color to paint the chair? You can't go wrong if you paint it white, because this color is the most versatile, goes well with any bright upholstery;
- Before staining on the back of the chair can be glued stucco decor with wood glue;
- Achieve the effect of a very old and dirty chair in Provence style, you can use dark brown wax;
- Chalk paint is a relatively new type of paint that is not yet commercially available. However, we recommend using it, because due to its density, increased adhesive properties and super-fast drying (in 30 minutes), it saves a lot of time and effort. Buy in Russia chalk paints you can at the designer Daria Geyler, and in Kazakhstan - at the Vernenskaya Manufactory. Also you can always order paints foreign manufacturers- Annie Sloan and Rustoleum.
It’s better to figure out how to paint an old chair with your own hands this video master class will help you.
Method 2. Seat upholstery
Most often, if the chair has soft seat, then painting the frame is not enough to completely update it - you need to change the upholstery. Here are some photo examples of how upholstering a seat can turn an old chair into a stylish piece of decor.


Office chair before and after painting, reupholstering the back and seat
By the way, if your chair or stool does not have a soft seat, then you can make it yourself: first, cut out the MDF base exactly in the shape of the seat, then follow our master class, upholster it and, finally, screw it onto the chair frame with screws.

To make a soft seat for a stool, it is enough to glue the foam rubber directly onto the base, and then cover it with a cloth, hammering the stapler staples onto inside seats.

Upholstered stool

For work you will need:
- Anti-stapler (or its alternative);
- Furniture stapler and staples with a height not exceeding the thickness of the seat base;
- Textile;
- Foam rubber about 4 cm thick;
- Batting or synthetic winterizer;
- Scissors;
- Knife-serreytor for bread (with teeth);
- Screwdriver.
How to reupholster a chair with your own hands:
- First we need to remove the seat from the chair frame with a nail puller or a screwdriver.
- We are filming old upholstery using an anti-stapler and remove the filler if it is dilapidated (if it is in good condition, then it can be reused). Next, wipe the base of the seat from dust and dirt.
- If the wooden base of the seat seems too old and unreliable to you, use it as a template to cut a new seat out of plywood.
- We put the seat on the foam rubber, trace its outline and cut it out.

- We cut the fabric and batting in such a size that they can wrap all sides of the seat (along with foam rubber), leaving 10-15 cm free. These surpluses are needed to make it more convenient to stretch the material.
- So, we got four blanks: base, foam rubber, batting / synthetic winterizer and fabric. Now we need to put it all in a sandwich. First of all, we spread the batting, put foam rubber on it, and on the foam rubber - the base of the seat with the wrong side up. Next, we simply bend the edges of the batting onto the seat and, slightly pulling the material, fix it with a stapler. The corners of the batting can be cut off, or you can simply bend and fasten in the same way.

How to restore a chair seat
- After all the batting is attached to the seat, trim off the excess.

- If desired, the foam rubber can be pre-glued to the base or stitched around the perimeter with a stapler, retreating 5 mm from the edge of the seat.
- The most crucial moment has come - the stage of reupholstering the seat with a cloth. Spread the fabric inside out and place the seat on it. Next, fold the edges of the fabric along one of the sides and fix with a stapler. Now stretch the fabric slightly over the opposite side of the seat and fix it with a stapler in the same way.

Repeat the procedure on the remaining two sides and proceed to the design of the corners - they need to be wrapped as shown in the photo below.

Chair after restoration
- We return the seat to its place and fix it with "native" fasteners.

Helpful Hints:
- The upholstered seat of the chair can be additionally decorated with furniture carnations around the perimeter.
- Upholstery fabric should be selected in accordance with the style of the chair. So, for example, a traditional jacquard fabric is not suitable for a modern chair, and a classic chair with an elegant back is unlikely to “make friends” with a fabric with a new-fashioned geometric print.
- The same fabric from which your curtains are sewn is ideal for upholstery of a chair. In the interior, such a coincidence will look very harmonious.
- The print on the fabric may overlap with the carved crossbars as shown in the photo below.

For a more visual master class of upholstery of an old chair seat, see this video.
Method 3. Decoupage of a chair with paper
Do you want to decorate a chair with a cool print or cover up minor defects like scratches and stains with drawings? This can be done using the decoupage technique.

chair decoupage idea

chair decoupage idea


chair decoupage idea

chair decoupage idea


You will need:
- Any paper with the desired print, for example, it can be multilayer napkins, pages from magazines and books, geographic Maps, posters, wallpapers, etc.;
- PVA glue;
- Brushes 2 pcs (for applying glue and varnish);
- Scissors;
- Transparent matt varnish acrylic or polyurethane;
- Water (if necessary);
- Roller for working with large formats.
How to update decoupage chairs:
Step 1. Clean the chair from dirt and stains, paint if necessary, following the first instruction in the article.
Step 2. Cut out the fragment that you need from the selected polygraphy. The workpiece can be either large (for example, in the shape of the seat and back) or very small.
- If you are using napkins, then first you need to separate the top layer with a pattern and only then cut it out.
- If you want to cover the whole chair, including the legs, the paper needs to be randomly torn into small pieces of about 10x10 cm, as shown in the next photo slider.
![]()
- To decoupage the back and seat, they must be removed from the chair frame with a screwdriver, and then used as a template for cutting the workpiece (see photo below).

Step 3 Lubricate the place you want to decorate with PVA glue liberally and attach your drawing to it, then smooth with a brush with the remaining glue, releasing all air bubbles and smoothing out the wrinkles.

- If the cut out print is small, then it is better to grease not the chair, but reverse side the workpiece itself.
- If the paper is very dense, then it needs to be moistened a little in water - so it will become more plastic.

- A top layer of adhesive is not required but is often desirable (it should be thin anyway).
Step 4. Repeat step 3 with other parts of the chair and leave the glue to dry for about a day.
Step 5. Coat the decorated areas or the entire chair with 4 coats of clear lacquer, allowing each coat to dry completely. Ready!

Method 4. Decoupage of a chair with a cloth
It would seem, how else can you radically modify the chair with your own hands, except by painting. In fact, there is another cool way - decoupage with a cloth.
- A chair updated in this way will last a surprisingly long time even under heavy loads. And if individual threads are knocked out of the fabric along the edges of the chair, you can simply cut them off and process them with a layer of PVA glue.

Decoupage idea for an old chair
You will need:
- Textile;
- Wooden chair;
- PVA glue or special glue for decoupage;
- Sharp clerical or dummy knife;
- Brush for applying glue.
How to update a decoupage chair:
Step 1. Using a screwdriver, remove the back and seat from the chair. If you want to paint the chair, do so before taking it apart.
Step 2. Spread the fabric on a flat surface, put the seat on it and circle it along the contour, stepping back about 2.5 cm from the edge, then cut out the blank.

Step 3 Coat the outside of your seat with PVA glue, then place the fabric over it and smooth it out. Once the fabric is leveled, coat it with PVA glue and leave to dry overnight.

Step 4 When the fabric is dry, make sure it is completely stiff. Next, cut off the excess fabric with a sharp knife exactly along the edges of the seat.

Step 5. Now again treat the perimeter of the seat with PVA glue to prevent wear at the edges.
STEP 6. Repeat steps 2-5 with the back of the chair and other details you want to decorate and finally put the chair back together. The main condition for the successful restoration of the chair is that the pattern must exactly repeat the shape of the surface to be decorated.

Here are some more photo ideas for decorating a chair with fabric.

Decoupage of an office chair with a fabric with additional protection with polyurethane varnish

Decoupage ideas for stools


Almost all pieces of furniture are subject to wear and tear. Even with careful handling, time takes its toll, and the material from which this or that thing is made undergoes aging and loses its appearance, and in some cases already ceases to fulfill its main function. In the case of chairs, the seat of the chair, that is, its upholstery, wears out first. And also the legs often suffer due to the fact that they constantly have a load. They can break, loosen and eventually fall off completely, causing the chair to become unusable.
This is where the need for its restoration arises, because this process will not take much time and you will not spend as much money as if you bought new chair. The process of restoring furniture is especially relevant if it is an expensive, old, rare thing or someone else's gift that you do not want to throw away.
Chair restoration
You need to know that old chairs are repaired for a number of reasons, which are characterized by certain damage. This may be an insignificant defect in the form of erasing the paintwork. Viennese chairs usually have such a defect. In this case, you only need to clean wooden surface and paint. There are more significant damage.:
- breakage of wooden elements (legs, backs);
- upholstery wear.
 When worn upholstery fabric it is required to carry out such a restoration process as a constriction. It cannot be said that this is a very time-consuming work, rather simple, in contrast to the one when you need to restore the "backbone" of the chair when it is loosened.
Old wooden chairs, stools, stools and stools can be repaired with some tools and the necessary material.
Tools
- coarse sandpaper;
- fine-grained sandpaper;
- different types of screwdrivers;
- stapler;
- mallet and hammer;
- scissors;
- tassel;
- screwdriver;
- clamps.
Material
From materials, to repair wooden chairs with your own hands, you will need the following items:

Operating procedure
Repairing chairs with your own hands is not a difficult process. Many people have already gone through this and know all the nuances of how to restore an old chair with their own hands. All you need is to thoroughly study the master class on chair decoupage and other restoration techniques.
Disassembly
 To start, refurbished chair needed properly clean from dust and dirt, applying to it also wet cleaning with a sponge. After waiting for the surface to dry completely, you can proceed to the next step.
Before proceeding directly to the restoration of the chair, it must be disassembled. There are two types of disassembly: complete and incomplete. TO complete disassembly includes the dismantling of the entire structure of the chair. Of course, this option is more complex and time-consuming, and if you choose it, then you can give advice on how to do it. If the entire structure of the chair is fastened with screws, then this will not be difficult. In the event that the legs, backrest and all parts of the chair are held together thanks to the glue poured into the grooves, you will have to make a little effort to disassemble it.
As a rule, the seat and back are removed without difficulty. The difficult step in disassembly is the disassembly of the frame itself. Here it is necessary to apply a certain force to knock the parts out of the grooves. For these purposes, it is best to use a mallet (rubber or wooden), because a metal hammer can easily chip the components of the chair or form dents.
Removing old glue
 In any case, when knocking out parts, you will need to get rid of the old dried glue (in some cases this may be epoxy resin). To do this, use a dampened sponge or some unnecessary rags. It must be applied at the attachment point of the two parts and left for a while so that the glue or epoxy gets wet. After that, the parts will easily move away from each other.
If it is difficult to get close to any place to remove the glue, you can use another method, which, by the way, is more effective. This method is based on the principle of removing glue with steam under high pressure. Most likely, most people do not special devices, creating a targeted effect of hot steam under high pressure . But there is a way out here too.. It is enough to find a piece of rubber hose about a meter long and put it on the spout of a kettle filled with water, which at that time is put on the stove. On the hose itself, you can pick up some kind of nozzle that narrows its diameter.
Recovery steps
Below we will consider the restoration of the chair at home with incomplete disassembly. The stages of stool recovery will be in the following order:
- Inspection of the coating and repair of cracks if necessary.
- Strengthening loose legs.
- Seat restoration.
- Creating covers.
 The last stage is optional and is performed at the request of everyone. DIY chair covers will protect the chair and make it look newer. And also due to the fact that they can be changed, there is a factor of variability in the design.
So, first of all, you need to prepare work surface and take care of hand protection and overalls. To protect your hands, use pharmacy latex gloves and wear clothes you don't mind getting dirty. If you are restoring a chair outdoors, then there must be appropriate weather conditions for this (no wind or rain). If you do this at home, then you can lay oilcloth or large garbage bags on the floor under the chair.
After dismantling the seat, it must be removed from the old upholstery and fitted with a new one. Upholstery fabric can buy at any furniture store, with matching pattern and color. Upholstery can be glued or nailed. In the second case, you will need pliers. It is advisable to remove the old coating, and not fit a new one over it. The filler should also be removed. Then it needs to be sanded with medium grit sandpaper and, after wiping the dust with a damp cloth and waiting for it to dry, cover it twice with a primer.
The interval between coats of primer should ideally be 24 hours, but the manufacturer usually specifies a shorter time. The primer also has bactericidal properties, which is especially important for old furniture. When two coats of primer are applied, you can proceed to close-fitting.
 Note: The seat can be upholstered special master. As a rule, such services are quite cheap, especially if you provide the master with your material for covering.
Synthetic foam rubber or batting is suitable for filler. When using batting, the number of layers is about 4, but more can be done, depending on how soft the seat you want to achieve. . Batting or foam rubber cut strictly to the size of the seat and fixed on its surface with the help of furniture stapler or small nails.
The upholstery material, the so-called seat cushion, should be fixed not only around the perimeter, but also in the middle. This will prevent the material from slipping during operation. Now, in order to fit our seat, we cut off the cape along the contour of the seat, stepping back about five centimeters from the edge. Having placed the filler, you can drag it, fixing each side with a stapler and overlapping the corners, which are also fixed. The reverse (invisible side) can not be covered.
How to make a chair
 Perhaps, The easiest way, if there is a chainsaw and a grinder, make it using the usual acacia hemp or another tree with beautiful texture. It is done in the following way. cut off right size a stump, the diameter of which will vary from 25 to 30 cm. You choose the height yourself, focusing on the one that will be comfortable for you. The height can be determined by measuring some home stool. After that, an incision is made with a chainsaw in the form of a cross, about half the depth of the stump.
Then, with an ax, a small depression is made in the middle of the stump and a small amount of combustible material - gasoline or diesel fuel - is poured into it. In the process of burning, the inside of the stool will burn out, it is important to monitor this process and prevent the legs from becoming thin. The thickness of the legs should be at least five centimeters at the base and it expands towards the seat. All burnt wood is scraped off with an ax or knife and polished with a grinder. A special nozzle in the form of a brush with coarse bristles is put on it.
After cleaning the inner surface, using a grinder and a grinding disc, the edges of the legs and the seat are processed along the entire circumference . Then painting is done stain diluted to the desired shade and, after drying, varnish.
Stool
It takes quite a bit of time to make a simple stool and minimum set tools. Of these, you will need:

The diagram below shows with a dotted line the shape of the leg, which you need to cut out in the amount of four pieces, as well as required dimensions for the board. The shape may be different, it is shown here as an example.
Important: The base of the leg must be flat to give the stool stability.

After marking the workpiece, cut with a jigsaw strictly along the line. In the future, the resulting leg can be used as a layout simply by applying it to the material, circling and cutting it off. When all four legs are cut off, we proceed to their processing. You can clean the edges with a semicircular router, but if there is none, use ordinary sandpaper. True, it will take a little longer. The stool seat requires a board of the same section in the form of a square with a side of 320 mm. The edges of the seat need to be smoothed and made semicircular. The workpiece is also cleaned from all sides with a grinder.
Then, when all four legs and the seat of the stool are ready, provided that they are well processed with sandpaper, you can start connecting all four legs. First, we drill two holes in each leg in the upper part. The drill must be used with a slightly smaller diameter than the self-tapping screw, otherwise it will not hold. Then a small indentation is made with a drill of a larger diameter, so that when the screw is screwed in, its head is drowned and it can be safely primed in the future.
An approximate connection diagram is shown in the figure below, for this you need to attach one leg perpendicular to the other and connect with self-tapping screws.

In the same way, we connect the other two legs and fasten them to the rest. Such a connection is very reliable, since four screws hold one leg. When all four legs are connected, we apply the entire fastened structure to the stool cover and mark its contours with a pencil in order to know where to screw the screws when connecting the seat to the legs. Making holes in outside seat, not forgetting a small hole of a larger diameter to hide the heads of the screws. After tightening all the screws, it remains only to clean the places where the joints were and cover the entire surface of the stool with varnish and stain (if desired).
Covers and capes
Tools needed to make your own chair cover:
- sewing machine;
- scissors;
- fabric and thread.
 First of all, remove all marks from the chair: height, width, distance from the back to the seat, length of the legs. An alternative way to remove marks is to make marks directly on the fabric when you apply them to the chair.
The cover itself will consist of two capes. One of them will extend from the bottom of the legs to the back and throw over it. Another cape covers the side of the legs. The two capes are held together with bandages of the same material as the capes. The fabric is stitched on both sides sewing machine and bandages are sewn on by hand.
Regardless of whether each of us carefully or carelessly uses furniture, over time it loses its original appearance and becomes unusable. Worn upholstery, an unpleasant appearance, the joints of structures are loosened - these are signs of aged, unusable furniture. Throwing away, for example, your favorite chair or stool is a pity, but is it possible to make repairs with your own hands, and what are the ways to do this? Many masters believe that repairing chairs with their own hands will be a simple, reasonable and useful solution.
Natural wood and products from it do not lose their properties, while maintaining the quality of parts. If wooden chair was in the room, the legs may loosen in it, individual elements and connections. Do-it-yourself repairs will allow you to bring the structure to an impeccable appearance and give a new life. It should be noted that there are several types of damage. You can restore the appearance and strength characteristics with the replacement individual parts, for which the structure is disassembled in parts. During operation, defects may appear:
- damage to the paint or varnish layer;
- thorn-groove joints loosened under the influence of constant loads;
- the appearance of chips, cracks on a wooden surface;
- fading, damage to the upholstery;
- damage to the wheels, loose, broken legs and other problems.
The chair can be repaired with your own hands in all of the above cases, for which you do not need to purchase special equipment.
Steps for a simple chair repair
It is quite possible to transform a chair into a new state after repair and restoration at home. To know how to repair a chair quickly, you should determine the defect. A simple repair of wooden chairs with your own hands can be done without disassembling the product.
When a stool or chair is not pleasing to the eye, it can simply be painted or varnished. For consistent work, you need to perform several actions:
- remove the upholstery so as not to spoil the fabric during the painting process;
- remove the old layer of paint or varnish;
- we repair the surface of wood by grinding, priming;
- apply new paint or varnish;
- put the upholstery in place.
Carefully remove the leg from the socket. Remove old adhesive and apply fresh. Place a weight on the seat. Excess glue that comes out, remove
We pull the parts and inject fresh glue into the socket under the spike. A narrow wedge will expand the trunnion and the connection will be stronger. A close inspection of old chocks will help you determine if they need to be replaced.

We cover the cracks
It is important to properly remove the paint so as not to damage the wood. Cracks must be sealed, primed, allowed to dry, and then sanded. Repairing a chair with your own hands can be a rewarding and exciting experience.
Loose Chair Repair
Strengthening the corners on the frame of the chair How to glue the drawer side
It is important to understand that in the design of a loose wooden chair, there may be a drawstring under the seat, and crossbars in the leg area. Step-by-step instruction will allow you to repair chairs at home quite easily and quickly, which will require the installation of bars to increase rigidity:
- The first step is to replace the upholstery. You can do it yourself, but if it is complicated, then use the services of masters in the studio.
- If you replace the upholstery yourself, you will need to disassemble the old upholstery layer from the seat, replace the foam rubber.
- Inspect the surface for damage and repair.
- Put new upholstery on the surface, bend the edges, nail to the tree with carnations, or with a construction stapler.
- If the legs inserted into the seat are loose, you can pull out the rocking leg, remove old glue then apply fresh glue to it and insert it back. For a better understanding of how to properly repair wooden chairs in stages, if not only the leg, but also the back is loosened, you can watch the video.
- Chairs with a drawer side and crossbars will be more difficult to disassemble and repair due to the presence of a large number of tenon joints. If the legs of a chair of simple solid wood construction are loose, it is necessary to pull out the loose legs, clean them of glue, and glue them back into place.
- If one seam diverges, drill a hole from below or from behind and inject glue into the damaged part into it.
- A damaged trunnion can be repaired with special thin pegs, or a bandage made of paper strips smeared with glue. The strips should be the same width as the trunnion.
Repairing wooden chairs and stools on your own does not require large investments, which every master and craftsman will like. And if the chair has wheels built into the legs that have become loose, you can also repair it yourself, without the help of a furniture repair shop.
How to fix wheels on chairs

Broken chair
The most frequent problem modern designs chairs, including office chairs, is a broken wheel. For a chair on wheels to last for a long time, it can also be repaired independently using a Phillips screwdriver, pliers and a hammer. The reason for the loss of the wheels may be.
« How to repair a chair?" - enough difficult question, given the variety of furniture today. Moreover, even classic version wooden chair is presented in several forms, the difference of which lies in the method of assembly. Accordingly, such chairs will have to be repaired different ways.At home, you can repair an office or computer chair, which we will discuss in more detail in the section below. Also, it will not be a problem to restore a stool or chair made of wood. However, furniture made of metal, molded plastic, glass and other materials is most likely not going to be able to be repaired on its own. In this case, you should either contact the master, or purchase a new chair.
We restore office or computer chair
office or computer chair is a large chair made of metal and plastic, upholstered in soft fabric. The convenience of such furniture lies in the fact that the design of the chair allows you to change the height of the seat, the position of the back, and the chair has the ability to move freely on the floor due to the system of wheels.
When buying such furniture, great attention should be paid to the design with wheels, as well as the seat height adjustment system. It is in these places that the computer chair breaks most often.
The following are the most common office chair breakdowns:
- the lever, which is responsible for raising and lowering the seat, does not respond to pressure, which is a consequence of the breakdown of the air valve;
- the seat is not adjustable and is not fixed on desired height, which is also a consequence of the failure of the gas lift;
- if the back of the chair is not set to the desired position, then the reason lies in the broken mount;
- one of the most common problems- this is a breakage of the cross or loss of wheels;
- the chair squeaks or makes other unnatural sounds during operation.
In most cases, if the problem is not running, you can fix the computer chair at home on your own. Of course, you should make sure that you have instructions that will allow you to safely disassemble and then reassemble the chair.
To fix the problems associated with the gas lift, the chair will have to be disassembled, or rather, its upper part with the seat and back removed. Next, you should experimentally find out for what reason the lift lever does not work and whether it can be somehow corrected. If the trigger lever is bent and does not reach the button that is responsible for adjusting the chair, you can try to straighten the structural element. You can use a hammer or pliers for this purpose.
If the valve inside the gas lift is not sealed, this can cause the seat to lower each time the chair is used. You won’t be able to fix such a breakdown on your own, and professional craftsmen most often recommend purchasing a new gas lift and installing it on a computer chair or office chair.
As for the cross and wheels, in this case it will also not do without replacing parts. If the wheel just falls out, it may be enough to replace the fasteners. The same is true with the repair of the back. Sometimes it's enough just to tighten the regulator tightly, but if it is broken, the part will have to be replaced.
You can try lubricating a creaking chair. To do this, you need to disassemble the chair and get to the gas lift. The bearings are lubricated with special oil. If the back creaks, it is enough just to tighten it.
Repairing a computer or office chair at home is really problematic. It’s impossible to deal with a serious breakdown on your own. But you can try to eliminate minor flaws.
More on how to fix a broken shock absorber and secure the seat computer chair You can find out if you watch the video below.

We repair a wooden chair with our own hands
It is difficult, but possible, to repair a wooden chair at home with your own hands. To do this, it is not necessary to be a carpenter, it is enough to have clear instructions before your eyes.
First of all, you should figure out which breakdowns occur most often.
- Breakage of fasteners and joints. Since wooden chairs, unlike cast plastic products, consist of many small parts, the likelihood of their failure is much greater. Also, the wear of structural parts is much faster. In this case, you often have to deal with the need to replace fasteners, screws and other small parts.
- Replacement of the main elements of the chair. Wood furniture can be easily damaged if mishandled. Fortunately, replacing the leg or back of a wooden chair is much easier than replacing an iron or plastic structure. A damaged part can be ordered from a carpentry workshop and then installed by yourself.
- The chair creaks or wobbles. In this case, you should pay attention to the joints, it may be necessary to disassemble the chair and glue its parts again.
Each situation should be examined in more detail. Also in the section below we will tell you how you can restore an old chair and change the seat upholstery. Optional to throw away quality furniture if some minor part is broken.

Repairing the legs
Chair legs - basic Basic structure this type of furniture. If one of the legs is damaged or, worse, broken in half, it is not possible to repair the chair at home. However, this is a common misconception.
It is possible to fix a broken leg. To do this, it is enough just to glue the tree correctly. If the fault is even, then it will definitely not be difficult. For repair, follow the following sequence of actions:
- The first step is to rinse and degrease the surface that we will glue. Choose to work comfortable spot where you can position the chair so that it does not wobble.
- Find the right glue for the wood, apply the substance to the crack and connect the two parts of the broken leg. Now you need to fix the tree for several hours in a stationary state. The time depends on which glue you choose.
- In some cases, these actions may already be enough to fix a broken leg. However, if you are not sure about the quality of the tree, then it is better to carry out additional work. To do this, install a chair with a glued leg in a comfortable position, then use a router to make a not too deep groove in the middle of the leg (about 10 millimeters).
- Now you need to cut out an insert of suitable size from wood, which will serve as a fastening element for the broken chair leg. Insert the resulting part into the groove that we cut out earlier. If the insert stands out too much, you need to cut off part of the element.
- After making sure that the insert fits snugly into the leg of the chair, lubricate the groove and wooden element glue abundantly, then connect the parts. Nothing if there is a lot of glue, the excess is quite easily removed with a clean, damp cloth.
- If possible, secure the parts tightly in some way so that the wood sticks together well and efficiently. Subsequently, such a chair will definitely not break at the place of gluing. As additional measure you can glue two inserts on opposite sides.
- Subsequently, it remains only to paint over the insert with a pigment suitable for the color of the chair.
A few days after the repair, the chair can be used. Do not worry if at one of the stages the work does not work out. It happens that the first time the fault is difficult to glue together. Just repeat the procedure and wait until the tree sticks well and securely.
Many people also often ask what is the best glue to use to glue a wooden chair leg. It is best to use a specialized product. The glue must be waterproof and not leave streaks on the wood. Many prefer PVA glue, as well as carpentry and synthetic pastes. Before buying a product, be sure to familiarize yourself with the composition of the glue, or better, check with a consultant whether it is possible to use the selected paste for wood.

Back loosened
If the back of the chair is loose, then it is necessary to renew the gluing of the grooves. In no case should you start the problem, because in this case there is a possibility that the elements of the back will simply disappear and more laborious work will have to be done.
To easily update the gluing, use the suggested below. step by step master class with photo.
- First of all, you need to carefully disassemble the back of the chair by unscrewing the screws from the wooden inserts as shown in the photo.

- After that, it is necessary to carefully knock out the inserts from the main backrest structure using a special carpenter's hammer made of rubber or dense wood.

- Now you need to generously lubricate the insert with the selected adhesive. Try to smear with paste not only the insert, but also the area near it, which is connected to the main backrest structure.

- Cut off a piece of gauze, lay out the fabric as shown in the photo. The gauze will strengthen the adhesive. Carefully insert the wooden element into the groove.

- Next, you need to clamp the back of the chair in a vise so that excess glue stands out from the groove. Don't forget to use wooden spacers so that the metal vise does not damage the surface of the chair. Remove excess paste with a knife or other sharp object.

- With a damp cloth, wipe off the remaining glue on the wooden back of the chair.

- As an additional reinforcement, you can use metal corners that will extend the life of a wooden chair. To do this, you need to make holes for the screws.

- Next, you need to carefully attach the corners and tighten the screws with a drill. After such a procedure, the chair will not only stop creaking, but will also become more stable.

Depending on the glue chosen, you need to leave the chair for a while so that the back elements stick together well. After that, the furniture can be used again. You can glue broken back elements by analogy with a broken leg, the repair of which is described above.
Changing seat and upholstery
The most difficult thing to repair is the seat of a wooden chair, or rather, its main structure. In this case, the chair must be completely disassembled and reassembled. In this case, all the same tools and materials will be used: drill, glue, tightening, gauze, screws and metal corners.
Some chairs, such as the Viennese chair, have an arched seat, which greatly complicates the process of repairing it. However, if you disassemble the structure correctly, there should be no problems. In the case of re-gluing the seat, we will need several vices that will need to be installed on the structure for high-quality gluing.
Do not forget to further strengthen the gluing of the frame, so that later you do not have to do the work again.
If the chair has a soft seat and upholstery, sooner or later the fabric will have to be changed. The reason for this may be damage to the material or contamination that could not be washed off. We recommend using the following types of fabric for upholstery:
- cotton fabric, although it does not look bright and catchy, but such material is durable and wear-resistant, so upholstery from it will last a long time;
- linen upholstery is slightly less wear-resistant than cotton, but is also suitable for frequent use in everyday life, besides, a chair with such antique upholstery looks like;
- vinyl upholstery is not afraid of moisture, it is very easy to wash such a fabric from any kind of pollution, but this material is not suitable for hot climates;
- tapestry is an expensive fabric, but it is very durable and ideal for upholstery of chairs, besides, such furniture subsequently looks very unusual and catchy;
- often chair seats are upholstered with velvet, as it is a durable and soft fabric, but it is very difficult to clean serious dirt from such material.
Choose the upholstery material most suitable for the interior of the room in which the chair most often stands.

What to do if the tree has dried up?
Over time, the wood from which the chair is made can dry out, which will lead to a loss of strength of the furniture. What should be done to avoid this or fix the problem that has already appeared?
First of all, I would like to point out that wooden furniture, whether it is a chair or a wardrobe, careful care is needed. Such material does not tolerate a sharp change in temperature, as well as high or, conversely, too low humidity.
As preventive measure the varnishing of a wooden chair needs to be updated, which will significantly reduce the chances that the wood will dry out. In hardware stores you can buy a special varnish, as well as paint with an additional protective layer.
If the problem has already appeared, then only help wooden inserts, which will hide the resulting cracks and strengthen the structure of the chair. They are performed according to the same methodology as described in the section on repairing a broken chair leg.
If the cracks are small, you can use special wax or wood putty, retouching construction pencils will also help. After treatment with the selected agent, the surface of the chair must be painted and varnished.
After studying the information provided, now you know how you can repair a wooden chair or an office chair on wheels yourself at home.