Restoration of chairs. How to make a stool at home
Hello, friends! Today, for a while, let's forget about universal problems, economic troubles, and other global topics.
I want to offer you, if you have a little extra money, free time and a desire to do something with your own hands, slightly change the interior of your house.
Actually, I don't like keeping old things in my apartment. But somehow it so happened that, with a total renovation of the interior after another protracted renovation, four old chairs remained standing in the kitchen.
At first, I made a promise to myself that I would soon replace them with new and stylish ones. But they so took root in our family, became almost "relatives" and I somehow did not dare to throw them into the landfill.
Then, having looked closely at them, I thought: "but they are not so bad - they are wooden, strong, well, except that the upholstery has already faded and does not quite match the color of our new kitchen."
And if so, I decided to act and repair the old chairs with my own hands. To tell the truth, not with my own, but with the hands of my husband.
He is a great craftsman and everything he does he does only with a quality mark (I boast a little). Therefore, I entrusted this work to him without hesitation.
Since we only needed to replace the upholstery of the chair, and the rest of its wooden parts did not need to be repaired (except to renew the varnish in some places), we bought:
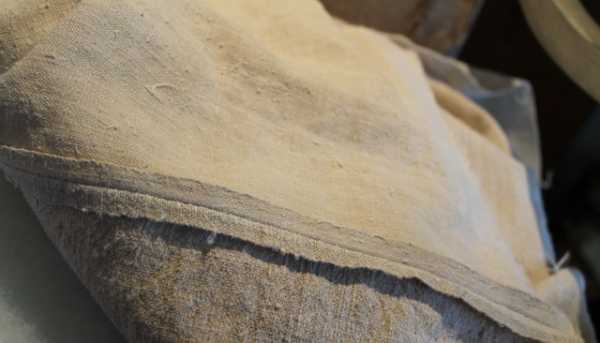
- Fabric for furniture upholstery - 1x1.40 m. This fabric was just enough for 4 chairs and a little more remained (later for the ottoman's constriction). When choosing, we focused on quality, texture and a suitable color. The purchase of the fabric cost us 360 rubles.
- Foam rubber. We decided not to use the old foam rubber, but to buy a new one and make the chairs a little softer. Foam rubber was sold only in sheets. 1 such sheet with a size of 1x2 m, thickness - 20 mm. Its purchase cost us 240 rubles.
- A piece of plywood 6 mm thick, approximately 1x1 m in size. Plywood remained from the repair.
- Furniture stapler and for him special staples... We didn’t buy this either, because it was all already.
- I also needed a small wooden block. Small pieces were cut from it, about 2 cm wide and 10 cm long. And a few screws to screw them on.
- Wood varnish on water based(we also had it).
Sequence of work:
- Removed the old seat


- New blanks were cut to fit the old seat (if the old plywood is in good condition, you can leave it too)

- Pieces of foam rubber were cut to the same size. In order to make our chairs soft, the foam was put in 2 layers

- We started cutting the fabric. The fabric was also cut to fit the seat, but at the same time, 5 cm was added on all sides for hem.

Everything. We have prepared all the blanks.


Let's start assembling
We make such a kind of layer cake out of our blanks: first - fabric, then foam rubber and the base of a chair made of plywood.
So that the seat does not move on the chair and is well fixed, special wooden blocks were screwed onto the plywood from the bottom side with screws.

We fix the fabric on the back of the base with a furniture stapler.


Everything - our nice and soft seat is ready.

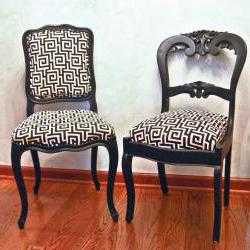
And here, admire what we got:
The chairs are almost as good as new. Beautiful upholstery goes very well with wallpaper and facades on kitchen cabinets... In addition, they have turned from semi-soft to soft.

And all this cost us only 600 rubles. Well, in which store do you buy four wooden chairs for that kind of money?
How do you like this savings? I really liked it. Something else needs to be repaired.
And, yes, I completely forgot that there was a little fabric left, and I wanted to use it to tighten the cover of the ottoman. But more about that next time.
And what secrets do you have to renovate the interior with your own hands? Bye Bye…
Sooner or later, most of us are faced with the task of buying new furniture, including chairs. At the same time, it doesn't always make sense to buy new furniture up to a high enough price, since we can refurbish old chairs.
This approach has many benefits. Here are just the most obvious ones:
- It doesn't take long, especially when you follow the instructions.
- Using old Soviet furniture instead of buying new ones will save a lot.
- It will help to create new, at the same time, unique interior items that no one else will have.

The thing is that chairs, like any other piece of furniture, are not something eternal. Even high-quality chairs are susceptible to aging and breakage, especially when we, in one way or another, "help" them by inadvertently causing damage. So it turns out that pieces of furniture become unusable. Of course, chairs, being one of the most heavily used pieces of furniture, are the first to suffer. In this case, as a rule, the seat of the chair is usually most damaged, while all other parts remain more or less intact and unharmed.

If you are interested in restoring old chairs with your own hands at home, then you can be sure that you do not even need to have any kind of rich experience in decorating and repairing. It is enough to master a master class on hauling, painting, decoupage and other options for alteration and decor old furniture and you can fix the chair. In any case, this experience may come in handy in the future, since you will be able to make the upholstery of "grandmother's" sofas and the upholstery of armchairs of about the same age. Thanks to this approach, almost any furniture is provided with a second life, and not just a place in a landfill or in a closet, as is often the case.

Meanwhile, the idea of furniture repair has one more, albeit not the most obvious, plus. The point is, how to restore old chairs at home will help not only to make new things that already seemed unnecessary. In addition, you can feel the pleasure of the embodiment of your creative energy.
How to upgrade a chair or armchair

The first step is to remind you that the method of recovery depends on the nature of the damage. If we try to highlight the main damage, then we can identify the most common types of damage:
- Broken leg, backrest, seat or other wood problem.
- Upholstery wear is observed.
- The paintwork on the wooden surface has worn out (especially during the restoration of Viennese chairs).

So, the way the chair is restored will depend on which part is broken or worn out. So, the scheme of restoration and repair should be chosen depending on the places (or places) in which there are problems.
Often, it is enough to simply reconnect the loose parts, restoring one of the connecting parts, which could deteriorate over time. It is about the groove and the spike. The wear or expansion of one of them just leads to the fact that the chair gradually becomes unstable and begins to stagger on its legs. Repair, as a rule, consists in almost complete disassembly of the structure with the extension of the spike. To solve this problem, you will have to, as they say, try.

On the other hand, if you need to restore wooden chair, in which the old paintwork has deteriorated, this can be done much easier. If the varnish is cracked, you just need to remove it, treat the surface with fine-grain sandpaper. And then apply a coat of paint again. Or varnish, if you provide for this particular type of coating. In any case, paint or varnish is your choice.
Also pretty a simple matter is the hauling of old chairs. To do this, you only need to replace the old worn or torn fabric with a new one. Let's take a closer look at the main stages of chair restoration at home.

Recovery stages
Any chair can be made new. However, this requires at least general outline know the sequence of work. If you have no experience in doing such things, then for this it is recommended to study at least a short master class, which will be discussed below.
Preparatory stage

With the proper approach, even if the upholstery is torn at the chair, the legs are loose, the old varnish or paint is partially or completely cracked, it can be completely transformed by doing the restoration with your own hands. First of all, you need a minimum required set tools and materials:
- Chair restoration tools: screwdriver, hammer, 2 different screwdrivers, scissors, brush, clamp, stapler, sandpaper, small mallet and scissors.
- Materials: screws (self-tapping screws), staples for staplers, glue for wooden furniture, foam rubber, paint and varnish, fabric for upholstery.

After preparing the materials, try to remove dirt and dust from the stool by washing it thoroughly. To do this, you can wipe the stool with a slightly dampened sponge.
Disassembly
Before restoring the chair, it must be disassembled. After waiting for the chair to dry after wiping it with a damp sponge, you can proceed to disassemble it. The seats and backrest, as a rule, are removed quite simply, after which the frame is disassembled. Use a rubber mallet rather than a metal hammer to prevent damage to the components when knocking them out. In any case, work should be done very carefully.

If the table is assembled with screws or screws, then it is not difficult to disassemble it, since you just need to unscrew them. In any case, it is advisable to dismantle all parts as they may interfere with repairs. In this case, if there is such a possibility, designate the fastener parts or simply fold them in such a way that you later could not confuse them.
As for how best to remove the remnants of old glue, especially epoxy. Those places where there are glue residues must be covered with pre-moistened rags or sponges. Any old and unnecessary rags will do. Hold it on the chair until the glue is completely wet, after which it can be quickly scraped off with a knife.

Please note! It's best to find an old, dull knife for this job, as there is no point in using a new or well-sharpened one.
In any case, after you have finished disposing of the old glue, you will need to allow some time to dry the wood pieces. In cases where epoxy resin got into hard to reach place, it can be removed in about the same way, with the only difference that instead of water, you will need to use steam. If you don't have any special devices which create hot steam under pressure, you can use the old old-fashioned "method", which involves using a hose with a tip that goes over the spout of the kettle.
Step-by-step recovery instructions

So, after the preparation has been completed, we can proceed directly to restoring the old chair. Here's what you need to do:
- First of all, get rid of chips and possible cracks. This is done with a putty.
- Then sand the wood thoroughly sandpaper, first with coarse and then fine grain, so that the work surface becomes smooth.
- Take a good look at the stele and all its details. If the legs are loose, then this needs to be addressed. There are several options: either the use of a wedge (it is driven in from the end of the trunnion), or wrapping the trunnion with a bandage, followed by smearing with glue.
- If the legs of the chair are very loose, but, for one reason or another, it was not possible to dismantle it, then there is one way that helps to solve the problem. So, you need to drill a thin hole at the junction, and then pour glue there using a syringe.
- In order for the glue to "take on" better, and the connection becomes reliable, put any available weight on the seat and wait until the glue is completely dry.
- After that, the chair seat is restored, if necessary. It can consist of soft upholstery or made of wood. It all depends on the design of the chair. As for the alteration of the frame, then several different finishing options can be used for it, ranging from varnishing or red and ending with such rare technique like decoupage.

By the way! Alternatively, you can sew the covers. This will allow not only updating old chair but also make it attractive through the changeable design of the covers.
DIY recovery
Now let's see what can be done with antique chairs during restoration and how best to decorate them.
Decor with fabric
It is quite simple to make such decoration. You need to either make a constriction of old soft places, or sew covers. By the way, a similar approach can be applied to sofas and other pieces of furniture.

Backrest update
There are different variants... Among the most common that can give chairs new life- decoupage and the use of textiles (including denim).
Restoration using upholstery constriction

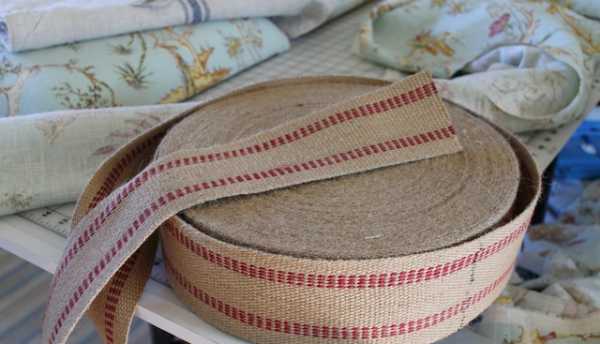
The main thing in this case is the choice of high-quality and durable fabric. These include jute, tapestry and jacquard. Sometimes velor will do. Upholstering chairs using tapestry is a great technique that, by the way, gives an excellent result in the end. By the way, you can add a pattern woven according to the macrame method to the fabric.
We use macrame for decoration
If we talk about macrame in a little more detail, then it should be noted that this can be done even if you do not have the skills of weaving with this method.

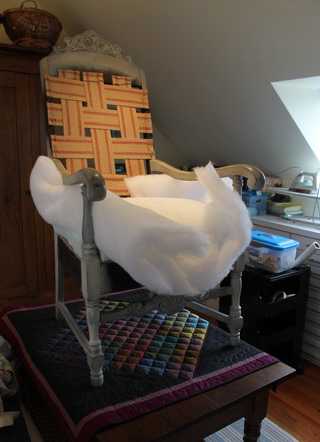
One possibility is that if the back of the old chair is soft, remove the upholstery and weave a simple square mesh. By the way, the size of the cells can be as large or small. To give the renewed chair a more harmonious appearance you can also change the seat upholstery.
Decoupage technique
This option can make a true decoration out of your chair. Using this method, you can decorate a lot of things by completing various crafts, up to decorating a box for souvenirs. So, you can extend the lives of antique chairs, however, only if all of them structural elements made of wood.

Jute decoration
And finally, I would like to say a few words about how you can decorate an old, for example, a Soviet chair, if you have unnecessary or torn jeans. There are two options for making the decor: completely pull the chair with jute, and use denim as an additional decoration. It can be a strip or a small patch.
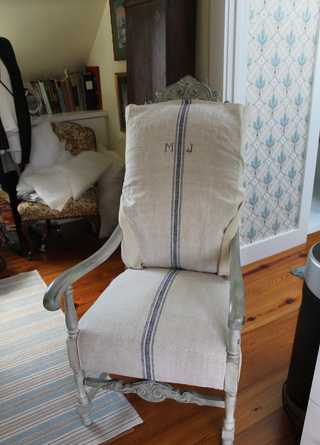
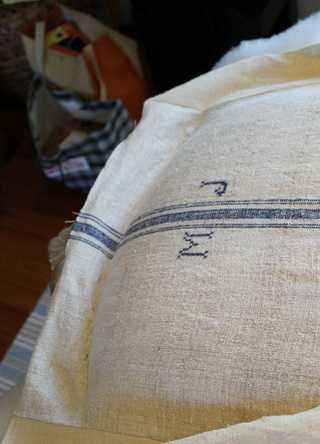
In my coral room for a long time everything is in place: above the bed - instead of a bicycle -. And only the old chair was an eyesore to me. Finally, I got around to restoring it: painting and re-tightening the seat.
I'm talking about how I did it and share the process. Perhaps some of you will be inspired by this story to update your furniture.
A few years ago, I read a blog post on the A Beautiful Mess about redesigning a dining room. I remembered the mismatched chairs that they brought together, painted with bright yellow paint, and due to one color, the chairs began to look very harmonious and original. Since then, these yellow chairs have not left my head.
Please note that I am not a restorer and the process I am describing should not be used to restore antique pre-revolutionary chairs. In this case, it is better to contact a professional. But if you have old Soviet chairs lying around, which are a pity to throw away, then you can update them and give them a new life.

To restore a chair with your own hands, you will need:
- newspapers for surface protection;
1. Remove the seat and sand the surface
I didn't use a special primer, I just removed the seat from the chair (it can be attached with nails or screws) and sanded the entire wooden surface of the chair with sandpaper.
2. Paint the chair with paint
An important question is what paint to paint the chair. It's very simple: I went to the store and asked a consultant for advice on what paint would be suitable for painting a wooden chair. I was advised to use the semi-matt Tikurilla Pesto 30. I chose the color from the palettes in the store and the consultant mixed the right paint can for me.
I painted the chair three times in total. When you apply paint for the first time, you want to exclaim "Stoa?" The paint lays down in a thin layer, a dark wood shines through it, grooves remain on the paint from the brush. The main thing here is patience.
Between applying each layer, I waited a day until the paint was completely dry.
3. Choose a fabric for the upholstery of the chair seat

Ohhh! The choice of fabric was almost the most difficult moment in this whole story. I went to the Internet to ask Google what he would suggest about fabric stores in St. Petersburg. What I found was a sad sadness. Websites in the style of the early 2000s and the range of photos were such that I was amazed. Driving around the city in search of fabric, not being sure that I would find what I needed, somehow I did not smile at all.
And then I remembered my favorite fabric store, Myata Fabric, with beautiful modern prints. Now the guys are launching own production fabrics and will soon open a relaunched site, and I was lucky to grab one of the last pieces from the old collection. And I do not regret for a second that I had to wait until the fabric reached me by mail from Yekaterinburg. The wait was clearly worth it.
4. Cut the fabric for the seat

Several years ago, the seat was already overtightened, but the cat sharpened its nails on the old fabric and it became unsightly. At the same time, the seat itself was completely normal, so I did not change the fabric and foam rubber inside, but simply decided to wrap the seat with a new fabric.
I put the seat on the fabric and cut it around the perimeter with an allowance of 4-5 cm.
5. Secure the fabric with a construction stapler


First, I secured the fabric with a construction stapler with four sides so that the fabric does not fidget and then separately walked around the perimeter. First on the sides of the seat and only lastly - on the corners. In the process, I made sure that the fabric was well stretched, but still not too tight.


Perhaps it was my simple construction stapler, or maybe the plywood seat, but the staples were not fully inserted into the seat, so I tapped them all with a hammer to secure them properly.
6. Cut off excess fabric

I cut off the excess fabric to make it look neater. It is especially important to do this in the corners. Separately, you can cut out a cover for the bottom of the seat, so it will look even neater. But my chair will not move much, but will stand in one place, so I decided to ignore this step.
7. Attach the seat to the chair
Depending on which mounts you originally used, attach the seat to the chair base with them. I attached the seat with glue gun since my chair is used rather in decorative purposes- stands in a corner, I fold a blanket, clothes on it, put my bag. If you plan to use the chair to the fullest, then it is better to take care of a more serious fastening.
Here's what happened in the end!

Over time, furniture loses its appearance: the upholstery is rubbed, corners get off, scratches, chips, etc. are formed. But such unpleasant moments are not a reason for acquiring new interior elements. Indeed, often external damage can be repaired on your own.
So, it is possible to restore the chairs with your own hands in five steps, which will be discussed in this article in the photo master class. Before you start updating your chairs with your own hands, you will need some tools: a hammer, a Phillips screwdriver, sanding paper of various grain sizes (from 80 to 220), a surface sanding machine, wood paint, wax, primer, brush or spray gun.

Stage one: remove the upholstered chair
Separate the upholstery and seat from the body of the old chair with your own hands using a screwdriver or nail pusher, then gently tap the seat with a hammer - it will come out of the base of the frame. If there is no upholstery on the chair, you can proceed to the second stage of the restoration.
Stage two: preparation for painting
At this stage of the restoration of old chairs, it is necessary to very well clean out the previous layers of paint or varnish on the chair. To do this, use sanding paper. The grain size will depend on the number of layers of coatings on the elements of your workpiece. This is the longest and most difficult process in the restoration of furniture with your own hands, however, by such actions, you will perfectly prepare the furniture for further painting. Of course, if you use a grinder, the case will go much faster, but there will be a lot of dust.
Stage three: priming and painting
The third stage of renovation involves priming the surface of the chair, since the wood has a peculiar porous structure, which means that wax varnish or wood paint will not last long and will not be of high quality. If you would like to paint the chair different colors, then first open it with a transparent primer to hide irregularities and cavities in the surface. By using a spray bottle, you will save more time.
The fourth stage of our restoration master class
The penultimate stage is not particularly difficult. When your workpiece is dry and ready for further use, sand the primer again, then open the surface with wax varnish to strengthen the subsequent layers of paint. It is worth applying the balm with a rag, and then polishing it again with a special brush.
Fifth stage: painting old chairs without decoupage

The last step in DIY chair restoration is staining. To apply the paint well, you need to paint the chair in one layer and leave to dry for about a day. After the chair is dry, polish the paint, paint with another layer, leave the workpiece to dry again and polish the paint layer. If you really want to, you can apply a third layer of paint or make a decoupage with your own hands, but it depends on you.
The color of the chair surface completely changes its design. The paint should be chosen in accordance with the colors of the interior of the room. The most successful and universal solutions- a shade of black, beige, white and light gray colors. Be sure to consider the options for using upholstery or capes, as these components should be different from the general colors of your chair.
If the wooden chair did not have soft upholstery, you can update the upholstery for your self-refurbished chair yourself, or use cushions and covers to make the seat softer.
Training
In order to start the restoration, you will need:
- Roller
- medium grit sandpaper
- fine grit sandpaper
- tassel (flutz)
- primer
- acrylic paint

Before starting to upgrade the chair, you should carry out special preparatory work.
The first step is to carefully remove the upholstery. These manipulations require caution.
It is very important that the surface is not damaged. After that, you need to remove the nails (ordinary pliers or a nailer will help with this).
To do this, choose any of the methods you like: using broken glass, sandpaper or a special machine for grinding.
In a home environment, the second method is more suitable.
It is best to purchase sandpaper for removing varnish with medium grains. Fine-grained in this case will do a disservice.
The coating softens and comes off well under this influence. To make the work much easier, you can take a block of wood that would be normal to hold in your hand and wrap sandpaper around it. In order to make it more convenient, it can be glued.
After the varnish has been removed from the surface of the chair, you can proceed to the next stage. In this case, use a primer that is designed to wooden surfaces.
It is necessary to carefully coat all the details of the chair with this composition. When the primer is completely dry, you can start painting the furniture. To do this, you need acrylic-based paint.
For such work, this composition is mainly chosen, because it meets many requirements:
- Dries quickly enough
- practically does not have any smell
- able to withstand any mechanical damage
In addition, acrylic paint has rich bright shades.
Artificial aging of the chair
To carry out such work you will need:
- Candle made from paraffin wax
- a special patina that is sold in shops selling finishing materials
- acrylic based paints
- a sheet of sandpaper and more

If you need to make a decoraburette or an old unnecessary Provence-style chair, then this upgrade option is perfect.
To give the surface of this furniture a scuffed effect, you can use acrylic-based dyes in gray-green, dark brown or black.
They are applied to the parts of the chair in some areas (without painting over it completely) and wait for it to dry.
At the next stage, you should rub the painted areas with a candle based on paraffin, and paint such areas with a contrasting paint.
For the Provence style, a blue or white shade is well suited. After that, you can take sandpaper and walk through all areas. Medium-grained is best for this purpose.
With this method, the layer of paint that is on top is very well removed. The result will be spectacular scuffs that give the chair a vintage look.
There is another way how to make a chair decor with your own hands, the master class of which is presented below. It only needs one-step craquelure. You can find it in shops selling handicraft goods.
First, you need to determine on which parts of the chair the cracks will be located. After that, you need to give the surface of the furniture a dark shade.
To do this, paint of this color is applied to it with neat movements. After the first layer is completely dry, you can start applying a one-step craquelure. This is also done in one step.
Craquelure doesn't need two layers. After that, you can apply a contrasting paint (colors are selected, as in the first option). You need to try to make strokes so that they go in the same direction.
You cannot return to the area that has already been painted. In this case, you can accidentally cover up the cracks, and the proper effect in the form of craquelure may not work. As for how the cracks will be located, this will depend on the direction in which the brush moves.
Strokes can be applied both vertically and horizontally. A very interesting crackle effect will turn out if you move with a brush, as if repeating the outlines of a semicircle. In addition, you can alternate directions to achieve good results.
The antique effect can be obtained by using the antique patina for toning. Such a composition is used to smear convex surfaces, darken the borders of the chair, as well as the existing indentations in the motif of the pattern on the chair, if any.
Patina is applied using a regular foam sponge, it is allowed to stand for about 5 or 10 minutes and the excess is removed. It is convenient to do this with a damp cloth.
If there is no patina in the house, then it can be successfully replaced with ordinary acrylic-based paints. For example, experienced restorers know that black tint combined with burnt umber gives the appearance of antique bitumen. As for the parts of the chair, which are made of metal, they can be painted blue or in green.
Cloth decoration

Usually, the chair frame remains the same, and does not change in any way over time.
As for the back and seat upholstery, they lose their quality and look shabby.
Typically, a dining chair set consists of 6 chairs.
Of course, getting rid of them can be very costly for any family, so the owners very often look for a way to replace such a piece of furniture.
Since chairs can hardly be found alone in stores, there is another way - to change the upholstery.
If such furniture still has a normal frame and the house has the most common tools, then you can try to decorate it.
The choice of fabric for constriction
First of all, you should decide what kind of fabric for the constriction will be as a cover for the seat and back of the chair. To do this correctly, you should remember that, first of all, textiles must have good technological characteristics. These are tensile properties, strength and abrasion resistance.
And after that, you can pay attention to the attractiveness of such textiles from an aesthetic point of view. Choosing fabric for upholstery by last characteristic, you should look at how it will be combined with other decorative elements and with the entire interior as a whole:
- Tapestry for upholstery. It contains a large percentage of cotton interspersed with synthetic fibers. It is this addition that makes these textiles much more durable and durable. As for the direction in which the fibers of such upholstery go, it does not change. This means that the pattern or pattern can only be placed horizontally or vertically (depending on the fabric). This feature must be taken into account when choosing an upholstery material.
- Furniture silk. This type of fabric has gained great popularity as an upholstery for furniture. Chairs decorated with such a textile covering will look expensive and elegant. This material is almost entirely made from natural synthetic fibers, so it has good wear resistance. Since such textiles look very festive and elegant, they are most often used for the restoration of "Viennese" chairs. They look very elegant and in themselves are a good decoration for the dining room, as well as other rooms.
- Jacquard. This material has a special charm. It is very sophisticated, but rarely used for decorating ordinary furniture. Restorers use it to pull up antique chairs. Its unique aesthetic and technological characteristics help to use this material to decorate exclusive furniture.
In addition to the above fabrics for upholstery chairs, currently other materials are widely used (microfiber, arpatek, etc.). Such textiles allow you to use furniture every day, due to its good durability.
In addition, the surface of such upholstery fabrics lends itself well to washing and cleaning with any chemical means intended for these purposes.
Experts advise choosing restoration textiles that have good durability. Also, you need to pay attention to the aesthetic appearance of the material, because it is very important that the upholstery is not only of high quality, but also brings harmony to the room.
Decorating process
First of all, you need to deal with the separation of all the parts that secure the upholstery. After that, you should test all the fixation areas in the chair structure, as well as the grooves.
This is necessary in order to extend the life of such furniture. Using a sheet of medium-grained emery paper, it is necessary to process the entire surface of the chair in order to get rid of the roughness.
To make the seat soft, put a piece of foam rubber under the base of the structure. It is cut to size.
As for the thickness of such a material, then in this case it is chosen based on its own preferences. The dimensions of the foam rubber must exactly match the dimensions of the seat frame.
After this procedure is carried out, the batting should be cut, leaving 5 cm margins on each side. You need to cover the foam rubber with a sheet of this material.
Those areas that remain are fixed with a special furniture stapler. Excess material is cut off with scissors or a knife.
Basic principles
In order to succeed interesting product, you should familiarize yourself with the basic principles of decor:
- It should not be forgotten that before making the markings on the upholstery textiles, it is imperative to pay attention to the direction in which the pattern on the fabric will go. The area that fits is delineated with chalk or a simple pencil. The decor material does not need to be overstretched. Irregularities and creases should be avoided. As for the connection sections, they must be fixed with a furniture stapler in several rows (this is usually done in two rows). The remaining fabric is carefully trimmed.
- To get a new chair back, you can choose any option: decorate the old one, if it is still not very worn out, or create a completely new one using a plywood sheet. The upper is finished in exactly the same way as the seat. With regard to the pattern for this part of the chair, then it is chosen in accordance with the bottom seat. The pattern should be harmoniously combined or repeated here and there.
- If during the restoration work any irregularities, seams or kinks appear, they can be easily masked with tape. It should be exactly the same size (or slightly larger) as all the resulting small defects. The work is carried out using transparent wood glue, which holds all the details of the chair well and dries up a short time... Such decoration with braid is especially relevant if, after the restoration of the furniture, screws or paper clips appear that cannot be hidden in the usual way.
- After the joinery glue has dried, you can begin assembling the structure. In order for the chair to look like new, you need to pay attention not only to replacing the upholstery on the seat and back, but also to other details of such furniture. To give the finishing touch, the legs of the stool are covered with a colorless varnish, which will protect them from various damages.
- In order for such a product to acquire stability and serve as an interior decoration for a long time, all the elements on the chair should be well strengthened with the help of special metal corners.
In addition to the listed methods, you can use the simplest one - the usual staining of the chair. This method will help to give the furniture novelty and showiness.
What you need to make a chair decor with your own hands, step-by-step instruction which is presented above? Before starting work, you should pay attention to the fact that restoration work is carried out in order to extend the life of this furniture model.
Therefore, it is advisable not only to replace the seat and back, but also to strengthen the legs and other details well. Only in this case the product will look no worse than from the catalogs of famous furniture stores, and besides, it will serve a good long service.
The video shows a master class on chair decor from Mehedova:
Have you noticed a mistake? Select it and press Ctrl + Enter to tell us.
Read also:


How to decorate a wardrobe with your own hands: interesting ideas from ...

What colors are combined with gray in the interior: how ...

Combination of green with other colors: options ...

DIY interior things: inexpensive way…

How to paint old furniture or new life for ...
- Categories
Interior
- Similar posts
- author
DIY chair restoration master class
At the beginning of furniture restoration work, it is necessary to choose the type with which the old chair will become new. If wooden elements were very loosened, cracks appeared on them, and the casing was pretty worn out over time, then to update such a chair, a detailed and thorough restoration with its complete or partial disassembly will be required. If, over time, the chair has not suffered much: the fabric is slightly frayed, the varnish has peeled off and the paint has faded, then there will be no need to disassemble the item itself. The simplest and most economical type of restoration is do-it-yourself chair hauling. Next, we will consider each of the types of updates in more detail:
Comprehensive restoration of chairs
In the work on the comprehensive restoration of chairs, the following inventory will be needed:
- Filler for furniture. Such material can be, for example, foam rubber.
- Special stapler and staples for furniture.
- Varnish and paint, as well as stain.
- Brushes of different hardness, width and shape.
- A sheet of plywood for new elements of chairs, if the previous ones are completely unusable.
- Furniture adhesive.
- Metal clamps.
- Furniture tapestry, with colors that will organically fit into the new interior.
- Grinder.
- Wooden mallet.
- Screwdriver.
- Drill.
- Self-tapping screws and screws.
You also need to take into account that the restoration work will take about 5 - 7 days. Part of the time will be spent on drying finished product after gluing and painting.
Read on: HOW TO UPDATE AN OLD KITCHEN FURNITURE WITH YOUR OWN HANDS? PHOTOS BEFORE AND AFTER
Procedure and stages of restoration work
The first step is to prepare the chair for restoration work. Clean all surfaces from dust and dirt, and remove greasy stains, If there are any. To do this, you can use any soap solution and rags or brushes. The main task at this stage is speed. The tree does not like long contact with water and chemical solutions.
After the chair is completely dry, it needs to be taken apart. This must be done as carefully as possible so as not to spoil any individual elements.
When all parts are disconnected, they must be carefully examined for defects. If there are cracks, you will need to glue them together. Only after the glue is completely dry can you start grinding all the parts using sandpaper.
Read on: OWN HAND RESTORATION OF OLD DOORS. MK WITH PHOTOS BEFORE AND AFTER
During the assembly of finished parts into a single structure, carefully lubricate all joints with glue. When the chair is assembled, it needs to be wiped off dust and any excess glue removed. Further, until it dries completely, the finished chair should be left for a couple of days, having previously loaded it with something heavy.
Do-it-yourself chair upholstery: master class
- We remove all the damaged parts - upholstery and filler.
- We cut out the new seat and backrest from a sheet of plywood exactly to the shape.
- Preparing new upholstery and filling.
- Next, we put the new fabric on the table, put the filler on top and the last plywood. The fabric is pulled over the plywood and secured with a stapler.
- At the end, when all the steps are completed, a layer of stain and varnish is applied to the chair, left to dry completely, and the seat and back are mounted to the chair.
After looking at the before and after photos of restoring chairs with your own hands, you will see that this is the best solution to inexpensively and tastefully update your old Soviet furniture. After that, she will be able to serve you for many more years, delighting you and delighting guests every day.
See also the video: DIY chair restoration workshop
Recommendations on how to update furniture with your own hands in stages
The biggest problem concerning any wooden product, Is a violation of the integrity of the outer layer (paint, enamel). These damages can be easily repaired with a special furniture wax: transparent or colored. It is quite simple to use: it is warmed up and rubbed into the surface with the help of small spatulas.
But, in the case of structural damage, deep scratches and chips, this method will not work. A more fundamental approach is needed on how to update furniture with your own hands.


The procedure is carried out in several stages:
Disassembly and replacement of fasteners
We carry out complete disassembly checking the condition of the fasteners. Then we replace them with new ones (it is recommended to get rid of all the nails, using self-tapping screws instead). Usually, at this stage it is quite enough to use a screwdriver, but sometimes you may need a hexagon or adjustable wrench.
Getting rid of the old coating
In order to remove paint from furniture, we apply a special solvent to it. After an hour, each element must be rinsed with water to completely remove all residues. After that, all the details need to be dried. Correct restoration of furniture with your own hands with a photo should help to completely restore former appearance products.


Putty
We dilute the purchased powder in the volume of water indicated on the package and apply the mass to cracks, chips with a small rubber spatula. After each stroke, it is necessary to let the layer dry and only then apply the next one. To make the surface smooth, we use sandpaper. After processing, all the elements can be put together.
Painting
For furniture, it is better to use acrylic. It not only adheres firmly to the surface, but also protects the wood structure. It is most convenient to use a sponge for application: it will completely cover even the most small parts and the paint will penetrate deeper. For maximum effect it is necessary to apply 3-4 layers and let each dry.


Varnishing
In order to give the furniture a complete look, it is necessary to varnish it. It can be matte, glossy and silky. In this matter, it all depends on personal preference. It is best to use products in the form of sprays - they are easy to apply in an even layer.
After applying the varnish to the surface, let it dry, and your furniture is ready for a new life cycle.
Do-it-yourself step-by-step furniture restoration with photos and instructions


If it is necessary to replace the soft elements of the interior, you can turn to such a technique as restoration. After all, the principle of action is somewhat different:
1) Disassembly. This step may require a screwdriver, Allen key, and adjustable wrench. The first step is always to remove overhead elements: poufs, sidewalls, backrest, seats, etc. Oftentimes, their fasteners are found at the bottom of the furniture. If the element is folding, you must first remove its mobile part.
2) Removal old upholstery... After disassembly, all elements must be removed from the upholstery material. It is often fastened with staples, so this step requires either a flat screwdriver or a special staple remover. Care should be taken not to damage the fabric. Indeed, in the future it can be used as a sample. To do this, you need to restore furniture with your own hands with a photo. This will make it easier to compare the results and what happened before.
3) Inspection and replacement of packing and elastic elements. If the stuffing material has lost its properties (sagged, compressed), it is necessary to update it, but it is rather difficult to do this without the outside help of a specialist. After the foam rubber, there are elastic elements: either springs, or mesh or belts. In the event of their subsidence and excessive stretching, they should also be replaced.
4) Preparation of patterns. In order to accurately prepare the upholstery for upholstered furniture, you must use the old coating. To do this, you need to completely straighten the new fabric and clamp it around the edges with something heavy. The old upholstery should be laid on top and, using a pencil or chalk, outline it along the contour, taking into account small allowances (2-3 cm).
5) Fastening of parts and their sheathing. How to update furniture with your own hands, saving correct shape all upholstery items? It all depends on the design features of the model. But, if all the preparatory work for the manufacture of patterns was performed correctly, then there will be no problems. To secure the new material, you will need a special stapler and several people to help fix and tension the tissue. In the case of complex decorative elements, it is better to contact a specialist in hauling. But the restoration of furniture with your own hands with a photo can also be of high quality.
6) Layout component parts... It is better to assemble upholstered furniture in its original state according to a photograph prepared before disassembly.
Thus, you can give your upholstered furniture an updated look without significant costs, which requires a minimum of tools and focus on the process.
Chair upholstery. We transform the interior!
No matter how good the quality of the furniture, it will still fall into disrepair. But how sad it is to part with your favorite soft chairs! After all, they are comfortable and stable, but the upholstery fails. You should not throw furniture in the trash, it is better to give it a second life. Restraining a chair is a very fun and easy process. A little effort, patience - and your interior will be transformed, and your budget will not suffer from the purchase of new furniture. Show your imagination and design skills - and your family and friends will be surprised and kindly envy such chairs!
Down with the old!
The upholstery of the chair will go like clockwork if you prepare everything you need and stock up on a good mood. First, carefully inspect the frame for damage and scratches. If there are any, they can be removed with wood putty and varnish. You can paint the frame with paint to match the color of the upholstery, it will turn out original and stylish. Such unusual chairs bright colors can decorate both the nursery and the living room. Pick up the fabric and accessories, and you can safely get to work.

Dismantling
All old soft parts of the chair must be carefully removed. Arm yourself with a nail puller, scissors, hammer, knife. All of these tools will help you remove fabric and filler without any problems. Remove the seat first, taking care not to damage wooden structure... Pry off the nails with a nailer and pull upward. Now separate the fabric from the seal to make a pattern. Thus, you will definitely not be mistaken with the size, and do-it-yourself chair hauling will go like clockwork.
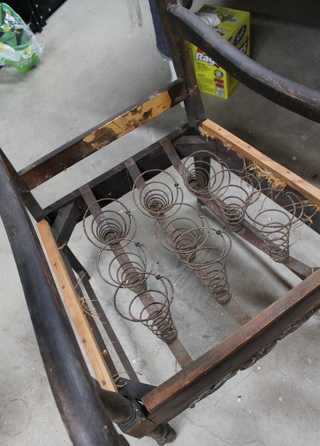
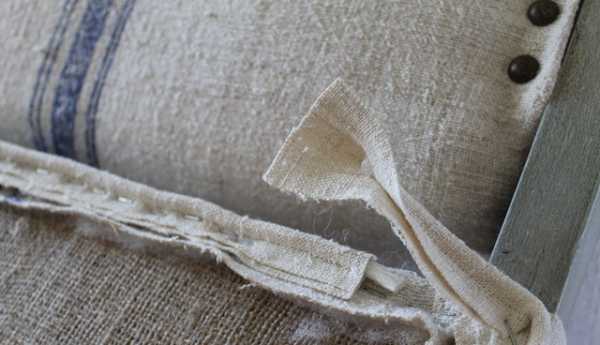
Be sure to remove all springs by cutting off the twine holding them, but only if they are badly worn and damaged. Springs usually last for several decades. If they are satisfactory, simply cover the springs with a piece of burlap and secure with an industrial stapler.
If the springs had to be removed, it was the turn of the old nails. All that should be left of the chair is the base and the plywood or grill on the seat. Repair and hauling of chairs is done in order to save money, so ordinary foam rubber can serve as a seal.
Do the same with the back of the chair. Extract all soft materials without damaging the fabric.

Noble tree
If properly cared for wooden furniture, it will serve for a long time with faith and truth. Tighten all bolts timber frame, and you can start painting. The varnish is perfect for any kind of wood. Cover all elements with two coats of varnish or acrylic paint. If desired, the legs can be decorated with decoupage technique or applied through a stencil. There are special waterproof stickers for furniture on sale. They can also decorate chairs, but then it is better to choose a single color fabric. It will turn out original and unusual.
Soft seat
Before going to the store for fabric, measure the chair and calculate the number of meters of material. Padding kitchen chairs requires special attention. Their seats quickly deteriorate, as they are used constantly, they are prone to soot, grease, and dirt. Jacquard, tapestry, chenille will work well. Fabrics are not so cheap, so you shouldn't buy too much.
To make a pattern, take a piece of heavy cardboard and trace around the old fabric from the seat. Now transfer the pattern to new material and cut. We do the same with foam rubber. When all the blanks are ready, you can start assembling the structure. The chair padding is in full swing! Using universal glue, we attach the foam rubber to the base (usually plywood). After the glue has dried, apply the fabric and begin to bend the edges inward, seal the seat.
We stretch the fabric tightly and fasten it to the plywood with a stapler. Now we screw our piece of furniture art to the frame and enjoy the work! The backs need to be covered with fabric at the back so that the chair looks neat. Bend the edges evenly, make sure that there are no folds or folds.
Instead of fabric, you can use a leather substitute. The chairs will look presentable and austere. The edges can be trimmed with furniture studs with shiny caps. Create stylish things with your own hands!

Skillful fingers
It is a great pleasure to create comfort and beauty in your home. If you have patience and feel the creative impulse, your home will be transformed beyond recognition. Do not spare your strength, show your imagination, and everything will work out! Pulling a chair can be a fun activity for the whole family. You will get great pleasure, and even save your family budget!
How to pull chairs with your own hands - chair hauling - Comfort

By knowing how to do-it-yourself chairs, you can restore your furniture and get attractive and unique pieces that will delight you and your guests with brand new upholstery.
Restoring chairs at home is a fairly simple process that requires renewing the frame and upholstery. All you need is a set of common tools, paint, foam and new upholstery fabric.


Stage 1 - preparation
In order for the chair to take on a new look, you will need the following tools and materials.
Prepare your tools:
- Screwdriver
- Bolt wrench
- Pliers and narrow nose pliers
- Furniture stapler
- Scissors
- Sandpaper or sander
- Brushes
You will also need acrylic paint or wood stain and varnish for the restoration of wooden parts, glue. Prepare materials of your choice:
Prepare 2 pieces of rough fabric: for the spacer between the padding and the seat and between the seat and frame. Use professional foam rubber for furniture, its density is 22 - 25 kg / m3.
Tip: keep the old upholstery intact to make a pattern with new fabric.


Do-it-yourself restoration of wooden chairs begins with disassembling the structure. Unscrew the bolts and separate the individual parts of the chair, remove the old upholstery and filling.
Stage 2 - restoration of the framework
If you have to restore a Viennese chair with your own hands, do it like any other - disassemble the structure and start by updating the frame. To do this, sand the surface with sandpaper, removing the remnants of the old coating. The surface should be sanded with # 80 and # 100 sandpaper, and to facilitate the process it is better to use grinder.


Tip: using a stain, you can tint the chair under natural wood: beech, oak, walnut, mahogany.
Stage 3 - replacing filler and upholstery
The advantage of do-it-yourself upholstery of old home chairs is that you can give them a look that is in harmony with the style of the interior, as well as bring your own creative ideas to life. To do this, select furniture fabric the desired texture and shade, and then feel free to start hauling.

Tip: for a more reliable fastening of the seat layers, coat them with glue around the perimeter and place a load on the finished chair for 2 days, for example, a bucket of water.
The final stage is assembling the finished chair
Connect the component parts, replacing the old fasteners with new bolts if necessary.
Ideas for design
Do-it-yourself home hauling of a chair is not only a need to update the appearance of furniture, but also an opportunity for creativity. As a new upholstery, you can use not only specially purchased furniture material.
For this purpose, you can use independently embroidered compositions, Pavlovo Posad shawls, denim, leather belts weaves and other materials of the original texture and with a variety of patterns.


If you have artistic skills, the legs and back can be painted with patterns, "aged", trimmed decorative elements, also made by hand. For finishing the edge of the seat, you can upholster it with contrasting colored tape, trim with beads or large buttons. You can even sew new case for the back and make the chair look like a chair.
Doing it yourself will give you a few hours of inspired creativity and a lot of fun, and will also allow you to update the interior to your liking without ruining your family budget and buying new furniture. Chairs with unusual upholstery attract the attention of guests and delight the whole family!
How to pull a chair
Preparatory stage

Before starting work, prepare materials and tools. This is where the question arises as to what kind of fabric will be used for the new upholstery and filler. Foam rubber is suitable for the filler. The thickness must be at least 40 mm. The recommended density is about 40 kg / m³. As a last resort, you can take a synthetic winterizer, batting, but they are short-lived, crumpled, deformed.


Usually, the upholstery of the chair is stretched with fabrics that can hold their shape. The second requirement is the ability to clean the surface with a brush, soapy water. The best option considered jacquard, tapestry, flock, chenille. To determine the size of the cut that you need to buy, measure the seat and add 15 - 20 cm for allowances on each side.
In addition to the fabric and filler, the following is prepared:
- cardboard for patterns;
- furniture stapler;
- screwdriver, pliers;
- centimeter tape, a ruler;
- scissors;
- pencil, crayons.
Removing old upholstery


Stool rebuilding begins with the removal of worn out materials. So that there are no problems with assembly after installing new upholstery materials, you need to remember how the chair is disassembled. First, they turn it over, examine it. The existing bolts are unscrewed, other fasteners are pulled out with pliers. There may be staples, clamps. All parts made of wood or metal are set aside, and at the end of the work are used in assembly.
Inspection of the frame


First, you need to put the frame in order, and only then will the very hauling of the old chairs be possible. After all, even the most beautiful upholstery will not give new life to furniture if the chair does not stand firmly on its feet. During the inspection, loose knots, fragile joints are revealed. They are being pulled up. If necessary, replace the fittings. If there are cracks, they are glued, and this place is pulled together with clamps.


If the wooden base is scratched, has an unpresentable appearance, it is cleaned of the old coating, and then decorated with a new layer of paint or varnish. The plywood seat base is kept flat and clean.
Pattern of details


A piece of cardboard is used for the pattern. A plywood base for sitting is placed on it and circled. This will be the pattern for the filler pattern. To get a pattern for a pattern of upholstery fabric, it will be necessary to add 10 cm to the hem on each side of the seat shape.


You can cut the fabric with both scissors and a clerical knife. If the fabric has a pronounced pattern, you need to monitor the location of the patterns / stripes so that later it looks good on the chair.
Padding an old chair


First, the filler is installed and glued. Then the resulting blank is placed on the upholstery fabric, which is spread face down. The soft side of the workpiece should rest on the fabric. The fabric is folded under tension and secured with a stapler. How to pull a chair, you can watch a video or photo. Then it will become clearer how to carry out the work at this stage. If there are large unfixed folds between the staples, they are nailed down with small nails.


When the material is secured, it is trimmed so that the long edges do not hang down. Next, proceed to the installation of the seat in place and its fasteners.


If the seat was with springs, they must be re-sewn, distributing them evenly over the entire surface. After all, the springs themselves do not wear out. In addition to the upholstery fabric, you will also need a layer of burlap, which will help withstand the mechanical effect of the metal.
Chair back repair


The chair backrest is carried out in a similar way.
- Dismantling.
- Making patterns.
- Cut out materials.
- Fasteners for filler and upholstery.
- Installing parts in their original place.


Anyone can repair a chair using the material offered by the master class. As a result, old furniture will receive new opportunities to delight its owners.
Source http://mainavi.ru/dizain/mebel/peretyazhka-stula-svoimi-rukami/
While cleaning in the country / at home, you found your favorite wooden chair. Of course, it's sad that he is old and cracked, but his condition is still excellent. You don't want to throw it away (and there are a lot of memories associated with it), so you decide to repair it and use it again. How will it look like?
Option number 1... A trip to the carpentry shop to make repairs (not the fact that it is good).
Option number 2... The most common one is “I want it securely and for a long time, so I will do it myself”. Yes, repairing old furniture with your own hands is the most successful in terms of saving costs for restoration and the ability to feel like a Master (just like that, with a capital letter). Without much praise, we propose to move on to the restoration repair of a wooden chair with your own hands.
The main material is already there - a chair. To bring it into its proper form, we take the following "ingredients" for work:
- Furniture foam rubber for the seat (choose the thickness according to the level of love to sit - hard, not very hard or soft);
- Brushes 45 mm wide, hard, 2 pieces;
- A sheet of 4-ply plywood for the seat (replacement is required if you do not want to fall like at school);
- Furniture glue "Moment joinery";
- Clamps for fastening chair elements;
- Furniture tapestry (sold at furniture and regular fabric stores);
- Hammer, wooden mallet, grinder, screwdriver, drill, jigsaw;
- Screws, metal corners to strengthen the structure;
- Five free days for the work itself (we assume that the glue needs to dry out, like varnish and stain, every day).


Does the set inspire concern only with its listing? For a novice master, this is only a small part (for more experienced ones, this list can go up to fifty points, and work on the restoration of a chair with decoration can take a month). Moving on to the pleasant part of any job.
Do-it-yourself workshop on chair restoration (step-by-step instructions with a photo)
Are the instruments ready? A chair and are you ready? Forward!
1) We look at how the chair was fastened. First of all, you need to disassemble everything that "moves":
- Where there are screws, remove them carefully,
- We carefully remove the wooden pins on the legs with a drill (we just drill them),
- We take out the nails very carefully (if the chair was hammered together).


2) We number all the details that are. Necessarily. The numbering goes up from the legs. Accordingly, you should have at least 10 parts at least, depending on how the chair was made:
- Legs,
- Crossbars for legs,
- Seat,
- Two backrest strips,
- The back itself.
We carefully inspect all the details for cracks (you can't see everything at once, don't worry). If in doubt about your memory, take a regular photo when restoring furniture. It helps, honestly.

3) We glue all the cracked parts. Excess glue will be removed after sanding.
To make the parts stick well and guaranteed to last longer, we squeeze them with clamps
4) Pay Special attention for chair seat repair:
- We simply circle the old plywood seat on a new sheet of plywood, carefully cut it out with a jigsaw,
- On the new plywood seat, glue the foam rubber as carefully as possible (also cut in the shape of the seat),
- Be sure to fix the foam rubber around the edges. furniture stapler, leave to dry for a day.
If you want to make the seat softer, then each new layer of foam rubber you fix at the edges, do not glue it.
We throw out the old seat.

4) After gluing the parts, sand them thoroughly grinder and sandpaper (round and small parts will not work with a grinder). Remove the remaining fine dust with a slightly damp cloth. Once again we inspect everything for cracks.
Here is a video on the restoration of an old chair from one home master, you may be interested in:
5) We finish the seat. At restoring an old chair is just as important as the renovation process. On the widest part of the seat, we fasten the tapestry with a stapler, pull it forward very tightly, bend the edges under the seat. There should be at least 5 cm of fabric around each edge. We fix the fabric with a furniture stapler at a distance of 1-2 cm.Repeat the procedure on all sides of the seat.
As a result, we get such a kind of drum, inside of which there is not emptiness, but foam rubber.

Continuation of the video from the home master, do-it-yourself seat restoration:
6) We cover all the details with a stain, after a day we paint over with 3-4 layers of varnish so that the chair does not become covered with cracks the first time the guest lands on it.

7) We collect the chair. When gluing parts, we do not regret glue, we very carefully erase the excess and remove it with a slightly damp cloth.
The details of the connection of the seat and legs, crossbars and backrest are reinforced with metal corners set on screws!
Nails do not have the desired effect of "longevity".
8) We cover again with a layer of varnish to hide the irregularities and that's it - your chair is restored and ready to use again!

The end of the video on the restoration of the chair from the home master:
As you can see, everything is very simple. The main thing is not to rush, to approach all stages of the restoration carefully, not to miss the details. And then everything will work out, the restored chair will be better and more beautiful than the new one!
Video: DIY chair restoration
Watch an excellent workshop on chair restoration and decoration from the best half of humanity - as you can see, not only men can do it!
To cheer you up before the work ahead, we suggest you get inspired by some ideas.
Lovers of modernity can "play" from the basic form to the one that pops into your head.

The most simple options restoration renovation of wooden chairs are Provence and Country. We advise you to start all the same with them.
Another option for the restored chairs:

But interesting idea to restore old wooden chairs and make them a support for feeding a pet:

And finally, original version using an old chair near the house or in the country:

Happy restoration!

