DIY installation of basement siding: practical advice. Installation of basement siding for country house How to make basement siding with your own hands
Influence external environment- a factor that, one way or another, should be taken into account when operating buildings of any type. Therefore, the protection of the external elements of the building is quite an appropriate measure in this case.
This is especially true of the basement part of the facade, which v to a greater extent subject to aggressive loads.
It is not only precipitation that has a negative impact here, but also moisture, dirt and mold formed from damp earth, snow and rain puddles. One way to protect the foundation of a building- sheathe it basement siding... It is about him that will be discussed in this article.
What is basement siding?
Basement siding - this is one of the types cladding panels which is made from polymer materials or thin metal by pressure casting.
Usually, manufacturers add components to the composition of these products (various resins, titanium, modifiers, plasticizers), thanks to which they gain additional strength. Such panels can be used for cladding both the lower part of the structure and the entire building.
At the same time siding performs not only protective function , but also decorative, due to the ability to imitate various natural and artificial materials.
Basement siding panels are wider and thicker than conventional vinyl counterparts, which simplifies installation and makes the material more durable.
Types and manufacturers
Today on sale you can find several types of siding, each of which has its own characteristics.
If, for example, the cladding will be laid in two rows, then the number of panels in one row multiplied by two. Thus, the total amount of material is calculated.
The height of the outer corners of the basement siding is identical to the width of the panels, which means the number of corners will be equal to the number of rows of panels, multiplied by the number of corners of the building. That is, when laying siding in two rows and the house has 4 outer corners, you need 4x2. It turns out - 8 corners per building.
When calculating the number of starting rails, you need to start from the fact that one plank is usually enough for two panels, which means that the number of panels in one row should be divided by two.
Another element that may be needed when lining the basement with siding is the J-profile.
It is used both for finishing interior corners and instead of a starting rail - in cases where the house is on an uneven area, and it becomes necessary to cut panels.
The fact is that on the bottom of the siding there are hooks for attaching to the starting plate, and when cutting the part is left without these elements... Therefore, the trimmed panel is inserted into the preset J-profile.
The number of such profiles calculated based on total length slopes and the length of the profile itself, which is usually 3.66 m.
The calculation of the ebb is carried out taking into account the fact that it is necessary to fasten these parts with an overlap... The length of the ebb tide is 2 m, therefore, for a building with a perimeter, for example, 50 m, 27 ebb tides will be needed, since when connected, the useful length of the ebb tide is 195 cm.
Installation instructions for dummies
Primarily, you need to assess the strength of the base, and also remove old paint and putty from the surface, cut off irregularities. If there are loose bricks, secure them cement mortar... It is allowed to leave irregularities with a difference of no more than 2 cm.
Further a metal or wooden lathing with a step of 0.4 m for horizontal arrangement of panels and up to 0.91 m for vertical installation... The distance between the ground and the bottom of the sheathing should be about 15 cm.
First of all, a starting bar is installed, which is fixed with self-tapping screws in a horizontal position along the entire perimeter of the building, as in the photo. Then you can fix the corner trim pieces.
Installation of panels usually starts from the left corner of the building and is carried out adhering to certain rules.
Panel installation technology:
- the first part is installed on the starting plate and pushed into the groove of the corner element;
- further along the level, the horizontalness of the panel is checked, after which it is fixed to the crate with the help of special fasteners;
- install all other panels in the same way;
- before installing the last row of cladding, a finishing strip is mounted.
The process of installing basement siding can hardly be called super complicated. Such a finish is quite within the reach of any diligent and hardworking owner. And taking on this business on your own, you can save a lot on the services of craftsmen.
In the next video, see how to install the panels for the base / plinth:


With your own hands and step-by-step instruction, after reading the step-by-step instructions, you can easily repeat this with your home.
When you want to quickly and without special costs renovate the facade of your house, pay attention to this finishing material like a basement siding.
The genius of this building material the fact that for an affordable price and in the shortest possible time you get a high-quality imitation of expensive decorative elements.
And the process of installing siding panels is so simple that even a teenager can do it.
When choosing a siding, consider
For cladding a plinth, pay attention to:
- The tightness of the joints at the joints;
- The thickness of the panels must be more than 16 mm;
- The warranty period is at least 20 years.
Verified manufacturers
The most popular are panels imitating cladding stone or.
Their well-known manufacturers:

Work technology
Preparing the walls
For fastening the siding, it is not necessary to prepare the surface to be decorated itself, the main thing is that there are no obstacles to fastening.
Fastening the lathing
As a rule, the finishing material is fixed to the lathing. It can be carried out horizontally or vertically, made of metal or wooden planks.
With a vertical crate, the step should be 91 cm, with a horizontal one, 46 cm.
When installing the lathing, it is imperative to use a level, and do not forget about the presence of electrical wiring, ventilation holes.
In the process of attaching the siding, it is possible to lay insulating material in the grooves and increase the thermal insulation of the house, therefore, for these purposes, it is necessary to provide a sufficient distance from the frame to the wall.
The lathing begins to be erected from the ground at a distance of approximately 5-10 cm from the ground. And if there is a high-quality blind area around the building, the gap may not be made. The frame should be in the form of squares measuring 50x50 cm.
With the help of laying siding, you can give unusual shape corners of the building.
Panel mounting
The starting bar is set strictly according to the level.
 The siding installation process itself consists in the sequential compilation of panels into special profile grooves and fixing them with self-tapping screws. To save material, it is possible to use cut pieces of the panel.
The first panel is inserted into the starter bar and pushed into the groove in the corner piece. The level of the beginning of the structure is checked and in several places they are fixed to the crate. The actions are repeated until the entire canvas is collected. Before the start of the last row, a finishing bar is set.
Important! Do not drive the screws tightly. It is better if its head rises 1 mm above the panel.
When joining siding panels, you must carefully monitor that there are no gaps between them.
Control over the excessive tension of the siding elements at the moment of fastening will help to prejudge the swelling and reshaping of the panels in the future.
The installation process starts from the bottom. In the case of fixing the trim under the window sill or cornice, first, several finishing strips are installed, and then proceed to the panels.
Various openings for pipes or ventilation in siding are made with a 6mm allowance.
The final stage
Internal and external corners, various modules and small details will help to give the complete look of the whole structure.
Externally, with the help of siding, the house can be changed beyond recognition. Equip with various design gadgets. For example, stucco or carved overlays. Siding provides a wide scope for design activities.
And what is important for performers, there is no need to bother with surface preparation. There is no need to remove old paint, tear off boring casing or cover with any special compounds.
Just choose the style you want and get to work. The simplicity of the technology allows the real "teapot" to do the job in installation works Oh. All that is required from you is a small representation of the process and the execution of monotonous, but neat actions.
Siding plinth maintenance
Siding is much easier to maintain than natural material... It is advised to wash the coating regularly, to clean the adhesion of dirt with a brush in the direction from top to bottom. It is allowed to add to the water detergents... You can remove mold stains with simple bleach or a special vinyl cleaner.
Installation instructions for facade plinth panels for the plinth and facade of the house

Basic instructions:
Installation is always carried out from left to right. When moving to another wall siding, move from the lowest point of the structure.
Be sure to take into account changes in panel size due to temperature changes. Position the siding to compensate for these deformations as much as possible. Withstand the necessary expansion joints, do not press down on the pins of the previous row when installing the siding to avoid warping. We recommend storing the panels according to the arrows on the packaging. Keep in mind that if the installation is planned to be carried out at a low temperature, it is better to store the siding in a warm room, because this increases the flexibility of the material.
The shades of panels from different batches may differ, therefore, when decorating one wall, experts do not recommend mixing different batches. The pigment number for each batch is stamped on the package.
Siding should be used for finishing only vertical surfaces, it is also permissible to use for mansard roofs with a slope of 9/12 or more. The warranty does not apply to floor panels or other types of roofs.
Ensure a flat, level and nailed wall surface before starting work. Recommended installation on plywood or on a wall with a thickness of 11 mm, oriented structure. If shingles are used, fill all the free space and provide a smooth surface.
Make sure that nails or other fasteners penetrate at least 11 mm into the surface. Please note that the size of the fasteners may vary.
For insulation it is necessary to use breathable materials of a suitable color, not foil. In the latter case, the warranty will be void.
When fastening the panel with nails, it is necessary to drill an inconspicuous hole with a larger diameter from its front side than the rod of the fastening element - this is necessary to insure against warping during temperature deformations of the panel. The heads of nails or screws can be coated with paint.
It is recommended to secure the siding, which is at the level of the installer's belt, since this is how a person sees reverse side panels. When attaching the siding, it is not necessary to achieve the panel's immobility; always place the fasteners in the center of the hole, while lightly pressing the panel. It is not recommended to mount more than two corners at a time in order to leave the possibility of subsequent adjustment and alignment of the panels.
1. Installation of the lathing

Attach the batten to the wall surface. The lathing can be made of wood (impregnated with a special fire-resistant compound) or metal.
In warm climates, where the ground does not freeze, you can fix the crate in the ground.
In cold climates where the ground freezes, attach the batten to the house by hanging it at least 15 cm above the ground. The lathing made in this way should be supported on the ground with the help of pegs. The resulting space can be filled with soil during landscaping to give the house an aesthetically finished appearance.
The vertical elements of the battens should be spaced with a pitch of no more than 91 cm, while the horizontal beams should be connected flush for the installation of the panels.
To determine the position horizontal lathing measure 46 cm from the bottom of the house wall. In this case, the top row should fall under the upper edge of the panel, just in that part of it where the nail holes are located. The top edge can be finished with an inverted U-channel (J-profile) or a finishing strip. If the openings are more than 91 cm, then additional strapping is required for every 46 cm.
2. Installation of the start profile.

Set the starter profile along the pre-drawn chalk line. The profile should be located at a distance of 10 cm from the corner of the building, and the allowance for the width of the corner panel should also be taken into account. The starting profile is fastened with nails every 30 cm. The starting profile is installed evenly and strictly horizontally.
If necessary, trim the panels of the bottom row to the required height circular saw using a thin-toothed panel set in the opposite direction. When cutting into the face of the panel, reverse the saw to minimize chipping.
If pruning is necessary lower parts panels, the start profile is not used. In this case, the panels are fixed with nails through the front surface (hammering at least 5 nails into 1 panel) in inconspicuous places, for example, along the seam line. Driving nails through the face requires pre-drilling the fastener holes.
Cutting the panels
Determine the number of panels required for wall cladding. To do this, divide the total length of the wall in centimeters (minus the width of the corner pieces used) by 112 cm. The end panel should not be shorter than 30 cm. You may need to adjust the size of the first sticks to accommodate the end panel. The panel can be cut in steps of 20 cm anywhere on the panel, while avoiding overlapping seams, so that the mounted structure looks as natural as possible. Do not cut off more than one end piece at the same time, as may need to be adjusted in the following rows.
3. Installation of the first panel.

Moving from left to right, position the first corner of the brick or stone panel with an outlet about 3 mm below the bottom edge of the starting profile. Slide the first panel to the left, flush against the corner. Carefully position the first panel on the support strip with the correct entry of the mounting pins, without reducing the expansion joints. Slide the panel to the left until it stops 2 mm before the corner.
When installing panels brickwork align the horizontal grout line with the corner.
Note. Panels "under a stone" have an arbitrary pattern, their mortar joints should not coincide with the angle.
Apply sealant before aligning the panel to the corner.
4. Installation of the second row.

Drive nails straight through the backing, with the nail heads just touching the panel lightly. Bring the next panel into the start profile and slide it to the first panel. Install the following rows. For a natural looking brick or masonry, offset each successive row by 20 cm.
Never push the panels up and down on top of each other. Pull the panel down smoothly so that the panels are attached naturally.
Mounting can be facilitated by slightly lifting the right side of the panel. Check the attachment of all locking pins.
When adjusting the cut parts of the panels between windows or around openings, an undercut is required for an allowance of 3 mm when installing around panels at low temperatures. The same gap may be required when adjusting panels in vault soles, roof corners, around abutments, and other locations where sufficient panel movement is not possible.
The basement siding is equipped with posts on the rear panels in the form of mounting pins. When installing a new row of panels, it is not recommended to press the panels by these posts, the stops serve as protection against warping during temperature fluctuations. A minimum of five fasteners must be installed on one panel, which should only lightly touch the surface of the panel in order to provide the necessary freedom. Install the fasteners flush with the panel. Corrosion-resistant fasteners should be fixed to a solid substrate with a minimum thickness of 11 mm (7/16 in.).
5. Installation of internal corners.

Plinth siding J-profile can be used to trim interior corners, or panels can be marked and cut to fit in the corner. It is recommended to level the corner before installing the panels with vinyl or aluminum tape.
When finishing the wall, it may be necessary to hammer nails through the face. When driving nails through the face, drill a hole in an inconspicuous place, such as a mortar joint. This hole should be larger in diameter than the shank of the nail or screw to ensure thermal deformations, but smaller than the diameter of the head.
Remember that the panels will shrink or expand up to 6 mm (1/4 in.) As the temperature fluctuates. The average spacing between panel tiles is 13 mm (1/2 in.).
At a temperature of -1 ° C, leave a 16 mm gap between the panels to prevent warping.
At a temperature of + 16 ° C, a gap of up to 13 mm can be left.
At a temperature of + 32 ° C, the gap is up to 10 mm.
Way exterior decoration Houses - complex issue requiring significant financial and labor costs.
To solve it, an understanding of the meaning and features of the functioning of the finishing layer is required.
One of the most convenient and relatively inexpensive ways the exterior of the house is siding.
It possesses high decorative qualities, provides reliable external protection wall materials and contributes to the ventilation of the wall cake, the timely removal of steam. In addition, the installation of siding can be done by hand, as carefully as possible, without dirt and stains from various solutions.
- This is a cladding material, the original purpose of which was to finish the lower part of the walls of the house - the basement. Typically, a plinth is the protruding part of the foundation of the house. It is made of stone or concrete, so basement siding mainly mimics different variants brick or masonry.
NOTE!
This, as well as its size, is the difference from conventional siding, which is made in the form wooden elements- timber, logs or ship boards.
Plinth siding proved to be suitable for complete facade cladding, and the level of cladding from a design point of view is much higher than that of conventional samples. The variety of shapes and colors of the panels, the high realism of the canvas, which can not be immediately distinguished from a real stone or brick even close, quickly found their fans and earned popularity among consumers.
In addition, the difference in panel dimensions contributes to a convenient installation that can be done alone. This makes it possible to save a lot of money, so the demand for basement siding is constantly growing.
For today there are the following options basement panels:
- For facade tiles.
- Wood imitation (shingles, boards, etc.).
All types of panels have many of their own. The simulation options are especially widespread. stone walls, where there are forms of wild stone, rubble, boulder, granite, etc. Many panels with repetition brick walls- from smooth clinker to antique handmade bricks.
In addition, there are several options for each type of panel. color scheme allowing you to get additional design possibilities in home decoration.

Complete set of basement siding
In addition to the panels that form the wall covering, the basement siding is completed with additional materials that serve for finishing architectural elements (corners, openings, etc.), fixing panels and decorating the edges of the canvas.
These additional elements are called add-ons and are produced in full accordance with the main panels - both in color and in shape. different manufacturers may result in a size or appearance mismatch, therefore, only elements of the same type from a single manufacturer.
In number additional elements for basement siding includes:
- Corner profiles.
- Starting bars.
- J-bars.
- Metal corner pieces.
- Subsystem elements for creating lathing, etc.
Depending on the manufacturer, the basement siding can be completed with additional elements making the installation better, and appearance- more complete and realistic.

Where to start installing basement siding
The beginning of any installation work should be a careful calculation. the required amount material, components and fasteners. If external wall insulation is planned, then the estimate must necessarily include the one that is optimally suitable for climatic or technical specifications insulation.
CAREFULLY!
Calculation errors will lead to a halt in work and a wasted time searching the right material... When calculating, take into account a small stock of material in case of damage, erroneous cutting or other unforeseen circumstances.
If there is an intention to use several colors, then for each type of panels a certain margin is also needed (usually 15-20% is accepted), allowing difficult situation get out of the situation.
Preparing the wall for siding installation
Before starting installation work, prepare the surface of the walls. This procedure is very important, since after installing the siding, access to the walls will be impossible, and it will not be possible to perform any actions.
Such operations should be performed:
- Free the wall from all hanging elements - street lamps, CCTV cameras, air conditioners, brackets, etc.
- Remove the platbands from the door or window openings, disconnect all drains, window sills etc.
- Inspect the surface of the wall, assess its condition.
- Any cracks or gouges that are present must be repaired. Flaking or crumbling areas are removed as much as possible and completely sealed. In the most difficult cases, a full coat of plaster is recommended.
- To install the insulation, you will need to use special glue, so the surface is cleaned of old paint and covered with a layer of deep penetration primer (primer) 2 times.
- All applied materials must be cured for the prescribed time to achieve working dryness.
If you plan to install insulation, the condition of the walls is of particular importance, since for quality work wall cake requires close contact of the insulation with the surface of the walls.
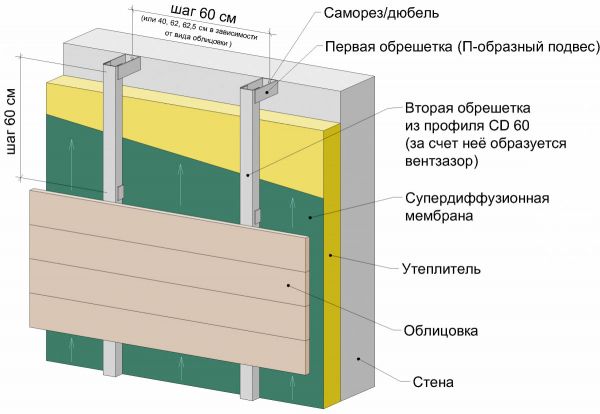
Which crate is best suited for basement siding, installation procedure
For the installation of siding, a support system of strips is required that carries the sheathing sheet. Traditionally, to create the lathing were used wooden blocks, the work with which is simple and does not raise any questions.
Nevertheless, the quality of the material does not stand up to criticism - wood is fire hazardous, prone to decay, the appearance of fungal infections, insects spoil it, etc. For cladding, the service life of which is 50 years or more, such a crate is not suitable.

A more modern type of lathing is based on the use of metal drywall rails mounted on the wall by means of straight hangers. Such material is not subject to corrosion, since it has a reliable protective covering- galvanized layer.
The planks have straight straight lines, they are completely fire safe, neutral to microbiological manifestations - mold, fungus, algae, etc. In addition, the installation of such systems is much more convenient and faster, since setting a flat plane is much easier, it is done in a matter of seconds.
For some types of basement siding, manufacturers produce their own version of the crate, which is most suitable for the corresponding panels. This option is optimal in terms of strength and reliability of installation, but it is not suitable for all types of panels and has a higher price.

Installation of the battens takes place in the following sequence:
- The walls are marked, the places for the installation of direct suspensions are marked.
- Insulation is attached to the wall with installed suspensions. The suspensions pass through it, for which cross-shaped cuts are made in the material, which are then carefully tucked in.
- A waterproofing membrane is installed on top of the insulation, the petals of the suspensions are carried through it by the piercing method.
- Sheathing strips are attached to the protruding petals of the suspensions. First, the two extreme ones are installed - on the left and on the right, the vertical is carefully displayed. Then a cord is pulled between them, with which it is easier to adjust the position of the intermediate strips.
- All other planks are installed. Their position is constantly monitored, errors are eliminated immediately.
If the thickness of the insulation is too large and the length of the petals of the suspensions is not enough, then you have to make a two-layer lathing using an older technique.
Procedure:
- Wall marking, installation of suspensions.
- Installation of horizontal strips of the bottom and top.
- Installation of the remaining horizontal strips along the cords. The distance from the wall surface to the upper part of the plank should be no less than the thickness of the insulation.
- Installation of insulation between the planks, waterproofing.
- Installation of a counter-lattice - a system of vertical slats. They are installed in 35-40 cm increments (optimal for basement siding). Since the first layer has a flat plane, adjusting the position of the counter-lattice slats is not required.
NOTE!
The second method is more time consuming and costly, therefore, it is resorted to only when necessary.
How the siding is fastened
There are rules for fixing panels and additional elements of basement siding. They mainly ensure the presence of temperature gaps between all the elements of the web and the extensions, otherwise, when heated in the summer, the web will begin to swell or go in waves.
The rules for attaching siding are as follows:
- For fastening the elements, nails or self-tapping screws with a protective coating are used.
- The installation point of the self-tapping screw should be exactly in the middle of the elongated mounting hole, allowing some movement of the part.
- You can not fix the details in yourself drilled holes, for this purpose it is necessary to use a special notch.
- The panels should be fastened only through the holes in the nail strip.
- Self-tapping screws are screwed strictly perpendicular to the base.
- It is impossible to tighten the self-tapping screws tightly, the part should move slightly. To do this, a gap of about 1 mm is left between the head of the self-tapping screw (or nail) and the part..
- When installing vertical parts, the upper self-tapping screw is located at the top point of the mounting hole, and all subsequent ones - in the usual way, in the middle.

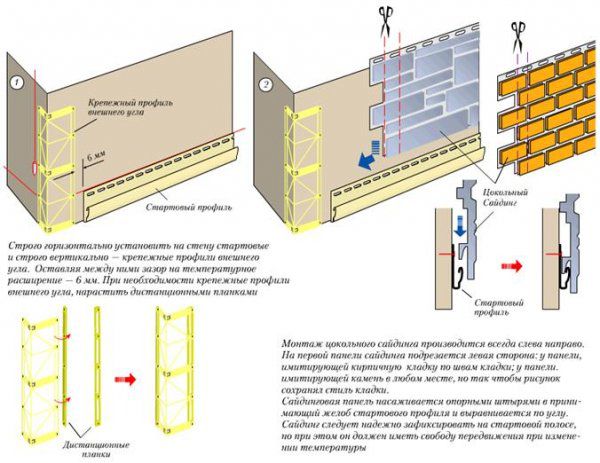
Installation of basement siding
- Installation of basement siding begins with the installation of the starter bar. For some types of material, the starting strips are made of metal for greater strength... Subsequently, they will be hidden by the canvas. Installation of the starting bar is carried out strictly horizontally, which should be checked by building level... Longitudinal joints cannot be made tight, a temperature gap of 2-6 mm must remain (depending on the season or temperature).
- After installing the starting strip, the corner strips are mounted. They are installed on corners and window or door openings.
- Installation of panels starts from the lower left corner. The panel is cut vertically to obtain a straight line, inserted at an angle into the starter bar, slides tightly to the left until it is in full contact with the corner bar. then you should move it back by 5 mm - make a thermal gap.
- The panel is fixed with self-tapping screws, after which the following is mounted I am.
- The next row of panels should be installed with an offset of about half the length so that the joints are staggered.
- The top row of panels ends with a J-strip.
You cannot install one corner, mount panels and then cover the canvas with a second corner. Corner strips must be fixed properly.

Useful video
In this video you will learn how to install basement siding:
Conclusion
Installation of basement siding is not difficult, but it requires compliance with certain conditions. The main one is the observance of temperature gaps and loose fastening of the elements, which gives the entire system the ability to move when expanding or contracting when heated or cooled. In addition, you will need the usual accuracy, thoroughness in working out the details, then the finish will turn out to be stylish, aesthetic and for a long time will delight the owner.
In contact with
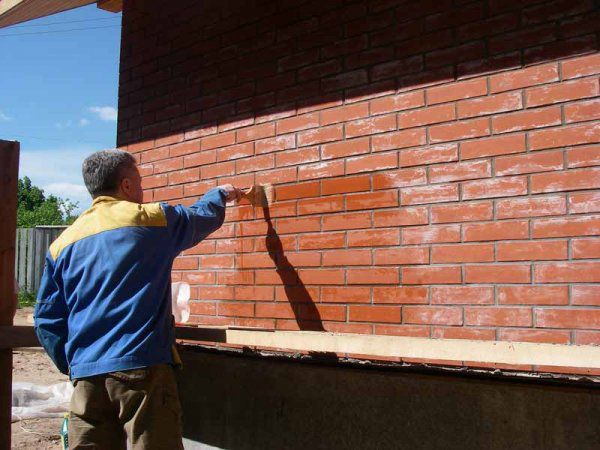
By right, one of the most reliable building materials for protecting the foundation and walls from moisture, freezing and the scorching sun is siding. But despite all of it positive traits, improper installation of panels can negate all efforts to create reliable protection constructions. Let's talk about how to produce DIY installation of basement siding so that the foundation of the building will serve for many years.
Required tools
Any type of construction involves the use of certain tools. We need the following items:

Siding accessories
Step by step installation instructions for basement siding contains specific terms, more precisely names individual elements of this material, which “catch the ear” of an ordinary person who has never faced such work. Of course, it's not worth talking about what siding panels are. But here's the rest in more detail:

We have listed only those elements that are required for the installation of the base / plinth. There are also bevels, window and door linings and other details, without which the cladding of the facade of the building is impossible, but this is a completely different topic.
1 stage of siding installation - installation of the lathing
The panels must be fixed to a perfectly flat surface, otherwise all siding parts may deform, which can negatively affect the state of the foundation as a whole. If you plan to fasten it to a concrete or brick base, then the installation of the lathing cannot be avoided. 
The lathing can be built from wood impregnated with a fire-resistant compound, or from metal - it all depends on your capabilities and the climatic conditions of the area. In areas with a warm climate, it is possible to fix the crate in the ground, with a cold one - only to the plinth at a height of about 12-15 cm from the ground level. The space formed between the crate and the ground is usually covered with earth to give the finished structure. 
The distance between the vertical slats should not exceed 91 cm, if this rule is not observed - carry out additional strapping every 40 cm.
Stage 2 - installing the starting profile
The starting profile must be installed along a pre-drawn line, and it must be located 10 cm from the corner of the building. Its installation is carried out with nails in increments of 30 cm - to perform this operation, you will need a level, because all parts must be fixed strictly horizontally. 
Stage 3 - cutting panels
First, determine how many panels are needed for the plinth cladding. It is very simple to do this: the total length of the wall in centimeters is divisible by 112 cm. Remember that the final panel cannot be shorter than 30 cm!
Stage 4 - installation of the first panel
At this stage, the immediate finishing with basement siding the first tier of the structure. 
As already mentioned, you need to move from left to right - set the angle of the first panel just below the edge of the starting profile, namely by 2-3 mm. Slide the first panel to the left - almost all the way to the outer corner, then apply sealant to the edge of it and dock with the corner. Be sure to maintain the necessary expansion joints (the gaps between the siding elements, designed for their possible movement relative to each other) and do not pinch the pins of the previous rows.
Stage 5 - installation of the second row
Drive nails or screws only through the backing, and only at right angles. Each next panel must be entered into the start profile and moved to the very first panel. The installation of the remaining rows is carried out in the same way - their number depends on the height of the foundation. If the siding is made in the form of stone or brickwork, then it is necessary to give a natural look - for this, move each row by about 15-20 cm relative to the previous one. 
Lower the panel down smoothly, in no case pushing it to the previous level, so the fastening will be reliable and natural. Basement siding is equipped with special posts located on the rear panels called mounting pins. These parts are designed to protect the siding from deformation during temperature fluctuations, but not to fix it to the wall. Five or more fasteners can be installed on one panel, providing the required design freedom. 
Nails or other fasteners should penetrate into the surface by at least 11 cm, or better - more, and for their installation on the surface of the panel, you need to drill a hole with a diameter larger than the size of the nail shank.
Stage 6 - installation of internal corners
At this stage do-it-yourself basement siding must be firmly fixed on inner corners building. For this, a J-profile or an inner corner is used - the second option is much simpler. 
One or another element is securely fixed in the corner of the building, "falling" with one entrance into the already mounted panels. Then you can continue to work on installing panels on an adjacent wall.
Stage 7 - installation of the finishing board
The final step required to install the trim (trim profile) on the last row of panels. Holes of a certain diameter are drilled in the profile, slightly exceeding the size of the fastening rods. Then it is fixed to the surface of the foundation, leading the edge of the panel behind it and fixing it all with a sealant. It can be heated to bend the profile at the corners.
Actually, the installation of basement siding is not an easy job. But it is quite possible to cope with it together or three together - you just have to start.

