We make a kitchen table with our own hands. Making a large dining table
Making furniture with your own hands is not only a great way to save money, but also an opportunity to put your creativity into practice!
It's about making coffee tables with your own hands. Too many side tables do not happen. They can be placed next to the sofa to put a vase of flowers or a mug of tea, use as bedside table or as a stand for potted plants. However, monotonous wooden tables are unlikely to revive a dull interior. I want something stylish and unexpected ...
Stylish do-it-yourself table made of wooden slats
This bench can serve as a coffee table, extra seating or seating area. indoor plants. Such a piece of furniture will “fit” well into almost any interior!

DIY coffee table photo
Materials:

Tools:

Step one: Using a hacksaw, cut the ends of two 2.5x7.5cm boards at a 45 degree angle. Cut out fragments from 2.5 × 5 cm bars, the length of which will correspond to the internal length of 2.5 × 7.5 cm blanks.

how to make a coffee table with your own hands. Photo
step two: Place 2.5x5cm blanks in the middle and 2.5x7.5cm around the edges. Make sure the ends of the inner rails are aligned.

Step Three: Measure the distance between the outermost 2.5x7.5cm boards and cut two blanks of this length from 2.5x10cm boards. They will serve as the lower supports for the bench. Secure them by screwing self-tapping screws into each longitudinal rail.
Step Four: Using the Kreg Jig, drill two pocket holes at each end of the support rails. These holes will be used to connect to the 2.5x7.5cm end pieces.
Tip: It's hard to give specific recommendations on how far from the edge to attach the Kreg Jig. This depends on the length of the screws used, the exact thickness of the board, etc. We advise you to pre-practice on unnecessary scraps of boards.

unusual coffee table with your own hands. Photo
Step five: Place 2.5x7.5 cm blanks along the edges of the structure. After making sure that their ends are at the same level, fix them with clamps.
Tip: If you are using softwood (such as pine) to make the table, place unnecessary scraps of boards under the clamp supports. Otherwise, traces of clamps will remain on the wood.
Step six: Securely attach the 2.5x7.5cm end pieces to the base of the bench by driving 3.5cm wood screws into the countersunk holes you made at the ends of the support rails earlier.

wooden coffee table. Master Class
step seven: Measure the width of the finished base to determine how long you need to cut 2.5 × 7.5 cm blanks for the ends of the bench. We recommend that you take a sip with a small margin in length, and then take your time to grind off the excess until you achieve the perfect fit.

Step eight: Moisten the ends of all rails with water and apply a small amount of Gorilla Glue.
Step nine: Install the end boards in their intended place and wrap the entire structure with a belt so that it does not fall apart until the glue dries. For reliability, you can additionally fix the ends with a few finishing nails.
Step ten: Sand the surface of the bench sandpaper 120 grit to eliminate all the bumps at the joints. All gaps in the seams and recesses from the heads of nails (the latter must be recessed into the wood without fail) fill with putty. When the putty is dry, sand the surface again, this time with 220 grit sandpaper.
Step Eleven: Paint the bench. We advise you to sand the surface again before painting with 400 grit sandpaper and water.

Step twelve: On the lower support rails, fit the special mounting plates for attaching the legs. When fixing them, make sure that you drill holes in places where there are no already screwed screws. The distance from the mount to the edge of the bench base should be about 2.5 cm. Screw the legs themselves into the mounts.


Coffee table made of copper pipes. Master Class
The material for the manufacture of the next table can, perhaps, be called the most unexpected. This time we decided to tell you how to make a table out of ... copper tubes with your own hands.

Materials and tools:

The figure below shows all parts (pipes (A-E) and various fittings (F-H)) with their dimensions and quantities. All that's left for you to take pipe cutter and sit in front of the TV, which will brighten up the tedious cutting process a little. It's not hard, just a little boring. 😉


When all the blanks are ready, you can begin to assemble the lower part of the table. How to do this is shown in the figure.

Having collected the lower tier, you can proceed to the upper one. The only part not listed in the parts list is the four pieces of 2.5 cm pipe that are placed in tees at the top. corner posts. Without these inserts, you will not be able to put on decorative caps, because. the latter have the same diameter as the tees.

Reliable connection of the tubes to each other will ensure glue, but we recommend applying it only after the preliminary assembly of the structure, i.e. after you make sure that all the cut tubes are of the right length and fit well with each other.

Wooden shelves, which you can pre-paint if you wish, are fixed with special clamps that are placed on the underside of each board. Now you are ready to decorate your home with your new DIY table!


DIY lightweight cement table

Concrete countertops and other interior elements have recently become more and more popular. However, for all their attractiveness, they are not without a number of shortcomings. First, pouring large amounts of concrete can sometimes be quite expensive. Secondly, if we are talking about small side tables, another serious problem comes to light - such furniture turns out to be too heavy. On the one hand, there is a desire to get a good, solid thing, on the other hand, I want to be able to move a table made by myself without the help of professional movers. The found solution can be considered an insight.

Materials and tools:

Step one: Mark and cut the foam sheet. From a 120x240 cm piece, you can cut 18 squares 40x40 cm. Stacking them on top of each other, you get a 40x40x45 cm box.

do-it-yourself foam board. Photo
step two: Glue the cut pieces. 3M Super 77 spray adhesive is ideal for this. It is best to perform this stage of work outdoors. Don't forget to wear gloves and a long sleeve shirt. Apply an even layer of glue to one side of the first square, then do the same with the second. Wait ~15 seconds, then connect the squares, making sure their edges are joined. Repeat this until all the square blanks are connected into a single whole. Wait about 30 minutes before proceeding to step 3.

Step Three: Now the most interesting thing ... giving the resulting parallelepiped the outlines of the future table. We decided to make a table in the shape of a cylinder. You can come up with something more original or, on the contrary, keep the original block with right angles. Cutting foam is easy and fun. At first, your design will have a rough, angular look, but don't worry! After the table is given desired shape, it's time for sanding. Using sandpaper 36 grit will quickly smooth out any bumps. As you get closer to the ideal, gradually move to sandpaper with a finer grit size. Don't aim for a super-smooth surface, at this point you only want to achieve the desired shape.

Step four: The surface of the future table is polished, it is time to cement it. The first coat, applied throughout the foam mold, will fill in the voids and texture of the foam. You only have ~20 minutes, so act fast so you have time to iron out the bumps. When the applied cement mortar dries, you can apply the next layer. The number of layers depends on how smooth and even the surface you want to have in the final (as a rule, four to five layers are required). It should be remembered that the smoother the surface of the final layer before it dries, the less it will have to be sanded!
Tip: When cooking cement mortar follow the manufacturer's instructions. You should not prepare more mortar than you need to apply one layer (for example, we used 220 ml of water and 450 g of cement). Make sure you don't forget to cover your workbench or workshop floor as this is a messy job.

Step five: After the last layer of cement has dried, you can sand the surface if desired. We wanted to achieve a glossy finish, at least on the top of the table, so we sanded it down using a variety of grit sandpaper, ranging from 100 to 2000.
Tip: If you are planning this operation, get a protective mask that will help you protect your lungs from cement dust
(The table made in this project turned out to be very strong and strong, but at the same time it weighed no more than a kilogram.)

Do-it-yourself stump table
The material for the next table sometimes literally lies underfoot. Even residents of megacities, if desired, will be able to find a suitable stump.

log table. Photo
Materials and tools:
- wooden block;
- white acrylic paint;
- manual grinder;
- chisel;
- hammer;
- decorative upholstery nails;
- molar tape.
Step one: Find a table base! This should not be an old rotten stump, but a freshly sawn block of wood. Let it dry for at least 6 months (there's nothing worse than waiting, but it's necessary) until the bark begins to peel off the trunk.
Step two: Using a chisel, gently remove the bark from the log in a downward motion. If the stump is dry enough, you won't have to use too much force.
Step three: Via grinder with medium grit sandpaper, sand the surface, removing the remaining bark and smoothing sharp corners. Do not forget to sand the surfaces of the lower and upper cuts. Wipe the wood with a damp cloth.

Step Four: It's time for painting. We used a white semi-gloss paint that includes a primer (we needed three coats for full coverage). You can choose a different type and color of paint, focusing solely on your taste. Don't forget to pre-prime the surface of the wood. Make sure you don't forget to finish the bottom cut.
Step five: Get your decorative nails ready. Apply a strip of masking tape along the top edge of the side surface of the log block, thus marking the place where the first row of nails will be located.

Step Six: Using a hammer, drive in the first row of decorative nails. To ensure that the distance from them to the upper edge is the same throughout the “line” of nails, use the strip of masking tape you previously glued as a guide. After the first row is completed, repeat the same with the second and third row of nails (we needed almost 150 studs for three rows).
Tip: Cover the underside of the stump with furniture felt so you can move the table around the room without damaging the flooring.
The work is done. You can use the new piece of furniture and be proud that you made this charming coffee table with your own hands.


Coffee tables: do it yourself
Wooden table: how to make?
Many people are interested in how to make a wooden table with their own hands to get a model with an original appearance. Let's consider one of the options.

To make an original coffee table with your own hands, you should take beam with a section of 5x10cm. It is sawn into parts of the following length: 130cm - 9pcs, 21cm - 12pcs, 34cm - 2pcs.
The prepared beam is placed in three rows, leaving room for attaching the legs.

Remove the top two rows. The beam in the third row is slightly shifted to get an interesting appearance. Next, mark the places for attaching the transverse parts.
Lay the extreme bars of the second row and mark the places of the cuts. Then cuts are made circular saw or a hacksaw with a chisel.

The bars of the second row are fixed with screws.

The third row is laid, the parts are shifted and fixed.
An empty space is formed under the tabletop, in which they are fixed legs.
Wood is processed protective composition that preserves the grain of the wood.


The original model of a wooden coffee table with their own hands

First, to make a table with your own hands, prepare boards: 6pcs - 22.5x45cm, 2pcs - 22.5x41cm, 8pcs - 20x4cm, 8pcs - 40x4cm.

Planks 20x4 and 40x4 are glued in pairs. To ensure they are securely glued, they are clampedclamps.

While the blanks for the legs dry, collect box from the rest of the details. They are connected with carpentry glue and nailer.

legs attached to the box with countersunk screws. At the bottom between the legs put the crossbars.

Lid for a table made of wood is also made using boards 22.5x45cm. They are glued together, and then the resulting square is sawn into two triangles.

One triangle is fixed with screws, and rails are fixed on the second so that it is removable.

All parts are sanded and painted.


Stylish coffee table. Master Class

They start making a stylish table with their own hands from marking the sheet Chipboard 16mm thick. The center is found on the sheet at the intersection of two diagonals.

A nail is driven into the center, to which a thin rope or a harsh thread is tied.

Tie a pencil to the free end. This allows you to draw a circle.

If you want to make a table with your own hands not round, but more interesting shape, then the shape of the circle is changed by drawing bends.

The tabletop is cut out jigsaw or reciprocating saw.

Edges are processed sandpaper.
legs fasten with screws. If they are inclined, then the slope should be outward.

Table surface stain in the right color.

Simple shape coffee table

To make a coffee table with your own hands, take boards 40x15cm - 2pcs and 50x19cm - 2pcs. In addition, you will need legs and mounting plates.

On one of the boards they fix more plates for fixing legs. From the edges should retreat a little.

The sides and top of the table are fixed with wood glue.

It dries for about half an hour.


Do-it-yourself log table

A do-it-yourself coffee table with such an appearance will become a decoration for a summer house or a country house. Begin work with the assembly of the frame. To do this, take sheets plywood two centimeters thick. A base with dimensions of 60x80cm is cut out of them. A box 68 cm long, 45 cm wide and 40 cm high is attached to the base.

do-it-yourself log table. Photo
After that, cut thirty pieces of round logs 45 cm long and twenty-four round cuts, the thickness of which is 3 cm.
Harvested logs are attached around the perimeter of the box. Attached from below to the base rollers. They are installed, departing from the edge by three centimeters.

In addition to glue, it will be useful to fix the logs on the screws from below.

Installed on the box plywood cover. Rounds are glued on it. The space between them is filled with wood putty, which does not shrink when dried. Apply it in stages so that the previous layer has time to dry.

After the putty has dried, the surface polished. To do this, use a surface grinder. After that, the log table can be used.
Rustic table

If you are interested in how to make a table from wood cuts with your own hands, then you should read the instructions.

They start making such a coffee table with their own hands by choosing the right material.


Selected saw cut inspect for interesting details or parts that need to be removed.


Unnecessarily rough, protruding parts are cut off. On the side where the countertop will be, the surface align.


For work use cleaver, which moves at an angle of forty-five degrees.

The sides also need to be aligned.

All surfaces grind, using ever-decreasing grit.


Glossy varnish mixed with resin in equal proportions.

The resulting composition is applied to the wood in a thick layer. It will dry for a long time. If gaps appear during the drying process, they must be filled.


bottom side clean up. If there are voids in the tree, then they are filled with resin gradually until the hole is filled.


If there are air bubbles in the dried resin, then the surface is heated with a heat gun or burner.

A second layer of resin is applied and again left to dry for two days. The entire surface of the countertop must be glossy.

At the handles of the ax, a part is cut off at an angle of 22 degrees. The surface is sanded and painted in the desired color.


Mark out places for legs and make holes.


Glue is poured into the holes and the legs are installed. Each has a special pad.


White coffee table

They make such a coffee table with their own hands from plywood and glass. First, prepare a drawing and determine the dimensions. Then proceed directly to manufacturing.


handmade coffee table Blueprints
Plywood acts as a countertop box with partitions, covered with glass on top. Triangular legs are attached to it.


At the box, you can make a door to access what's inside, or raise the glass.


legsfor a table with your own hands, it is better to cut it out of fairly thick plywood. It must be remembered that double legs are easier to make than large quantity single.


When all the parts are ready, they are assembled together and fastened. The table is painted or varnished.


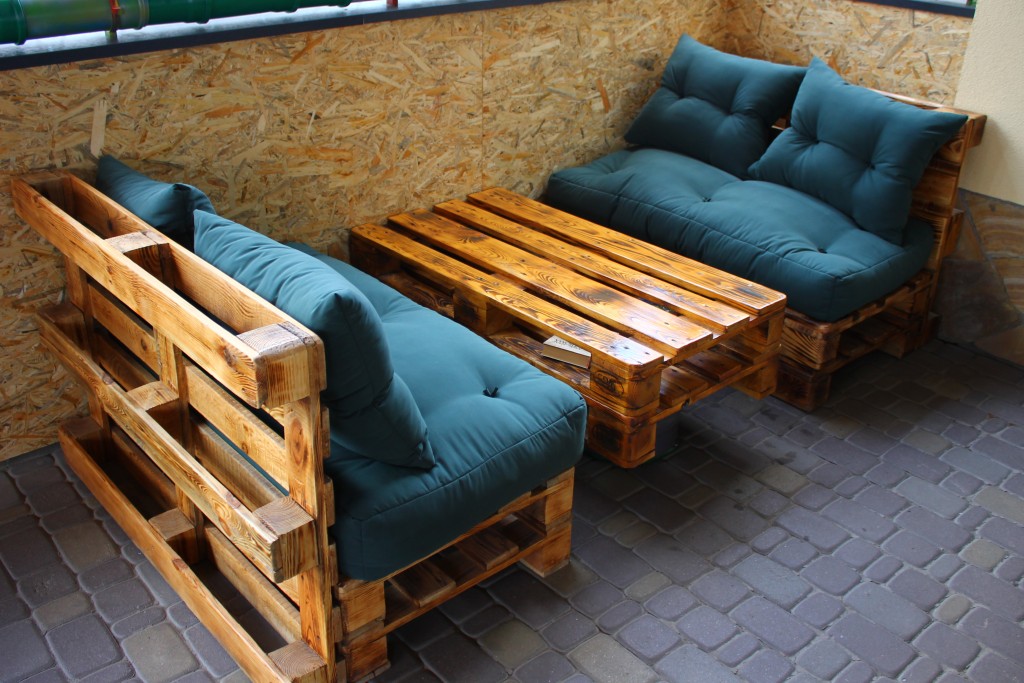
DIY pallet table
If you know how to make a table from pallets with your own hands, you can get an interesting version of furniture for the home. Pallets must first be sanded, sawn into pieces and primed.


pallet table. Instruction
A table is assembled from the prepared material. To do this, attach the legs or wheels. The pallet itself or the surface assembled from individual boards can be used as a table cover.


After all the parts are connected, the structure needs to be painted or varnished. After that, the pallet table is ready.
The second version of the table from pallets
To make such a table with your own hands, you will need one or two pallets. First, you should draw a sketch of the future product, taking into account all sizes.


The table will have a shelf for small things under the tabletop. The design is assembled from prepared parts.


The surface is painted with black paint, but this is not the only possible option. There are many other decorating possibilities.


Coffee table stand
How to make a table out of copper pipes with their own hands, may be of interest to many craftsmen.

Pipes are first marked and cut. Then they are smeared epoxy glue and assemble the base for the table.


This base is applied to the board and the attachment points are circled. In these places you will need to drill holes by pipe diameter.

Four holes are drilled, but not through.

The board is impregnated polyurethane and cover stain.


The rest is collected from the pipes frame.


Legs and base cover paint in the color of the table top.

Made from a piece of cloth pocket, which is hung on the transverse parts of the legs.


All parts are assembled together, adding epoxy glue for reliability.


DIY marine-style table
Such a table from the old window frame looks very romantic. The frame is cleaned of dust. If required, replace the glass.

wooden surface stain white acrylic paint. After drying, the paint layer is treated with sandpaper so that the wood comes out. Also available in blue and white.

To make legs, take cutting and sawn into pieces of 34 cm. After that, it is treated with sandpaper to remove roughness.
The blanks are drilled in four places. Next, each leg is attached to the base, and the base with legs to the frame. All this is done with self-tapping screws.

The legs are covered with coarse rope.
For cleaned and defatted glass glue sea souvenirs and seafood. From above they must be covered with glass, which is cut out in the workshop to fit the frame.

Make a loop at one end of the rope. The rope is glued around the perimeter of the frame, leaving the loop free. When the second end reaches it, they tie an interesting sea knot.

It is no secret that furniture is used in the country house that has served its time in the apartment. The table is no exception. However, in country conditions, the furniture that served perfectly at home may not always fulfill its purpose. It's about about modern tables made mainly of chipboard. Such tables are not suitable for gazebos, verandas, gardens, and even in a house with high humidity in the off-season, their service life is limited. In such conditions, a wooden table is necessary, but a wooden table is not a cheap pleasure. The solution to the problem is to make a table with your own hands. To do this is quite simple. In addition, this will save a lot, including on delivery.
The simplest table design
The most simple design The table is shown in the photo below. At the same time, such a design is the least expensive both in terms of materials and manufacturing forces.

Fig.1.
Optimal table dimensions
One of the advantages of making a table for giving with your own hands is that the table can be made in any size. Thus, the table is easy to adjust to the dimensions of the gazebo, porch or kitchen.
To make it easier to navigate in size, I will give a dimensional grid, which is most often used in the production of tables. The size chart is based on the size of the countertop.
- 60x90 cm. A table with such dimensions is optimal for 3 people. At such a table it is convenient to have lunch, drink tea, etc. Due to its size, it will fit well into any small space.
- 80x120 cm. 4 - 6 people can comfortably sit at such a table. Usually a table with such dimensions is appropriate to place in a large kitchen or on a veranda.
- More than 120 cm. Tables with such dimensions are good for feasts. In the conditions of a summer residence and the limited space of a country house, such a table is mainly installed in a gazebo or under a canopy in the open air.
Naturally, when making a table with your own hands, the size can be made arbitrary, however, in order to be comfortable at the table, you should follow the recommendations given above.
Manufacturing procedure and table drawing
The drawing of the table is shown in the figure below.

Fig.2.
Table legs are made of a wooden bar with a section of 40x40 mm and a length of 70 cm. If you want to decorate the table, then balusters can be used as legs. They are carved, and will make the design of the table more interesting.
The support for the countertop can be made from a board with a section of 25x150 mm, sawing it lengthwise into two halves. For support, you need 2 boards 650 mm long and 2 boards 1050 mm long.
With a countertop, everything is much more interesting. The tabletop can be made in various ways. The easiest option is to buy furniture board required dimensions. It can be purchased at chain hypermarkets of building materials.

Fig.3.
Following this path, it should be remembered that the furniture board is made by gluing small pieces of boards, and with constant exposure to atmospheric precipitation, it will quickly become unusable. Therefore, a table with a table top made of furniture board must be varnished or painted to protect it from moisture.
Another option is a plank top. Boards can be used in any size. For example, a section of 25x100 mm. This is a simple and cheap countertop option. This option is devoid of the disadvantages that are inherent in the furniture board.

Fig.4.
However, without special equipment, it is unlikely that it will be possible to tightly fit the boards. Therefore, the countertop will have gaps between the boards. It looks good for a garden table. But not very practical.
You can get rid of the gap mentioned above by using an unusual, tongue-and-groove board. It will cost a little more, but you get a smooth, even tabletop.

Fig.5.
As a grooved board, boards for the euro floor can be used. They are easier to find in the store. It is only important not to forget to cut them from the wrong side.
Table assembly
Once all the elements of the table are ready, you can start assembling the table. The assembly of the table is carried out in a certain order.
First, assemble the support for the countertop and fix the legs to it. This is the most difficult moment in assembling the table. As described earlier, the countertop support consists of 4 boards. They need to be connected to each other. This can be done in several ways.
The photo below shows how to assemble the support for the tabletop and fix the leg to it with a special tie.

Fig.6.
This method is the ideal solution, except for the fact. That it may not be easy to purchase a special screed.
Another way is to pull the entire structure together with a wooden block.

Fig.7.
Applying this method you need to pay attention to the fact that the bar must be sawn off at an angle of strictly 45 degrees. Otherwise, the table will not be rectangular.
In my opinion, the simplest and most affordable option for assembling the legs and supports for the tabletop is to use a metal general construction corner 50x50 mm in size. You can buy it in any store, and it has the correct geometric shape.
The last step in assembling the table is installing the table top. Depending on the type of countertop, it can be fixed in various ways. The furniture board can be attached with corners or with glue. Separate boards with self-tapping screws and glue.

Fig.8.
As you could already understand, making a table for a summer house or a house with your own hands is quite simple. It's important to get creative. Such a table can be decorated with any paintwork. Wooden table handmade will delight you every day and will last for many years.
Wooden tables and decoration ideas

Fig.9.

Fig.10.

Fig.11.

Fig.12.
Dinner table - an essential attribute of any dining room or kitchens, center of gravity for all families on weekdays, and especially on holidays, when behind him are going relatives and friends. Therefore, the table must be comfortable, of high quality and beautiful.
Big in stores today choice, but it is much more pleasant to make a dining table with your own hands. Moreover, this is a significant saving for the family budget.
Dining table options
- Extendable dining table. The most popular option. Small for everyday use, with the arrival of guests, this table increases significantly due to additional countertops.
- Folding table – perfect solution for a small kitchen. The simplest option is fixed on wall tabletop and leg support.

- Folding table. The classic representative of this type of furniture - When assembled, it resembles a cabinet. It has one narrow tabletop-frame and two wide large ones, which are located on the sides and unfold.

- A very handy thing that is suitable for both the kitchen and the living room. When folded, it can even be unfolded - a full-fledged dining table.

What can be made from?
 materials that are used for the manufacture of dining tables, enough:
- tree;
- chipboard, chipboard, MDF;
- plastic;
- natural or fake diamond;
- metal;
- glass other.
Each of them has their own pros, as well as cons.
- Tree
Solid wood table is a classic. Wood attracts people not only because of its beauty, but also because it is easily processed. Moreover, the tree is ecological material that has a positive effect on human health. But, unfortunately, it has its drawbacks. At the table you need to carefully care. Wood is sensitive to climate change. conditions in room. For example, if the room is quite humid or hot, it does not affect the material very well. - Glass
whether it be coffee, dinner or some other, it looks very stylish. But this stuff is hard processed. In addition, not every glass is suitable for dining table. Need to pick up lasting material. Best for table top armored glass, the cost of which is very different from ordinary glass, and the processing is carried out only at the factory where it is used special equipment.
Wooden dining table
 So you've decided do dining table on kitchen with your own hands. First of all, you need to decide on dimensions future product, so that it harmoniously fits into the interior.
You can take it ready drawing dining table, if indicated in it dimensions meet your requirements.
For example, consider manufacturing dining table from wood.
This simple rectangular a table with four legs Great look both in a classic interior and in choosing the appropriate way finishes, you can make a dining table in or in

Materials and tools
 Before assembling the table, prepare materials:
- balusters(legs) - 4 pcs. Height - 73 cm. They should not be thin;
- cutting boards:
5 x 15 x 100 cm (for countertops) - 4 pcs.,
80 cm (long crossbars) - 2 pcs.,
40 cm (short crossbars) - 2 pcs.; - sandpaper;
- glue carpentry;
- dowels.
Note: countertop boards need polishing.
 necessary for the manufacture of a dining table:
 - pencil, roulette, meter;
- hacksaw, a circular saw or Bulgarian;
- plane;
- drill(drill 8 mm.);
- screwdriver or screwdriver;
- self-tapping screws(30 mm);
- brushes.
Manufacturing steps
Step 1. We make a table. Boards trim first in width, and then in length. Process surface planer. Sand the wood thoroughly so that the countertop becomes smooth. Edges must be well finished. If you do this, the boards will tightly adjoin each other.
Make the same marks on the edges of the boards, step back 10–15 cm. Then drill out holes and apply carpentry glue. Plaster the edges. After that, the chopsticks must be driven into the holes. Connect boards.


Excess glue must be removed emery paper. Level the joints between the boards with a planer, grind tabletop surface and edges.
Note: if you walk on the countertop with a metal sponge, the wood will become more textured.
Step 2 We fasten the legs and do base for table top. Balusters must be connected with short crossbars thus:


Step 3 Pairs of legs connected by short crossbars are fastened together long crossbars.


Step 4 Drill in long crossbars holes. When the glue dries, install countertop.

For more strength it is possible to strengthen the structure with additional transverse bars or boards.

How to make a table from a metal profile:
table decoration
 Definitely more before assembly need to antiseptic impregnation.
When the work is done and the table is ready, you need to do it finishing. First of all, choose color your product. It can be absolutely anyone. Best fit oak or walnut, these colors are considered classics.
Give the wood the right shade and even imitate valuable wood species can be used with decorative stains.
For protection from moisture and giving presentable appearance need to cover the table several layers varnish. Each layer must be thoroughly dried.
If desired, the tabletop can be decorate. For example, interesting and uncomplicated even for a beginner, it is applicable both for decorating a new product and for restoration dining table with your own hands.
How wooden dining tables are made, see video:
The interior of any home will be decorated with crafts made with your own hands. Not the most difficult option for individual creativity - home table from wood. Designing your own is easy. Here the flight of fancy is unlimited, but you need to start with the choice of design, purpose and design features that you plan to implement. At the very beginning, you need to create drawings and drawings, according to which it will be possible to assemble the finished table.


Drawings and diagrams
Initially, work out each element in detail, especially decorative additions if they are planned. This is just the case when embellishment will not be superfluous. It is best to draw a drawing according to actual dimensions, choosing the appropriate scale on paper.


The type of the table can be the most diverse, from the usual written to the children's massage. It is also possible to make a table with your own hands for a bath. One of the easiest to make is a corner table.


It is not so difficult to create a small transformer or a table-book. It takes up little space in the room and is functional in many situations. Sliding design will help save some space. For home construction, a carpentry table is very suitable. And, of course, a table on the veranda, where you can gather with the whole family for an evening tea party.


Decor
Decorating will greatly improve the appearance. Almost any table design will be decorated with carved legs, especially if you decide to implement the project in rustic style. The addition of the countertop decor with LED lighting will look elegant. A luminous table in the corner of the living room will add warmth on a cold winter night. There can be an infinite number of options, but the main thing is not to overdo it and not go too far with decorations.


Style and design
There are no restrictions and strict limits for your own creativity. The easiest way to do original thing- perform it in the style of "old times". This is the most common and not too difficult craft to perform. Imitation of antiquity will decorate almost any interior.


Design homemade table Ideally, it should organically fit into the interior of the room in which it is planned to use it. Possible various forms and artistic solutions. Wood products allow you to experiment with geometry.


About how to do unusual table see the next video.
Form


Such a table may different angles and will not lose any functionality. For each side of this design, you can fix permanent places for family members. The smaller sides are for children. The larger sides are for adults.


Material
The tree is convenient to use in any condition. The secondary use of wooden structures is also quite suitable. It is very good to use old boards. Many breeds only get better with time.


It's no secret that a floor made of valuable breeds that has served a century is sometimes used to make musical instruments. When reusing, be sure to remove the top layer, which will give the final product a neater look. Products made from such material, without exaggeration, will last forever.
Combination of dissimilar materials
Combinations of wood and metal look original. The massive plane of the table will be decorated with iron, and ideally, cast-iron legs. The combination of oak and cast iron will achieve an excellent result. Heavy cast iron pairs perfectly with oak or ash.
The combination of hard African breeds and metal structures. The result will amaze anyone, even the most demanding connoisseur.


Glass and wood are the perfect match
Graceful wooden stand will become the best decoration for glass table. Modern fastening devices will ensure a reliable articulation of these materials. The round shape of the final product with this combination is the most optimal solution.


You can combine different materials
It is quite possible for light concrete base install a wooden or glass coffee table top. Quite a modern solution that will add a light industrial touch to the interior design. The combination of glass and concrete, as well as pine additions, will look great.


How can natural stone be used?
Quite an elegant combination, if everything is done in moderation. Do not overload the table structure with too heavy elements. Try to find a suitable base made of natural stone. The design of the wooden top will be prompted by the stone itself. Put a massive wooden surface on it and you will get a table that no one else has.

Beautiful examples and options
With your own hands it is quite possible to make very beautiful, original things that will look no worse than those of famous masters. Homemade items will always be your pride and topic of discussion among friends.


What can you make yourself?
Almost any table is within the power of each of us. This simple household item does not require special knowledge and special professional skills. We start making wood products at school, at labor lessons. Therefore, the simple wooden design of the laptop table will be quite on the shoulder. Both chairs and a bench for a country house can also be made independently.


You can come up with your own design of home crafts. The folding table will not constantly occupy living space. It can combine several functions. From baby changing station to work surface for home crafts.


A wide field for creativity will give a combination of wood and other materials. Don't be afraid to experiment. Combine dissimilar objects together, and you will achieve amazing results. Even if you decide to combine rarely combined elements, do not be afraid to try. Any ideas can be realized.


How to make a table?
Home design should start with a small coffee table. The design can be quite simple. The work surface can be purchased at the hardware supermarket.

Glued pine is best. The glued array is less prone to deformation with changes in humidity and temperature changes. It is most convenient to pick up legs for your crafts in the same place.


Desk
It is better to assemble it from ready-made wooden panels - it is quite a reasonable start to home needlework. Ready-made elements or entire blocks are easiest to order with delivery on a site that sells components for such work. Here you can find all the necessary accessories. It remains only to spend a little time on the assembly. Additional processing and fitting will not become too difficult, the main thing is that you will get the necessary experience for further creativity.

Table for the kitchen
It's not that hard to make your own kitchen utensils. You can start with a small pine kitchen table. Legs are easiest to buy ready-made, pine is the most a budget option. The working surface is easier to choose according to the planned dimensions. It remains only, in the literal sense, to put the table on its feet.

Kitchen set

Assemble the kit kitchen furniture according to their own drawings, the wave is within the power of everyone. You need some skills to install opening doors, but this simple science can be comprehended by watching a few videos on the Internet.


Required Tools
You can start with a small set. A hammer, planer, chisel, wood saw, nails and screws can be found in every home. You will also need a ruler and a pencil. If it is possible to purchase an additional power tool, be sure to do so.

An electric planer in the house or a jigsaw will come in handy for the following crafts. Such a tool must be of good quality. It will last for many years, even if you do not use it every day.

Special tool
For achievement High Quality it is better to use special equipment with an electric drive. Acquisition costs will not be significant, and you will have the opportunity to move on to more complex projects in the future.

What can be purchased in addition to an existing electric drill:
electric jigsaw - will allow you to make a high-quality cut of any materials;
electric planer - will make the surface of the tree perfectly flat;
circular saw - will provide a longitudinal or transverse cut of industrial quality;
a mechanical device for milling work - will process the edges of your craft with an intricate pattern and help you cut decorative elements on a wooden surface;
sanding machine - makes finishing a wooden surface a simple and enjoyable experience that does not require much effort.


It is best to purchase a combined power tool that combines several different functions in one device. This will reduce costs and allow many design ideas to be realized. By the way, a home electric drill can be supplemented with various attachments, which will expand its capabilities.

Accessories
If you decide to make a trip to the needlework store, stock up on everything you need right away. For your craft, you will need additional components to securely fasten the wooden parts. The simplest steel corners will make the design more reliable in operation. Do not skimp on additional decorative elements. They will not be superfluous, but only decorate the appearance.

Ready-made kits that can be purchased at the store will add more elegance to wooden crafts. It will look very nice homemade desk for a child, if you use metal legs from any ready-made furniture set. It is easy to make a bedside table for him from the same standard kits. Handles and accessories can be picked up in the same store.


Fastening of wooden structures
ancient technology wooden joints without iron nails and glue is almost lost. But it won't hurt to try. Adjust all wooden joints with minimal gaps, drill holes in the joints with a diameter of six to eight millimeters and hammer a dried wooden spike into it.
If all wooden parts are excessively dried before assembly, then over time they will gain the required amount of moisture and increase their size. The connection will become strong enough, and the swollen wooden spike will give additional strength.

Traditional mounting options
The simplest and reliable option- drive a screw into a tree. Now they make special self-tapping screws for wood joints, which, unlike a conventional screw, do not require an exact hole for screwing in. If the thickness of the connection is not very large, then additional holes can be dispensed with. The wood screw will do everything by itself, especially if you use an electric screwdriver. Such a connection will last a long time without glue.

Why is glue needed?
To give a wooden structure additional strength, it is best to glue the articulating surfaces. You need a little glue, but the result will be excellent when combined with self-tapping screws or nails, glued wood connection will remain strong for many years. Glue is best used on a water basis. There are many varieties of reliable wood glue.

How to make an original home table?
crafts own design it's not that hard to create. The material is found in any forest.
A unique craft will come out of an array of wood. But this will take a little effort. The ideal base big tree, whose diameter is more than eighty centimeters in circumference. If you manage to use part of the root system, then a reliable base for the table will come out and additional legs will not be needed.
You need to understand that it will not be easy to deliver such a blank from the forest, but the result will pay off all the work, such a table cannot be compared with anything.


Table for summer cottage
A street table for a suburban area certainly needs to be done by yourself. Ideal material- all the same log brought from the forest. The base is conveniently made from birch logs of small diameter. They need to be dug into the ground about fifty centimeters.

Then align their upper parts by sawing off the excess wood. The working surface can be made from a log of large transverse diameter by sawing it longitudinally. The flat part will just be the surface of the street table.

All outdoor additional buildings are best made of wood. This natural natural material perfectly tolerates moisture, heat, and frost. It is also better to make a bench for a summer cottage yourself from the same wooden components. A homemade bench will look organically near your handmade table.
Why is it better to use an array tree?
The structure of the tree is such that its durability directly depends on how intact its integrity is. Therefore, since ancient times, solid logs have been used to build houses. With minimal processing, when the whole structure is preserved as much as possible, wooden structures can last for hundreds of years without collapsing or changing its shape.

What can be made from solid wood?
For starters, you need to be patient. Cutting down a tree and delivering it to the house is not the most difficult task. It is important to properly prepare the material for subsequent processing.

Preparation of a wooden blank
Be sure to rid the tree of excess moisture. If it is not possible to agree to do this at a woodworking enterprise where there is special drying equipment, then it is quite possible to do the drying at home.
Logging is usually done in the spring, when the trunk has not begun to absorb moisture from the soil, that is, before the thaw. Usually it is March. Drying naturally lasts from several months to a year, depending on the type of wood.

Why is it important to use only dry material?
A raw tree will certainly crack as soon as the bark is removed, unless, of course, this is planned by your design idea. Some breeds greatly change shape when dried improperly.

Dry wood should be well cleaned and sanded, a light layer of texture varnish or stain will not interfere to give more texture to the product. If the diameter of the circle is large enough, and part of the root system has become reliable support, then the table is almost ready. The upper part must be well sanded and varnished. Here it is ready perfect design for a laptop.

Dimensions
If you want to make a large dining table from a solid log, you will have to work a little and make a longitudinal cut in the middle of the trunk with a chainsaw. You will get two almost identical halves. If the width of one part is a meter or more, and the length is at least one and a half meters, then there is already a base for the dining table. Can be left lower part semicircular or align by cutting off the semicircular bottom.
It remains to build reliable legs and treat the surface of the table with any convenient way. It is not necessary to make the table absolutely even, especially if precious woods were used. Moderate irregularities will give the craft an additional charm.

How to use the second half of the log?
A little extra effort, and - a strong bench for the table is ready. If the width of the log is of sufficient size, then two strong benches can be obtained on both sides of the table. They are best hardwired into general design, or make two separate strong seats for several people. The bench, of course, will have to be leveled and all irregularities removed. Ideally, sand well and varnish or stain.

Colors
Do not be too zealous in painting wooden products. If you decide to enhance the natural color, then it is best for any breed coffee tones. It is best to use water-based varnishes and paints. They are less toxic and interact well with wood.
It is perfectly acceptable to use undyed materials with natural colors. Cast iron without additional coating and wood of natural color will become an original decorative solution that does not require additional color shades.

Very well combined raw aluminum and dark woods. Natural silver color and dark oak texture look very original. Elements with natural colors are well suited for additional decoration.
But iron components, unless, of course, it is stainless steel, in any case, you need to paint. Even if your table with iron legs will always be indoors, the metal must be coated with any coloring compound. Iron corrodes even in dry and warm rooms and requires painting work.
Wood coloring
When using wooden planed products in the open air, painting is required not only in decorative purposes. A good coating will protect the wood and prolong its life. In this case, special compositions for outdoor work are used. The color scheme can be any. The most acceptable are all the same dark coffee shades.

Useful little things
- The wisest thing is not to rush. Any work requires thoughtfulness and accuracy of execution. Don't set any deadlines for yourself. Do work when you feel like it.
- If something does not work out, put the craft aside and return to it after a while. Such work will only be a joy, and you will achieve a good result.
- Do not take on a complex project right away, start with simple work. You need to gain some experience for subsequent more complex crafts. Using power tools will make your job easier. Be sure to follow all safety precautions when working with any tool used for woodworking.

- Even a small splinter can become a problem if you do not pay attention to it at the time. Follow the safety regulations. Always wear goggles when working with wood products, especially if machining is involved.
- If you have little experience, but there is a desire to make at least a wooden table with your own hands own house, start by going to the building materials supermarket. There you will find everything you need for individual creativity. Design decisions will be prompted by the materials themselves.
- To begin with, use wooden blanks that require minimal post-processing.
- Carry out all work in a spacious room. A small workshop in the country is ideal. Painting should be carried out in a well ventilated area, even if low toxicity products are used. Observe all necessary drying times for glued and painted parts.
Advantages and disadvantages
Handmade crafts do not always look perfect. But don't get upset about it. Minor flaws will be compensated by absolute satisfaction from the work done by oneself. Such disadvantages can be attributed rather to advantages. An industrial product will not keep your hands warm.
Even if furniture production is far from your area, make country table with your own hands to gather with family and friends on warm summer evenings is quite a feasible task.
Its main advantage, in contrast to the purchased one, is undoubted savings. It is not necessary to make a table from scratch: simply by assembling purchased parts, you will save 30-50% of the cost. If it is possible to use materials left over from construction or repair, the costs will be limited to the purchase of fittings.
To choose a design, you need to decide where the product will be used.
Using cheap non-standard boards for a country or kitchen table - substandard - you will get advantages that are not available for mass production. Sounds doubtful? But this is true: knots, due to which the boards are rejected, have interesting decorative properties. If you succeed in emphasizing them successfully, you will become the author of a completely unique design product, which is a pity to leave in the garden in the rain.

Making a country table with your own hands to gather with family and friends on warm summer evenings is quite a feasible task.
To choose a design, you need to decide where the product will be used: on grassy lawn under a tree, complement the gazebo, stand in the workshop or in the house.
The simplest country table can be assembled in a few hours with a minimum of materials, but it will not last long either. To get a product that will be really pleasant to use, you need to carefully prepare the boards and perform all technical operations at each stage with high quality.

Its main advantage, in contrast to the purchased one, is undoubted savings.
If you find a large stump in the woods, it can make an easy-to-make garden table. It is only required to remove the bark from the stump, make it on top even cut, sand it, treat it with an antiseptic and varnish it. It is enough to nail or screw a finished furniture board to the "leg" from the stump - and you're done.
Worktops made of boards fastened at the bottom with transverse slats look good. If you prefer glued worktop, it can be done with your own hands, but it will require a lot of effort.

If you succeed in emphasizing them successfully, you will become the author of a completely unique design product, which is a pity to leave in the garden in the rain.
It is difficult for a novice master to fix the legs securely, so try to choose a design by correctly evaluating your skills and taking into account the cost of labor and time. The easiest way to make cruciform and L-shaped legs. To attach straight legs - you need to carefully connect the parts.
One of the most cozy options for garden - collapsible table with benches, which can be installed in the gazebo or on the veranda. It's easy to do, the main thing is to choose quality materials and properly prepare them for work.

The simplest country table can be assembled in a few hours with a minimum of materials, but it will not last long either.
How to choose a tree?
For garden or kitchen table suitable wood many species, both soft (pine, spruce, cedar, fir) and hard (oak, birch, ash, walnut, maple, apple, pear, acacia, etc.) The exception is too soft wood species (poplar, alder, aspen , willow).
One of the main parameters of the suitability of wood for making furniture is resistance to decay: the species listed above meet this requirement.
If you are not planning on doing furniture work constantly or just starting to practice, give preference to the most common types of wood - pine and birch.

Worktops made of boards fastened at the bottom with transverse slats look good.
Wood can be used for the tabletop, frame and legs different breeds. At the assembly stage, you will need dowels: they are usually made from acacia or boxwood. Birch wood has an inexpressive pattern and can be significantly warped due to spilled liquid - it is better not to use it as a countertop material, but due to the hardness of this breed, legs can be made from it.
The countertop is best made of oak or pine. If you know how to brush wood, the surface of the kitchen table can become a real work of art. Wood lends itself to brushing soft species: wood is fired gas burner, and soft fibers are removed with an iron brush. Work is best done in the yard due to the large amount of dust. If you managed to burn the wood evenly, the result will please you. The brush can be tinted with stains, stains, artistic acrylic paint diluted with water. Of course, wood brushing is not required: it is only a finishing option.

If you prefer a glued worktop, you can do it yourself, but this will require a lot of effort.
The choice of paints and varnishes and glue
Before proceeding with the installation, the boards must be protected from decay. The tree must be impregnated with a water-polymer emulsion (WPE): the treatment is carried out twice with an interval of 3-5 days. This is enough for the product to last a long time.
Some models require glue. Along with special carpentry adhesives (BF-2, etc.), building PVA can be used: it is applied to both surfaces to be glued, dried to a “tack”, then the parts are connected and kept under pressure for up to three days.

It is difficult for a novice master to fix the legs securely, so try to choose a design by correctly evaluating your skills and taking into account the cost of labor and time.
Choice paintwork materials determined by where you plan to use the product: in the yard or indoors. For garden table which is inevitably exposed to precipitation, alkyd, alkyd-urethane, nitrocellulose varnishes and oil paints are suitable. For the kitchen table, as well as for any furniture that is constantly in the room, it is better to use acrylic paints and varnishes: they are more environmentally friendly, do not have strong odor. Lacquers marked with the "blue angel" mark are recommended for children's furniture and toys.
If you decide to cover the wood with stain, paint or just tinted varnish, this must be done before assembly. Material compatibility must be considered. The lacquer is tinted with a paint of a suitable composition: if the lacquer is alkyd, the paint should be oily, if you use acrylic lacquer, it can only be tinted with acrylic paint. First, a small amount of varnish is thoroughly mixed in a separate container with paint, and then the resulting mixture is added to a larger volume of varnish.

One of the coziest options for a garden is a collapsible table with benches that can be installed in a gazebo or on a veranda.
What tools are needed
For work you will need:
- hacksaw,
- circular saw or jigsaw;
- drill;
- screwdriver;
- hammer (if you decide to use nails).

For a garden or kitchen table, wood of many species is suitable.
This list includes only the most necessary tools, but to make work more comfortable, and ready product looked aesthetically pleasing, it is advisable to buy or rent a rotary miter box, an eccentric sander and a milling machine.
The rotary miter box makes it possible to make cuts exactly at the right angle. An eccentric sander will allow you to prepare parts simply, quickly and efficiently: you will sand the boards in an hour, instead of doing it all day manually with sandpaper. For high-quality processing of the ends, a belt grinder is useful, and a milling machine allows you to select a tree for the necessary grooves and process the edges.

If you do not plan to engage in furniture work all the time or are just starting to practice.
Homemade pallet table
A spectacular rustic-style table can be constructed from pallets ( wooden pallets). If you are a happy owner of such a container, especially a double-deck pallet, just disassemble it: there is no problem in purchasing boards!
Think it's always better to buy new boards? You probably have not worked with wood before: raw wood cannot be used (the product deforms after a few months), and dry boards are much more expensive. To dry raw wood boards, they are stacked in a well-ventilated area: this necessary process will delay your project by 4-6 months! A good option for the kitchen table can be the already mentioned rejected boards, also dry.

It is possible to use wood of different species for the table top, frame and legs.
Let's go back to the pallets: they are dismantled. Now at your disposal are strong boards with different patterns and colors, it is possible that from trees of different species. These features should not be considered as disadvantages: they will give the product a zest: you just need to create an interesting composition from them, alternating boards of a similar shade.
The sides of the pallet will make an excellent frame, and the remaining planks will be used to assemble the countertop.

Work is best done in the yard due to the large amount of dust.
To make the legs, you will need a bar with a thickness of at least 5 cm. All the details must be prepared: sanding strictly along the fibers with sandpaper, first coarse (No120-150), then finer grit (No400-600), carefully removing dust.
Some boards can be painted with acrylic or oil paint. Loft style fans can use stencils in the form of numbers or simple graphic symbols. Boards with a beautiful natural pattern “morim” or simply varnished. After staining or the first layer of acrylic lacquer, the soft fibers rise; they need to be sanded with medium grit sandpaper and a new coat of varnish applied.

A spectacular rustic table can be constructed from pallets (wooden pallets).
If a non-aqueous varnish is used, it is enough to apply 2-3 layers, and if acrylic, the number of layers can reach up to ten.
A good option for the kitchen table can be rejected boards, also dry.
We fasten the tabletop boards with planks, which we place at the joints of the boards. Using a drill, a screwdriver and self-tapping screws, we fasten the boards to the planks (at the joints we use two self-tapping screws, on solid boards - one). The use of a drill is necessary so that when screwing in the screws, the wood does not crack. We assemble the frame from the prepared sidewalls of the pallets. Using a drill bit suitable for self-tapping screws, we drill holes at the joints. We coat the joints with glue and fix with self-tapping screws. We install the legs: simply fasten the boards to the frame, screwing in the screws diagonally. To strengthen the structure, we make jumpers at the bottom in a similar way.

To make the legs, you need a bar with a thickness of at least 5 cm.
Wooden table with glued top
For a glued worktop, you need to choose boards of the same width. If the table is intended for a workshop and its appearance is not of great importance, you can use old floorboards: there are already grooves there. To make the grooves yourself, you need a milling machine.
To assemble the countertop, a flat surface is required. We simply coat the sidewalls with glue, join the boards without gaps and tighten the resulting structure with clamps. Depending on the glue used, the countertop should dry from 1 to 3 days. If everything is done correctly, you will get a countertop with a completely flat surface without cracks. It remains to work out the ends - first trim with a jigsaw, and then sand. In the absence of a belt grinder, this must be done manually - with sandpaper, first large, then medium grit.

After varnishing the parts, you can proceed to the installation, which consists of several stages.
If you don’t want to mess around with glue and clamps, you can use a ready-made furniture board from a hardware store. Then the countertop remains covered with a transparent or tinted varnish.
For a good result, you need to apply 5-7 (for acrylic varnish up to 10) layers. After every third layer work surface countertops should be sanded with fine-grained sandpaper, carefully removing dust with a damp cloth. At the varnishing stage, it is important not to rush: each layer of varnish should dry well.
It remains to make the legs of a garden or kitchen table: let's focus on the option with L-shaped legs. You will need boards with a thickness of at least 22-25 mm.

For a glued worktop, you need to choose boards of the same width.
L-shaped legs consist of two parts connected at an angle of 90. On the boards to be joined, it is necessary to make a selection, coat the joint with wood glue, and then install self-tapping screws.
When the glue dries, cover the legs with varnish and after drying, simply fasten them to the countertop with screws.

The connection of the legs with the tabletop has several options.
Table with straight legs
To make straight legs, it is enough to file a thick beam into pieces of the same length. The connection of such legs with the tabletop has several options.
In order for the straight legs to be installed securely, at home, you can use the connection on the dowels. You can make them yourself from acacia wood or buy ready-made ones. To assemble dowel joints, you need quick-drying wood glue (BF-2).

To make straight legs, it is enough to file a thick beam into pieces of the same length.
Table with X-shaped legs
Sequence of work.
- On the inside of the tabletop, we fasten two strips on each side with self-tapping screws.
- To make the table look good, the edges of the planks must first be cut at an angle of 52.
- We fasten the paired planks so that the legs fit, we make laps of 2-3 mm on each side.
- We lay the boards on a flat surface, crossing them at the right angle. We measure the distance between the ends of the boards: it should correspond to the width of the table.
- We circle the intersection with chalk: here it is necessary to choose half the thickness of the boards so that after assembly they lie in the same plane.
- We coat the recesses with glue and place the parts under the press for 1-3 days. For greater reliability, the connection can be strengthened with self-tapping screws.
- We varnish the legs.
- It remains to attach them to the table top, placing them in the grooves formed by the slats - and the table for giving with your own hands is ready.

X-shaped legs are made of bars or boards with a thickness of at least 50 mm.
Table with benches
The best solution for a gazebo is a dining table with benches attached to it. It is better to make such a design collapsible in order to clean it indoors for the winter.
The table will require thick boards (from 32 mm), which must be cut into pieces according to the drawing. In this version, two benches are attached to the table. When all the parts are cut, they must be sanded, paying special attention to the ends. We varnish each board separately.

The best solution for a gazebo is a dining table with benches attached to it.
To connect the parts of the structure, we will prepare the studs (length 160 mm), nuts and washers - 24 pcs each. For other connections, use self-tapping screws or nails of a suitable length. Using a drill, it is necessary to prepare all the holes for the fasteners.
According to the drawing, we assemble the countertop and the upper parts of the benches. We cut the cross rails along the edges, the angle should be 45. This is convenient to do with the help of a rotary miter box.
We make and fasten all the legs to the screws. We fasten the parts cut at an angle.

We varnish each board separately.
We tighten the product with studs with bolts. The holes for the studs must be pre-drilled with a drill. When installing the stud, you need to put washers on both sides and tighten the nuts using a wrench.

We tighten the product with studs with bolts.
Seat boards are fixed with gaps of 5 mm. When the seats are connected to the sawn supports, we attach them to the assembled base with 160 cm boards: you will need 4 boards.
We install the remaining studs and enjoy the result.

Using a drill, it is necessary to prepare all the holes for the fasteners.
VIDEO: Do-it-yourself wooden table in the gazebo
50 photo ideas: how to make this table with your own hands


