How to check the electrical panel. How to properly assemble an electrical panel in an apartment or private house
So, you have decided to put the electrical panel of your apartment or house in order. For example, you bought an apartment or strange things happen to the electrics in the apartment: the lights are flickering, the sockets either work or don’t work. Need a revision.
By electrical panel we mean either an apartment panel, or a panel in a private house, or its own section in a floor electrical panel.
When using electric motors great importance has a transmission of torque from the motor shaft to the device shaft. Torque is transmitted and varied using worm gearboxes. This part is quite in demand, and you can buy a worm gearbox in Yekaterinburg.
Inspection of the electrical panel - stages of work
Let's divide the electrical panel inspection work into several stages:
- External inspection of the shield;
- Inspection of the inside of the shield and its contents;
- Checking contact connections;
- Checking switching devices (, RCDs, etc.), including calculation of the electrical network.
Before inspecting the electrical panel, provide backup lighting in advance. Turn off all machines, including the input machine. When working, follow the instructions.
External inspection of the shield
Make an external inspection of the shield. This is a formality, but cracks and chips on the plastic apartment panel should be repaired. The shield cover must be closed and locked in the closed position.
Inspection of the inside of the shield and its contents
When you open the shield cover, you will probably see a layer of dust. Remove the casing protecting the machines. Wipe it from dust and dirt. Use a dry brush or brush to remove dust from switching devices and wires.
According to the rules, all cables must be labeled. must be signed. The marking of cables and circuit breakers must be such that anyone who opens the panel understands where the wires go and what the circuit breakers and protective devices protect.
Checking contact connections
There are three types of contact wire connections in the electrical panel:
- Connection of wires and metal panel body;
- Connection of wires and terminals of circuit breakers;
- Wire contact on terminal block contacts.
Connection of wires and metal panel housing
Connections between wires and metal shield can be bolted or with a nut.
The general algorithm for checking connections is as follows.
- Any contact of wires with the body should be free of oxidation and especially rust.
- If you need to disassemble the connection, strip the ends of the wire.
- At the end of the wire you need to make a ring to match the size of the bolt.
- Bolted connections must have a washer. Reinforce the bolt connection with a washer. The nut connection is reinforced with a lock nut.


For example, consider the ground contact of a metal electrical panel:


- Disconnect the ground wire;
- Strip the ground wire and ground bolt on the chassis;
- As a rule, the grounding wire of the electrical panel is attached under a bolt. At the end of the wire there should be a ring for the connection bolt;
- Restore the connection of the grounding wire to the panel body;
- The connection nut must be tightly tightened, ensuring reliable connection. There should be a flat washer under the nut;
- To strengthen the connection, screw on the second nut (lock nut);
- The grounding location must be marked with a grounding sign;
- Perform a similar operation with all wire connections to the metal parts of the panel.
Contacts in automatic machines and protective devices
Check the connections of wires and terminals. To do this, use a screwdriver to tighten the connection terminal bolts. Tighten firmly, but without fanaticism.
Wire contact on terminal block contacts
Similarly, tighten all the bolts on the terminal blocks installed in the panel.
Checking switching devices installed in the switchboard
After “pulling” all the contact connections, all that remains is to check the functionality of the switching devices installed in the switchboard. This mainly applies to and.
To do this, you need to apply voltage to the shield. Turn on all automatic devices.
Using the “Test” button on , check the functionality of the devices. Faulty devices, that is, those devices that do not turn off when you press the “Test” button, need to be replaced.

Testing of protection devices is done after pulling the contacts, because a weak contact may indicate a false fault during testing.
This completes the inspection of the electrical panel.
If you need to find a malfunction of equipment or electrical wiring, one of the operations that is performed first is to test the cables and wires with a multimeter (tester) to check the serviceability of the circuit (no breaks in it), the presence of a short circuit and determine its resistance (if necessary ). In this way, it is possible to easily and quickly check the serviceability of a lamp, iron, switch, fuse, transformer. This article will discuss how to test wires correctly with a multimeter.
What you need to know about the device to connect wires
If you plan to test the wiring in your apartment, there are a few important things you need to know about multimeters important facts. First of all, it is worth noting that you can check the wire most a simple device. An inexpensive Chinese model with minimal capabilities is quite suitable.
But at the same time, it is most convenient to use a device that has the dialing function itself. In order to set the device handle to the appropriate position, you need to turn it in the direction of the diode icon (as an option, an image of a sound wave can additionally be applied). This means that when checking the integrity of the wire, a sound signal will sound when the contacts are closed.
But availability soundtrack It is completely optional for testing wires with a multimeter. The fact that the circuit is broken will be indicated by a unit on the display, indicating that the resistance level between the probes is higher than the measurement limit. If there is no damage in the area under study, the resistance value will be displayed on the screen, which ideally should tend to zero (subject to operation in short-distance household networks).
Sequence of actions when calling
- Before you test the circuit with a multimeter, you need to turn the handle of the device to the desired position.
- Install the ends (measuring leads) into the appropriate sockets. The black wire goes into the socket marked COM (sometimes it can be marked with “*” or a ground sign), and the red wire goes into the socket where the Ω sign is indicated (sometimes it can be marked with an R sign). It is worth noting that the Ω sign can be applied either separately or in combination with the designations of other units of measurement (V, mA). This is the correct position of the test leads, which will allow you to maintain polarity when making further measurements. Although if only the integrity of the wires is checked, their relative position will not affect the result obtained.
- Turn on the device. A separate button may be provided for this, or activation may occur automatically when the knob is turned to the desired position when selecting measurement limits or operating modes.
- Connect the measuring ends to each other. If a signal sounds, it means that the device is operational and ready for use.
- Take the cable or wire being tested (its ends must first be stripped of insulation, stripped to a metallic shine, and dirt and oxides removed from the surface). Touch the test leads to the exposed areas of the conductor.
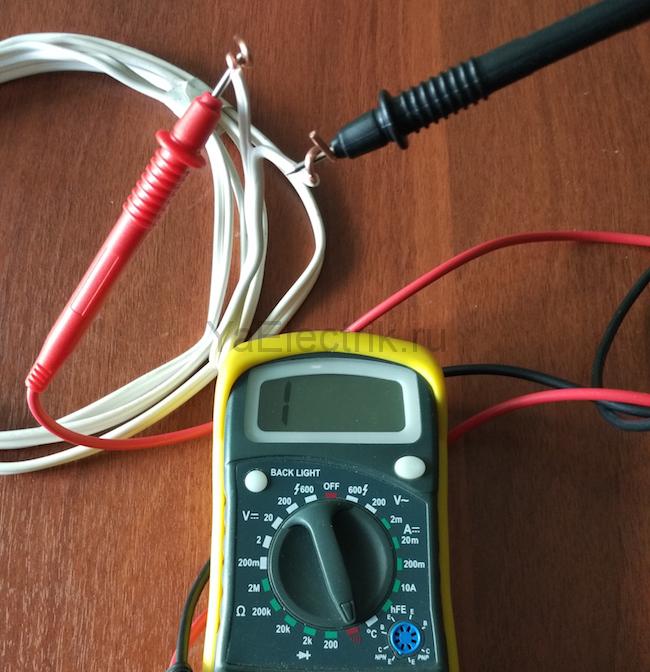
- In case of continuity, a signal will sound, and the device readings will either be 0 or indicate the resistance value. If the display shows 1 and there is no beep, the tested conductor is broken.
Rules for safe calling using a multimeter

testing the network cable with a multimeter
Working with electricity does not allow for unprofessionalism, so a certain list of rules has been developed that make it possible to make it as accurate, fast and safe as possible.
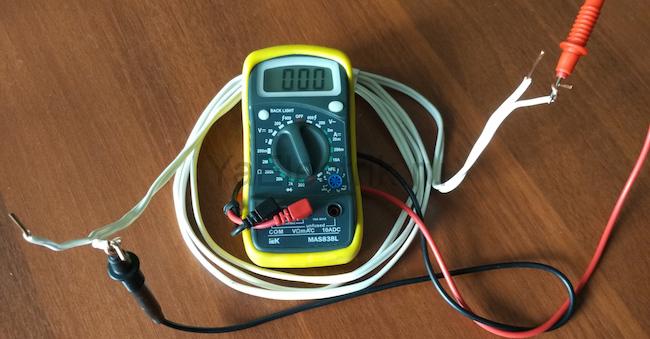
- When making calls, it is most convenient to use special tips at the ends of the measuring wires, which are more commonly known as “crocodiles”. They will make the contact stable and free your hands when taking measurements.
- When testing, the circuit being tested must always be de-energized (even low-current batteries must be removed). If there are capacitors in the circuit, they must be discharged by short-circuiting. Otherwise, the device will simply burn out during work.
- Before checking the integrity of a long length of conductor when taking measurements, it is important not to touch its bare ends with your hands. This is due to the fact that the resulting readings may be incorrect.
When testing a multi-core cable, it is necessary to separate and strip all existing cores from both ends. After this, you need to check the circuit for the presence of short circuits: to do this, a “crocodile” is attached to each core in turn, and all the remaining ones are touched with the other measuring end in all possible combinations.
Check to see if there is a short circuit between the cable cores. If the indicator shows “1” and there is no sound signal, then everything is in order, otherwise there is a short circuit.
In this case, a sound signal will indicate the presence of a short circuit between the tested wires. This may not be of practical importance for small cross-section multi-core cables operating in low-current networks, but when working with high voltages it is fundamentally important.
We call the cable cores. There is a sound signal - everything is fine, otherwise the core is damaged.
To determine the integrity of the cores, the same operation is performed, only at one end of the cable all stripped cores are twisted together. When searching for a break, it is important to consider that the absence of a sound signal at either end will indicate a violation of the integrity of the conductor.
We check the wiring in the apartment with a multimeter
Let's take as an example modern apartment, in which the wiring is made in accordance with current requirements and standards. This means that when laying the lighting lines and power outlets, they were routed, and they were laid in each of the rooms. separate wires. Each of these circuits is powered from the apartment panel through a separate circuit breaker.
If the light has gone out in one of the rooms, you should first check that the lamp is working properly. Before starting work, it is necessary to de-energize the room/apartment depending on the power supply. When using an opaque incandescent lamp in a lamp, the integrity of the filament is difficult to visually determine, so you will need a multimeter and its continuity function. Let's figure out step by step how to do this correctly.
First you need to check the shield for triggered circuit breakers. In the first case, they will be in the on position (then the fault may be hidden in the room switch, lamp or socket). The likelihood of damage to the wiring in such a situation is low. If the device works, you will need to check everything except the room switch, including the switchboard itself.
If the machines don't work

We ring the switch. When the switch is on, there should be a sound signal, when off, there should be silence and “1” on the indicator.
- Make sure there is voltage at the input and output of the machine. If it is, you can proceed to further verification.
- Prepare the device for operation and check its serviceability by short-circuiting the measuring leads.
- Unscrew the lamp from the socket.
- Touch one of the measuring probes to the base (the metal part of the lamp with threads), and the second to the central contact of the lamp (the insulated center of the end part of the base).
- A sound signal and instrument readings that are different from 0 or 1 mean that the lamp is working. If it is faulty, you need to replace it, which will solve the problem.
- We check the cartridge for serviceability. To do this, you need to disassemble the lamp, make sure that the connected wires and contacts are intact. If everything is in order, then the cause of the failure is not in the cartridge. If malfunctions are detected, they must be eliminated. The lamp cannot be screwed in yet.
- We check the serviceability of the room switch. To do this, remove the plastic cover, unscrew the screws and remove it from mounting box. We inspect the equipment for the appearance of carbon deposits and check the tightness of the fasteners. If everything is in order, you need to install the measuring ends of the tester on the contacts of the switch. The appearance of a sound signal when dialing in the on position will indicate that the equipment is working properly. The wires do not need to be disconnected.
During such a check, as a rule, a malfunction is identified, which becomes the cause of all the troubles. Eliminating it allows you to quickly solve the problem.
If the machine worked
To ensure electrical safety during work, in this case the voltage is turned off using a general apartment circuit breaker. Next, the serviceability of the socket and the wires connected to the lamp is determined according to the algorithm described above. If there are no faults, you need to check the wiring itself using a multimeter and the continuity function. Such malfunctions happen quite rarely, but they still happen, for example, during installation suspended ceilings or decorative elements interior
The wiring in this case is performed as follows.
- Using a screwdriver, disconnect the connected conductor (if installed correctly, it is located at the bottom) and move it to the side. The “zero” of this group is, as a rule, located at the zero clamp under the machines.
- Unscrew the incandescent lamp from the socket. Using a ready-to-use tester, we check the line by connecting one of the measuring probes to “zero” and the other to the disconnected conductor. If the device beeps, it means the wiring is shorted.
- In this case, in the room under the ceiling above the switch, we find and open the junction box. We disconnect the wires.
- We check all groups of wires for short circuits.
To determine the section of the circuit in which there is a short circuit, we again check the circuits on the apartment panel with a multimeter. If the signal sounds, it means that it is the wire laid from the switchboard to the box in the room that needs to be repaired. Otherwise, the search will need to be continued until a result is obtained.
Video
From all of the above, we can conclude that having a multimeter with a dialing function in the house is an objective necessity for anyone. home handyman. With such a device, in most cases it will be possible to quickly eliminate minor faults without turning to specialists for help.
Unscheduled shutdown of electrical circuit breakers is a problem faced by almost every resident of an apartment and private house, owner of a summer house, country cottage. Most often, traffic jams occur due to surges in the power supply network, short-term current overloads after turning on powerful household or construction equipment, closures. In order to restore the power supply, it is necessary to determine the reasons for the outage and start the electrical circuit breaker.
The lights in the apartment went out: what to do?
Before you climb into the electrical panel yourself, you need to understand the reasons for the shutdown. So, if there is no light in the entire house and neighboring ones, then the cause of the shutdown could be problems at the power plant, rolling blackouts. In this case, you should turn off all electrical household appliances from the sockets (so that when high voltage current is supplied it does not burn out), and wait for the power supply to be restored. If you live in apartment building post-war years of the twentieth century, (for example, in Khrushchev), then, most likely, the safety plugs in your apartment or electrical panel on the site were knocked out.

In order to restore power supply, you must:
- Exit to landing;
- Open the electrical panel;
- Determine which of the plugs has flown out (this can be done visually: the white button on the black round plug will stick out from the body by several cm);
- Press the white button into the fuse housing.
New ones may be installed at some sites electric machines. If the pedals of the machine are lowered, it means the plugs have been knocked out. In order to return the light, you need to move the pedals to the top position.
Why and how to turn off the electricity in the apartment
When carrying out any electrical installation work, long-term departure of the owners or the emergence of potentially dangerous situations related to the quality of the wiring, the apartment must be de-energized. This can be done from the landing.
So, to turn off the electricity in an apartment, you must follow these recommendations:
- If the plugs in the machine are old, ceramic, without buttons, in order to de-energize the apartment it will be enough to simply unscrew them;
- If the plugs on the site are black, with buttons, you need to press the small red buttons on all of them;
- If there is a new machine on the site, in order to turn off the power to the apartment you will need to lower its pedals down.
After this, you need to check whether you have turned off your machine. Otherwise, when carrying out repair work, you can get seriously hurt.
It will be more accurate and easier to check the shutdown using a special indicator screwdriver.
Using this tool is simple: you just need to insert a screwdriver into a socket and check whether the indicator on the tool lights up. If yes, then the apartment is not de-energized. Any outlet in your apartment is suitable for this test.
How to turn off power to an apartment from the landing
An apartment panel may contain several groups of switches. One group may be responsible for the light in the rooms, the other for the current in the sockets. In order to de-energize the apartment in this case, it will be necessary to move all the toggle switches of the machine to the lower position or find a common switch to which phase and zero are connected. It is this switch that is responsible for introducing electricity into the apartment. This switch is located under your group in the electrical panel.
In old houses, in addition to the main circuit breaker, it is necessary to turn off the switch, which is responsible for zero.
This switch is located in the panel below. There are often two such switches for a standard landing. You can determine which of them applies to your apartment by logic: the one that is closer to your apartment will be your switch.

In this case, it is necessary:
- Always check whether the apartment is de-energized (voltage in sockets) using an indicator screwdriver;
- Warn neighbors about possible outages;
- Unplug household appliances that require delicate handling (computer, refrigerator, washing machine);
- Do not touch the plugs if the electric meter is faulty: a broken electric meter can mislead by showing that electricity is not supplied;
- To continue repair work that requires electricity, it is necessary to use special carrying cords with sockets connected to the machine's wires. At the same time, such manipulations should not be carried out without a specialist.
So that, if necessary, you can quickly find and turn off your machine, you can sign it. Yes, over working group You can write the apartment number with a marker.
Several ways to open the door panel without a key
The electrical panel is made of fire-resistant material, is located in the entrance and, often, consists of two or three sections responsible for the machine, light meters and devices operating on weak currents. Each section has its own door that can be locked with a key. This key may be kept by the electrician servicing the house or the concierge. Often, duplicates are taken from the main key and issued to each apartment. This is done so that, in case of unforeseen situations, residents can quickly react and not wait for an electrician. But what to do if you were not given the key?
There are several ways to open switch box keyless:
- If the shield is protected by built-in small locks (as on mailboxes), to open them you can use a women's hairpin - hairpin. To do this, you need to insert the pin with one leg into the upper part of the lock, the other into the lower part, and try to turn the mechanism. Instead of a hairpin, you can use any other thin but durable object. The main thing is to act carefully so as not to break the object in the lock.
- Simple mechanisms can be opened with a flat-head screwdriver. To do this, insert a screwdriver into the lock and turn it to the right.
- Padlocks can be opened using a crowbar or pliers.
Before hacking the shield, you can contact your neighbors. Often, residents who have lived in the house for a long time have their own keys. In this case, after an emergency blackout of the apartment, the panel must be closed. This will protect curious children and adult residents of the house from injury.
If the traffic jams are broken, how to turn on the electricity (video)
Power outages in old houses are common, because old electrical wiring and the machines themselves are not designed for modern electrical engineering. Therefore, often, when simultaneously turning on large quantity electrical appliances, automatic machines. If your lights turn off often, then you, like no one else, should know how to quickly turn on the machine. After all, sometimes there is absolutely not enough time to wait for electricians. Use the tips above and turn on the machines yourself quickly and safely!
The fact that home electrical wiring should be given close attention is evidenced by the sad statistics of the Ministry of Emergency Situations: very often the cause of fires in apartments and houses is faulty wiring. electrical wiring. After all, if a short circuit occurs in it, then the temperature of the spark is so high that everything nearby can ignite.
What should you know to keep the electrical wiring situation under control?
In principle, proper electrical wiring should not be a headache for a homeowner. This is the concern of the specialists of the company with which the contract for the supply of electricity is concluded. But you understand - in our country... Moreover, the competence of electricians is now in question. And therefore, if you own house or apartment are not indifferent, you will have to spend time and inspect all the ingenious “nooks and crannies” through which electric current travels throughout the house.
Naturally, you should start from the place where the current actually enters your house. Traditionally, the entrance to the house is considered to be the place where the electricity meter is installed. Although electricians prohibit apartment owners from poking their noses there, you can carefully look into it. 
Owner of a private house
The check should begin with overhead line that suits your home. Inspect the pillars: there should be no lopsided or wooden poles. If the highway is made from old aluminum wires, on which insulation is missing in places, then such a wire should be replaced immediately! Naturally, not on your own. You must request its replacement. Ideally, on a SIP wire, which is self-supporting. The input circuit breaker must have characteristics B, and the rated current must be 25 A. Not more.
Owner of an apartment in an apartment building
Electricity is supplied to the apartment from a panel installed on the staircase. Meters are installed in such a panel depending on the number of apartments on the site. Circuit breakers, installation conductors, and clamps – “nuts” – are also installed here. Since you have electricity in your apartment, it means everything is connected correctly. And you should pay attention to some flaws, which, unfortunately, are very common:
- The shield door does not close. This must definitely be eliminated. After all, if the door is open, hooligans can easily get in. Or children will climb in unknowingly;
- the inside of the shield is covered with a thick layer of dust. If there is high humidity, dust conducts electricity, and a short circuit and fire may occur in the panel;
- the wires from which the risers are made are aluminum. If this is the case, then remember that you will not be able to ground it.
After you have finished entering, go inside the living quarters. The main thing here is the reliability of the wiring. If you notice that the wiring in your home is made of aluminum, then replacing the wiring should be a top priority when planning your renovation. Aluminum is a very capricious material. And the majority modern switches, lamps, sockets are not intended for aluminum wire. And their contacts get very hot if aluminum wires are connected to them.
If the wires are copper, then they should be rigid, not stranded. If a soft conductor is twisted with a hard conductor, then this connection will become very hot. There is a very high risk of fire.
All switches, sockets, lamps must have a complete body and cover. All tightening screws must be in place. If there are cracks, immediate replacement is required. A cord with damaged insulation is replaced. Nothing should get hot, hum or smell like burning.
Where water is often spilled, there should be no switches or sockets.. If you are forced to constantly use extension cords, then this means that you simply do not have enough sockets. Additional sockets should be installed. Both the tee and the extension are temporary solutions. They cannot be used on an ongoing basis.
If you use electric heaters, they should not be homemade - only factory production! They should be located no closer than 1 meter from materials or flammable objects. They must stand firmly so that they cannot be knocked over by an accidental push. 
All electrical devices devices with a metal body (washing machine, refrigerator, etc.) must be grounded. If this is not possible, then they should be protected using an RCD, which is installed, or in distribution board, or as a socket adapter.
Electricity in the kitchen
If your stove has different electrical equipment(electric spit, electric ignition), then the gas supply must be carried out using an insulating insert. If a leak occurs electric current, then the liner, which is not insulated from the stove, can quickly become hot, and then the gas will ignite.
All electrical appliances must be located at a sufficient distance from water sources so that drops do not fall on them. After all, electricity and water are bad neighbors.
An apartment or house switchboard, for a person far from electricians, is a box with some things, an electric meter and a bunch of wires inside. It’s unclear why everything is there and what good it does. And it is completely unclear by what logic it was collected. And most importantly, it’s simply scary to climb there.
If you have such thoughts and reactions to installing an electrical panel in a private house or apartment, congratulations! You are a reasonable person. Because an electrical panel is a really complex and unsafe thing. To competently design and assemble a distribution and metering panel, you need to know a lot of things.
In short, assembling an electrical panel in an apartment is impossible without:
- electrical wiring project;
- choosing the right location for installation;
- shield assembly diagrams;
- choosing the right housing (metal or plastic, built-in or wall-mounted);
- competent selection of components;
- correct installation of equipment;
- proper connection of the switchboard to the power cable.
Attention! Any mistake will make the operation of the equipment unsafe, and this will affect all the electrical systems in the house and your household appliances. Therefore, installation of the switchboard should only be carried out by an experienced electrician!
And we will tell you about how the shield is designed, what types of circuits there are, what is inside the case and other subtleties. So that you can check the work of the master and understand why this or that part was chosen.
- Buy a ready-made electrical panel for installation in an apartment or assemble it yourself
1. Selecting an installation location
Let's start with the simplest part - where to place the switchboard in the apartment? It is most convenient to place it near front door in the hall. In this case, you will not have to pull the power cable far from the site. Most best option in height - at eye level of an adult. And it’s convenient to take meter readings and turn off the machines if necessary.
For those who support pushing everything under the ceiling, “for greater security, like they used to hang meters,” let’s say the following. Old electric meters with fuse plugs were simply mounted on the wall without boxes, and therefore were hung from the ceiling. A modern electrical panel has a durable casing and is locked, so children will not get in unless you leave the key in a visible place.
When choosing a location for installing a panel in a private house or cottage, you need to consider where and how the cable from the overhead line or underground supply line is or will be installed. Data on external networks can be obtained from local energy sales.
2. Buy a ready-made electrical panel for installation in an apartment or assemble it yourself
As the old song says, “how far progress has come,” you can buy a ready-made shield with a full filling. If your electrician suggests such a “proprietary” assembly design, then do not be alarmed. The shields are collected by enterprises and electrical installation companies, including on order or for standard projects apartment wiring.
The main point that needs to be clarified is whether your master has worked with ready-made shields before or this is his first experience. If he has installed a dozen or two such assemblies and knows their features, then feel free to agree. But if you are a “guinea pig” for the first experiment, refuse. It’s better to let him assemble it himself, with his own hands, the old fashioned way.
3. Switchboard elements
The layout of the panel in the apartment is one of the main points, but before we deal with it, let's see what elements are included in the design. So that you can understand the symbols and composition of the wiring diagram.
Typically, when installing a shield, use:
- Introductory machine. It is placed to protect the entire wiring circuit. The cores of the main incoming cable are connected to the terminals of the input circuit breaker. For comfortable work with an electrical panel, a switch is often installed in front of the introductory circuit breaker. It allows you to de-energize the entire assembly to replace elements, safe preventative maintenance, and completely shuts off the power supply to your apartment or house. In this case, the power cable is connected to the switch.
- Electric meter. It is installed after the introductory machine and calculates the energy consumption in a house or apartment. Sometimes the meter stands separately, up to the panel, along with a circuit breaker. For example, on the site of an apartment building.
- Residual current device— designed to protect against electric shock and prevent fires. The RCD in the circuit can be one, installed after the meter, for example, in a one-room apartment with a small load. Or they install several RCDs on separate lines with high consumption (for an electric stove, washing machine, air conditioner).
- Linear automata. Needed for individual lines on different rooms, household appliances and lighting. They break the circuit if an overcurrent or short circuit is detected, protecting the wiring and connected equipment from damage. Triggering the machine can prevent a fire due to heating and ignition of the wire.
- Diffautomatic protection— can be installed instead of a pair of automatic circuit breaker + RCD on separate power lines of electrical appliances.
- DIN rail— mounting element for installing equipment. Attached to back wall electrical panel housings. Depending on the dimensions of the cabinet, the number of DIN rails and the possible number of installed modules may vary. In order not to make a mistake when purchasing a switchboard housing based on the number of modules, you need to draw up a wiring diagram.
- Connection bars. Needed for connecting and connecting working zeros and grounding wires. The panel uses both neutral terminal bars and grounding ones.
- Distribution buses. Installed for a “bundle” of linear machines, RCDs, and automatic circuit breakers. Comb busbars have reliable insulation and allow you to quickly and safely connect a number of machines through the input terminal block. They can be used both for the current conductor and for the working zero.
4. Diagram of the electrical panel in the apartment
Is the diagram always used when installing a panel? No, not always, but only a master with extensive experience and experience in electrical installation can assemble a distribution board for electrical wiring in an apartment without a diagram. When you make shields constantly and hundreds of them a year, the diagram is imprinted in your head. That is, in fact, it is always there, it’s just not drawn on paper.
Well, if the diagram is printed and you are interested in understanding what kind of rectangles and lines are depicted there, let’s figure it out together.
What types of diagrams are there and what is indicated on them?
The diagram should indicate everything, from the input circuit breaker to the limit switches on the lines. Moreover, not just squares are drawn, but the full designation with the denomination and protection class is written down. This diagram will be useful when replacing modules or adding new ones.
Let's now look at different variants diagrams for assembling a panel in an apartment.
For housing in an old building (wiring without grounding)
In Soviet-built houses and reconstructed old buildings, the wiring is not grounded. Therefore, there is no grounding PE bus in the electrical panel circuit.
For a one-room apartment we use the simplest version of the shield. Its design will include:
- housing with din rails;
- two-pole input circuit breaker 32 Ampere;
- electric meter (the example shows “Mercury 201”);
- RCD 2P 40A at 30mA;
- 3 single-pole 16 A circuit breakers (lighting, sockets, washing machine);
- zero PEN bus (for separate connection of zero and protection).
Attention! For safe operation wiring in such schemes separates the neutral working and protective conductors in the cable on the PEN bus, even in the absence of a ground loop.
To protect against voltage surges when “zero burns out” due to dilapidated house wiring, a voltage control relay is added to the switchboard circuit. It is triggered when the insulation breaks down and the phase and neutral wires come into contact, breaks the circuit and protects household appliances from damage.

For two- to three-room apartments, this scheme expands to required quantity linear machines. And on socket lines with large household appliances, for example, a washing machine/dishwasher, additional two-pole RCDs with a lower rating (16-25A/10mA) are installed to protect against electric shock. This allows for high safety even without a ground wire.
Electrical panel diagram in an apartment with RCD and grounding
If the house is new or the cable in the entrance was changed and a ground loop was installed, then the layout of the apartment panel will be different. For example, let's also take one-room apartment with an electric stove in the kitchen.
When installing the switchboard you must use:
- plastic box with 2 rows of DIN rails;
- two-pole input circuit breaker 40 A;
- single-phase electric meter;
- RCD 2P 50 A at 30 mA;
- 4 single-pole package switches (three for 16 A and one for 25 A for the stove);
- zero bus (working zero N) and ground bus (PE);
- comb bus (for connecting machines).
Attention! An electric meter with a nominal value of 40 A with this circuit option is installed on the site or in a separate box paired with a circuit breaker. But it can be added to the plan and placed between the input machine and the RCD.
In an apartment with big amount rooms and cable lines For powerful equipment, it is necessary to install additional 2-pole RCDs with a rating of 16-25A/10 mA. They will react faster to a small leak and protect against electric shock.
For example, washing machines often “fight with electric shock” because of problems with internal wiring. And if you touch them wet hands, then you can get a noticeable blow. This is extremely dangerous, especially for children or people with weak hearts. The RCD on the connection line of the machine will sense surges and turn off the power at the first contact of the bare wire with the body.

Both circuit options, with and without grounding, are designed for networks with a voltage of 220 Volts, which is used in most residential buildings in the city. But some buildings receive power at 380 volts and the circuits of apartment electrical panels in them are much more complicated.
Switchboard diagram for an apartment with a three-phase power supply network
In new houses, for example, in town houses, a network with a voltage of 380 Volts is installed and the corresponding wiring is made in the housing. The electrical panel diagram for an apartment of this type is more complex and uses three-phase and single-phase devices. An electricity meter is usually installed separately on the site, paired with a three-pole circuit breaker or switch.
In principle, such an assembly can also be used for a private house with three-phase power supply. But with the mandatory installation of a general fire protection RCD. It is not necessary to install it in an apartment if there are separate devices on the lines.
To install the shield you will need:
- housing with DIN rails;
- three-pole input circuit breaker for 63 Amperes;
- three-phase meter;
- two-pole RCD 40 A at 30 mA (to protect bathroom lighting lines, washing machine and room sockets);
- linear machines for 1 pole (rated 16, 25, 40 A);
- additional two-pole breakers for wiring kitchen sockets 16A/30mA and hydromassage bath(25A/30mA), they can be replaced with a pair of RCDs + a circuit breaker with similar characteristics;
- zero buses and protective;
- comb tires.
The circuit can be supplemented with an additional RCD for an electric stove (2P 25A/30 mA).

Panel in an apartment with a three-phase electric stove
In some houses, a three-phase network cable is supplied to the apartments, but the voltage of 380 Volts is used only to connect the electric stove. All other wiring is done for single-phase network and the shield turns out to be combined.
At the entrance there is a three-pole 63 A input circuit breaker (after the switch), then a three-phase meter. Then the power wire is run along two different branches. In the first, excess phases are removed and a switchboard circuit and electrical wiring with one phase of 220 Volts are installed. The second branch is left unchanged and three phases are connected to the electric stove with a straight wire.

A three-pole circuit breaker with 20A or 32A (depending on the power of the electric stove) and a four-pole RCD with an ampere rating exceeding the machine’s rating by one step must be installed on the line, i.e. For circuit breaker 20A should take a 25A/30mA RCD, for a 32A machine - a 40A/30mA RCD. Or they install a difavtomat with similar characteristics for current (20A or 32A) and leakage (30 mA).
When installing wiring, use a three-phase five-wire power cable with a current load from 20 to 32 Amperes and a special socket and plug for connecting an electric stove.
If instead of a stove there is a separate panel and a separate oven, then you will have to run two connection lines. On the panel - three-phase, on the cabinet, most often single-phase, with the installation of appropriate circuit breakers and RCDs. (About the choice of sockets for the oven and hob you can read it)
Refrigerator for separate machine
Often, in the panel diagrams in the apartment, a separate line is made for the refrigerator in order to turn off everything except it. This allows you not to empty the refrigerator of supplies during a vacation or business trip and at the same time turn off the power to everything else for safety.
5. Switchboard in a private house
Houses are different, just like apartments, and the layouts in them are also different. But they can be divided into 2 groups: for wiring at 220 V and at 380 V.
Distribution board for 220 V electrical wiring in a private house
For small-format suburban housing or country house no complicated assembly required. There is no large load, and therefore the circuit resembles a simple electrical panel for a one-room apartment.
For installation you will need:
- box with DIN rail;
- input two-pole switch 40 Ampere;
- electricity meter (single-phase, corresponding in current rating to the input circuit breaker, single or multi-tariff);
- two-pole circuit breaker or RCD 50 A/30 mA;
- batch switches/circuit breakers for 1 pole (according to the number of load lines, with a rating of 16 A for lighting and sockets and a rating of 25-40 A for a powerful load, for example, a stove);
- zero bus;
- safety bus;
- insulated connecting comb.

If there are more working lines than in the diagram, for example, there is also a garage and a workshop, then we add circuit breakers for them and install additional RCDs to protect against current leaks due to breakdowns on the housing and damage to the wiring. In a garage or workshop this is necessary because high humidity and lack of heating. It is better to install an extra RCD with a small rating than to “catch” an electric shock in a damp room.
Assembly of a panel for a private house with a three-phase network
If the house is large, like a cottage, then it is most often powered from a three-phase network. There is a lot of wiring both in residential premises and in outbuildings. Therefore, the project turns out to be serious and many elements are needed for assembly.
The electrical panel diagram for a home includes:
- housing with 2-3 rows of DIN rails;
- 3-pole input circuit breaker 63A;
- three-phase electric meter (rated current 63 A);
- four-pole RCD 80 A at 300 mA (for general fire protection of the wiring circuit);
- distribution buses;
- 1P automatic switches for individual load groups (lights - 16A, sockets - 25A, powerful household appliances and outbuildings - 40A);
- additional two-pole RCDs with a rating of 10/16/30 mA to protect certain groups: sockets, garage (the current value is an order of magnitude higher than in machines from 25 to 50 Amperes);
- a three-pole circuit breaker for 20 A and a 4P RCD for 25 A with a leakage current of up to 30 mA for connecting an electric stove or a difautomatic circuit breaker for 20 A/30 mA;
- zero buses and protective PE bus;
- comb tires.

The power of the fire-fighting RCD of 300 milliamps was selected for the total load and significant background leaks. It is designed to protect wiring from fire due to short circuits or damaged insulation. To protect individual circuits from electric shocks, devices with a lower rating are installed to respond to a leak in the protected line.
The house uses a voltage of 220 V for lighting and sockets for household appliances, as well as a 380 V line for powering the electric stove. A single-phase network branch goes to outbuildings.
If you need to power a three-phase load, you can add another power circuit with output outside the house. Or install a machine, an RCD and a 380 V socket inside the house to connect the load through an extension cord. This option is suitable if the equipment will be turned on very rarely.
6. How to choose a housing for an electrical panel in an apartment or house
Since all the elements from the diagram are installed inside the panel body, it must be selected after developing the installation plan. So that everything you need will fit and there will be some reserve for adding components. The result is a diagram for 42 modules, which means we’ll take the case for 46, or we’ll take 66 places, and we’ll take the cabinet for 72.
The free space will allow you to connect a new line or pair if the need arises. For example, we bought more household appliances, but the cable and sockets in the kitchen/bathroom will not carry the overall load and we need to “throw in” additional ones. Or they changed the stove to a more powerful one and it needs a cable with different characteristics. Therefore, it is better to take a cabinet with a reserve number of modules than to later replace it with a new one and reassemble the entire panel.
When choosing a housing, the space available for connecting wires and connecting groups of machines is also taken into account. During installation, it is necessary to maintain a safe distance between elements. You cannot push them and the wires tightly, compacting them like sprat in a jar.
Types of electrical panel housing
All cases or, as they are also called, boxes can be divided according to two main characteristics:
- material of manufacture (metal, plastic).
- installation method (mounted, built-in).
Metal cabinets Most often they are wall-mounted and mounted on the wall. They are available in both standard versions with a degree of protection IP 31-43, and moisture resistant with IP 44-54. To assemble a shield in a house or apartment, a standard housing is sufficient; it is unlikely to get exposed to rain or be placed next to water supply pipes. Sealed boxes are useful for installation outdoors and are not of interest to us.
There are models of metal cabinets for installation in a niche; if you like metal and want to put the cabinet into the wall, choose this one.
Plastic shields Available for both wall and niche installation. You can choose a plastic cabinet for small assemblies (in apartments/country houses) and for complex multi-component panels (cottage, Vacation home, large apartment). In terms of strength and IP protection, they are not inferior to metal ones.
Advice! When choosing a shield for a niche, make it slightly larger than the body in width and height. It is much easier to fix the installed shield using foam or alabaster in large opening than pushing it into a niche end to end.
Number of modules and filling of boxes
Cases are sold with installed DIN rails for a certain number of modules, it is indicated in the product name. Din rails are mounting guides for installed equipment. Automatic machines, RCDs, and meters have special latches that secure them to the rail.
The number of modules is the number of elements the size of one module that can fit on the slats. If an element occupies more than one module in width, then fewer elements will fit into the housing. To determine the required number, you need to add up the dimensions of all the circuit elements in the modules, taking into account the margin for the distance between the parts.
Some models are equipped with DIN rails with end caps that can be removed. This frees up space for additional elements. But it is better to take a cabinet with a reserve number of modules, as we have already said (for example, we counted 66 modules, we bought a box for 72).
To connect working neutral and protective wires, special buses are used. Some cabinet models have them installed, but most often when assembling the panel they need to be purchased separately.
7. Body of the shield for the apartment in the online store website
RCD
The circuit may have one residual current device for the entire wiring, it is also called a general fire protection RCD, and separate ones for lines with a heavy load. The current rating of a general fire protection RCD in amperes is theoretically equal to the rating of the machine, but from practical experience it is better to set protective device with a high rate. This will protect the RCD from damage due to overload. In such cases, the machine does not operate instantly, but after some time there is a danger that the protective device will burn out. But if the rating of the RCD is higher than that of the machine, it will easily tolerate an overload of even 30-40%.
The magnitude of the differential current depends on the total load on the wiring. For simple circuits, a 30 mA RCD is sufficient; for complex and loaded circuits, use 100 mA or even 300 mA. The main task of a fire protection RCD is protection against short circuits and fires.
The following are suitable as general ones:
RCDs on lines usually have a difcurrent value of 10 mA; they must respond quickly to minimal leakage, but according to the recommendations of the PUE, equipment can also be installed at 30 mA. Based on the nominal current rating, it is also better to take a “protection” with a larger value, that is, for a socket line paired with a 25 A circuit breaker, preferably a 40 A RCD.
For lighting, we take a 25-amp RCD to a 16 A switch.