DIY classic curtains. Master class: how to sew curtains for the kitchen with your own hands with patterns
Details? This will be an article: how to sew curtains master class. In it you will learn how to sew beautiful curtains. This will be information on how to sew simple curtains.
A curtain is a curtain made of thick fabric. A curtain is a curtain made of thin fabric. The difference between curtains and curtains is in one technological operation, due to the density of the fabric. There is also a difference in allowances due to the thickness of the fabric. The bottom of an organza curtain, for example, can be overlocked by inserting a fishing line or thick ribbon into the edge when overlocking. Also, for thin fabric, it is permissible to plan an allowance for the bottom of the curtain of 2 cm, 1 cm each (). And for thick fabric, you need to plan a minimum of 4 cm, 2 cm of hem each (a hem seam with a closed cut), since if you plan only 2 cm, then such a hem will turn away from the other side and look poor.
You can see how to calculate a curtain in this article.
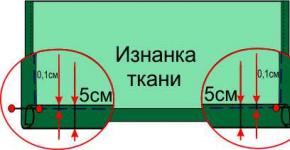
1. Find the face and back of the fabric. The face of the fabric will look into the room. First, we sew the sides with a hem seam with a closed cut. Since our fabric is thick, I allowed an allowance of 8 cm for processing the sides. This means we turn in 2 cm, and then turn in another 2 cm, so 4 cm comes out on one side and 4 cm on the other.
2. We process the bottom of the curtain, using a hem seam with a closed cut(if we planned it that way). We turn in 5 cm, and then another 5 cm, so we took a total of 10 cm to hem the bottom.

3. Now it’s time to sew on the curtain tape. Here you need to pay special attention to what you need correctly find the face of this tape, it is very often confused with the wrong side, and then the entire tape has to be altered. Look at the photo, I lifted the sewn ribbon with my finger. On the wrong side it does not rise at all, whereas on the face it rises through the dotted line.
Therefore, look carefully: where you can lift the sewn-in narrow ribbon with your finger, this is the face of the ribbon. You will then attach hooks to this narrow ribbon to hang the curtain. There are two of them in a strip; you can hang the curtain from the top strip, or from the bottom one. Accordingly, your curtain will hang higher or lower.
We do not cut the tape itself from the roll and do not cut it ahead of time! We sew it directly from the roll, and then we cut off what is unnecessary.

4. Place the fabric face up and place 2cm of tape underneath. Then we wrap the piece of fabric with tape.

5. And add 0.1 cm from the edge of the tape. When we finish this line almost to the end, we turn the other edge in the same way.

6. Turn the tape inside out, making a 1-2mm edge so that 1mm of the tape does not peek out from the face.


8. Using a pin or your hands, remove the laces to tighten them from under the allowance.

8. We write the remaining lines where we like, I did it as in the photo, but you can write it a little differently. The main thing is to ensure that the tape does not warp. It is better to lay out the fabric and ribbon evenly and pin them together with pins.
It is also better to make lines one after another and towards each other, in order to avoid distortions of the tape. When attaching the tape, do not accidentally grab the laces, otherwise they will not tighten.

9. We pull the ribbon together with the laces, beautifully laying out the folds on the face. And we tie the laces tightly in twos, not fours, so as not to tighten the edge. The laces can be cut, leaving 5cm ends, or you can sew bags and put them there without cutting the laces at all, I sewed such bags, but during use I see that it would have been better to tie them and cut them right away, and put the ends of the cut laces under a transparent tape so that they don't stick out.
You can bring the ends of the laces under the ribbon with a regular thin hook.

10. Here is our finished face view. The stitches can be made with contrasting threads, or you can match them to the color of the fabric, see for yourself which design you like best.

But I sewed this curtain for my living room. In my opinion, it turned out quite well to sew beautiful curtains.

P.S. Where to put stitches along a narrow ribbon if sewing a curtain? The sewing is exactly the same, and look at the stitching in the picture.
You can sew curtains for the kitchen in the same way. If you have little space, you can simply make it shorter, then it will seem. that there is more space.

Some visitors ask how to sew curtains for the kitchen. I answer - exactly the same as ordinary curtains. You can only make it shorter in length, not reaching the floor by 20-30cm or more, so that the curtains do not take up much space.
I think now you know how to sew curtains yourself and you will definitely succeed!
In order to sew curtains yourself, no special cutting and sewing skills are required. The technology for making them is simple, you just need to have everything you need on hand. Having once made curtains on her own, in the future the housewife herself will be able to decorate any room, creating a unique style.
In contact with
Which curtains are easy to sew yourself?
How to sew curtains? This question is often asked by housewives who have a lot of free time and a lot of interesting ideas in their heads.
Curtains are a certain type of fabric that “dresses” the window.
The technology of sewing curtains is easy to learn and use, thanks to which the housewife can make simple types of curtains.
Design classic style curtains is a paired combination of panels of different fabrics.
Most often, housewives sew a thin, transparent, freely hanging curtain that covers the entire window space, with thick paired curtains. It’s easy to make your own patterns for these curtains. Simple curtains can be complemented by a lambrequin (a frill of short curtains at the top of the window).
You can make it with your own hands. They look like smooth fabric sheets, the rise of which forms overlapping horizontal folds. You can sew such a curtain in two types:
- with horizontal folds in the lower area of the fabric;
- with horizontal folds throughout the curtain.
You can decorate the room in an original style with help. They will elegantly decorate the kitchen or any other room. A woman can make handmade loops on her own, and a sewing machine will help sew the main fabric of the curtain.
Sewing curtains with your own hands can also be applied to making English curtains. They look like a garland of soft fabric with a traditional English pattern. The curtains are in the raised position, held in place by tapes.
You should start sewing curtains, starting with simple models, gradually moving on to complex sketches. This will help you sharpen your skills and improve your practical sewing skills.
What to stock up on before work
 How to sew curtains correctly and beautifully?
To make original window products that add uniqueness to the interior, you should stock up on everything necessary for the job.
First you need decide on the type of fabric.
In this case, you should take into account the level of illumination in the room, since if it is not observed, any curtains will look like pieces of fabric.
If there is a lot of light in the room, then curtains from:
- viscose;
- flax;
- velvet;
- polyester (cotton with polyester);
- silks;
- taffeta.
How to sew curtains correctly, and what fabric is best suited for this? Curtains made of viscose, velvet and linen are resistant to fading, so they are ideal for children's rooms. We sew clothes for windows from polyester in rooms where there are always people and there is a high probability of frequent washing. Polyester is resistant to repeated washing. Sewing silk curtains helps reflection of excess light, so it is better to choose pastel colors, as they do not fade. Taffeta is easy to wash and resistant to fading.
When choosing fabric, you should be careful about the choice of color. If the room’s windows face south, then “cool” tones will protect from excess light. Gray, green and blue shades can save you from excess light and heat. If the light in the room is limited, then... Red, beige, yellow and orange tones will fit perfectly into the corresponding interior. The structure of the fabrics should be transparent and preferably light.
The following equipment will help you cope with the task of sewing curtains correctly when the craftswoman works independently:
- sewing machine;
- needles and threads;
- pin set;
- iron;
- crayons;
- sharp large scissors;
- ruler.
When choosing fabrics you should take into account the interior space of the room. Using horizontal stripes on curtains, you can visually expand the room, while vertical stripes make the ceilings higher. and other rooms organza, as it is easily washed and can be done without ironing.
Sewing algorithm for beginners
 Many housewives ask how to sew curtains using a pattern with their own hands?
For beginners, there is a certain procedure for sewing clothes for windows. In this case, patterns must be made, and only then the main fabric is cut.
Let's look at how to sew curtains in the simplest way and how to sew tulle with your own hands at home?
It is customary to start a master class on even the simplest sewing with checking the operating condition of equipment.
To do this, you should use a sewing machine to make at least ten lines on previously prepared test material. After making sure that the stitches lie evenly, you can begin the main sewing.
Next comes creating a sketch on paper. For beginners, it is best to sew the first curtains in a rectangular shape. Measure the required length and width, and then make a pattern. The finished patterns are applied to the selected fabrics and outlined with chalk. Using sharp scissors, future curtains are cut out.
For further independent production of future curtains, you need processing of cut edges. This will protect the fabric from unraveling during washing and use. First, we bend and stitch all the edges around the perimeter of the material. You can simultaneously sew a curtain ribbon to the top edge.
At the last stage, we fasten the threads along the edges of the curtains ourselves and iron the finished products.
Now it’s clear how to sew curtains with your own hands at home. In a similar way, you can sew tulle with your own hands. For your first job you should choose simpler tulle structure b, so that it wouldn’t be such a shame to alter damaged material. A traditional master class on how to sew tulle with your own hands looks like this:

When carrying out daily sewing of curtains, you will learn not only sewing, but also learn how to sew two-color curtains with your own hands.
The first completed product may not be entirely perfect in appearance, but don’t despair. The more you work with the equipment listed, the more skills you will have in sewing window products.
We sew a lambrequin
We looked at how to sew a curtain with our own hands for beginners, and now we will get acquainted with the work of sewing a lambrequin. Lambrequin decorates many interiors, adding a certain zest and charm to it. How to sew curtains with your own hands, decorating them with a lambrequin? Making this product is not so difficult, it is important make the necessary measurements and patterns correctly. Step-by-step instructions for a lambrequin look like this:
- Step 1: Definition with Sketch
- Step 2: Selecting materials.
- Step 3: Making patterns.
- Step 4: Sewing the product
- Step 5: Ironing and hanging.
 The production of lambrequins begins with the correct selection of fabrics for the selected sketch.
They must be organically combined in structure and color so that the product can beautifully shape the interior of the room.
Having prepared the necessary material, we proceed to making patterns.
The lambrequin occupies a fifth or sixth of the entire length of the curtains on the window. Large volumes of fabric require folds. Using tape, we mark areas for folds on the product.
For the future product, we bend the upper part of the fabric to make a pocket and beam. The pocket is always wider than the timber. Sewing pockets involves processing the elements using a reverse seam.
The location and volume of folds are secured to the product with threads followed by ironing. We sew the edges of the lambrequin and secure the folds. The instructions for making lambrequins include decorating their edges using:
- beads;
- fringes.
Beautiful products will be obtained if the craftswoman applies maximum effort and accuracy. When hanging a lambrequin on windows, it is important to drapery the curtains with your own hands, which allows you to give the product volume and originality.
We sew Roman blinds
This step-by-step instruction will help you make elegant Roman blinds:
- We buy dense material of the required size.
- We measure the area of the window opening, adding at least five centimeters to the resulting value for allowances. Increasing the length of the canvas no less than twelve centimeters.
- Using chalk, draw lines on the fabric for stitching with threads. A master class on sewing curtains with your own hands looks similar.
- We attach adhesive tape to the top of the curtain and attach a similar tape to the beam. We attach the curtain to the surface of the beam.
- We iron the bottom side followed by stitching.
- Wide stitches attach the rings to the canvas. We attach the finished curtain to the surface of the beam.
- We thread the cord into the gaps of the rings, then tighten and cut off the excess ends.
Roman style kitchen curtains are ready! Skillful draping of the product on the window makes it more expressive and solid. Now you know step-by-step instructions on how to sew curtains with your own hands in classical and Roman styles.
Note! You can design curtains of any complexity with your own hands. All you need is an original idea and a few sewing skills.
Video: making a Roman blind yourself
Conclusion
Curtains are an important part of the interior, so their choice should be approached with a great deal of responsibility. If you cannot find the desired model in the store, you can make it yourself by familiarizing yourself with the sewing algorithm.
- Date: 04-05-2015
- Views: 484
- Comments:
- Rating: 27
The decision to make will allow you to significantly save money and create curtains that are ideal in your opinion. Before you start making curtains, think about what model they should be, what design will best fit into the interior of the room and, of course, what fabric you will use for sewing. The appearance of the room directly depends on all this.
Classic curtains go well with many styles, and almost any fabric is suitable for sewing them.
And the first task that you have to solve before making curtains is the choice of fabric. The material should be beautiful, high quality and, if possible, inexpensive. The modern market offers a huge selection of materials, so you can easily choose the most suitable option and make the most beautiful curtains.

Select the color of fabric for sewing curtains taking into account the color scheme of the room. You need to approach this moment as carefully and responsibly as possible. Although you will spend your time on this, in the future you will be able to sew such beautiful curtains that you cannot buy in any store. If the design of the room contains bright colors and some ornaments and designs, it is recommended to choose a discreet and plain fabric. If the design of the room is calm and subdued, and the only decor is discreet patterns on the walls, take a closer look at bright and eye-catching materials. from such fabric, you will breathe new life into the room. Thus, curtains should stand out favorably in the interior, and not merge with the surrounding environment.
If you have never sewn curtains with your own hands before, if possible, avoid buying silk and satin fabric. Such fabrics are extremely difficult to process. The best options are linen, organza, velvet, cotton, jacquard, brocade. At the same time as choosing the fabric for your curtains, select the material for the curtains with your own hands.
Quite often, people mistakenly believe that straight, classic curtains look boring and unoriginal. In reality, the situation is completely different. If desired, you can easily modify straight curtains, for example, by sewing decorative braid to them. Even the braid can be sewn in different ways and form different folds. When you come to the store, study all the available options, trying to imagine how your own curtains will look in combination with each braid.

Before choosing various additional decorative elements, think carefully about the finish. The choice is huge and gorgeous: all kinds of tassels, ruffles and many other elements. To sew simple straight curtains, you don’t have to make patterns or waste time on a number of other preparatory steps. It is enough to measure the window opening and calculate the required footage.
If you are going with patterned fabric, purchase a little more material to ensure the pattern is symmetrical. If you encounter any difficulties, you can consult with the seller in the store. When calculating the required amount of fabric for curtains, do not forget about the allowances at the bottom and top.
Sewing curtains yourself requires the following tools and equipment:
- Directly fabrics for sewing.
- Curtain clips.
- Cornice and other related accessories.
- Sewing machine, pins, thread.
- Scissors.
- Centimeter tape.
- The bar is about 1 m long.
- Iron.
Return to contents
Step-by-step instructions for sewing curtains for the living room

At first it may seem to you that it is very easy and simple. In reality, there is nothing particularly complicated about this. You just need to remember the technology and adhere to the established sequence. In living rooms, curtains with braid are most often hung, so the procedure for sewing just such curtains will be discussed below. Still, there are no significant differences in the sequence of sewing curtains of other types.
First, calculate the required amount of material. To do this, measure the distance between the cornice and the floor, as well as the length of the cornice. If you want to sew long curtains, additionally add about 10 cm of hem allowance to the length. Select the width according to personal preferences. If you want to get a draped curtain, multiply the length of the curtain rod by 3. For example, if you have a curtain rod that is 2.5 m long, you will need to purchase 7.5 m of material. If you don’t need a lot of folds, multiply by 2-2.5. Add 6 cm to the width for the side hems. If you are sewing a curtain from two fabrics, add another 2 cm seaming allowance.

Pattern for hemming the bottom of the curtains: 1,2 – sequence of folding the fabric.
Fold the edges over the sides twice. First you need to bend it by 1 cm, then by 2 cm, and after that, stitch it on a sewing machine. Hem the bottom edge of the curtain, bending it first 3 cm and then 5 cm inward. The top edge needs to be folded inward by about 3 cm, then ironed. On the wrong side, a decorative braid is pinned to this edge. Use pins for fastening. You need to retreat approximately 1 cm from the top fold. It is important to choose the correct length of the braid. Usually the product is taken 5-6 cm longer than the canvas itself. Pull the ends of the laces from the wrong side of the braid and tie, then turn the seam allowance inside.
The same operations are performed with the second edge of the braid. Only in this case there is no need to tie the laces. This edge will be the outer edge. The braid is attached along its lower and upper edges to the canvas. Sew the folded edges of the product. There is no need to sew the ends of the laces on the outer edge.
Finally, all you have to do is form the folds of the curtain. To do this, they need to be pulled together with laces and tied. There are loops right next to the braid. Hooks are inserted into them at equal distances from each other. The more folds you want, the more of these hooks you will need. This completes the beautiful curtains for the living room.
Return to contents
A guide to sewing curtains for the bedroom

Pattern of curtains “with scallop”.
For the bedroom, curtains made of thick material that retains the color of the sun are best suited. Select the material you want in color and decor and begin the sewing process.
First you need to take measurements and cut a piece of material of suitable length. Measure the distance between the cornice and the floor; if you want long curtains, add 10-15 cm on each side in width and 25-30 cm in length. Before cutting the fabric, double-check everything carefully to avoid future complications and mistakes.
In professional workshops, the material is marked out on tables specially designed for this purpose. At home, as a rule, you have to be content with the floor. The marking is done using a special centimeter. The lines are drawn using a long ruler or bar and a bar of soap or tailor's chalk.
Before starting to sew seams, iron the material using an iron. This will make further work more convenient. Always keep the edges of the fabric in sight. Sew the necessary seams.
Take another piece of material and cut 2 strips of 15 cm long and 15 cm wide from it. To be more sure, make a margin of 2.5 cm. Fold the cut pieces in half lengthwise and sew. These will be grips and decorative tape. After this, cut another strip, but this time 21 cm long. It also needs to be folded twice in length, stitched and turned out, and then cut into 3 identical parts 7 cm long.
Fold in the raw edges of each of these strips and sew them to your curtain as decorative loops. Place one in the center, and the remaining 2 on the sides, at a distance of 2.5 cm from the edges.

Pass decorative ribbon through the loops. Its ends must be sewn to the side parts of the curtain. Pull the curtains back and secure the drapery with a hook, then use a hook or velcro to secure it to the wall.
The most common problem is the lack of a sewing machine. Although the unit is useful, no one usually wants to buy it just for sewing curtains.
There is an excellent alternative, namely gluing. A special adhesive tape is used. It is sold in sewing stores.
Measure the duct tape and cut it into pieces that fit the width and length of the curtain edges. Tuck the tape into the seam and iron according to the instructions. Very fast, convenient and simple. Using such tapes eliminates the need to work with a sewing machine.
By sewing curtains with your own hands, you can save some money. The first thing you need to do is choose a model and design of curtains. Any room can be decorated using various curtain designs. It is recommended to choose color and fabric based on the color scheme of the room’s interior. It is important to pay special attention to the shape and overall design of the curtains.
In everything you need to observe moderation. Not everyone likes too bright colors or a large number of sewn elements on the curtains.
If you have a large room, then you can sew something original that can stand out significantly in the interior of the room. If the room is made in a classic style, then the curtains should also be classic.
Classic curtains

The classic type most often includes straight curtains, which are made from the most common fabrics in combination with curtains. Sewing these curtains with your own hands is quite simple.
In some cases, they are complemented by lambrequins that cover their upper part. You can sew lambrequins in various ways. The most common are straight lambrequins, which are draped with folds. Recently, models with an unusual lower part of the cut have begun to appear.
It is quite important to choose the right fabric.
How to choose fabric for curtains?

To sew curtains, it is important to purchase high-quality and inexpensive fabric. Today there are quite a large number of different fabrics on sale, so there should be no problems with the choice.
The color of the product will first of all depend on the color scheme of the room. If the decor of the room has bright colors and a large number of different elements, then it is best to give preference to plain, discreet fabrics.
If the interior is made in calm, muted colors, then you can choose a spectacular and bright fabric. Products made from such fabric can complement a room and become the main accent of interior decor. Curtains should stand out from the overall decor.
It is not recommended to make simple curtains from satin or silk material. It is quite difficult to sew products from such fabric, because it is practically impossible to process. It is recommended to pay attention to such materials as:
- velvet;
- velours;
- brocade;
- cotton.

When choosing material for curtains, it is important to take care of the fabric for curtains.
There is an opinion that straight curtains are boring and ugly. In fact, it's the other way around. The look of straight curtains can be easily changed, for example, by sewing a decorative braid that will collect the top edge of the fabric. Depending on the fastening method, folds of the base material can be formed. In the process of selecting braid, it is recommended to familiarize yourself with the finished products to get an idea of how the selected braid will look in the interior.
Before choosing additional decorative elements, you will need to decide on the finish. It can be done in the form of tassels, ruffles or other elements.
In order to sew ordinary curtains, you do not need to have patterns; it is only important to measure the size of the window. You can calculate the required amount of material in meters by measuring the length and width of the window.
If the selected material has a pattern, you will need to purchase a longer fabric to be able to place the pattern symmetrically. If you have difficulties determining the footage of the material, you can get advice from a seller from a fabric store.
When choosing fabric, it is important to remember that you will need to make an allowance for the hem of the curtain at the top and bottom, so the length of the fabric must be increased.
How to adjust a sewing machine?

To be able to make a high-quality curtain, you will need to know not only the sewing technology, but also configure the sewing machine. Curtain fabrics require proper thread tension adjustment and the correct choice of needles. In addition, the quality of the thread will affect the quality of the stitching.
If you want to make the seams invisible, you will need to set the average stitch length, adjust the thread tension and presser feet. This must also be done so that the stitching cannot tighten the fabric. You will need to set the height of the rail teeth so that during the movement of the material they do not “collect” the curtain.
If some of this is not done, the seam may pull the material, after which it will not be possible to iron it with any iron. Some seamstresses pull the edge of the curtain while sewing. You should be aware that this is not necessary, because this may result in the needle breaking and the edge of the curtain stretching.
Many curtain fabrics cannot be sewn several times because needle marks will remain. Therefore, you will need to take a small piece of material and check how the machine will sew this fabric. During the process, you can adjust the necessary parameters.
How to sew curtains for the living room?

Before sewing the curtain, you need to make sure that the sides of the curtain are perpendicular to the floor.
When sewing curtains, it is important to follow the procedure.
You will need to determine the required length of the canvas. To do this, measure the length of the cornice and the distance from it to the floor surface. If you want to sew long curtains, then you need to add 10 cm to the length of the curtain fabric. This is necessary to make an allowance for the hem. The width is calculated based on personal preference. If you want to make a draped curtain, then the length of the cornice must be multiplied by 3. For example, if the cornice is 3 m long, then you will need to buy 9 m of fabric. If you do not want to make a lot of folds on the curtain, then the length of the cornice must be multiplied by 2.
You will need to add 6 cm to the width of the curtain that was obtained so that you can bend the curtains at the edges. If, in order to increase the density of the curtain, you need to sew several fabrics, then you need to make an allowance of 2 cm.
On the sides, the edges will need to be folded inward 2 times - 1 cm and 2 cm. After this, the edges need to be sewn on a typewriter. The bottom edge is folded 3 cm inward, after which it is ironed. The braid is pinned to this edge from the wrong side. The braid should be 6 cm longer than the length of the fabric. The ends of the cords are pulled out from the inside of the braid and then tied. Next, the allowance is folded inward.
The same must be done with the other edge of the braid, but in this case the ends of the cords do not need to be tied. This edge of the curtain will be the outer edge. Next, the braid is connected to the curtain, for which it needs to be stitched along the top and bottom edges of the curtain. The edges of the braid that were folded are also sewn on, but the ends of the cords on the outer edge do not need to be sewn on.
The braid has loops into which hooks are inserted at the required distance from each other. The more folds there are on the curtain, the more hooks you will need to place.
How to sew simple curtains for the kitchen with your own hands?
Fashionable curtains are the main decoration of the kitchen interior. You can purchase ready-made models, but it is more economical to make them yourself. You can sew such curtains quickly.
In order to sew curtains for the kitchen, you will need to purchase the following materials:
- Curtain fabric.
- Fabric for lining.
- Velcro tape.
- A protractor that can be used to quilt blankets.
- Rail.
- Pins with a diameter of 7 mm.
- Screws.
- Screws.
- Nylon cord.
- Rings made of plastic.
- Sewing kit.

The diagram of a Roman blind can be seen in Fig. 1.
You can cut out the front and lining fabric as follows:
- You will need to draw a horizontal line on the lining, 20 cm from the bottom.
- You need to retreat 5 cm from the resulting line for the backstage.
- After the next 20 cm, marks are made for another curtain. The same actions continue until the very end of the canvas. Marking can be done using a conveyor belt for quilting the blanket.
- Next, the longitudinal sections on the lining fabric are folded and ironed. The width of the hems should be 2.5 cm.
- The lining is laid out inside out, after which the bottom and top of the drawstrings are connected with pins.
- Next you need to stitch along the pins. To prevent the seams from coming apart, you need to reverse the stitching at the ends of each line.
- The longitudinal sections of the curtains are folded by 5 cm, after which the hem is ironed.
- The wrong side of the fabric is connected to the lining material using pins.
- You need to stitch the drawstrings over the seams.
- The upper edge is processed and then folded 2 cm.
- Adhesive tape is glued to the loops.
- Next you need to stitch the top edge with a hidden stitch.
- The longitudinal edge of the lining fabric is processed with a hidden stitch so as not to catch the material on the front side.
- The lining is trimmed from the bottom side by 8 cm, after which a double hem of 4 cm is made. Next, the hem is ironed. The hems are hemmed only to the lining.
Visually the sewing process can be seen in Fig. 2.
At this stage, the curtains for the kitchen are sewn. After this you will need to attach them.
How to fasten curtains?

Figure 2. Sewing process.
- The wooden pin must be cut so that its length is 2 cm less than the length of the scar.
- The pin is inserted into the slide, after which the holes are marked.
- A wooden strip is inserted into the lower scene, after which the holes are closed.
- To each of the scenes, retreating 10 cm from the edge, you need to attach 2 plastic rings.
- The nylon cord is cut in the middle.
- The end of the first cord is threaded through 1 row of rings, and it must be firmly tied to the last ring.
- The same must be done with the other part of the cord.
How to make simple curtains with ties?

The price of curtains will depend on the amount of fabric chosen, so you will need to take measurements.
- The distance from the top of the cornice to the floor surface is measured. Subtract 2 cm from the obtained value.
- From this number the distance from the cornice to the top of the curtain (the length of the ties) is subtracted.
- To process the bottom of the curtain, you need to add 10 cm.
- The width of the fabric can be calculated as follows: the length of the window cornice is multiplied by 2.5. 16 cm is added to the resulting value.
- If the material needs to be sewn, then you need to add 2.5 cm.
- The minimum distance between ties is 8 cm.
Models with ties can be seen in Fig. 3.
Manufacturing technology

The ties can be sewn as follows:
- Cut out 2 strips, adding 2 cm to the side seams and those that are placed along the length.
- The strips are folded with the main side inward and then stitched together.
- The corners of the strips are cut off and then turned inside out, threading the pencil onto the material.
- At the end, the finished product must be smoothed.
Curtains can be sewn as follows:
- The panels need to be stitched together to obtain the required width of the curtain. After this, the edges of the seam are processed.
- The lower part of the curtain is folded 10 cm and then ironed.
- The edge that was folded needs to be folded in half. The product is hemmed with an invisible seam.
- The finished curtain is laid out, after which the ties are pierced to the main side of the canvas. The raw sides of the curtain and the tie need to be aligned by pinning them together and sewing the tie.
- The fabric is folded along the upper edge of the seam and then smoothed out. Next, the material needs to be stitched on a typewriter.
- The side parts of the curtain are folded 2 times. After this, they need to be ironed and stitched.
At the end, the curtain needs to be ironed from the inside out, hung on the curtain rod and straightened out all the existing ties.
Curtains with scallops and frills

Elements of a Roman blind: pins and rings for the cord - the lifting mechanism.
These products are made up of a cascade (festoons), which are assembled into a triangular-shaped curtain and a rectangular-shaped frill, which is located between the festoons. The frill is much shorter in length than the scallops. It can be sewn from the same fabric as the curtains. You can also make it from a dense material that will not transmit light.
To make such a simple curtain you need to purchase:
- Fabric whose width is 2 times the width of the window.
- Threads to match the color of the fabric.
- 2 holders.
- Accessories for decoration.
- Scissors.
- Pins.
- Needles.
- Iron.
- Measuring tape.
- Fastening elements.
- Hooks.
- Curtain rail.
The manufacturing technology is as follows:
- First of all, the size of the window is determined.
- You will need to add 5 cm under the rail and 1.5 under the stitching. The same amount of fabric is needed for lining.
- Both canvases need to be cut.
- The trim is placed on the fabric so that the edges match. After this, the structure is secured with pins.
- These parts are sewn from the middle of the top, leaving 1 cm for stitching allowance.
- The seam is smoothed out carefully. After this, the scallop is turned out of the hole, which was not specially sutured. You will need to turn the corners well with the non-sharp part of the scissors.
- In the upper part, 5 cm is bent so that it is possible to install a rail under the scallops and frill. All this is secured with pins. Next, the product needs to be stitched.
Sewing fashionable and beautiful curtains is quite simple. This can be done by almost anyone who wants to create a masterpiece in terms of design. To do this, you just need to come up with your own original idea, purchase simple materials and tools that are most often found in every home.
Stylish curtains in the interior are a dream come true! Thanks to the abundance of fabrics, it is easy to choose any fabric to decorate the interior in the same style. Ordering tailoring from a tailor shop is expensive. If the housewife simultaneously wants to decorate the house and save the family budget, she can sew curtains. To do this you will need a sewing machine and the ability to use it.
Before starting work you need to purchase:
- tool - sewing machine;
- fabric and matching threads;
- a set of needles and pins;
- measuring ruler and centimeter;
- tailor's scissors;
- iron.
How to sew curtains (step by step instructions)
To sew high-quality products, you need to prepare a pattern and check how the sewing machine works with the fabric you need.
- Using a sewing machine, sew several stitches on a small piece of material to make sure that the stitching lies evenly.
- Sketch the future curtain on paper. The simplest model is 1 or 2 pieces of rectangular material.
- The patterns are applied to the fabric and traced.
- A piece of fabric is cut with scissors.
- To sew the top edge. Fold the seam allowance at the top and stitch the curtain tape.
- Tuck and finish the side cuts. Place the edges of the ribbon inside the seams so that, if desired, you can pull the edges and gather the curtains.
- Fold the bottom of the product and stitch. Fasten the threads and iron the finished curtain.
- Iron the finished products.
Material selection
You can safely sew from taffeta: the real material hardly fades at all and washes well. Silk will reflect excess light. When choosing, give preference to cream or pastel tones: brighter shades may fade. Polyester can withstand repeated washing. Linen is an ideal choice for a children's room: it does not fade, just like viscose or velvet.
The color scheme of products intended for rooms facing south should be cool. This palette may include blue, cyan, green, gray. The thicker the fabric, the better. In the summer heat, curtains will save you from the heat. When there is not enough sunlight in the room, it is better to choose fabric painted in light shades: orange, yellow, beige and red. Products made from light, transparent fabric look great here. When we choose the fabric and sew the curtains ourselves, we can adjust the interior space: vertical stripes will visually make the room taller, and horizontal stripes will make the room wider.
Practical organza products are popular: they are easy to wash and do not require ironing. For the kitchen it is recommended to use natural fabrics: . However, on the sunny side, cotton fabric quickly fades and loses its attractiveness. Blinds will help protect products from the sun.
Measuring and cutting
If we sew the curtains ourselves, it means we calculate the amount of material ourselves. Determine the consumption of fabric and curtain tape. It is better to take it with a margin of 50 cm. Measurements are taken from the cornice to the bottom edge of the products. Consider the material consumption for the hem. Curtains can be long or short. You can sew beautiful curtains that cover radiators or barely reach the windowsill.
Fabric measurements should be taken along the edge. Measure the width and pull a couple of threads from the fabric to mark where you need to cut. Cotton fabric and mixed fabric should be moistened and ironed so that it does not shrink in the product.
Sewing
Before sewing curtains, you need to set up the equipment. It is better to insert a new needle into the sewing machine. Pre-adjust its operating mode. The optimal line length is considered to be 4-6. It is necessary to adjust the thread tension with the presser foot. The desired height of the rack teeth is also set so that the seam does not tighten the fabric. Curtains cannot be altered several times: the seams leave noticeable marks.
 Sewing curtains
Curtain braid is sewn as follows:
- Align the curtain and make a hem on the wrong side of about 2 cm.
- Heat the iron slightly and press the hem.
- To prevent the ribbon from moving, turn it inward 1.5 cm and pin it with a pin.
- Make the top stitch first at a distance of 0.3 or 0.5 mm from the edge of the tape. The braid needs to be hidden.
- Sew the bottom line.
- Pull the cords out and tie them in a knot to prevent them from escaping.
- Cut off any excess tape.
Making curtains with eyelets
The grommet device greatly facilitates the process of hanging drapes and curtains. The new solution fits perfectly into the laconic interior styles. You can sew curtains with rings for hanging at home.