Where to start sewing curtains. How to sew curtains with your own hands: step-by-step instructions
The magical place that gathers all the guests in the house must be perfectly decorated. The living room is the face of a house or apartment. And the curtains in it are a powerful decorative tool. Do not neglect the choice of this element; curtains can tell a lot about the owners and create a favorable atmosphere.
You don’t have to buy curtains; you can sew them yourself. For this not the easiest task, you need to decide on the type of curtains and fabric, choose the right color, prepare the material and then just sew. Different interior designs will have their own window decorations.
The type of fabric is selected based on:
- Living room volumes;
- Degrees of illumination;
- Interior style.
For modest-sized rooms, choose lightweight fabrics. If the room doesn’t get a lot of light or you don’t need to hide behind thick curtains from the eyes of neighbors, then just organza or tulle is enough.
For thick curtains, jacquard, linen, velor, silk, satin, and velvet are used. , will depend on your experience in cutting and sewing. Not all materials from this list are suitable for beginners to sew on their own.
- The length of the cornice (plus 6 centimeters for bending the sides);
- The height from the floor to the cornice (adding 10 centimeters for hemming if the curtains are long).
Tip: If you want drapery on your curtains, take three or two times the width.
Believe me, everything is much simpler than it seems!
Photos of curtains with a unique design, made by yourself
From beads  From scarves
  Cross-to-cross fastening
  Rainbow made of threads
  With lambrequins
  With buttons
Popular models and product designs
Several of the most popular types of curtains for the living room:
- Straight (with or without decoration);
- Thread curtains;
- "Bishop's Sleeves";
- French curtains;
- Austrian curtains.
Straight curtains look great in Country or Provence styles. In itself, it would be unnecessary to complement luxurious interiors with lush or flashy curtains. Delicate or thematic motifs will be perfectly highlighted and emphasized by a straight curtain. It doesn’t have to be just hanging fabric; it can be complemented with lace, fringe, tassels, elegant tiebacks, and simple lambrequins.
With the advent of the popular high-tech style in interiors, thread curtains are gaining popularity. Light and unobtrusive, they can highlight the main idea, or they can become a bright color accent. In a simple room design, thread curtains also help to bring beauty.
Tip: For decoration, try using threads of different lengths and textures, you will get an interesting design move.
The last three models, created with your own hands, will fit perfectly into luxurious and expensive-looking rooms. Rigid lambrequins with straight curtains also fall into this category of curtains. These same types of curtains look great in a classic living room.
Photos of the indicated types of curtains for the hall, which you can sew with your own hands
Straight French Austrian Yarn Bishop Sleeves
Let's break down some important tips for needlewomen into sections.
Working with material:
- Silk and satin are the most difficult materials for needlework, especially in large quantities, do not use them if you are sewing for the first time.
Product color:
- The warmer and lighter the tone of the curtains, the wider the room will appear;
- Cool shades of blue (lavender, violet, blue) will help add depth.
Materials and interior design:
- Suitable for classic curtains: silk, velvet, etc.;
- Linen is suitable for ethnic and eco-style;
- Provence is perfectly complemented by cotton, linen, synthetic fabrics with imitation of rough textures, weaving, and natural fabrics with floral patterns;
- In high-tech, in addition to thread curtains, light materials (organza, brocade, veil) are hung.
Directly sewing curtains:
- If in the process you will stitch two fabrics with an ornament, then you need to purchase fabric with a margin in order to evenly match the pattern;
- To make it easier to work with the fabric, you need to wet it, dry it and iron it.
Stylish curtains in classic colors in the living room interior

Patterns
Option for sewing a classic curtain:
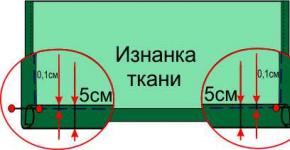
- Hem the sides. We bend the fabric on the sides twice - the first time by 1 cm, the second by 2 cm. Sew.
- Hem the bottom. In the same way, but with turns of 3 and 5 centimeters.
- You need to bend the top 3 centimeters and iron it with an iron.
- We attach the braid to the ironed seam with pins, stepping back from the top edge by a centimeter. The length of the curtain tape is 5-6 centimeters greater than the width of the curtains.
- The edge of the braid on the wrong side must be pulled through, pulled out and tied. One seam allowance is folded inward, the second is not. It will mean the front side.
- Sew the braid along the top and bottom edges. The edges that have been folded are also sewn on. Only the laces are left on the front edge.
- We tighten the laces and form a gather on the curtains.
A way to make thread curtains with your own hands:
- We take the rail and the required number of decorative threads.
- If the threads are attached directly to the cornice, then each thread should be twice the length. The thread is folded in half, thrown over the cornice and secured with a loop.
- If the threads are attached to rings or hooks, then you need to add a few centimeters to the length of the single thread to attach to the ring.
- We fasten the threads every 2-5 millimeters.
- To prevent the thread from moving along the rail, you can secure it with glue.
Below are useful patterns.
Sewing curtains with your own hands is a fairly simple job that almost any housewife can master without any problems. Having figured out how to sew curtains, you can decorate your home with unique products that will perfectly complement the interior and surprise others.
Sewing curtains yourself is not as difficult as it seems, the main thing is to do everything consistently and accurately.
And if people, as a rule, choose a design according to their taste, then the technical component should be studied thoroughly. There are many varieties of curtains, but they are all based on several basic models. So, having thoroughly understood the sequence of sewing basic options, you can sew any curtains with your own hands without any problems.
What kind of curtains can you easily sew with your own hands?
When deciding to sew curtains with your own hands, you should first choose a suitable style. There are quite a few of them, but there are no more than 10 main ones, and some of them are very similar to each other. To make your choice easier, consider the technology for sewing the most popular types of curtains. The remaining variations have minor differences from them, so making the necessary adjustments will not be difficult.
After studying the proposed instructions in detail, you will learn how to quickly sew the following types of curtains with your own hands:
- English curtains.
- Roman curtains.
- Simple curtains with ties.
- Lambrequins.

Before you start sewing, prepare everything you need for work:
- Sewing machine.
- Fabric for sewing curtains and matching threads.
- Pins, needles.
- Pencil.
- Ruler and tape for taking measurements.
- Transparent nail polish.
- Sharp scissors.
Return to contents
How to sew curtains with a lambrequin?
This is a fairly simple design, which, despite its comparative ease of manufacture, looks truly chic. Lambrequins fit into most common interior styles, perfectly complement and organically complete them.
The first thing you need to do is pay attention to the choice of material. As a rule, housewives who decide on their own make all the design details from the same type of material. But no one forbids you to experiment. So, for example, to sew the main part, you can use a plain material, and make the lambrequin patterned, or vice versa. There are no special rules in this regard; it is only necessary that the finished curtains fit well into the existing interior of the room.
Once the main material for the curtains has been selected, proceed to calculate the required quantity. The lambrequin usually accounts for a fifth or sixth of the total curtain length. Don't forget to leave extra for hems. Select the width taking into account the width of the window in the room. Think about whether folds are needed and how many there should be. It is better to mark in advance all the locations of the folds using braid.

At the first stage, you need to bend the upper part of the selected material and sew from it a kind of pocket for the curtain beam. The pocket should be slightly wider than the beam itself. Work this element with a reverse stitch.
Folds, if you want to make them, need to be secured with threads and carefully ironed. Before securing the folds, carefully sew the edges of the lambrequin. After this, the base for your DIY curtain will be ready. But that's not all. Efforts must be made to ensure that the lambrequin is truly original and unique. When choosing jewelry, be guided by the material used. For example, light fabrics are perfectly complemented with beads and organza flowers, while heavy fabrics are best decorated with fringe.
Return to contents
Sewing Roman blinds
In most cases, curtains of this type are sewn with the expectation that they will cover the window opening quite tightly, so the first thing you need to do is measure the window in the room. Add 5 cm to the measured width for allowances. You need to add 12 cm to the length.
Choose the fabric to your taste. There are many different options available for sale, so you can easily choose the one that best fits the interior of your room. Take the material, lay it out on the table and smooth it out thoroughly. Use tailor's chalk or a bar of soap to mark the lines of the hem and folds. After applying the necessary markings, you can begin hemming future curtains on the sides.
Next, you need to take a beam onto which you will later attach the Roman blinds you made yourself. Adhesive tape is nailed to the beam. The exact same tape must be attached to the top of the curtain. At this point the canvas will be attached to the block.

Carefully press and hem the bottom edge of the Roman shade, then sew on the trim. At the places where the slats are inserted, rings should be attached with wide stitches. Do all these tasks and attach the curtain to the bar. At this point the main stage of the work will be completed.
Finally, the cord is threaded into rings, carefully tightened, after which the remaining ends are cut off. Roman blinds are ready. You can hang them and enjoy the results. By the way, recently such curtains are often combined with lambrequins. It looks quite solid and makes the interior more expressive.
Return to contents
Curtains in English style
English curtains look airy and sophisticated. Curtains of this kind will decorate the room very well, adding some zest to its interior. There is absolutely nothing complicated about making such curtains yourself. You only need to prepare satin, natural muslin and satin ribbon. When selecting the height and width of the curtains, take into account the dimensions of the window opening to be decorated. Be sure to leave a few centimeters for folds and hems.
Mark the places on the fabric where the satin ribbons will be sewn. To do this, you need to carefully pull out 2 threads from the fabric: one along the top edge, the second at a distance of 17 cm from it. Using the same scheme, you need to designate the places and directions of the horizontal ribbons.

Take the prepared satin ribbons, tuck both sides about 1 cm, carefully iron them and carefully hem them. Next, pin the ribbons to the main fabric using pins and carefully stitch them on the machine. In the gap between the fixed vertical stripes you need to place a couple more beautiful satin ribbons. Cover them with a satin strip of suitable width. Pin this strip to the main material using tailor's pins, focusing on the previously drawn threads. Finally, you need to secure the upper edges of the ribbons. The bottom edge is carefully hemmed and steamed.
Return to contents
Step-by-step instructions for sewing simple and beautiful curtains
If you don’t want any complex or too binding compositions, opt for simple curtains with cute bows. These curtains are best suited for the kitchen. They look unpretentious, but very beautiful. In addition to the curtains, you can add various details that will add a certain zest to the interior.
Choose fabric for curtains with a width equal to the width of the opening in the kitchen. Select the length at your discretion. You can make very short curtains, maybe up to the windowsill, or up to the floor. Additionally, you will need a narrow ribbon made of satin fabric and threads of a suitable color.
This curtain goes well with blinds, simple tulle and other simple materials. Decorations in the form of pastel bows will make the overall composition more fresh, delicate and interesting.

The fabric can be chosen at your discretion. Just remember that the drapery of different materials has its own characteristics. A plain cotton blend fabric is best suited for the kitchen. Materials of this type breathe well, creating a feeling of airiness and lightness in the room. Satin ribbon is used as a decorative element, preferably in a contrasting color. A combination of, for example, pink and gray, black and white, etc. looks great.
First you need to take a piece of fabric of a suitable size, lay it out on a flat horizontal surface and smooth it out thoroughly. After this, you need to baste the side edges and the bottom edge. Next, you should hem the top edge, taking into account the width of the cornice. Gather the side seams with thread. 5-6 stitches at a distance of 10-15 cm from each other are enough. After completing all these manipulations, all that remains is to hang the curtains on the curtain rod. To finish, you will need to throw a ribbon of satin fabric over the hanging curtain rod, pull it together and form beautiful decorative bows.
Designers call home textiles the key moment of any interior, and therefore they advise taking it very seriously. Curtains and curtains are the largest pieces of home textiles. And you can't go wrong with them. They should be selected taking into account the overall color scheme, style and purpose of the room. However, some women do not take risks and order the design and production of curtains to professionals. Unfortunately, the cost of window treatments is very high. And many housewives who, after renovation, only have to make the final touch, have no choice but to do it themselves. This means that there are hours ahead of choosing a style and color scheme, shopping for fabrics, purchasing related materials and - the magic of creativity.
Five simple options for sewing the top hem
If you are planning to sew the curtains yourself, then check out the five options for processing the top edge. They are all easy to cut and sew. Curtains with such a top from these five options are universal; they will look great in any room - from the kitchen to the nursery.
Simple top
The upper edge, as well as the lower and side edges, are folded, ironed and stitched. Curtains with such a top are most often hung with clothespins or hand-sewn loops. Using this type of processing of the upper edge, you can quickly sew. By the way, do not sew long curtains: today kitchen fashion dictates a shortened style.

Braid
This option is chosen by women who are thinking about the question: “How to sew so that the gathers and folds are the same?” Laces stretched through a special braid can create a wide variety of shapes of smooth and clear folds. You just need to sew a braid to the four folded and hemmed edges, and even a child can be trusted to pull the lace.

Loops
Curtains with straps look simple, but tasteful. And sewing them on is no more difficult than straps on a dress, except maybe there are more in number. The easiest way is to sew the loops directly to the hem of the top (from the wrong side), but it will be much more beautiful and stronger if the edge of the loop is inside the finishing seam.

Secret hinges
This version of the curtain top has its own charm. The main difficulty is to calculate the size of the loops. It all depends on the diameter of the cornice and the density of the fabric. Take your time, calculate it again before sewing the curtains. Make the cut with your own hands. And start sewing.

Eyelets
The peculiarity of curtains with grommets - plastic or metal rings - are ideal vertical folds. Choose this option with confidence - sewing them is not as difficult as it seems. Cutting even holes and snapping two parts of eyelets together takes five minutes per ring.

When choosing a curtain style, consider the overall style of the house. Curtains with beloved lambrequins are one of the elements of modernism, so in a room where high-tech reigns, they will look, at least, strange. In addition, each style has its own “favorite” fabrics. So, classics are heavy, dense curtains, and country, for example, are light and natural curtains. Before you do it yourself, make sure that the chosen style and fabric will not contradict the overall interior design.
Stylish curtains in the interior are a dream come true! Thanks to the abundance of fabrics, it is easy to choose any fabric to decorate the interior in the same style. Ordering tailoring from a tailor shop is expensive. If the housewife simultaneously wants to decorate the house and save the family budget, she can sew curtains. To do this you will need a sewing machine and the ability to use it.
Before starting work you need to purchase:
- tool - sewing machine;
- fabric and matching threads;
- a set of needles and pins;
- measuring ruler and centimeter;
- tailor's scissors;
- iron.
How to sew curtains (step by step instructions)
To sew high-quality products, you need to prepare a pattern and check how the sewing machine works with the fabric you need.
- Using a sewing machine, sew several stitches on a small piece of material to make sure that the stitching lies evenly.
- Sketch the future curtain on paper. The simplest model is 1 or 2 pieces of rectangular material.
- The patterns are applied to the fabric and traced.
- A piece of fabric is cut with scissors.
- To sew the top edge. Fold the seam allowance at the top and stitch the curtain tape.
- Tuck and finish the side cuts. Place the edges of the ribbon inside the seams so that, if desired, you can pull the edges and gather the curtains.
- Fold the bottom of the product and stitch. Fasten the threads and iron the finished curtain.
- Iron the finished products.
Material selection
You can safely sew from taffeta: the real material hardly fades at all and washes well. Silk will reflect excess light. When choosing, give preference to cream or pastel tones: brighter shades may fade. Polyester can withstand repeated washing. Linen is an ideal choice for a children's room: it does not fade, just like viscose or velvet.
The color scheme of products intended for rooms facing south should be cool. This palette may include blue, cyan, green, gray. The thicker the fabric, the better. In the summer heat, curtains will save you from the heat. When there is not enough sunlight in the room, it is better to choose fabric painted in light shades: orange, yellow, beige and red. Products made from light, transparent fabric look great here. When we choose the fabric and sew the curtains ourselves, we can adjust the interior space: vertical stripes will visually make the room taller, and horizontal stripes will make the room wider.
Practical organza products are popular: they are easy to wash and do not require ironing. For the kitchen it is recommended to use natural fabrics: . However, on the sunny side, cotton fabric quickly fades and loses its attractiveness. Blinds will help protect products from the sun.
Measuring and cutting
If we sew the curtains ourselves, it means we calculate the amount of material ourselves. Determine the consumption of fabric and curtain tape. It is better to take it with a margin of 50 cm. Measurements are taken from the cornice to the bottom edge of the products. Consider the material consumption for the hem. Curtains can be long or short. You can sew beautiful curtains that cover radiators or barely reach the windowsill.
Fabric measurements should be taken along the edge. Measure the width and pull a couple of threads from the fabric to mark where you need to cut. Cotton fabric and mixed fabric should be moistened and ironed so that it does not shrink in the product.
Sewing
Before sewing curtains, you need to set up the equipment. It is better to insert a new needle into the sewing machine. Pre-adjust its operating mode. The optimal line length is considered to be 4-6. It is necessary to adjust the thread tension with the presser foot. The desired height of the rack teeth is also set so that the seam does not tighten the fabric. Curtains cannot be altered several times: the seams leave noticeable marks.
 Sewing curtains
Curtain braid is sewn as follows:
- Align the curtain and make a hem on the wrong side of about 2 cm.
- Heat the iron slightly and press the hem.
- To prevent the ribbon from moving, turn it inward 1.5 cm and pin it with a pin.
- Make the top stitch first at a distance of 0.3 or 0.5 mm from the edge of the tape. The braid needs to be hidden.
- Sew the bottom line.
- Pull the cords out and tie them in a knot to prevent them from escaping.
- Cut off any excess tape.
Making curtains with eyelets
The grommet device greatly facilitates the process of hanging drapes and curtains. The new solution fits perfectly into the laconic interior styles. You can sew curtains with rings for hanging at home.
- Date: 04-05-2015
- Views: 484
- Comments:
- Rating: 27
The decision to make will allow you to significantly save money and create curtains that are ideal in your opinion. Before you start making curtains, think about what model they should be, what design will best fit into the interior of the room and, of course, what fabric you will use for sewing. The appearance of the room directly depends on all this.
Classic curtains go well with many styles, and almost any fabric is suitable for sewing them.
And the first task that you have to solve before making curtains is the choice of fabric. The material should be beautiful, high quality and, if possible, inexpensive. The modern market offers a huge selection of materials, so you can easily choose the most suitable option and make the most beautiful curtains.

Select the color of fabric for sewing curtains taking into account the color scheme of the room. You need to approach this moment as carefully and responsibly as possible. Although you will spend your time on this, in the future you will be able to sew such beautiful curtains that you cannot buy in any store. If the design of the room contains bright colors and some ornaments and designs, it is recommended to choose a discreet and plain fabric. If the design of the room is calm and subdued, and the only decor is discreet patterns on the walls, take a closer look at bright and eye-catching materials. from such fabric, you will breathe new life into the room. Thus, curtains should stand out favorably in the interior, and not merge with the surrounding environment.
If you have never sewn curtains with your own hands before, if possible, avoid buying silk and satin fabric. Such fabrics are extremely difficult to process. The best options are linen, organza, velvet, cotton, jacquard, brocade. At the same time as choosing the fabric for your curtains, select the material for the curtains with your own hands.
Quite often, people mistakenly believe that straight, classic curtains look boring and unoriginal. In reality, the situation is completely different. If desired, you can easily modify straight curtains, for example, by sewing decorative braid to them. Even the braid can be sewn in different ways and form different folds. When you come to the store, study all the available options, trying to imagine how your own curtains will look in combination with each braid.

Before choosing various additional decorative elements, think carefully about the finish. The choice is huge and gorgeous: all kinds of tassels, ruffles and many other elements. To sew simple straight curtains, you don’t have to make patterns or waste time on a number of other preparatory steps. It is enough to measure the window opening and calculate the required footage.
If you are going with patterned fabric, purchase a little more material to ensure the pattern is symmetrical. If you encounter any difficulties, you can consult with the seller in the store. When calculating the required amount of fabric for curtains, do not forget about the allowances at the bottom and top.
Sewing curtains yourself requires the following tools and equipment:
- Directly fabrics for sewing.
- Curtain clips.
- Cornice and other related accessories.
- Sewing machine, pins, thread.
- Scissors.
- Centimeter tape.
- The bar is about 1 m long.
- Iron.
Return to contents
Step-by-step instructions for sewing curtains for the living room

At first it may seem to you that it is very easy and simple. In reality, there is nothing particularly complicated about this. You just need to remember the technology and adhere to the established sequence. In living rooms, curtains with braid are most often hung, so the procedure for sewing just such curtains will be discussed below. Still, there are no significant differences in the sequence of sewing curtains of other types.
First, calculate the required amount of material. To do this, measure the distance between the cornice and the floor, as well as the length of the cornice. If you want to sew long curtains, additionally add about 10 cm of hem allowance to the length. Select the width according to personal preferences. If you want to get a draped curtain, multiply the length of the curtain rod by 3. For example, if you have a curtain rod that is 2.5 m long, you will need to purchase 7.5 m of material. If you don’t need a lot of folds, multiply by 2-2.5. Add 6 cm to the width for the side hems. If you are sewing a curtain from two fabrics, add another 2 cm seaming allowance.

Pattern for hemming the bottom of the curtains: 1,2 – sequence of folding the fabric.
Fold the edges over the sides twice. First you need to bend it by 1 cm, then by 2 cm, and after that, stitch it on a sewing machine. Hem the bottom edge of the curtain, bending it first 3 cm and then 5 cm inward. The top edge needs to be folded inward by about 3 cm, then ironed. On the wrong side, a decorative braid is pinned to this edge. Use pins for fastening. You need to retreat approximately 1 cm from the top fold. It is important to choose the correct length of the braid. Usually the product is taken 5-6 cm longer than the canvas itself. Pull the ends of the laces from the wrong side of the braid and tie, then turn the seam allowance inside.
The same operations are performed with the second edge of the braid. Only in this case there is no need to tie the laces. This edge will be the outer edge. The braid is attached along its lower and upper edges to the canvas. Sew the folded edges of the product. There is no need to sew the ends of the laces on the outer edge.
Finally, all you have to do is form the folds of the curtain. To do this, they need to be pulled together with laces and tied. There are loops right next to the braid. Hooks are inserted into them at equal distances from each other. The more folds you want, the more of these hooks you will need. This completes the beautiful curtains for the living room.
Return to contents
A guide to sewing curtains for the bedroom

Pattern of curtains “with scallop”.
For the bedroom, curtains made of thick material that retains the color of the sun are best suited. Select the material you want in color and decor and begin the sewing process.
First you need to take measurements and cut a piece of material of suitable length. Measure the distance between the cornice and the floor; if you want long curtains, add 10-15 cm on each side in width and 25-30 cm in length. Before cutting the fabric, double-check everything carefully to avoid future complications and mistakes.
In professional workshops, the material is marked out on tables specially designed for this purpose. At home, as a rule, you have to be content with the floor. The marking is done using a special centimeter. The lines are drawn using a long ruler or bar and a bar of soap or tailor's chalk.
Before starting to sew seams, iron the material using an iron. This will make further work more convenient. Always keep the edges of the fabric in sight. Sew the necessary seams.
Take another piece of material and cut 2 strips of 15 cm long and 15 cm wide from it. To be more sure, make a margin of 2.5 cm. Fold the cut pieces in half lengthwise and sew. These will be grips and decorative tape. After this, cut another strip, but this time 21 cm long. It also needs to be folded twice in length, stitched and turned out, and then cut into 3 identical parts 7 cm long.
Fold in the raw edges of each of these strips and sew them to your curtain as decorative loops. Place one in the center, and the remaining 2 on the sides, at a distance of 2.5 cm from the edges.

Pass decorative ribbon through the loops. Its ends must be sewn to the side parts of the curtain. Pull the curtains back and secure the drapery with a hook, then use a hook or velcro to secure it to the wall.
The most common problem is the lack of a sewing machine. Although the unit is useful, no one usually wants to buy it just for sewing curtains.
There is an excellent alternative, namely gluing. A special adhesive tape is used. It is sold in sewing stores.
Measure the duct tape and cut it into pieces that fit the width and length of the curtain edges. Tuck the tape into the seam and iron according to the instructions. Very fast, convenient and simple. Using such tapes eliminates the need to work with a sewing machine.