How to make a rectangular opening from an arch. How to make an arch in the doorway yourself
A few years ago, arched openings came into fashion. This design of the entrance to the room is beautiful, original and allows you to do without installing doors. Using modern materials, can be made and trimarched vaultdo it yourself. The work is not too difficult, but requires great accuracy. In addition, it will be necessary to think in advance how finishing will be done openings. You can make arrangements in various styles, considerhow to make an arch doorway.
Arch is very spectacular way revive the interior and make it more attractive. A beautifully decorated arched opening in the vault will emphasize the beauty of the interior in the room, make the atmosphere more original.
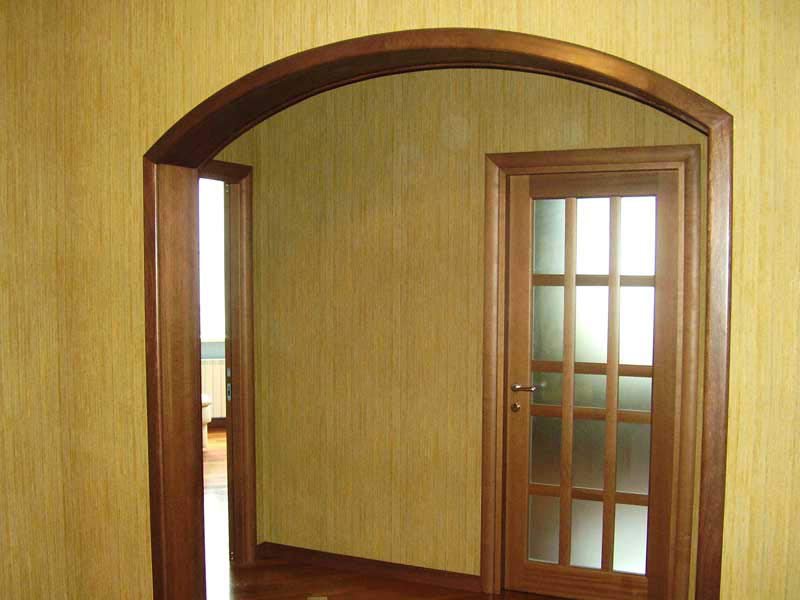
A huge variety of forms of arches and harmoniously selected finishes will transform the room. To verify this, just look at the photo of the room before the arch was inserted into the opening, and after the repair was completed. Consider how you can create a niche in the form of an arch, install it in the vault of the wall and finish it with your own hands.
Types of arches
When decorating interiors, arched openings perform not only decorative, but also practical functions. Run a niche in the vault of the wall separating adjacent rooms, or install a partition with an opening in the form of an arch in large room it is possible to divide the space into zones without the use of interior doors.
In most cases, semicircular openings are used, the following types of arches are distinguished:
- A classic arch is a structure in which the bending radius of the arc is half its width.
- Arch modern. It has original form, in which the arc is executed with some rise.
- Romantic arch. It is almost a rectangular opening, the edges of which are rounded.
- Elliptical arch. In this case, it has the shape of an oval, with an expansion in the middle part and a narrowing at the top and bottom.
Advice! What do they look like different types arches, can be seen in the photo in interior magazines.
Getting ready to install the arch
Consider how you can install and finish a classic drywall arch with your own hands.
We take measurements
It is necessary to start creating an arch by taking measurements from the opening. You will need:
- Take measurements along the two diagonals of the opening. These measurements must match, otherwise, you will have to first work to align it.
- Remove width gauge. This measurement is useful for determining the bending radius of the arc.
- Measure height.
We purchase materials
In order to install the arch you will need:
- Sheets arched drywall 6.5 or 8 mm thick. If the opening in the room standard size, one sheet is enough. This material is very easy to use. You can use plywood, but working with it is more difficult.
- Metal profile. You will need 2 pieces of a guide profile 50 × 40 and 1 piece of a rack profile 50 × 50 mm.
- Fasteners: dowels with screws (25 pcs.), self-tapping screws 3.5 × 25 mm in size and “seed” screws 3.5 × 11 mm.
After completion of construction, it will be necessary to finish the arch. For this you need to stock up:
- Primer;
- Finishing putty;
- Perforated arched corners.
The rest of the material is purchased depending on the planned design of the opening and the wall adjacent to it.
Installation work
First, the frame is constructed. Do-it-yourself steps for doing this work:
- We cut off two sections of the profile along the height of the opening and one along the width and fix them in the opening using dowels with screws.
- Now you need to prepare the arcuate part of the frame. The length of the profile for this part is determined by adding two values - the radius of the arch and the height of the indent from the top of the opening.
- To make it possible to bend the profile, you need to make cuts in the parallel side parts of the profile with scissors for metal or a grinder. The spacing of the incisions is 4-8 cm. After that, the profile is bent, giving it the necessary shape.
- We fix the manufactured part of the frame, after leveling it.
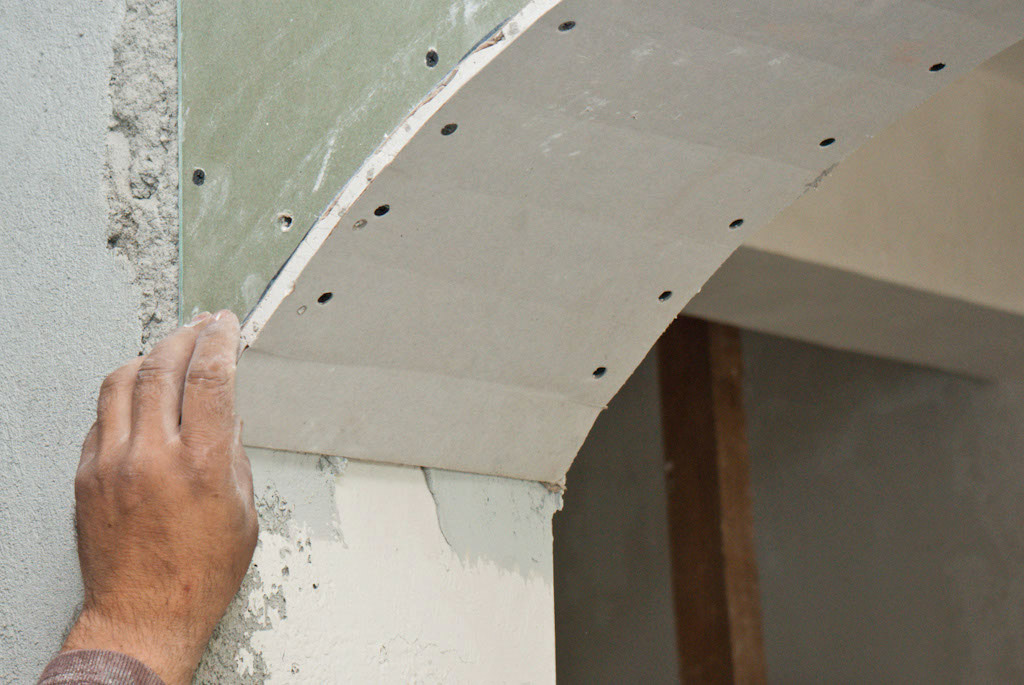
- We sheathe the finished frame with drywall blanks. First, the gable parts are sheathed, cutting out the details according to the size of the opening. Then the inner part of the arch is made. To bend a drywall blank with your own hands, you need to make cuts from the wrong side without damaging outer layer. The prepared drywall part must be installed by fixing it to the frame with self-tapping screws.
Finishing work
The drywall arch is almost ready. But as you can see in the photo, without finishing it does not look very attractive. Consider how you can complete the design and framing of the assembled arched opening with your own hands.
First of all, you need to putty all the seams and the location of the screws. We attach a perforated corner to the outer edges of the putty composition so as not to bother with putting the putty out of the form.
Then we apply a layer over the entire surface of the arch finishing putty, and after it dries, we grind the surface, achieving smoothness. It remains to prime the surface, after which a fine finish can be performed.
How can you finish the arch? The selected option should be in harmony with the wall decoration. For example, if the walls are covered with wallpaper, the same material can be used to finish the arch.
You can use other options that are combined with wall decoration. For example, trim interior arches artificial stone, tiles, decorative plaster, you can use a combination of different materials. You can see the photo how beautiful and original the decoration of the arch can be.
So, interior openings in the form of arches are an original and very attractive way to decorate the interior and create an opening between adjacent rooms without installing a door. If desired, making an arch yourself is not difficult. And how interesting it is to finish the arch can be seen in the photo in interior magazines.
The main characteristic feature of the arches is that they always look advantageous in the interior, both classic and modern. This architectural element allows you to visually combine several rooms, which to some extent softens the overall impression of small apartments.
The arch in the kitchen is very practical, because with the advent of powerful hoods, the need for a door has completely disappeared. The same element, installed in the opening leading to warm loggia, actually unites the space and makes the adjacent room noticeably more spacious. Thanks to the expansion of the opening, it is also possible to increase the degree of insolation, which is important.
 In this article we will tell you how to make an arch in a doorway yourself from different materials.
arch types
Immediately before you get down to business, you must definitely decide what shape your arch will be. Accurate and correct selection option will ensure the harmony of the overall appearance of the apartment and combine aesthetics with practicality.
When choosing the type of arch, you need to take into account the following points:
- room height;
- the width of the existing opening;
- the material from which the walls are built.
So the correct (semicircular) arch does not look good in a room where the floor-to-ceiling distance is 250 cm, unless the opening is narrow (up to 70 cm). This  the option fits perfectly into high rooms (3 meters or more).
The classic arch should have a bend equal in depth to ½ of the width of the opening. That is, if the last 80 centimeters, then the radius of the arch will be - 40.
In the presence of a wide passage and low ceilings, it is advisable to build a straight portal, the arched element here will look too unnatural. Alternatively, it can be narrowed by placing open shelving on the sides (or only on one side).
The easiest way is to choose the shape of the arch if the wall is only planned to be built. Here the choice is practically unlimited. The openings can be wavy, trapezoidal. It is acceptable to make it completely round in Asian style.
materials
In reality, the arch is easy to build from a variety of materials:
- brick;
- wood;
- Chipboard and MDF;
- metal;
- drywall;
- plywood;
- plastic.
In the conditions of an apartment, capital arches are not erected, and therefore they are most often made of wood, plasterboard or plastic.
Preparatory work
 First of all, the opening should be freed from old door. It is dismantled along with the box. The internal surfaces are cleaned of the remnants of the solution, dust-free and thoroughly primed. If there are irregularities, they are eliminated.
Next comes the time to determine what type of arch in your particular case. fit better Total. To do this, you can cut out several options from cardboard and, by attaching them to the opening, see what will look more harmonious.
If you don’t have the desire to mess around for a long time yourself, get a ready-made arched portal at a hardware store. The following materials are currently available:
- plastic;
- tree.
The last option is the most expensive.
clapboard
It is not difficult to build an arch if the room is trimmed with clapboard. In this case, however, you will have to install it on the wall of the adjacent room, but such accent elements are very popular today.
In this case, the base of the arch is cut out of chipboard (not thinner than 18 mm). It should clearly fit into the dimensions of the opening. It is strengthened there using trimming bars installed across the sidewalls. Then the walls are sheathed with decorative strips, cut to shape. The inner vault is sealed with either flexible plywood or pieces of lining. Here you can set the backlight, but only LED bulbs are allowed in it.
Drywall
 In order to veneer the GKL opening correctly, it is necessary to knock down a layer of plaster from the wall above the future arch - this will allow you to place the sheet flush with it. The drywall blank is cut out so that it protrudes at least 15 cm above the opening, on the sides - 5 cm on each side.
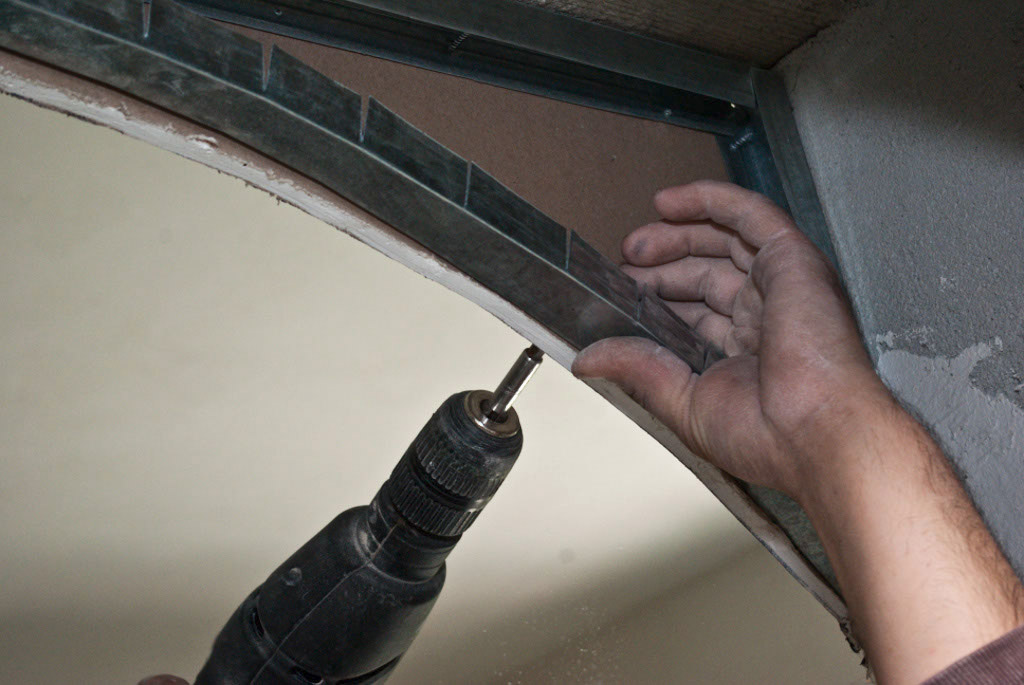
The profile is needed only to stiffen the circle itself. To do this, take the type UD. In it, with the help of scissors, cuts are made at least every 20 mm, so that only one side wall remains intact. As a result, you will get a flexible part that can be easily adjusted to the shape of the arch.
In a rectangle prepared from drywall, whose size is 15 cm larger than the future arch in height and 10 in width, two points are marked 50 mm from the edge.
Next, using a pencil on a string, the outlines of the bend are applied, holding the end of the string along the center of the lower edge of the piece of plasterboard, starting from one of the above marks. If the arch is made incorrect (sloping), then the place of fixation of the thread is moved back below the edge of the workpiece.
Then, along the drawn line, drywall is cut with an electric jigsaw or a conventional one. hacksaw blade for metal (not suitable for wood - too large teeth severely damage the edge). It is advisable to put two blanks together at once and cut out the excess in one fell swoop.
A profile is screwed to the rounded end of the GKL with self-tapping screws, not reaching the edge of 1.5 cm, so that the strip with which you will close the arch along the end “drowns”.
Next, the surface of the wall, freed from plaster and primed, is covered with a layer of glue (Perlfix is the best) using a notched trowel. A piece of GKL is pressed against it and lightly slapped with the palm of your hand. Additionally, it is fixed with several dowels. On the other side of the wall, a second arch element is installed.
When the glue dries, jumpers are mounted between the profiles for rigidity. The end is sheathed with a strip of drywall, notched from the inside across, through 2 centimeters and broken.
All seams are sealed with special glue (Fügenfüller) and glued with fiberglass. The edges are protected by a flexible corner. The sides of the opening are also lined with plasterboard strips and reinforced.
The last stage of work is puttying and painting.
You can make an arch in the doorway in various ways. Each of them is selected based on specific situation. It is necessary to take into account the construction skills that home master and financial possibilities.
It is worth noting that it is possible to qualitatively install an arch in a doorway with your own hands only when all the features of this design are taken into account. The fact is that this type of finish has its pros and cons.
The advantages include the following aspects:
- Visual increase in space. In this case, two factors are combined at once. The first is that an opening without a door unites two rooms, this erases some existing border. The second is based on the shape of the structure.
- Great option for zoning. Indeed, the arch can become great solution problem, which is to divide a single area.
- Good decorative look. This design can be a decoration of any interior. It should be taken into account that overall design should be harmoniously thought out.
We must not forget about the existing shortcomings. They are that the feature this product is openness, since there is no door leaf. Therefore, there is a complete lack of sound insulation, the penetration of foreign odors, if we are talking about the border with kitchen area.
 When making an arch, you should think about the fact that the feeling of security will disappear.
Existing Options
What is the peculiarity of installing an arch in a doorway? The point is that there are different kinds construction data:
- Ellipse. It is believed that this configuration is classical. It is made round. All transitions are very smooth.
- Round. This option allows you to expand the opening. This method is suitable for cases where zoning is required.
- Trapeze. Assumes no rounded areas.
 Arch - various types of structures
 On a note! You can often hear that the arch and the portal are two different architectural element. In fact, the portal is the most simple solution arched structure. It is made in the form of a rectangle, sometimes complemented by rounded corners.
Features of the construction of arches
You can make an arch in several ways, but you need to consider the height of the openings.
For low openings
This method of creating an arch is that the surface is pre-marked. The marked area is cut out (hollowed out).

The general technology is:
- The opening is being dismantled. Deleted old box. Part of the crumbling plaster is removed.
- The height of the future structure is determined. Lines are drawn along the two vertical sides. They must be equal and executed exactly at a given height.
- To obtain the radius of the arch, the available width is measured. This value is divided in half.
- Between uprights a horizontal line is drawn. It should be located at a level that will correspond to the beginning of the rounding.
On a note! It is important to consider that the distance to the ceiling should not be less than 30 cm.
- The center is marked on the drawn line. A self-tapping screw is screwed in. A cord is tied to the screw, which must be equal to the specified radius. A pencil is attached to the end of the rope. This tool marks the bend.
- According to the existing markup, cropping is performed. If the wall is strong enough, then slotting is performed. To facilitate the work, pre-drilling is done.
 It is necessary to comply with the requirements for the construction of the arch
 Thus, the necessary form is obtained. Next, it should be carefully processed. This is done by grinding. The resulting structure is processed with putty or plaster. They can serve as a finishing material.
For high openings
The door arch can also be done in a different way. It lies in the fact that drywall and a metal profile are used as the main material. The technology assumes that everything will be done according to an existing opening. The following actions are performed:

On a note! The created crate should be drowned to the thickness of the GKL boards used. Small errors are possible. They are easily fixed with plaster.

On a note! If you need to install the arch very quickly, the most right decision will use the finished design. These products are made from various materials and have standard configurations.
After all the procedures, it turns out almost finished construction. It is only required to install a fragment of the GKL plate, which will close the open arcuate space. The procedure is as follows:
- The curvature is measured.
- The resulting size is transferred to drywall.
- The required fragment is cut out.
- This part needs to be bent. To do this, it is cut from the wrong side into strips.
- Carefully put in place and fix.
 Finished plasterboard arch
 The completed design needs additional decorative trim. It should be noted that drywall makes it quite easy to do the arch with your own hands. If wood is used as a material, then it is necessary to have sufficient experience in order to properly process and install such a product.
Fiberboards and plywood are used as substitutes for GKL boards.
 Often to create arched openings use plywood instead of drywall
 There are some tips to help you get a beautiful arched opening:
- The general appearance of the arch should match the interior design.
- To get more original design- it is made out with different sides individually.
- Existing communications should be laid in advance.
Summarizing the above, it can be noted that there are various ways to do door arch. You just need to be patient, as well as adhere to certain rules and recommendations. Then everything will definitely work out.
When you have an apartment, you certainly want to make it cozier, more comfortable and bigger. Currently, one of the ways to visually enlarge your home is to create arches instead of doors.
Various photos of arches show how diverse they are and how much they change appearance housing. It is about how to make an arch with your own hands that will be briefly described below.
arch types
The arch is an opening in the wall that does not have an overlap in the form of a door. Their views differ only in the upper part, or rather in how the corners are built (straight, rounded or curly).

V modern world There are 7 types of arches:
- classic;
- "modern";
- "romance";
- ellipse;
- trapezoid;
- "portal";
- semi-arc.

The first four types have rounded corners and differ only in the form of rounding.
So the classic arch is a semicircle with a radius of half the width of the opening; "modern" has a small corner radius; "romance" and ellipse are similar to each other and represent the usual rounded corners.

Another thing is the trapezoid and the portal. These two types use sharp corners. In the trapezoid, the top, respectively, represents this figure, and the “portal” is an ordinary opening without a door.

However, even an unremarkable "portal" can be made to sparkle with new colors, giving the pillars the appearance of columns in the ancient style (Greek or Roman).

Trapeze though is pretty unusual decision, but not suitable for any style, therefore it is used much less often than other arch options.

The last type is a semi-arch, as the name implies, it consists of 1 rounded and 1 right angle. This type of arch began to be used recently, but it has already gained popularity.

It is up to you to decide which arch to install in the apartment, but we will dwell in more detail on drywall arches, as the most convenient material for building.
Step by step instructions for creating an arch
We choose the future shape of the arch. It is important that it fits general style premises that will connect.

We clean the opening from the plaster and level it. It's simple here - the cleaner the surface of the work, the more reliable the mount.

We fix the arch frame. We build the frame itself from a profile (it can be made from wood bars).

We attach a cut-out drywall arch to the frame (one side). To get an arch desired type, in the middle of the drywall base we make a hole for the nail. We tie a rope to it and get a homemade compass. Now, by changing the length of the rope, you can change the radius of rounding corners and their appearance.

We apply drywall on the other side and mark on it, as if on a stencil, an arch, after which we cut it out and attach it to the frame.

In no case should this be done on the floor, since the opening is usually asymmetrical, which has the most detrimental effect on the accuracy of one-to-one markings.
Note!


We measure the resulting arc and make a tape for fastening from the profile. After that, we attach the resulting tape to the arch of the arch with self-tapping screws.

Install jumpers. Their size is calculated simply: the depth of the arch is minus 1.5 centimeters, the material of manufacture is a metal profile, less often wood. We attach a sheet of drywall to the end of the opening with self-tapping screws.

We spend Finishing work(we level with putty, overwrite possible holes, paint, or glue wallpaper).

Other ways to make an arch
You can also make an arch in the opening in two other ways. The difference between these methods of creating an arch in fixing drywall.
In the second version, it is attached to the jumpers not with a whole sheet, but with specially cut pieces (set) using a special solution (water, putty plus PVA glue) and this must be done without delay, since the solution hardens very quickly.

Note!

The third option provides for wooden lintels planted on glue. Drywall in the opening to the lintels is also glued.

How to bend drywall?
In addition, the question may arise: how to bend drywall? Thin cardboard (6 mm) is best suited for this.
And there are at least 2 ways to bend it:
Method 1 - roll a roller on cardboard to break the gypsum in it, soak it in water and gradually screw it to the tape with screws.

Method 2 - make cuts on drywall every 4-5 centimeters. When you attach to the end of the opening, the material at the place of the cuts will burst and better adhere to the wall surface.

We wish you good luck with your work!

Do-it-yourself arch photo

Note!


To transform your interior and add some zest to it, you can make a drywall arch. Such a design inspires respect and makes you think, because it seems that it is simply impossible to do it on your own. But all the fears and worries are completely unfounded. If there is a desire, then using step by step instructions, which will be given below, it will be possible in an apartment or house. And also to figure out which of the materials will be preferable in each case.
First of all, you need to understand what such a design is. The arch is one of the elements in architecture that is characterized by curvilinearity. The place of creation are through or blind openings and spans. For greater effect, it can be supplemented with various decorative elements.
There are different types of arches:
- Classic - characterized by smoothness of form. Has equilateral rounding.
- Semi-arch - has only one rounded corner. Is an modern solution for newfangled trends in the interior.
- Trapeze - complex shape from curved lines.
Of course, there are many more species (see photo).

It would be better if a template is made before starting work. It is very easy to make from ordinary cardboard or fiberboard. So, it will be possible to immediately understand how the object will look, which rounding is preferable.
Working with wood requires the most attention. In this case, no error can be allowed. Various breeds are suitable for production, but pine is most often used as a fairly durable and cheap material.

Need to know! Before working with a tree, you need to make sure that it is well dried. Otherwise, no instruction will help, drying and warping will begin. Correcting the situation would be impossible.
Not everyone likes pine as a quality finishing material but it's easy to fix. For finishing work, you can use precious woods (oak, beech, mahogany) or cheaper veneer.
Manufacturing process
In general, any work with natural wood, if there is no experience, it is better to entrust specialists. When creating an interior opening in a house or apartment, you need to proceed from real possibilities.
There are several options for the design of such material:
- typesetting
The arched opening is made by assembling different fragments (small parts). That is, rounded elements are created by pressing, which are then joined together (gluing, twisting). This is a rather painstaking process that requires the presence of many tools. Helps avoid distortion. Making a type-setting arch from wood
 - One-piece structures
Literally made from whole piece wood (beam). Preferably hardwood. Often, such a design plays the role of an “internal” frame, which is subjected to external processing.

Installation
To install the arched structure, you must adhere to the following rules:
- The installation site is carefully prepared, all unnecessary is removed, the surface is puttied.
- Prepare in advance essential tool- in each case is individual.
- Mounting takes place in several stages:
created load-bearing frame;
elements are laid and connected;
outer cladding is done. - After that, proceed to the finish: coated with varnish or paint.
- Defects lead to the formation of empty spaces - they are puttied or foamed, but this will be a clear flaw.
This option would be preferable if you want wood to serve as the material, but natural wood use is not possible. In addition, do-it-yourself plywood arch is quite simple.

Training
- A detailed sketch is created. For this, all necessary measurements opening. This allows you to create a visual project, and immediately make a calculation necessary materials and accessories.
- Prepare and place the installation. All unnecessary is removed in advance, if necessary, trimmed.
- Prepare the instrument:
hacksaw or jigsaw with files;
drill and screwdriver;
sandpaper and bar;
finishing tool.
You need to understand that plywood is quite unique material. With it, you can create magnificent designs, it is distinguished by its strength and increased flexibility.
The first way to use plywood
The technology is:
- Measure the opening. Immediately note what size the arc should be.
- A strip is cut out of a sheet of plywood, the edges are well processed.
- This fragment is moistened a little, waiting for a while.
- Now this material will take almost any shape.
- The strip is bent and immediately inserted into the desired opening - fixed, do not forget to install spacers at the corners.

You need to wait until the plywood is completely dry. At this time, it will finally take the form of an arc. Further, they act in two ways:
- Make inserts from a wooden beam. The surface is sheathed with drywall.
- Apply mounting foam. open areas they just froth. After complete drying, the protruding areas of the swollen material are removed. In order for the plywood arch to take on a decorative look, the surface is completely puttied and covered with paint or varnish.

The second way is more complicated.
It will be similar to working with GKL. It consists of the following:
- The distance between opposite sides of the opening is measured. measured desired height arches.
- All this is transferred to a sheet of plywood. It should be of such a size that it captures the walls for another 10-15 centimeters - two sheets of this will be needed.
- Three points draw an arc.
- With the help of a jigsaw, unnecessary is cut out. The first sheet is used as a stencil for the second. The operation is repeated.
- Both segments are installed in a stationary place. They are fixed - jumpers are made between them. The main thing is to install them correctly. In this case, the thickness of the material from which the arc will be made is measured. That is, if the thickness is 6mm, then the jumpers should be installed from the edge of the arc to the same distance (+ 1-2 mm).
- Choose the material for the arc (GKL or plywood) - bend it and install it.
- Carry out finishing work.

There is another way to create a plywood arch, but it takes time and tools. Its essence lies in the fact that the internal filling of the arch is made from cut plywood fragments. Namely - there is a filling like a sandwich. But this method allows you to adjust the depth of immersion of each subsequent arc. Thus, it is possible to create a wavy (embossed) structure.
Drywall arch
How to make a drywall arch with your own hands? There is nothing difficult in this. This material is somewhat reminiscent of plywood, but it is easier to work with and much cheaper.
It's great when you can combine several at once construction works: erecting walls and creating a drywall arch. Then you can carry out the installation with the least finishing work.
There are two ways to use drywall, but it all starts with preparatory work:
- It is necessary to ensure that the work site is freed from all unnecessary ( door frames, platbands, decorative elements).
- If there are cracks, chips, then they close up. Yes, the design of the arch will hide everything, but it is better to avoid unpleasant consequences.
- The necessary tool is being prepared.
- A preliminary project is being created.
Method one - on a metal frame
This is a very fast and quite popular way that allows you to make a drywall arch in your house or apartment.
In a similar manner, it is done wooden frame. Only there more attention should be paid to the jumpers, on which the arc will be attached.
To better understand how to do interior arch from drywall, watch this video:
The second way is dialing
More difficult option. The principle is:
- From the corner of the opening, on both sides, segments of the plasterboard begin to be fixed. To do this, mix PVA and water.
- Each next piece is smaller than the previous one.
- So, until the smallest segment is fixed.
- Additionally, they are strengthened with self-tapping screws, anchors.

The hardest part is coming. Namely, with the help of a putty mixture, a smooth arc is formed. It's not that easy, it's better to prepare templates in advance.
As you can see, there are many ways, you can use different materials and technology. Not every one of them is suitable for work that you can do yourself. But if there is a desire, then following certain rules will allow you to create a magnificent design.

