How to feed stalked celery. Growing celery and caring for it - we share our experience. Secrets of growing celery.
Celery has been known since ancient times to the Egyptians, Greeks, and Romans. In the burial of one of the Egyptian pharaohs, dated 1200 BC, a wreath of celery leaves was preserved at the head of the mummy. The ancient Greeks depicted him on coins, and the poet Homer sang it in his works "Iliad" and "Odyssey". Beauties prepared rejuvenating masks from celery, and doctors prescribed preparations from it for many diseases. V Ancient India, Tibet, China, they even treated cancer.
In medieval Europe, the first cultural forms of celery emerged in the 15th-16th centuries. At first, leafy and petiolate varieties were cultivated, and in the 17th century. root crops were bred.
According to legend, celery juice was included in the magic drink of love between Tristan and Isolde.
Celery was brought to Russia as an ornamental spice and flavoring plant. At the beginning of the 18th century. it was grown in Nemetskaya Sloboda, in the gardens of noble estates, and near canneries even more often than cucumbers. However, it was leafy celery; both then and now, petiole is grown in small quantities in our country only by amateur enthusiasts, while in the USA, India, China, Korea and Japan it is cultivated everywhere.
Celery: both feed and heal
The health benefits of celery are incalculable. It is used in cooking, pharmacology, folk medicine, cosmetology, food and canning industry.
Celery in cooking
The petioles are boiled, stewed, pickled, salted and even frozen. The fiber of celery stalks is digested slowly, accumulating a lot of water, as a result, when absorbed, a feeling of satiety is created, and puffiness is reduced. The nine-component essential oil, based on sedanolide, imparts a long-lasting pleasant aroma and stimulates digestion and kidney function.
Petioles are used to prepare salads, first and second courses, side dishes and seasonings for fish or meat
IN MEDICINE. Celery has an antiseptic, blood-purifying, wound-healing, anti-allergic, anti-inflammatory, mild laxative and good diuretic effect. In traditional medicine, drugs are prepared from seeds for the treatment of arthritis, gout, edema and cystitis. Decoctions, infusions, oil, juices from different parts celery is used for malaria, urticaria, liver disease, neuroses.
Favorable ratio mineral salts and B vitamins has a beneficial effect on the nervous system, increases brain activity, concentrating attention, accelerates the speed of thinking, improves memory. The petioles contain up to 7 mg% carotene, which is necessary for normalizing vision and preventing night blindness. Vitamin C (100-150 mg%) supports the human immune system, protects body cells from free radical damage and premature aging.
Celery essential oil protects the integument of nerve endings, reduces inflammation, relieves pain in gastritis, polyarthritis.
Celery is unique in its ability to lower blood pressure in hypertensive patients. This is due to the high content of potassium and magnesium, which relaxes smooth muscles; flavonoids that strengthen blood vessels; and fiber, which removes about 10% of cholesterol from the body.
Magnesium has a beneficial effect on nervous system, and iron - on the processes of hematopoiesis. Biologically active organic sodium maintains calcium in a dissolved state and, together with phosphorus, strengthens bones and teeth.
Celery coumarins increase the activity of leukocytes, enhance immunity, relieve headaches. Due to the accumulation of polyacetylene and phthalides, celery has the ability to remove cancer-causing carcinogens from the body, preventing dangerous diseases.
Tea made from brewed leaves is useful for elderly people suffering from constipation, a decoction of roots and leaves eliminates bloating, relieves spastic pains. Celery juice enhances the excretion of toxins from the body, helps cleanse the blood. It is useful for people prone to excessive consumption of sweets and smoking.
To reduce the activity of hydrochloric acid, a mixture of celery and carrot juice in a ratio of 5: 6 is recommended for patients with high acidity of gastric juice.
Soup from stalked celery include in the menu for people suffering from diabetes mellitus, obesity, diseases of the thyroid gland and genitourinary system. The use of petioles has a beneficial effect on the body in case of shortness of breath, scurvy, and salt deposition. They are recommended for sleep disturbances, neurasthenia, insomnia, and excessive excitability.
This one has useful plant and contraindications. Celery is not recommended for pregnant women, mothers, breastfeeding, babies, with caution - sick hepatitis, as well as at the time of exacerbation of stomach ulcers, duodenum and colitis. Its use should be limited to people suffering from epileptic seizures and urolithiasis, so as not to provoke an exacerbation and active movement of stones.
Celery in cosmetics
Celery is a part of moisturizing and nourishing creams, masks, vitiligo treatments, anti-edema serums for the skin around the eyes, and medicated shampoos. They prevent dehydration, refresh and restore the barrier function of the epidermis. For their preparation, dry extracts (1-5%) or freshly squeezed juice are used. Zinc contained in celery juice makes the skin and hair beautiful and healthy, strengthens the nails. Cosmetic masks rejuvenate the skin. With urticaria and allergies, sore spots are wiped, after which the skin softens, saturated with moisture, becomes elastic and healthy, puffiness and redness disappear.
There is evidence that celery cures alcoholism, for which half a glass of juice is mixed with water 1: 1, drunk once a day for a month.
The systematic use of celery, mashed with an apple and seasoned with sour cream, tones up and enhances sexual potency in men, liberates and relieves of sexual complexes on the mental level
Celery family
In addition to celery, this family includes many spices, and also root vegetables - parsnips, carrots. Therefore, it is not surprising that the cultivation of stalked celery has much in common with its orange sister.
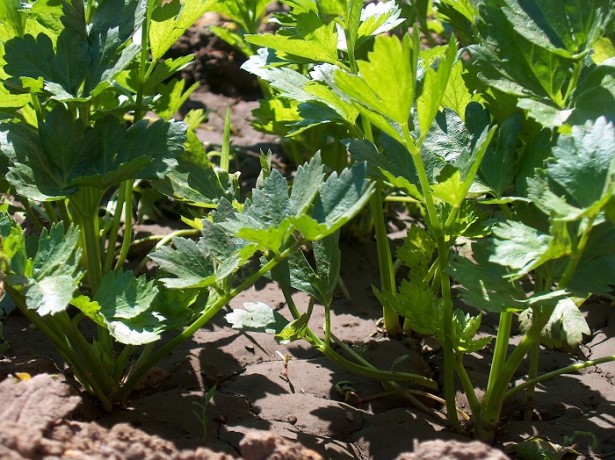
In the first year, stalked celery forms dense, without voids, stems, in the second year - seeds. Its leaves are noticeably larger than those of leaf varieties... The petioles are 8-9 mm thick, 2-3 cm wide, 22-50 cm long. They can be green, pale green, pink and red, in need of bleaching or self-bleaching. The latter are more thermophilic. From the emergence of shoots to the cutting of the petioles, 80-180 days pass, depending on the variety. Root system located at a depth of 20-25 cm.
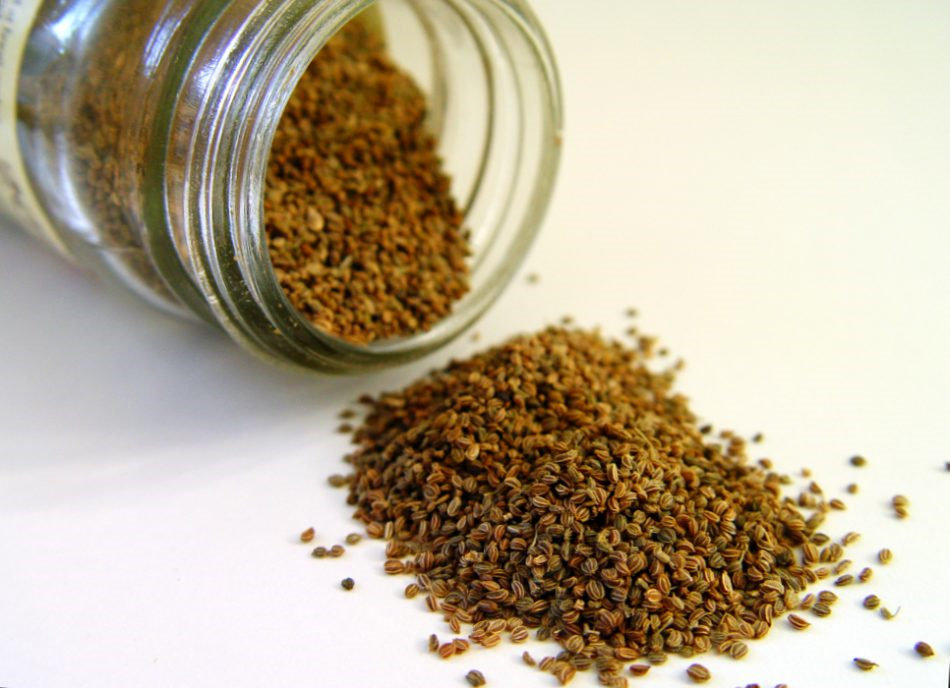
In the second year of life after disembarkation mother plants peduncles are formed. They bloom in about 2 months. Within 3 weeks, the flowers are pollinated by insects, giving life to the fruit - a small achene. At first, it is greenish-crimson, then, when ripe, gray or brownish brown, splitting into 2 parts. The seeds are very small, up to 800 seeds per 1 g. They retain their germination capacity for 2-4 years.
Petiole celery is a cold-resistant plant for a long day (13-17 hours), it is pulled out by sowing in the ground or through seedlings. Seeds can germinate at 3-4 degrees, but this process will be long, since optimum temperature for emergence of shoots 20-25 degrees. Young plants tolerate frosts of 4 degrees without loss, adults - up to 8 degrees. With prolonged cold weather below plus 10 celery shoots. For normal growth and development, the most favorable temperature is 12-20 degrees.
Large and succulent petioles form on sandy loam and loamy soils rich in humus and nutrients, on cultivated peat bogs. At the same time, it does not tolerate acidic earths.
Celery is hygrophilous, but suffers from flooding. In the seedling period, it is responsive to soil and air moisture. Mature plants need abundant watering only during dry periods. For normal development, they need a lot of potassium and nitrogen. Roots need oxygen and, accordingly, frequent loosening of the soil.
All types of celery are easily pollinated among themselves, while their quality deteriorates. For example, the stems of the petiole become hollow and narrow.
The best varieties of stalked celery
Petiole celery varieties are divided into green ones that need bleaching, and there are intermediate forms for self-bleaching. The choice of the cultivation method (through seedlings or sowing directly into the ground) largely depends on the length of the petiole formation period, so be careful when purchasing seeds.
ATLANT
From germination to harvesting, 150-170 days pass. Petioles 40-45 cm long, rosette weight 300-340 g. Productivity up to 3.3 kg / m2. The variety needs bleaching.
GOLD
It takes 150-160 days from germination to harvest. Petioles slightly curved, light green, slightly ribbed, middle length, outlet weight 830 g, yield up to 5 Kg / m2. Self-bleaching grade.
MALACHITE
It takes 80-90 days from germination to harvest. Petioles are thick, fleshy, light green, slightly curved with a slightly ribbed surface, length 30-35 cm, rosette weight 1.2 kg. Productivity 2.8-4 kg / m2. Self-bleaching grade.
MEN'S VALUE
A promising variety, ready for harvesting in 150-165 days after germination. Petioles are large, thick, light green, slightly ribbed, slightly curved, length 45-55 cm, rosette weight 560-650 g. Productivity up to 3.3 kg / m2. The variety needs bleaching.
PASCAL
It takes 100 days from germination to harvest. Petioles are light green, slightly curved, length 25-30 cm, rosette weight up to 450 g. Productivity up to 3.9 kg / m2. The variety needs bleaching.
TANGO
One of the best varieties, ready for cleaning in 160-180 days. Petiole up to 50 cm long, bluish-green, strongly curved with inside, without coarse fibers, outlet weight up to 1 kg. The value of the variety is high aroma, long-term preservation of the presentation, good taste. Productivity 1.9-3.7 kg / m2. The variety is resistant to flowers and rust.
CRUNCH
Ready for harvesting 100-120 days after germination. Petioles are dark green, fragrant, juicy, of medium length. Productivity 2.9-3.2 kg / m2. The variety is cold-resistant, requires bleaching.
Ready for harvesting 160-180 days after germination. The petioles are powerful, dark green with a violet tinge, curved from the inside, without fibers, weighing 350 g, 25 cm long. Very fragrant, retain their juiciness for a long time. Productivity 3.7 kg / m2. The variety needs bleaching.
Stalked celery - from sowing to harvest
Autumn chores
The place for stalked celery needs to be sunny, provided with water, with fertile soil, neutral acidity (pH 6.5-7.5). On dry and poor lands, the petioles grow thin.
I'll tell you about the cultivation of petioles using my example. Our land is heavy, so we form a bed in the fall. For digging, we apply fertilizers: a bucket of humus or compost, a glass of ash, 1 tbsp. a spoonful of superphosphate per 1 m2. The acidity is high, so we lime the soil. It is advisable to add lime under the predecessors, that is, vegetables that grew in this place before celery.
Those with light soil can grow petioles in a trench 40 cm wide and 30 cm deep. They fall asleep gradually, as the plant is hilled for bleaching. it old technology, its disadvantage is the too slow development of plants. But it can be accelerated if compost or manure is placed on the bottom of the trench, and fertile soil is poured on top, not reaching the edge of the trench 8 cm. A garden bed or trench prepared in the fall is loosened in spring.
Growing celery seedlings
Long-growing stalked celery is best grown through seedlings. We grow it on a windowsill, sowing is carried out in the 3rd decade of February - 1st decade of March in a seed box.
Without preparation, seeds germinate for a long time (more than 20 days). Therefore, to accelerate germination, we keep them in a solution of immunocytophyte for a day (1 tablet per 20 ml of water).
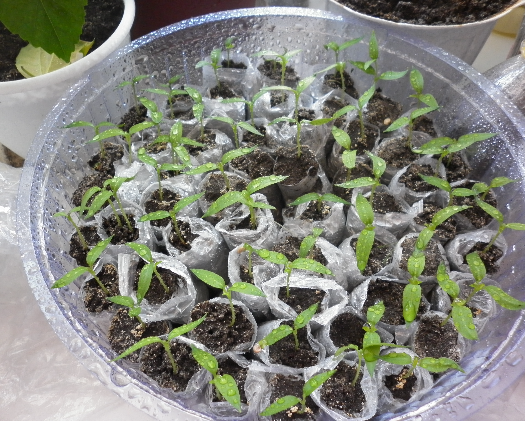
Fill the box with a light nutrient mixture made up of garden soil and humus in equal parts with the addition of a small amount of sand. We moisten the substrate, the next day, pour snow 1.5-2 cm thick over the wet earth, slightly compacting it. We close the seeds shallowly, they germinate better in the light. Cover the box with glass on top. The snow melts, the seeds are drawn into the soil.
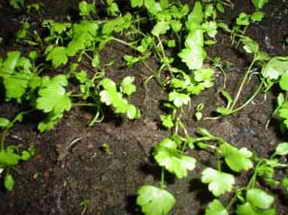
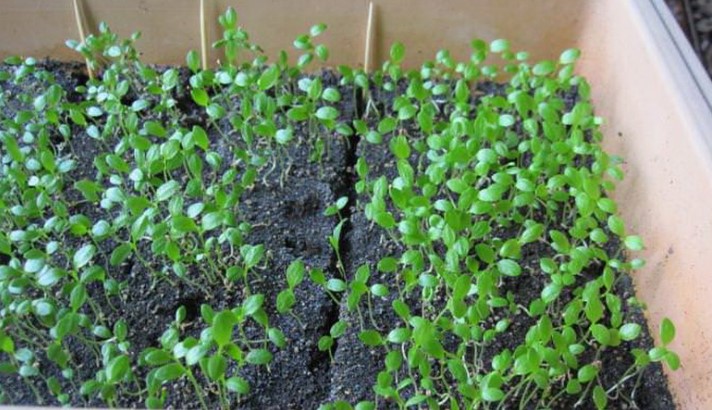
Until the emergence of shoots, we keep the box at room temperature... The sprouts are shown in 7-10 days. Then we remove the glass, and transfer the crops to a bright, cool place (10-12 degrees) for a week to prevent the seedlings from pulling out.
As needed, we water the settled warm water, being careful not to wet the cotyledon leaves. Watering cold water can lead to black leg disease. If there are signs of it, we use the biological product tri-hodermine, which inhibits the development of infection.
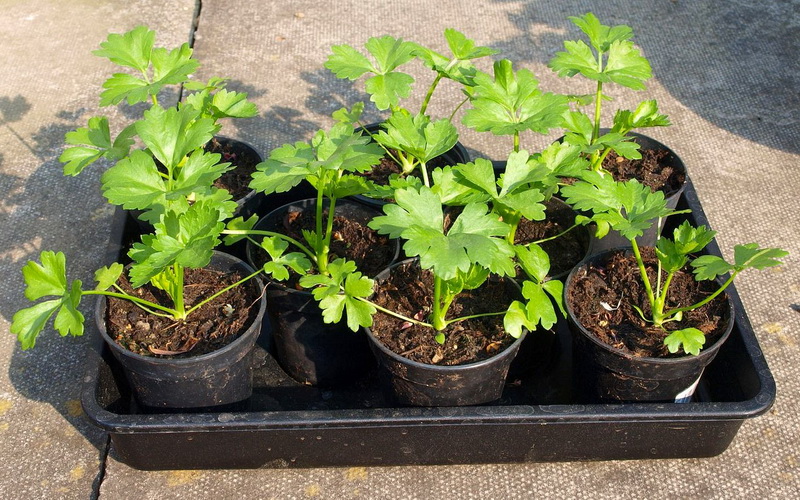
When two or three leaves are formed, about 40 days after germination, we transplant the seedlings into cassettes or pots with a diameter of 6 cm. We don’t pinch the main root, unlike root celery, we only reject plants with weak roots and deformed leaves. When transplanting, we do not fall asleep at the growth point. After the seedlings, we water and shade for a day with damp paper.
Two weeks later, we feed it with a solution of complex mineral fertilizer (1.5 g / l of water). If celery leaves turn pale, fertilize with urea (0.5 g / l of water). We repeat the top dressing after 10-12 days, gradually increasing the dose of fertilizers to 2 g / l. To avoid leaf burns after fertilization, wash off the nutrient solution from the plants. clean water from a hand sprayer. From time to time we carefully loosen the soil, water it as it dries out.
Plants 12-15 cm high with four to five leaves and a root system well braiding with an earthen ball are ready for transplanting in open ground
One week before disembarking on permanent place we harden the seedlings by taking them to the loggia. First, at 15 degrees for 2 hours, gradually increase the residence time.
With a small amount of cultivation, petiole celery can not be transplanted into pots, but only thinned out, leaving an interval of 6 cm between seedlings and cutting off the excess with scissors. Or, immediately sow seeds that have grown into pots, placing 5-7 seeds in each and removing the extra ones as they grow.
Sowing celery in the garden
After the snow melts, we dig up our heavy loamy waterlogged soil again, having previously sprinkled 30-40 g / m2 of any complex mineral fertilizer. From the carrot fly, we pay the garden bed with dry mustard or tobacco dust (1 tbsp. Spoon / m2). On peaty soils, it is also necessary to add trace elements, preferably in liquid form.
Green varieties of stalked celery, except for less cold-resistant self-bleaching ones, can be sown immediately into the ground, which is what we are doing. Since the essential oil contained in the seeds inhibits the emergence of seedlings, we sow after germination. Wrap the wet seeds in a damp cloth and put them on a saucer. On the sixth day, white borings appear in 5-6%. Then we put the saucer with the seeds in the refrigerator and keep it there for several days at a temperature of 1 degree.
We sow in April - May in grooves 0.5 cm deep, made across the garden bed after 30-40 cm or in 3 rows along it. Sprinkle the seeds with damp earth, and cover the garden with a non-woven cloth and film. Seedlings appear on the seventh day after sowing. Then we remove the film, and leave the non-woven fabric until it warms up.
Some celery lovers sow dry seeds, mixing with sand to remove seedlings less when thinning.
The celery is returned to the previous bed no earlier than after 3 years
Petiole celery in small quantities can be planted among cabbage, beets, potatoes, along the edge of the cucumber garden. The benefits will be twofold: saving space and protecting neighbors, since celery repels many pests from laying eggs.
Planting celery seedlings
We plant celery seedlings in early May, which prevents premature shooting of the plants. By this time, the soil is well warmed up and rooting occurs quickly. Overexposed and weak seedlings do not produce high-quality petioles.
When planting seedlings, the growth point cannot be covered
When planting, add sand to each hole, since our soil is heavy, add ash and a handful of organo-mineral fertilizer to a giant. It is even better to add 3-4 g of prolonged-release AVA fertilizer, thanks to which there is no need for further fertilizing.
Petiolate varieties form powerful bushes, so we place the seedlings according to a 50 × 40 cm scheme.However, we plant self-bleaching plants closer (50 × 25 cm) to enhance natural bleaching. Place the seedlings so that the bases of the leaves are at the level of the soil, and the growing point is above the ground. This promotes continuous growth and good quality petioles. In the heat, we plant the plants in the evening.
After planting, water the seedlings, sprinkle the soil around with sawdust, peat or cut grass to keep moisture longer.
We feed, we drink, we protect
Celery crops are freed from nonwoven fabric, thinning the rows, removing weeds, loosening the soil. Do not forget that any delay in growth provokes premature shooting.
The first time we thin out when 4-6 leaves appear, leaving 15-20 cm between the bushes. The second time after 10 days, doubling the distance between the plants.
Avoiding strong soil compaction, we constantly loosen it. First, to a depth of 5-6 cm, and after heavy rains or watering by 12-15 cm, combining with fertilization.
Petiole celery responds well to feeding with humus, manure, ash, mineral fertilizers... We feed the first time 2 weeks after planting seedlings or a month after germination, using mullein infusion (1:10) with the addition of potassium sulfate (10 g for every 10 liters of solution). After feeding the plant, we water it with clean water to prevent burns.
The second feeding is carried out 3 weeks after the first, using 10 g of ammonium nitrate, 30-40 g of superphosphate and 20-30 g of potassium sulfate per 1 m2. Fertilizers are embedded in the soil with a hoe to a shallow depth.
Water the celery weekly, consuming 20 l / m2. When there is little rain in August and September, we increase the irrigation rate to 25 l / m2. We are still trying to keep the water out of the leaves. Moisture on them provokes the appearance of fungal diseases that affect first the leaves, and then the petioles.
To give green petioles a pleasant taste, they must be isolated from sunlight. Then they acquire a light green or almost white color, the content decreases essential oils, the taste improves. The easiest bleaching method is to cover it with earth. At the same time, it is impossible to fall asleep "heart" - the point of growth and the bulk of the leaves.
The petioles of the plants are huddled, adding the earth gradually. First, so that they do not fall apart, then the plants are covered half the length, and at the end, almost to the top. Hilling should only be done with damp earth.
This method has one drawback - often the petioles acquire an earthy flavor. This also happened with our celery. Then we stopped bleaching the petioles during the growth period, and after harvesting, we began to drop them along with the leaves in the basement or greenhouse, where they bleach perfectly. However, the yield decreased at the same time.
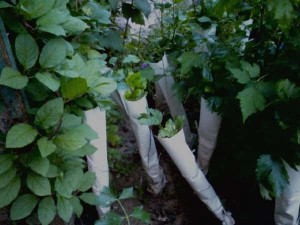
We gradually mastered whitening in another way. When the celery plants are fully developed and reach a height of 30 cm, which usually happens in the first half of September, carefully collect the leaves and tie them with a soft cloth. Then we shift the soil near the base of the plants, tightly wrap the petioles with wrapping paper, tie with twine. There should be no gap between the edge of the wrapper and the surface of the soil. From above, the wrapper should end near the leaves, without covering them.
The bleaching process starts 20 days before harvest. As a wrapper, someone uses several layers of newspapers, others collect the leaves in a bunch, putting on them plastic bottle with a cut off the bottom and throat, and the space from the base to the leaves is filled with sawdust and fallen leaves. In general, there are many methods of bleaching, the main thing is that the light should not fall on the petioles!
Harvesting
We remove the petioles in September-October. We dig out the self-bleaching varieties first, as soon as a large outlet is formed that needs bleaching - 3 weeks after the start of bleaching. In any case, the entire crop must be harvested before frost - frost makes the petioles unfit for food.
In an unlit basement, the petiole wrappers can be removed. They bleach well in the dark and become tender.
With a shovel or small pitchfork, carefully remove the plants with roots from the soil and leave in a cool, damp place. Sometimes we drop it in the basement, placing it in wet sand without removing the wrapper. And immediately open the vents and doors for airing so that the wrapped petioles do not rot. Before freezing, we finish airing the basement and store the celery like this until spring.
If the collected plants are few, store in the refrigerator. Cut off the roots and leaves of the bleached stalks, clean them from the ground, rinse them under running cold water, dry them slightly. We put it in plastic bags or wrap it in aluminum foil and put it in the refrigerator. In this form, the petioles are perfectly preserved at a temperature of 0-2 degrees for a month and even longer.
If on the threshold of freezing, and the celery did not have time to fully form the petioles (more often this happens when sowing directly to the garden), they can be grown. As a rule, non-bleaching varieties grow better. They tolerate transplanting well, produce little waste and retain their green color for a long time. You can grow celery in a greenhouse or basement at a temperature of 4-6 degrees, a relative humidity of 85-90% and moderate watering. During the growing period (60-80 days), young leaves appear, petioles grow.
Celery stalk - fight against diseases and pests
Pests and diseases have not spared celery. We will tell you how to cope with them and save high quality harvest.
The celery (borscht) fly flies out at the end of May, often flies from the hogweed. It lays eggs under the skin of the leaves, small lumpy spots appear on them. The formed larvae eat away the tissue, leaving long brown passages. The petioles become bitter, the yield decreases. In the middle lane, it gives one generation, in the south - two, hibernates in the soil.
Ways to fight. Observe the crop rotation, preliminarily lime the acidic soil, thin out the seedlings in a timely manner, destroy the hogweed and weeds of the family of the same name, dig deeply in the garden in the fall.
The carrot fly hibernates in the soil. It flies out in spring, laying small white eggs under the plant when the first true leaf is formed. The larvae damage the roots and other parts of the celery. The carrot fly in the middle lane gives two generations: in June - July and in August - September.
Ways to fight. Weeding, fertilizing and loosening the soil in a timely manner. In early June and early August, sprinkle the soil between the rows two to three times with a mixture of equal parts of tobacco dust and sand or dry mustard (1 tablespoon / m2) with an interval of 7 to 8 days.
The carrot beetle is a danger to the northwest region. The pest hibernates on conifers, feeds on pine needles in spring and early summer. Then it flies to celery and sucks the juice from the leaves. They are deformed, the petioles are shortened, the plants look oppressed.
Ways to fight. The same as against the carrot fly.
The legume aphid is the largest of all aphid species. Each generation develops in just two weeks.
Ways to fight. At the first signs of a pest, spray celery with broths or infusions from the tops of tomatoes, potatoes, dandelion, yarrow. A good result is obtained by an aqueous infusion of orange, tangerine or lemon peels (1:10), which is kept for 3-5 days.
Cercosporosis, or early burn, often manifests itself in a damp cold season with sudden changes in temperature. Numerous rounded spots of 5 mm each with a light center and a red-brown border visible on both sides of the leaf are formed on the leaves. Oblong spots appear on the petioles. At high humidity the spots are covered with a purple bloom. Diseased leaves and petioles dry out. The pathogen persists in the soil and on plant debris.
Prevention and Treatment. Disinfect seeds at a temperature of 48 degrees for 30 minutes, observe crop rotation, destroy weeds and plant residues... With a strong spread, spray the plants with 0.1% baseol or Topsin-M, the solution consumption rate is 1 liter per 10 m2. Last treatment 20 days before harvest.
Aphids are prevented from breeding by nasturtium or savory sown next to celery.
Septoria, or late burn, strikes in late summer. Small, numerous yellow spots, on the petioles they are oblong, depressed, brownish brown. The causative agent of the disease persists on plant debris, seeds and soil for up to three years. The disease spreads in cold, rainy weather.
A decoction of tomato tops will destroy aphids - a carrier of viruses
Prevention and Treatment. The same as with cercospora.
Powdery mildew affects all aerial parts of the plant, covering it with a white or grayish cobweb bloom. Then it turns into felt with black dots, passing from the upper side of the sheet to the lower one. The disease progresses strongly with sharp fluctuations in air temperature and humidity. Cold dew contributes to the spread. The causative agent of the disease overwinters on plant debris and weeds.
Prevention and Treatment. Dig deep into the soil, destroy diseased plant debris and weeds, observe the alternation of plants. With a strong spread of infection, spray the plants with an infusion of sow thistle (300 g per 5 liters of water, leave for 8 hours).
Cucumber mosaic manifests itself depending on the virus strains and weather conditions. In one case, this is a yellow mosaic and a slowdown in growth, in the second, large rings on the tops of plants, causing their deformation, in the third, small rings. The causative agent of the disease persists on wild plants from which aphids are carried.
Prevention and Treatment. In areas where the mosaic is spread, it is necessary to sow or plant seedlings early, remove weeds in a timely manner, spray the plants against aphids with a decoction of tomato tops (2 kg of dry tops per 10 liters of water, boil for 30 minutes over low heat, strain after settling and dilute 2-3 liters of decoction in 10 liters of water).
Rust occurs in early summer. On the underside of the leaf and petioles, red-brown pads appear, which eventually turn into light brown powdery spots, and by autumn they form a dark brown sporulation, often merging into one line. Diseased plants turn yellow and dry out, the stalks lose their commercial qualities.
Prevention and Treatment. Sow or plant seedlings in optimal terms, spray plants with biological remedies: phytosporin-M (4-5 ml / l of water), bactofit (7 g / l of water). This amount is sufficient for the treatment of 10 m2.
Boron deficiency causes death of the growth point in the center of the rosette along with the adjacent leaves. At the same time, the base of the petioles cracks longitudinally. Cracks form in the upper part of the roots, which gradually expand and are populated by secondary microorganisms. The disease often affects plants on light sandy soils and in dry years.
Prevention and Treatment. Observe the rules of agricultural technology, water the plants in a timely manner, spray brown in a concentration of 0.04% throughout the season.
Stalked celery - culinary recipes

Celery is a wonderful gift from nature. Judge for yourself - dishes made from it have a refreshing delicate taste, are distinguished by high nutritional value, juice, tincture and broth are healing, the pulp of the petioles restores youth to the skin.
VEGETABLE SALAD
Products: 2 celery stalks, 1 each bell pepper and 1 cucumber average size, 2 tomatoes, 5-4 radishes, 1 hard-boiled egg, 1 tbsp. a spoonful of vegetable oil, 1 teaspoon of lemon juice, onion and parsley to taste, black pepper and salt.
Peel the petioles from the upper skin, wash, cut into half rings. Cut the pepper and tomatoes into slices, the radish - into slices, the cucumber - into cubes, finely chop the greens. Combine everything and put in a salad bowl, salt, mix, season with vegetable oil with lemon juice, decorate with a boiled egg, cut into petals along with the yolks, and put a radish rose in the middle. Place in the refrigerator for 10 minutes. Sprinkle with black pepper before serving.
CELERY WITH SALMON
Products: 2 celery stalks, 200 g of lightly salted salmon, 150 g of crab meat, 75 g of boiled rice and green peas, 50 g of grated cheese, mayonnaise to taste. Cut the celery stalks into half rings, salmon into small pieces, crab meat into cubes. Add boiled rice, green peas, grated cheese. Mix everything, season with mayonnaise. Top the salad with crab strips. From celery crescents, make flowers, in the middle of which put a pea.
MINESRONE ITALIAN SOUP
Products for 4 servings: 400 g of stalked celery, 1 onion and 1 carrot each, 1 clove of garlic, 100 g of zucchini, 75 g of canned white beans, several broccoli inflorescences, 1-2 tbsp. tablespoons of olive oil and curly noodles, 1 teaspoon of tomato paste, 50 g of green peas, 100 g of potatoes, 1.5 liters of water or vegetable broth, parsley and basil to taste, salt, ground black pepper, Parmesan cheese.
Onion cut into half rings, chop the garlic. Heat olive oil in a large saucepan, add onion and garlic, sauté over low heat for 5 minutes. Add diced celery, carrots, zucchini and broccoli. After 5 minutes, add the peeled tomatoes and tomato paste... Simmer for another 5 minutes and add beans. Then pour in broth or water, bring to a boil, simmer for 20-30 minutes. Add green peas, noodles and diced potatoes and cook for 10-15 minutes. Season with salt, pepper, add fresh chopped basil and parsley, cook for 5 minutes. Pour the prepared soup into bowls, sprinkle with grated Parmesan cheese before serving.
STEWED STEPS
Products: 3 celery stalks, 1 tbsp. spoon butter, grated cheese and flour, 1 medium onion, 1.5 cups of chicken stock, ground black pepper and salt to taste.
Wash the petioles, peel off coarse fibers, cut into 1 cm pieces. Lightly fry the onions in a deep frying pan, preventing discoloration. Add celery, simmer for 5 minutes. Pour in flour and mix, salt and pepper, gradually pour in the broth, without ceasing to interfere. Continue simmering over low heat until tender, about 30 minutes. Add grated cheese 2 minutes before removing from heat so that it can warm up and dissolve. Serve with boiled chicken.
STUFFED CELERY
Products: 2 celery stalks, 100 g of cheese, 1 tbsp. a spoonful of olive oil, 1 bunch of dill, ground black pepper to taste.
Cut the petioles into 20 cm pieces. Split them lengthwise, not reaching the end, and put in cold water for 10 minutes. Drain the water, dry the pieces of celery slightly. Prepare the filling with finely chopped dill, ground black pepper, diced hard cheese and olive oil. Grind everything to a pasty state. Spread this J mixture over each celery stalk. Fold them in a bunch, wrap them tightly in aluminum foil, place in the refrigerator for 2 hours. Before serving, cut into 1 cm slices and arrange nicely on a large platter.
DIETARY RAGU
Products: 100 g celery stalks, 500 g carrots, 100 g parsley root, 2 tbsp. tablespoons of tomato paste, 2 teaspoons of butter, salt to taste, dill or parsley.
Cut the celery stalks and parsley root into small pieces, grate the carrots. Pour vegetables with a little water, salt and simmer until tender. Put in tomato paste, add pieces of butter. When serving, sprinkle with finely chopped dill or parsley. This stew is good for diabetes, chronic diseases gastrointestinal tract, overweight, after operations.
OKROSHKA
Products for 4 servings: 80 g of celery stalks, 1 l of kvass, 8 radishes, 2 cucumbers, 4 medium-sized tomatoes, 80 g of doctor's sausage, 4 tbsp. tablespoons of sour cream, onion, dill, parsley and salt to taste.
Wash and finely chop the celery stalks into half rings. Cut the egg into slices, radish - into slices, cucumbers, tomatoes and doctor's sausage - into cubes, chop onion, parsley and dill. Arrange everything on plates, pour with kvass. Salt and season with sour cream before serving.
Celery - healthy recipes
REAL SEEDS
Pour 2 teaspoons of celery seeds into 2 cups boiled water room temperature, leave for 2 hours, drain. Take 1-2 tbsp. spoons three times a day 30 minutes before meals. The infusion relieves swelling, reduces pain and swelling around the joints by removing uric acid crystals. Recommended for urolithiasis, joint pain, gout, arthritis, rheumatism, obesity, diabetes mellitus.
HERB BREW
Pour 1 teaspoon of dry celery or 1/2 teaspoon of seeds with a glass of boiling water, insist, wrapped, 8-10 hours, drain. Take 4 times a day for 1 tbsp. spoon with menopause, difficult and painful menstruation, frigidity. The course of treatment is 21-30 days, 4 courses per year are recommended.
INFUSION
Pour 15-20 g of chopped petioles or leaves with a glass of boiling water. Insist in a thermos for 4 hours, drain. Take 2-3 tbsp. tablespoons 3-4 times a day for diabetes.
CELERY VIAGRA
Wash and finely chop 400-500 g of celery stalks. Fill a three-liter jar with them. Add 50 g of ginger root, cut into wedges, 3 cloves of garlic, 1 pod of hot pepper. Pour in brandy or vodka. Keep for 3 days, first in a warm place, then in the refrigerator. Filter into another dish, you get 1.5 liters. All that is left can be insisted 2-3 more times. Take 30 ml at night as a stimulating sexual activity, as well as an anti-inflammatory, tonic, diuretic and anti-scurvy agent.
CELERY JUICE
Rinse the petioles, grind through a meat grinder, squeeze the juice. Take 2 tbsp. spoons 3 times a day before meals, with the deposition of salts, thorns. The organic sodium contained in the juice removes toxins, thins the blood and lymph, preventing them from thickening. Compresses can be made from the spin. Pre-lubricate the sore spot with vegetable oil. Then apply gruel, a dense fabric on top, insulate with woolen material. Keep for 2 hours.
Celery - recipes for beauty
MASK
Ingredients: 1 tbsp. a spoonful of chopped celery and oatmeal, 1 teaspoon of cream, 3-4 tbsp. tablespoons of vegetable oil, 5 tbsp. spoons of milk.
Grind the celery stalk in a blender. Grind oatmeal in a coffee grinder, mix with celery, add cream, vegetable oil, slightly warmed milk. Mix everything and apply on face with a generous layer for 10-15 minutes. Then wash off the mask with warm water. Recommended for normal to dry skin.
TONIC
Ingredients: 100 g celery stalks, 1 cup boiling water.
Chop the petioles, pour boiling water over, leave for 4 hours. Strain and wipe your face in the morning and evening.
Growing celery and caring for it - sharing our experience
How to over-stubborn celery
Whatever you say, rich gardening experience is a force, it can save you from many troubles. But if you use it without looking back, you can get into a mess. However, serious people treat their mistakes with humor: they will get it anyway. And to others - science.
Down and Out trouble started
About four years ago, after reading how useful root celery is for health (and supposedly fiddling with it in the garden a little), I decided to grow it. In the first year, he did not even grow in me, since I did not believe that the seeds should simply be poured over the ground and left like that. It seemed painfully strange to me, because in my practice I have never met this method.
I hoped for my rich experience, in short. The next year, she planted it in February as it should: I mixed humus with garden soil and added a little sand and ash. She spread the seeds on the surface and only pressed them slightly with her fingers to the ground, poured them from a spray bottle and stuffed the box with crops into a bag.
And exposed it to the light. Two weeks later, I saw that the roots were hatching, - I watered it again (by the way, during this time I took the boxes out of the bag and aired it every other day - if the ground was dry, then it was sprinkled with water with a weak solution of potassium permanganate).
So, only when I saw the white roots, I slightly sprinkled them with sand on top. And when I saw that small leaves appeared, my joy knew no bounds. It turned out, it came up! So I sprayed all the time with potassium permanganate to protect the seedlings from the black leg. When the second leaves appeared, the sprouts lay down on the ground under their weight, because they were very weak, like strings. Then I took the sand and began to pour it in again (it has a fine structure, so it passes well through the thin veins of the leaf and does not crush them). She carefully lifted the sprouts with a toothpick and added sand until they stood upright.
I didn’t water it, because the soil was damp enough, and the added sand retained moisture even more.
Then I watered directly from a spoon between the bushes, but I did it very carefully, because an excess of water would certainly lead to the appearance of a black leg (and again every time I added a weak potassium permanganate).
Looking ahead, I will say that such care was not in vain: the plants rooted well, and there were no diseases. When I saw that all the sprouts were growing together and stubbornly, I thinned them out a little - I left 20 pieces. So they grew in this container before being transplanted into the ground (they rose 8 cm in height).
Planted in early May. I dug up a bed 1 m long and 60 cm wide, planted it in rows, buried the roots to green leaves. They all started. But then it turned out that they were planted very often, because when I placed the small roots, I had no idea what size the adult plants would be. But their size also depends on caring for them - well, how can you figure it out? Moreover, the case is new.
OK. I loosen, water - the leaves have already grown to a height of 40 cm and closed. In the fall, she began to dig and pulled out root crops with a diameter of 5-6 cm with huge roots that grew like beards. I cut off all this "hairiness", there were bits 3-4 cm long. I tasted it - something incomprehensible, they reminded me of the white roots that we mined in the forest in childhood and gnawed.
Only later I found out that both the leaves and all sorts of small roots must be removed in advance - only then a good tasty root will grow.
WITH USE AND WITH TASTE
I decided to continue the experiment. The next year I bought seeds of the Gribovsky variety (the bag said 900 g). I planted it the same way in February. They all went up. When they had grown so much that they could take it with their hands (that is, three leaves), I spread out two for insurance: what if one doesn’t survive? If both were accepted, the extra one was simply cut off. By May, all the plants looked great. And I planted them in a row along the edge of the strawberry bed after 30 cm. I dug a hole, sprinkled it with humus, added a little ash, watered and, without waiting for the water to be completely absorbed, transferred the celery seedlings from the glass directly into the mud.
When the plants finally hardened and began to gain strength, I scooped up the soil from the roots and cut off the regrown root beards with a small knife. And at the same time she cut off the leaves from below, leaving three or four pieces in the center. And she did so almost until September. As a result, the main roots developed so strongly that they crawled out of the ground and right here, above, also expanded in breadth. Of course, she often loosened it, watered it with pigeon droppings (insisted for three to four days and diluted 0.5 liters per 10 liters of water). By the way, I fertilize all other plantings in the garden with this solution. I have a lot of this stuff, because Nikolay (husband) keeps pigeons.
So, as a result of my long efforts, I finally got good roots - up to 800 g. I dug up, cut them off, dried them in the sun, put them in a box and put them in the cellar in the cold. I took it out all winter, and put the remains in the refrigerator in the spring, and they were enough until the next harvest.
Now I have celery every year. I really like to add it to cabbage soup and to all dishes with meat. I'm not going to part with him. The leaves that I break off are also dried and poured into a jar and also used in cooking all year round.
I wish everyone who has not yet learned how to grow celery, success and patience in achieving their cherished goal. Never give up after your first failure! It's not for nothing that they say that everything in life depends on us. And I have no doubt that readers really have golden hands, and if not yet, then soon, thanks to the advice, they will. I wish you all good health and good luck in your experiments, because living without them is not interesting!
V recent times on the beds of our gardeners you can see everything more different cultures, which for our region can be considered quite exotic, or, in extreme cases, unconventional. certainly can be attributed to such vegetables. Its long stems, which have excellent taste, are fried or stewed. If you dream of getting an unusual harvest, we will tell you how to grow stalked celery from seeds.
How to prepare stalked celery seeds for sowing?
Since the seeds of the culture germinate for a rather long time, their preparation for planting is necessary, which includes the following procedures:
- 45 minutes soaking in 1% potassium permanganate solution;
- 30-minute soaking in water at a temperature of 50-55 degrees;
- daily soaking in warm water.
Sometimes gardeners wonder why stalked celery seeds do not hatch even after all the operations mentioned above. Most likely, you just came across low-quality seeds.
How to plant stalked celery seeds for seedlings?
Under normal climatic conditions middle lane stalked celery is grown in seedlings. Planting of stalked celery with seeds is carried out in March in a container filled with moist, loose soil. Seeds are scattered on the surface and covered with a layer of soil no more than 5 mm. Before the emergence of shoots, the container is covered with foil or glass and periodically ventilated. Watering is carried out by spraying. The first shoots, by the way, can be seen in two weeks, not earlier. When the first two true leaves appear, stalked celery can be dived into separate pots.
Cultivation of stalked celery
There is no difficulty in growing stalked celery. 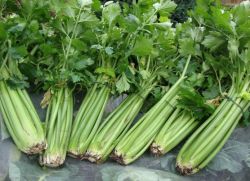 Seedlings are planted in May after hardening them on an open balcony or terrace. Suitable area - open, sunny, windless with loose soil with excellent drainage properties. A suitable planting pattern is about 25x25 cm.Trenches about 30 cm deep are prepared for planting.
Caring for stalked celery implies mandatory feeding. A vegetable needs nitrogen, which is sufficient for humus. Systematic watering is an indispensable part of care; without sufficient moisture, the taste of the vegetable becomes unpleasant and bitter. In order for the stem to bleach, it must be piled up to the lower leaves.
You can cut the crop 12-14 weeks after planting in open ground.
Many housewives like to use celery in cooking, it can be leaf, stalked or root. It would be nice to grow celery on personal plot, is not it?
Celery is a biennial, moisture-loving, cold-resistant plant, a representative of the umbrella. The cultivation of any type of celery has its own characteristics:
Leaf celery - early ripening, grown by seedling or sowing (up to 105 days).
Petiole celery - the most promising method of growing is considered to be seedling (up to 125 days).
Root celery - seedling method of growing (170-230 days).
Soil for growing celery
 The plant loves light, water and nitrogen nutrients... Does not tolerate soil fertilized with fresh manure (root crops are affected by spotting)! In the spring it is possible, if there was no autumn digging. Most good harvest can be obtained on the soil by applying a large amount of humus in autumn (4-5 kg / m2) and deep digging. In this case, it is necessary to use compost together with mineral fertilizers of 30-50 g of phosphorus and 15-20 g of nitrogen and potassium fertilizers (potash fertilizers can be replaced with ash). Optimal. Liming the soil is carried out under the previous culture.
If the soil is heavy clayey, then it is necessary good drainage... The plant does not tolerate wet and acidic soils.
Growing root celery

Varieties - "Friggo", "Yudinka", "Bejo Zaden", "Prague giant" ("Apple" - has lost varietal characteristics).
Growing seedlings
The seeds are disinfected with a 1% solution of potassium permanganate and 0.2% boric acid, soaked (for 15-20 minutes in water with a temperature of 50 ° C or at room temperature for 1-2 days, changing the water every 2-3 hours) , dried in air and sown in the first weeks of March, without burying into the substrate. The soil substrate should consist of equal parts of turf and humus, or turf, humus and sand (in a ratio of 1: 1: 0.5).
Smooth the surface of the ground, gently water in the evening and sow the seeds in rows in the morning, observing a row spacing of 5 cm. Sprinkle a little with the mixture (0.2-0.3 cm) on top and put in a warm place. The first shoots appear in 7-10 days. It is better to use a spray bottle for watering. Cover the box with seedlings with glass. When the first true leaf appears, a dive begins, deepening to the base of the leaves and without falling asleep in the central bud (peat containers or a greenhouse are used).
Landing in the ground In 60 days, 5 leaves should appear. We select quality seedlings and we begin to disembark. 2 weeks before transplanting seedlings in open ground spend liquid top dressing so that the mixture does not fall on the leaves. You can use the following combinations:
- for 1 bucket of water 30 g nitrogen, 30 g phosphoric and 20 g potash fertilizers;
- 1 part mullein per 10 parts water and 20 g each double superphosphate and potassium salt;
- 1 part slurry to 3 parts water and 20 g each of double superphosphate and potassium salt.
If, nevertheless, fertilizer gets on the leaves, then it must be washed off with clean water from a watering can with a strainer.
In the second half of May, we plant root celery seedlings in a permanent place so that there is no more frost, since the plant can go to the arrow and give an inedible root crop.
Do not deepen the seedlings, so that the roots do not turn out to be small with lateral additional roots, which will entail a decrease in taste.
Row spacing - 65 cm, between plants - 20 cm.Setting scheme for early ripening 40 × 40 cm, for mid-ripening - 50 × 20 cm or 60 × 30 cm.
 Top dressing for weakened celery seedlings: a solution of ammonium nitrate, potassium salt and superphosphate, 25 g per 10 liters of water. Fertilize 2-3 times during the growing season.
Watering root celery should be at the root, and in the last month of growth, this should be done more intensively.
Root celery does not require hilling, only at the end of September, when the roots are already developed and poured. Loosening until the foliage closes between the rows.
Remove side shoots, and from July, remove old leaves. If spots appear on the leaves, they need to be cut off - this is a sign of a fungal disease.
When to Harvest Root Celery
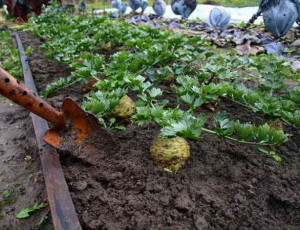 Plants are harvested before the onset of frost. Carefully dig up and cut the roots. Small roots are also dug out, leaving 3-4 young leaves, and used for forcing greens. The twisted leaves can be dried and used in cooking.
Storage
For storage, boxes of wet sand or peat are required. They are laid tightly, leaving the neck and leaves on top.
Growing leaf and stalk celery
"Tops" are as demanding on soil and fertilizers as "roots" (light sandy loam or loamy). Seedlings of stalked celery are grown according to the root principle.
 Row spacing 40-45 cm, between plants 15-20 cm.
In order for the stalks of celery to be bleached, in early September, the plants should be spud.
In order not to huddle, regardless of the type of celery, you can use soft cardboard, craft paper, straw and even newspaper. Press the stems tightly and wrap them in light-shielding material, the leaves should remain free.
Storage
Wet sand boxes are required for storage. Stack tightly without removing the paper.
Growing celery according to the Meatlider method
Root celery cannot be thickened, unlike leaf celery, but do not go too far with leaf celery, as it will be small. The development of seedlings takes 60 days, during this time 5-6 leaves will appear. Seedlings are planted in the 20th of May, immediately feeding with a mixture of fertilizers nitrogen of phosphorus and potassium in a ratio of 1.8: 1: 1.8 (2 tsp per 10 l of water).
Choosing a site for planting
With a full sunny day - on narrow rows in 2 rows every 17 cm.
When shading for about 3 hours - a row spacing of 25 cm.
When shaded for about 5 hours - in a checkerboard pattern, 35 cm apart.
Water abundantly, especially at the end of the growing season. Do not loosen. For the entire vegetative period, they are fed 2-3 times.
A quick way to germinate root and stalk celery seeds
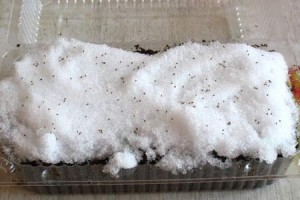
Fill the box with substrate and water abundantly the day before the intended planting. Prepare the snow and on the day of sowing, lay in a layer of 1.5-2.0 cm, compact and sow the seeds in rows. Cover with glass and place in a warm place, the temperature should be 20-25 ° C. When the first shoots appear, sprinkle with a moistened soil mixture with a layer of 0.2-0.3 cm, transfer the box to the light and remove the glass. When the seedlings have almost all sprung up, transfer the box to a cool (10-12 ° C), but bright place for 6 days so that the plants do not start to stretch in length, then move the box to a warm place (15-17 ° C). After watering the seedlings, loosening is required. When the first leaf appears, a pick is carried out according to the 5 × 5 cm scheme.
Seedlings are planted, not thickening, from mid-April according to the scheme: early ripening 40 × 40 cm, late ripening 50 × 50 cm.
The cotyledons should be 0.3-0.5 cm above the soil surface.
Growing celery seeds without picking and without pots
You can do without picking plants, but then thinning is required and often more than one. When planting seedlings in open ground, pay attention to their length, if more than 7 cm, then pinch the roots by a third of the length.
Growing celery seedlings in a bouquet way
When the seeds are baked, take 5-7 pieces and sow in pots (5 × 5 cm), evenly distributing them over the surface of the substrate. When thickened, thinning is done. Do not dive.
When growing celery seedlings, regardless of the method, observe the relative humidity of 70%.
Growing celery in a greenhouse (seedlings and seeds)
You can find a lot on the Internet delicious recipes that use leafy celery or stalked celery is easy to grow and suitable for our climate, so there's no reason to ditch such a healthy vegetable!
What determines the success in growing celery?
If you like to season dishes with fresh herbs and cannot imagine your site without green onions, dill and different types lettuce, be sure to pay attention to plants such as leaf and petiole celery. Do not be afraid of the specific aroma and spicy taste of greens, so great that you should definitely include it in your diet as a seasoning or as a side dish for main courses.
Another question is how to grow stalked celery or leaf celery correctly to get plants with rich aroma, lush foliage, firm stems and excellent taste? To do this, you need to take into account some of the nuances that will be discussed in this article.
Celery planting video
It is recommended to place the beds with celery on open to the sun places, but even in a light shade, this plant feels good, and its foliage becomes more fragrant in such conditions. The most suitable temperature for leaf and petiole celery is about +20 degrees, in temperate climates it grows best and can even tolerate light frost. Varieties with reddish petioles are especially frost-resistant.
For growing celery are preferred fertile soil, loose enough, drained and at the same time capable of retaining moisture. The acidity should be neutral, but if the soil is acidic, lime must be added to it before planting.
Celery seed
Do not plant celery next to parsnips, otherwise both plants may suffer from the same pest - the celery fly.
Purchase of seeds:
- Particular attention should be paid to the choice of the variety. Of the tested varieties, one can single out: leafy celery Gentle, Zakhar, Kartuli, Vodrost, and from petiolate varieties - White feather, Golden, Malachite. You can find out more in the corresponding article on our website.
- At the time of buying planting material be sure to check the expiration date, since celery is already growing with difficulty, and if the seeds are more than two years old, their germination drops significantly.
- Buy varieties with different terms ripening so that you can cut the greens and stalks throughout the season.
If you are planning to grow celery at home, the choice of variety can be a decisive factor on which the yield of the plant will depend, its appearance and taste.
How to grow celery seedlings
Just as with, you will first need to rinse and soak the seeds for three days, and then grow seedlings from them. You can immediately plant leaf and petiole celery with seeds directly in the open ground, however, in the initial period, the plants sprout and grow too slowly, so it is safer to spend time growing seedlings.

Seedling method of growing celery
Prepared seeds are usually sown for seedlings in March, using boxes filled with loose soil mixture, which may include leafy soil, sand, peat and humus, for planting. Try to spread the small seeds evenly over the soil surface and sprinkle with a thin layer of peat on top. The seedlings should be kept at a temperature of +20 degrees, gently pouring through a fine sieve. If the seeds were fresh and you soaked them before planting, then they should sprout about the fifth day after sowing. From this moment, the temperature must be lowered to +15 degrees so that the seedlings do not stretch out.
Keeping the soil hydrated, having adequate light throughout the day, and ventilation are the main ingredients. correct cultivation seedlings of leaf and stem celery.
With the appearance of the first true leaves in the seedlings, the plants must be planted in separate cups, trying not to cover the socket with earth from which the leaves appear. Place the dived seedlings on a sunny windowsill for the best development of new leaves.

With the appearance of the first true leaves in the seedlings, the plants must be planted in separate cups.
Planting celery seedlings in the garden can be carried out at the end of April or in May, when frosts are no longer expected. Pre-harden the plants by placing them in a box on the street or on the balcony for several hours, then transplant them to a garden bed according to the 20x30 cm scheme.
Stem and leaf celery - growing by all the rules
Prepare the beds for stalked celery in the fall: dig wide furrows (40 cm each), about 30 cm deep, fill them with manure or compost and cover them with soil. Digging trenches for planting and hilling plants in the second half of summer is necessary for all traditional stem varieties, so that celery stalks are "bleached" - they acquire a white tint and a delicate taste without bitterness. There are self-bleaching varieties that do not have to be planted in trenches and huddled up, but they are not frost-resistant, and their petioles are not so tasty and crunchy.
Self-bleaching varieties can be grown in ordinary beds, you do not need to tie and huddle them
Instructions on how to grow stalked celery outdoors:
- In the spring, before transplanting seedlings, a complex fertilizer is introduced into the soil with a rake. Keep in mind that stalked celery will need a lot of nitrogen for normal growth, so a month after planting, the plants will need to be additionally fed with nitrogen.
- When replanting young plants, make sure that the rosette with leaves remains above the ground, lightly compact the soil around the plants. As the stems grow, you will need to add soil to the furrows.
- During the summer, make sure that the ground does not dry out, periodically apply top dressing and loosen the soil.
- Once the celery stalks are 30 cm tall, bundle them up and tie them with twine, being careful not to damage the stalks. Wrap the entire base with dark paper, while the celery leaves should look from above, like from a vase. This technique is necessary in order for the petioles to acquire a white tint and fill with juice.
- For the winter, trench stem celery is covered with straw.
Self-bleaching varieties can be grown in ordinary beds, they do not need to be tied up and hilled. For sweeter stalks, lay a layer of straw up to 20 cm thick around the plants.
Video about growing stalked celery
A minimum of hassle requires leaf celery - its cultivation is reduced to weeding, loosening row spacings and regular watering. It is only important when planting not to forget to place the growth point above the ground and constantly monitor that a crust does not form on the bed (mulching the soil will help to avoid this).
You can cut trench petiole varieties at the end of autumn or dig them up as needed. Self-bleaching varieties are ready for harvest 12-15 weeks after planting in the ground. And leaf celery begins to be cut for greens as early as July, as soon as it becomes clear that removing several stems will not harm the main plant.
The usefulness of celery is unlikely to be disputed by anyone. This is the main product healthy eating, an inexhaustible storehouse of useful trace elements and vitamins, a nutritious product and a complete replacement of herbs on the table. In order to get a good healthy harvest in your garden, it is recommended to practice growing petiole seedlings from seeds.
A seedless method simply does not exist, since the long growing season - 3-5 months - excludes the possibility of sowing in open ground even in the south. How to grow stalked celery, how to properly sow, care for, dive and plant in the beds - in our article.
Celery varieties
The cultivation of stalked celery has not yet reached a large-scale level in our country. This is due to the complexity of the plant's agricultural technology, and to the peculiarities of planting and care, and the bleaching of rhizomes for further consumption.
Difficulties arise even at the stage of seed selection. It is not enough just to buy the first package that comes across, but carefully choose among different varieties, sizes, ripening times and even tastes.
Sowing table of stalked celery through seedlings:
|
Name |
Vegetation period, days |
Description of the variety |
|
Non-self-bleaching |
||
|
Petioles of medium thickness, height 42-45 cm |
||
|
Petioles short up to 25 cm, thick fleshy |
||
|
Male prowess |
Thick fleshy petioles up to 50 cm long.Very juicy |
|
|
Medium height (30-38 cm), resistant to short-term frost |
||
|
Average height, curved, well kept |
||
|
Self-bleaching |
||
|
Thin, curved half-meter stems |
||
|
The earliest variety with short but very taut petioles |
||
|
Belong to the most appetizing and meaty species. The stem is tall, fleshy, taut, tolerates storage well |
Non-self-cleaning varieties require certain bleaching manipulations, otherwise the petioles will be very tough, fibrous and practically unsuitable for food. But at the same time, the bleached heart is surprisingly tasty, moderately crispy, tender and very nutritious.
Self-cleaning varieties are more convenient to grow, but they are worse stored, more susceptible to diseases, and should be eaten as soon as they are harvested.
Features of seed germination
- This deciduous crop is considered to be the most difficult to penetrate, due to the high concentration of essential oils in the seed. V agriculture on an industrial scale, they are etched with a solution of hydrochloric acid, and at home, to obtain petiole celery seedlings in hot water(up to 60 ° C) the seeds are soaked in advance until the water cools down, after which they are washed with warm water and dried to a crumbly state.
- Dry grains should never be sown; this will delay the emergence of seedlings by more than a month. Before sowing, they are washed, checked for germination (see below), wrapped in toilet paper, moistened abundantly, wrapped in a bag and sent to a warm place, preferably on a battery, but away from sunlight or artificial light.
The seeds should be completely submerged in water, not lightly damp.
You can use another, simpler way of growing petiole celery seedlings - pour sawdust into a jar, sprinkle them heavily with water, cover with a piece of gauze on top and lay out the seeds. Sawdust should just stick in water, then each seed will swell well. This container is also exposed to a battery or other warm place, but so that the sun's rays can reach the jar.
VIDEO: Preparation of planting material for sowing
What should be the soil
It is advisable to use self-prepared soil, for which the following components are mixed:
- peat - 3 parts;
- sod land - 3 parts;
- humus - 1 part;
- sand - 0.5 parts;
- wood ash- 0.5 parts.
All this is mixed, calcined in the oven for an hour at a temperature of 180-200 ° C, stirring occasionally. It can be doused with boiling water or a weak solution of potassium permanganate.
Disinfection of the land is carried out without fail before planting seeds for growing seedlings.
After the soil has been disinfected, it is left for one and a half to two weeks to revive a favorable microflora. it necessary condition further growth of seedlings.

If it is not possible to prepare the soil on your own, you can buy a universal soil at any agricultural store, which no longer needs preparatory measures.
It is advisable to choose the one that is intended for growing cabbage.
Sowing
Sowing seeds for petiolate celery seedlings begins in the second decade of February and ends in mid-March, depending on the growing season of each variety.
There are 2 basic methods of sowing seeds:
- in a container - a box, pots, cassettes, peat cups or tablets, etc .;
- in a container with snow;
- in diapers - in polyethylene or a pad, rolled into a roll.
In a container
Pour into prepared containers a layer of earth 5-10 cm and lightly watered it with water. They make small paths with a pencil and spread the seeds at a distance of 2 cm from each other, between the grooves - 5 cm. It is not necessary to deepen the seeds, it is enough to sprinkle them with earth and sprinkle them abundantly from the spray bottle.
In a container with snow
Everything is done in the same way as in the first case, but a layer of snow is laid on top, and seeds are placed on it. Melting, the snow will "take" them away, at the same time saturating them with moisture.
In diapers
Highly convenient way, in which plant roots remain intact. With such an organization, it is convenient to pick and transplant into beds or open ground.
For this you will need:
- meter strips of the substrate under the laminate 40 cm wide;
- soil - prepared or purchased;
- seed material;
- rubber bands;
- deep plastic containers or buckets.
Work order:
- Spread a substrate on the table and spread a layer of earth 3-4 cm thick on it.
- Spread out, retreating from the edge 3 cm, the first grain, make the first turn of the roll, lay out the second - the second turn, etc. You should get a roll of earth with seeds.
- Fix it on three sides with an elastic band so that the structure does not fall apart.
- They are installed vertically in containers (do not confuse where is the top, where is the bottom).
- Water is poured at the bottom of the container, and sprayed on top from a spray bottle.
This method saves space, facilitates maintenance and allows you to handle plants without the risk of injury to the root antennae.
Seedling care at home
The main care is timely watering and lighting.
- You need to water from a pallet or by spraying. The second way is preferable.
- When the first loops of sprouts appear (usually after 30 days), the seedlings are rearranged under phytolamps or daylight.
- In the third week, the seedlings should be fed with liquid organic matter.
- After the appearance of the third full-fledged leaf, picking into separate cups is allowed.
- 2 weeks before transshipment to the beds or greenhouse, the seedlings are hardened, taking them outside for half an hour, and every day increasing by another quarter of an hour.
- Before transplanting, watered abundantly and the next day you can start the process itself.

Transfer to open beds
The recommended time for replanting grown petiole celery seedlings is the second decade of May, when the soil is already fully warmed up. Small furrows are made with a chopper at a distance of 50 cm from each other, sprouts are laid out and sprinkled with earth.
Be sure to water it carefully so as not to erode the roots, and mulch with hay, straw or mulch. The main thing is that the composition must retain moisture well.
A plant that has received less watering during the growing season is unfit for food.
In the future, the sprouts are looked after in the same way as for other crops - timely watering, top dressing with ready-made fertilizers, loosening and weeding from weeds.
The introduction of dressings is a prerequisite for the harmonious growth of petiole celery seedlings. The first fertilizer is applied 15 days after planting, the second - with an abundance of green mass, the third - after 40 days, when the root begins to develop.
Non-self-cleaning varieties are planted in deeper trenches, into which soil is constantly poured while the crop grows. At this time, the process of cleansing the roots takes place, as a result of which an unusually juicy and tender core is obtained.

It is imperative that lateral root shoots are pinched 2-4 times during the growth process. This will form the root crop and get a good harvest.
The land should always be moist, for which the soil must be mulched. It does not need to be raked to water, it is enough to pour water from above so that it penetrates into the root zone.
If frost is approaching, the seedlings must be covered with acrylic, spunbond or cellophane. In autumn, when the temperature drops to -5 ° C at night, bushes are also covered.
Harvesting and storage
Harvested for the first time in mid-August in an attempt to determine the level of maturity. It is not necessary to harvest the entire crop at once if we are talking about personal farming. Self-cleaning varieties are eaten immediately, while unpeeled varieties can be stored for up to a month.
For freezing, you can peel the roots or cut the foliage, rinse, dry and put in dry bags, then send everything to the freezer.
VIDEO: Growing root and stalk celery for seedlings

