Do-it-yourself metal deck chair. Do-it-yourself sun lounger - schemes and best ideas on how to create a comfortable and stylish lounger
Work on fresh air brings a lot of pleasure. But if you have to deal with a serious project that requires considerable physical effort, then at the end of the day there is a feeling of fatigue. You can quickly recuperate different ways. One of them is relaxing in a wooden deck chair with a glass of soft drink in hand. Such furniture can be purchased at a furniture store or made by hand.
Types of structures
Traditionally, chaise lounges for summer cottages are made in the form of structures resembling chair-beds, in which the upper part looks like the back of a chair, and the lower part looks like a small sofa. The main advantage of such models is the ability to change the position of the back. Depending on the performance, several types of sun loungers can be distinguished:
- in the form of a rocking chair;
- suspended;
- anatomical;
- folding.
In order to facilitate the movement of wooden deck chairs, special wheels are often added to the structure, which allow them to be delivered to any place.
 A special type of sun loungers are anatomical devices for giving, which exactly repeat the curves of the human body.. You can talk about their convenience and practicality only after acquiring such pieces of furniture.
Some manufacturers are trying to offer non-standard wooden deck chairs for summer cottages, so they involve designers in order to jointly create recreational equipment. unusual shape. Such models are more expensive than usual ones, but if you want to surprise guests with bizarre forms of a deck chair, then you should still think about buying such furniture.
Thanks to the presence hanging mount sun loungers allow the wearer to rock while lounging on it. To install such a device on metal carcass a clamp is used, which provides it with high reliability. You can place such a structure in a shady place or you can install it in the upper part of a special part in the form of a small visor. Rocking in such a deck chair will bring only pleasure.
Instead of a stable solid support, rounded hoop legs can be added to the deck chair design.. Then it can be used as a rocking chair. This model can be installed anywhere. If desired, it can be folded and moved to another part of the site or a special place that was chosen for recreation.
It is no coincidence that more and more summer residents are thinking about making a deck chair. This device attracts them with its functional features:
- Garden lounger provides maximum comfortable conditions to relax the spine and adjacent muscles. In the reclining position, the spinal muscles relax as much as possible, which are subjected to a particularly high load when working on the beds.
- Chaise lounges not only differ in convenience in use, but also easily develop that allows to transfer them from one place to another.
- Design features allow the owner to special efforts change the inclination of the back from a sitting to a lying position.
- fine decoration suburban area, which will look great not only in the garden, but also on the veranda. Chaise lounge is able to give country house stylish and beautiful look.
- A great way to relax people of different builds. Thanks to high reliability such devices can easily withstand up to 100 kg of live weight.
Material selection
Traditionally, deck chairs for summer cottages are made of wood. They differ environmental safety, easy operation and reasonable price.
But wood is not the only material from which a deck chair can be made. Manufacturers also use other materials for their manufacture:
- plywood;
- the cloth;
- corrugated board;
- logs;
- wooden pallets;
- rattan;
- plastic;
Plastic is quite often chosen for the manufacture of sun loungers, which are installed next to natural reservoirs and in pools.
Advantages and disadvantages
Wood is popular as a material for making sun loungers for summer cottages due to the following advantages:
- low price;
- availability;
- ease of care;
- environmental friendliness.
The only drawback is the low resistance to decay, which can be improved by special processing.
Often, deck chairs for summer cottages are also made of metal, which has the following positive properties:
- high strength;
- low weight, which can be achieved through the use of aluminum frame in combination with a fabric middle.
To make such a deck chair, the owner must have welding skills to create a frame.. Even such a lounger must be treated with anti-corrosion compounds, otherwise it will not last long.
At plastic structures the following advantages can be identified:
- light weight;
- unusual design solutions;
- no need for special care;
- low price.
Plastic sunbeds have very low strength, they do not withstand the aggressive influence of the climate. Not everyone has enough experience and knowledge to independently build a sunbed for a summer residence from this material.
Preparation for work
Before you start making a deck chair, you need to think about the materials and tools that will be needed to create it. Much here depends on the chosen model. Quite common is the option when the deck chair is made of mixed materials- wood and matter. To get a reliable and attractive-looking fabric chaise longue with wooden frame, you will have to prepare the following:
- durable fabric (denim, tarpaulin, canvas) 2 m long and 50 cm wide;
- 3 pairs of rails 0.25 x 0.6 cm long 62, 110 and 120 and cm;
- wood slats 2 x 2 cm (one 65 cm long and two 50 cm each);
- PVA glue.
You can’t do without certain tools during this work, and among them there should be mainly those that any owner has at home or can purchase:
- nuts with bolts suitable sizes;
- roulette;
- square;
- file;
- sandpaper with a minimum cross section;
- electric saw;
- drill.
If there is a desire to make a deck chair from other materials, then a completely different amount will be required. consumable and a set of tools. To make metal products, you can not do without welding machine and Bulgarians. When creating structures from rattan, jute and or vines, you will need special devices for weaving.
It is advisable before starting work to find as much information as possible on making a garden lounger with your own hands in order to learn about all the intricacies of the workflow and thereby avoid possible difficulties.
 Now that everything you need to work has been prepared, you can proceed to consider the process of creating a long chair from wooden material. The choice in favor of wood is quite logical, since it is the most affordable and environmentally friendly safe material. It can be freely purchased without incurring significant monetary costs. There will be no difficulties when working with wood, even for amateurs who, with minimal skills in working with this material, can create something with their own hands.
Work order
The very process of making a lounger will not cause difficulty to the owner of the site. If you approach the matter with all seriousness, then you can make a wonderful thing. Making a deck chair with your own hands looks like this:
- The first step is to make the main elements of the frame. From the existing lumber, it is necessary to make boards with the following dimensions 400 x 2.5 x 8 cm. In addition, three bars of 400 x 5 x 10 cm will be required. In addition to them, two fixing studs must be made.
- Every wooden detail the frame must be thoroughly sanded and coated with a special impregnation to protect against mold and decay.
- The frame is made of a wooden beam in accordance with the selected scheme.
- To build a seating area, it is necessary to cut boards 60 cm long each. Their number can be any and depend on the size of the gap between the boards. For standard models with dimensions of 60 x 200 cm, most often no more than 13 boards are required, which are placed at 1 cm intervals from each other.
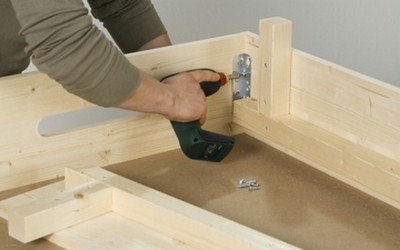
- Using a screwdriver, the boards must be attached to the frame, making sure that the wooden pieces are strictly parallel to each other.
- We begin to fasten the legs, after bringing each to the same length, which should be 35 cm. If desired, the deck chair can be made a little lower. Prepared bars must be fixed at the head and at the feet. From the side of the head, the legs can be made single.
- For the manufacture of the backrest, you will need to make a frame, which should freely enter the structure made in the previous stages. The frame should have the following dimensions - two pieces of 88 cm and 3 pieces of 39 cm. Do not worry about the fact that there will be gaps around the perimeter of the backrest inserted into the frame. They are necessary for the free reclining of the back.
- Directly on the back frame, it is necessary to fix the slats of the required length. They can be installed both across, fixed on the main part, and along. During installation, the screws are screwed in, sinking them into the body of the tree. This will make using the sun lounger safer. To make the product look attractive, the upper part of the rail can be rounded.
- To ensure the most reliable fastening of the back to the base, you must first do through holes in these details, stepping back from the edge 9 cm down. They need to insert the mounting studs and secure.
- Before installing the supports, you will need to cut grooves in the main structure - 2 pieces on each side. The first is made at a distance of 9 cm from the hairpin with dimensions of 5 x 10 cm, and the second is cut with an indentation of 20 cm from the first, the dimensions of which should be 5 x 5 cm.
- To adjust the position of the back in this model, use wooden beam 60 cm long. It must be installed in the first or second groove, which will allow you to transfer the product from a half-sitting position to a reclining position.
- The final stage is the finishing of the product. You can use ideas borrowed from ready-made drawings or design the product using the materials available. A deck chair for a summer residence can be painted, varnished or decorated using decoupage techniques - any of these options will change appearance sun lounger and extend its service life.
The method of making a wooden deck chair described above is not the only one. Other options are also possible - for example, using as a basis metal frame from an old folding bed.
Finished product care
The service life and functionality of a country lounger largely depends on competent care for it.. In order for it to bring only pleasure to the owner for many years, the following events should be regularly carried out:
- wet cleaning of textile elements;
- lubrication of folding mechanisms;
- timely painting.
 Many of our compatriots who own summer cottages arrange their holidays on it in different ways. Often on their sites you can find wooden deck chairs that provide them excellent conditions for relax. For the most part this homemade designs, which you can make with your own hands, even without experience in the construction industry. Due to the simplicity of the design, deck chairs can be made from improvised material. But to start without a drawing such work is still not worth it.
How nice after a hard day's work to retire in the garden or sit on the lawn by the pond in order to relax, unwind and enjoy the sounds of nature. And what piece of garden furniture do most people associate with a comfortable stay? Yes, garden chair! A comfortable portable elongated chair, in addition to its direct functional value, will act as a spectacular exterior element that emphasizes the style of a summer cottage. There is nothing difficult in making a garden deck chair with your own hands. We have selected for you several options for easy-to-make sun loungers. It will not be difficult to choose among them. suitable model, which anyone can build.
Such a deck chair can be safely used instead of a bed: a flat surface, an adjustable backrest. What else do you need for an afternoon break?! The only drawback of this design is that it is very problematic to move around the site yourself.
Chaise lounges of this design are very popular, both among vacationers on the sea coast and among the owners of suburban areas.
But there is a way out! We suggest considering the option of a deck chair equipped with rollers. To make a sun lounger, you need to prepare:
- 18 mm thick laminated spruce boards;
- Wooden bars 45x45 mm (for the frame);
- Boards 25 mm thick for sidewall sheathing;
- Electric jigsaw and screwdriver;
- Drills with a diameter of 40 mm for woodworking;
- 4 fixing corners for beds;
- Countersunk head screws;
- 4 rollers 100 mm high;
- Sanding sheet grit 120-240;
- Varnish or paint for woodworking.
Plates required size can be purchased at the carpentry workshop or at construction market. When choosing plates, it is better to give preference to coniferous products, since they are more resistant to precipitation.
The size of the deck chair depends on the desire of its owner. In most cases, the design is made in the size of 60x190 cm. Having decided on the dimensions of the deck chair, we make two long and two short sidewalls from wooden bars. From them we assemble the frame of the structure, fixing it together with the help of mounting corners. outer side we cover the frame with boards.
On long slats at a distance of 5-8 cm from the corner, we fasten the legs of a deck chair, the material for the manufacture of which was bars 5-10 cm long
We fix the legs to the boards using screws 60 mm long.

We mount the wheels: in the center short legs chaise longue install rollers, fixing them with screws 30 mm long, equipped with a semicircular head with a diameter of 4 mm
To make a wooden grate, using an electric jigsaw, we cut boards 60x8 cm in size from plates.
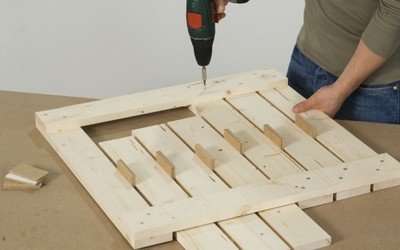
We attach the planks to the lounger on self-tapping screws, leaving a gap of 1-2 cm. To maintain the gap, it is most convenient to use special spacers
When planning to make a deck chair with an adjustable back, the lattice should be divided into two parts: a sunbed and a headboard. We put both parts on connecting boards and fasten them together with a door hinge.

To equip the mounting plate between the long bars of the deck chair frame, we fix the transverse rail. On the mounting plate we fix the support post, fixing it on both sides with screws
The finished deck chair remains only to be processed by walking grinder, and open with varnish or paint.
We invite you to watch a video that shows how such a deck chair model is assembled:
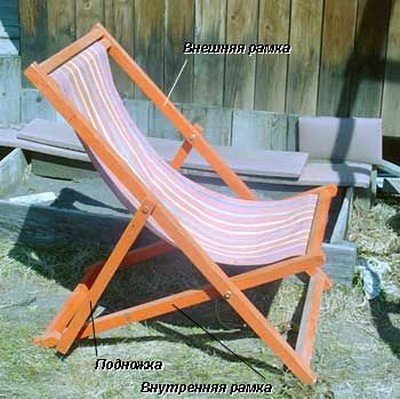
Option # 2 - fabric chaise lounge on the frame
Another no less popular model of a deck chair that can be folded, giving an almost flat shape.

It is convenient to move a light chair around the site, choosing open sunny glades for relaxation, or, on the contrary, shaded and hidden corners in the garden from prying eyes
To make a folding deck chair, you need to prepare:
- Reiki rectangular section 25x60 mm thick (2 parts 120 cm long, two 110 cm each and two 62 cm each);
- Reiki of circular cross section with a diameter of 2 cm (one piece 65 cm long, two - 60 cm each, two - 50 cm each);
- A piece of durable fabric measuring 200x50 cm;
- Nuts and furniture bolts D8 mm;
- Fine-grained sandpaper and a round file;
- PVA glue.
Reiki is best made from hardwood species, which include birch, beech or oak. For the manufacture of a deck chair, it is better to use fabrics that are characterized by increased strength and resistance to abrasion. For example: canvas, tarpaulin, jeans, mattress teak, camouflage.
We cut the slats of the required length. Using sandpaper, carefully sand the surface.

According to the scheme, where A and B denote the main frames, C represents the stop-regulator, we assemble the main structural elements
In the long rails of the main frames at a distance of 40 and 70 cm from the corners of the structure, we drill holes with a diameter of 8 mm, and then grind them with a round file.
To make it possible to change the position of the back in the deck chair, in frame B we make 3-4 cutouts at a distance of 7-10 cm. To equip the seat, we drill holes with a diameter of 2 cm, stepping back from the two ends of the rails. We install crossbars in the holes - round slats, the ends of which were previously lubricated with PVA glue.
Let's start assembling the deck chair: we connect parts A and B with the help of screws inserted through the upper holes. By the same principle, we connect parts A and B, only through the lower holes
The frame is assembled. It remains only to cut and sew the seat. The length of the cut is determined by the possibility of folding. Too short a cut will not allow the deck chair to fold, and an excessively long one will sag in the disassembled position. To determine optimal length, you need to fold the deck chair and measure the fabric: it should be slightly stretched, but without effort.
We nail a piece of fabric with finished edges to round slats located on parts A and B. To do this, we wrap the crossbars with the edge of the cut, and then fix them with small carnations with thick caps. A variant is possible in which “loops” are made at the edges of the cut and put on the crossbars.
Option #3 - Kentucky Folding Chair
The original chair is assembled entirely from bars. If necessary, the chair can always be folded and put away for storage.
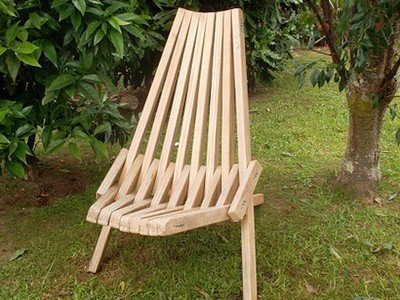
The advantage of such garden chair in that, when disassembled, it does not take up much space, while the design is designed in such a way that it allows you to completely relax your muscles
To make a chair, we need:
- Wooden bars measuring 45x30 mm;
- Galvanized wire D 4 mm;
- 16 pieces of galvanized wire clamps;
- Fine-grained sandpaper;
- Hammer and cutters.
For the manufacture of a chair, bars of 50x33 mm in size are also quite suitable, which can be obtained by sawing a 50x100 mm board into three equal parts. total length bars should be 13 meters.
Instead of galvanized wire and staples, galvanized studs can be used, the edges of which are fixed with eight nuts and washers.

To determine the required number and length of wooden bars, it is convenient to use the pivot table. According to the drawing, we make through holes
The diameter of the holes should be 1.5-2 mm larger than the thickness of the wire used. Having prepared required amount bars, all faces should be carefully processed, sanding the surface with fine-grained sandpaper.
Let's start building the structure.
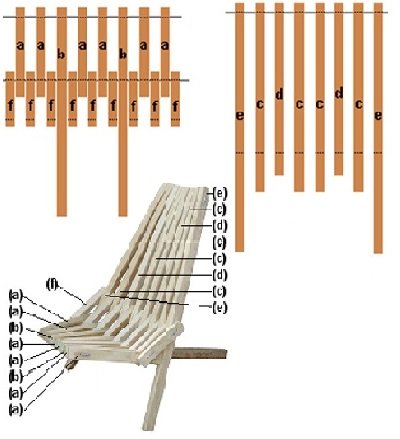
For clarity, we use the assembly diagram of the seat with dividers, as well as the back of the chair. The dotted lines indicate the places of through holes with a wire threaded through them.

On a flat surface, according to the scheme, we lay out the bars for arranging the seat. Passing wire through through holes
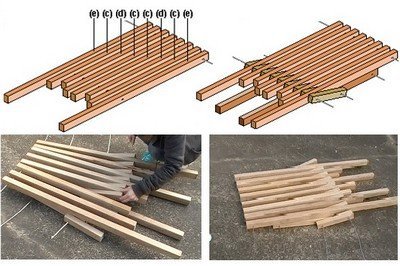
By the same principle, we assemble seats with dividers, connecting wooden blocks pieces of galvanized wire
The main structural elements are assembled. We take the ends of the wire, holding the sides of the structure, and carefully raise the chair.
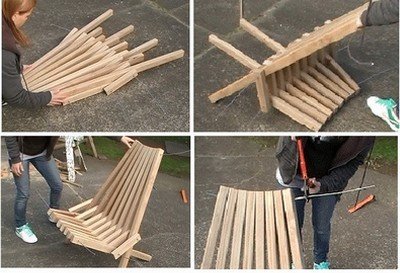
It remains only to cut off the excess wire with wire cutters, and then bend and secure the ends with galvanized staples
Chaise lounge for a summer residence: 8 do-it-yourself models
The garden chair is ready. If desired, it can be coated with a semi-matt varnish for woodworking. This will significantly extend the life of such a popular element of garden furniture.
Equipping a place to relax near a private house, it is impossible to do without a sunbed. Here you will need the ability to make a comfortable deck chair with your own hands. It is a folding chair-lounger, on which you can sit in a reclining position.
Chaise lounges are metal, plastic, wooden. Often these materials are combined with inserts made of strong textiles, or they are complemented by light overlays in the form of pillows and mattresses.
Having decided to make a chaise lounge for a summer residence with your own hands, choose wood as the material of manufacture. She is easy to work with. A completely wooden sunbed will turn out to be reliable, strong, will serve you long time. Detailed description how you can make a sunbed with your own hands, diagrams, design drawings and photos will help to avoid problems in work.
Reclining chair for relaxing in the garden or by the pool
On such a deck chair for giving, it is convenient to sit in the shade of plants reading a book or take a place in a sunny meadow for a beautiful summer tan. Despite the fact that it is a very simple design, the sunbed can be installed in three positions: fully horizontal surface or with two options for raising the back. Moreover, one of the most simple designs. But it is known what easier mechanism the less prone to breakage.

Even an inexperienced master can make such a deck chair with his own hands. It will have comfortable parameters even for an adult tall man: width - 60 cm, length - 215 cm.
Materials and tools
The material from which we will make a lounge chair will be a pine beam and a board. Their dimensions, along with a list of tools and fixtures, are listed below:
- 3 bars 4000x100x50 mm;
- 4 boards 4000x80x25 mm;
- 2 studs for attaching the back to the frame;
- drill with drills;
- self-tapping screws;
- sandpaper;
- putty for wood;
- paint (color of your choice);
- carpentry glue to strengthen fixed joints;
- roulette;
- square;
- marker;
- saw or power saw.
Description of work
Before starting work, carefully consider similar drawings in order to understand the logic of subsequent actions.

- First of all, we assemble a frame from a bar. We take 2 parts of 2150 mm and the same amount of 500. We make connections with a drill for self-tapping screws. To increase reliability, we pre-lubricate the places to be joined with glue.
- Let's start working with the fixed part of the surface. We cut a board with dimensions of 4000x80x25 mm with a saw into segments of 60 cm. In total, 13 such parts need to be made.
- Leaving between the boards (60 cm long) gaps of a centimeter, we fasten them with self-tapping screws to the frame. We control the angle of connection of the strips at 90 degrees.
- We proceed to install the legs of the deck chair. For greater stability, the legs in the seat area must be made double. For them, we take 4 bars 35 cm long. We glue them in pairs, then fasten them to the base with glue and self-tapping screws. Any surplus adhesive should be wiped off immediately. This will help in the future to avoid problems with the processing of these areas of wood.
- From the side of the headboard, we also fasten single bars-legs 35 cm long. Then we attach second bars to them, which are 20 cm shorter than the first ones. We fasten them so that the lower edge of the parts coincides (as shown in the figure).

- Let's start creating the back of the deck chair. We will assemble the frame of this part from a pine beam measuring 100x50 mm. Prepare for the back frame 2 pieces of 880 mm and 3 pieces of 390.
The dimensions of the base of the back are chosen so that it can fit inside the main part of the deck chair (with small gaps for free movement).
- Back upholstery. If you want to give the product a more attractive look, fasten the trim strips along the length of the frame. At the same time, round the top edge of each board on both sides. Keep a distance of 10 mm between the strips.
- To fix the back on the frame for its free movement, you need to prepare holes. Measure 70-80mm from the edge of the last seat board. At the indicated distance, make holes with a drill that pass through the frame of the backrest and deck chair. Place a hairpin on each side of them.
- The mechanism for lifting and fixing the moving part is based on placing bars in special recesses that will not allow the back to fall down. The first selections must be made on both sides of the main frame of the deck chair, stepping back 7-8 cm from the hairpin. The dimensions of the recess should be 10 cm wide, 5 cm deep. We make the second recesses at a distance of 20 cm from the first, 5 cm deep and 5 cm wide.
If you place the first support bar 60 cm long horizontally in the first recess, the back of the chaise longue will lock into the "chair" position. The person sitting on the chair will be comfortable to sit. To change the level of raising the backrest, the first bar should be moved to shortened legs, and the second support bar (60 cm) should be inserted vertically into the second recess. You can fully expand the deck chair by removing the second bar and lowering the back. In this case, the small frame will stand on the first bar, placed on the shortened component parts of the legs.

- Finally, take care of finishing the deck chair. Treat the bumps with putty and hide the screws. After drying sandpaper sand corners, surfaces so that there are no sharp parts, burrs and roughness. Cover the wooden product with stain, this will protect the material from harmful influences. Paint your chaise lounge chair the color of your choice.
The garden chaise longue for giving is ready. You can equip them picturesque corner garden plot and enjoy a pleasant stay.
Compact chaise longue: comfort wherever you want
A folding deck chair, of course, cannot be called a sunbed, it looks more like an armchair. But the product has a number of other advantages. The design is very simple, so making it yourself is not difficult.
The chaise longue has a small weight, compact, so you can easily move to a new place with it. And if you show diligence in work and care when choosing materials, the product will serve you for a long time. personal plot dachas not one year.

What do you need to make a folding deck chair?
Before you start, prepare:
- For the back frame: 2 parts - 1219x38x19 mm, 1 - 610x38x19, 1 - 648x38x19, 1 - 610x64x19.
- For the seat frame: 2 parts - 1118x38x19 mm, 4 - 603x38x19, one - 565x38x19 mm, one - 565x64x19 mm.
- To support the back: 2 parts - 381x38x19 mm, wooden dowel with a diameter of 12 mm and a length of 648.
- 2 pieces of thick fabric 1372x578 mm.
- 2 wooden dowels with a diameter of 12 mm, length - 559.
- 4 bolts with nuts 50x6 mm.
- 12 washers.
- Screws 50x4 mm.
- Glue.
Work sequence
The joints must be additionally glued. After pressing the parts, immediately remove excess glue.

- Consider in detail the drawings, diagrams with the dimensions of the deck chair. They will help to understand the principle of its folding.
- Drill pilot holes, then countersink them for screws.
- Assemble the frame for the back of the sun lounger. Attach the bottom bar 50 mm from the bottom edge. Between the 610x64x19 mm bar and the top piece, leave a distance of 10 mm to secure the fabric.

- Assemble the top of the seat frame in the same way as the backrest. Attach the first bottom plank 203 mm from the bottom edge of the side plank. We fasten the next 3 boards with a gap of 13 mm from the previous one.
- We connect the seat and back frames by tightening them with bolts and placing washers under the bolt heads. We also place washers between the racks of the frames.
- We fasten the support strips for the back with bolts with washers.
- We place the round dowel on the glue in the drilled hole of the planks without gaps.

- It's time to make a seat out of fabric. We put together 2 pieces of fabric with the right sides inward, sew, stepping back 60 mm from the edge. On the one hand, we leave a segment of about 100 mm unsewn.
- We turn the workpiece inside out and sew the sides along the length.
- We lay cavities (for wooden dowels) across the width on both sides, stitch them.
- We thread the dowels into long holes in the fabric.
- After finishing work with wooden base(sandings, coatings protective agent, painting) put the seat in place.
Folding chaise longue for your dacha is ready. Drawings, images helped to create a practical, comfortable, lightweight chair for outdoor recreation.
A chaise longue is a comfortable and lightweight chair design that is used in places of recreation: on the beaches, by the pools, an integral part of the decoration of the dacha. It can be used to relax after a hard weekday at work, caress yourself with the sun's rays or take a nap under the shade of the local trees, away from the curious eyes of the townsfolk.
In this article, we will talk with you about how you can make a regular wooden deck chair, give examples of photos, videos and instructions.

How to make a sun lounger with your own hands?
First choose suitable look and modification of the sun lounger. Plastic, wood, synthetic fabric and aluminum can be used as the base material. We have chosen the most affordable option sun lounger made of wood.
Type of tree for sun lounger
Tree selection is based on the following principles:
- material possibilities;
- future owner's preferences:
- garden style;
- available handy materials.

When choosing future wood for your deck chair, you pay attention to mechanical properties some type of tree or another. For example, the most durable types of wood are: ash, oak, larch and beech. With them, the design will delight you for many years. Wood is distinguished not only by the durability of its service, but also by its aesthetic component.

In its turn, finished goods from precious woods is not the cheapest pleasure for the buyer. Such a thing is not always available to an ordinary consumer who is trying to save any extra penny, because money is not superfluous. Before assembling the sun lounger with my own hands, look at the drawings of the sun lounger.
Type of wooden deck chair
A self-made chaise longue will not only be an example of prudent spending of the family budget, but will also add zest to the appearance of your fabulous country garden.

Magazines and newspapers have accumulated countless drawings, designs and ready-made solutions wooden sun loungers. The dimensions of homemade sun loungers are identical to industrial models.

A folding deck chair is much more comfortable than a regular one. It is easy to move around the territory, and in winter it can be folded and removed, even cloudy weather will not create any interference.

Preparation and manufacture of a sun lounger
Pre-purchased parts for the structures of the future deck chair must be processed, we impregnate the wood with an antiseptic and anti-corrosion compound. We grind the surface to a perfectly smooth state. The resulting details are put aside and proceed to the study of the drawing.

Turning to the latter, one can see that lower part the legs are fixed crossbars. They allow you to fix the back in the desired position. When installing only one plank, it is first necessary to make cuts in the places where the planks are installed in increments of 5 cm, starting from 20 centimeters.

The back frame should have bolt attachment points, we retreat from the edge on each side by 41 centimeters, and on the very base of the seat - 43 centimeters indent from above.

First you need to assemble the frame for the back. The main load will be transferred to the bar 20 x 60 x 610 mm, so take Special attention its consolidation. It should be of the highest quality. It is customary to leave a distance of 1 centimeter between the planks. It will be needed to secure the fabric in the future.
Using the above instructions, we assemble the main frame. Then, we connect 2 frames together - the back and the seat. Pay attention to the back frame, it is necessary to drill a hole on it from 2 sides, the distance is 41 centimeters for the back and 43 centimeters for the seat. Screw the two parts together with nuts and bolts.

Attention! During regular use of the chair, the nuts may gradually loosen and unscrew. To avoid this trouble completely, fasten the locknuts. For better fixation of nuts, "Moment" or ordinary paint can be used.

To determine the degree of free play, first tighten the nut firmly, and then gradually weaken. Let the paint and glue finally set.

The next step is to mount the support for the back. Planks are fastened with bolts and washers. Choose only thick fabric for the seats, the best choice there will be tarpaulin, canvas and jeans.

The material blank is folded 2 times and stitched with an indent of 1.5 centimeters. After that, it must be turned out. We bend a piece of fabric on one side so that the rod can be inserted and stitched. We do the same on the other side.

We push each of the ends of the folded fabric between the slats and insert a rod into it. We will get a tightly fixed seat, and at the same time dismantling it to wash it will not cause any problems.

DIY sun lounger photo


Chaise lounges are comfortable light chairs that are often equipped with places to relax. They are installed on beaches and near outdoor pools. To give this item may be part of the exterior. On it you can relax after a busy tiring day, swim in the gentle rays of the sun or take a nap in a shady place away from human eyes. In this article, we will look at how to make a deck chair with our own hands from wood, show drawings, as well as photo and video instructions.
To begin with, you should decide on the type of deck chair. It can be made from wood, aluminium, plastic and synthetic fabrics. We will focus on a practical and easy-to-manufacture option - a deck chair made of wood.
Wood for the product and its design is selected depending on:
- your preferences;
- the availability of improvised materials;
- financial opportunities;
- style of your garden.
When choosing wood for a future deck chair, you should take into account the physical and mechanical properties of certain types of wood. For example, beech, ash, larch or oak will last the longest. It is durable and durable materials Moreover, they are aesthetically pleasing. But this type of wood is quite expensive and exceeds other types of wood in weight, which makes it more difficult to move finished products.
A deck chair made with your own hands will not only save you money, but also ennoble the garden, give it exclusivity. There is a wide variety of wood deck chair designs.

A folding chair is more convenient, as it will not be difficult to move it, and in rainy weather it can be easily folded and hidden (which is important for wooden products). With just one movement, you can turn a chaise longue into a comfortable chair.
materials

So, from the materials we need:
For back legs:
- 2×4×122 cm - 2 pcs.
- 2×4×61 cm - 1 pc.
- 2×4×65 cm - 1 pc.
- 2×6×61 cm - 1 pc.
For seat legs:
- 2×4×112 cm - 2 pcs.
- 2×4×60 cm - 4 pcs.
- 2×4×57 cm - 1 pc.
- 2×6×57 cm - 1 pc.
Back support:
- 2×4×38 cm - 2 pcs.
- Wooden rod with a diameter of 1.2 cm, length 65 cm - 1 pc.
Fabric seat:
- Fabric 137×116 cm.
- Wooden rod with a diameter of 1.2 cm, length 55.9 cm - 2 pcs.
To fix details:
- Bolts and nuts - 4 pcs.
- Washers (under the bolt head and nut) - 8 pcs.
- Joiner's glue.
- Screws.
Instruments:
- Drill.
- Sandpaper or grinder.
- Needle file of round section.
Preparatory processes
All parts must be pre-treated, namely, sanded and treated with special impregnations to protect wood from corrosion. Then the product will serve you much longer.
As can be seen in the drawing, crossbars are installed at the bottom of the seat legs, thanks to which the position of the backrest is fixed. If you plan to install only one plank, you should first make cuts in place of the planks: 20 cm from the edge, then 25, 30 and 35. You also need to make holes for the bolts on the back frame, retreating 41 cm on each side. On the seat frame should retreat 43 cm from the top. And on the support of the back of the deck chair, make a hole in the center from the edges.
Frame assembly

First of all, the back frame is assembled. A plank with a size of 2 × 6 × 61 cm will carry the main load, so special attention should be paid to its fastening. Its fixation should be performed as securely as possible. Be sure to leave a gap of 1 cm between the two planks. It will be necessary for attaching the fabric.

Based on the above diagram, assemble the seat frame. After that, fold the back and seat frame. First, on the back frame from the top bar, drill holes on both sides at a distance of 41 cm, and on the seat 43 cm. Fasten them with bolts and a nut. Between the racks of the frame, be sure to lay the washer.

Nuts may loosen during use. To prevent this, tighten one more locknut. Nuts can also be planted on paint or glue Moment. To adjust the free play, first tighten the nut and then loosen it slightly. Then let the glue/paint dry.

Now you can install the back support. Fasten the planks to the back with bolts and use washers in the same way. A large dowel is pressed into the prepared hole in the planks using glue.
The fabric for the seat should be strong enough. Suitable canvas, tarpaulin, jeans and other types of fabrics resistant to wear.
The fabric should be folded in half and stitched, stepping back 1.5 cm from the edge. Then we turn it out. We bend the edge of the fabric for the rod, which fixes the fabric seat between the slats, and stitch it. We do the same with the reverse edge.
Then the edge of the fabric should be inserted between the slats and the rod should be installed in the bend. Thus, the seat will be firmly fixed, but at the same time it will not be difficult to remove it for washing.
Final Processes

At the final stage of manufacturing a deck chair, it is desirable to eliminate the remaining or formed irregularities and roughness with a needle file or sandpaper. After that, if desired, the product can be covered with paint or varnish.
Of course, using this construction, you have many opportunities to improvise. For example, instead of fabric seat, you can simply install more slats all the way to the connection. It depends on your preferences.

This design is completely different from the previous one. But nevertheless, making it with your own hands is not at all more difficult. Such a deck chair is not very convenient to move, but, with careful execution and careful processing, it is quite aesthetic and easy to perform.
Of the tools we need:
- drill;
- sandpaper;
- saw;
- roulette;
- marker.
From materials:
- 2.5 × 8 × 60 cm - 13 pcs. (slats for sitting);
- 5×10×21 cm - 2 pcs. (longitudinal bars for the frame);
- 5×10×50 cm - 2 pcs. (cross bars for the frame);
- 5×10×35 cm - 6 pcs. (chaise lounge legs);
- 5×10×88 cm - 2 pcs. (back of the product);
- 5×10×39 cm - 3 pcs. (back of the product);
- 2.5 × 8 × 88 cm - 6 pcs. (slats on the back frame);
- 5×10×60 cm - 1 pc. (beam for fixing the back in the desired position);
- wood screws;
- studs for fixing;
- paint or varnish;
- wood impregnation.
The first step is to process the wood. Then you need to make a frame. To do this, take 2 longitudinal beams of 215 cm each and 2 transverse beams of 50 cm each. We connect them with screws.

Next, take 13 planks of 60 cm each and fix them on the frame with self-tapping screws, leaving a gap of 1 cm between them. To make the distance even, you can use centimeter spacers in the form of planks. Thus, we got the seat.

The next step is to install the legs of 35 cm from the timber (the length of the legs can be changed as desired). From the side of the seat, to strengthen the structure, we make double legs.
Next, we make the back of two bars 88 cm long and three bars 39 cm. The back frame should freely enter the main structure, it is also necessary to leave a small gap between these blanks.

Now fix the back boards in the longitudinal direction. The end boards can be rounded to give them a more aesthetic appearance.

So that the backrest can easily rise and fall, make through holes at a distance of 9 cm from the edge of the seat through both structures. Fastening is carried out using special studs.

After that, at the base of the deck chair, you need to make 2 grooves into which the support bars will be placed. Due to this, the back can be fixed in different positions. One groove is made at a distance of 9 cm from the pin, 5 × 10 cm in size. The next groove is 20 cm from the previous one 5 × 5 cm.

A bar 60 cm long is laid horizontally in the first groove, which will hold the back in the desired position. If you want to change the position of the backrest, then the beam is shifted into the second groove.

Following this pattern, the process wooden deck chair practically completed. It remains only to sand the structure, varnish it or paint it.
original ideas

We invite you to review original design sun lounger making. For its manufacture, logs Ø75–120 mm are required. To do this, you need to prepare the following tool:
- logs;
- electric saw;
- drill;
- self-tapping screws;
- staples;
- set of drills.

The manufacturing process is as follows:
- First, cut logs 45 cm long.
- After you form the layout of the future design. To do this, take electrical tape and use it to draw a contour directly on the floor.

- Next, make holes in the chopped logs.

- All elements are interconnected. 4 long self-tapping screws are screwed into each log. You can use a socket wrench to tighten them.

- Now you can turn the resulting design and test it. If it is unstable, then eliminate this defect.
- To make the chaise longue more stable, fix the brackets on the back side.

Although this work process is quite troublesome and time-consuming, the result will please your eye. At the same time, such a deck chair will be a great addition to a summer cottage.
If you have your own ideas for making a deck chair, then write about them in the comments to this article. If you find it difficult to come up with your own design, then use the drawings below. We hope the information provided will help you make your own deck chair.
Video
In the video provided, you can learn more about the technology:
Blueprints
The presented drawings will help you design a deck chair with your own hands: