How to make an aluminum frame for a backpack. DIY backpack - patterns and step-by-step instructions on how to sew and make a backpack from various materials (110 photos)
Any journey will be much more comfortable, productive, and safer when your hands are free. The main load when wearing a backpack falls on the legs and spine. The evolution of this item began when the straps were first attached to a simple bag. A lot of time has passed since then, and now there are about one thousand varieties of models on sale, in particular, products for tourism. Among the popular ones is the easel backpack, which for several decades has been among the top most demanded on the market. Let's figure out what is the reason for such popularity, what are the features, advantages, disadvantages of the product.
The backpack got its name due to the presence of a metal structure that serves as a frame and is called a machine tool. Traditionally, it is made from lightweight aluminum alloys. It was important for manufacturers to reduce the weight of the product as much as possible, giving it the necessary rigidity. Today, the machine is made not only of aluminum. The best performance characteristics are inherent in fiberglass fixtures and especially CFRP. The configuration of the backpack has undergone significant changes. The rigid frame provides the traveler with the following benefits:
- even load on the shoulders, spine, the ability to walk with a straight back;
- the presence of a large number of independent compartments for storing things with easy access to them;
- the possibility of individual adjustment;
- ergonomic shock absorbers to ensure proper fit to the body and adequate ventilation;
- free placement of internal content that will not interfere with the campaign, crush;
- affordable price;
- reliability and durability.


Admirers of this model can be found on any tourist trail: in the forest, in the mountains. They are in no hurry to change the comfortable and ergonomic easel knapsack, preferring more fashionable trends. There are reasons for this. No other backpack has such a rigid structure. At a halt, it can be placed in a stable upright position, which is sometimes necessary.
On some models, a standard camera mount is built into the frame.
The disadvantages of the design include excessive rigidity of the product. Falling with an easel backpack is extremely unpleasant, often painful. For high-altitude travel, it is better to purchase other models of a special design. They are much more expensive, and if the desire for snowy peaks is irresistible, hiking is frequent, then it makes sense to spend money on such products. For a regular tourist route, a good wireframe option is perfect. Due to the design features of things in a tourist easel backpack, you can not put a special method. Even harshly placed rigid objects will not press on the back, causing discomfort when walking.


Criterias of choice
When buying a product, you should pay attention to several important points:
- Machine material. The most reliable is carbon fiber. In terms of characteristics, it surpasses the aluminum analogue and has greater resistance to shock loads, stronger to break, and lighter.
- High-quality tourist easel backpacks are recommended to be purchased in specialized stores. It is better to bypass the products of dubious production. A backpack is bought for many years, so there is no point in saving on it.
- All straps, belts must be equipped with adjustment mechanisms, have sufficient strength, but at the same time be soft. The most critical parts are metal, but to facilitate the construction, some of the fittings are made of high-strength plastic. Shoulder straps must be anatomically shaped. They are curved outward, made of several layers: power, decorative, softening.
- It is important that there are enough internal and external pockets. When choosing the latter, it is advisable to pay attention to the presence of a through hole.
- The weight and size of the product must be selected taking into account your own height and anatomical features.
- A very important criterion is the capacity of the easel backpack.
Preference should be given to products from reputable manufacturers. The control system there is extremely tough - from a careful choice of fabric to a set of accessories and belts. An experienced tourist can determine the quality of products by touch, by appearance, so it is better to take such a specialist with you when buying. This will help to avoid unreasonable expenses and the first time to choose a product that meets the basic criteria.


Which backpack is better, easel or anatomical
Disputes over the advantages and disadvantages of this or that model have not subsided for many years. Proponents make a compelling case for their choice, but there is no definitive answer. A powerful advertising campaign for high-tech anatomical products, from the point of view of fans of easel backpacks, is shattered when they offer to stuff a model with a soft back with things, food, canned food, and then put it on. The difference is significant. Owners of an anatomical backpack will have a hard time, as hard objects will put a lot of pressure on their backs.
In turn, fans of anatomical structures quite reasonably prove the consistency of their choice by the fact that the product is more ergonomic than an easel knapsack. The backpack itself is lighter, and travel with it is more comfortable. In fact, it is best to use each type when it is more appropriate. It is no coincidence that many experienced tourists have several models that they choose depending on the situation.
It should be recognized that technological progress, the capabilities of modern industry have led to the fact that the latest generation of anatomical backpacks is in great demand. There is a logical explanation for this. They are more comfortable to use. When storing at home, they are easier to store on the shelf as there is no rigid frame. The easel backpack can only be placed or placed on a very large shelf. True, you will have to pay a little more for such convenience.
A good anatomical backpack can cost one and a half to two times more. Professional models are even less affordable.
A special category of backpacks with improved characteristics is necessary for climbers, rock climbers. Often the product is made to order, or it is modified from a purchased model with your own hands. Moreover, stiffeners can be inserted into the anatomical backpack, and, on the contrary, some elements can be removed from the easel. Thus, a kind of hybrid is obtained that has the characteristics of both types. It is possible that the industry will begin to produce products that are not similar to classical designs and acquire new useful properties. At least, anatomical backpacks are increasingly equipped with rigid tabs, which makes them similar to easel counterparts.


Video
Photo


Every tourist, at least once, thinks that something is missing in his backpack. Taking into account the individual characteristics of the structure of the body, it is sometimes difficult to find such a thing on your own. But in skillful hands, the fabric easily turns into a comfortable backpack. Design hiking backpack only looks complicated and incomprehensible, but if you follow the instructions, you can sew it yourself.
Fabrics
It is important that the backpack is durable and waterproof. Therefore, the choice of fabric is approached with special attention. For its manufacture, the following materials are suitable:
- advise- it was developed for the army and has the corresponding indicators: durable, lightweight, inexpensive, withstands low temperatures, allows water to pass through, crumbles when cut;

- cordura- also invented for the army: it is produced in different densities, water-repellent, does not crumble, expensive, heavy, does not tolerate low temperatures;

- Oxford- fabric with a matting weave and nylon content: lightweight, inexpensive, heat-resistant (does not lose its properties from -50 to +110 degrees C), waterproof, fade when exposed to direct sunlight;

- polyester- for greater strength and moisture resistance, they are treated with polyvinyl chloride: cheap, light, does not change properties in frost and sun, does not deform, does not crumble, does not withstand heavy loads, does not save from moisture.

Advice! When choosing a material, you should take into account the planned loads and conditions of use.
Accessories and additional materials
For practicality you will additionally need:
- thin nylon (with a width of 150 cm) - 70 cm;
- isolon (foam) 10 mm thick - 1 sq. m .;
- sling 25 mm - 7 m;
- sling 45 mm - 2 m;
- fastex 25 mm - 2 pcs.;
- fastex 45 mm - 1 pc .;
- tightening buckle - 14 pcs .;
- stop-lock - 1 pc .;
- zipper 30 cm - 1 pc .;
- zippers 20 cm - by the number of pockets;
- aluminum tubes for D4 frame, length 70 cm - 2 pcs .;
- D3 cord - 1.3 m; 13. braid for finishing seams - 2 m.
Fabric calculation
The easiest and most accurate fabric calculation method- this is to make a layout on graph paper using a scale (cutting) ruler. Thus, you can calculate the required amount of material as accurately as possible.
 In this case, you will need 2 m of fabric with a width of 150 cm.
Important! Tailoring such a product will require at least 3 sq. m. of the main material.
Step-by-step cutting and tailoring of a hiking backpack
Below is the construction of a 90 liter backpack.
Initially, the details are drawn on paper, cut and cut out of the material. To make it more convenient to cut the paper pattern, pin it with pins to the fabric, circle it with chalk, adding allowances.
 You will need the following details for sewing:
- the back and bottom of the product are made in one piece, the height of the part is 101, of which the back is 75x30, the bottom is 30x26x33;
- the main part is in the form of a trapezoid with dimensions 80x75x85.
- one pocket measuring 25x25, and two - 25x15;
Reference! The number of pockets depends on the wishes of the owner, but 3 pieces are sewn as standard.
- the straps are drawn curved with a length of 65 and a width of 8 and are cut from all three materials;
- valve 30x25 with folds, cut out of thin nylon and stuck around the corners;
- overlay on the back with a height of 50, and a width: top 20 and bottom 25, cut it from nylon and isolon;
- the belt is cut out, as well as the straps from all materials, length 70;
- tube 110x75, cut out of thin nylon.
Important! All dimensions are indicated in centimeters and excluding seam allowances, usually 0.7 - 1 cm is added.
 After all the details are cut out and the necessary accessories are prepared, they start sewing.
On the "body" of the backpack, according to the marks, pockets are sewn in with zippers. Vertically between them, two slings are sewn with a width of 2.5 cm and horizontally above and below the pockets.
From the upper corners downwards, two slings are tuned into the back with a width of 25 mm, the top is left open, so that the frame can then be inserted there. Tightening buckles are sewn on the sides at a distance of 30 and 55 cm from the bottom on both sides and two to the upper corners. And two slings at the top and bottom. They retreat 25 cm from the top and grind the handle in the center. Under it, the straps are tweaked, having previously collected them from the main fabric, thin nylon and isolon between them. Adjust the overlay, covering the ends of the straps, leaving the sides open for the belt along the bottom.
 Shoulder strap principle collect the belt. Only in addition, a wide sling with fastexes is grinded on top. Two slings 2.5 cm long, 45 cm long are sewn to the edges, tightening buckles are sewn to connect with the backpack.
Assemble the valve so that it turns out like a box, narrow tightening buckles are sewn into the seams in the corners, with which it will be attached to the base. Sew in the zipper by making a slot in the center.
Connect the back and base of the backpack to each other folding them face to face. The main seams are reinforced with tape.
Tube grind down and make a drawstring 2 cm wide on top. Insert a rope into it and thread the ends into a stop-lock. They grind it to the backpack and insert aluminum tubes into the tunnels made earlier.
 Having collected all the parts together, you should carefully examine the product and, if something is missing, add it.
Reference! When making your first backpack, you should try your hand at cheap mock fabric.
 Useful Tips
- you can cut the fabric with a special soldering iron, in which case the edges will melt and will not crumble;
- to get a backpack with a volume of 75 liters, they reduce the main part from all sides and the height of the back by 10 cm, and the length of the tube part by 20 cm;
- shoulder straps are placed at a distance of 50 cm from the bottom with a height of 170 - 180 cm, with a greater height - 55 cm and with a smaller height - 45 cm;
- it is better to sew with strong nylon threads;
- for the strength of the seams, it is better to sew with a zigzag or double stitch.
 The patterns can be improved individually. For example, increase or decrease the size and number of pockets. A hand-sewn backpack will become an indispensable companion in any hikes.
A tourist who goes on a trip on foot usually finds himself at a standstill before the question of how to adapt things and provisions for carrying on their backs, which there are so many and which are so necessary on the way. Backpack ? But a backpack costs 8-12 rubles and you can get it only in large cities, which, of course, is not available for everyone.
In No. 10 of "World Tourist" for 1928 there is a description of the "ponyagi" used by the Tungus and Russian hunters of the Angara region. But making a ponyagi is quite difficult (steaming and bending a tree) and requires a lot of time, which is always so little for a tourist going on a hike. Therefore, I want to bring to the attention of tourists the so-called "flyers", which we have successfully used for several years on short and long excursions in the Ussuri taiga.
Flyers, recommended US explorer traveler VK Arseniev and used by the natives of the Far East, have two options.
The first option makes it possible to quickly strengthen the bale on the flyer, which significantly saves time when stopping at a bivouac and when leaving it.
For the manufacture of flyers in the forest, two branches are cut out in the form of symmetrical forks, as even as possible. The wood species is indifferent. Excess knots and growths are cut off. Fork dimensions given in the figure are intended for a person with a height of 170 cm; at other growths, they must be changed accordingly.
Then they find a piece of a branch with a knot branching off at an angle close to 90 °.
This piece of branch is attached by means of wire or twine to one of the forks, which have been slightly cut beforehand to prevent slipping. Subsequently, when the flyers are ready, a strap is put on this transverse branch.
The strap is an ordinary towel made of the thickest, widest and most durable canvas possible. The same towel can be used on the way when washing. A loop of strong twine is tied to each end of the towel so that these loops can be moved along the towel to adjust the length of the strap, but if you pull on them, they should not slip.
Now the second fork is taken and tied with its thin ends to ropes that have a length equal to the thickness of the bale, that is, approximately 20-30 cm, and in turn are tied to the thin ends of the main flyer.
You can start packing your things. For this, a blanket, a strong sheet, a tent panel or an awning can serve. No special bags are required - they are dead weight. The blanket is spread out, the luggage is compactly laid out on it and carefully wrapped in the spread fabric so that it turns out to be a dense and long bundle with a center of gravity in the middle.
Then the main flyer is placed on the ground with the crossbar facing up. On the crossbar, hooked on perpendicular knot, put on the shoulder strap. Now, putting the bale on the main flyer, it is clamped subsidiary flyer and tightly pull together the free (thick) ends of the flyers with a strong rope.
The result is a bag ready to carry. Putting the knapsack on your back, adjust the length of the straps by moving the rope loops at the ends of the towel. Full adjustment is achieved after one to two days of travel.
For example, the crossbar may be tied too high in relation to the flyer, and then the knapsack pulls the shoulders strongly. Or vice versa, if the crossbar is tied too low, then the load tends to spread over the head.
The second option is somewhat simpler, but each time it takes more time to tie the knapsack. It differs from the first in that it is limited to only one main flyer, and a rope serves instead of an additional one.
A 3-4 mm thick rope is tied to both thin ends of the main flyer. and 45-50 cm long, and to the middle of this rope they tie another one, but 2-3 m long. With these ropes, the bale is tightly tied to the main flyer. That's all. Some of the readers may have a fear that the flyers will press hard on the back, but if the branches are chosen quite even and smooth, then they are not felt at all.
The advantages of flyers over a backpack are as follows:
1. The "dead weight" of the flyers is less than that of the backpack (especially when the tree is dry).
2. About the "load" is not as limited as with a backpack.
3. Thanks to the flyers, the load does not adhere tightly to the back with the entire surface, which makes the back less sweaty.
4. Due to the high position of the center of gravity and the elongated shape, it is evenly distributed along the back and the straps pull and cut the shoulders less (if only they are thick and wide enough).
5. A knapsack with flyers lies on the back more stable than a backpack and, after some skill, accommodating, with a heavy knapsack, you can jump over obstacles.
6. The cost of the flyer is zero!
7. In case of breakage, the flyer is easy to resume, making it even on the way.
In conclusion, it is recommended that tourists get a piece of good oilcloth, approximately 80X100 cm, by sewing ribbons to two adjacent corners. In case of rain, this oilcloth can be used to close the knapsack or close it with it and by tying the ribbons at the neck. On bivouacs, oilcloth is placed under the bed, which eliminates the penetration of moisture from damp earth or grass.
And finally, every tourist should purchase a skin for sleeping. The skin can be any: sheepskin, bear, goat, seal, deer. Its size is 60 X 90 cm. and more. Such a skin is very light, takes up little space, but protects against colds and gives some comfort.
Practical notes by B. Roberg. (magazine "World Tourist", 1930, No. 4, from the personal library of N.M. Ryazan)


In Soviet times, almost every tourist sewed a hiking backpack with his own hands, because the shops were littered with soft Abalakov's or easel "Ermaks", we saw new models only in photographs in the magazine "Tourist". Although, of course, sewing tourist backpacks was not an easy task, because everything was in short supply: from fabric to accessories.
But if you have a desire and free leisure, and a suitable fabric and accessories are hidden in the bins, then my step-by-step instructions on how to sew a 90-liter hiking backpack (frame) will help you make a really useful product.
Useful articles:
DIY hiking backpack: materials and accessories
In order to sew a tourist backpack with your own hands, you will need:
Dense nylon like avisent or cordura - 3 sq. m or cut 1.5 * 2 m
Thin nylon like parachute silk or bologna - 1 sq. m or cut 1.5 * 0.70 m
Izolon (tourist foam mat) - 1 sq. m, 1 cm thick
Narrow sling, 25 mm - 7 m
Wide sling 45 mm - 2 m
Tightening buckle - 14 pcs.
Snap buckle - 2 pcs.
Snap buckle, wide for a belt - 1 pc.
Zipper - 20 cm, 1-3 pcs. depending on the number of pockets
Zipper - 30 cm, 1 pc.
Tape for strengthening the seams - 2 m, 1-1.5 cm wide
Rope for tube - 1.30 m, diameter 3 mm
Aluminum tube - 2 pcs., Length 70 cm, diameter 4 mm
or plate - 2 pcs., length 70 cm, width 2 cm
The dimensions on the backpack pattern are in centimeters, excluding seam allowances. If you want to sew not a 90-liter, but a 75-liter backpack, then reduce all dimensions of the "body" of the backpack by 10 cm, the height of the back of the backpack by 10 cm, the circumference of the tube by 20 cm.
How to sew a backpack: cutting out the main elements
Sewing a tourist backpack begins with cutting out its main elements. Do not forget to melt the edges of the fabric with a lighter after cutting so that they do not get shaggy. It is better to sew the seams with nylon or lavsan threads, zigzag. If the machine does not zigzag, sew two parallel stitches.
 Rice. one. The "body" of the backpack is 75 * 80-85 with designated places for pockets, if you need them (I recommend only one - the central one). At the bottom, in the corners, you can immediately sew on slings 40 cm long and 25 mm wide, reinforcing them with fabric kerchiefs.
Rice. a, b. The pattern of pockets, it is necessary to sew a zipper into them (we leave it at your discretion, we advise you to decide on this in advance, before you start sewing a tourist backpack with your own hands).
Rice. 2. Back of a backpack - 75 * 30 with a bottom 26 * 33 made of dense nylon. The bottom can be sewn on separately, but it is better to cut them with one piece of cloth, which reduces the number of seams.
Rice. 3. Shoulder straps: two of dense nylon, two of thin. The same shape must be cut out two blanks from isolon (foam). The second strap needs to be cut out in the mirror image.
Sew tight and thin pieces together, stitching them to each other along the contour. Turn out and insert a strip of isolon into the inside. On top of the tight side of the strap, sew a 25 mm wide sling, stitching it in 3-4 places across. The strap should end where the strap is and end with a tightening buckle.
Rice. 4. Valve 32 * 26. Cut and sew on a thin fabric (Fig. C), as if making a box. Sew in a 30 cm zipper, either along the seam or in the center of the wide wall, making a slit. Sew 4 tightening buckles in the corners.
We sew a hiking backpack: making a back
Now let's get down to the most difficult thing in such a matter of how to sew a hiking backpack - making a back.
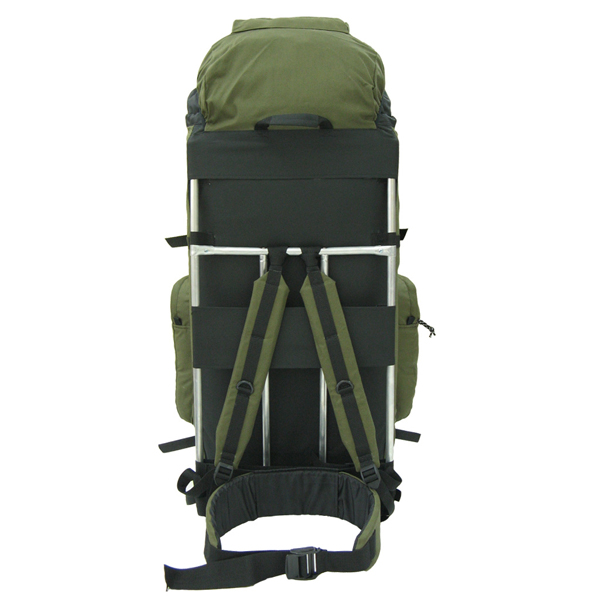
 Rice. five. Take the back of the backpack cut out earlier (Fig. 2). Sew 2 strips 2.5-4 cm wide to it (tunnels for the future frame - tubes or plates).
A sling 25 mm wide is suitable for the tubes, a strip of dense nylon for the plates. Sew on 6 tie-back buckles as indicated on Rice. five, 4 slings of 25 mm - 2 at the top and 2 at the bottom. In the center of the back, sew a loop-handle from a 25 mm sling at a distance of 25 cm from the top edge.
Rice. 6. Sew the finished shoulder straps over the loop handle. If your height is 170-180 cm - at a distance of 50 cm from the bottom edge. If higher - 55 cm. If lower - 45 cm. If you are trying not for yourself, then before you sew a backpack, specify this parameter.
Rice. eight. Cut out a piece from isolon and soft nylon. Tie them together.
Rice. 7. Sew on detail from Fig. 8 on the back of the backpack over the shoulder straps. Stitch the lower part of the part (trapezoid) with two lines across the back, so that a belt can be inserted between them.
Rice. nine. The belt is also made as shoulder straps (Fig. 3): dense fabric, izolon, thin fabric are sewn together. Sew a wide sling on top (you can use a car seat belt), sew a wide snap-on buckle on one side. Attach 2 additional slings 25 mm wide, 40 cm long to the edges of the belt (they will attach the belt to the "body" of the backpack), at the place of their "docking" with the backpack, sew the buckles.
 Rice. 10. Take the "body" of the backpack (Fig. 1) and sew on it with 25 mm wide slings as shown in the figure.
Details Rice. 10 and Rice. 7 sew together in an inverted form - with pockets and straps inward, and seams outward.
Reinforce key seams with tape.
 Rice. eleven. Cut out a tube-shaped tube made of soft fabric 30 * 110. Fold the fabric over the wider side to form a drawstring and stitch. The width of the drawstring is 1-2 cm, depending on the thickness of the rope for tightening the tube, which you are going to thread through it.
Sew the tube to the top of the backpack. Turn the backpack inside out. Insert into pre-sewn strips (Fig. 5) aluminum plates or tubes, cut to size before stitching the backpack. Buckle the flap, insert the belt and tuck the second part of the buckle into one of its lines. Fasten the belt with thin straps to the backpack.
Examine the backpack, if something, in your opinion, is missing - add. Ready! You have successfully sewed a backpack with your own hands!
Perhaps you have improved our patterns and sew a more perfect hiking backpack with your own hands.
Dmitry Ryumkin specially for

