Do-it-yourself country chair. We make a comfortable garden chair with our own hands
The summer cottage serves not only for growing vegetables and fruits, but also for a good outdoor recreation. This is best done in a luxurious and reliable armchair made by yourself. We will talk about how to make it, what materials, tools and knowledge will be needed below in the article.
If you like to tinker with wooden crafts, it will not suit you to install standard plastic chairs on your own site. They not only do not fit into the natural atmosphere of the kingdom of plants and flowers, but also unreliable.
In addition, their design does not always contribute to a good rest. Therefore, in this case, we offer you a simple model of a wooden garden chair, which will organically fit into the landscape of a suburban area. You do not need special skills, as in forging or welding metal products, although knowledge of carpentry is desirable.
Requirements for country wooden furniture
Special conditions of use require that the design meet certain parameters. Then it will last long enough in the original version.

Let's consider them in more detail:
- Immediately count on the fact that the chair needs to be made transportable, then in case of bad weather you can quickly hide it under. Of course, special antiseptics and paints used to protect wood will allow the structure to withstand atmospheric influences, but we advise you not to test it in such cases.
- Choose hardwoods for garden furniture, such as oak, beech and walnut. Although the price of such materials is higher, the quality of the construction will be excellent. Aspen, larch, cedar and pine are also little susceptible to decay, but the disadvantage of the latter is sensitivity to impact. Even a small one is enough for a dent to appear on the chair, which then will not be easy to remove.

- Particular attention should be paid to the protection of the material from atmospheric influences.. This is due to the fact that it can be exposed to sunlight for a long time, it often falls under heavy rain, so you need to protect it from such tests.
Preparation for protection begins at the stage of harvesting wood for the manufacture of furniture. Fold the boards under a canopy in a pile, press it heavy on top and leave to dry, it’s very good if you could buy dry and high-quality lumber right away.
In the process of work, the blanks must be sanded, impregnated with an antiseptic, and then with hot drying oil. At the next stage, dry them, and varnish them for outdoor use.

- The relief of the texture and the decorative cut of the tree will depend on the number of undeveloped branches and knots, i.e. the more, the better. Such a polished surface may resemble strolling grape snails.
Tip: when assembling a wooden chair for a summer residence, fasteners should be sunk into the material, then you will avoid puffs on clothes and scratches.
How to prepare for work
First of all, it is necessary to pre-assemble all the tools that you may need, as well as the material. In our case, all the blanks, with the exception of the insert strips, will be cut out of a cedar board, the thickness of which should be at least 20 mm.
| Details | Dimensions are in mm:
|
| Material |
|
| Instruments |
|
Manufacturing process
Preliminary stage - cutting the main elements
Let's start by cutting out the details. To do this, we will prepare a detailed drawing, so it will be easier for us to continue manufacturing the chair.

Prepare the parts that will later become the rear legs and back. To do this, try to carry out all the work based on a detailed drawing with explanations, where there are appropriate tips. After consulting with it, mark and cut the desired blanks.
Cut the back legs, backs, seats and armrests from wide panels.
Get them by gluing boards that you need to match the color and texture of the wood.
Tip: Select the slots for the keys in advance, positioning them so that they are invisible after the cutting is completed.
- Cut out the back legs using a cardboard stencil. Attach the template to the blank that will be used as the leg, and circle it with a pencil. Connect and pull together two blanks with masking tape so that you can cut both at the same time.
Carry out cutting with a small margin. To fit parts to size, use a milling cutter or planer.

- Cut out the back. To do this, cut the workpiece in such a way that the glue line is exactly in the middle between the boards. Bevel the bottom end of the backrest at a 12.5° angle to match the profile of the rear legs. Round the top edge with a 9 mm radius.

Having finished these works, you can start assembling the product, for this you will need to cut and fit other parts in place.
We continue to work
Below are instructions for assembling and cutting the rest of the elements.
Back and rear legs
- Drill holes for fasteners in advance so that the workpieces do not crack.
- Use screws (50 mm) and glue to fasten the rear legs to the backrest.
- Connect the side ends of the backrest to the legs at an angle of 12.5°.
- Close the gaps between the parts with insert strips by making them of the appropriate profile. The ends of the slats and the opposite ends of the legs must match, which will indicate the correct position of the back.
- Screw the inserts to the back with screws (l = 50 mm).
Tip: keep in mind that the strength of the seat will depend on the location of the boards that should be placed from one leg to another.
- Take a circular saw and cut the piece to width.
- Mark the sides of the seat, which are angled.
- File the workpiece from the sides along the outer marking line. You can not yet clean the raw ends.
- Select a groove on the back end of the workpiece, the bottom of which is tilted at an angle of 12.5 °. This must be done because the seat will be at an angle to the back. In this case, the joint will turn out to be dense, which is what we need.
- Round the front end of the seat.
- Screw the seat to the legs, sand its side edges, fit them flush with the rear leg plate.
Seat

front legs
- Cut out the front legs by beveling their top and bottom edges 6˚.
- Screw them to the rear using screws (l = 32 mm), reinforcing the connection with glue.
- Make a proleg - a jumper between the legs, so that the garden chair gets additional reliability and stability.
You need to cut it to size:
- attach the workpiece to the front legs and mark the fixing grooves. In this case, make the bottom of the groove at an angle of 12.5 ° to the plate;
- select to a depth of 9 mm from the high side of the groove;
- attach the jumper to the front ends of the legs using glue and screws (l = 32 mm).
armrests
- Saw out wedge-shaped supports for them, beveling their top edges by 6 °.
- Screw the supports to the front legs using glue and screws (l = 32 mm).
- Cut out the armrests as well as the back support for them.
- Clean the ends of the parts with sandpaper.
- Cut the ends of the support at an angle of 30°, the top edge at 31.5°.
- Press the rear support piece against the back with clamps.
- Replace the armrests and loosen the clamps.
- Level the position of the rear support element, achieving a strict horizontal armrests.
- Tighten the clamps and screw the rear support to the backrest.
- Screw the armrests to the rear support, then to the wedge supports, and then to the front legs, using glue and screws (l = 50 mm).

Close the recessed screw heads with wooden plugs and grind them flush. Take hot drying oil and saturate the wood with it, dry the product and varnish it. You will end up with a comfortable classic design with a beautiful texture that will be appreciated by your family.
Output
A wooden chair for a summer cottage, made independently, will add the necessary flavor. The main thing to remember is that it is necessary to protect the structure from atmospheric influences so that it lasts for a long time. Only familiar tools and materials will be used in the work. The video in this article will help you find more information on this topic.


Making chairs for a summer residence with your own hands is both a way to demonstrate your skills and an opportunity to additionally decorate the site. Such furniture is useful in the case when you want to sunbathe in the garden, and to relax in the shade of trees with your favorite book. Using these products, you can feel comfortable anywhere in your summer cottage. And when arranging family holidays and picnics, the problem of accommodating guests can be easily solved. Thus, homemade chairs are great helpers and organizers of recreation.
Making a chair for a summer residence is within the power of even the most inexperienced master.
Their design should be chosen taking into account where they will be used. For example, a garden chair is suitable for relaxing in the garden, and a rocking chair on an open veranda. While indoor furniture can be made from any material, outdoor furniture requires chairs made from materials that are resistant to the vagaries of nature. A few typical cottage designs are discussed below.
Homemade garden chair

Furniture of this type has been known for a long time and quite well. Most often, it is assembled from planed boards without glue, using self-tapping screws or bolts. Any boards, even old ones, can serve as a material. In order to make a chair, you will need the following tools and materials:
- hand saw, circular or end saw;
- drill manual or electric;
- screwdriver or screwdriver;
- bolts with nuts and self-tapping screws.
The popularity of such structures is due to their simple design, convenience and reliability in operation. For example, by putting pillows on the seat and back, the chair can be easily turned into a soft one. It can stand both in the house and on the street, and in the latter case, both in an open place and under a canopy.
As already mentioned, various boards can be used. Below are the approximate dimensions of the parts. In any case, it is recommended to make a sketch with the dimensions indicated on it. Approximate dimensions of parts and their number:

- front leg (section 15x2.5 cm, length 60-85 cm) - 2 pcs.;
- horizontal rail of the seat frame (section 15x2.5 cm, length 118 cm) - 2 pcs.;
- front transverse rail of the seat frame (section 10x2.5 cm, length 55 cm) - 1 pc.;
- rear transverse rail of the seat frame (section 10x2.5 cm, length 60 cm) - 1 pc.;
- horizontal rail for collecting the back (section 10x2.5 cm, length 60 cm) - 1 pc.;
- horizontal rail for collecting the back (section 10x2.5 cm, length 74 cm) - 2 pcs.;
- vertical rail for the back (section 12x2.5 cm, length 120 cm) - 5 pcs.;
- armrest (section 15x2.5 cm, length 90 cm) - 2 pcs.;
- emphasis under the armrest (section 12x2.5 cm, length 20 cm) - 2 pcs.;
- seat rails (section 10x2.5 cm, length 58 cm) - 5 pcs. (their number can be increased by decreasing the width accordingly);
- self-tapping screws 4.5-5 cm long.
Chair assembly sequence:

- The bars of the seat frame 118 cm long are given the desired shape - their front parts are rounded and bevels are made on the back.
- These bars are bolted to the front legs. The distance from the ground to the lower edges of the bars is 18 cm. Washers should be placed under the nuts.
- The two resulting parts are fastened with transverse rails of the seat frame using self-tapping screws. The front is butt, and the back is overlapped.
- On three horizontal rails (short in the middle) the back is assembled. Then its upper end is sawn off according to the template. The lower part of the backrest is screwed to the rear cross rail of the seat frame. The angle of its inclination should not exceed 30 °, and the depth of the seat should be about 50-55 cm.
- The structure frame is rigidly fixed with two armrests.
- The seat of the chair is sheathed with slats using self-tapping screws. In the rails, you need to pre-drill holes and countersink the entrance.
- All elements are carefully cleaned with sandpaper and impregnated with an antiseptic, it is better to putty the caps of self-tapping screws. For final finishing, wood stains, moisture-resistant impregnations or varnishes for wood are used. You can cover the product with opaque paints.
This garden chair is of the simplest design and just as easy to make with your own hands, which is quite suitable for a first experience even for a person who is not experienced in carpentry. Clear drawings with dimensions, simple materials that may have been left over from construction work, and ordinary tools will help you make such a chair in just 2-3 hours. Following a simple instruction, you just need to cut the required number of elements to size, mark and drill holes, and then assemble them as a constructor into a single whole.
Now let's get started and prepare the necessary materials and tools for work.
Instruments
- Circular or miter saw (a hacksaw is also suitable).
- Electric planer (if you use non-planed boards).
- Drill or screwdriver (with drills and bits).
- Measuring tool (tape measure and corner with a protractor for measuring angles).
- Wrench.
- Pencil.
- Paint brush.
materials
- Edged board:
90x45 mm (6.6 meters) and
90x20 mm (6 meters). - Furniture screws (dowel-head galvanized or chemical-coated against rust):
M10 100-110 mm - 10 pcs. - Self-tapping screws:
40 pcs. with a pot-head 4.5x60-75 mm for fastening elements of the backrest, armrests and seat of the garden chair. - Abrasive sandpaper with grain P40-60, for cleaning corners and splinters. Ideally, apply with a grinder or drill attachment.
- Protective impregnation for wood or stain with varnish.
Further, in the drawings below, the size of the board for the manufacture of a garden chair is optimal, i.e. for example, if you take a standard edged board 100x50 mm, then process it with a planer and at the output you get an approximately optimal size of 95-90x45 mm or something like that. I think that here a few millimeters plus or minus will not play a big role. After all, we are not building a submarine, so there is no need to be afraid, feel free to take a tool and start working!
And drawings to help you, all dimensions given are in millimeters.
Drawing 1. Elements of a chair from a board 90x45 mm.

Drawing 2. Elements of a chair from a board 90x20 mm (inch).

Drawing 3. Elements of the chair assembly (sidewall).

Chair assembly
1. To begin with, we will file all the elements of the garden chair and drill holes in them in size, with a drill with a diameter of 10 mm.
2. Now you need to process them with abrasive paper to avoid further minor injuries and splinters.
3. We collect two sidewalls of the chair, which, in principle, are a mirror image of each other.

4. We fix all the elements with bolts, washers and M10 nuts. It is better to use furniture bolts with a flat head.

6. Now it remains to apply a layer of impregnation, paint or stain with varnish. Don't forget about intermediate drying.
The chair is ready!Agree, nothing complicated. You should end up with a pretty nice garden chair.
If you make this chair complete with such a garden bench, you can get a very interesting combination.
Below in the photo, see various versions of this chair from different authors, maybe you will come up with an interesting idea how to add some zest to this simple design.Here is such an interesting interpretation of a garden chair with vertical elements of the back along with a small table.


A very original modification of the author is to add additional slats to the seat and back of the chair, as well as a footrest, which at the same time serves as an additional amplifier. The armchair is stained and varnished on top.

Send your creations to me by mail or leave in the comments, and they will be published.
- Edged board:
» From the presented material, you will learn how you can make a "Garden Chair" with your own hands and install it on your site, for example, in the shade of a fruit tree (apple tree). On an armchair, rest after work on the beds will be much more convenient and pleasant, because due to the inclined back, the load is removed from the spine.
To make a chair, you do not need serious knowledge in carpentry and carpentry, everything is extremely simple and practical. The material is also the simplest - a board of 25-30 mm and screws.
Let's look at the whole process of creating the "Garden Chair", as well as analyze what exactly the author needed?
Material
1. board 25-30 mm (softwood)
2. screws (for wood)
3. stain
4. varnish
Instruments
1. hacksaw
2. screwdriver or screwdriver
3. ruler and pencil
4. brush
5. sandpaper
The process of creating a "Garden chair" with your own hands.
It is not so difficult to get your own country furniture, especially if you have material (pallets or a board), the planks must first be planed and sanded with sandpaper, and then just follow the author's photo instructions.
First of all, armrests are made from the board (in the form of the letter P), everything is twisted with the help of wood screws.


The rear legs are screwed at an angle to the front.

A seat is sewn onto the plane of the rear legs from the same board, a cross member is also added to strengthen the structure and greater rigidity.

The back is made in the same way, the boards are screwed to the lower and upper crossbars.


To give garden furniture a more noble look, it can be covered with stain and varnish, or painted with paint in any color of your choice)
As you can see, there is nothing complicated in creating a garden chair, everything is extremely simple and clear.
So, do not throw away pallets and planks after construction or repair, they can be used to make cool furniture.
This concludes the article. Thanks for attention!
Come visit more often. Don't miss the news in the world of crafts!
The article is presented for informational purposes only!
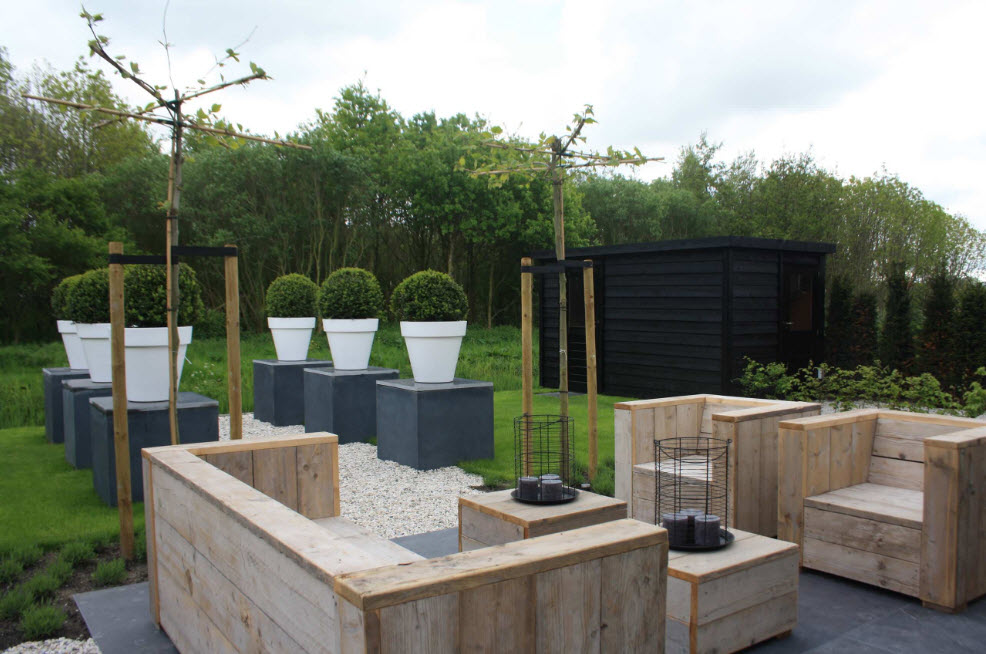
Each owner of a private house of an urban or country type, a summer cottage or a personal plot, sooner or later faces the need to improve his territory. And this is not about breaking beds and flower beds, planting trees and shrubs, but arranging comfortable, but at the same time practical areas for recreation, cooking and eating in the fresh air. It’s hard to imagine a landscaped plot without garden furniture, but not everyone can afford to buy one, and it’s much more pleasant to sit on a bench made by yourself or dine outdoors at a table that didn’t cost you a dime. In this publication, we have collected many options for garden furniture that you can make yourself. Possessing only improvised materials, a small set of tools and a great desire to make your site landscaped, comfortable and aesthetic.
In order for garden furniture to appear on your site, which can become not only a reliable exterior item, but also a reason for the pride of the owners and the envy of neighbors and guests, you need not so much - waste material, perseverance, a little imagination, work and effort. In this article you will find examples of making garden furniture from wood, building pallets, used household items.


Choosing a material for the execution of country furniture
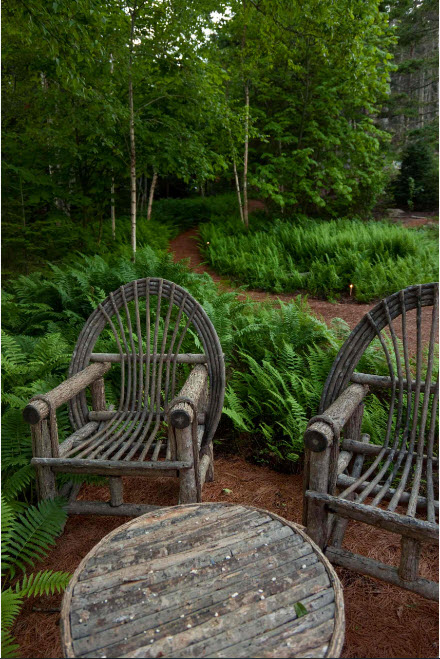
In order for self-made furniture to organically fit into the existing image of a summer cottage or a private courtyard, it is necessary to responsibly approach not only the manufacturing process itself, but also the choice of material. The most versatile and at the same time very malleable material in terms of processing is natural wood. The advantage of wood is that it can fit perfectly into any stylistic direction in the design of the landscape. And this can be achieved through a variety of design options - from massive furniture made from logs to light and elegant products woven from vines or twigs.


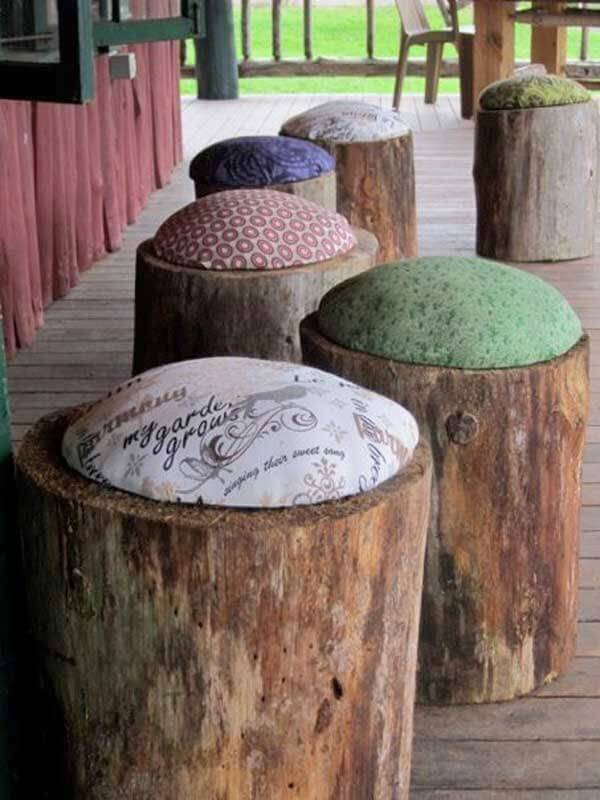
The advantage of wood for creating furniture with your own hands is that it has many manifestations. You can create a piece of furniture with minimal material processing in the shortest possible time. For example, ordinary hemp can be turned into stools or small tables-stands. It is enough to make sure that the surface of the new pieces of garden furniture is perfectly hewn and becomes safe for use.
You can create garden furniture from branches and twigs ...
Or logs and large timber ...


Benches and benches - an essential attribute of country life
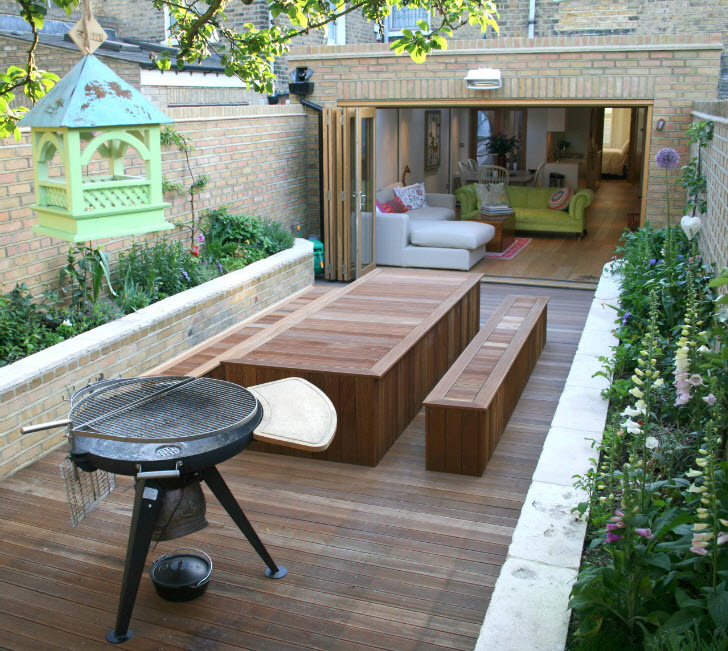
Even a very small backyard needs garden furniture to sit on to enjoy the fresh air, watch the sunset or watch the sunrise. Well, on the site of a large family or in the courtyard of hospitable hosts, where companies gather, it is completely necessary to take into account the possibility of seating several people.


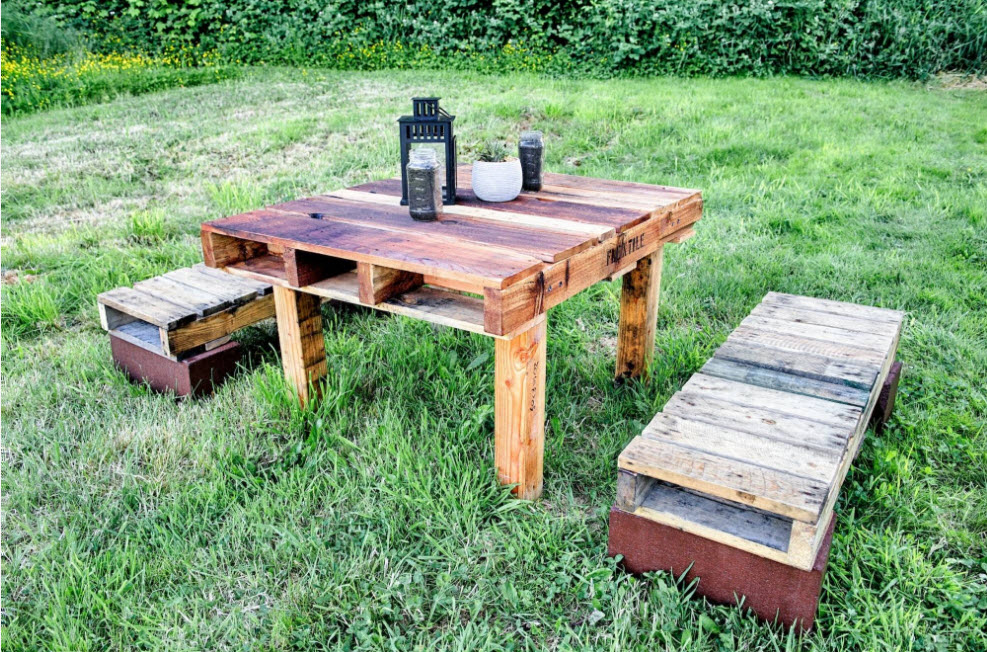
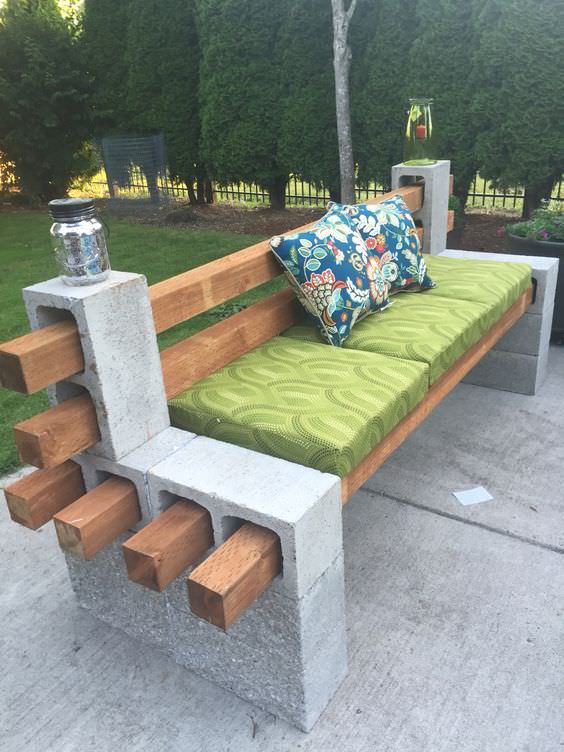
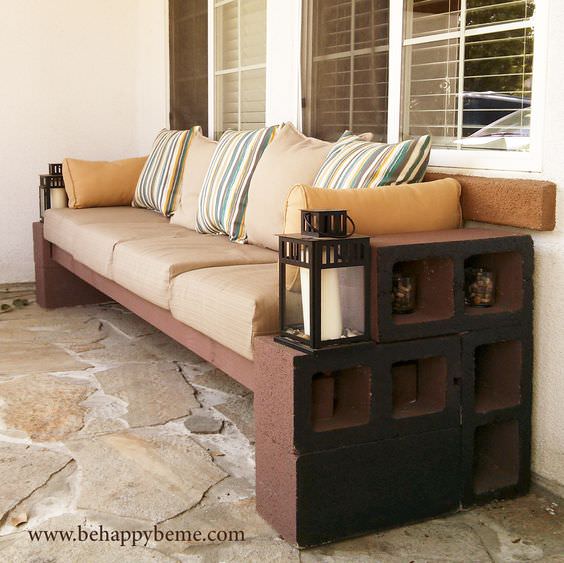
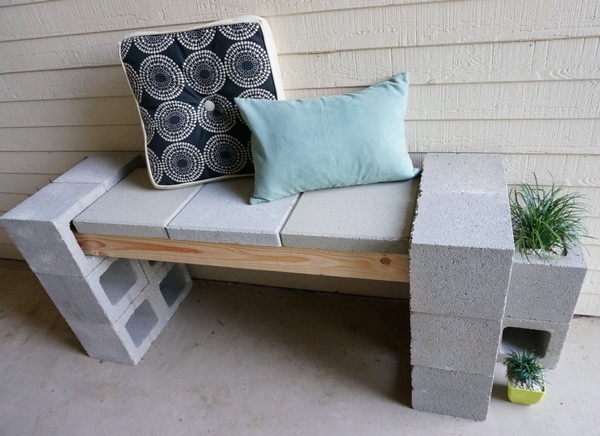
One of the easiest ways to create benches and benches is to use a wooden beam and cinder block with square holes. The bench or bench is assembled as a constructor, you do not even need to use any tool or bonding solution, construction adhesive. The advantage of such structures is not only ease of installation, but also portability - you can easily disassemble your piece of garden furniture and move it to another place or put its parts in a shed until the new warm season.

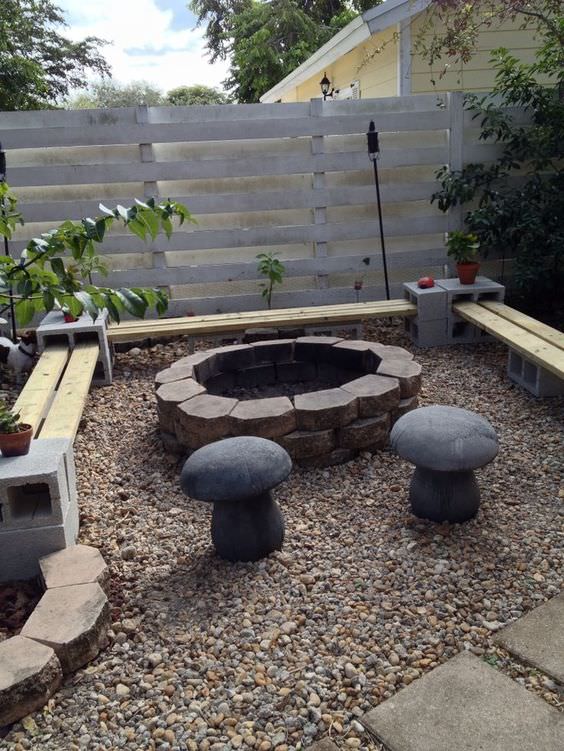

If you put soft seats and sofa cushions on a bench made of cinder block and timber, then an ordinary solid garden bench turns into a convenient, comfortable sofa.

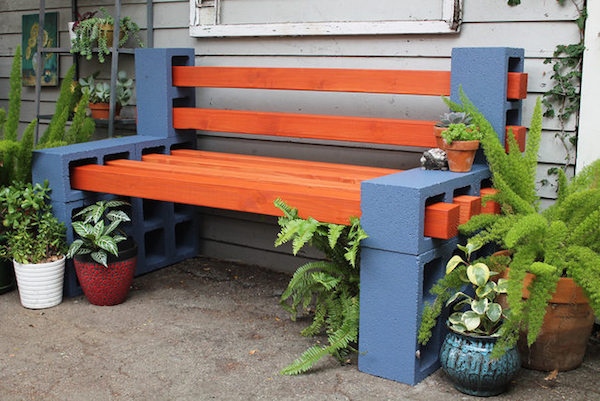
By combining the materials of garden furniture, you can increase the strength and improve the appearance of products. For example, together with a tree in one or another modification, metal structures can be used, for example, parts of beds (backs, legs).

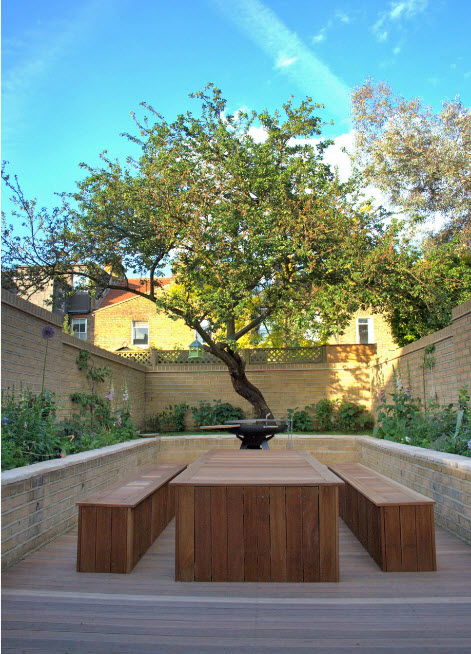
Outdoor dining area
In the fresh air, any dish seems to be tastier. Every owner of even a tiny backyard tries to create an environment in which they could have meals outdoors, even if we are talking about short breakfasts. Depending on the needs and size of your family, you can equip a small area for short meals, or install a spacious dining table for receiving guests in the fresh air. It is noteworthy that both options are within the power to implement on their own.
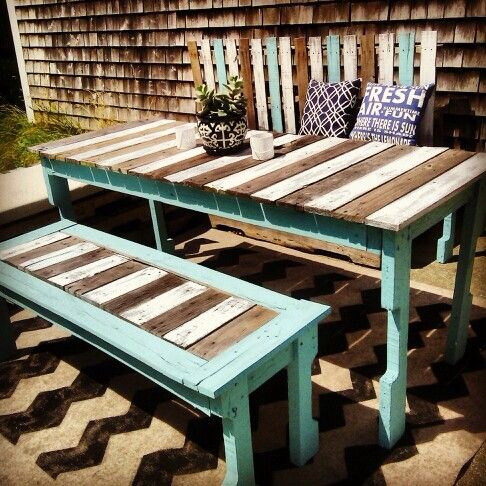


One of the simplest, but at the same time practical ways to organize an outdoor dining group is to make a table, together with benches. The model shown in the photo will require a minimum amount of material, but it will be quite roomy. The only drawback of such a dining group is that if you need to increase the number of people sitting at the table, then you can do this only for 2 seats (you will need chairs or stools).

You can equip a dining area or a segment for short meals (breakfasts and afternoon snacks) according to the type of bar counter. This is easy to do with the help of building blocks and wooden beams or boards. Only stools for such a countertop need to be selected as bar stools, with the appropriate height.

Recreation area on a summer cottage or personal plot
Outdoor recreation is associated with different things for everyone. For some, these are gatherings with friends and neighbors, for others, reading on a slightly swaying swing, while others need sunbeds for air baths. For all options for active and not very relaxing, you can make furniture with your own hands, and even from improvised means at minimal cost.


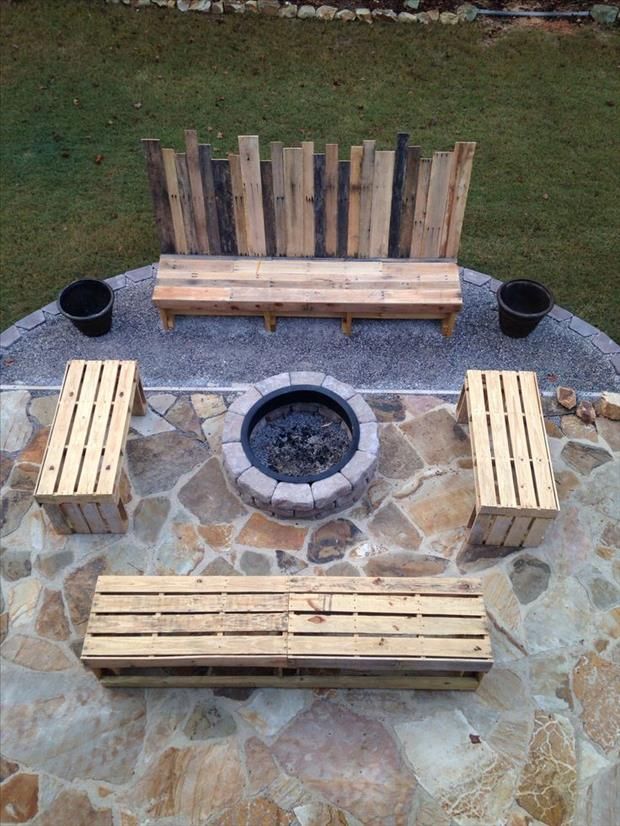
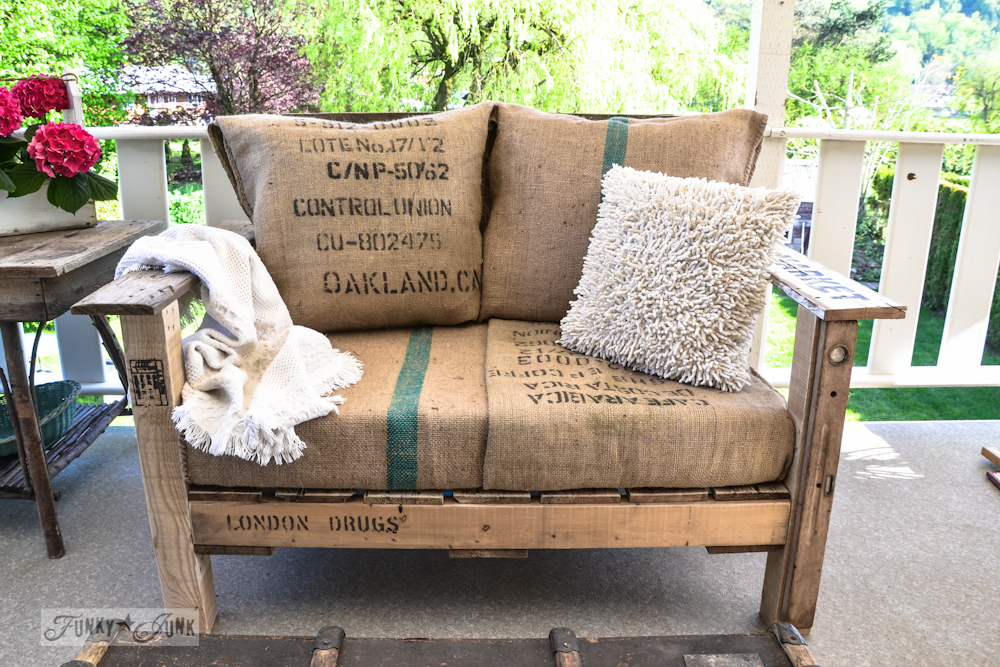
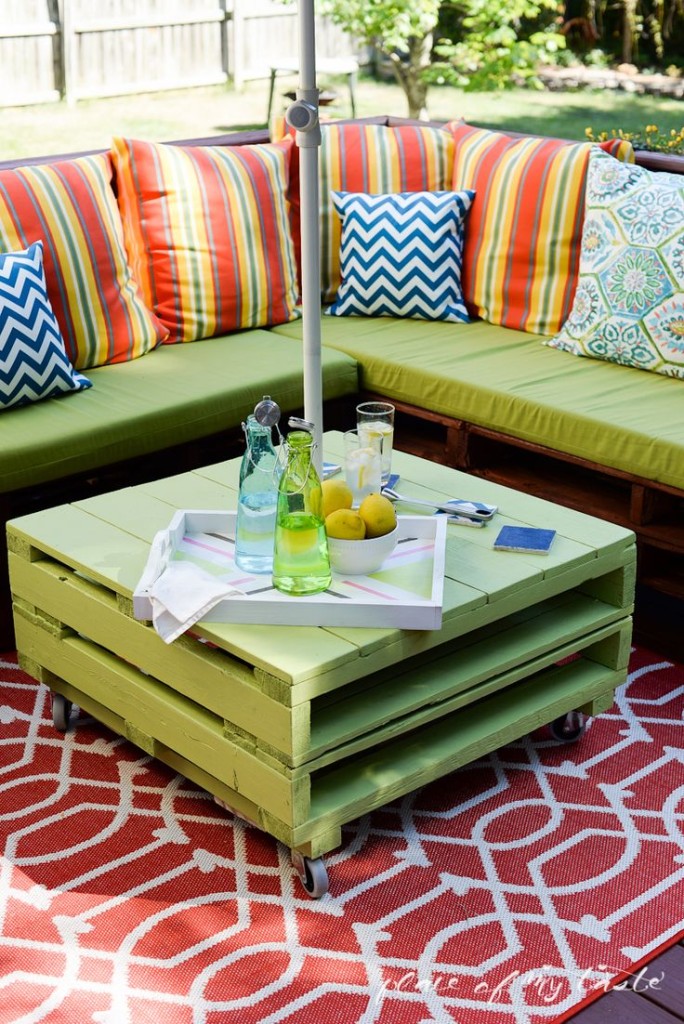
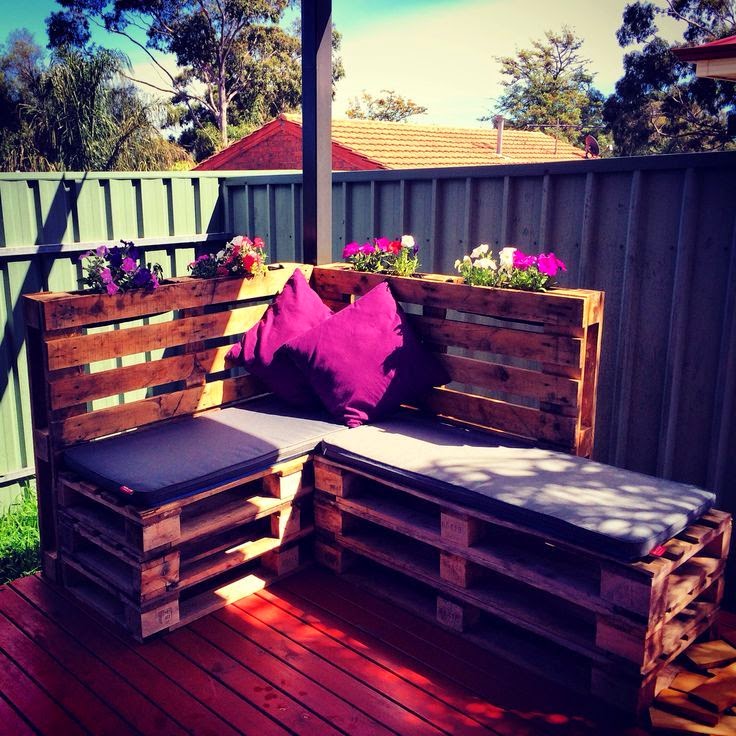
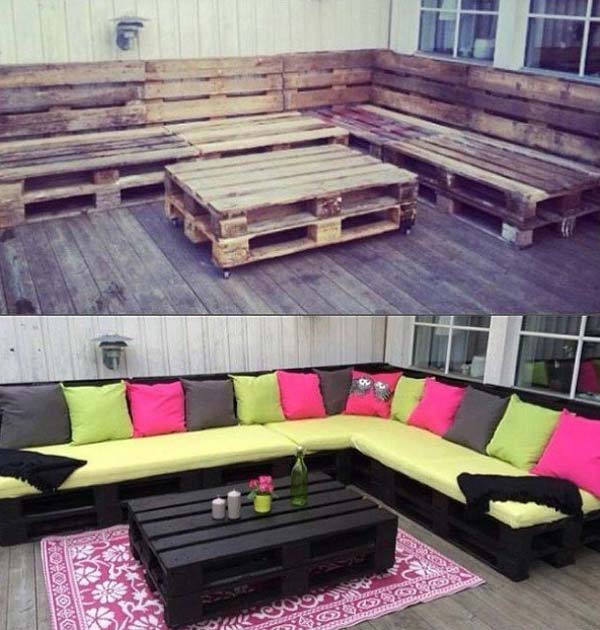
One of the most common ways to create garden furniture for a seating area is using construction pallets or pallets. The advantage of such an assembly is its simplicity - the wooden blocks are already formed in part of the future armchairs and sofas. Well, even the owner of a summer house or any other land plot who has not previously held a hammer in his hands can build a coffee table from pallets. Even building glue can be used to fasten the elements.


Another advantage of using construction flights for the manufacture of garden furniture is that you can get the material at a very low price or even free of charge, because we are talking about used products. It will only be necessary to take care of thorough cleaning of surfaces, leveling and slight polishing, impregnation of the material with antiseptics against decay.
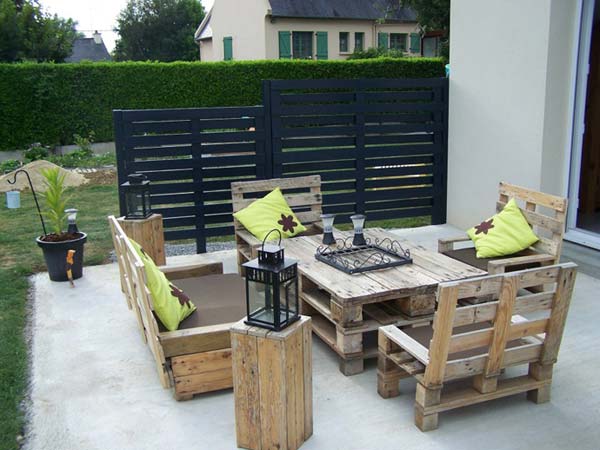


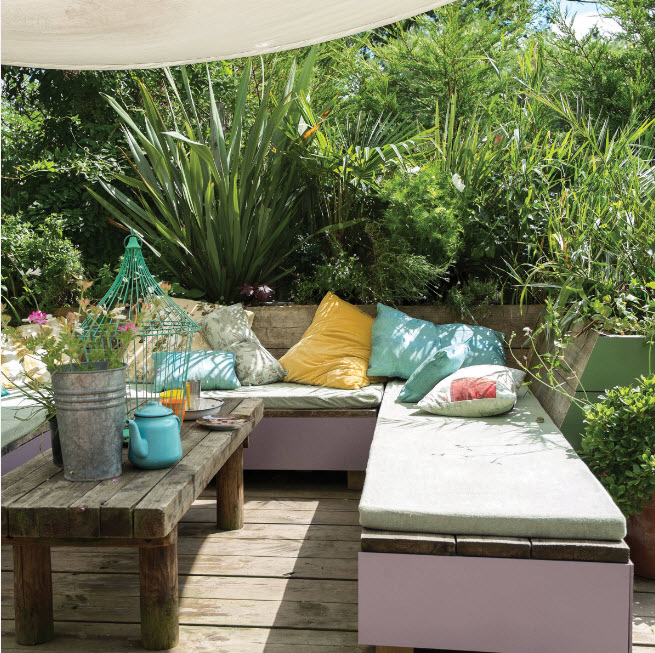
From building pallets, you can create whole compositions for outdoor recreation areas. It can be a spacious corner complex, composed of a sofa type, comfortable armchairs and a coffee table. It is enough to put soft pillows and seats in armchairs and sofas to arrange a living room environment right on a summer cottage or garden plot ...


With the help of wooden pallets, you can equip an area not only for relaxation, but also for sleeping. A summer bed or just a layer of construction pallets with a mattress is a great opportunity to create a bedroom in the fresh air - take care only of a canopy over the bed to protect from the sun.


It is easy to build a comfortable swing from old pallets. You can tie them on ropes or chains to the roof of a canopy and gazebo, on a terrace or just under a tall sprawling tree with thick branches.


A slightly less popular, but at the same time a practical way of arranging a summer cottage garden furniture is the use of building wooden coils. They can be used to make chairs…


