How to make a wardrobe with your own hands. Corner swing cabinets - varieties, drawings and tips for assembling with your own hands Corner cabinet with your own hands from chipboard drawings
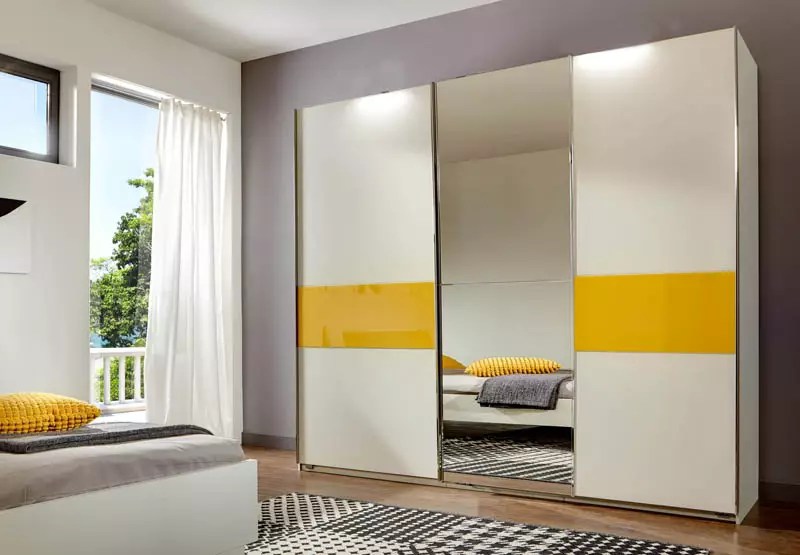
The sliding wardrobe saves space by itself, and if it is made in the corner, then this is the most good option... It does not attract too much attention to itself, leaves a lot of free space in the apartment, and how much you can put in it! It is quite possible to make comfortable corner wardrobe do it yourself.


Design features
Unlike its usual counterparts, the corner wardrobe is always designed as a stationary one. It is created according to the dimensions of a specific corner and does not imply its movement.

First you need to decide which corner cabinet you need. Basic types of construction:
- triangular;
- trapezoidal;
- L-shaped;
- "Five-wall".

In addition, cabinets can be built-in and cabinet. A built-in wardrobe is essentially a small pantry. The shelves in it are mounted directly on the walls, and the space is fenced off with a door. The cabinet cabinet has a plinth, a top cover and a back wall, at least made of thin fiberboard sheets.

The most "economical" for space is a triangular cabinet: it has no side walls. Its depth will be determined only by the width of the walls, which you are ready to "give up". The rest of the cabinets are a little more difficult to manufacture and will have additional depth.


If you decide to make a corner wardrobe with your own hands, it makes sense to use the entire space from floor to ceiling to ensure maximum capacity.
It is very important to take into account the peculiarities of the corner itself. If there are irregularities on the floor or walls, they must be leveled, because they can affect the operation of the mechanism sliding doors... In addition, experts recommend making all preliminary measurements only after leveling the walls and floor! Pay attention to the skirting board near the floor or under the ceiling - will it allow you to mount a cabinet?

Manufacturing is popular today radius cabinet, the facade of which is made in the form of a semicircle or a wave. Such furniture fits harmoniously into the most different interiors... Such a cabinet is especially good for large hallway and bedrooms. Very popular for the kitchen corner option from drywall - it is simple to perform and takes up very little space.

When you make drawings of the interior of such a cabinet, you need to take into account its purpose. If it is a closet for a hallway, it should have a bar for outerwear, shelves for shoes (possibly high for boots), shelves for hats and accessories, a place for umbrellas, gloves, etc. In the living room, a wardrobe can serve as a storage for books, documents, blankets and bedspreads, beautiful dishes. Accordingly, the main thing in it is the shelves. A small safe can also be envisaged. A wardrobe for a bedroom usually contains clothes, linen, bedding. A bar, and drawers, and shelves, and cells are appropriate in it.

Step-by-step instruction
After the diagrams and sketches of the cabinet are created and approved by your household, you can start making the cabinet. You will need the following materials and tools (sample list):
- furniture board;
- metal profile and roller mechanism for doors;
- fiberboard sheets for back wall(if it is supposed);
- boxes, doors, rods, hooks;
- fittings;
- bezels (if required);
- puncher;
- screwdriver;
- "Hexagon";
- "Level" (to assess the evenness of the shelves);
- glue, ruler, tape measure, pencil;
- triangle;
- screwdrivers, hammer;
- fasteners (bolts, confirmations, shelf supports, etc.)


According to the experience of many men who have already created cabinets with their own hands, it is best to entrust the sawing of boards and their external edging to professionals: give the material to the workshop, where there is special tool for precise cutting. They can also make original milling on the facades. You can independently "cut" shelves and parts for drawers - ie. internal filling of the cabinet.

If your closet is built-in, first of all you need to mark the boundaries on the floor where the doors will be. The same lines need to be applied to the ceiling. Then shelves and rods are screwed to the walls using a punch and other tools. The final touch the guides for the doors and the doors themselves are installed.

For cabinets with rear panels and a bottom, the base / plinth or podium of the cabinet is first assembled and installed. Then a long and responsible process begins - drilling holes. You must first carefully mark all the attachment points. Then you can drill. If the hole is made on a plane, an 8mm drill is required. For end holes - 5 mm, and its depth should not exceed 60 mm.

Each do-it-yourself cabinet is unique, so make universal description that suits everyone is impossible. But there are some general principles for assembling this type of furniture.
First, the cabinet frame is assembled - that is, its vertical walls and partitions, which are fastened together by horizontals - a plinth, top cover, etc. Then shelves and rods are screwed to the side walls. Drawer carriages are attached. A metal sliding door mechanism is attached at the top and bottom. After that, the back wall is attached (usually it consists of several sheets of fiberboard, cut to fit the sections of the cabinet). Then - drawers and doors are installed.

Ideally, the cabinet should be assembled “lying down” - that is, spreading the details on the floor. This makes the assembly more likely to be accurate. But this is not always possible due to limited space. In addition, a tall cabinet that almost reaches the ceiling can be very difficult to lift. The main rule of "standing" assembly is to collect all the parts from the bottom up - the base, side walls and partitions, then - the shelves, etc.

Carefully thought out sketch, good scheme, a little patience and precision - and your own corner cabinet will delight you for many years!

The wardrobe, invented in the USA, began to be widely used as the main type of storage for household items and clothes. In our country, this type of furniture appeared only in the middle of the last century. This is surprising because many of us have lived in small apartments, in which its advantages are obvious.
Planning a corner wardrobe with distribution of space for storing things and shoes.
Domestic craftsmen were in no hurry to make a wardrobe with their own hands. The reason is that the case version, apart from sliding doors instead of swing doors, has no other advantages over the wardrobe we are used to.
It is much easier to make a built-in wardrobe with your own hands. To make it, it will take significantly less material, and even an inexperienced carpenter can make such a compartment on his own. With a smaller occupied area of the room, such a storage option will have a larger volume than a hull one.
Sliding wardrobe device: distinctive features

Drawing of a corner wardrobe with dimensions.
The sliding doors of the first wardrobes produced by our industry did not have rollers for movement. There was a longitudinal spike at the bottom, along which the door moved, which had a groove along the lower end.
Such simplest design was reliable enough. Its disadvantage was that it was necessary to apply great efforts to move the doors, because the cabinet itself and the doors were made of heavy material, such as chipboard at that time.
You can make a sliding wardrobe with your own hands built-in or in a conventional mobile version. The corner cabinet can also be made built-in or cabinet on your own.
A do-it-yourself corner wardrobe must be made with reference to a specific place.
In terms of it, it can have the shape of a triangle, a trapezoid, be L or U-shaped. From other types, a five-wall can be distinguished. This design has the shape of a pentagon with 3 straight and 2 obtuse corners.
This diversity is the versatility that the corner wardrobe has. If everything is clear with other forms, then the five-wall requires clarity. This version of the sliding wardrobe, taking up few large area, much more spacious than, for example, a triangular counterpart.
Stages of preparation for the manufacture of a five-wall
When making a wardrobe with your own hands, do not try to saw at home sheet material, from which the side walls and doors will be made. It is almost impossible to manually achieve the required dimensional accuracy, especially for a corner wardrobe. Having decided on the dimensions of its sides and doors, it is advisable to use the services of a workshop, where it is possible to provide the required cutting accuracy. It is also desirable to process the ends there, which will be visible from the outside. The elements located inside the cabinet can be made by yourself.

Assembly diagram of a compartment door for a corner cabinet.
Before doing corner compartment do it yourself, check the installation site. This is especially important for the inline version. Any unevenness in the floor or ceiling where the doors will move must be repaired. Otherwise, there will be problems with the installation of guides for moving the doors.
Make sure not electrical outlets and other elements that may affect the installation of the wardrobe with your own hands. Take into account the dimensions of the skirting boards and, if available, the moldings on the walls under the ceiling.
It is impractical to save on the sliding door system. More expensive Italian or German designs will pay off due to their reliability and long-term operation.
It makes no sense to show the specific design of the carriages. There are a lot of them, and each of them has its own characteristics during installation. First you need to figure out how to mount: the dimensions of the cabinet elements will depend on this. More reliable is the option of doors with an upper running carriage. At the bottom of the door there will be a roller moving along a guide.
Before you start making a wardrobe with your own hands, you should have an appropriate tool. In the manufacture of the built-in version, a perforator drill is required. You will need a power tool to screw in the screws. It is advisable to have a manual circular saw with a guide fence. A hand saw will also work.
You will need an angle clamp, a tape measure, a stapler, a soft and hard hammer, a drill with a set of drills, a hex wrench for screwing in confirmations. Confirmation drills are required to drill holes for confirmations to the specified depth. For simple drills a limiter can be used.
It is necessary to purchase dowels, shelf supports and screws.
Drilling holes in chipboard is the main operation when assembling furniture

Diagram of the device of the corner wardrobe compartment.
Confirmates are used to fasten panels made of chipboard for furniture. Usually, confirmations with a size of D × L = 6.4 × 50 mm are used for furniture. This mount has d = 4.4 mm. The hole diameter for it should be in the range of 4.5-5 mm. With a larger diameter, the fastening will not be reliable, with a smaller diameter, the confirmation can destroy the fiberboard material.
For drilling holes, special drills are used, which are drilled to a depth of L and provide appropriate dimensions in the upper part of the confirmation (H and h). After countersink the surface of the plate under the cap. The confirmat is screwed in, without applying great effort, with a special hex wrench.
3 drilling options:
- full thickness drilling;
- drilling at the end;
- drilling in 2 pieces at the same time.
Another, the most difficult option is drilling for dowels. General condition for all types of drilling is the perpendicular position of the drill to the surface.
Let's consider the drilling option in 2 details. The parts are applied to each other and secured with an angle clamp or other device. After that, markup and drilling are performed. This option is the fastest and most accurate. To determine the mark by the thickness of the chipboard, it is advisable to make it out of wood or aluminum corner sample. If the chipboard thickness is 16 mm, then the center of the hole in the template should be exactly in the middle.

Options for corner wardrobes.
If the parts are connected so that the holes are drilled separately, then the strength of the fastening depends on the accuracy of the marking. So you have to drill when connecting parts to dowels. For example, to install the cabinet lid on the dowels, holes are first made in it with a drill with a diameter of 8 mm with a stop that does not allow drilling through it. Holes from the edge of the cover are drilled taking into account the indentation of the sidewalls, if provided. With the same drill, holes are made in the sidewalls to a depth of 20 mm. It depends on the accuracy of the marking whether the dowels will fall into the holes. The dowels are put on the glue at the ends. When assembling, the masters do not recommend pouring glue into the holes on the lid, you may have to disassemble the cabinet.
It is especially easy to assemble a built-in wardrobe, which will have only 2 sides fixed perpendicular to the wall. These parts are securely attached to the ceiling, floor and wall using corners. The corner is fixed to the base using plastic dowels and self-tapping screws or screws. The sidewall is attached to the corners with self-tapping screws. Between these elements it is necessary to fix the door movement system.
With proper preparation, problems with the assembly of the cabinet should not arise.
have recently become one of the most common pieces of furniture. This design provides a comfortable experience. Most often they are not purchased in finished form, but are made to order. But if there is a possibility and necessary materials you can make a furniture set yourself. Before starting work, you need to decide on the number / location of shelves and drawers... It is also important to plan the structure taking into account the dimensions of the room. In any case, all these points need to be studied before making a wardrobe with your own hands. Drawings in this case are a kind of starting point, and our today's review will help you cope with this rather difficult task with a minimum of errors.
Feature furniture designs of this type are those that allow you to save usable space in the room. At the same time, sliding doors for a wardrobe can be glass, mirrored, rattan, plastic or bamboo.
So, let's consider the main advantages of furniture sets:
- a variety of designs: built-in, rectilinear, hull and;
- furniture sets allow you to effectively use even small space... This perfect solution for small rooms. At the same time, mirror surfaces allow you to visually increase the space;
- conciseness of designs;
- filling wardrobes. Such furniture sets allow you to hide everything unnecessary. They are used not only for clothing, but also for various household accessories and small-sized appliances;
- models can be built-in, cabinet and mezzanine;
- the wall of the room, as well as the floor or ceiling, can be used as the walls of the cabinet;
- sliding wardrobes are made to order;
- the possibility of self-design.

Some disadvantages are worth noting:
- quick wear of the sliding system;
- high-quality internal filling of the cabinet is required;
- aluminum profile can be deformed;
- requires careful maintenance: cleaning all surfaces and guides.
For your information! To prevent the door from leaving the rail, a schlegel for sliding wardrobes is used at the joints and ends. It needs to be glued, which will create shock absorption when the doors are suddenly opened.
Types of wardrobes
Consider the main types of wardrobe:
- embedded models that do not have a floor, back wall and ceiling. These headsets cannot be moved or repositioned. They consist of side walls, shelves and internal partitions. Built-in models are custom made, but can be purchased and individual elements for self-assembly;
- freestanding sliding wardrobes are equipped with doors that move on a rail. This structure has a floor, a back wall and a ceiling;
- corner headsets are suitable for small spaces. It is compact but very spacious inside. Corner design suitable for small rectangular room or a square hallway;
- diagonal angular take up the entire corner. Such designs are more spacious and look stylish. Inside, you can hide not only a wardrobe, but also bed linen, as well as blankets.


Materials for the wardrobe
Before you start making a corner cabinet or any other with your own hands, decide on the material.
Tree
For durable headsets, choose solid wood. It is a prestigious material for furniture. It should be borne in mind that wood is not the most the best way for the built-in wardrobe. The humidity level is higher in the niche. For a cabinet made of wood, it is necessary to carefully select wood without cracks and knots. The sash frames are also made of wood. In this case, it is necessary to glue together.
Wood headsets have the following advantages:
- environmental friendliness of the material. The tree does not contain toxic components;
- increased level of wear resistance;
- aesthetics of products. Wood furniture is distinguished by natural colors and unique patterns;
- naturalness of the material;
- the ability to carry out restoration work;
- ergonomic use of space;
- variety of styles.
Drywall

One of the popular materials is that made from pressed wood shavings. A thermosetting synthetic resin is used to create a dense composition. This material is easy to process.

When working with plywood, consider the softness of the material. Products can deform when twisted. It is recommended to use washer-shaped gaskets for such connections.
Film faced plywood is also popular. At the same time, plastic reduces the effect of formaldehyde in resins.

Furniture panels
The best material for homemade designs are furniture boards... This material is known for its durability, environmental friendliness and reliability.
It is worth noting the following advantages of using this material:
- significant funds are not required;
- you can bring to life unusual design ideas;
- the product may have various forms and construction;
- for a furniture set, you can choose functional fittings.

The location of the wardrobe in the room
Before you start creating a wardrobe with your own hands in the hallway or in another room, it is worth considering its location.
If you put the headset along a solid wall, then the furniture itself will be perceived as a wall. Better if the cabinet is up to the ceiling. Doors can be mirrored, which allows you to visually enlarge the room.

If you place two identical cabinets along the wall and leave a distance between them, you get an alcove. You can put or in the resulting niche. In the living room, an alcove can be used to create an area with a false fireplace.

A practical solution will be and installation of the headset along the edges of the door and window openings... A mezzanine can be installed above the opening. The cabinet can be recessed into specially created niches. If the size of the room allows, then it can be small.
Depending on the particular style of decoration of the room, it is not necessary to make built-in wardrobes or mask them. For a retro or glam vintage style, bulky furniture will only complement the colorful design.

It is also necessary to choose the right sliding mechanism for the wardrobe. It shouldn't be noisy.
Hallway


Children
A lot of things need to be placed in the children's room. These are seasonal clothes and shoes, children's toys, board games and Sports Equipment... In addition, you need to find a place for books, notebooks and bedding.
The sliding wardrobe is a spacious set in which all things and objects can be placed. The doors of this piece of furniture move apart to the sides, which does not take up much space.
Keep in mind that cabinet furniture is selected for children, so the shelves must be at the required height. It is important that there is no sharp corners on the ends of shelves and racks. For each thing, it is necessary to take a certain place, so the child will quickly learn to order.
Note! When ordering from outside, as a rule, it is not possible to control material consumption.
It is important to choose high-quality fittings, it depends on correct adjustment sliding wardrobe doors. Doors should not jam and slide out. Sliding systems consist of a profile and a sliding support. Roller mechanisms can be axial or bearing.

Choice of cabinet filling
The internal content helps to decide what the layout will be. Do not place the outerwear section in the center, as moisture from it can spread to the sides. It is better to place this compartment on the side. Bedding boxes are not recommended to be placed directly above the floor.

How to correctly arrange the elements and how to assemble a wardrobe with your own hands can be seen in the video below:
The number and dimensions of doors, guides, rollers for wardrobes
Choosing guides for the wardrobe, Special attention devote to the material of their manufacture. The lowest cost is plastic profile, but it has little reliability and short service life. The best solution will be the use of combined rail guides, in which the bearing surface for the rollers is made of metal.
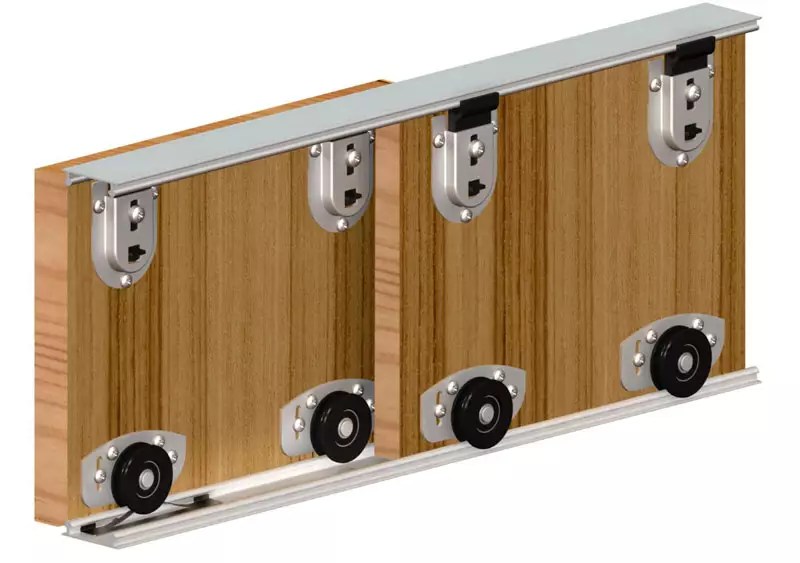
Steel profile for sliding doors has increased reliability. Furniture rails are made of aluminum famous brands.

The rollers are made of metal, since plastic is not durable. The roller contains a ball-bearing internal mechanism that allows the doors to move freely in the horizontal direction.
Do-it-yourself wardrobe and compartment door assembly
We suggest that you familiarize yourself with the process of assembling a wardrobe with your own hands in the table below:
| Photo | Description of work |
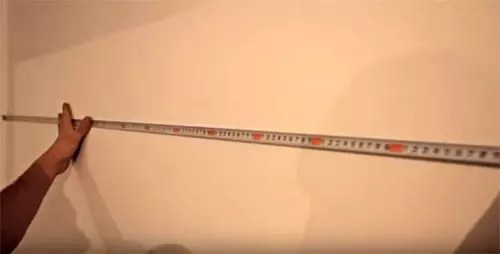 | To assemble the wardrobe, it is necessary to apply the markings. It should be noted the dimensions of the cabinet in width and location vertical rack... The heights at which the shelves will be fixed are marked. |
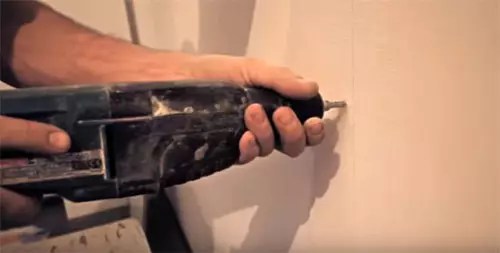 | We drill holes for dowels. |
 | The profile is put on before installation. |
 | We install a vertical stand. |
 | We apply the markings for the mezzanine shelf and install it. |
 | A side wall is installed. |
 | The markup for the shelves and their installation are performed. |
 | Marked by size and installed a bar for clothes. |
 | False panels are installed. |
 | One panel is fixed at the bottom. |
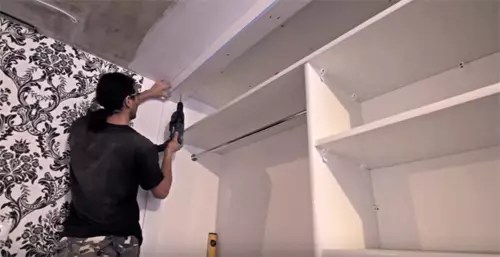 | The supporting upper part is attached. |
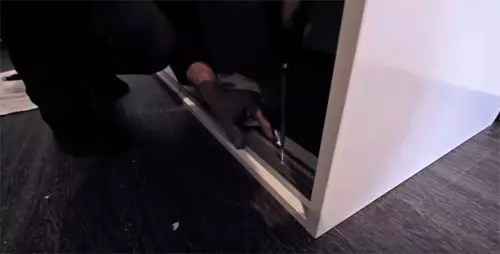 | The lower guide is fixed with a screw. |
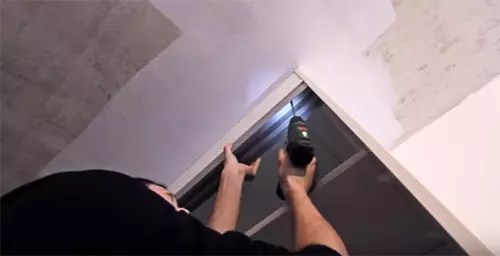 | The upper rail is attached in the same way. |
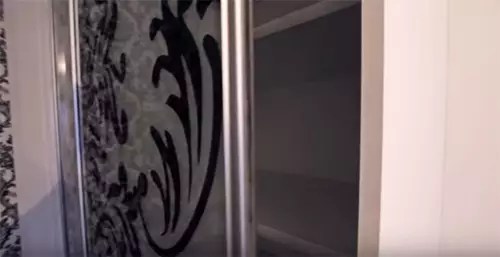 | Doors are being mounted. |
The process is presented more clearly in this video:
Interesting solutions for sliding wardrobes: photo examples
Do not forget about the decor of the furniture set. Pilasters can be used as decoration. These elements are made of solid wood or MDF. A furniture cornice can be installed on the roof. An interior baguette is used for decoration. You can choose a baguette of different shades. Furniture with photo printing also looks stylish.

Article
A corner cabinet with your own hands can be made in one day or even in a few hours. It all depends on the skills of the performer, the quality of the instrument used. This task is within the power of even a beginner who has never dealt with the creation of furniture.
A corner wardrobe is a convenient piece of furniture that allows you to store things while saving space. The dimensions of the product depend on where you plan to install it. For example, for small room make narrow products with swing doors, and if there is enough space, you can afford a full-fledged wardrobe.
Tools, materials and general working principle
The work will need the following tools and Consumables:
- joinery boards (humidity not more than 15%), chipboard or drywall;
- screwdriver;
- jigsaw;
- sandpaper or angle grinder;
- paints and varnishes and a tool for their application;
- furniture conductor;
- dowels;
- wood glue or PVA;
- hinges or guides, depending on the selected type of opening;
- door handles and other accessories;
- furniture edge (for chipboard);
- plywood or fiberboard (for the back wall);
- measuring instruments.
A corner cabinet with your own hands can be made of wood, chipboard or drywall. The principle of work with the first two materials is the same, the only difference is that chipboard does not require additional processing... A drywall cabinet will cost as cheaply as possible, but you need to create a clear drawing that will correspond to a specific installation site.
Wardrobe made of wood or chipboard: step-by-step guides
The number, height and location of the shelves can be changed at your own discretion. The presented drawings assume the possibility of choosing doors - you can make both swing and sliding doors.


Regardless of which drawing is selected, there is a general working order. Step-by-step instruction:
- Preparation of parts.
- Wall blank.
- The canvases are cut in accordance with the dimensions that the selected schemes offer.
- Wood materials leveled if necessary, then sanded.
- Holes are made on the canvases for the subsequent fastening of the parts together with screws. For this, a furniture conductor is used - it will allow you to clearly observe the indents, to prevent the mismatch of the grooves.
- If there are shelves in the wall, then the easiest way to attach them is to put them on dowels. Blind holes are made for them in the walls. The depth is half the length of the dowel. Installation is done with glue.
- Wooden walls are covered with paintwork materials. If the cabinet is made of chipboard, then on the end you need to attach furniture edge- a special tape that will protect the material from moisture ingress.
- Manufacturing of shelves and other cabinet parts. The work is done in the same order.
- Wall blank.
- Assembling the cabinet. If all the parts are made correctly, then the assembly will not be difficult.
If you are making a cabinet out of wood, then it is important not to rush and let it dry. paintwork.

How to make a drywall cabinet
Only a built-in wardrobe can be made of drywall. This material is not structural, but finishing, its sheets cannot be fastened together - any connection will turn out to be unreliable. Therefore, plasterboard furniture is created on a different principle than furniture made of wood or chipboard. First of all, a frame is created, onto which the material is subsequently sewn.
In work you will need:
- Screwdriver.
- Metal corners. You can also use wooden slats, but it is more labor intensive and less reliable.
- Electric jigsaw.
- Hardware.
- Fasteners for connecting metal corners.
- Measuring instruments, level.
- Paint and tools for its application.

Instructions:
- Planning. It is necessary to create a drawing for a specific installation location. In this case, you can use existing drawings. Diagrams should be as detailed and accurate as possible. If you cannot make them yourself, it is better to ask a specialist.
- Markup. Most important stage work. It should be noted the location of all frame rails. The "evenness" of the future cabinet directly depends on the accuracy of the marking. Therefore, everything needs to be drawn, controlling the level. It should be remembered that measuring seven times is much easier and faster than assembling a curved cabinet, and then dismantling it and doing all the work again.
- Assembling the frame. The corners are attached to the walls with self-tapping screws, they are fastened to each other using special mounts... Everything needs to be controlled by the level. At this stage, the curvature can still be corrected.
- Backlighting. If it is provided, then before creating the case, it is necessary to conduct all the wires, draw conclusions for the light bulbs.
- Corpus creation.
- Drywall is cut to fit with a ruler using a sharp knife.
- Patching drywall sheets. They are attached using special self-tapping screws gypsum-metal or gypsum-wood (depending on what the frame is made of).
- Strengthening the corners. They are the most vulnerable point of the design. So that the cabinet does not break off at the edges, and gypsum dust does not appear in the house, it is necessary to protect it with a corner metal profile. A layer of plaster is placed on top of it.
- Doors are made of chipboard or wood. It is better to give preference to a wardrobe, since it is more problematic to fasten the hinges. After the products are created, the guides are installed and the doors themselves are installed on them.
- Painting the product in the desired color.
The wardrobe, invented in the USA, began to be widely used as the main type of storage for household items and clothes. In our country, this type of furniture appeared only in the middle of the last century. This is surprising because many of us have lived in small apartments in which its benefits are evident.
Domestic craftsmen were in no hurry to make a wardrobe with their own hands. The reason is that the case version, apart from sliding doors instead of swing doors, has no other advantages over the wardrobe we are used to.
It is much easier to make a built-in wardrobe with your own hands. To make it, much less material is required, and even an inexperienced carpenter can make such a compartment on his own. With a smaller occupied area of the room, such a storage option will have a larger volume than a hull one.
Sliding wardrobe device: distinctive features

The sliding doors of the first wardrobes produced by our industry did not have rollers for movement. There was a longitudinal spike at the bottom, along which the door moved, which had a groove along the lower end.
This simple design was quite reliable. Its disadvantage was that it was necessary to apply great efforts to move the doors, because the cabinet itself and the doors were made of heavy material, such as chipboard at that time.
You can make a sliding wardrobe with your own hands built-in or in a conventional mobile version. The corner cabinet can also be made built-in or cabinet on your own.
A do-it-yourself corner wardrobe must be made with reference to a specific place.
In terms of it, it can have the shape of a triangle, a trapezoid, be L or U-shaped. From other types, a five-wall can be distinguished. This design has the shape of a pentagon with 3 straight and 2 obtuse corners.
This diversity is the versatility that the corner wardrobe has. If everything is clear with other forms, then the five-wall requires clarity. This version of the sliding wardrobe, occupying a slightly larger area, is much more spacious than, for example, a triangular analogue.
Stages of preparation for the manufacture of a five-wall
When making a wardrobe with your own hands, do not try to saw at home the sheet material from which the side walls and doors will be made. It is almost impossible to manually achieve the required dimensional accuracy, especially for a corner wardrobe. Having decided on the dimensions of its sides and doors, it is advisable to use the services of a workshop, where it is possible to provide the required cutting accuracy. It is also desirable to process the ends there, which will be visible from the outside. The elements located inside the cabinet can be made by yourself.

Before making a corner coupe with your own hands, check the installation site. This is especially important for the inline version. Any unevenness in the floor or ceiling where the doors will move must be repaired. Otherwise, there will be problems with the installation of guides for moving the doors.
Make sure that there are no electrical outlets and other elements that may affect the installation of the wardrobe with your own hands. Take into account the dimensions of the skirting boards and, if available, the moldings on the walls under the ceiling.
It is impractical to save on the sliding door system. More expensive Italian or German designs will pay off due to their reliability and long-term operation.
It makes no sense to show the specific design of the carriages. There are a lot of them, and each of them has its own characteristics during installation. First you need to figure out how to mount: the dimensions of the cabinet elements will depend on this. More reliable is the option of doors with an upper running carriage. At the bottom of the door there will be a roller moving along a guide.
Before you start making a wardrobe with your own hands, you should have an appropriate tool. In the manufacture of the built-in version, a perforator drill is required. You will need a power tool to screw in the screws. It is advisable to have a hand-held circular saw with a fence. A hand saw will also work.
You will need an angle clamp, a tape measure, a stapler, a soft and hard hammer, a drill with a set of drills, a hex wrench for screwing in confirmations. Confirmation drills are required to drill holes for confirmations to the specified depth. For simple drills, a stop can be used.
It is necessary to purchase dowels, shelf supports and screws.
Drilling holes in chipboard is the main operation when assembling furniture

Confirmates are used to fasten panels made of chipboard for furniture. Usually, confirmations with a size of D × L = 6.4 × 50 mm are used for furniture. This mount has d = 4.4 mm. The hole diameter for it should be in the range of 4.5-5 mm. With a larger diameter, the fastening will not be reliable, with a smaller diameter, the confirmation can destroy the fiberboard material.
For drilling holes, special drills are used, which are drilled to a depth of L and provide appropriate dimensions in the upper part of the confirmation (H and h). After countersink the surface of the plate under the cap. The confirmat is screwed in, without applying great effort, with a special hex wrench.
3 drilling options:
- full thickness drilling;
- drilling at the end;
- drilling in 2 pieces at the same time.
Another, the most difficult option is drilling for dowels. A common condition for all types of drilling is the perpendicular position of the drill to the surface.
Let's consider the drilling option in 2 details. The parts are applied to each other and secured with an angle clamp or other device. After that, markup and drilling are performed. This option is the fastest and most accurate. To determine the mark by the thickness of the chipboard, it is advisable to make a template out of wood or aluminum corner. If the chipboard thickness is 16 mm, then the center of the hole in the template should be exactly in the middle.

If the parts are connected so that the holes are drilled separately, then the strength of the fastening depends on the accuracy of the marking. So you have to drill when connecting parts to dowels. For example, to install the cabinet lid on the dowels, holes are first made in it with a drill with a diameter of 8 mm with a stop that does not allow drilling through it. Holes from the edge of the cover are drilled taking into account the indentation of the sidewalls, if provided. With the same drill, holes are made in the sidewalls to a depth of 20 mm. It depends on the accuracy of the marking whether the dowels will fall into the holes. The dowels are put on the glue at the ends. When assembling, the masters do not recommend pouring glue into the holes on the lid, you may have to disassemble the cabinet.
It is especially easy to assemble a built-in wardrobe, which will have only 2 sides fixed perpendicular to the wall. These parts are securely attached to the ceiling, floor and wall using corners. The corner is fixed to the base using plastic dowels and self-tapping screws or screws. The sidewall is attached to the corners with self-tapping screws. Between these elements it is necessary to fix the door movement system.
With proper preparation, problems with the assembly of the cabinet should not arise.

