Small pond in the garden. How to arrange a pond in your own country house
The idea to dig a pond on my site came to me a few years ago. But, since this work is time-consuming and not easy in terms of a creative approach, its start was postponed for a long time. Finally, during another vacation, I decided to get down to business and follow step by step all the steps necessary to create a pond. It was decided to make the pond film, with a geotextile lining. Plant it with plants and get fish. Install an aerator for fish. Water circulation is also planned due to a small waterfall with three cascades. It was made initially, even before digging a foundation pit for a pond, from a pile of stones laid on a man-made clay hill. Water will be circulated in a closed circle from the pond to the waterfall using an inexpensive bottom pump.
That's all the original data. Now I will proceed directly to the story of the construction of the pond, trying not to miss the details.
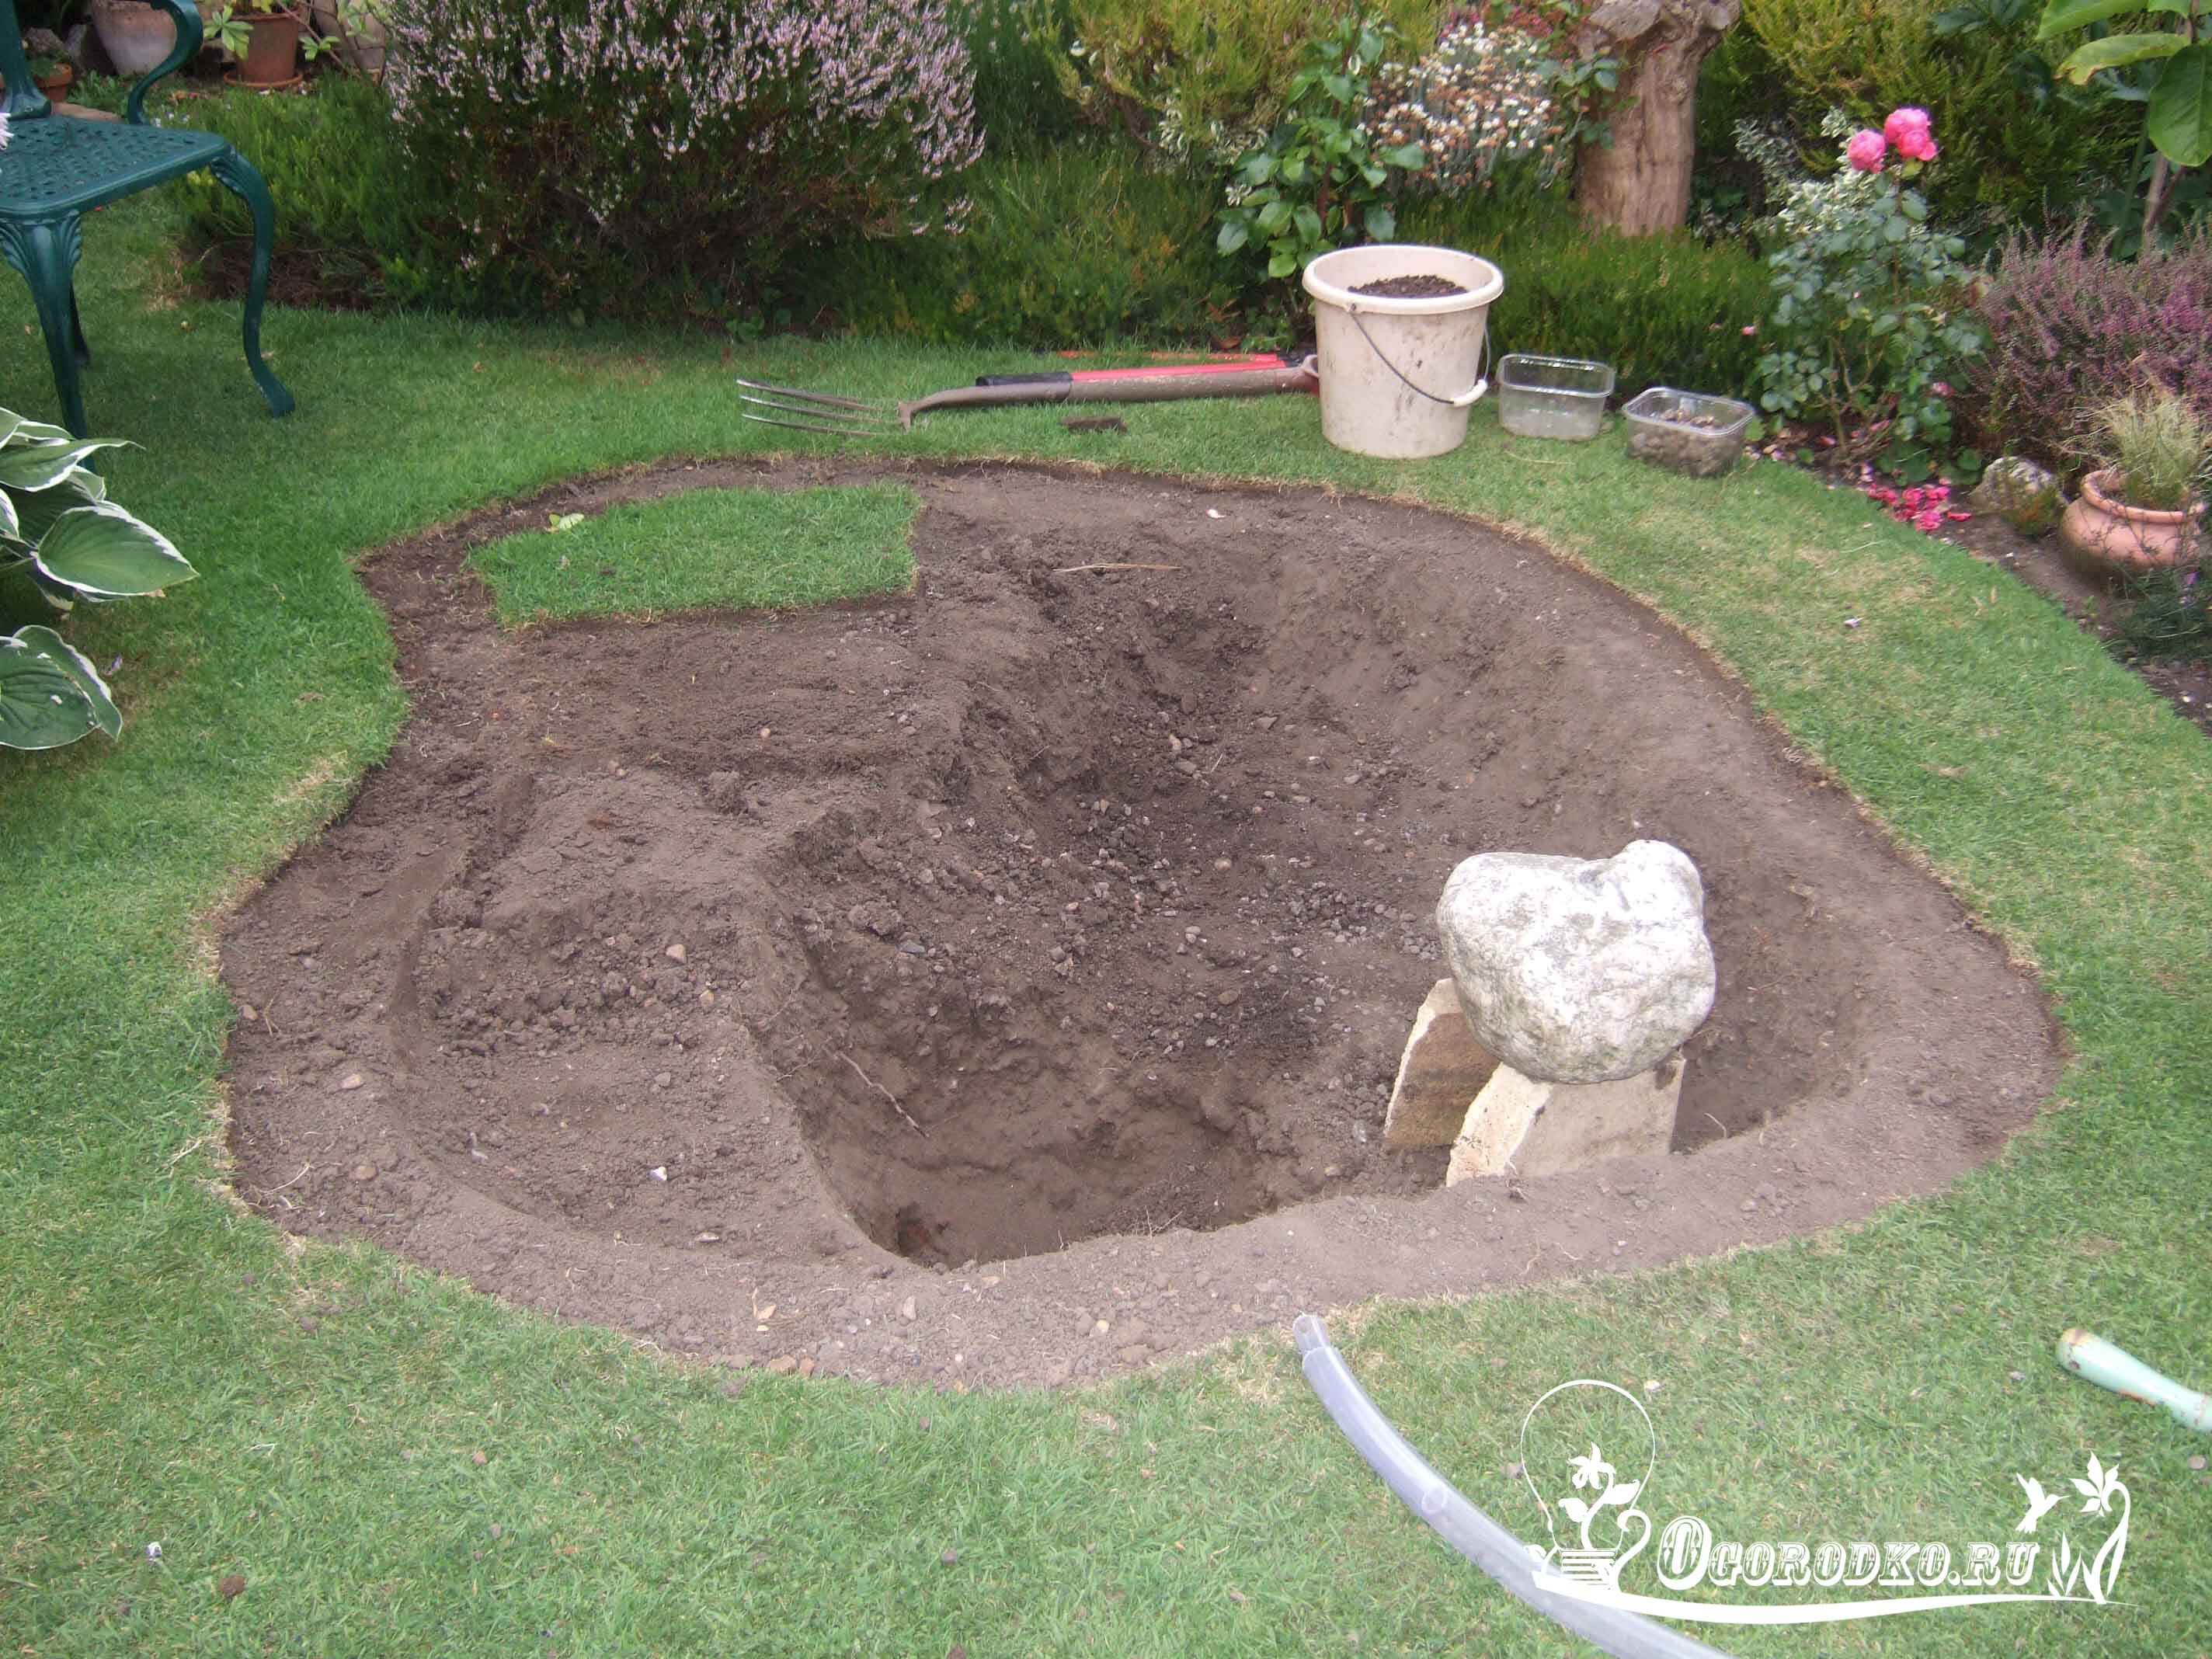
First of all, I took a shovel and dug a pit with dimensions in terms of 3x4 m. I tried to make a natural, rounded shape, without sharp corners. Indeed, in nature, coastlines are always smooth, without straight lines, such must be adhered to when creating artificial pond. At its deepest point, the pit reached 1.6 m below ground level. It could be done less, but in my case it is supposed to breed wintering fish, which requires a minimum of 1.5-1.6 m.
On the rise of the pit, 3 terraces were made. The first (shallow) - at a depth of 0.3 m, the second - 0.7 m, the third - 1 m. All are 40 cm wide so that it is possible to install pots with plants on them. Terracing is performed for a more natural look of the water surface. And also for the placement of aquatic plants, the number of terraces and their depth will depend on the type of which. You need to think about this in advance. For planting cattail, for example, you need a depth of 0.1-0.4 m, for nymphs - 0.8-1.5 m.
The pit for the pond should be multi-level, with several terraces
Stage # 2 - laying geotextiles
The pit was dug, stones and roots were taken from the bottom and walls. Of course, you can immediately start laying the film, but this option seemed too risky to me. Firstly, seasonal ground movements can cause the pebbles that were in the thickness of the soil to change their position and break through the film with sharp edges. The same will happen if the roots of trees or shrubs growing nearby reach the film. And the last factor - there are mice on our site that dig underground passages and, if desired, can easily get to the film. Need protection. Namely, geotextiles. It just will not allow rodents, roots and other unpleasant factors to damage the film.
I bought geotextile 150 g / m 2, carefully laid it out and brought the edges a little to the shore (about 10-15 cm - as it turned out). Temporarily fixed with stones.

The geotextile is laid with the edges on the shore
Stage #3 - waterproofing
Perhaps the most important stage is the creation of waterproofing. They can be neglected if the hydrogeological conditions of your site allow you to create natural reservoirs. But such cases are very rare and it is better not to take risks, so that later you do not have to redo everything.
So, waterproofing is needed. In my case, this is a dense butyl rubber film specially designed for ponds and reservoirs.
I would like to dissuade you from using polyethylene films, sold in ordinary hardware stores and used for upholstery of greenhouses. Especially if your pond is big enough. Such isolation will lie for 1-2 years, then, most likely, it will leak and you will have to redo everything. Extra headache and expenses are secured. You need a special film, for ponds - PVC or butyl rubber. The last option is the highest quality, the strength of the butyl rubber film is enough for 40-50 years for sure, and maybe even more. The advantage of rubber waterproofing is that it stretches perfectly. The pressure of the water in the pond will sooner or later lead to subsidence of the soil. The film in this case is stretched. PVC may crack or come apart at the seams. Butyl rubber will simply stretch like rubber, it can withstand significant stretching without consequences.
I calculated the dimensions of the film needed for my pond as follows: the length is equal to the length of the pond (4 m) + double the maximum depth (2.8 m) + 0.5 m. The width is determined in the same way.
I spread the film over the geotextile, bringing the edges 30 cm to the shore. I tried to smooth out the folds on the bottom and walls, but I didn’t really succeed in this. Decided to leave it as it is. Moreover, the folds will compensate for temperature changes and it is not necessary to pull it too tightly.

A pit lined with butyl rubber will hold water in the pond
After laying out, it is necessary to fix the edges of the film. It is impossible to leave them open on the ground, since water will get between the film and the walls of the pit. Inevitably, the appearance of water bubbles, due to which the film will have to be removed. And this is very difficult, especially with large pond sizes.
I decided to dig in the edges of the film and thus firmly fix them. At a distance of 10 cm from the edges of the pond, I dug a groove, 15 cm deep. I laid the edges of the film inside and covered them with earth. From above he overlaid the whole thing with sod. It turned out to be a real coastline overgrown with grass!
Stage # 4 - running water
Now you can run water. I threw a hose into the pit and pumped water from the well with a pump. Water was collected for several hours. As the folds of the film were filled, they were knocked down, they had to be straightened. But in the end, the stretch turned out to be quite uniform.

A pond filled with water must settle for some time to establish a biobalance
And one more important detail which is worth mentioning. Together with clean water from the well, I poured a bucket of water from a natural reservoir into the pond. This is necessary to accelerate the formation of biobalance. In other words, water from a reservoir with an already existing biosphere will help to quickly establish the same in a new pond. There will be no balance, the water will become cloudy and green in a matter of days. And soon it will not resemble a pond, but a swamp with a greenish slurry. Plants planted in the water at the bottom will also contribute to the activation of the biosystem.
I immersed the pump to a depth of 0.5 m, it supplies water to the upper cascade of the waterfall and to a small garden fountain. Separation of water is regulated directly on the pump.

The circulation of water in the pond occurs due to the fountain and waterfall
Stage #5 - planting plants and launching fish
Plants are a separate issue. I wanted to plant a lot of things so that the pond immediately, from the first days, created the appearance of a natural, natural reservoir. So I went to the market and picked up marsh irises, callas, water hyacinths, a few nymphs. For landscaping the coast, I took a couple of bushes of lobelia, loosestrife, and white calla lilies.
Upon arrival, this seemed not enough to me, so I made a trip to the nearest pond (from which I drew water for biobalance) and dug out several young cattail bushes. It will grow and purify the water. It is a pity that there is nothing more suitable in this pond. And then you wouldn't have to buy anything. Perhaps you will be more lucky and in the nearby pond you will find all the plants for planting your own pond. After all, almost all aquatic plants grow in our natural waters. With some luck, you can find and pick sedge, cattail, yellow irises, calamus, derbeinik, yellow egg capsules and much more.
On the upper terrace I placed balcony boxes and baskets planted with cattails, callas, water hyacinths, marsh irises. Planted in heavy fertile soil, covered with pebbles from above so that the fish would not drag the soil and pull out the roots.
I planted nymphs in baskets - I have 4 of them. He also covered the top with pebbles. I placed the baskets on the middle terrace, the one that is 0.7 m deep. Then, as the stem grows, I will lower the basket lower until I set it permanently 1-1.5 m above the water level.

In shallow water, aquatic plants are planted in baskets and boxes

Nymphaeum flowers last only a few days, then close and fall under water.
Lobelia and loosestrife were seated along the coastline. I also dug calla bulbs there. The loosestrife very quickly began to lower its branches directly into the pond. Soon the film on the rise will not be visible! Everything will be overgrown with grass, loosestrife, calla and other planted plants.
At first, the water in the pond was clear as a tear. Thought it would be like that. But, after 3 days, I noticed that the water had become cloudy, the bottom was no longer visible. And then, a week later, she became clean again - a biological balance was established. I waited another two weeks and decided that it was time to release the fish - all the conditions for her living were created.
I went to the bird market and bought some suitable specimens of comets (almost gold fish) and carp - gold and silver. Only 40 fish! Released everyone. Now they frolic near the fountain.

The pond with running fish looks magical!
For a comfortable stay of the fish, an aerator was connected. The compressor is 6 W, so it works constantly, it is not expensive in terms of electricity consumption. In winter, an aerator is especially useful. Saturation of water with oxygen and polynyas will be provided.
This master class can be completed. I think it turned out very well. Most main indicator this - pure water. As such, I don't have mechanical filtration. The balance is regulated by many plants, an aerator, water circulation through a waterfall and a fountain using a pump.
In terms of finances, most of the funds went to butyl rubber film. I dug the foundation pit myself, if you have to pay an excavator or a team of diggers, then the hole will be dug out quickly. Plants are not too expensive (and if they are taken from a natural pond, then they are generally free), fish are too.
So everything is real. If you are not afraid of significant labor costs (especially for digging a pit) and the need for a creative approach - go ahead. As a last resort, if you are unlucky with a designer vein, look through photographs of ponds in magazines or on the pages of specialized sites. Find something you like and try to make something similar for yourself. And then - enjoy the result and your own pond on the site.
Ivan Petrovich
01.03.2016
45 771
How to make a pond in the country with your own hands - stepwise technology and mistakes

Beautiful decorative ponds, photos and pictures of which can be seen everywhere, have become an integral part of many garden and summer cottages. However, not everyone knows how to make such an ornament with their own hands. The pond is an element of decor, a place where they relax, get distracted from the bustle of the city. Water is the most the best remedy from stress. Recommendations, a photo gallery, tips for arranging will help you overcome the steps on the way to the beautiful, serene, and also teach you how to ennoble your home area with minimum investment. The arrangement of a pond in the yard, its design will not take you much time.
What style to choose, where to place?
The initial stages of the improvement of the reservoir are important and necessary. Thoughtful styling in harmony with landscape design will be the basis for creating a reservoir. You need to choose a style in accordance with the architecture of the house, buildings. In the interior of the garden, you can arrange a formal version (correct geometric shape), or a free natural reservoir, forming an integral composition with other decorative elements.
Formal views are the main decorative element in the garden. They are suitable for small and large areas, there are different sizes are placed in the center. Free reservoirs are equipped in arbitrary forms, giving a natural natural look hiding artificiality.
 do-it-yourself pond in the country - in the photo
  small pond in the country with their own hands
 in the photo - a pond on suburban area
  in the photo - a pond in the garden
Choosing Japanese style, remember, stone, water and lanterns are the basis of the image. Think in advance of the shape, location. Bonsai-style trees, a tea house will complement and decorate the garden. An indispensable attribute of Chinese manners are considered garden walls, windows, moon gates. The entrance to the structure is equipped with an entrance gate. The English garden seeks to merge with nature, the French one is filled with majesty and large space with fountains, cascades, and sculptures. Italian mini-pits with fountains are placed in front of the main entrance of the house and are the central composition.
Choosing a place and material for arrangement
Many craftsmen know how to make a pond with their own hands, given the size, location, choosing sunny open areas. Trees located in close proximity will create additional trouble. Fallen leaves, constant shade of trees impede growth ornamental plants, pollute the water. You can arrange the structure under the trees, but the obligatory stay in the sun for 5-6 hours a day.

 do-it-yourself pond in the country house
Regarding the size, consider the scale of the site. The pond should harmoniously fit into the landscape design. small garden plots an area of 6 acres is equipped with small structures that are easier to build, the financial costs will be negligible. Deep and voluminous make for large areas and fish breeding. Do not plan to run fish, do not dig a big pit.
 do-it-yourself pond in the country house
  in the photo - do-it-yourself country pond
To build a pit with your own hands, you need to buy, prepare materials for future construction. There are great opportunities for your imagination here. You can build a decorative lake on the site from any materials. Capital reservoir with concrete base takes time, money. Various plastic containers, a lake from an old bathroom, tires from large tractor wheels will cost less, and will look beautiful if done right. It is easy to make a design using a special elastic durable film.
 in the photo - a pond on its site
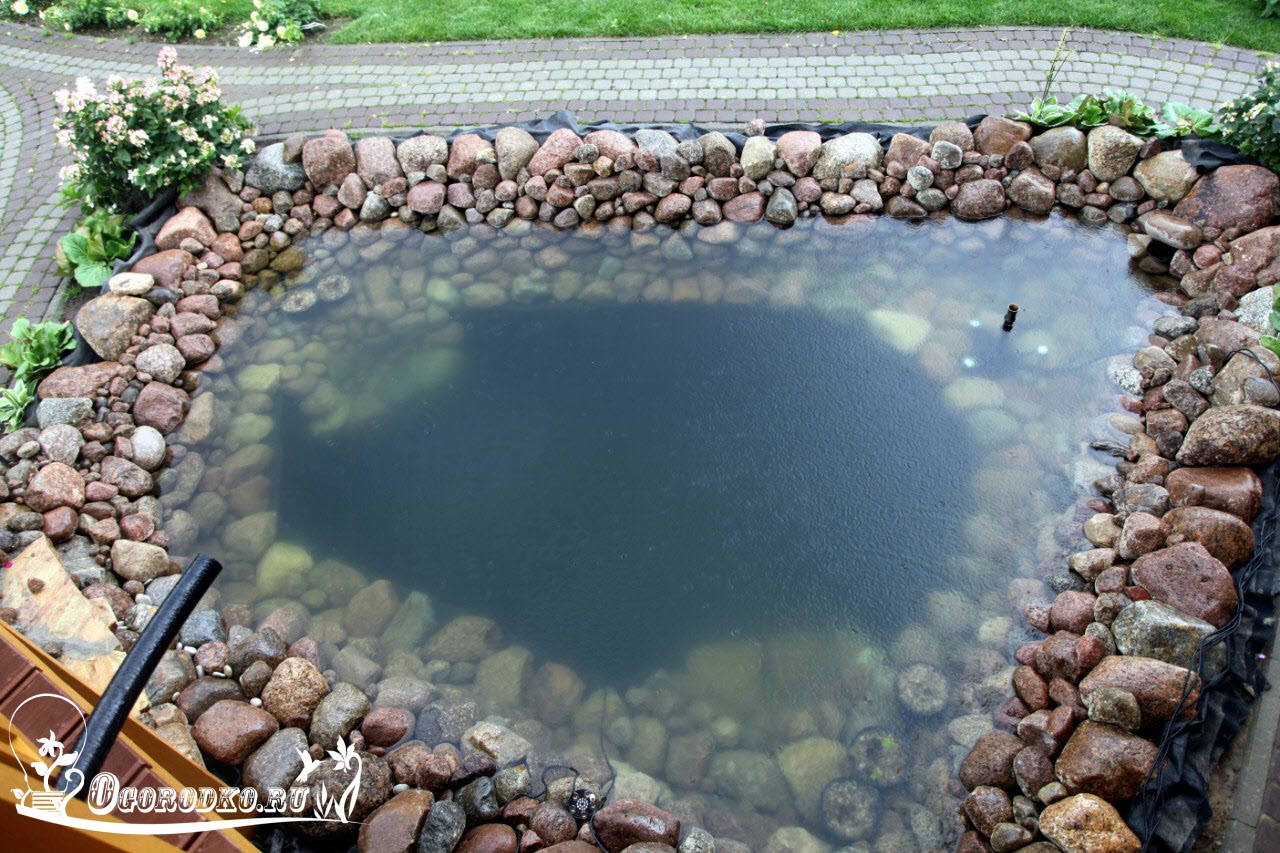
How to Create a Lake Step by Step Using Black Film
— Schematically outline the project of the future reservoir, indicating the width, depth, location of curtains (thresholds for planting). The drawn drawing will allow you to correctly position the plant, decor elements, avoid misses, alterations.
 step 1
  step 2
- Draw the outlines of the lake with a garden hose, sand, spray paint, or whatever you can find. uneven surface must be level.
- A pit is dug to the depth of the near threshold (for plants and flowers), the next tier is marked, and dug out. The lake can be made in several tiers. You can do without thresholds if it is small.
 step 3
- To buy a film of the required size, the finished pit is measured with a cord, added 40-50 centimeters on each side of the bowl.
- The next step is to fill in the sand and tamp. No sand, start laying the next layer. small variant can be done without sand.
- You can protect the material from cuts and damage with the help of geotextiles, which are laid on the bottom, the walls of the pit after a layer of sand. You can replace the purchased material with the existing old unnecessary linoleum, carpeted, ruberoid.
 step 4
  step 5
- It is more convenient to fix the material by tearing a shallow trench along the edges. The edges of the film are laid in it, sprinkled with a layer of earth, rubble.
- A stream will help to rid a large pit of stagnant water and submersible pump which is placed at the bottom. The pump is connected to the cleaning filters. The stream is placed above the level of the lake, so that the water flows down freely, rises with the help of a pump. You can hide it under beautiful stones, plants. They plant a hill from a stream beautiful flowers, decorate with various decorative elements (sculptures, clay pots).
 step 6
  step 7
- The coastline along the entire perimeter is laid out with decorative stones (natural cobblestones), preventing the earth from sliding into the pond. Place the plants, sprinkle the bottom with small pebbles, fill with water.
The construction of the lake with your own hands is completed, keep the pond clean and tidy, remove debris and algae in a timely manner. Use biological balancers, plant fertilizers, anti-algae products, water clarification. Find the right place, do it right, decorate it beautifully. Mistakes, miscalculations can turn an attractive good body of water into a continuous problem, keep this in mind.

I really want to relax after the summer heat and physical labor near a picturesque place. Perhaps the first thing that comes to mind is water. Unfortunately, not all land owners are lucky to have a pond in their country house. Therefore, many summer residents equip a mini pond in the country with their own hands. We will talk about this in this article.
Perhaps at first you will have questions: how to do it? what material? where to place? But believe me, you can build a pond with your own hands. Moreover, we are talking about a small pond in the country - mini copies of reservoirs from 0.5 to 1.5 m3.
Design of the future pond
Thanks to today's technologies, the owner can build a pond of any complexity. For example, there are three possible options for a small pond: wrap a recess in the ground with a film and fill it with water; use a ready-made container that may be right at hand; fill the walls of the recess in the ground with concrete and fill with water.
Option 1
To get started, create a project for the future pond on paper. Consider the width, depth, and sills for planting. Start drawing contours on the ground. This can be done with paint or sand.
 If several tiers are planned in the pond, then mark them out and dig them out one by one
 Purchase a film for your pond with a calculation of +0.5 m on the sides on the sides of the pit bowl. More purchases will be needed: geofabric is a material that is laid on the bottom and walls of the bowl to protect the film from damage. Although you can use something from the bins: an unnecessary carpet, old linoleum.
 Geofabric for reservoirs
 You can fix the film with rubble, laying it in trenches dug along the edges of the thresholds. Fill the pond with water gradually, taking breaks. Lay out the shore line with stones and cover the bottom of the pond with small pebbles.
Option 2
First, decide on the shape of the container in which the water will be. Then dig a pit under it, retreating 30 cm from the sides. Tamp the bottom so that it is even. If you have chosen a multi-tiered plastic mold, then pour water gradually, and fill the space between the form and the bowl of the pit with sand.
There are many more options for a small pond in the country. Can be used:
- Unnecessary bath. Mark the area with the dimensions of the bathroom, adding 10 cm on the sides. Dig the pit 20 cm deeper. Under the drain hole of the bathtub, make a drain with stones for draining. Pour crushed stone with sand at the bottom of the pit and tamp it down.
- Taz. We follow the path of least resistance and use the most a budget option, because even a leaky basin can be used by covering the hole with a film. Leave the edges of the basin above the ground. Under the bottom and between the walls of the basin and the pit, lay a layer of a solution of clay and sand. Fill the bottom of the basin with soil to plant the duckweed and bury it, or whatever you choose. Such a pond will be miniature and beautiful.
 Bathroom pond
 And more tires, a barrel, a boat or even an old cabinet! It is convenient that some of these containers can be brought into the house for the winter. Indeed, making a pond with your own hands is not difficult!
How to make a pond from the bathroom (video tutorial)
Option 3
I think many will agree that to build a pond according to the third option, some, at least basic builder skills are needed. But at the same time, do not let this scare you, because any summer resident or owner of a plot in the private sector is already a bit of a builder. And as a reward for your work, you will have an almost eternal piece of paradise in your yard.
Stages of construction of a reservoir in the country (video)
Seriously approach the choice of the location of the pond, because it will be impossible to move it. Now you can start.
If you decide to make a reservoir without thresholds, then this will greatly simplify the task. Dig a pit with slopes at 45 degrees. Tamp the hole and fill it with sand.
Lay a PET or PVC film on the bottom, without pulling it hard. Start pouring concrete from the walls, and then go to the bottom.
Try to do this part of the work in one day to avoid cracks at the joints.
Press in reinforced mesh. Pour the second layer of concrete as soon as the first one dries. Constantly check the level of the horizon. Pour in water when the concrete is completely cured.
 concrete pond
 Before deciding on the option of building a pond, decide which design idea will look especially organic on your site. If the house, paths and flower beds are designed in a strict style, feel free to break a clear-cut pond. If you like everything natural, then any arbitrary shape fit.
Decide on a place
How to make all the inhabitants of the pond feel comfortable? If you have a large plot of land, then carefully study the area so as not to make a mistake with the choice. There are several secrets that we will share with you.
- The roots of old trees can interfere with the work, and over time, even the walls of the reservoir. Also, falling leaves and fruits will make you clean your pond often.
- Choose a place with the expectation that the pond will be in the shade for some time so that algae and microorganisms do not develop too actively in it.
- At the same time, the sun is needed for plants along the bank. So you have to search best option considering these nuances.
- If your pond is small but deep, then make sure that it is always in sight when children play nearby. And why hide such beauty from the eyes?
- Best of all, the reservoir will look in the hollow. They almost always go down to the lake, river, sea.
 Mini pond for a summer residence
 Consider a possible ecosystem
If you want fish to live in your pond and flowers to bloom, then a few rules from this section will help you.
Plant selection
Decorative flowers in the pond do not suffer from temperature changes and can even tolerate frost (of course, except for the southern varieties of plants that will need to be hidden for the winter). But still, make sure that the water in the pond will be heated by the sun for at least five hours during the day.
The less light, the faster the mini pond in the country will turn into a small swamp. Then it will look completely unattractive, a characteristic smell and flowering will appear.
In nature, an amazing process of self-purification has been launched, and at home, the owner should take care of the cleanliness of the reservoir.
As in a natural pond, plants in a home pond are divided into the following types:
- those that grow on the shore;
- those that grow in a humid zone on the border with water;
- floating on the surface;
- shallow and those that grow at depth.
Although the air humidity will be higher on the shore along the pond than in other places, simple garden plants they can live there. But still, consider that they do not look ridiculous or casual next to other inhabitants of the pond. Begonias, aquilegia, balsam and many other perennial plants that are used to decorate landscapes will harmoniously combine.
A zone with constant humidity, but without stagnant water is the best place for moisture-loving perennials. Among such stars are meadowsweet (meadowsweet), lysichiton, darmer, iris and many others.
 Irises also successfully get along in shallow water. They compete with susak, pontederia, tail
 A water lily can rightfully be called a deep-sea queen. She copes well with harsh winters. Water lilies are not only beautiful, but also useful. It is they who can create the shadow necessary for the pond. Among other deep-sea beauties, the lotus (however, it needs to be dug up for the winter, because in most of the territory former USSR for almost 8 months the water does not warm up, as it is necessary for the flowering of such varieties), water paint, oronium, water chestnut and many other bizarre inhabitants of the depths.
Rivals of deep-sea plants are algae, which saturate pond water with oxygen and support the vital activity of other organisms. Among them are the swamp, hornwort, etc.
Animal inhabitants
Insects, microorganisms and protozoa will start up in your pond on their own. You will have to take care of the fish yourself.
 Fish in the pond in the country
 But don't think that you can't get them. In fact, there is nothing supernatural here. Check the depth of your pond - it should be at least 90 cm deep. This is necessary for the fish, because this way they can overwinter. And in summer the water does not warm up too much. Smaller ponds are suitable only for growing ornamental plants.
By the way, in ponds with fish, a third of the surface of the water should be covered with greenery.
How to turn your suburban area into a real paradise? Just. You need to create a beautiful place that pleases the eye. And where the soul rests, there the mood improves, and the vitality rises.
One of the brightest touches in landscape design can be decorative pond in the country, comfortably located among the greenery.
Despite the fact that most summer cottages are limited in size to the standard six acres, and the owners do not have the opportunity to make a large pond, this is not a reason to deny themselves the pleasure of having an artificial reservoir on the site. The technical side of the issue will also not become an obstacle, if there is a desire and competent instruction describing step by step how to make a pond with your own hands.
Stage 1 - Idea (types of ponds)
Before starting large-scale construction works and to build a whole lake with your own hands, you need to think about the goal of creating a reservoir on the site.
In terms of functionality (goals), four types can be distinguished:
 small pond.
This is a reservoir, which is part of the landscape composition. Their purpose is to decorate a corner of the garden and please the eye. Active recreation near such a pond is not expected.
 decorative pond.
It is a deeper body of water. As a rule, they are decorated with bridges, fountains, and lights are mounted. Such a pond is equipped near country house, terraces or gazebos, benches, sun loungers and umbrellas (or awnings) are installed nearby. And the reservoir becomes the center of the recreation area for the inhabitants of a private house.
 .
.
A personal artificial lake in which fish swim is not only a dream of fishermen. Children, cats and other family members will be happy to watch colorful fish while relaxing in nature.
 .
.
They are also country ponds, which are designed, in addition to the aesthetic function, to provide an opportunity to refresh or even swim, depending on the size.
Based on the purpose and own capabilities, the location of the pond, its parameters and geometry will be determined.
Stage 2 - The style of the reservoir in the country
The garden pond can be made in two versions with an endless variety of different modifications:
 Formal (regular) body of water.
The name successfully reflects the essence of the pond, it is a structure that has a rigidly defined shape.
Geometrically correct form the pond is more suitable for plots aged in classical style or in modern, minimalist or high-tech styles.
Along with rectangular shapes, round, square and broken (symmetrical or asymmetrical) also belong to the formal type of pond.
 Landscape pond on the site.
A more popular option among users, since it has an irregular coastline, a natural look, creates the effect of being close to nature and does not limit the flight of the creators' imagination.
Tip: The shape of the pond is determined by the preferences of the owners, but the more complex the shore line, the harder it is to lay the film.
An important aspect that you need to pay attention to when choosing the style of the reservoir on the site is the terrain. A flat surface makes it possible to equip a reservoir of any configuration. Differences and irregularities require increased attention, but they allow you to make a reservoir with a waterfall or a cascade of ponds. On such a relief, a bridge or an artificial slide will organically look.
 You can also independently raise the pond above ground level. The only difference in the technology of work will be the construction of the foundation, which will avoid the distortion of the concrete bowl of the artificial lake.
 The high pond minimizes excavation, is easier to maintain and is suitable for families with small children (the edge is equipped with a fence with railings). Such a reservoir can be built near a covered terrace, making it not only an element of landscape design, but also a place of rest.
 Tip: If you're planning on making a pond with a fountain, opt for a tall pond.
Stage 3 - Place (location) for the pond
It is illogical to create a pond for the sake of a pond on the site. It is much more pleasant if the reservoir brings a zest, a decorative accent to the color of the landscape of the site. So, you need to place it in a good place. It is the location that will allow you to admire the artificial lake from anywhere.
How to choose the right place for a pond in the country?
To do this, you need to take into account a number of factors:
- plot size. Directly affects the size of the pond itself and its configuration;
- relief. It also determines the shape of the pond and provides an opportunity to simplify the creation of fountains, waterfalls, or vice versa, to achieve a perfectly smooth water mirror;
- soil composition and groundwater level. Have a direct impact on the depth of the pond, the complexity of the work and the need for additional materials;
- illumination. It is desirable that the pond is located in a shaded place. The time of exposure to direct sunlight should not exceed 5-6 hours. Otherwise, part of the water from the pond runs the risk of evaporating, and biological activity will negate all the beauty of the reservoir. Recommendation: after choosing a place for the pond, observe the solar regime for several days.
Tip: The deeper the reservoir, the more illuminated the place it can be located.
A pond intended for fish all the more needs thoughtful placement, because the level of oxygen decreases in very warm water.
- visibility. It is better to place the pond so that it can be seen from the window of the house or from the gazebo. Good visibility is especially important for families with children.
- reflection. The pond will only benefit if only clouds or beautiful buildings are reflected on its surface, and not a toilet or a greenhouse.
- degree of landscaping. The trees and bushes growing around the pond are definitely a very organic addition. But, these are also fallen leaves and branches, which, falling into the water, will pollute its surface and, ultimately, settle to the bottom in the form of silt. In addition, tree roots can damage the waterproofing of the pond.
Tip: you can ensure a sufficient amount of greenery near the pond by decorating it with plants in tubs (barrels).
- power supply. For those owners who plan to equip a fountain on the pond, lighting, etc. should consider in advance the possibility of electrifying this site and the yard.
Tip: it is better to supply electricity at the development stage and lay the wires in a protected and durable corrugation underground, and equip the connection points with a hatch for free access.
- the possibility of expanding the reservoir or arranging a recreation area. You need to plan ahead. In both cases, it is important that at least one side of the pond has enough space for possible redevelopment, adding a gazebo, barbecue area, installing sun loungers or a small waterfall.
- the compatibility of the pond with other buildings and the general view of the site.
Tip: it is better to start building a pond in the country with your own hands at the beginning of the warm season - in the spring. Thus, there will be a margin of time for the device and the reservoir will have time to fit into the design (“take root”).
Stage 4 - The size of the pond on the site
It cannot be said unequivocally that a large pond is a luxury, and a small one is a budget option or an opportunity to save money. A small pond does not always mean cheap, sometimes even the opposite. Each type has its own advantages. So let's focus on the key points:
- dimensions. Depend on the location of the pond in the country. On the sites there are recommendations on how much area the pond should occupy - from 3 to 10% of the total area of \u200b\u200bthe site. In fact, there can be no clear recommendations;
- width and length. Determined by the size of the site and the physical capabilities of a person. After all, the pit under the pond is most often dug by hand;
Tip: the aspect ratio will determine the harmony of the pond.
- depth. Depends on the dimensions of the pool, pond or lake and the purpose of the arrangement.
- zoning. Professionals recommend dividing an artificial pond into three sections:
- coastal zone (100-400 mm). Designed for planting plants and entering the pond;
- shallow (400-1000 mm). For plants growing deeper. Tip: Nymphea or winter-hardy water lily grows well at this depth;
- deep water (over 1 m). It is necessary in those ponds where it is planned to breed fish. The area of the deep-water zone depends on the type and number of fish, but should be at least 20% of the area of the pond.
Tip: The lowest point of the reservoirs should be below the freezing level of the soil. This is especially important for those ponds in which fish live. Thus, she can overwinter painlessly in a non-freezing pond.
- biodynamic balance. A pond is a place that is inhabited by living creatures, therefore, a balance must be ensured so that the pond can clean itself. Special processing water such as chlorination or ozonation for the pond is not provided.
Tip: plants should not occupy more than 50% of the pond area.
- content complexity. It's a paradox, but the larger the body of water, the easier it is to maintain.
Ponds - from small to large
Stage 5 - Material for the pond in the country
Moving forward in the field of studying summer cottages, we gradually got to one of the key questions, how to make a pond with your own hands. Any construction begins with the choice of material.
The market offers a lot building materials to create a pond. And craftsmen advise making a pond from improvised materials, this will allow you to build a small reservoir in the country without any special financial costs.
Consider all the materials suitable for building a garden pond.
 Concrete pond.
An expensive option that allows you to operate the pond for a long time. Filling the pond with concrete (construction of a concrete bowl) is a method that is more suitable for building a pool.
 Plastic bowl (capacity).
 More suitable option. Made of PVC (polyvinyl chloride) or fiberglass, the form allows you to quickly complete all the work on the arrangement and operate the pond from 5 to 30 years, depending on the quality of the bowl.
The purchased form allows you to make a reservoir in 3 stages: dig a pit, install a bowl and fill the voids with sand.

The plastic bowl for a pond is characterized by simplicity of installation, durability and frost resistance.
Their minus is the high cost, the complexity of transportation (with a large volume) and the need to have basic installation skills. Otherwise, the bowl is very easy to damage. Please note that plastic bowls are destroyed under the influence of ultraviolet radiation.
Tip: the clear shape of the plastic bowl limits the possibility of creating a landscape pond on the site (subjective opinion).
 In this subgroup, the most the best option is a bowl (form) for a fiberglass pond, reinforced with a rubber base. An absolute plus of fiberglass in reliability and maintainability.
 polymer film.
 Provides unlimited possibilities in terms of choosing the shape of the reservoir. The simplest and most affordable material in this category is polyethylene film. It is affordable and cheap, but will not last long.
 More long life on PVC film. At correct installation With proper care, it will last more than 10 years.
  Tip: instead of PVC film, you can use advertising banners (transparents). They try to get rid of used banners and they can be bought inexpensively.
  Butyl rubber film for the pond. The most reliable material (rubber) for waterproofing a reservoir. Experts recommend a butyl rubber membrane (EPDM) for those who have a rocky bottom, many roots, a significant depth of the pool. The service life of butyl rubber is 50 years. It withstands repeated freezing.
 Folk ways to make a pond from improvised materials
 Bath pond
An old bathtub is the perfect container, specifically designed to hold water. It can be painted in a bright color and set in a beautiful corner of the garden. Or you can deepen it into the soil and get a small country pond, even with a fountain.
 Tire pond (tire or wheel pond)
 Another easy way to make a mini pond in the garden.
How to make a pond from a tire with your own hands is shown in the photo.

 Basin pond
The method is so simple that women or even children are more often involved in its device. The basin holds water easily. Like a bath, it can be installed on the ground or deepened. The main thing in arranging a pond from a basin is decor. And then, a garden mini-pond will decorate the site no worse than a full-fledged reservoir.
 Decorative pond from plastic bottles.
Suitable for those who want to combine two in one: create a decorative pond and eliminate the buzzing of mosquitoes.
The material was prepared for the site www.site
Please note that the choice of material for the pond has a direct impact on the arrangement, appearance and its service life.
Tip: When choosing a material for a pond, make sure that it is environmentally friendly.
Stage 6 - tools and equipment for the pond
To make a simple pond in the country, you need to prepare a level, a cord (for marking), pegs, a hose for irrigation, a shovel and a cart for removing soil.
For a more technological (capital) reservoir, equipment for the pond will be required:
- filter for water purification. The installation of a filter in reservoirs where fish is bred is especially relevant.
- pond pump. Allows you to organize the supply of water under pressure. It is used for pumping / pumping water, watering the garden, arranging fountains, waterfalls, operating filters (cleaning);
- pond sterilizer. Needed to eliminate algae (will help make the water clear);
- compressor (aerator) for a pond. Important for fish and plants. Aeration of the pond allows you to saturate the water with oxygen. Compared to an aquarium compressor, it has more power.
Stage 7 - We build a pond in the country with our own hands
As you can see, there are more than enough materials that allow you to create a pond on your own. We will focus on how to make a pond in the country from PVC film. The choice is due to the fact that the film takes shape better, it is quite affordable, working with it does not require special skills, the film is subject to repair.
Tip: so that the film does not tear in winter time, it is necessary to provide for the deep-water part (below the freezing depth of the soil), which will serve as a kind of compensator.
7.1 Choice of pond film
PVC film colors:
- black - will turn the bottom of the lake into a mirror. In a dark pond, clouds, etc. will be well reflected;
- brown - perfectly imitates bottom soil. Suitable for creating landscape ponds;
- blue or cream - will give the pond a resemblance to a pool, but fish are clearly visible against a light background.
When choosing a film, pay attention to:
- composition. Polyethylene is fragile, PVC is stronger;
- thickness. A film with a thickness of more than 0.5 mm is suitable for a pond. The maximum thickness that is on the domestic market is 1.9 mm;
Tip: The deeper the pond and the more complex its shoreline, the stronger and thicker the film should be. The presence of stones or tree roots is also a reason to choose a stronger film.
- trademark (brand). According to reviews, as well as from practice, it is recommended to use film from the brands Gardena, Heissner, OASE;
- resistance to mechanical damage;
- UV resistance.
Tip: For pond depths over 1.5 m. best solution will use butyl rubber (EPDM or synthetic rubber, as it is also called). The rubber film is capable of stretching, resistant to UV and mechanical damage. Maintains from 40 to 80 °C.
- absence of toxic components in the composition of the film.
Calculation of the film for the pond
- film length = pond length + 2 x pond depth + margin (500-600 mm);
- film width = pond width + 2 x pond depth + margin (500-600 mm).
How and what to glue pvc film for the pond
The gluing of the pool film is carried out with a special adhesive (for example, Tangit (Tangit) PVC-U) or adhesive tape, for example, Quick Seam 3.
Tip: it is better to immediately adjust the geometry of the pond to the dimensions of the film.
7.2 Sketch and diagram of a pond in the country
Before you start digging a pit for a reservoir, you need to draw a sketch on paper, and also transfer it to the surface of the soil. It is advisable to indicate the depth and width of the shelves for plants or steps. This technique will avoid problems in the process of constructing a pond. It is convenient to apply the marking with a garden hose (it is flexible, bright, it is easy to adjust it) or with sand.

Tip: after marking the ground, cover the resulting area with a light film and look at it from different parts of the site. You may actually have to make adjustments to the future pond.


7.3 Digging a pond pit
The pit device includes:
- removal of sod (excavation);
- excavation pit. It is convenient to dig from the edge to the center, gradually deepening in the right places. For decoration, laying stone or laying turf, you need to dig a ledge 600-700 mm deep;
- soil removal, and construction debris, roots, stones and anything that could damage the film.
Tip: since the excavated earth needs to be put somewhere, you can equip an alpine hill or level the surface of the area where there are depressions.
In the process earthworks you need to constantly make sure that the banks are on the same line. If a waterfall is planned, then you need to maintain the desired height difference.

Advice. If you need a building level (level) of great length, then you can do it yourself. To do this, you need to lay a regular building level 500 mm long on a long board.
7.4 Laying the pond substrate
After the pit is dug, its bottom and walls are well rammed (this is necessary for shaping) go to waterproofing. Pond waterproofing is needed to prevent water from escaping into the soil.
Tip: some users prefer not to isolate. In practice, this leads to the fact that the water has a variable level.
There are several ways to form a substrate:
- lay out the compacted pit with stones, gravel and fill it with sand. But after a few years, such waterproofing will cease to fulfill its functions;
- lay geotextile on the bottom and cover with sand. A more reliable method, but also more expensive;
- lay PVC film. It is about the film, as the most common option in question in this article.
7.5 Laying the pond foil
Proper laying of the film does not exclude the installation of a sand cushion at the bottom of the future pond. According to professionals, such a pillow eliminates the possibility of damage to the film by roots or stones.
Advice. It is better to lay the film on a hot day. As it warms up, it will become more pliable.
Given the relief of the bottom and banks of the reservoir, everyone will be faced with the fact that the film will be laid in folds. At the same time, users are advised to make one large fold, and not many small ones. The formed fold can be pressed down with stones or glued to the main part of the film.
 It is important that the laid film lies freely on the surface of the pit, without tension. Otherwise, after filling the pond with water, it can stretch even more and tear.
In order to fix the film, it is enough to dig an auxiliary trench. After laying the film, you can fix it with rods and fill the trench with rubble.
After the film is laid, the pit is filled with stones.
Tip: choose a large stone for the bottom. The flat bottom of the stone will prevent the possibility of tearing the film. For walls, it is better to use rounded stones, since flat ones slide.
Upon completion of the work, the pit is filled with water. Moreover, it must be served without pressure in the middle of the pit.
Only after the water in the pit has stood for 1-2 days can the film be cut off.
7.6 Strengthening the banks of the pond
A homemade pond in the garden will look well-groomed and reliable only when there are beautiful and strong banks.
Depending on the type of soil, the bank of the pond should have a slope:
- with chernozem or clay - it is allowed to make vertical walls;
- with sandy soil - inclined.
Practical users believe that the optimal slope for the shore of the reservoir is 45 °. Such an angle will prevent the shore from crumbling and will prevent ice bulging during freezing / thawing.
When finishing and decorating the banks of the pond, take into account the plants that will be planted on them. Since they all grow at different depths, you should take care of the landing shelves formed at a certain depth.
In the process of digging a pit, each owner will inevitably face the question of how to strengthen the bank of the pond.
The following engineering methods are suitable for strengthening the coast:
For a gentle coast:
- geomat;
- geogrid (perforated polymer);
- geogrid.

Craftsmen advise using a more familiar chain-link mesh, the cells of which are clogged with earth with clover seeds (or other perennial grasses) or to strengthen the shore of the pond with plants and bushes.
For a steep bank:
- gabions;
- piles (sheet piling or ordinary);
- retaining walls.

Biological methods can strengthen the coast just as well. The photo shows plants that can not only strengthen the shore, but also decorate an artificial reservoir.

Advice. For greater reliability, it is better to combine engineering and biological methods fortification of the shore of the reservoir.
Stage 8 - Making a pond in the country with your own hands
 A pond in the country will become a full-fledged design element of garden decor only when it is finalized.
To make a country pond natural or decoratively decorate a shaped pond, you can use:
- plants planted directly on the bottom of the pond. To do this, you need to put prepared plants in special containers on curtains (pond steps). Tip: Native plants do better in a pond;
- plants in tubs. To do this, any plant is planted in a tub (barrel, bucket, pot) and placed on the shore of the pond. The advantage of this way to decorate the coast is that you can use any, even exotic plants and constantly modify the look of the coastline;
- to equip the island of "dream" in the middle of the pond. Install on the island decorative rock a boulder or put a plant in a flower pot;
- run bright fish;
- lay beautiful stones.
Tip: it is better to intersperse the laying of large stones with the laying of smaller ones, in this way, it will be possible to avoid uniformity in the design of the coast.
- pave comfortable and beautiful paths from natural stone, gravel, saw cuts of wood or brick;
Tip: gravel paths require more maintenance as they are washed away by rain and grass grows through them.
- throw a bridge over a pond;
- complement it with a waterfall;
- install beautiful fence from wood or stone;
- organize a night illumination of the pond. Moreover, you can install LED lights, or place lights in transparent glass balls on the water mirror. They can be lowered to the bottom with the help of weights;
- install deck chairs or a gazebo on the shore of the pond.


Stage 9 - Caring for a pond in the country
- protection of the pond from the leaves will provide a mesh construction on a light frame.

- cloudy water, which will stay in the pond for 2-3 weeks, settles over time. In addition, the biological activity of small inhabitants will soon make it transparent.
- a net is useful to clear the pond of leaves;
- to raise the water level, you need to periodically top it up (with a bucket or a hose without pressure);
- you need to monitor the rate of spread of algae, in order to limit their growth, you can plant cattail or nymphaeum (lily);
- shelter plants planted in a pond from the cold or bring them into the house;
- periodic cleaning of the reservoir will eliminate bottom debris;
Tip: The pond can be cleaned quickly and effectively in winter. To do this, it is enough to break the ice and take it out of the pond along with the silt.
- algicides - an emergency measure for cleaning the pond. But due to its high toxicity, you should not contact it unless absolutely necessary.
Stage 10 - Preparing the pond for winter
The pond, which is based on a special plastic bowl, can winter, because the bowl can withstand significant temperature changes. And so that it does not deform from pressure, created by ice, it is enough to place a few empty plastic bottles in the container. Bottles must first be tightly closed with lids. To prevent the destruction of the bowl, 1 bottle is enough for 1 square meter containers.
But what about those who have a film pond - will the film crack from frost? If the depth of the pond exceeds the depth of freezing of the soil, you don’t have to worry. Empty bottles can also be used to protect smaller water bodies.
Important! All equipment and plants need to be covered for the winter.
Conclusion
In this article, we have covered all the key points of creating a pond with our own hands, from the idea to the care. We hope that we have dispelled doubts and given confidence in our abilities. Dare! And by the beginning of the season you will have a wonderful water spot in the countryside.

