How copper pipes are connected. Overview of fittings for mounting copper pipes
Copper pipes - universal material, which is used almost everywhere: when creating water pipes, gas pipelines, heating systems. They are not afraid of chlorinated water, which makes them particularly attractive for the installation of urban water supply networks. Copper is not afraid of corrosion and has a very long service life.
Installation of a copper pipeline is carried out using a variety of different types connections, and this is not only welding and soldering, but also the use of compression (crimp) elements.
Advantages and disadvantages of compression fittings
The connection of copper pipes with compression fittings is convenient because it does not require high temperature and special equipment.
This means that they can be used to mount pipes in hard-to-reach places, from the tools you only need:
- spanners,
- calibrator,
- cutter.
The time of work is reduced, labor costs are reduced, and the resulting system is completely sealed and durable.
However, this design is not without drawbacks. Compression fittings must be periodically checked and tightened, so they must not be concreted.
They are designed for low pressure in the system, therefore they are considered less reliable than soldering. The design is reusable, that is, it can be disassembled and assembled, but in practice, the reconnection is unreliable, and soon it has to be replaced.
The device and principle of operation of the compression fitting

Compression fitting for copper pipes consists of several parts:
- corps;
- crimp nut;
- crimp ring.
Crimp rings (usually one or two are used) are designed to create a tight connection and provide it with resistance to high pressure and durability. Thanks to them, the structure becomes resistant to vibration fatigue and can serve for many years.
Quality copper pipe fittings can last up to 50 years.
Advice!
It is better to choose parts that use special EPD M material for the connecting rings, rather than ordinary rubber, as they will last much longer.
Compression fittings are made from:
- brass,
- copper,
- plastic,
- metal.
At the same time, brass connecting elements are most often used, since this material is easy to process and costs less than pure copper. In terms of strength, it is inferior to stainless steel, but on the other hand, it is much easier to mount it.
Sometimes brass fittings are additionally treated with nickel to increase resistance to various influences.
When choosing, pay attention to the weight of the product, this indicator should not be too light. You can ask the seller for a quality certificate, in addition, professionals advise immediately choosing parts from a well-known manufacturer.
This ensures that you do not waste your money and that the installed system is reliable. Many advise to use brass fitting for HDPE pipes, as it is not subject to corrosion, but provides a greater margin of safety than plastic.
Types of compression fittings
AT various systems pipelines, several types of connecting devices are used, which you can see in the photo:

- tees(used when creating a one-way branch);
- crosses(installation of bilateral branches);
- couplings(connect two pipe sections of the same diameter);
- bends(used to create 45 degree turns);
- plugs(installed at the end of the pipe section).
If it is supposed to connect pipes of the same diameter, then direct connecting devices are used, and if different, transitional ones.
Installation of compression fittings on copper pipes
Since this type of connection does not require special equipment, it is quite possible to do it yourself.
In the European classification, two types of components are distinguished, marked with the letters A and B.
- Type A are used only for the installation of above-ground piping systems made of semi-solid grades of copper or stainless steel.
- Type B used for underground and surface utilities, it is designed for soft and semi-hard grades of copper with a thick wall.
Installation instructions for different types require strict adherence to certain rules in order to make the connection as reliable as possible.

Installation of compression fittings type A
- Choose the right element size. It is not difficult to do this, since all connecting structures are made according to a single European standard in accordance with the nomenclature;
- Cut the pipe and remove burrs. Check the cut with a gauge. Make sure that there is no dirt, rough edges or scratches on the surface. A compression ring is put on the pipe, you can moisten the junction with water to prevent the seal from tearing or slipping;
- Insert the pipe into the fitting as far as it will go. Tighten the clamping nut by hand first and then use a wrench.
Advice!
Excessive use of force is not required here, since the connection will not become more tight from this. When using cheap parts, the ring may be squeezed out, in which case the fitting will have to be completely replaced.
As a result of the actions taken, the pipe should only be slightly deformed, and this confirms that the connection is tight. The video in this article will show in detail in practice all the stages of work on creating a durable structure.
Installation of compression fittings type B
Fittings of the second type are mounted in approximately the same way. The cut is cleaned of dirt, it is important to ensure that the threads in the new fitting are clean. It can only be slightly lubricated with machine oil to make it easier to wrap. The seal cone must be pressed against the inner edge of the tube, the edge of the pipe itself must be flared.

It is important to choose the right key and make sure that it is not loose, otherwise you can easily damage the nut. For example, if a connection with a diameter of 54 mm is required, it is better to take a key with a length of 750 mm.

Features of connecting copper pipes
Price copper pipeline large enough, so it is recommended to follow a few rules when choosing materials.
- It is better that they are uniform, this will increase the life of the entire structure.
- It is impossible to combine copper with unalloyed steels. Because of this, electrochemical processes begin between the metals, which are detrimental to the connection. Steel elements and even galvanized steel in this case begin to suffer from corrosion.
- In extreme cases, if a heterogeneous connection cannot be avoided, they are installed in front of copper in the direction of water flow.
- Copper pipes are well combined with PVC pipeline parts, in this case there will be no negative consequences for the connection.
- PVC pipes for sewerage are increasingly replacing metal pipes, as they are cheaper, easier to install, and at the same time they are practically not inferior to them in strength and durability.

Conclusion
Crimp fittings for connecting copper pipes are used quite often, as it is both convenient and profitable. But it is important not to save on the quality of parts, otherwise the need for repairs will arise very soon. The more responsibly you approach the selection and installation of components, the longer they will eventually serve you.
There are many ways to connect copper pipes into a single piping system. The market provides a huge number of fittings, solders, fluxes, fasteners, allowing you to create detachable and non-detachable, serviced and unattended connections.
Work with copper pipes consists of:
- sizing - if the pipe is incorrectly measured, it is impossible to cut it correctly;
- cutting - made strictly perpendicular with a pipe cutter, given that it is better to make more turns than to apply force;
- deburring - deburring after cutting and oxide film(it is better to do this with a special napkin);
- connections.
Ways of connecting copper pipes:
- capillary soldering;
- high-temperature soldering;
- various fittings.
Connection by soldering
For connecting copper products by soldering flux should be applied to the cleaned surface and the parts should be immediately connected. Heat the connection unit evenly with a gas burner (blowtorch, soldering iron) until the flux begins to change color and the solder melts. The burner fire is diverted, the solder fills the gap between the elements.


In order for the amount of solder to be optimal, experts offer a simple guideline - the length of the solder rod should be equal to the diameter of the pipe. You can cut the bar of the required length before soldering. If one of the elements is a fitting that has already been soldered at the factory, then it does not need to be added.
After filling the gap with solder, it is necessary to allow time for cooling without exposing the assembly to mechanical stress. Once the solder has completely cured, remove any remaining solder and flux with a damp cloth. After the entire system is mounted, it should be flushed hot water. Flux contributes to corrosion, so its presence on the inner surface is undesirable.
Soldering copper pipesTypes of fittings for connecting copper pipes
Connection without soldering is made using fittings, which are divided into two large groups - straight (connection of elements of the same diameter) and transitional (connection of elements of different diameters). Diameters can be from 8 to 100 millimeters.
Based on the configuration, a fitting (connector) for copper pipes is called:
- coupling - must be made of the same material as the pipes, can be used both for elements with the same diameter and for elements with different diameters, used when there is no need to change direction;
- square - designed to change the direction of the system by 30, 45 or 90 degrees;
- tee - used to connect three ends located relative to each other at an angle of 45 or 90 degrees;
- cross - joins together four pipes located perpendicular to each other on the same plane;
- adapter ("American", futorka, sgon, nipple) - for combining pipes from different material using various methods;
- plug - a cap, a plug for sealing the end of the tube;
- fitting - for connecting a pipe and a flexible hose.

Based on the method, the connection of copper pipes with fittings can be:
- using a soldering fitting, under the thread of which there is tin. A flux-treated pipe is inserted into it, the assembly is heated until the solder becomes liquid and fills the gap;
- using threaded (equipped with threads);
- crimp (compression), allowing you to connect the elements different diameter. The pipe is fixed with a fitting using an O-shaped seal and a detachable or one-piece ring. Conventional tools are suitable for installation;
- press - fitting, consisting of a body and a sleeve and mounted using press - tongs;
- self-locking fitting, which is based on internal rings, one of which is equipped with teeth. When it is pressed with a special key, the teeth enter another ring, forming reliable connection. Just as easy as putting on, taking off.

Features of copper products: what to consider
When installing a copper pipeline, it is important to know not only how to connect copper pipes, but also to fulfill several additional conditions:
- to extend the life of the system, only copper and its alloys should be used;
- if it is necessary to use products from other materials, then it should be taken into account that copper cannot be combined with galvanized steel, as this leads to corrosion in steel elements;
- if the use of steel products cannot be avoided in any way, then they should be mounted in front of copper elements;
- safe connection of copper and acid-resistant steel.
Fasteners
For the final installation of any pipeline, clamps for copper pipes are required.


- clamps and brackets.
For domestic pipelines are used:
- metal C-shaped (fastening with one bolt) and O-shaped (fastening with two bolts) clamps made of steel and equipped with a rubber coating that neutralizes mechanical and acoustic vibrations;
- plastic clamps (movable and stationary) - for internal systems, equipped with dowel and screw;
- brackets - for hanging or arranging system elements.
It is obvious that for each system it is necessary to select its own methods of installation and fastening. Only when choosing quality materials and properly installed, the pipeline will be reliable and durable.
Production of copper pipesCopper pipes are used during installation DHW systems, cold water, air conditioning, heating, gas supply. They are expensive, but durable, plastic, resistant to corrosion. But to engineering Communication of them have served for decades, the connection of copper pipes must be done correctly.
We will tell you how the installation of copper pipelines is carried out, ensuring the tightness of the transported medium or the circulating coolant. The article presented for review describes in detail the installation technologies. Based on our advice, the construction of systems will be done “perfectly”.
To perform the installation of internal pipelines in the house, you can choose a pipe made of plastic, metal-plastic or stainless steel. But only an analogue made of copper is able to serve without problems and overhaul for more than half a century.
Properly installed copper piping systems in practice work properly throughout the entire period of operation, which is assigned to a cottage or apartment building.
According to accident statistics, the fittings and joints used for installation by soldering turn out to be more reliable than the copper pipes themselves - if a breakthrough occurs in the system, then only on the wall of the tubular product
Copper pipes are not afraid of long-term thermal loads, chlorine and ultraviolet. When freezing, they do not crack, and when the temperature of the internal environment (water, sewage, gas) changes, they do not change their geometry.
Unlike plastic counterparts, they do not sag. This plastic is subject to expansion at high temperatures, with copper this does not happen by definition.
Pipe copper products have two drawbacks - the high price and the softness of the metal. However, the high cost of the material pays off with a long service life.
And so that the walls of the pipes are not damaged from the inside by erosion, filters must be installed in the system. If there is no pollution in the form of solid particles in the water, then there will be no problems with the destruction of pipelines.
Pipe processing and welding requirements
When working with copper pipes, the following rules must be observed:
- When mounting cold water or hot water pipes by soldering, the use of lead solder should be excluded - lead is too toxic.
- The water flow rate must not exceed 2 m/s, otherwise the smallest particles of sand or other solid matter will gradually begin to destroy the pipe walls.
- When using fluxes, after completion of installation, the pipeline system must be flushed without fail - the flux is an aggressive substance and will contribute to the corrosion of copper pipe walls.
- When soldering, overheating of the junction should not be allowed - this can lead not only to the formation of a leaky joint, but also to loss of strength of the copper product.
- Pipe transitions from copper to other metals (steel and aluminum) are recommended to be performed using brass or bronze adapter fittings - otherwise steel and aluminum pipes will quickly begin to corrode.
- Burrs (metal deposits) and burrs at the cutting points must be removed - their presence leads to the formation of turbulent eddies in the water flow, which contributes to erosion and a reduction in the operational life of the copper pipeline.
- When preparing copper pipes for connection, it is strictly forbidden to use abrasives - their particles left after installation inside will lead to damage to the metal and the formation of a fistula.
If in the plumbing or heating system in the house, in addition to copper, there are also pipes or elements made of other metals, then the water flow should go from them to copper, and not vice versa. The flow of water from copper to steel, zinc or aluminum will quickly electrochemical corrosion sections of the pipeline from the latter.

Copper pipes are cut and bent without problems, even a novice master is able to cope with their connection into a single pipeline system. You just need to choose the right tools and follow the instructions.
Due to the ductility and strength of the metal, copper pipes are easily cut and bent. The pipeline can be rotated either by using a pipe bender or by using fittings. And for branching and connections with various devices there are many parts made of heat-resistant plastics, brass, stainless steel and bronze.
On the interaction of copper with other metals
In most private houses, household water pipes are assembled from steel and aluminum pipes. In heating systems, there are also radiators made of steel or aluminum. Incorrect insertion into such a copper pipe layout is fraught with considerable problems.

By building codes to exclude corrosion processes in the pipeline from pipes of different metal, the water flow must be directed to copper
The most optimal installation option is the use of pipes and devices exclusively from copper and its alloys. Now you can easily find bimetallic aluminum-copper radiators, as well as the corresponding fittings and valves. Combining different metals is only in extreme cases.
If the combination is unavoidable, then copper should be the last in the chain of pipeline elements. It is impossible to rid it of the ability to conduct electric current.
And in the presence of even a weak current, this metal creates galvanic couples with steel, aluminum and zinc, which inevitably leads to their premature corrosion. When installing a water supply system, it is imperative to insert bronze adapters between them.
Another potential problem is the oxygen in the water. The higher its content, the faster the pipes corrode. This applies to pipelines both from the same metal, and made from different ones.
Often, cottage owners make a serious mistake by often changing the coolant in heating system. This only leads to the addition of completely unnecessary portions of oxygen. It is best not to change the water completely, but to add it when the need arises.
Mounting Choice: Detachable vs Fixed
In order to form a single pipeline system, you can use several methods of their articulation. Different plumbers use crimp and press fittings, welding or soldering. But before you start work yourself, you need to decide whether the pipeline should be one-piece or detachable.
There are three installation technologies for connecting copper pipes:
- electric welding;
- soldering with a torch or electric soldering iron;
- pressing.
All these technologies can be applied in the formation of both detachable and non-detachable systems. It is more a matter of using a variety of fittings and adapters or abandoning them.

If the structure cannot be disassembled without destroying its individual parts, then it is considered one-piece - it turns out to be cheaper, but it is more difficult to repair
If the pipeline system needs to be detachable, as well as simpler in terms of repair and adding new elements, then the connections must be made detachable.
For this, fittings are used:
- compression;
- threaded;
- self-locking.
Detachable connections are easier to make on your own, you can even do without soldering. They do not require unnecessarily high qualifications from the master.
However, such units need constant inspection and tightening of the nuts to prevent leaks. Pressure and temperature fluctuations in the system lead to loosening of the fasteners. And from time to time it is recommended to pull them up.
If access to copper pipes is planned to be closed tightly with trim or concrete screed, then it is best to connect them into an integral structure by soldering or welding. Such a system is more reliable, durable and resistant to gusts.
Threading is prohibited on copper products. This metal is too soft in structure. When installing a detachable pipeline, all threaded connections must be made using fittings. The latter can be connected to a copper pipe by pressing or soldering.
Before making connections, copper pipes are prepared in a special way:
Image Gallery
Copper pipe is cut with a hacksaw or a pipe cutter. The cutting line must be exactly at a right angle.
After cutting, the end of the pipe must be processed with a deburring tool to remove the slightest bumps and burrs
The part of the pipe immersed in the socket prepared for soldering is thoroughly cleaned of dirt and degreased.
It is mandatory to clean and degrease the socket of the coupling, bend or tee, which will be soldered to the pipe
Cutting copper pipe before joining
Deburring with a deburring tool
Degreasing and cleaning the outer surface
Cleaning the coupling socket and fitting
Three main connection methods
Before connecting the pieces of copper pipes, they must be cut in accordance with the wiring diagram and prepared. You will need a pipe cutter or a hacksaw, a pipe bender and a file. And for cleaning the ends, fine-grained sandpaper will not hurt either.
Only having a diagram of the future pipeline system in hand, you can calculate the required amount of consumables. It is necessary to decide in advance where and what diameter the pipes will be mounted. It is also necessary to clearly understand how many connecting elements are required for this.
Option #1: Copper Pipe Welding
Automated or manual welding of copper pipes requires electrodes and gas to create a protective atmosphere (nitrogen, argon or helium). You will also need a DC welding machine and, in some cases, a torch. The electrode can be graphite, tungsten, copper or carbon.
The main disadvantage of this installation technology is the significant differences in the characteristics of the resulting seam and pipe metal. They differ in chemical composition, internal structure, electrical and thermal conductivity. If the welding is not performed correctly, the joint may subsequently even disperse.
Due to the alloying of copper as a result of the action of the deoxidizer present in the electrode, the weld in many respects differs greatly from the base metal being welded.
Welding copper pipes can only be correctly connected by a qualified craftsman. This requires certain knowledge and skills.
This installation option has a lot of technological nuances. If you plan to do everything yourself, but there is no experience with a welding machine, then it is better to use a different connection method.
Option #2: Capillary soldering
In domestic conditions, copper pipes are rarely connected by plumbing welding. This is too complex, requiring specialized skills and time consuming. It is easier to use the method of capillary soldering using a gas burner or a blowtorch.
The technology of soldering copper pipes with solder is based on the capillary rise (leakage) of the latter after melting along the gap between two pressed metal planes
Soldering copper pipes happens:
- low-temperature - soft solders and a blowtorch are used;
- high-temperature - refractory alloys and a propane or acetylene torch are used.
These methods of soldering copper pipes do not have much difference in the end result. The connection in both cases is reliable and tensile. The seam with the high-temperature method is somewhat stronger. However, due to the high temperature of the gas jet from the burner, the risk of burning through the metal of the pipe wall increases.
Solders are used based on tin or lead with the addition of bismuth, selenium, copper and silver. However, if the pipes are brazed for the supply system drinking water, then it is better to refuse the lead version due to its toxicity.
Image Gallery
To implement low-temperature welding, it is not necessary to have special equipment and special skills of the performer. You can do it on your own
Low-temperature solder joints are mainly used in the assembly of pipelines from R 220 soft pipes. They withstand a pressure of 220 N / mm², which does not exceed the operating parameters in domestic heating and water supply networks
To perform low-temperature soldering, it is enough to heat up the pipe and solder with a standard blowtorch
To create a melt that fills the capillaries and the gap between the connected pipes, low-melting solder is used, which quickly melts and spreads freely along the socket
Low temperature welding at home
Cove with soft copper pipes
Blowtorch for low temperature soldering
Use of low-melting solder
There are two ways to solder copper pipelines:
- socket;
- with fittings.
The first option involves expanding the end of one of the connected pipes with a special expander. Then this socket is put on the second pipe, and the joint is soldered with solder.
The end is expanded in such a way that a gap of 0.1–0.2 mm remains between the outer and inner walls of the products to be joined. More is not needed. Solder on it due to the capillary effect will still fill the entire gap.
In this technology, it is important not to damage the pipe during expansion. If it is made of hard copper (R 290), then it will have to be fired first. In this case, the metal at the junction acquires the properties of a soft analogue. It is important to keep these changes in mind when calculating the parameters of the working pressure in the pipeline.
The use of special fittings for capillary soldering eliminates errors with the degree of expansion of the pipe during the formation of the socket, they are initially adjusted to the desired dimensions
To simplify the do-it-yourself soldering of copper pipeline elements, it is enough to purchase ready-made couplings, turns, tees and plugs. They already have the necessary bell. The use of these parts leads to an increase in the cost of installation work, but greatly simplifies them.
To clean the metal at the place of soldering and lubricate the solder, the ends of the pipes to be joined are covered with flux. It should only be applied to the outside of the pipe walls. Bells and fittings are not processed from the inside. This is simply not necessary.
Image Gallery
High temperature soldering requires the use of a gas propane or acetylene torch
For prompt low-temperature melting, fittings with fusible solder fused into them are used. They can be used for high temperature soldering.
To improve the quality of the solder, the pipe sections to be joined are coated with a flux, which plays the role of lubrication and pickling of the metal. Borax is used as a flux in high temperature soldering.
For the production of high-temperature soldering, a refractory solder made of bronze or an alloy of silver and copper is required. It is supplied in the form of rigid rods with a diameter of 3 mm.
Propane or acetylene gas burner
Using Welded Solder Fittings
Flux treatment of the joint area
Solder rod
To perform soldering, the pipes are inserted into the socket and heated with a burner. When the desired temperature is reached, solder is brought to the gap. It starts to melt and flow inside.
If too much of it gets into the joint, it will flow out from inside the pipeline, which will lead to a narrowing of the internal diameter of the pipe. And at a low flow rate, the connection will not be soldered enough.
If problems arise with the use of solder, then you can use fittings in which it is already present in the required volumes. To simplify the work, a capillary belt made of the corresponding alloy is now introduced into these connecting elements from the inside at the factory. This part only needs to be put on the pipe and heated with a burner.
Option #3: Push-In Fittings and Press Couplings
One-piece connection of copper pipes can also be performed using press couplings or compression (collet) fittings. They use an o-ring instead of solder. The first option is clamped on the pipe with special tongs, and the second - with union nuts and a key to them.
To carry out correct installation hot and cold water supply, gas supply or air conditioning, it is necessary to familiarize yourself with the rules and methods of connection in a copper pipe system. The high cost is justified by the high technical specifications and long term use.
Fig 1. Working with a special burner
What are the nuances
To organize the creation of a pipeline system, pipes made of durable plastic are used. Stainless steel belongs to the expensive price segment, but reliability covers this nuance. For capital repair work, a copper pipe can be a full-fledged alternative.
Such a system favorably tolerates sudden temperature changes, is not afraid of a large amount of chlorine or ultraviolet content. To prevent the development of corrosion, inside are installed special devices. In the absence of compositions of heavy metals and other substances in the liquid, nothing will prevent such pipes from serving for a dozen years.
Significant shortcomings include the following:
- Softness.
- High price.
The last disadvantage is considered quite justified due to the long service life.
Basic requirements for welding
- It is undesirable to use the lead version in the process of manufacturing water supply, since this is a material with increased toxicity.
- The optimum water supply flow should not exceed 2 m/s. Otherwise, solid impurities will begin to adversely affect the functioning of the structure.
- During the installation process, the use of flux is important; at the final stage, the entire system must be cleaned. Otherwise, corrosion will form on the copper walls.
- At the joints of the structure, there should be no overheating. Otherwise, the strength of the structure is lost, as is the tightness at the joints.
- It is planned to carry out soldering using other metals, the connection of a copper pipe with a brass or bronze fitting is mandatory, otherwise the pipe will lose its strength.
- If bumps or burrs appear during pipe cutting, they must be smoothed out before soldering. This is due to a decrease in working time, the appearance and increase in the area of deformation.
- The use of abrasive compounds is strictly prohibited. Residual particles can lead to metallic flaws or fistulas.
When in contact with other substances in the process of working with additional types of material, the flow of water should be directed from them to the copper structure. If this rule is violated, the chemical reaction pipeline.
 Fig 2. Water direction
 The metal has a high ductility, so it is easily subjected to deformation during the cutting process.
Main types of connections
With the start, it makes sense to read the wiring instructions and take care of the pre-preparation: cut several pipes. You will need the following tools:
- pipe cutter,
- pipe bender,
- hacksaw,
- file.
To correctly clean up, it is optimal to use sandpaper. The correct calculation of materials can be made only if there is a plan for future work, which pipe diameter is appropriate. Counting the number of connecting elements is considered a necessary procedure.
There are several ways to connect copper pipes used in installation work Oh:
- Welding. On the manufacturing enterprises, the process has long been automated. However, it can be used independently by means of a special apparatus and electrodes. To create a protective environment, helium, argon, nitrogen are used. In some situations, you have to use a gas burner. Electrodes use copper, carbon, graphite or tungsten.
An important nuance is a strong discrepancy in the characteristics obtained at the seam and the metal from which the pipe is made. There is also a difference in the chemical definition of the composition, thermal conductivity parameters. If a violation is allowed in the technology, the probability of a seam divergence will increase several times.
 Fig 3. Welding result
 Only a qualified specialist with extensive experience can competently and accurately carry out welding. It is connected with many nuances when choosing this technology. When planning to do all the work yourself, it is better to use alternative way connections.
- Capillary. In everyday life, specialists rarely encounter the need to connect copper pipes. by the most simple solution The task is soldering using a gas burner or a blowtorch.
There are two ways:
- using high temperatures. You will need a propane or acetylene burner, hard metal alloys,
- at low temperatures. Enough blowtorch and soft metals.
 Fig 4. Capillary soldering
 The end result is almost identical: a reliable and durable connection. The first option involves a more resistant and smooth seam. But the likelihood of burning the pipe increases due to high temperature gas heating. For solder, you will need a base of tin, or a combination of lead with bismuth, copper or silver. But the use of heavy metals (lead) is not advisable to choose when installing water supply.
At home, it is realistic to implement:
- connection of copper pipes using compression fittings,
- bell-shaped.
When choosing the second option, one end of the pipe is pre-expanded by means of an expander. It is put on the end of another pipe and soldered. The procedure is performed only at the junction of pipes. Expanding the end of the pipe, 0.1-0.2 mm is left as a gap. The space is completely filled with capillary technology.
It is important not to apply mechanical damage soldering structures. If the pipe is made of durable R290 copper, it is pre-fired. The result is an analogue with greater softness. Pressure changes must be taken into account in the calculation process.
To facilitate the process, you can purchase ready-made connecting fasteners: coupling, tee, turn, plug. They already have a bell. But this requires additional financial costs, although it significantly simplifies the procedure and reduces the time for work.
 Figure 5. Fasteners
 The pipe is coated with flux so as not to use additional filters for cleaning. Solder is carried out when reaching optimum temperature. When melted, the metal flows inward. If a large amount gets in, it will flow out on its own from the inside of the structure. As a result, the pipe diameter becomes smaller.
- Press coupling or collet fitting. In places where it is planned to make solder, put on a ring with a seal. If a press coupling is used, then it must be clamped with tongs, and when fitting, you need to get a key and a union nut. The ends of the pipes must fit tightly so that there are no gaps. The clutch eliminates leakage.
 Fig 6. Push-in fitting
 For the implementation of everyday tasks, the connection of copper tubes using auxiliary elements and without soldering is the best option, since the probability of admitting serious mistakes.
 Fig 7. Ways of connecting copper pipes
 Choice of mounting technique
In practice, two options for installing a copper piping system are most often used. Before starting work, everyone decides for himself which pipeline will be: detachable or one-piece.
There are the following connection methods:
- welding using an electric machine,
- by pressing,
- usage gas burner or an electric soldering iron.
All methods are allowed to be selected in production, regardless of the type of pipeline. The main thing is to decide whether fittings will be additionally used or not. If the system needs to be lightweight and accessible in terms of repairs or additions additional elements, it is advisable to make the pipeline detachable. Fitting can be choose:
- compression,
- threaded,
- with automatic lock.
For self-creation this is the best option, there is no need to use soldering. It is not necessary to have extensive experience or knowledge to make a collapsible system yourself in living conditions. Periodically, you will have to tighten the nuts to avoid leaks. Constant adjustment of the pressure leads to a decrease in the strength of the fasteners.
The option without including connectors is relevant in the situation when it is planned to close it with a concrete screed. This is where welding becomes a must. It differs from the first option in its long service life and reliability. The thread should not be present on the copper product. The connection is made only with the help of fittings. Additionally, soldering or pressing is required.
 Fig 8. Example of a one-piece system
 Conclusion
The choice of copper pipe connection depends on the conditions under which it is planned to carry out all the work and for what purposes it is necessary. As a rule, adhesive work by means of a special apparatus, it is advisable to choose if there is specialized knowledge and experience. Without soldering - an option definitely for household use.
In the latter case, connecting elements and fittings are additionally purchased. But you will have to periodically monitor the condition of the pipeline, because over time, the fasteners may leak. Therefore, periodically you will have to tighten the fasteners.
During plumbing work, as well as when laying sewer pipes for the home, it often becomes necessary to connect various segments made of copper pipes. It is about this difficult procedure that we will discuss further.
Cutting a copper pipe with a cutter
Initially, it is necessary to cut the pipes of the desired size, for which a special tool is used, shown in the following figure.
How to cut a rigid copper pipe. The incision is made special tool, the clamp of which must be tightly tightened, and then begin to rotate around the pipe, repeating it until the pipe is cut.
- Pipe cutter wheel.
- Pipe cutter.
- Pipe cutter guide wheel.
- Copper pipe.
- Side of rotation of the screw.
- Handle for tightening the clamp of the pipe cutter.
The principle of cutting a pipe is very simple. The cutter is put on the desired end of the pipe and moves to the place where the cut will be located. The clamp of the cutter must fit snugly against the pipe, for which the screw (clamp) should be tightened. Next, you need to start rotating the cutter around the pipe, gradually tightening the screw, and so on until the pipe is cut.

The classic use of a copper pipe cutting tool
Of course, you can use a hacksaw to cut the copper pipe, but with such a cut, the edges of the pipe will be too uneven and will have to be smoothed separately.
The pipe is cut, now you can start grinding the edges.
Edge processing of copper pipe after cutting
First of all, you should clean the edges of the pipes, removing all possible irregularities. For this, a needle file or a semicircular file is usually used.

Carefully remove any irregularities left after the cut from the edge of the pipe. To do this, you will need a needle file or a rounded file.
- Copper pipe.
- Irregularities and scuffs after cutting the pipe.
- A file or needle file of a semicircular shape.
Grinding pipe edges
Now we take a thin skin and proceed to grinding the outer surface of the edge. Polish it until it shines. Next, the inner plane of the pipe is processed right at the edges. To do this, as a rule, you can purchase special brushes at the nearest hardware store.

Grinding the edges of a copper pipe with sandpaper is not at all difficult
Do not overdo it with the surface of the pipe - if you remove too much material, then there will be problems with subsequent soldering.

The edges of the pipe, both outside and inside, must be carefully cleaned with a thin sandpaper.
- Copper pipe.
- Sandpaper (thin).
- Using light pressure, sand the edge of the pipe.
- Cleaning the edge of the pipe.
- Copper tee.
- Fine sandpaper.
- Cleaning the inside edge.
- Run sandpaper along the inside of the pipe.
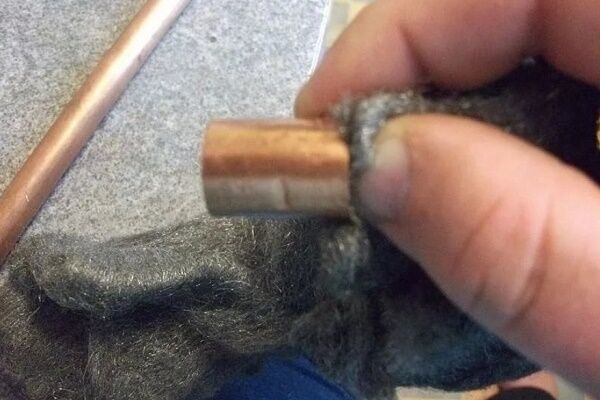
Flux application
Next, we need a brush, with which a thin layer of flux is applied both inside and outside the pipe. Because flux is a reactive etchant, use it carefully to avoid possible corrosion of the pipe.

It is advisable to use a brush to apply a layer of flux. Do not try to do this with your fingers - the flux is very poisonous and harmful not only to the fingers, but also to the eyes.
- Copper pipe.
- Copper tee.

Apply the flux to the copper pipe with a brush
Insert the pipe into the fitting as tightly as possible. Rotate this fitting to spread the flux evenly. If any drops remain outside the pipe, remove them.

With the edges of the pipe lubricated with flux, slide the fitting onto the pipe and rotate it so that it is more evenly distributed over the pipe. Be sure to remove any remaining flux that has leaked out.
- Copper tee.
- Insert the pipe into the fitting.
- Rotate the pipe to spread the flux over the fitting.
- Wipe off any remaining flux.
- Copper pipe.
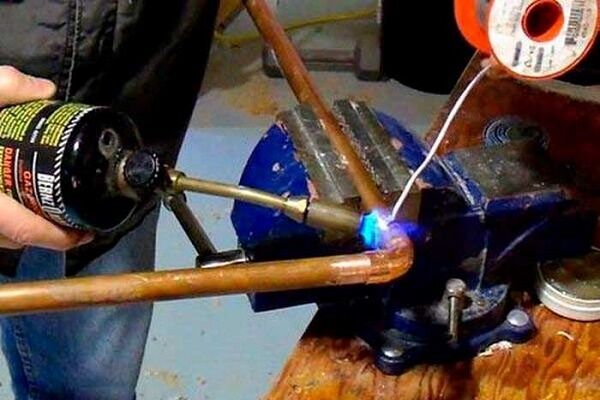
Treatment of pipe joints with a burner
Let's start with the burner. Light it and bring the flame of the burner to the edge of the pipe joint. Heat up the end of the fitting and blaze the end of the fitting one after the other.

Both the pipe and the fitting must be heated with a torch to a temperature at which the solder will begin to melt.
- Heat up the pipe.
- Heat up the side of the fitting.

Processing the joint of a copper pipe with a propane torch
Solder distribution
When the joint is hot enough and the solder begins to melt, touch the end of the solder to the point where the fitting and pipe join. Go through this junction in a circular motion. After the entire edge is covered with solder, and you are sure that there are no gaps left, you need to wait until the joint has cooled down. Also note that when applying solder, the burner flame must touch the pipe.

The end of the solder must be applied to the fitting and fired along the joint. The solder will then melt and go straight into the gap between the pipe and the fitting. During the entire process, warm up the fitting so as to maintain the melting temperature of the solder.
- Copper fitting.
- Hold the propane torch at the fitting.
- Copper pipe.
- Apply solder to the joint and spread it along the edge.
- Solder.

Use of solder to weld copper pipe
How does the solder get directly into the space between the pipe and the fitting, will it not remain outside? In fact, the solder will enter the gap due to the action of capillary forces, and it can flow both vertically and horizontally. This process is clearly illustrated in the following figure.

Mechanism of action of capillary forces on solder.
- Copper fitting.
- Copper pipe.
- Solder that enters the gap between the pipes due to capillary suction.
- The solder hardens and forms protective layer, which is distributed along the edge of the joint.
- How solder is distributed.
- Straightened solder.
- Cooled solder takes on a paste-like form.
To select a solder, one must be guided by the pressure of the liquid in the pipeline being laid, as well as the melting temperature of the solder. According to existing standards, in fluxes and solders intended for sewer systems, the concentration of lead should not exceed a value of 0.2%.
How to connect soft copper pipes
It is not for nothing that a soft copper pipe is called that way - it is not difficult to bend it with your hands. However, at the same time, the risk that the pipe will be bent incorrectly is quite high. Therefore, we strongly recommend using a pipe bender.
If the pipe is too kinked, water will not be able to fully pass through the kink zone, not to mention the appearance of cracks. If a bend of a sufficiently large radius is needed, then the flexible sheath of a conventional water hose, made of a spring, is perfect as a pipe bender. It is only necessary that this sheath matches the diameter of the copper pipe.

If you need to bend a long soft copper pipe, you can use a spring sheath of a conventional hose. The pipe should be bent carefully, without applying too much force. Then, simply by rotating, remove the pipe.
- Spring protective sheath.
- Soft copper pipe.
To bend the pipe, you can gently press on it with your knee. In this case, the larger the bending radius of the pipe, the less likely it is that the pipe will be too bent.

The simplest method of bending a soft copper pipe: using a regular steel corrugated hose and a plastic bottle
If you want to bend the pipe within a smaller radius, then you can not do without a manual pipe bender. Rotate the handles 180 degrees before inserting the pipe into this tool.
When the pipe is inserted, one handle must be raised so that it makes a right angle with the other handle. It is difficult to make a mistake here, since there is a corresponding mark on the pipe bender roller that must be aligned with the bending point.
Pipe bender application video
This video demonstrates how to properly use a pipe bender to bend copper pipes for plumbing or air conditioning systems.
Using a pipe bender
Now just bring the bender handles together until you get exactly the bend you want. Before bending the pipe, make sure that the pipe bender fully matches its diameter.
Lever pipe bender - perfect tool for bending copper pipe. In this case, the minimum bending radius depends on the diameter of the pipe you are bending.
- Copper pipe.
- Copper pipe.
- Turn the handle until the pipe is bent to the desired angle.
- Rotate the handles 180 degrees and insert the pipe into the pipe bender.
- Copper pipe.
- Pipe bender roller.
- Copper pipe.

Classical lever pipe bender for bending copper (and not only) pipes
Flaring connection of copper pipe
To connect a soft copper pipe, a coupling is often used, into which the pre-flared end of the pipe is embedded. A joint of this type has many advantages, in particular, it is very easy to dismantle it if necessary and fix it again.
Typically, a flare joint is used when a propane torch cannot be used, or if it is not possible to drain water from an old pipe. To fasten the coupling, it is enough to put it on the pipe, after which it is necessary to flare the end of the pipe using the appropriate tool.

The photo shows the flare and clamp with a set of holes for calibration. All this together and there are tools for the correct flaring of a copper pipe.
Flaring process
The flaring of the copper pipe is as follows.
- First you need to clean the end of the pipe.
- A coupling is put on the pipe.
- The pipe is inserted into the calibration hole and then clamped. Of course, the diameter of the pipe must match the diameter of the hole. In this case, the end of the pipe must be installed flush or slightly higher than the clamping plane.
- An appropriate fixture is put on the clamp, after which the screw should be rotated. Ultimately, the end of the pipe must be flared at an angle, which, on average, is 45 degrees.

The end of the pipe should be clamped in the calibrated hole. Next, the flaring tool is moved to the clamp, and the cone is inserted into the pipe. Flaring is carried out by rotating the screw.
- Edge flaring tool.
- Flaring cone.
- Calibration holes.
- Clamp.
- Copper pipe.
The pipe is removed from the calibrated hole, after which the coupling is transferred close to the previously flared edges.

A coupling is used to connect the flared ends of copper pipes.
- Coupling component for flaring.
- The tapered end of the component is inserted into the flared part of the pipe.
- Coupling component in the form of a nut.
- Flared pipe edges.
- Copper pipe.

Standard Coupling for Copper Pipe
To wrap the threads of the coupling, use sealing tape and then tighten the appropriate nut tightly. Now the clutch is fully assembled and we can admire it in the next picture.

The assembled clutch looks like this.
- Nut for flaring.
- The central component of the coupling.
- Flare nut.
- Copper pipe with flared end.
Sometimes copper pipes are cut at the factory with an allowance of 2-2.5 cm. This is done so that in case of unsuccessful flaring, the end of the pipe could be cut off and flared again.
Video on expanding copper pipes
A visual tutorial on expanding copper pipes with your own hands. You can see for yourself that there is nothing complicated in this process.
Coupling with gasket
To connect a copper pipe with taps and valves, an element such as coupling with gasket .
In fact, this is a regular nut with a sealing gasket. In this case, the fitting that is connected to the coupling must have a thread corresponding to the thread of this nut.

This coupling has a special fixing gasket that fits exactly into the nut, which has internal thread, after which it is inserted into the hole of the reinforcement, which, in turn, has an external thread.
- Copper pipe.
- Screw.
- Sealing gasket.
- Coupling for connection with a gasket.
- Connection with another pipe.
- valve or fitting.
Installing this clutch is easy. Initially, a nut is put on the pipe, then sealing gasket.

Typical gasketed coupling for copper pipe
Next, the pipe is inserted into the fitting, it must be exactly perpendicular to the opening of the fitting. This is very important point, because if the pipe is installed in the fitting even at a slight angle, then leakage is almost inevitable.
The sealing gasket is now pressed against the edges of the fitting. It remains to tighten the nut on the valve, and it is not necessary to tighten it much, about a quarter of a turn.