Paintings in the technique of woodcarving. Embossed carving: from basic skills to confident technique
When decorating a living space, you can use a variety of materials, but traditionally wood is used for these purposes. To date, artistic processing is carried out using huge number technician, but perhaps the most spectacular results are obtained when using slotted woodcarving.
The technology cannot be called complicated, but the resulting products are striking in their beauty and grace. We will discuss this technique in more detail later.

What is a thread?
Through drilling and cutting through any background are the essence of openwork cutting. Upon completion of the work, light and airy patterns are obtained. There are through and overhead thread options. The first option creates the desired effect with a gap, the second implies overlaying on any background (base).


To make a through cutting of wood, drills, special chisels, and saws are used. The most suitable tool would be electric jigsaw, allowing you to quickly and easily complete almost any drawing.

The process of work itself assumes the presence of pre-prepared drawings for the slotted thread. Therefore, we will briefly consider some of the steps that are important to go through on preliminary stage.

Preparatory stage
For first-time carvers, it makes sense to focus on theory. Printed publications, needlework sites will provide comprehensive information on the considered decoration method.

After studying the technology, it is worth preparing the tools, if necessary, purchase them in the store. In addition to a jigsaw, chisels may be needed. different sizes, drill and drills, cutters, expendable materials for grinding, etc.


Another important milestone at this stage will be the choice of patterns and sketches of the future jewelry. You can try to make the latter yourself or find suitable ones on the network, since there are plenty of specialized sites on this topic. Printing at the correct scale will complete the preliminary step.

Wood
The main requirements for the material are its dryness and quality. There are many blanks in specialized stores dedicated to handmade. Suitable wood is available in hardware stores and sawmills.

In addition, you can "profit" quite well at furniture factories, where there is always a large amount of unnecessary scraps. One more possible variant- used boxes and pallets.

The quality of work depends not only on the master, but also on the species and type of wood. Each has unique properties, which is important if you have specific creative goals. Let's take a quick look at some of the material options.

Pine is the most accessible and inexpensive species. However, it is suitable only in rare cases... There are several reasons: resinousness, different density of layers, a noticeable texture that interferes with the creation of a small pattern.

Aspen is considered soft material and unsuitable for a beginner. It is easy to cut, the wood wrinkles and you need a lot of experience to work with it.

Birch and linden are distinguished by their excellent structure, have the necessary density, which makes it possible to embody even the most daring sketches of slotted carving.


Plum is excellent because of its pliability in processing, at the same time it has the right hardness. Small drawing and plum jewelry for women will be an excellent product in the hands of a master. Beginners should also try their hand at this material.

In order to avoid subsequent cracking and bending of the slotted product, it is important to remember that the material is dry. Random drying in a warm and well-ventilated room will be the most in the best way... Boards are placed on the end and on the dies to provide air access to all sides.

Creative process
Woodwork begins with transferring the pattern to the workpiece. For this, at the preliminary stage, all templates were prepared. When the drawing is applied to the part, the stage of reaming the holes next to the drawn lines begins.

The drill should be of such a diameter that a jigsaw file can easily pass into the resulting hole. Where it is impossible to make cuts with a jigsaw (too small a pattern and sharp bends), use a narrow hacksaw blade.

Experienced craftsmen advise using saws with fine teeth, otherwise the edges of the slots will have a ragged outline and the product will lose aesthetics. Drill preferably with feather drills, having prepared a thin hole in advance.

Gluing helps from torn edges when slotted on plywood thick paper with back side blanks. For beginners, it is better to try simple patterns with large details and a minimum number of corners.

Finishing
Refinement of the product is performed to obtain smooth and clean edges. Chisels are used; a sharp knife is useful in hard-to-reach areas.

Cleaning is carried out using sandpaper, a file or an abrasive wheel. Ready product sanded on both sides until the desired appearance is obtained.

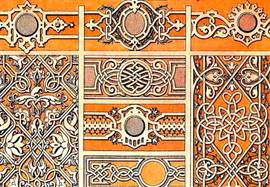
Looking at the photo of the carved carving, it becomes clear that the resulting patterns are an excellent decorative element for furniture, window frames, cornices. The elegance of the product makes it possible to create excellent women's jewelry, decorate screens and much more.

Photo of slotted thread


One of the most luxurious, prized for originality and handmade, by right are considered products made in the form of woodcarving. Since ancient times, with the help of this type of art, unsurpassedly decorated towers and huts have been created.
Some of them are currently considered architectural monuments. This art begins to revive in modern world... Great helpers in this matter are stencils for wood carving.
In contact with
What is a stencil for?
First, let's try to figure out what stencils for woodwork are. These are special ones, with the help of which elements of patterns are applied to the surface of the wood.
They are much make it easier to repeat the same characters and allow you to speed up your work. For example, the most demanded stencils are samples for platbands.
With their help, quite complex work for interior and facade decoration.
Stencils are subdivided according to their purpose for creating interior elements:
- ribbon carved ornament;
- carved platbands;
- pilasters;
- towels;
- carved balusters and so on.
All varieties are considered professional templates. You can use them create multiple ornaments for wood carving volumetric and significantly facilitate the task that is set before the master. There is no need to create them yourself. On the Internet pages you can find and download the version you like.
How to choose a stencil
Wood carving patterns are so diverse that they can be used by both novice craftsmen and high professionals. With their help, unpretentious ornaments and high-level works of art are created.

The main thing is to make the right choice. To do this, you must adhere to certain rules:
- if the incisors began to be used quite recently, then do not choose intricate ornaments, since it is rather difficult to work on them, and you can spoil the workpiece;
- choose their own stencil for each type of woodcarving;
- before starting work, it is necessary to apply a drawing on a stencil to the workpiece, the lines must be neat and clear.
 Finding stencils is easy today. This can be done using electronic libraries.
Every decorator will appreciate the convenience and rich selection of this source. Here you can pick up drawings from a bygone era, as well as modern masterpieces.
When making a choice, be sure to commensurate the dimensions of the workpiece and the image itself.
You also need to choose a sample that will look appropriate on an element of the interior. We pay attention to the nuances:
- for a large product, you do not need to choose a stencil with small elements or openwork patterns;
- stencils with large drawings are inappropriate for small items;
- proportions must always be observed.
All of these tips apply to any drawings.
Types of wood carving
Wood carving does not have a narrow direction, on the contrary, it has several varieties:
- slotted;
- flat-relief;
- embossed.
Slotted carving on plywood
 The key to success when making a slotted thread - right choice ornament. Thanks to him, plywood carving defines the overall concept and gives aesthetics to the product.
Drawings and ornaments on floral or animalistic themes - standard representatives classic style and are suitable for any direction in the interior.
Very often used slotted lettering... In this case, ready-made stencils are difficult to find, since they are created individually for each case. This is due to the fact that it is necessary to maintain the size, style of the font, and the set of words is always different.
Important! The situation is completely different with patterns of plant, animal and fantasy style. Many variations on this topic can be found on the Internet. Some options are shown in the photo below.
House wood carving
Brownie is the main focus of decorating huts, which is very common in the Nizhny Novgorod Territory. It is she who can boast of various lace patterns... For self-execution, you should select the appropriate sketches.
The main condition for house carving is to avoid small parts... They will be lost on the facade of the house, and they will not last long.
House carving options can be selected on woodcarving sites. But there are craftsmen who can make a template to order. In this case, you can realize exactly your idea and get an original pattern.
Attention! House carving patterns are applied using tape stencils.
Through wood carving
A distinctive feature of a through thread is complete wood removal from the inside of the figure.

Through thread comes in different styles:
- simple, in which elements are cut out along the contour of the picture;
- openwork, when a drawing is created with a three-dimensional effect due to multilevel cutting.
Frames, various overlays, door leafs, and elements for decoration are made with the help of through-thread.
Through thread in oriental style performed with a jigsaw.
Sawing with a jigsaw
Sawing with a jigsaw is mainly carried out on plywood. For execution quality work you must have at least the slightest experience with the tool... Also, an important factor is the presence of an original stencil with the image of animals.

Frequently used stencils:
- a pair of swans;
- the head of a deer, a wolf;
- bettas on the knitting needle;
- horse standing on its hind legs;
- butterflies.
It all depends on the style of the interior, which needs to be supplemented. decorative elements... You can easily find sample templates on the Internet.
 Most suitable material for cutting - birch plywood 3-10 mm thick... In addition, for work you need to prepare:
- copy paper for cutting the pattern;
- special paper for grinding parts;
- joiner's glue for joining parts;
- transparent varnish for a dignified appearance.
Before starting work, the workpiece is carefully sanded with glass paper, only then they begin to transfer the drawing.
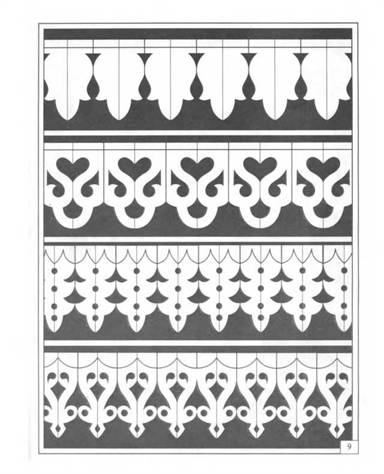
Floral ornament
Often, plant or leaf designs are made in stripes or borders, consisting of repeating patterns. Can be performed in an individual composition that contains an image trees, fruiting plants, various floral elements etc.

The work is done in different ways:
- display in naturalistic form;
- simplified plant elements.
Floral ornament for wood carving is in second place in popularity after the geometric pattern. Favorite thematic elements at all times are lilies, grape leaves and berries, oak, hops, ivy and more.
Sketches for patterns
Stencils for wood carving are quite diverse in their subject matter. Some of their variants are used in a narrow direction, and some can be found on any interior elements.

Here are several options for sketches that can be used for a specific purpose:
- Wooden pattern is used to decorate the front of houses... It looks perfect on both doors and walls.
- Cutting artistic style used to decorate dishes and furniture.
- Especially in high esteem products made with the use of intricate openwork cutting... It is most often used for household items.
Important! A well-chosen sketch will help you carve wood quickly and accurately.
Useful video: templates for wood carving
Each type of cutting has its own processing technology, detailed elements are maintained. In some cases, several techniques are used simultaneously, which are subsequently transformed into a three-dimensional canvas with the presence of the smallest fragments. This is what characterizes a true master.
Wood carving for beginners is an interesting and fun activity that is not particularly difficult. It is not necessary to have artistic skills to create ornaments and patterns. Now ready-made sketches and video tutorials come to the aid of a beginner.


Most even successful masters are inspired by the work of other people, so be sure to carefully review the stencils, diagrams and drawings of other amateurs.

Varieties of techniques
Sculptural carving is the most difficult and requires certain skills. There are many books on this technique.

The carving features a fully finished background and beautiful ornament. It is performed with a jigsaw, a knife, and finishing can be produced with a chainsaw.
Geometric carving will help you learn the technique.

In order to make artistic carvings, it is easier to copy a finished sketch than to create your own.
But most of the ready-made patterns are distinguished by a certain intricacy, so a novice master can try himself in creating his own simple sketch.
Sketching
When designing a sketch the following sequence of steps must be followed:
- A workpiece is selected for work;
- The sketch indicates the main elements and places where the thread will be applied;

- With the help of drawing accessories, the picture is redrawn onto graph paper or tracing paper with scale markings;
- If any elements are repeated, then it is enough to create a single stencil.
With the skills of working in the simplest graphic editors (for example, Paint), you can create a sketch there, and then simply print on paper at the required scale.

Stencils are usually used many times, so it is advisable to make them from a relatively dense material (cardboard, plywood).
Here are some details on how to transfer a drawing from a template to a tree:
- The sample is fixed by a router directly on the base, cutting is performed directly along its contour;
- The contours of the stencils are transferred to the tree with a simple pencil;
- You can transfer a sketch from paper to a board by placing tracing paper under it. After drawing the outline of the sketch, a trace of carbon paper will remain on the tree;
- The simplest patterns can be transferred using gouging (with a needle, knife or awl).

Stages of work
When the sketch is transferred to the base, the most interesting process begins - the direct processing of the wood.
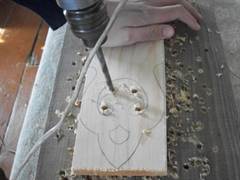
If you are working with the through-thread technique, the first step is to apply starter holes in each piece. This is done, as a rule, using electric drill... After that, a saw is inserted into the holes, and part of the tree is cut out. Then the edges are aligned and the decoration begins.
Flat and volumetric threads are made slightly differently.

At the beginning, the contours of future patterns are made with a knife. Next, the cutter cuts the deepest central part. All other depressions are formed from it.
Small parts are made with a chisel.
Sometimes you may need additional tools(for example, mallet, for harder types of wood).

A deep relief is made with a chisel with a curved blade. Upon completion of the work, all edges are processed in order to eliminate roughness and chips.


Any owner dreams of making his home memorable and beautiful. If the house is no longer new, it is not so easy. One of the possibilities is carved platbands. They will even turn an ordinary "box" into a masterpiece.
Material for platbands
Carved platbands are made mainly of coniferous wood. The best option- pine, normally cut, inexpensive, durable due to its high resin content. In principle, you can use any other coniferous board, but it is better not to try with spruce: it is too fibrous, it cannot be cut even with the sharpest tool.
You can also make carved platbands from hardwood - linden (the softest), poplar, maple, oak, cherry, etc. But you need to know how to work with each species, get your hands on it, and there is no guarantee that something digestible will turn out, and hardwood is expensive. Therefore, window frames are often made of pine. You just need to pay attention to the quality characteristics.
Carved window trims - a way to make your home unique
If there is wood or a board that has lain for 3 years or more, you can use it: it is already definitely dry, only processing and calibration will be required. If there is no woodworking equipment at home (thicknesser and circular saw), you will need edged board... Carved platbands wood will do first or top grade... This means that there should be no knots, chips, or resin pockets on the board. Take wood chamber drying, with a moisture content of no more than 8-12%. This is not for sale in the markets, you need to look for it at sawmills and in hardware stores.
Why chamber drying? Because it is dried in a special chamber, rapidly removing moisture. At the same time, some of the boards crack, bend - these go to rejection, the rest are sold. If you make carved platbands from oven-dried wood, they will definitely not be crumpled and they will not crack.
Instruments
To make carved platbands with your own hands, you will need the following minimum set:
- drill with a set of drills;
- an electric jigsaw with a smooth start and a bunch of different wood saws;
- chisels;
- sandpaper with different grain sizes;
- flap disc made of sandpaper for wood on a drill.

To reduce the time it takes to create carvings and sanding, it is better to have a router and sander.
One by one or in bulk?
Carved platbands usually consist of repeating elements. At least two vertical battens on each window are made the same. And since usually several windows are drawn up, many identical elements are required. If the platbands are going to be slotted, naturally there is a desire to cut out several pieces at the same time, folding the boards in a pile and somehow fixing them.

The desire is understandable, but difficult to realize, and the benefits in time are not as great as it seems. The first difficulty is that home craftsmen usually have jigsaws that are not too powerful. To cut through several planks, you have to move the file more slowly along the intended pattern. On straight lines the speed is still tolerable, on curves it is low. And, the smaller the bending radius, the slower you have to move the file. If you are working with one board, there are no such problems. So, in terms of time, the gain, if there is, is quite small.
One more point. Even thick, good, expensive files are deflected with a large thickness of the workpiece. So, when cutting several boards at the same time, the quality of the cut on the bottom (or two) remains a big question.
The procedure for making a platband with a slotted thread
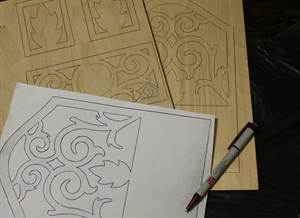
Using a template, we transfer the desired drawing to the board (where to get it, how to enlarge it, how to make a template, read below). If necessary, we correct, draw the details well. Next, we will describe the procedure step by step.

We remove the wood in the slots of the picture

Since the carving will be looked at from afar, some inaccuracies are not fatal, but it's still worth striving for the ideal.
Making a curly edge
Some platbands have a straight edge. Then we skip this stage. If the edge is curly, you will still have to work with a jigsaw.

If the cut is difficult, it may not be very attractive places. This is not scary, then we will process them where necessary - with chisels, the same jigsaw, emery. When you are satisfied with the result, you can move on.
Final revision
Owners wooden houses probably know everything about how to handle wood. But, just in case, let's repeat the general rules again.

Choice paints and varnishes very wide. Any for outdoor work. But keep in mind that opaque paints will have to be renewed periodically - just like that once a year. And that means - to shoot old paint, primer, paint again. The situation is simpler with oils for wood - they do not give a film on the surface of the wood, but are absorbed into the fibers. It is also necessary to renew the coating, but just remove dust and cover with a new layer. And the processing frequency is less. Cons of oil for wood - higher price, fewer flowers.

How to enlarge a template
Simple carved platbands can be made without templates. There will be several examples in the video - it shows how to outline, how to cut. But not everyone will be able to draw more or less complex patterns on their own. You need skill and talent. The easiest way is to find the diagram, print it in the right size, transfer to cardboard and cut out. This will create a pattern that you can trace.
The second way is to sketch from a photograph. Not all schemes can be found. Some, especially the old ones window frames, you won't find it anywhere. If you have at least some drawing ability, you can sketch them.

Even such an ornament can be drawn ... if you have the skill
Questions may arise about how to increase the size of the found schema or template. There are three options:
- Using any graphics editor. The simplest one - Paint - is in any computer running Windows (the "Image" tab, the "Resize image" line, select "centimeters" and put the desired length (height) in the box. The resulting file can be printed. If the printer is small format, it may be necessary to split into several pages, then glue them together and, according to the resulting picture, make a template.
- Using a photocopy. Copier has a zoom function.
- Taking graph paper, transfer the drawing to the desired scale. To do this, divide the original image into squares with a side of 0.5 or 1 cm (you can print it on a piece of paper in a cage). Then we transfer the lines to graph paper, increasing them in the required proportion.
The first two are faster. But when scaling, the picture may turn out to be fuzzy and blurry. It can be corrected by hand, you can draw in some kind of editor, for example, CorelDRAW. How to do this, see the video. Just an example of drawing a diagram for a thread.
Related Videos
Schemes, templates, patterns


The style is completely different ...
The art of wood carving. How long ago did it appear? Nobody will tell now. Since ancient times, wood has been the closest material for a person's attitude to the world. It often seems that, they say, it is necessary to correct this bitch a little, remove the unnecessary and it will become a work of art. But no, in fact, wood carving is a painstaking professional work. Skillfully, you can make a masterpiece!
- First, desire, creativity and good mood.
- Secondly, the material. In principle, you can cut any kind of wood. But the easiest way to work is with birch, linden, aspen, pine, spruce and cherry. The wood must be well dried. In addition to wood, you need paper for sketches, a template for smooth transitions of lines, a ruler, compasses, a triangle and a pencil.
- Third, tools. In general, a wide range of tools are used for cutting. But for a beginner carver, a jigsaw, an awl and a knife will be enough.
- Fourth, workplace... Before picking up the chisel, be sure to create yourself a workspace. For this, you need a table or bench. They must be stable and durable. But it's better to make a workbench. It is more convenient and reliable.
- Fifth, you need to create sketches for wood carving.
Let's get acquainted with the main types of carving. We will note 2 common types: sculptural and relief.
- Sculptural is separate worthy works and plots. Usually these are people, animals and abstract forms.
- With relief wood carving, images are made on the surface (background). For example, a bird hovering against the backdrop of a mountain landscape.
To get started, we need sketches. Where can I get them? This is your fantasy! Anything that you come up with and apply to the tree. But, if fantasy is tight, then you can find ready-made sketches on the Internet. The main thing is to start with simple sketches for stencils.
Found a sketch for wood carving. You need to turn it into a stencil. What is a stencil? This is the transfer of a drawing to paper. The paper must be strong. It can be tracing paper or carbon paper. With the help of them, we simply transfer the drawing to the surface. Or we create a stencil from cardboard. After that, attach it to the tree and outline the outline.
And if you use geometric thread , then you can simply draw a pattern on the blank. First of all, you need to select areas for yourself and determine which of them will be convex and which will be concave. Only in this case will the correct drawing on the tree be obtained. This, by the way, is the lightest type of carving. It is great for making boxes, boards, frames.
Gallery: stencil woodcarving (25 photos)


Contour Carving Stencils
 And also simple is contour thread... Here, the main thing is the ability to correctly cut grooves of the same thickness and depth. What we use a variety of chisels for. After cutting the blade in this style, usually the inside of the grooves is tinted. Then the sketch is perfectly visible and looks very picturesque. ... The dignity of this species cutting is the ability to take virtually any stencil and transfer to a blank. But there are many ready-made templates for those who want to try themselves just in this form of cutting. Animals, plants and landscapes look very good in this technique.
Geometric patterns for wood carving
The simplest templates are geometric figures, floral ornaments (leaves, twigs), butterflies. They are often used in the manufacture of carved platbands on the windows. In ancient times, it was believed that platbands protect the house from evil spirits. Therefore, they were often decorated with patterns in the form of laurel leaves, oak leaves, lotus flowers and lilies. They also used Celtic (Scandinavian) braid. This is a braid pattern, various weaves.
Stencils for plane technology
And with the help of the plane technique, you can create interesting shapes of various animals. For example, put a wooden bear or a swimming swan in your garden. Can be made fairytale heroes – formidable dragon or Serpent Gorynych... Or frighten the guests with masks of any mythical characters. By the way, masks are performed using volumetric technique. This thread requires skill and skill. They have different sizes: from 25 to 50 cm in length. You can come up with sketches of stencils for masks yourself or take ancient Slavic heroes from books, for example.
Stencils in Plane Cutting Styles
 Here the process will not be so easy... Here you need to make a deep background, it is located as if under the relief. The relief itself, as a rule, falls over. The transitions are made smooth with a file or emery. Make the background even or leave it slightly textured. In order for the artistic carving to turn out truly luxurious, we also cannot do without a stencil.
The ability to carve wood allows you to create many amazing beauty and internal energy of things. Developing technique and constantly learning, you can make real masterpieces of art. For example, you might start carving out icons and paintings. This is a very painstaking and exciting activity. Such canvases are quite expensive.
And with a fantasy, you can do Original gifts to your family and friends. For example, a wooden medallion engraved or carved clock... The latter can be both wall-mounted and floor-standing.
So wood carving can be not only a fun but also a lucrative hobby. The main thing is to have imagination, creativity and put your soul into your work. Then the products will not only delight you and your friends, but also protect you from negativity.

