Recuperator drawings. Air recuperator in a private house - independent production and installation
Energy Saving Technologies construction allows you to keep heat in the house and save on heating costs. But the resulting sealed room requires constant ventilation or ventilation system equipment. In the cold season, the difference in temperature between outgoing and incoming air masses reaches 40-60 degrees Celsius and is covered by the heating system. The result is that the costs of expensive additional building materials do not pay for themselves. A recuperator, a simple device used independently or as part of a ventilation system, can significantly reduce the imbalance.
What is recovery
Recuperation is translated from Latin as “return of what was spent.” When we're talking about about ventilation, the wasted resource is heat. Warm air leaves the room, the heating of which has already spent energy, and cold air enters, which again needs to be warmed. Air recovery is the process of equalizing the temperature of the incoming medium due to the thermal energy of the outgoing medium. Technically, it's just heat transfer.
What is a recuperator
A recuperator is a device for recycling thermal energy in one technological cycle of heating and ventilation of a room. It reduces the temperature difference between the incoming and outgoing air masses by 4-5 times and retains two-thirds of the heat lost during conventional ventilation and airing. Saves energy and material resources.
The design is based on a heat exchanger, through which two air flows come into contact and do not mix with each other. The first - warm - is drawn out of the room and goes outside, heating the working elements of the device along the way. It cools itself down. The second - cold - comes from the street and goes into the rooms. Its temperature increases due to interaction with the heated parts of the heat exchanger.
In the summer, when air conditioners are running in the house, the recuperator also works to equalize the temperature of the flows. Only the reverse process occurs - emanating from the room cold air cools the incoming one. This reduces the load on the climate control system.
Important! The recuperator reduces the load on heating and air conditioning systems.
The heat exchanger is installed in a housing, the design of which ensures the isolation of one flow from the other. The functional elements that ensure the operation of any type of recuperator are fans (supply and exhaust) and filters installed at the inlet of the flows.
Advantages of installing a recuperator
Air recuperators are not yet very common in Russia. But abroad, concerned about the conservation of energy resources and savings, they are widely used. Their installation provides the following advantages:
- Ventilation and heating costs are reduced by 30-50%;
- A comfortable microclimate is created in the house with constant access fresh air;
- There is no problem of uneven distribution of air masses, when cold air spreads along the floor and warm air rises;
- Dust and exhaust gases do not enter the room, as when ventilating through a window;
- Long service life of the equipment.
Important! The recuperator provides constant access to fresh air at a comfortable temperature without additional costs for heating it.
Types of recuperators
Depending on the design of the heat exchange unit, recuperators are divided into the following types:
- rotary;
- plate (radiator);
- tubular;
- chamber;
- recirculation;
- heat pipes.
Rotary type devices
In a rotary air recuperator, the working element that transfers thermal energy between the outgoing and incoming flows is a rotating drum. The internal cavity of the rotor consists of longitudinal cells (layers of corrugated steel) that do not interfere with the free passage of the air mass. Along the axis of the heat exchanger, the air ducts with the outgoing and incoming flow are separated.
Warm air passing through half of the heat exchanger heats the cell plates. When the rotor turns, these plates find themselves in a zone of cold air, where they give off heat to the flow entering from the street. In operating mode, cyclic heating and cooling of the plates occurs, due to which heat exchange occurs. The rotor rotation speed is adjusted by the recuperator's automatic system in such a way as to prevent freezing of the mechanism and achieve maximum efficiency of heat transfer.
Rotary devices are characterized by the following advantages:
- The maximum efficiency among all devices that perform recovery reaches 90%;
- Adjustable rotor speed allows you to regulate heat transfer;
- The return of some moisture allows you to do without humidifiers;
- They practically do not form condensate, so they do not require the organization of its drainage.
Flaws:
- To properly design a recuperator with a rotary heat exchanger, you need an impressive ventilation chamber, as a result of which such devices are quite large;
- It is impossible to exclude a slight mixing of the outgoing and incoming media - the air remaining in the channels joins the opposite flow during rotation.
- The presence of moving parts implies wear and tear of parts and failure Supplies(drive belt, gaskets, bearings, etc.), resulting in increased operating costs;
- Regular technical inspection and maintenance is required.
- Recuperation occurs only with a rotating heat exchanger, that is, with constant electricity consumption.
Plate type devices
The heat exchanger of a plate recuperator is a block (cassette) made of sheets of metal, plastic or cellulose, assembled with gaps of 2-4 mm. Between the plates there are longitudinal inserts (ribs) that form air channels and act as air flow guides.
The design of the heat exchanger passes air flows of different temperatures through the layers, alternating cold and hot. The media do not mix with each other - thermal energy is transferred through the plates.
According to the direction of movement of air masses, plate heat exchangers are divided into:
- cross-flow;
- countercurrent;
- direct flow
The cross-flow type is the most common, since such a heat exchanger has a simple structure. A plate block is assembled from square panels in such a way that the direction of the cells alternates - each subsequent layer is rotated 90 degrees relative to the previous one. Sometimes, instead of flat plates with ribs, corrugated sheets are used. The movement of air flows in such recuperators occurs crosswise.
Direct-flow and counter-flow recuperators have a more complex heat exchanger design. It has a section with parallel channels. Flows move along them either in one direction - in direct flow, or towards each other - in counterflow.
A feature of plate recuperators is the active formation of condensate on the plates when there is a large difference in air flow temperatures. Therefore, devices of this type must be equipped with a water intake pan and a drainage of condensed liquid.
If the condensation temperature is below 0 degrees Celsius, the heat exchanger begins to freeze. To combat this phenomenon, the following methods are used:
- They arrange a bypass outlet - when the icing (pressure) sensor is triggered, the cold flow is automatically directed to bypass the heat exchanger, and warm air at this time warms the plates;
- The frost-free section of the heat exchanger is equipped with automatic heating;
- The air duct from the street is allowed below the soil freezing level (length - up to 50 m), arranging a so-called “ground heat exchanger”;
- Two or three heat exchanger cassettes are installed sequentially into the recuperator body - this way the cold air from the street will come into contact with the coolest air, and the warmest air from the room will come into contact with the sufficiently warmed one;
- Heat exchangers are made from sheets of hygroscopic cellulose, the sheets of which absorb moisture from the air and return it to the cycle.
Attention! Plate recuperators must be protected from icing
Advantages of plate recovery devices:
- Simple and understandable design, you can assemble such a recuperator with your own hands;
- Easy installation and operation;
- Good efficiency– from 40 to 80%, and when installing several cassettes – up to 90%;
- Minimum energy consumption – for automation (for protection against freezing) and fan operation;
- Long service life - no moving parts, no wear of parts;
- Possibility of modernization - the thermal efficiency of the device can be easily changed by adding or removing plates;
- Air enters the premises even in the absence of electricity - due to natural exhaust.
Disadvantages of recuperators with metal and plastic plates:
- The formation of condensation requires a drainage device;
- Frost protection must be provided;
- An operating mode that includes regular defrost cycles has reduced efficiency.
Cellulose recuperators do not have all these disadvantages, but they also have their own characteristics:
- They absorb odors along with moisture and then distribute them into the room for a long time;
- Do not use at high air humidity - the plates are deformed and block the air channels;
- Cellulose cassettes are not repaired or washed - they are only replaced.

Operating principle of a plate recuperator
Devices with tubular heat exchanger
Tubular recuperators operate on the same principle as plate recuperators. Only instead of channels formed by plates and ribs, metal tubes of small diameter (about 10 mm) are used. The warm air flow moves through the tubes and heats them, and the cold air flows through the area between them, taking away thermal energy.
The housing for the tubular heat exchanger is a cylindrical air duct - this design does not take up much space and is often installed directly into the thickness of the wall.

Chamber recuperators
Cold and hot air masses pass through a common chamber separated by a movable damper. From time to time the damper turns and reverses the flow. Heat is transferred through the walls of the chamber.
In such a recuperator there are moving parts and partial mixing of flows occurs.

Recirculation devices
In recirculation heat exchangers, heat transfer is carried out by an intermediate coolant - water or antifreeze. Tubes with a liquid medium first pass through the outgoing flow, where the coolant is heated, and then enter the incoming flow area and give off heat.
The design of such a recuperator allows the supply and exhaust heat exchangers to be located at a distance from each other. But it has low efficiency and requires the installation of additional equipment for water circulation.

Recuperator with intermediate coolant
Recuperators with heat pipes
The heat exchanger of such devices is a system of freon-filled tubes. In the zone of warm air, it evaporates, and when it reaches a cold flow, it cools and forms condensation. The design has no moving parts and eliminates mixing of flows.

Application of recuperators
Of the variety of devices for air recovery, devices with a rotary, plate or tubular heat exchanger are widely used. They are characterized by a simple design, easy installation and high efficiency.
Devices with rotary heat exchangers are used for ventilation of large premises - halls of shopping centers, restaurants, hospitals, workshops of industrial enterprises. It is not advisable to buy them for a private home.
Plate and tubular recuperators are used to equip heat-ventilation systems in private construction, in small warehouse and industrial areas, in administrative and office premises.
How to make a recuperator yourself
Air recovery devices are expensive equipment that have a long payback period: 3-5 years for cheaper units and more than 8 years for expensive ones. However, with minimal technical knowledge and installation skills, you can save a lot family budget and make an air recuperator for your home with your own hands.
The easiest way is to make your own design with a plate recuperator. For this you will need:
- Material for the plates - sheet metal 0.5-1.5 mm thick, sheets of getinax or textolite, plastic (cellular polycarbonate or polypropylene) - 6.5-7 m2;
- Material for gaskets 2-3 mm thick, no more than 10 mm wide - oiled wooden slats, technical cork, cord, plastic, plexiglass;
- Case material – plywood, tin, chipboard, MDF, plastic;
- Four flanges for air duct pipes;
- Corner for racks;
- Neutral sealant (silicone);
- Glue;
- Insulation – roll and mineral wool (glass wool);
- Two filters;
- Two fans;
- Fasteners
Manufacturing stages:
- Square plates with a side of 200-300 mm are cut. About 70 pieces will be required. A prerequisite is that the workpieces must be the same size, have smooth edges without bends or burrs. Therefore, it is better to use a power tool and cut several sheets folded in a stack at once.
- The gaskets are cut to the size of the side of the square.
- On each plate, except the last one, three strips of gaskets are glued in parallel - on opposite edges and in the middle.
- The blanks are assembled into a block. To do this, the top of the strips is coated with glue. Lay the panels on top of each other, turning each subsequent one 90 degrees and aligning the edges. The last one to glue is the plate without spacers. To increase strength, a weight is placed on the cassette while the glue dries.
- Tighten the cassette with corners. The cracks are filled with sealant.

Plate heat exchanger made of plastic (cellular polypropylene)
- Assembling the body. The internal height and length of the box is equal to the diagonal of the plate heat exchanger, and the width is equal to its height. If filters and fans will be installed in the case, then it is necessary to provide space for them.
- Four holes are cut in predetermined places (usually two in the side walls), into which the flanges are inserted. The joints are treated with sealant.
- Mount the mount for the heat exchanger. Since condensation forms in it, the operating position must ensure free flow of liquid. Place the heat exchange block in a vertical position on the edge, the angle between the edges of the plates and the bottom should be 45 degrees. Guides for the heat exchanger, made from angles, are attached to the walls of the housing. This way the block of plates can be easily removed for maintenance.
- A small hole is cut out at the bottom of the box and a condensate drain is arranged.
- Assembling the recuperator. Ensure the tightness of the formed four compartments so that the movement of air masses is carried out only through the heat exchanger channels.

- Fans and filters are installed at the inlet of the flows - they can be mounted in the housing, if space is provided, or directly in the supply pipes.
- Provides protection against freezing. Install electrics and necessary automation.
- Connect incoming and outgoing air ducts. The case is closed. If necessary (installation in the attic), the recuperator is insulated from the outside or enclosed in a heat-insulating casing.
Video: how to assemble a tubular recuperator yourself
A self-made air recuperator provides an efficiency of 50-60%. This is enough for a private residential building. If higher performance is required, then devices manufactured in industrial conditions are used.
Create a healthy microclimate in modern country houses without the use of a ventilation system is almost impossible. Such structures provide an influx of fresh air into rooms equipped with sealed plastic windows and doors and remove exhaust air outside. However, any supply and exhaust system ventilation has one significant drawback. When used in winter, home owners increase heating costs. After all, the air coming from the street cools the rooms and they have to be heated additionally.
Meanwhile, this problem is solved in an elementary way. In order to reduce heat loss, you simply need to include a special device called an air recuperator in the ventilation system. It will be easy to purchase. Companies involved in the production of ventilation systems sell different types similar equipment. Recuperators can differ in design, performance and, accordingly, cost. The simplest model can be assembled with your own hands.
What is a recuperator
Devices of this type are essentially conventional small heat exchangers. The street air entering them is heated by cooling the exhaust air released outside. In this case, the flows inside the recuperator do not mix, which is achieved thanks to the special design of the equipment.
Types of air recuperators
By design, heat exchangers of ventilation systems are:

There are other types of recuperators. However, they all have quite complex design and are used in the same way as rotary ones, mainly only in enterprises.
How to assemble a plate recuperator
Very often the owners country houses An air recovery system of this particular type is manufactured and installed. Assembly technology Such heat exchangers are not too complicated and involve the following steps:
- production of the plate heat exchanger itself;
- housing installation.
What materials will you need?
In order to do plate air recuperator for the ventilation system, you need to prepare:

Heat exchanger assembly
The metal sheet must be cut into 200x300 mm plates. This operation should be performed as carefully as possible. Finished plates must have ideal geometry. The presence of burrs on them is unacceptable. It is best to cut steel or aluminum with a grinder, folding three sheets into packs. It is unlikely that you will be able to do quality work with scissors.
The height of the finished heat exchanger should be 300 mm. Based on this, the required number of plates is selected. The finished elements are connected in such a way that the distance between them is 2 - 4 mm. Pieces of sheet cork 5x5 cm are used as gaskets.
3 such spacers are placed on the edge of the long sides of the first plate. Next, the second metal element of the pack is installed on them. One gasket is placed in the middle on its short sides. Continue assembly in the same order until the heat exchanger reaches the desired height, also laying the corners. Fixation of elements can be produced, for example, for liquid nails. In order to make the heat exchanger durable, after assembly is completed, some kind of weight is placed on it for some time.
 The box for the heat exchanger is made of 18 mm plywood or chipboard.
its size should be slightly larger than the size of the plates in length and width. The walls can be fastened with screws or self-tapping screws. Previously, two holes are cut out in two of them for the air duct pipes. The case must be assembled in such a way that they are located diagonally to each other (two holes on one wall at the bottom, two others on the opposite wall at the top).
Assembly and insulation of the air recuperator
The heat exchanger is inserted into the knocked-down housing on its edge. That is, in such a way that the edges of the plates are located in relation to its bottom at an angle of 45 degrees. Since the dimensions of the heat exchanger practically coincide with the dimensions of the box, it should fit tightly. At the next stage, pipes for the air ducts are inserted into the holes made in the walls of the box. The places where they are attached are coated with sealant.
To avoid rotting of plywood or chipboard, it is advisable to paint the heat exchanger body with enamel or oil paint. The recuperator is usually installed in the attic of the house. After both air ducts are connected to it: supply and exhaust, you can begin to insulate it. For this, it is best to take glass wool or mineral wool.
What other materials can be used
A metal heat exchanger, of course, is the most reliable and durable design. However, sometimes home owners use other materials to assemble recuperators with their own hands. This could be, for example, cellular polycarbonate. In this case, the sheet of material is also cut into plates of the same size. Next, several of these elements are cut into thin spacer strips. When assembling, five strips are applied to each square - two at the edges and three as stiffeners.
How to assemble a tubular recuperator
The design of this type of heat exchanger is elementary. It is even easier to make a tubular recuperator than a plate one. To assemble it you need to purchase the following materials:

When purchasing materials, you should take into account that the longer the finished device, the more efficient air recovery will occur in it. This type of heat exchanger is assembled as follows:
- Corrugation is packed in a spiral inside the pipe. It should be stretched completely.
- Branchers are placed on both ends of the pipe.
- The corrugation is hermetically attached to one of their outlets on both sides.
The exhaust air duct is connected to the tubular recuperator so that the flow passes through the corrugation. Supply attached to free outlets adapters. As a result, the flow passing through it will move along the pipe itself, taking heat from the walls of the corrugation.
The recuperator is very useful device, which must be supplemented with the ventilation system. Moreover, self-assembly of the simplest models of such equipment is, as you can see, a completely doable task. Make this design yourself and you can save a lot on heating costs.
kotel.guru
Heat recovery efficiency
Recovery is heat exchange, and translated from Latin as “return of used materials.” In supply and exhaust ventilation, the recuperator takes heat from the air leaving the room and transfers it to the cold supply air. In winter, the difference between the temperature of the exhaust air and the air supplied to the house can reach 40 degrees. Typically heating occurs due to heating devices, that is, the wallet of the residents of the house.
In hot weather, the recuperator is also useful, because the hot supply of street air makes the air conditioners work more intensively. A properly installed do-it-yourself heat recuperator for ventilation will reduce the difference between the temperature of the incoming and outgoing air flows by 4–5 times.
Advantages of heat recovery ventilation:
- a homemade heat recuperator in ventilation systems has an efficiency of at least 65%;
- apartment ventilation with recovery allows you to save at least 30% on energy bills;
- Very simple design does not fail, since there are no moving parts;
- the heat exchanger in the heat recuperator of the ventilation system is easy to maintain and maintain;
- the device operates without the use of electricity;
- Heat recovery provides not only ventilation of the apartment, but in some cases also regulates humidity.
The greater the difference between the temperature in the house and outside, the higher the savings from heat exchange.
Making a plate ventilation recuperator with your own hands
In a plate recuperator for ventilation, the flows of incoming and outgoing air are separated by plates made of heat-conducting material.
Thus, the flows do not mix, and heat is transferred.
The ventilation system with a plate-type recuperator is simple and very common. A person with minimal mechanical skills can make supply and exhaust ventilation with recovery with his own hands.
Work progress:
- Between the plates, a spacer frame is made of technical cork, textolite or wood up to 3 mm thick. The frames are glued to the plates with polyurethane glue. To prevent resistance to air flow from being strong, the gaps between the plates should be about 4 mm;
- The structure is glued together with a neutral sealant that does not cause corrosion;
- The housing for the heat exchanger in ventilation is made of tin or plastic, metal or MDF. The inside of the box is lined with mineral wool or other insulation with a layer of 5 cm;
- Two holes are made on opposite sides of the box, to which plastic flanges are attached, equal in diameter to the air duct pipes. All cracks are carefully sealed with silicone;
- To remove condensate from a heat recovery ventilation unit, it is necessary to install a drain pipe.
The basis of the recuperator for the ventilation system is the heat exchanger. The heat exchanger plates are cut from thin sheet metal (galvanized) or textolite. It is necessary to cut 20x30 cm plates. They must be very even and neatly cut. It is best to cut metal with a jigsaw, avoiding the use of metal scissors;
Tips for making a plate heat exchanger for ventilation
- When constructing ventilation with heat recovery with your own hands, it is necessary to take into account the speed of air movement, which can be increased by no more than 1 ms;
- The total area of the heat exchanger plates should be 3.5 - 4 square meters. meters to obtain a recuperator efficiency of 60%;
- It must be borne in mind that in frosts of -10 degrees and below, the plate heat exchanger may become covered with ice. It is defrosted from time to time, and a differential pressure sensor is installed in the warm half. If the ventilation system with recuperation freezes, the sensor will detect an increase in the pressure drop, air will be supplied through the bypass, and the heater will thaw using the heat of the exhaust air.
To reduce noise from ventilation with a heat recuperator, a box is constructed from moisture-resistant material (plasterboard), the walls of which are lined with insulating material;
Making a tubular recuperator with your own hands
A ventilation unit with a tubular coaxial type heat exchanger is easier to assemble than a plate one. But it is more massive and the longer the device, the more efficiently it works.
Materials for the manufacture of a tubular recuperator for ventilation:
- PVC sewer pipe 200 cm long and 16 cm in diameter;
- aluminum air corrugated pipe 400 cm long and 10 cm in diameter;
- adapters-splitters with a diameter of 10 cm.
Work progress:
The corrugation is stretched and inserted into a spiral plastic pipe. Each end of the corrugation is attached to one of the splitter rings and treated with sealant.
On the one hand, the fan drives warm air from the room into the resulting device, while cold air from the street penetrates between the walls of the plastic pipe and corrugation. Through thin aluminum walls, heat is transferred from exhaust air to fresh air.
The advantage of this system is that supply and exhaust ventilation with heat recovery produces less condensate compared to plate ventilation. And even its presence does not interfere with the operation of the recuperator. At the same time, a tubular type heat exchanger is not suitable for installation in an apartment due to its size, but for a private house the design is very good.
Another type of supply and exhaust ventilation system with heat recovery is presented in the video:
It is possible that the efficiency of our ventilation units with heat recovery is lower than that of branded factory-produced devices. But by assembling any of them yourself, you will significantly save money, and subsequently receive efficient installation and comfort in the room. Homemade ventilation systems with recovery are often installed in garages and country cottages.
www.strojdvor.ru
The principle of operation of the recuperator
The internal design of the recuperator allows the temperature from the flow leaving the room to be transferred to the cold air entering from the street.
This transfer occurs different ways, but in any case, through additional material heat exchange, so that the two streams do not mix (or practically do not mix).

How effective the recuperator is will depend on its design, the volumes it pumps through itself and the temperatures outside the window. But in any case, the figures are significant - from 50 to 91% savings.
Types of structures
There are several main types of recuperator designs:
- Lamellar.
- Rotary.
- With coolant.
- Tubular.
Lamellar– consists of aluminum sheets assembled together, which has the most good performance thermal conductivity at reasonable price material. Easy to implement, no moving parts, inexpensive. Efficiency – 40-70%.
Rotary has a rotating shaft powered by electricity and two countercurrent channels. The air heats up part of the rotor, it turns and transfers heat to the cold flow in another channel. The efficiency of such devices is usually higher, but:
- energy dependence;
- big sizes;
- difficulty of playback;
- complexity of repair and maintenance;
- and also that the flows are slightly mixed...
...make the rotor not so popular among consumers.
DIY air recuperator for home
The plate model is the easiest to make, so let’s look at it in more detail.
Pros and cons of a plate recuperator
 Pros of the plate model:
- good efficiency;
- simplicity of design;
- availability of materials;
- energy independence;
- There are no rubbing elements, which means it will last a long time.
There are also disadvantages that you need to be aware of right away.
The main problem is icing in severe frosts. This is due to the fact that indoor air is more saturated with moisture than outdoors. At normal conditions this moisture falls into condensation, but in frost it sets, forming a layer of ice.
Several solutions have been invented to combat freezing:
- Automatic diversion of flow bypassing the plates to allow warm air to warm up the icing (during this period the room is not heated).
- Heating the recuperator to a temperature that does not allow ice to linger (efficiency decreases by 20%).
- Cellulose cassettes that absorb moisture, returning it through the adjacent compartment to the apartment. Humidifier effect + no condensation.
- The easiest way to make a “ground heat exchanger” in your home is to bury the supply pipe below the freezing level of the soil. The length of the underground air duct is up to 50 m. The intake increases efficiency, heats the flow in winter and cools it in summer, and this is an excellent way to combat ice.
We can say that cellulose cassettes are the most The best decision, since with their use, the recuperator operates in any weather, electricity consumption does not increase, and there is no need to arrange a condensate collector and its disposal into the sewer.
Materials for production
What you need to prepare if you decide to assemble a plate recuperator yourself. Materials:

- Sheet metal (aluminum is best, but you can use roofing iron, textolite, getinax, or cellular polycarbonate). The thinner the metal, the better the heat transfer will be.
- Wooden slats for laying between the plates (technical cork or a simple cord are also suitable). Thickness 2 - 3 mm - the thinner the better. Width – approx. 10 mm.
- Sealant (non-acidic).
- Glue.
- Case material. It can be plywood, metal, MDF or a finished box.
- 4 flanges, the same section as the pipes.
- Mineral wool (4 cm thick).
- Corner.
- Hardware.
- Special fan or cooler.
The parts will be cut using a power tool.
We make a recuperator for the home - product drawings
Squares with a side of 20-30 cm are cut from metal. About 70 pieces need to be made. If you cut several pieces at once, it will be faster and smoother.
The slats are dried and cut to the size of a square side (20 or 30 cm). The blanks are glued to two sides of each square and left until the glue dries completely. There is no need to glue slats onto one square.
The upper parts of the slats are coated with glue, and a sandwich is assembled from all the squares. Important! Each subsequent square must be rotated at right angles to the previous one. The channels alternate, lying perpendicular to each other.
The top square is glued, without slats. Using the corners, the structure is pulled together and fixed.
All cracks are treated with a neutral sealant.
Fastenings for the flanges are made.
The heat exchanger is inserted into the housing. To do this, guides are made from angles on the walls of the building. The heat exchanger will need to be positioned so that its corners rest against the side walls (you will get a rhombus). Condensation will flow into bottom part. It is important here that two isolated spaces are created, and the air intersects only inside the plate structure.
A small hole is made into which a hose is inserted to collect and drain moisture.
Four holes are cut in the body for the flanges.
It would be great if there was a place for attaching filters at the entrance.
The walls of the building are finished with mineral wool.
Now you can install the fan and install the unit into the ventilation system.
Recuperator calculation
What power is needed for a recuperator for a specific room? The calculation formula is:
Q = 0.335 x L x (t end – t start).
- Qproductivity (meters cubic per second).
- L is the amount of supply air that should be supplied according to the standards per person (60 m3 per hour for someone who is constantly in the room, and 20 m3 for a temporary visitor.).
In parentheses is the difference between the temperature that needs to be achieved and the one coming from the street.
For example, you need to heat the air by 20 °C in a room that requires 120 m 3 of air per hour.
Q = 0.335 x 120 x 20 = 800 W.
How to find out the efficiency of a finished recuperator
To do this, you need to take measurements of the air temperature in three points login:
- Coming from the street before recovery (t street)
- Incoming flow into the house after recovery (t recup.)
- Flow leaving the house before recovery (t house.)
Efficiency = (t recup. - t street) : (t house. - t street)
The result obtained is multiplied by 100%
 Example:
Outdoors +3°C, at home +22°C, recovered flow +14°C.
Efficiency = (14 – 3) : (22 – 3)
Efficiency = 11: 19 = 0.57
0.57 x 100% = 57%
So, the efficiency of this device, under these conditions, is 57%
The same unit, under different conditions, will have different efficiency indicators.
Conclusion
Practice has proven the effectiveness of recuperators for ventilation systems not only in in public places, but also the most ordinary private houses. The experience of many amateur craftsmen has proven that it is quite possible to assemble a recuperator yourself. The devices are no worse than factory ones, but their cost is several times lower!
microclimat.pro
Advantages of a ventilation system with recovery
Modern forced supply and exhaust ventilation with recovery provides at least a threefold increase in efficiency and energy saving compared to traditional ones direct-flow circuits. Thanks to the use of a heat recovery device called a recuperator, the problem of limiting additional expense energy, the flow of clean and fresh air, ensuring the required level of humidity in the premises. It is important that in a closed volume, constantly provided forced air change has the following advantages:
- prevents colonies of dangerous microbes and mold from developing;
- removes carbon dioxide and dust.
External atmospheric conditions do not affect forced ventilation with a recuperator, which distinguishes it favorably from natural ventilation.
Types of recuperators
The recuperator is an actual heat exchanger, the central unit of such effective system. In it, the air pumped into the house is heated or cooled due to part of the energy received from the removed air flow, without mixing with it, due to the design features. According to experts, recovery ventilation schemes are the future, since they provide significant savings in energy resources.
Lamellar
An important parameter recuperator block is its coefficient useful action. To ensure the required efficiency, it must be at least 70−80%. There are several ways to increase efficiency. This is an increase in the time and area of heat exchange or preheating of the supplied air. In private households, it is quite easy to achieve an increase in efficiency in this way, using ground heat exchangers. A plastic pipe with a diameter of up to 200 mm, laid over a distance of up to 50 meters, at a depth of about 2 meters, will additionally warm the air supplied to the house in winter and cool it in summer.
 An important parameter of the recuperator unit is its efficiency
This technique significantly increases the overall efficiency of the entire ventilation system with recovery. When using a ground heat exchanger in winter, the risk of icing or frost on the plates of a cross-flow or counterflow heat exchanger is reduced due to the large temperature difference of the air flows. Energy consumption for heating the incoming flow is eliminated, the design of the heat exchanger is simplified and its final cost is reduced. If you do not use ground heat exchange, the inevitable condensation on the plates will lead to their freezing in winter. In this case, the heat exchange unit is equipped with optional equipment. This includes an automation unit that, based on signals from temperature and pressure sensors, controls the bypass air duct damper (“bypass”) and the activation of an additional air heater to heat the incoming air until the recuperator plates defrost.
Drawing and work diagram
Decentralized
In conditions multi-storey buildings, for apartments another type of heat exchanger is more convenient, more compact, called a decentralized ventilation air heat recuperator (DRTVV), simply a “warm window”. Such systems do not take up much installation space. They can be easily placed openly or hidden in a niche under a window, on a side wall, in the slope of a window opening, etc. The use of such a device is absolutely necessary when installing sealed plastic windows. This heat exchanger ensures the supply of warmed fresh air in winter and cooled air in summer, especially if air conditioning is installed in the room. The operation of the recuperator does not affect the temperature in the apartment.
 In an apartment we usually install a more compact recuperator - decentralized
A design of this type consists of a plastic pipe with a diameter of up to 200 mm and a length of up to 1.5 meters, into which a bundle of thin-walled tubes (aluminum) of equal length is inserted. Their flared ends are assembled into a cassette on two flange plates equal to the inner diameter of the outer plastic pipe. The design uses two tees and L-shaped bends made of plastic, the same diameter as the main pipe. A cassette of aluminum tubes is inserted into a plastic pipe. Tees and elbows are placed on the outer edges. On one side, one electric fan is installed in the elbow and tee, which provide exhaust and air supply. The length of the internal tubular cassette is selected to ensure the passage of supplied air through two elbows, and the exhaust air passes through the tees.
Drawing and principle of operation
Rotary type
The rotor type recuperator design has the highest efficiency. In them, counter air flows pass through a two-channel box. In the middle of the box, a disk rotates perpendicular to the flow. The disk is made of plates fixed in the same plane as the flows or a continuous corrugated metal strip rolled into a loose spiral. The metal of the plates or strips of the rotating disk is heated in the warm outgoing air stream. By turning, the heated part enters the cold incoming flow and heats it.
 Rotary type recuperators have the highest efficiency indicator
For efficient work design, the disk must have a large diameter and this is one of the disadvantages that limits the use of rotary heat exchangers in the domestic sphere. In addition, unlike the two previous types, this design involves partial mixing of flows, which requires the use of more complex filtration. And the presence of rotating elements can be considered another “not an advantage”.
Design and operation diagram (air-to-air system)
Which one to choose for an apartment or a house?
The consideration of the types of existing recuperators can be continued further, talking about the types of ribbed plate recuperators, etc. But the issue of independent production of such a design and its practical application in own home or apartment. First of all, you need to think about the required type of heat exchange unit. If all the windows in the apartment are plastic and effective ventilation is required, it is better to give preference to the ready-made industrial compact assembly DRTVV (“warm window”).
 The recuperator will provide good ventilation in room
For private households, where the issue of free space is not so acute, one of the cross-flow or counterflow plate designs is quite suitable. They are the easiest to make yourself. Below we consider the simplest way to independently manufacture a plate-type heat exchanger itself. Circuit solutions for automatic control, a damper device for switching to the bypass channel, etc. can be found on the corresponding Internet resources or in specialized literature.
How to make a plate recuperator with your own hands?
Plate materials
When choosing a material for making the cassette of the plate heat exchanger itself, there is no fundamental difference in what the plates are made of. Suitable:
- thin sheet of aluminum or copper;
- thin roofing galvanization;
- sheet textolite or getinax;
- another type of plastic.
The thermal conductivity of the plate material has almost no effect on heat transfer. How much do you need? Depends on the number of cassettes collected. About 4 is enough for one square meters. If, guided by the theory stated above, you want to increase efficiency, you need twice as much for a cassette of the same size. You can make one, but a larger one. However, the requirements for removing possible condensation from the case will not allow you to “lay” the cassette on its side and you will have to look for a place for installation.
You will need a corner for the racks of the cassette clip and flanges. The plates can be transferred using an oiled lath or strip technical plug. If possible, the blanks prepared for the plates can be stamped into U-shaped blanks with a side height of 4 to 5 millimeters. The slats and cork strip should be the same thickness, their width up to 10 millimeters.
Case material
- metal sheet or plywood;
- MDF up to 20 mm thick;
- block for the frame;
- hardware for fastening;
- mineral wool;
- silicone sealant.
Step by Step Actions
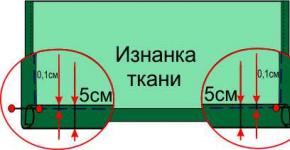
- First, the square-shaped plates are carefully cut. Side up to 300 millimeters. It is important to make all the plates the same size, being careful not to deform their edges. It is best to use a power tool by cutting several sheets folded in a stack. In total, you need about 70 of these blanks per cassette. Slats or cork, cut to the size of the side of the plate, are glued to the opposite edges of the squares. Nothing sticks to the last sheet. The glue is given time to dry. The prepared blanks are glued into a cassette. To do this, apply glue to the upper sides of the slats or strips of cork, and each subsequent sheet is laid with a 90-degree turn. The set is completed by a plate without spacers. The result is a cassette with alternating channels directed perpendicular to each other - the future heat exchanger.
- The cassette is pulled together by a frame from a corner. Silicone sealant is filled into the cracks. On the sides of the cassette there are fastenings for flange connections. It is necessary to take into account that the cassette must be positioned vertically on one of the corners of the square, forming an equilateral rhombus. The resulting condensation will accumulate in its lower part. This provides drainage hole with a tube for removing accumulated moisture. As mentioned above, more than one heat exchanger cassette can be installed in one housing for greater efficiency. In this case, the second one should have the same dimensions as the first one. Their adjacent angles should be in close contact, avoiding any gaps or gaps. Place silicone sealant on the bottom and top of the joint.
- The prepared cassette is inserted into the housing. Its internal height and length are equal to the diagonal of the square (if one cassette is used), and its width is equal to the thickness of the set of plates. In the walls of the housing, opposite the corresponding sides of the cassette, there are holes for attaching plastic flanges for air ducts. The heat exchanger must be installed in special guides from the corner, mounted on the walls of the housing. The cassette is removable, which is important for its maintenance.
- For incoming flows, it is necessary to provide the possibility of installing simple removable cassette filters. Mineral wool about 4 centimeters thick is attached to the inner surface of the housing walls. To ensure forced ventilation, fans are installed that allow you to regulate the rotation speed.
Video: making a recuperator at home
Part 1: Case Assembly
Part 2: plates
heat.guru
Types of units
By design features:
- ribbed;
- tubular;
- lamellar;
- finned plate;
- recirculating water;
- roof
According to the installation method, a do-it-yourself air recuperator can be:
Collector
The exhaust and supply go into common channels, the collector is fixed in a specially designated place. It is the main unit of the supply and exhaust ventilation mechanism.
Advantages:
- mounted in any convenient perimeter of a garage or other large room;
- partial replacement of parts is possible;
- During installation, additional holes and openings are not needed.
Duct
The “body” of the device is mounted in the wall channel. Equipment from the manufacturer can be equipped with a “reheating” function.
Advantages:
- automatic operation mode, moderate electricity consumption;
- ease of installation;
- easy to pick up required power device taking into account operation in one room.
High noise level. Repair operations are carried out only by specialists in the workshop. Each factory-assembled recuperator provides for filter replacement.
DIY plate recuperator
The cheapest ventilation device for the garage.
For the box you will need four meters of galvanized steel and timber. Acquired metal material cut into even slices. Mineral wool is placed into the walls of the welded structure and into the free cavities. The outlet of the flexible air duct is also placed in a two-layer box with mineral wool to reduce noise during system operation.
“Distance frames” are placed between the plates. Polyurethane adhesive is applied to a thin strip of technical cork. For optimal resistance to air flow, small gaps are left between the plates.
Provide holes in the box for ready-made plastic flanges, the cross-section of which must match the dimensions of the air duct pipes. So, the plate heat exchanger in the garage should be sealed on all sides. To achieve the goal, use silicone. Make sure that the temperature of the air drawn in is higher than the air drawn out.
- Equip the completed product with a pressure drop monitoring sensor. The built-in mechanism will regularly defrost the heat exchanger in winter: cold supply air masses will be directed through the bypass if a pressure difference is detected.
- Multilayer moisture resistant box is attached in the area of the outlet of flexible air ducts. The heat insulator is laid out from the inside. Simple retrofitting will help save electricity for heating the garage and enhance the sound insulation properties of the equipment.
Do not place the plates too close to each other. In winter, icy condensation will appear.
The sheets are made perfectly even; when working with galvanization, the work is carried out with special scissors or a jigsaw. A properly assembled do-it-yourself recuperator does not mix clean air that comes from the street with exhaust air. Heat-conducting plates separate the two flows.
An acid sealant will certainly provoke corrosion processes in the unit, so it is advisable to use ordinary acryplast to seal joints and seams.
Use only a neutral composition; a regular acid sealant can lead to corrosion of the unit.
Advantages of a plate heat exchanger
- Efficiency reaches 65%;
- the device is made without rubbing or moving parts, so the mechanism does not require frequent maintenance or repair;
- minimal operating costs.
Tubular air exchange mechanism
This do-it-yourself recuperator is distinguished by the creation of air exchange processes as close as possible to natural ones.
To create the device, you need a box and two aluminum or copper pipes, which are intertwined individually. The quality of work is affected by the length of the pipes and the tightness of their fit to each other. The unit operates using tubular structures placed in channels. Heat transfer processes are carried out using bundles of welded thin-walled tubes through which air circulates.
Air at room temperature passes through pipes of a smaller cross-section, and the metal receives heat. The “pipe-in-pipe” mechanism for the garage will be a wonderful alternative to factory products.
To achieve increased efficiency, you will have to increase the length of the pipe (this will affect the weight of the structure).
Do-it-yourself rotary-type recuperator
Principle of operation
It’s easy to make your own design, guided by ready-made drawings and projects. First, the fan operates as an extractor; the temperature of the exhaust air heats the impeller blades. Then the device goes into reverse mode and draws in air. The reverse process of heat transfer to incoming flows begins. To reduce heat loss, the walls of the air exhaust channel are made of metal. A homemade rotor mechanism has up to 75% efficiency. The impeller is made of very thin and light sheets of copper. The plates alternately heat up and cool down.
Advantages
- One of the highest efficiency among similar equipment.
- Does not dry out the air (controls humidity levels).
- Minimal condensation when operating in cold seasons.
The complex design, which includes an electric motor, drive belt, rotor and air duct system, requires frequent maintenance. Keep in mind that a DIY recuperator of this type is quite noisy. Do not confuse recuperation with air heating.
Do-it-yourself high-quality recuperator with drawing sketches
- The size of the future heat exchanger in the garage.
- Number of records.
- Hole diameter.
- Case dimensions.
The standard mechanism, as a rule, has 20 or 30 cm long walls.
The decision is made by the owner individually, at least 70 pieces are recommended. The thickness of the gasket between the plates is 3-4 mm.
The more cross section pipes, the more powerful the equipment will be.
Before you accurately determine the parameters of the box, keep in mind that the air circulation at the inlet and outlet should be unhindered. Determine in advance the location for fasteners and corners.
Basic rules when choosing the optimal location for a recuperator with your own hands
- unhindered access to the system to monitor the operation of the unit, replace filters or other partial repairs;
- it is taken into account that there will be noise at the installation site;
- It is necessary to calculate whether it will be convenient to install an air duct network within the perimeter of the planned installation. By the way, the shorter the air ducts, the cheaper the unit and the lower its performance.
Helpful information
To save under-ceiling space, you can install a roof-mounted heat exchanger. The structure is located on the roof, so it does not create discomfort for the owners. The efficiency of the device reaches 65%. Low cash and operating costs will cover complex installation processes using a fastening system.
Simple ways to improve the performance of the device:
- Aluminum, plastic or fiber filters built into the recuperator channels clean the incoming air from dust. These fragments become clogged quickly, so change the elements regularly.
- To prevent the supply fan from freezing, turn off the equipment from time to time. Frozen plates will thaw due to the escaping warm air.
Homemade air recuperator - all the pros and cons, manufacturing instructions. It is impossible to imagine comfortable living in a country house without a well-equipped ventilation system, since it is the key to ensuring that your home will have a healthy microclimate. And yet, most owners are wary of installing it because they are afraid of receiving exorbitant bills for electrical energy. If the same doubts begin to torment you, we advise you to consider such a device for a private home as a recuperator.
This is a small unit that is combined with supply and exhaust ventilation and it eliminates overspending electrical energy in winter, when the air requires additional heating. The most affordable and effective option is to make an air recuperator yourself. What kind of device is this, and on what principle does it work? This is what we will talk about.
Process concept
So what is heat recovery? This is a special heat exchange process in which unheated air from the street is heated due to the outgoing air flow from the room.
Due to this organizational scheme, the installation will save heat in the house. In a short period of time and with little electrical energy consumption, an ideal microclimate in the house will be created.
Economic feasibility of a recuperative heat exchanger depends on other factors:

Note, An air recuperator for a home is an important, but far from the only element that is required for effective ventilation in a residential area. Ventilation together with recovery is a complex system that functions only if it works in a professional “bundle”.
Device efficiency
As the ambient temperature drops, the efficiency of the unit decreases, but it is still important to make an air recuperator for a private house with your own hands, since if the difference is significant, the heating system will be overloaded. If it is only 0 degrees outside the window, then air with a temperature of +16 degrees will enter the pulp. Household units easily cope with their task. The efficiency of the device is easy to calculate if you use the following formula:
Ƞ =(tfast – tstreets)/(troom – tstreets)
- tfast– this is the temperature of the incoming air (after recuperation).
- tstreets- outside temperature.
- troom– temperature in the house according to recovery.
Modern devices are distinguished not only by high efficiency indicators and features of use, but also by design. Let's look at the most popular solutions and their features.
Main types of design
Specialists pay Special attention because there are several types of heat recovery systems with ventilation:
- Lamellar.
- Rotary.
- With separate coolants.
- Tubular.
| Design | Efficiency | Peculiarities |
| Cross-flow plate heat exchanger | From 60 to 80% | Average efficiency, low pressure loss, compact design, easy to connect. |
| Combined device of two cross-flow plate heat exchangers | 70 to 80% | High efficiency, but because of this pressure loss is higher, it is convenient to connect. |
| Counterflow heat exchanger on plastics | From 80 to (!) 90% | High efficiency with moderate pressure loss, space required for installation, design more expensive than those described above. |
| Counterflow channel type heat exchanger | 85 to 95% | Highest efficiency, relatively large pressure loss, additional installation space required. |
| Rotary heat exchanger | From 75 to 85% | Due to the risk of odor transfer, it is only suitable for those designed for one apartment and have low flow resistance. |
So let's take a closer look at them.
Lamellar view differs from other types in that its design contains aluminum sheets. This installation is considered the most balanced even in terms of cost and thermal conductivity (efficiency from 45% to 72%). The device is also distinguished by its ease of implementation, affordable price and the absence of any moving elements. No special preparation is required for installation. You can carry it out without any difficulties at home, with your own hands.
Rotary devices are the most popular. Their design necessarily includes a rotation shaft, which is powered by electricity, and 2 more channels for air exchange with countercurrents. How exactly does such a mechanism work? One of the sections of the rotor begins to warm up from the air, and then it turns and the heat transfers to the cold masses, which are concentrated in the adjacent channel. But despite high level The efficiency of such an installation has a number of very noticeable disadvantages:
- Heavy weight.
- Regular repairs and maintenance are required.
- It is difficult to repair the device with your own hands and make it operational again.
- Air masses mix.
- Dependence on electricity.
Note, that a ventilation device with tubular elements, as well as separate coolants, is almost impossible to make at home, even if you have all the drawings and diagrams.
DIY recuperator
An air recuperator is not difficult to make if you choose the right design. The simplest in terms of implementation will be the plate system. This model has both great advantages and no less noticeable disadvantages. If we talk about the advantages, then even A self-made air recuperator for a private home will give you:
- High level of efficiency.
- No connection to electricity required.
- Simplicity and reliability of design.
- Availability of materials and functional elements.
- Long service life.
But before you start making an air recuperator with your own hands, check all the advantages and disadvantages of the model. Main disadvantage- This is icing in severe frost. Outdoor humidity levels are not as high as indoors, and if left unaddressed, they will begin to turn into condensation. During frost, high humidity will contribute to the formation of ice.
There are several ways to protect the recuperator device from freezing. This special solutions small size, which differ in efficiency and method of implementation:
- Thermal impact on the structure, and thanks to this, ice will not linger inside the system (and the efficiency will be reduced by 20%).
- The removal of air masses from the plates by mechanical means results in forced heating of the ice.
- Supplementing the ventilation system with cellulose cassettes that will absorb excess moisture. It will be redirected to the home, and not only will condensation be eliminated, but also a humidification effect will be achieved.
Most experts agreed that cellulose cassettes are the best solution today. They will function in any weather, and there will be no electricity consumption, no sewer drain or condensate container required.
Tools and accessories
So, what should you prepare before you start assembling a plate-type home unit? Experts advise paying attention to the following materials:
- Aluminum sheets (polycarbonate or textolite are suitable). Please note that the thinner the material, the better the heat transfer will be. Forced ventilation in this case it will function better.
- Wooden slats (1 cm wide and 0.2 cm thick). They must be placed between adjacent plates.
- Mineral wool (thickness up to 4 cm).
- or metal for making the device body.
- Corner.
- Glue.
- Hardware.
- Sealant.
- Fan.
- 4 flanges (according to the pipe cross-section).
Important! The diagonal of the housing must correspond to the width of the heat exchanger. As for the height, it must be adjusted to the total number of plates and their thickness when connected to the slats.
Blueprints
Sheets of metal are used to cut squares, which should have sides from 20 to 30 cm in size. In this case, try to choose the optimal value, taking into account what kind of ventilation system was installed in your home. There must be at least 75 sheets. To keep them even, use only 2-3 sheets at a time.
To fully implement energy recovery in the system, wooden slats should be prepared according to the dimensions of the sides of the square. After this, carefully treat them with drying oil, and then each wooden element glue it to the other side of the metal square. One of the squares must remain unpasted.
To make air recovery and ventilation more effective, each edge of the slats on top should be thoroughly coated adhesive composition. The individual elements must be assembled into a sandwich of squares. It is very important that the second, third and remaining squares are rotated 90 degrees relative to the previous one. Thanks to this method of making an air recuperator with your own hands, you will alternate the channels and their perpendicular position.
After this, the upper square, on which there will be no slats, should be fixed with glue. When using corners, the structure should be carefully pulled together and attached. In order for the heat recovery process in the ventilation system to be carried out without air loss, the cracks should be filled with sealant. Make flange mounts. Place the manufactured device in the housing. Several corner guides should be made in advance on the walls of the device. The heat exchanger must be placed so that its corners rest against the side walls, and then the design will resemble a diamond.
Residues in the form of condensation will remain at the bottom. The main task is to obtain two exhaust channels that are isolated from each other. Inside the structure of elements in the form of plates there must be a mixture of air masses. A small hole should be made at the bottom to drain the condensate through the hose. Make four holes in the structure for the flanges.
Leave a separate place at the entrance for filters. The structure must be covered with mineral wool, and then a fan must be installed, and the device itself must be combined with the ventilation system.
Device calculation
In order to determine the power of the recuperator for a specific space, use the following formula:
Ǫ =0,355 * L*(troom – tbeginning)
- Ǫ – productivity (m 3 /sec).
- L is the total amount of supply air that should be supplied according to the norm for 1 person (65 m 3 /hour for those who are in the room permanently, and 25 m 3 for those who are in the room temporarily).
- (t room - t start) - this is an indicator of the difference between the temperature that is required and the one outside.
For example, in order to heat the air in a room to +25 degrees, where one person is constantly present, the following calculation is required: Ǫ=0.355*60*25=532.5 W.
To determine the efficiency of the unit, it will be enough to find out the temperature at the three main entry points into the system:
Efficiency=(trecuperation – tstreet)/ (thouse – tstreet)
- Temperature coming from the street before recovery ( tstreet).
- Temperature entering the house after recovery ( trecup).
- Temperature leaving the house before recovery ( thouse).
Conclusion
Now you know what a recuperator is and how important it is for a modern ventilation system. Such devices are much more often installed in country houses and public facilities. Now recuperators have become in demand, and if you wish, you can even make the device yourself from scrap materials, as described in the article.
About comfort modern home at different people different views. But in general, they are expressed in a simple formulation of favorable conditions for human habitation in it: it should be warm in winter and cool in summer. This requires costs to heat and cool your home or apartment. Given the ever-increasing cost of energy resources, housing maintenance is becoming more and more expensive. Thermal insulation of a home is becoming especially important; heating the street has become an unaffordable luxury.
High-quality insulation of housing is unthinkable without sealing a house or apartment. All doors and doors are sealed with special materials. window connections to the walls, the design of windows and doors ensures the tightness of their closure, etc. But as a result, the home turns into a kind of thermos, in which, without the use of forced ventilation, living becomes very uncomfortable. And what, additional heating/cooling of fresh air, which can now enter the house only through ventilation ducts, will cause new inevitable energy costs? On the contrary, the ventilation systems themselves contribute to savings. It's all in their design. Below we discuss ways to ventilate rooms using air recuperators. What is it, how do these units work and can you do it yourself?
Advantages of a ventilation system with recovery
Modern forced supply and exhaust ventilation with recovery provides at least a threefold increase in efficiency and energy saving compared to traditional direct-flow schemes. Thanks to the use of a heat recovery device called a recuperator, the problem of limiting additional energy consumption, the flow of clean and fresh air, and ensuring the required level of humidity in the premises is very effectively solved. It is important that in a closed volume, constantly provided forced air change has the following advantages:
- prevents colonies of dangerous microbes and mold from developing;
- removes carbon dioxide and dust.
External atmospheric conditions do not affect forced ventilation with a recuperator, which distinguishes it favorably from natural ventilation.
Types of recuperators
The recuperator is the actual heat exchanger, the central unit of such an efficient system. In it, the air pumped into the house is heated or cooled due to part of the energy received from the removed air flow, without mixing with it, due to the design features. According to experts, recovery ventilation schemes are the future, since they provide significant savings in energy resources.
Lamellar
An important parameter of the recuperator unit is its efficiency. To ensure the required efficiency, it must be at least 70−80%. There are several ways to increase efficiency. This is an increase in the time and area of heat exchange or preheating of the supplied air. In private households, it is quite easy to achieve an increase in efficiency in this way, using ground heat exchangers. A plastic pipe with a diameter of up to 200 mm, laid over a distance of up to 50 meters, at a depth of about 2 meters, will additionally warm the air supplied to the house in winter and cool it in summer.
An important parameter of the recuperator unit is its efficiency
This technique significantly increases the overall efficiency of the entire ventilation system with recovery. When using a ground heat exchanger in winter, the risk of icing or frost on the plates of a cross-flow or counterflow heat exchanger is reduced due to the large temperature difference of the air flows. Energy consumption for heating the incoming flow is eliminated, the design of the heat exchanger is simplified and its final cost is reduced. If you do not use ground heat exchange, the inevitable condensation on the plates will lead to their freezing in winter. In this case, additional equipment is installed in the heat exchange unit. This includes an automation unit that, based on signals from temperature and pressure sensors, controls the bypass air duct damper (“bypass”) and the activation of an additional air heater to heat the incoming air until the recuperator plates defrost.
Drawing and work diagram
Operating principle of a plate recuperator Scheme of a plate recuperator
Decentralized
In multi-storey buildings, another type of heat exchanger, more compact, called a decentralized ventilation air heat recuperator (DRTVV), simply a “warm window”, is more convenient for apartments. Such systems do not take up much installation space. They can be easily placed openly or hidden in a niche under a window, on a side wall, in the slope of a window opening, etc. The use of such a device is absolutely necessary when installing sealed plastic windows. This heat exchanger ensures the supply of warmed fresh air in winter and cooled air in summer, especially if air conditioning is installed in the room. The operation of the recuperator does not affect the temperature in the apartment.
 In an apartment we usually install a more compact recuperator - decentralized
A design of this type consists of a plastic pipe with a diameter of up to 200 mm and a length of up to 1.5 meters, into which a bundle of thin-walled tubes (aluminum) of equal length is inserted. Their flared ends are assembled into a cassette on two flange plates equal to the inner diameter of the outer plastic pipe. The design uses two tees and L-shaped bends made of plastic, the same diameter as the main pipe. A cassette of aluminum tubes is inserted into a plastic pipe. Tees and elbows are placed on the outer edges. On one side, one electric fan is installed in the elbow and tee, which provide exhaust and air supply. The length of the internal tubular cassette is selected to ensure the passage of supplied air through two elbows, and the exhaust air passes through the tees.
Drawing and principle of operation
Operating principle of a decentralized recuperator Diagram of a decentralized recuperator
Rotary type
The rotor type recuperator design has the highest efficiency. In them, counter air flows pass through a two-channel box. In the middle of the box, a disk rotates perpendicular to the flow. The disk is made of plates fixed in the same plane as the flows or a continuous corrugated metal strip rolled into a loose spiral. The metal of the plates or strips of the rotating disk is heated in the warm outgoing air stream. By turning, the heated part enters the cold incoming flow and heats it.
 Rotary type recuperators have the highest efficiency indicator
For the design to work effectively, the disk must have a large diameter, and this is one of the disadvantages that limits the use of rotary heat exchangers in the domestic sphere. In addition, unlike the two previous types, this design involves partial mixing of flows, which requires the use of more complex filtration. And the presence of rotating elements can be considered another “not an advantage”.
Design and operation diagram (air-to-air system)
Operating principle of a rotary recuperator Diagram of a rotary recuperator
Which one to choose for an apartment or a house?
The consideration of the types of existing recuperators can be continued further by talking about the types of ribbed plate recuperators, etc. But the issue of independent production of such a design and its practical application in one’s own house or apartment is of interest. First of all, you need to think about the required type of heat exchange unit. If all the windows in the apartment are plastic and effective ventilation is required, it is better to give preference to the ready-made industrial compact assembly DRTVV (“warm window”).
 The recuperator will provide good ventilation in the room
For private households, where the issue of free space is not so acute, one of the cross-flow or counterflow plate designs is quite suitable. They are the easiest to make yourself. Below we consider the simplest way to independently manufacture a plate-type heat exchanger itself. Circuit solutions for automatic control, a damper device for switching to the bypass channel, etc. can be found on the corresponding Internet resources or in specialized literature.
How to make a plate recuperator with your own hands?
Plate materials
When choosing a material for making the cassette of the plate heat exchanger itself, there is no fundamental difference in what the plates are made of. Suitable:
- thin sheet of aluminum or copper;
- thin roofing galvanization;
- sheet textolite or getinax;
- another type of plastic.
The thermal conductivity of the plate material has almost no effect on heat transfer. How much do you need? Depends on the number of cassettes collected. About 4 square meters is enough for one. If, guided by the theory stated above, you want to increase efficiency, you need twice as much for a cassette of the same size. You can make one, but a larger one. However, the requirements for removing possible condensation from the case will not allow you to “lay” the cassette on its side and you will have to look for a place for installation.
You will need a corner for the racks of the cassette clip and flanges. The plates can be transferred using an oiled lath or strip technical plug. If possible, the blanks prepared for the plates can be stamped into U-shaped blanks with a side height of 4 to 5 millimeters. The slats and cork strip should be the same thickness, their width up to 10 millimeters.
Case material
- metal sheet or plywood;
- MDF up to 20 mm thick;
- block for the frame;
- hardware for fastening;
- mineral wool;
- silicone sealant.
Step by Step Actions
- First, the square-shaped plates are carefully cut. Side up to 300 millimeters. It is important to make all the plates the same size, being careful not to deform their edges. It is best to use a power tool by cutting several sheets folded in a stack. In total, you need about 70 of these blanks per cassette. Slats or cork, cut to the size of the side of the plate, are glued to the opposite edges of the squares. Nothing sticks to the last sheet. The glue is given time to dry. The prepared blanks are glued into a cassette. To do this, apply glue to the upper sides of the slats or strips of cork, and each subsequent sheet is laid with a 90-degree turn. The set is completed by a plate without spacers. The result is a cassette with alternating channels directed perpendicular to each other - the future heat exchanger.
- The cassette is pulled together by a frame from a corner. Silicone sealant is filled into the cracks. On the sides of the cassette there are fastenings for flange connections. It is necessary to take into account that the cassette must be positioned vertically on one of the corners of the square, forming an equilateral rhombus. The resulting condensation will accumulate in its lower part. There is a drainage hole with a tube to remove accumulated moisture. As mentioned above, more than one heat exchanger cassette can be installed in one housing for greater efficiency. In this case, the second one should have the same dimensions as the first one. Their adjacent corners should be in close contact, avoiding any gaps or gaps. Place silicone sealant on the bottom and top of the joint.
- The prepared cassette is inserted into the housing. Its internal height and length are equal to the diagonal of the square (if one cassette is used), and its width is equal to the thickness of the set of plates. In the walls of the housing, opposite the corresponding sides of the cassette, there are holes for attaching plastic flanges for air ducts. The heat exchanger must be installed in special guides from the corner, mounted on the walls of the housing. The cassette is removable, which is important for its maintenance.
- For incoming flows, it is necessary to provide the possibility of installing simple removable cassette filters. Mineral wool about 4 centimeters thick is attached to the inner surface of the housing walls. To ensure forced ventilation, fans are installed that allow you to regulate the rotation speed.
Video: making a recuperator at home
Part 1: Case Assembly
Part 2: plates
Part 3: installation
To create a favorable microclimate in a house or apartment, the premises must be regularly ventilated. To ensure a balance of fresh air and humidity, you need to provide your home with good ventilation. Installing a recuperator will solve this problem and, in addition, save energy resources.
It is impossible to imagine comfortable suburban housing without a good ventilation system, since it is this that is the key to a healthy microclimate. However, many are cautious and even wary about implementing such an installation, fearing huge electricity bills. If certain doubts have settled in your head, we recommend taking a look at a recuperator for a private home.
We are talking about a small unit, combined with supply and exhaust ventilation and eliminating the excessive consumption of electrical energy in winter, when the air requires additional heating. There are several ways to reduce unwanted expenses. The most effective and affordable way is to make an air recuperator yourself.
What kind of device is this and how does it work? This is what we will discuss in today’s article.
Features and principle of operation
So what is heat recovery? – Recuperation is a heat exchange process in which cold air from the street is heated by the exhaust flow from the apartment. Thanks to this organizational scheme, a heat recovery installation saves heat in the house. In an apartment in a short period of time and with minimal costs electricity creates a comfortable microclimate.
The video below shows the air recovery system.
What is a recuperator? A general concept for the average person.
The economic feasibility of a recuperative heat exchanger also depends on other factors:
- energy prices;
- unit installation cost;
- costs associated with servicing the device;
- the duration of operation of such a system.
note! An air recuperator for an apartment is an important, but not the only element necessary for effective ventilation in a living space. Ventilation with heat recovery – complex system, functioning exclusively under the condition of a professional “bundle”.
Recuperator for home
As the ambient temperature decreases, the efficiency of the unit decreases. Be that as it may, a recuperator for a home is vital during this period, since a significant temperature difference “loads” the heating system. If it is 0°C outside the window, then an air flow heated to +16°C is supplied to the living space. A household recuperator for an apartment copes with this task without any problems.
Formula for calculating efficiency
Modern air recuperators differ not only in efficiency, nuances of use, but also in design. Let's look at the most popular solutions and their features.


Main types of structures
Experts emphasize that there are several types of heat:
- lamellar;
- with separate coolants;
- rotary;
- tubular.
Lamellar type – includes a structure based on aluminum sheets. This recuperator installation is considered the most balanced in terms of the cost of materials and thermal conductivity (efficiency varies from 40 to 70%). The unit is distinguished by its simplicity of execution, affordability, and the absence of moving elements. No specialized training is required for installation. Installation can be done at home, with your own hands, without any difficulties.
Plate type
Rotary– solutions that are quite popular among consumers. Their design includes a rotation shaft, powered from the mains, as well as 2 channels for air exchange with countercurrents. How does this mechanism work? – One of the sections of the rotor is heated by air, after which it turns and the heat is redirected to the cold masses concentrated in the adjacent channel.
Rotary type
Despite the high efficiency, the installations also have a number of significant disadvantages:
- impressive weight and size indicators;
- requirement for regular maintenance and repairs;
- it is problematic to reproduce the recuperator with your own hands and restore its functionality;
- mixing of air masses;
- dependence on electrical energy.
You can watch the video below about the types of recuperators (starting from 8-30 minutes)
Recuperator: why is it needed, their types and my choice
note! A ventilation installation with tubular devices, as well as separate coolants, is practically impossible to reproduce at home, even if you have all the necessary drawings and diagrams at hand.


DIY air exchange device
The simplest from the point of view of implementation and subsequent equipment is considered to be a plate-type heat recovery system. This model boasts both obvious “pros” and annoying “cons”. If we talk about the advantages of the solution, then even a homemade air recuperator for the home can provide:
- decent efficiency;
- lack of “connection” to the power grid;
- structural reliability and simplicity;
- availability of functional elements and materials;
- duration of operation.
But before you start creating a recuperator with your own hands, you should clarify the disadvantages of this model. The main disadvantage is the formation of glaciers during severe frosts. Outside, the moisture level is lower than in the air in the room. If you do not act on it in any way, it turns into condensate. During frosts, high levels of humidity contribute to the formation of ice.
The photo shows how air exchange occurs
There are several ways to protect the recuperator device from freezing. These are small solutions that differ in efficiency and implementation method:
- thermal effect on the structure due to which ice does not linger inside the system (efficiency drops by an average of 20%);
- mechanical removal of air masses from the plates, due to which forced heating of the ice is carried out;
- addition of a ventilation system with a recuperator with cellulose cassettes that absorb excess moisture. They are redirected to the home, not only eliminating condensation, but also achieving a humidifier effect.
We invite you to watch the video - Do-it-yourself air recuperator for the home.
Recuperator - do it yourself
Recuperator - do it yourself 2
Experts agree that cellulose cassettes are the optimal solution today. They operate regardless of the weather outside, while the installations do not consume electricity, they do not require a sewer outlet or a collection tank for condensate.


Materials and components
What solutions and products should be prepared if it is necessary to assemble a plate-type home unit? Experts strongly recommend paying primary attention to the following materials:
- 1. Aluminum sheets (textolite and cellular polycarbonate are quite suitable). Please note that the thinner this material is, the more efficient the heat transfer will be. In this case, supply ventilation works better.
- 2. Wooden slats (about 10 mm wide and up to 2 mm thick). Placed between adjacent plates.
- 3. Mineral wool (up to 40 mm thick).
- 4. Metal or plywood for preparing the body of the device.
- 5. Glue.
- 6. Sealant.
- 7. Hardware.
- 8. Corner.
- 9. 4 flanges (according to the pipe cross-section).
- 10. Fan.
note! The diagonal of the recuperative heat exchanger housing corresponds to its width. As for the height, it is adjusted to the number of plates and their thickness in conjunction with the slats.
Device drawings
Metal sheets are used to cut squares, the dimensions of each side can vary from 200 to 300 mm. In this case, it is necessary to select the optimal value, taking into account what kind of ventilation system is installed in your home. There should be at least 70 sheets. To make them smoother, we recommend working with 2-3 pieces at a time.
Scheme of a plastic device
In order for energy recovery in the system to be fully carried out, it is necessary to prepare wooden slats in accordance with the selected square side dimensions (from 200 to 300 mm). Then they must be carefully treated with drying oil. Each wooden element is glued to 2 sides of a metal square. One of the squares must be left unpasted.
In order for recovery, and with it air ventilation, to be more efficient, each upper edge of the slats is carefully coated with an adhesive composition. The individual elements are assembled into a square “sandwich”. Very important! The 2nd, 3rd and all subsequent square products should be rotated 90° relative to the previous one. This method implements alternation of channels, their perpendicular position.
The upper square, on which there are no slats, is fixed with glue. Using the corners, the structure is carefully pulled together and secured. To ensure heat recovery in ventilation systems without air loss, the cracks are filled with sealant. Flange mounts are formed.
Ventilation solutions (manufactured unit) are placed in the housing. It is first necessary to prepare several corner guides on the walls of the device. The heat exchanger is positioned so that its corners rest against the side walls, while the entire structure visually resembles a rhombus.
On the picture homemade version devices
Residual products in the form of condensate remain in its lower part. The main task is to obtain 2 exhaust channels isolated from each other. Inside the structure made of plate elements, air masses are mixed, and only there. A small hole is made at the bottom to drain condensate through a hose. 4 holes are made in the design for flanges.
Formula for calculating power
Example! To heat the air in the room up to 21°C, which requires60 m3 airat one o'clock:Q = 0.335x60x21 = 422 W.
To determine the efficiency of a unit, it is enough to determine the temperatures at 3 key points of its entry into the system:
Calculation of recuperator payback
Now you know , what is a recuperator and how necessary is it for modern ventilation systems. These devices are increasingly being installed in country cottages and social infrastructure facilities. Recuperators for a private home are quite a popular product nowadays. At a certain level of desire, you can assemble a recuperator with your own hands from available materials, as mentioned above in our article.