Pasting furniture with self-adhesive film. Ideas for restoring an old cabinet with your own hands

 Let's imagine a situation - it won't be long before the planned repair, but the furniture located in the house got wet or, conversely, dried out. Another option is to move to a rented apartment that has a very poor environment that negatively affects the people living in the premises.
The best solution to the problem in this case would be a self-adhesive film for furniture, which will quickly improve the situation without resorting to significant costs. This material is available in a variety of options, providing the ability to perfect match specific modification for each specific case.
 If you want to subject your furniture to a quick and high-quality restoration using a film, then you should seriously choose required material. In particular, it is worth carefully checking what substance it is made of, because cheap polypropylene and polyethylene models are often found on the market, with which it is fundamentally impossible to paste over a large object.
The best option will be traditionally used in many areas human activity polyvinyl chloride (PVC), from which a high-quality self-adhesive film is made.
It is also necessary to pay attention to the presence of an additional protective layer. For example, pasting kitchen table will require exceptionally high strength, since this piece of furniture is constantly subjected to high loads, aggressive external environment and hit with sharp objects.
If you ignore this requirement, then the self-adhesive film will not last even one month - soon only individual flaps will remain from it.
In addition, high-strength material should also be glued to the table in the nursery - it will save furniture from spilled paints, ink from disassembled pens, and other pollutants that are almost impossible to remove from wood-based panels.
 Using cheap self-adhesive film, many people are surprised to find that after a while it loses its original brightness of colors - they have to re-glue the material on the furniture, risking damage to it and spending additional money.
In order to avoid such a problem, it is necessary to choose a model with an additional layer of ultraviolet stabilization - just such a film is shown in the photo above. Moreover, this species protection can also be useful when using a transparent layer that is glued to various objects - it prevents furniture and household appliances from being exposed to harmful harsh sunlight.
 The most expensive modifications are distinguished by the presence of other layers - in particular, a moisture-resistant self-adhesive film is suitable for the kitchen and bathroom. In close proximity to heating appliances, represented by a stove, boiler, water heater, pasting is done using a thermally stable polymer.
As in the previous case, such a self-adhesive film can also be used as an individual protective agent- in the photo above you can see an option with protecting the tree from the accumulation of excessive moisture.
Aesthetic properties
Depending on what goals you want to achieve, the self-adhesive film that is optimal for this application may have different kinds. Therefore, before gluing this material, create small project repair in the form of a sketch.
You will do the most right if you take the original photo of the room and apply a drawing to it using a graphic editor.
Those who do not use specialized software, you should use the self-adhesive film itself, which can be easily applied to paper.
 In order to visually create more space in the room, you should stick a mirror layer on some furniture. Such a decision will original item in the design of the premises, as well as help to improve the psychological comfort of residents small apartments. At the same time, pasting is usually done using a matte material - an overly bright self-adhesive film can overshadow all other parts of the room, distracting too much attention.
In the photo, you can also see that even the reflective material can have different color tones - you can also choose any of them that best suits the overall design concept.
Fans of natural materials can be recommended to choose a self-adhesive film stylized as:
- a rock;
- ceramics;
- tree;
- the cloth.
However, it is worth gluing it on furniture only if the product is of sufficiently high quality. Often on the market there are goods manufactured by Chinese enterprises that have an unaesthetic appearance. Sticking such a film means spoiling the appearance of the room with a cheap imitation, not even remotely resembling the original.
 You will do the right thing if you choose a self-adhesive base well-known manufacturer- in this case, you can get the result, like that which is shown in the photo.
In addition, a glossy self-adhesive film is widely represented on the market, which differs in a rather original appearance. The scope of its application are rooms with a low level of lighting and not intended for permanent residence of people. In particular, gloss can decorate furniture in the hallway or corridor.
For the kitchen, bedroom, hallway, office, it is better to choose a matte option. In addition, self-adhesive film with good performance light reflections suitable for original design ceiling.
If you want to fully give free rein to your artistic imagination, then you can glue not a monophonic material, but real works of art made in the form of a polymer coating.
 An example would be original kitchen, which is shown in the photo - it is not difficult to buy such an option, and its price will not be much higher than that of a traditional self-adhesive film. In this case, it is necessary to observe the same condition as when choosing a product under natural material- only high quality will achieve the beauty of the image.
Method of work
The beauty that self-adhesive film has is that in order to properly stick such a finishing agent, you do not need to invite a professional worker. It is enough just to perform a simple preparation, which is quite within the power of any person.
The main condition is to glue the film only in good light, otherwise you may not notice minor defects, which will be impossible to eliminate later.
 First of all, it is necessary that the furniture is smooth and does not have external defects in the form of tubercles, large cracks, hardened drops of paint, burrs and other things. Therefore, before applying a self-adhesive surface, it is worth polishing the object with which you plan to work. This can be done both with the help of manual means, and using a special electric machine with brushes.
The final step will be degreasing the surface - this is necessary condition, without which the self-adhesive base can shrink, forming numerous folds and depressions.
In addition, it is allowed to glue the material only on perfectly clean furniture - otherwise, dirt will cause rapid peeling. decorative coating. Having completed all the preparation processes, you can proceed to cutting the film itself.
You just need to cut out the required piece, first outlining its shape and dimensions. Don't worry if you don't have a large enough ruler - many manufacturers pre-line the back of their products into squares with the specified side width. It remains only to glue the film, removing protective covering from the sticky part - carefully attach it to the object to be processed, starting from the top. Going down, gradually smooth it out to release excess air from under it, which is the cause of the formation of serious defects.
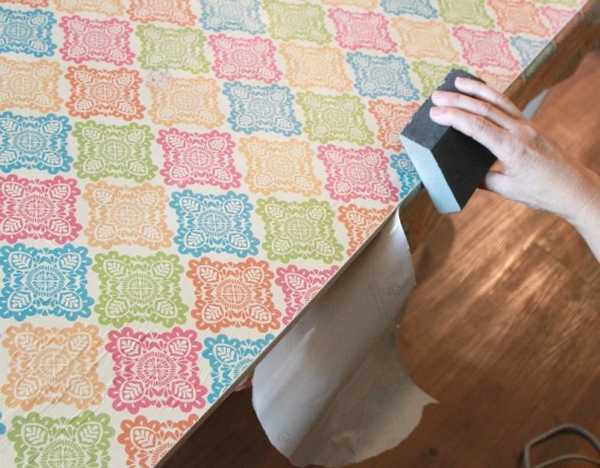
After repair work often there are finishing materials that are a pity to throw away. For example, wallpapers that are sold in large rolls, and. How to use them? You can glue them on cabinets, bedside tables, doors, and other furniture.
With this simple action, you will immediately kill two birds with one stone, use the remnants of finishing material and decorate old, battered furniture. To carry out such work, you do not need any special skills, but we will now tell you how to do it.
Bright accent in a quiet kitchenWallpaper
You have probably heard more than once that various interior items are decorated with wallpaper. How many master classes have you seen on TV from designers of all stripes, because each of them considers it his duty to give a second life to some household item.
They do this most often with high-quality vinyl wallpaper or non-woven wallpaper, since it is extremely difficult to work with paper options, and in order to get at least a satisfactory result, you have to sweat a lot.
Therefore, if you still have wallpaper, before getting involved in pasting surrounding objects, make sure of the quality of the finishing material.
Our choice of color and texture is also limited, since we work with residual material, but if you want to buy a new roll for this purpose, then start from overall design room and your taste buds.
 decoration kitchen furniture wallpaper
 It is quite acceptable to paste over the furniture in the room with canvases with the same pattern as on the walls. Such an interior will look quite harmonious and holistic. If you want to use a different type of wallpaper, then do not forget about the general concept of the design of the room.
Application of simple design solutions, will make a more harmonious interior. For example, if the room is decorated in light colors, then it is good to use dark or bright options for pasting cabinets. If the walls in the room are wallpapered with ornaments, then in order to avoid overloading the interior, the furniture is pasted over with plain canvases. It will look very cool interior decoration closet, made to match the walls of the room.
A good option for decorating cabinets, it is an imitation of others finishing materials, wood, brick, leather, stone. Such vinyl wallpapers are often used for decoration. various rooms and of course they stay. In addition, such canvases have a significant relief and a repeating pattern, which will help hide defects on the surface of the furniture.
 Classic variant cabinet decoration
 In hardware stores, you can find special murals designed for pasting doors and cabinets. Usually this paper options, which depict non-trivial subjects, less often a banal imitation of a wooden coating.
In fact, the wood cabinet is easiest to paste over with a self-adhesive film, which is just available in such colors. German and Dutch film is more expensive and of better quality, Chinese is cheaper, but this film often leaves the edges due to not the highest quality adhesive composition.
Note that self-adhesive wallpaper can be plain, stained glass, if this option suits you, use it.
If you are going to paste Kitchen Cabinet or a bedside table in the corridor, it is desirable that the wallpaper be moisture resistant for wet cleaning. This needs to be thought about in advance. Self-adhesive film has moisture-resistant qualities, like most vinyl wallpaper, but the paper is weak.
 The use of green and white colors that fit into the interior
 If you only have paper leftovers, in principle you can use them, but after pasting you will need to, which will add gloss and protect the canvases from moisture.
We make pasting
We collect the necessary materials
Before starting work, you need to take care of the tools and material. Here's what we need:
- sandpaper (sandpaper), an appropriate attachment for a drill or grinder, to prepare the surface for gluing;
- in some cases, a building hair dryer, but not necessarily;
- measuring instruments - ruler, tape measure, corner;
- tools for marking and marks - pencil, pen, marker;
- cutting tool - knife, scissors;
- primer and putty for wood preparatory work;
- tools for applying compositions - roller, brush, spatula;
- rags for smoothing and removing glue;
- PVA glue.
 Using a grinder for sanding surfaces
 As you can see, the list is quite impressive. If you don't have any materials, buy them. By the way, if the fittings of your furniture are worn out, then you can change them. For example, a handle, a new locker handle will not cost much, but will add color to your newly pasted furniture.
Preparatory work
Before wallpapering furniture, you need to take care of the surface on which you will apply the material. We need to make it suitable for such work, so we will perform the following manipulations:
 Typical domestic kitchen cabinet after decoration
 - To make it easier to work with a cabinet or bedside table, you need to disassemble it, remove all accessories from it.
- The next step is to sand decorative surface, remove the entire layer of varnish from it. This can be done with the help of a skin, which is very laborious, it will be easier to put the appropriate nozzle on a drill, grinder or screwdriver and walk over the varnish.
You can also remove the varnish with a building hair dryer. To do this, the surface is heated and the applied composition is scraped off with a spatula. But in this case, you can not do without sanding.
- If your furniture is made of solid wood and has not been processed in any way, then it is recommended to go through the zero sandpaper to create some roughness.
- In the next step, we remove all the dust from the skin, for which we use a damp cloth. Give the furniture some time to dry.
- After examining the dried surface for defects, we decide whether it needs to be puttied. If the cracks and notches are not so large, and the wallpaper for pasting is embossed, you can not do this. If the defects are deep, you will have to level the surface with putty, maybe even in several layers.
- As you may have guessed, after the putty has dried, putty places must be processed, leveled with a common surface. This is also done with sandpaper.
- Now the surface of the cabinet is almost ready, it remains only to prime it for better adhesion to the wallpaper.
Carrying out the preparatory work will provide 80% success, even if you can’t paste the wallpaper beautifully the first time, you will already have a base for further experiments.
pasting
Pasting furniture also takes place in several stages:
 Furniture upholstery work
 - First of all, it is worth making blanks from the remnants of wallpaper. To do this, the item is carefully measured and the dimensions are transferred to the wallpaper. Some patterns are cut out in accordance with the dimensions of the cabinet or bedside table.
- Next, the prepared surfaces are smeared with glue. Can be used wallpaper glue, but it is better to use building PVA, it will better glue the materials. It is necessary to apply the cut pieces to the surface of the cabinet carefully, try to straighten the canvas immediately. This is not so difficult to do, since the patterns are small in size.
- It is recommended to stock up large quantity dry rags or rags, to smooth the sheets and remove glue residue from them. A special pressure roller will help to press the pieces more tightly.
- After pasting a cabinet or other furniture with wallpaper, it is necessary to give the glue some time to dry, and only then fasten the fittings. Usually a few hours is enough, but in the case of large items, it may take a day.
As with standard wallpapering, try not to create indoors, there is some chance that the sheets will not stick well.
 The manifestation of fantasy in the interior of the kitchen
 Actually, that's the whole technology of decorating furniture with wallpaper. Definitely after these manipulations, your wardrobe will look better, certainly more interesting than if you painted it.
You can glue the cabinets yourself, as you can see, there is nothing complicated here, it is enough to make a little effort, patience and accuracy. In addition, the restoration of such items with your own hands will give you self-confidence and confirm your design abilities. Try it, maybe the world doesn't know the name of the new, successful designer yet.
With the help of self-adhesive film, you can update the design of any furniture. The properties of the material imply its use for restoration purposes. They can replace cracked laminate and veneer, hide partially or completely damaged facades, completely paste over old wardrobe(table) and give them a different look or raise performance characteristics. The process of updating furniture with self-adhesive film is simple, but it requires some patience and knowledge of the sequence of how to paste over an old cabinet with self-adhesive film and what tools will be needed.
Similar articles:
To choose a self-adhesive film for decorating an old cabinet, you need to familiarize yourself with the properties and characteristics of this coating, pay attention to the structure, base material, surface type, decorative design and appointment.
At the heart of all films are used: polyester, propylene and polyvinyl chloride. Additionally, plasticizers, stabilizers, pigments, paper, natural and synthetic fabrics can be added.


Self-adhesive film consists of three main parts:
- The surface is made of paper, polymer film or metallized foil.
- Acrylic or rubber adhesive base.
- Protective backing made of siliconized paper. Retains the adhesive side of the film and peels off before sticking.
There are calendered films that are able to stretch under the influence of high temperatures and shrink during cooling. They are best used in order to paste over a cabinet with even, smooth facades. If it is necessary to decorate rough or corrugated facades with a self-adhesive film, to hide existing protrusions, preference is given to molded materials.
The surface cloth differs in structure, it can be:
If all quality characteristics affect the durability and scope of application, the appearance of the furniture depends on the type of surface. There are the following types:
- Glossy film - has a high reflectivity. It can be pasted over the facade in dark and small rooms.
- Matte - has a soft surface. The canvas is used in good light.
- Mirror.
- Transparent coating - excellent for processing glass elements in facades.
- holographic material.
When choosing, take into account the size of the parts that will be glued. You need to purchase the most suitable roll of film to avoid a lot of waste. The length can be 2 and 15 m, the width is 45, 67.5, 90 cm.
Pasting the cabinet
The process of updating furniture with film is simple, but it requires patience and knowledge of how to glue a cabinet and what tools will be needed.
Required tools and materials
To start updating cabinets, in addition to the adhesive web, you will need a number of improvised tools:
- ruler or tape measure;
- pencil or marker;
- scissors, clerical knife;
- silicone spatula or dry rag;
- a spray bottle with soapy water;
Training
Sticking a polished cabinet with a self-adhesive film begins with surface preparation. From the very beginning, remove all removable fittings. For convenience, you can remove the doors from the hinges.
All furniture should be carefully examined for protruding fasteners, chips and cracks in the coating, since in the future all these defects will appear. It is enough to simply tighten screws and bolts with a screwdriver or wrench, and it will be more difficult to deal with irregularities. You will have to level the surface with putty, and then process it with sandpaper.
After leveling, proceed to cleaning and degreasing with any detergent and ethyl alcohol.
If the cabinet is unfinished wood, MDF or chipboard, a light coat of furniture primer can be applied to enhance adhesion and allowed to dry.


Pasting the cabinet
When gluing the film, 2 methods are used - wet and dry. The positive outcome of the whole process will depend on the choice of the right one.
It is advisable to use the dry method when processing small areas, applying decorative elements, in corner areas, or if the surface is uneven.
When dry pasting, you must first separate small plot substrate, releasing the adhesive base, attach the film to the place of fixing and level it. Further, as it is glued, the substrate is pulled back, and the sheet is gradually fixed and leveled in parallel with a silicone spatula.
If the question arose of how to properly glue the old cabinet completely and at the same time eliminate the likelihood of wrinkles and other defects, it would be better to use the wet method.
The process consists in gluing the film on a wet base, which will allow you to correct errors immediately in the process.
To moisten the adhesive layer, use a spray gun in the "fog" mode. To do this, the substrate is removed completely. For wetting, a soap solution is prepared from 10 ml of detergent and 1 liter of water. The main rule with the wet method is not to overdo it with moisture. This greatly slows down bonding and causes the material to slip off.
The prepared canvas is placed on a cabinet and moisture is squeezed out from the center to the edges, while fastening the surfaces. The remaining solution will completely evaporate after 48 hours. A day later, you need to once again process the canvas with a roller.
In the same sequence, we glue all the walls and facades.
What do you do with old furniture?
Poll Options are limited because JavaScript is disabled in your browser.
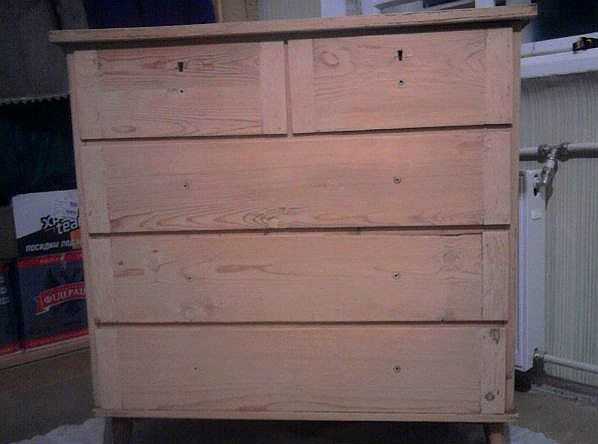
Despite the fact that Soviet-era furniture is quite reliable and strong, it is not considered beautiful, let alone competing with modern furniture. In addition, by this time it was pretty worn out and in need of repair. Even in such conditions, the owners are sorry to part with it. To buy a new, modern one, you need a lot of money, because furniture has always been not cheap, and it is not cheap even now. In this case, there is one, alternative option to leave the old furniture and not buy a new one - this is to try to update the furniture with your own hands, giving it an attractive and modern look. Cabinet furniture is quite easy to remake, especially since there are all the materials necessary for this. In any case, it will be much cheaper to purchase materials for reworking furniture than to buy new furniture. One of the easy and affordable tricks is to change the color and replace the hardware. There will be no special problems with fittings, but with a change in appearance, everything is much more complicated. There are several options, but two are considered the most common - painting and gluing special film or wallpaper.

The most affordable and easiest option is to paste old furniture with self-adhesive film. On sale you can find a film for every taste, both color and monotonous, of various colors, shades and textures. Many prefer wood effect film, but there are other options that meet the spirit of modernity. This approach can really turn an old wall into furniture that will have an attractive and modern look. It is not at all difficult, it is enough to do your work slowly and carefully, which will allow you to get an interesting result that deserves attention. To see this, just look at 2 photos. In the first photo, an outdated Soviet wall made of chipboard, and in the second - the same wall, but after renovation.

The wall has received a new appearance thanks to the use of compacted self-adhesive furniture film, cream color with matte surface. Where there was an open part of the wall, there are glass doors pasted over with a translucent matte film. For edging used furniture layout, chrome colors, and also self-adhesive.
The work consists of the following stages:
- The old wall is dismantled, everything that is not needed is removed, including accessories.
- All surfaces are cleaned of dirt and degreased. To do this, use a soft cloth and detergent. After that, the agent is washed off warm water with vinegar and finally the surfaces are wiped with a dry, clean cloth.
- Fragments are cut out of the film required size, with a margin of up to 1 cm. After pasting, the excess film is cut off with a clerical knife.
- The surface before pasting is irrigated with water from a spray bottle. A wet surface will allow you to accurately position the film, as it can be moved, or even peel off if the first time it was not possible to glue it well.
- Before pasting, removed from the film protective film, after which it is laid on the surface. Having correctly positioned the film fragment, they begin to smooth it with a soft cloth in the direction from the middle and to the edges. The main thing is that there are no air bubbles under the film. In this regard, all work is done slowly and very carefully.
- When bubbles form, they are pierced with a thin needle and the air is expelled from them. This operation is also carried out with a rag, moving from the edges to the puncture point. After that, this place is carefully rubbed with a rag.
- After the film is glued, a thin cotton fabric is taken and superimposed on top of the film, after which an iron is used with average temperature heating. The fabric is ironed along with the film.
- In conclusion, the finish (edging) is glued and fittings (handles) are installed.
- This technology is applied to each glued part. Glass is glued in the same way, only from the inside. After complete assembly, you will get a completely new furniture wall. In this way, you can breathe a second life into items such as bedside tables, chests of drawers, cabinets and kitchen furniture.
After the wall was successfully pasted over, the old cabinet was also updated and installed on the right. As a result, it turns out that the entire wall is filled with updated furniture. Using the same technology, you can also update old kitchen furniture - stick a self-adhesive film and replace the handles.

There is a second option for updating furniture, which is less expensive and, most interestingly, you don’t need to disassemble anything. In this embodiment, only furniture doors are pasted over and not with a film, but with non-woven wallpaper. PVA glue is used for pasting. So that the edges of the wallpaper do not bulge, they are cut into blanks, the size of which is 5 mm smaller size doors. Judging by the photo below, the result is not bad at all.

The advantage of such a finish is that the finish can be replaced with new wallpaper at any time.
As a rule, the surface pasted over with wallpaper lasts for five years. Similar technology was used in finishing kitchen set. To make the surface washable, the wallpaper is covered with two layers of PVA glue. The most important thing here is to do everything carefully so that smudges do not form, since you will have to work with a brush.
Alternatively, the wallpaper can be varnished, but before that it is better to experiment on desired wallpaper. It is important to determine what will be the reaction of the wallpaper to the varnish. When choosing a varnish, you need to know that acrylic and cellulose give a transparent surface, and polyurethane, after a certain time, will turn yellow. Polyurethane varnish is practically not amenable to the action of solvents and, if it is necessary to remove it, then mechanical action will have to be resorted to. Usually, coarse sandpaper is used for this or an electric drill with a nozzle is used.
How to update a chest of drawers
An old chest of drawers can stand in the attic for several years and lose only its appearance. Usually the old lacquer coating cracks, but otherwise, he can be envied modern furniture. It does not dry out and remains as reliable and strong as it was before. In this case, the chest of drawers undergoes a more complex update, using painting and decoration, using polyurethane molding and wallpaper.

Stage number 1. All fittings are removed from the chest of drawers, after which the old coating is removed. As a rule, the old varnish coating is removed mechanically using sandpaper (large). All shells, cracks and chips are sealed with putty and wait for it to dry. After complete drying, the surface is polished with a fine emery cloth. The result is what is in the photo below.
Stage #2. Installation of polyurethane moldings. The main task is to choose the right moldings so that they are neither small nor large. Basically, products up to 5 cm wide are selected and very narrow if you look at them in profile.
Acquired moldings are very carefully and accurately cut into segments of the required length, and the corners are cut at an angle of 45 degrees. At the same time, care must be taken to match the pattern. The molding is attached with PVA glue. Alternatively, you can use self-tapping screws for reliability. At the same time, before screwing them, recesses are made for them. All recesses are sealed with putty very carefully, otherwise there may be problems when the putty dries.

Stage 3. All surfaces for gluing are treated with a primer. As a primer, it is possible to use PVA glue diluted with water in a ratio of 1:2. After the primer has completely dried, proceed to painting. As a rule, 2 coats of acrylic paint are applied on water based. Color - coffee with milk, although the photo does not match the color indicated due to poor color rendering.

Stage number 4. Decoration is carried out on the basis of wallpaper made using silk-screen printing technology. Segments of wallpaper are cut clearly according to the size of the inner part, bordered by molding. The wallpaper is glued with PVA glue. After complete drying, the entire chest of drawers is covered with a water-based varnish in 2 layers.

Stage number 5. In conclusion, modern legs in the form of wheels for furniture are screwed to the chest of drawers and handles are installed.

If you carefully study the technology, then everything is much simpler than it might seem. Although, all stages require a certain accuracy, otherwise there will be problems with the appearance. In the same style, you can update the wardrobe. The result is not a bad set for a room or bedroom. Maybe not quite modern, but original and stylish, and most importantly - very cheap.
If old furniture has a lacquer coating, it is very difficult to get rid of it. In the absence of obvious flaws, it is better to resort to the help of a primer for complex surfaces and only after that proceed with painting. This approach will minimize the effort to update old furniture.
Updating an old nightstand
The photo below shows the process of updating an old polished bedside table. First of all, polishing was removed, after which the surfaces were puttied and sanded. After that, it was painted acrylic paint in two layers. In conclusion, paper from the gift bag was glued onto the door, thanks to which it was possible to obtain an original drawing. After that, the entire bedside table is covered with two layers of semi-gloss acrylic varnish.

All stages are not particularly difficult if you have the slightest skills. All processes correspond to the sequence of actions described during the restoration of the chest of drawers. The result exceeds all expectations.
 This old bedside table subject to update.
  This package will serve as an excellent decor for the doors.
  The result of updating the old nightstand.
 Remodeling furniture with your own hands is simple and accessible to everyone, if there is a desire. Unfortunately, without desire, nothing will work. Below in the photo, you can see a bedside table, redone according to a very simple technique: the bedside table was simply pasted over with embossed wallpaper and varnished twice.
How to remake a table
Having adopted such technology, it is enough just to turn an ordinary coffee table into the subject modern interior. It is simply taken and pasted over with wrapping paper. This is a thick paper that sticks without problems and does not sag under the action of varnish.
First you need to do the legs and edges of the tabletop. They need to be painted light color to match the new style more. After that, you can proceed to further work.
Before gluing, a paper blank should be cut out of a slightly larger size than the size of the countertop. PVA glue is used for gluing. The surface is well rolled with a roller so that there are no air bubbles. The result should be a perfectly smooth surface.

After that, remove excess material by running a fine-grained emery bar along the edge of the tabletop, pressing the paper against the tabletop. This method allows you to very evenly remove excess material, which is more like a professional action.
Finally, the surface is covered with two layers of varnish. In this case, the layers should be thin. Each layer is applied perpendicular to the previous one.

Alteration of furniture: photo ideas
I got an old kitchen as a gift wall cabinet. His frame was quite decent and it was a pity to throw out such a thing, and I wanted to save money on buying new kitchen furniture, which we did not have. Then I decided to restore this cabinet with a regular self-adhesive film.

There were a lot of colors in the store, and the price for such a film is small. I purchased two meters of film 45 centimeters wide.
First, I unscrewed the old furniture handles that had lost their appearance.


Since the cabinet was already pasted over with a film, it had to be removed. It is removed quite simply, but leaves behind an ugly sticky layer, which must also be removed. I removed this layer with a regular scouring powder and an abrasive sponge. I can say that I had to rub it well, but I still cleaned the closet.


The doors must also be unscrewed in order to make it more convenient to glue them.

Next, you need to measure the length and width of the film for pasting the door. We take the length and width of the film with a margin of 3 centimeters.

Then we separate the edge of the film from its base and gently apply it to the top or bottom of the door from the front side (see the photo below for how this is done). Note that it is very important to separate only the edge of the film, and not all at once.


Now let's take a bite soft tissue and, smoothing her film, glue it to the door. Right hand slowly pull the base of the film, which is at the bottom, and with the left we constantly smooth the front side. Thus, the film will adhere very evenly without bubbles and folds.


When the front of the door is glued, turn the door upside down.

We proceed to pasting the end parts of the door. To do this, glue the film first to the lower (or upper) end (see photo).

Then we make an incision on the side as shown in the photo, and wrap the cut piece, gluing it.


We cut off the sharpening part from above with a simple clerical knife.

We bend the remaining sharpening edge and glue it on inside doors. Then we process the corner on the other side in the same way. We also glue the end on the opposite side.

We bend the edge of the film along the long end of the door and glue it.

We cut the protruding edges with a clerical knife or ordinary scissors.

