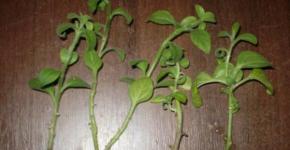
Muzanka houses are modern construction sites. How were the walls of the mud hut built? Read more about the design of such a house and how to build it
In Priirpenye, as throughout Ukraine, there are still old houses and even so-called “hutted huts” - these are either old wooden houses, or houses even with clay whitewashed walls and earthen floor.
Thick walls, floor, stove in half the room, wooden beams, supporting the roof, old slate (or even thatched “strikha”), 56 “squares” - this description may be suitable for most of the “huts” that still remain in Ukraine and Priipenye.

In this form they are suitable only for museums, but not for life. Often such houses are passed down by inheritance with the intention of “preserving the heritage.” And what should the unfortunate heir do in this case? And you can’t live in those conditions, and you can’t keep your promise! An excellent solution for everyone would be a full update! And how to do this? Renovating an old house in just four steps!
How to convert an old hut into a modern comfortable home - just 4 steps!
1. Leave the walls. Make sure the walls look satisfactory. Clay retains heat in winter and cool in summer, so, if possible, it is better not to part with original walls. Another thing is the internal partitions and the oven. They usually take a lot functional space, so we advise you to demolish them, leaving only the “box” itself. Aim to spend 20 to 30 days on this. Although, given current gas prices, there may be no need to rush to disassemble the stove!

2. Replace the floor.“Mazankas” usually stand on an earthen floor, which is actually a mound of earth inside the house, thanks to which moisture does not enter the room, and the distance to the ceiling is reduced by 50 cm. We recommend digging a pit and filling it with concrete. This will allow you to create a heated floor in the house if desired. Along with laying all the necessary pipes, concreting and “settling” this work may take 2-3 months, of which 1.5-2 months will be spent just drying.

3. Walls can also create climate. Usually in villages houses are “sewn up” with bricks outside and whiten, but uneven ones remain inside clay walls. We suggest doing the opposite. Agree, it is very important that the house has smooth walls. It’s more pleasing to the eye, and it’s easier to decorate smooth walls - you can paint, decorate with appliqués, wallpaper, changing the interior at least every season. Therefore, we recommend laying the brick with inside(1 brick, maybe even half a brick) - actually build brick walls inside finished house. And between the adobe and the brick, lay out a mixture of sand and clay, as well as polystyrene foam. As a result, the width of the walls will be about 80 cm - serious protection from cold and heat. Brick walls It needs to be plastered and painted. From the outside, only the corners of the house can be bricked, plastered and painted. It is better to line the walls with a frame of slats and tension plaster mesh. Next, we suggest making a layer from a mixture of clay, sand and hay, and laying a durable facing board with high heat and sound insulation properties. This treatment imitates a log house. You look at the house - a real wooden hut, and inside - smooth, brick, plastered walls. Prepare to spend 1 to 1.5 months on this stage.

4. Updated roof. If roof structure in satisfactory condition, then it is better not to demolish it, but only replace the slate. Place new boards on the old rafters and cover them with painted slate. Make a brick box above the ceiling and pour expanded clay into it to a height of 15 cm. We recommend lining the ceiling itself with boards, leaving the old beams. Then treat with stain, impregnation and varnish. All is ready! “Roofing” work will take from 3 to 6 weeks of your time. And if you line the attic with wide clapboard, you will also get a second floor!

At first glance, everything seems simple. But, in total, all work will take up to 6 months! However, a house in six months - is that really a period? It is also a house that keeps you warm in winter and cool in summer. In 40-degree heat, when the whole country turns on the air conditioners at full power even at night, you will be covered with warm blankets when you go to bed. And this indescribable smell of freshly cut wood and forest is literally intoxicating, as soon as you cross the threshold of your hut without chicken legs. It's worth it!
Everyone who wants to leave civilization first of all thinks about where he will live, sleep, escape from bad weather, and people, as a rule, fearing that they will not be able to build a log house in a season and prepare for winter, since this can be problematic, choose as an option for living in a hastily made dugout or hut, but all this temporary housing is not entirely suitable for life, but rather as extreme survival, depending of course on how to build it - but still.
For example, you can consider a compromise option that can be built by people with modest physical capabilities and even women, since there are no heavy, unliftable logs and you don’t need to dig a hole for it, like for example for a dugout. This house is a frame with walls sewn from small diameter logs, and the roof, ceiling and floor are made in the same way.
>
>
Read more about the design of such a house and how to build it
After the place is marked, planned, and cleaned, according to pre-designated marks, you need to dig in the posts according to the markings. If the house is small, then four columns will be enough, but if more, then it is better to add another column to each wall for reinforcement. After the pillars have dug evenly into the ground, you can begin tying the longitudinal and transverse crossbars; on the floor and ceiling, logs under the logs should be passed more often, a step of about 60 cm, and the walls will be strengthened when you sew logs on them one by one, the logs need to be closer to each other, so that there are no large cracks left, you need to adjust them with an ax, cutting off the excess.Next, when the entire frame and walls of the house, including the attic and roof, have been assembled, we begin to insulate the walls. Using wire or rope, we tie rods crosswise to the walls in several layers 20-30 cm thick, we need them as reinforcement so that the clay does not fall off the walls because the clay layer is very thick.
Then, using a prepared solution based on clay and sand or loam or the soil that is contained under the top fertile layer of the earth, we apply a protective insulating layer to the walls and then insulate the ceiling with a thick layer, about 15-20 cm. Before filling the ceiling with soil, you need lay something down for additional sealing, for example film or roofing felt, but if not, then you can use straw and grass. Afterwards, when the house is almost ready, all that remains is to fill in the rubble for additional insulation.
And so, after the main work, we are left with the most difficult thing to manufacture, this is the door and window. If there are no special tools or ready-made boards, then you can assemble the door jamb and the door using an axe, the work is of course painstaking, but you need to fit everything as tightly as possible so that the heat does not escape, and then cover the door with something - for example, fabric, or unnecessary clothing.
With the window, everything is exactly the same as with the door, we drive everything with a hatchet, you need to install at least double glass, but if there is none, then you can use film, but it needs to be put into three or four threads, with at least a centimeter distance between each other, to create several layers of “air cushion”. The tree for such a house can also be used freshly cut, without preliminary drying, since it is of small diameter and therefore will dry quickly, and it will not move, since you have already secured it, and it will not go anywhere. The diameter is not necessarily too thick; tree trunks with a diameter of 10-15 cm are suitable for logs.
It is better to tie and fasten the entire structure not with nails, but with wire, or you can use ropes. You can dig soil suitable for the solution for applying to the walls on site or right inside the house, at the same time the subfloor will be deeper, and then when laying the floor you will make a hatch and you will climb through it into the subfloor and store your supplies there.
Even simple soil can be used as a soil, but clay-containing soil is better. Of course, such walls will constantly crack, and they will need to be greased every year, but it will be warm and dry. Such a frame house, coated with a thick layer of clay, is suitable for the first time, while the main, more comfortable housing is being built, and then the mud hut can be used as a barn, warehouse, dig a cellar there, or simply be used as a warehouse.
With a log house, everything is much more complicated, you need logs two or three times thicker, and each log needs to be carefully processed and adjusted; doing it alone is a very difficult undertaking, no matter how you look at it, and you may not be able to finish it in a season if you don’t have construction experience. log houses and knowledge. As an option, of course, you can small house cutting down about 3/4 m is possible for one person, but it will be a bit cramped for long-term, long-term living, although this will probably happen.
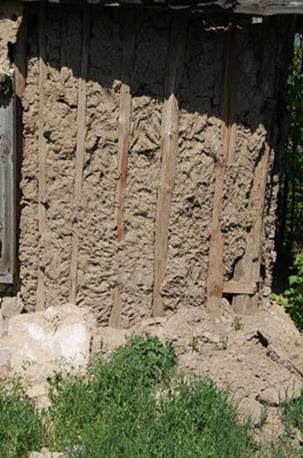
Reinforcement of walls with wooden rods and poles
Reinforcement allows the thick layer of clay soil to stay firmly on the walls and not fall out. For reinforcement, the first layer of poles is nailed or tied to the walls with wire, and subsequent layers of poles are tied to the previous ones.The thickness of the reinforcement layer depends on the expected thickness of the walls, and the thickness of the walls should be made depending on the climate of the region where the house will be built, it can be 10 cm. and 40cm. Also, to insulate such walls, instead of reinforcement and coating, you can use adobe blocks.
Adobe or soil blocks are made in molds, grass is added to the solution to strengthen the blocks for reinforcement, this makes the soil blocks stronger. The blocks are laid as brickwork, that is, the house is simply covered with blocks.
The roof frame must be quite strong to withstand the roof itself along with the roof and the snow load in winter time year, especially in those regions where there is a lot of rainfall. You can cover the roof with both roofing felt and soft roof, and tin, or just straw, in general, whatever is available.  >
>
 >
>
Production of soil blocks, clay, adobe
Adobe, or soil blocks, are made quite simply and quickly. Clay or clay-containing soil is mixed directly in the hole where the soil is located. It is more convenient to stir the soil by laying down a film or tarpaulin; you can stir it in a trough, basin, or sheet of tin.Water is added to the clay, and everything is thoroughly mixed and pounded with feet, then straw, or hay, or grass is added to it, even twigs of bushes can be used, in general, anything that is suitable for reinforcing the block.
Then everything is thoroughly mixed again and placed in wooden molds, the solution is compacted and left to dry. When the clay dries and sets, the blocks can be removed from the molds and laid out for further drying.
It takes 10-15 days to dry, periodically turning the blocks over for uniform drying, that is, a couple of days on one side, a couple on the next, and so on until completely dry. When the blocks are dry, you can begin to lay walls from them. Blocks are laid with bandaging, that is, so that the vertical joints of the blocks do not coincide with each other between the rows, so that the upper block covers the junction of the lower blocks.
After masonry, the walls are plastered and whitewashed with whitewash (slaked lime), lime protects from moisture and precipitation, and gives an aesthetic appearance. Adobe blocks retain heat well, do not like humidity and dampness, because of this they lose their strength and collapse (crumple). Such a hut must be lubricated again every year, all cracks and places where plaster and clay have fallen out must be plastered. The walls are plastered with ordinary clay with the addition of sand.  >
>
 >
>
Until the 50s of the last century, in the northern and northwestern parts of Ukraine, as well as in some steppe regions of southern Russia, houses were traditionally built, which were popularly called and continue to be called mud huts(from the word smear - to plaster with clay mortar).
A little technology for making smeared walls
Now there are people who want to build ecological homes with their own hands. Therefore, enthusiasts are reviving such old-fashioned technologies, guided by the principle - “everything is new, it’s well forgotten old.”
Let's look at some features old technology making smeared walls.
The walls of the mud huts are composed like the walls half-timbered house, from a wooden frame. The gap between the posts and crossbars, which used to be called cages, was filled in the following way: they installed wooden stakes and poles, braided them with brushwood, straw or reeds, and then coated them with clay.
Depending on the type of cell sealing, smeared walls can be divided into:
- wooden;
- wattle;
- straw;
- reed.
Wooden huts consist of frames (crossbars) and racks, the spaces between which are filled with thin logs (knurling), wooden plates or blocks. The surface of such a wall was first filled with wooden shingles from thin poles, and then coated with clay mortar.
Wicker mud hut. With this design, the cells of the supporting frame are filled with vertical wooden stakes and horizontal poles (the pitch of the stakes and poles relative to each other was taken to be approximately 17...25 cm depending on their thickness). After installation, these elements were braided with brushwood and plastered with clay mortar.
Straw hut differs from wattle only in that instead of brushwood, strands of long and straight rye straw were used. The pitch of the stakes from each other was about 17...18 cm.
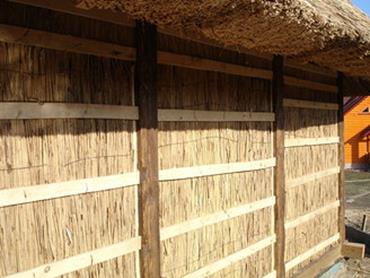
Reed mud hut. When constructing walls in this way, bundles of winter reeds, previously cleared of husks, were attached with wire to poles installed in cages. The beams were nailed to the upper and lower horizontal elements of the half-timbered frame (trimming).

The walls were coated as follows. Surfaces of external and interior walls were previously cleaned and moistened with a wet brush, and the first layer of solution was thrown onto it, which was then left to dry. Next, subsequent layers were added until it was possible to smooth and level all the depressions on the surface of the walls.
By doing plastering works, before performing the subsequent plaster layer, pieces of crushed brick were stuffed into the fresh and still soft coating, as far as possible.
After plastering and final drying of the entire plaster marking, the walls were whitewashed with lime, chalk or white clay.

The walls of cold auxiliary buildings were erected in a similar way. The ends of horizontal poles wrapped in straw, pre-impregnated with a liquid clay solution, were installed in the vertical side grooves of the racks. Adjacent rows of poles were fastened to each other with knitting needles, punching through the straw, or the rows of poles were intertwined with thin wire.
The surface of such walls was leveled by throwing plaster mass made of clay, lime and sand.

It would be interesting to hear your thoughts about mud houses...
The usual Ukrainian hut, a mud hut, belongs to this capital group.
The technology of building houses from clay was known more than six thousand years ago. Mazanka, due to practicality, availability and low cost of materials, as well as speed of construction, was built everywhere. The main materials from which these clay dwellings were made over the centuries were brushwood, straw, reeds, wood, clay and other available materials, which can be found in abundance in Ukraine and southern Russia.
Among the huts there are distinguished: adobe-block hut, adobe-cast (adobe) and the hut itself. All these types of dwellings were used in the steppe and forest-steppe, where clay is abundant and scaffolding almost none.
If a hut was built on the site of an old one that had burned down, then the removed clay was sorted into suitable and unsuitable (one that contained a lot of wood chips or that was baked from the fire was considered unsuitable).
|
|
|

Adobe-block hut. It was made in two ways. In the first case, adobe blocks were used, into which an old unusable adobe hut with strong walls was sawed for one reason or another and sawed into transportable blocks. They sawed with a string saw made of barbed wire with handles. After the material was prepared, laying began on clay solution.
In the second case, new blocks were made, but in this case it took a year to prepare the adobe blocks. During the first construction season, the family worked on making blocks: extracting clay (to do this, dig a well and a cellar, or extract it from a quarry located near the village). The best construction qualities the clay was produced by freezing, so it was stored on the site for the winter. Then the clay was mixed with straw or hay (sometimes wood chips), but more often with chaff (waste from milking grain) and the blocks were formed. The blocks that dried over the summer were stored in a stack for the winter, protected from snow and rain.
Whey, blood, and dung could be added to adobe mixtures to improve the properties of adobe. They not only increased the strength of adobe, but also increased its moisture resistance and durability.
 On the territory of Ukraine, until the collapse of the USSR, rural factories producing adobe operated. Now there are only a few such factories, their products continue to be in demand among villagers.
This technology is characterized by convenient and fast construction; it was very easy to work at heights without serious scaffolding. Walls were quickly erected using clay mortar blocks. But often the villagers forgot to bandage the seams or made the walls too thin, which is why such houses eventually fell apart into “cubes”. But at the same time, the walls could turn into a monolith, which is very difficult to disassemble or destroy.

Adobe-cast (adobe) hut. The walls of such a hut are more durable and require much maintenance. The clay was soaked and kneaded next to the future home. One or more holes were dug in which the clay-sand mixture was mixed. Mixing could be carried out with the help of animals (horses, oxen) and special devices(cart wheels). The technology was divided into adobe and adobe.
Claystone is a technology for laying plastic clay into formwork that already contains straw. Claybite- This is a mixture of clay and straw with less water, also placed in formwork. In both cases, the mixture is thoroughly compacted.
The hut was built according to the principle of climbing formwork. This process was quite difficult and lengthy. It was necessary to prepare the mixture, install the formwork, lay the mixture with layer-by-layer compaction, wait for the structural strength to gain, after which the formwork was removed, the scaffolding was installed and everything was repeated all over again. The pouring height at one time is 300-400 mm. Up to 20 people, or even more, could work on one house at the same time.
|
|
|

The difficulty of manufacturing was the compaction of the mixture above human height. With this technology, it was necessary to strictly follow a number of rules for arranging a complex ligation of a thin frame made of poles and reeds.
Mazanka. Muzanka is the warmest clay housing, the fastest to build, but no less labor-intensive. Burnt driftwood and large stones were used as the foundation. The cross members of the frame were branches of felled acacia. The frame was made without nails, it must be said, all connections were made using mortises and notches. When they chopped a big tree, then one trunk with a diameter of 300-400 mm was split into 2 or 4 parts and used as supports at angles. If younger trees were used, then trunks with a diameter of 100 to 200 mm were used to support the frame. Then branches were woven into the crossbars to create a kind of “basket.” After this, the frame was coated. A clay-straw mixture was used, the amount of straw ranged from 10 to 70% by weight.
The advantage of the hut was that it could be made in one season, because It dried much faster than ordinary adobe. In the manufacture of mud huts, adobe was also used, but much less.
In the northern variants, mud hut was carried out on a log house with 3-4 crowns, which was coated with kaolin clay. This method simultaneously solved the problem of caulking the seams and imparted a traditional white color.
Hut huts are still being built according to traditional technology using modern hardening solutions and a wide range of wood.
As a rule, it is performed under mud strip foundation. Then they begin construction load-bearing frame. Wooden frame, on the basis of which the hut wall is built, is usually made of pine or oak wood. The walls of the house, except traditional method on plows (frame), usually made on the basis of specially made adobe blocks or made of mud brick.
|
|
|
|
|
|


The main beam, the slab, ran along the longitudinal axis of the house. The svolok was considered the abode of the brownie. Purlins rested on this beam, onto which clay was thrown. Where boards were used as purlins, the ceiling now looks like a bubble hanging into the room (partly because the board lay flat). Where unsanded round timber was used, repairs were required because the ceiling had long since fallen off along with the bark. Also, the load was taken by eye, because deformations of the ceiling (partly again due to raw wood) were a constant phenomenon. The attic has always been used for drying and storage. Because of this, sometimes a weak overlap in some places could give uneven shrinkage, which could cause waves to appear.
The selection of these houses is especially close to my heart, since it was collected in Podolia, my small homeland. I spent my early childhood in one of these huts and I have very warm memories associated with them. Vinnytsia artist Vladimir Kozyuk collected this photo collection for 13 years, for which he is deeply grateful. 
Vladimir photographed his first hut under a thatched roof back in 1996, completely unconsciously. And over the course of several years, the artist simply began to dream about these houses. After such dreams, he got up and drew what he saw. In 2004, he bought a digital camera and began purposefully searching for and photographing all the mud huts that still remained.
Today, many of these houses no longer exist, but there are photos and paintings. They are kept in many museums in Ukraine. The author connected the lives of its residents with each of these houses. 
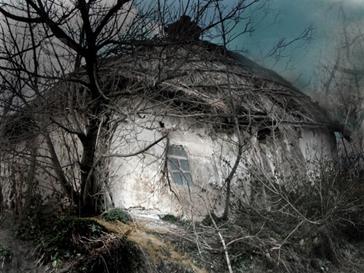
With. Posokhov, Murovano-Kurilovetsky district, Vinnitsa, Ukraine 2005.
This adobe house under the straw, together with the grandmother, became the calling card of the Holodomor project; a huge banner hung in the center of Kyiv. It is noteworthy that the house is simply plastered with clay and there is no white limestone plaster.

When it was photographed, this mud hut was more than 300 years old. This is one of two oldest houses in Ukraine. A striking example of the reliability of adobe frame structures. Mazanka was with wooden log house on a stone foundation. The log house there has already turned to stone. Now this house no longer exists. The top of it rotted, it was flooded with rain and the house collapsed.

With. Yakimovka, Oratovsky district, Vinnitsa, Ukraine 2004. The house of Mikola's grandfather.
This mud hut was still about a hundred years old. This is not a staged photo. Grandfather was just chopping wood when he raised his head. He asked: “How much do I owe you for taking my picture?”
Here it is worth noting that the walls are tightly covered on all sides with brushwood, this protects it from moisture and dampness.

With. Verbovets, Murovano-Kurilovetsky district, Vinnitsa, Ukraine April 22, 2005. Baba Nadya's hut.
This is very beautiful house, where people still live today with a stable and a cellar, all under straw.

Teplitsky district, Vinnitsa, Ukraine, 2006
The grandmother-philosopher lives here.
“They considered her strange in the village, but for me she was quite normal. She posed for me for a photo. She talked about the deputies: “they are greedy, they offend people. That’s why they get diabetes and cancer, and then they waste money on treatment. But I live in my own house, I don’t offend anyone and I feel good.” She covered her house with sheaves herself. What kind of ingenious equipment did she come up with so that these sheaves, with the help of a rope and a lever, flew out onto the roof themselves? She then got out and tied them. She still had a bunch of sheaves in her garden. It would be enough for two more houses,” says Vladimir.

With. Ruban Nemirovsky district, 2009. Baba Marta's hut
“My wife’s grandmother lived in this village, and that’s how I found this house. Grandma Martha was so tiny. And the barn in the yard is just as small and the entrance doors are just as small. She told me that this year, while I was visiting her, neighbors broke into her house. The cereal was taken away. And she crawled under the bed so that she wouldn’t be beaten,” recalls Vladimir.

With. Naddnestrianskoye, Murovano-Kurilovetsky district, Vinnitsa, Ukraine
One of the best mud huts: whitewashed, lined with sheaves. The hut consists of two halves. The grandmother in the photo lived in one with her grandfather. And the other half was a barn. There lived a dog.

With. Kotyuzhintsy, Kalinovsky district, Vinnitsa, Ukraine 2004
All walls are tightly covered from snow and moisture with sheaves of corn. 
With. Deresheva, Murovano-Kurilovetsky district, Vinnitsa, Ukraine 2004. 
With. Chernyatyntsi, Kalinovsky district, Vinnitsa, Ukraine 2010. 
With. Vivsyanyky, Kozyatinsky district
The house is on a hill and is well heated by the sun. 
With. Dzyunkiv, Pogrebischensky district, 2006 
With. Chesnovka, Khmelnitsky district, 1998. Baba Vaska's hut

With. Zhabelovka, Vinnytsia district, 2008.
The last mud hut under a thatched roof in Vinnytsia region 
With. Verbovets, Murovano-Kurilovetsky district
The wide extended foundation is clearly visible in order to protect the house from freezing.
You can view the entire selection on Vladimir Koziuck’s website
Now many technologies: clay plasters, roofs made of reeds and thatch, frame houses- come to us from the West under the guise of very expensive and fashion trends, which only the wealthiest people can afford.
But these construction technologies have been used in our country for many centuries, and let this selection of simple rural mud huts be confirmation that such houses can last and last for a long time. Let's revive the construction of houses from local materials while they still exist, and not buy technological innovations brought far away, which by and large taken from us.