Using CD disks as a mosaic step by step. How you can use old discs: workshops for crafts from CD and DVD
If you can't part with old discs, but you don't even have anywhere to play them, put them to work! Use the CD as decorative material. For example, with the help of discs, you can transform the wall above the stove.
First, it's beautiful. Secondly, from now on it will be very convenient to wash off the grease, the splashes of which often stain the wall above the stove.
First, mark the wall that we will decorate. You can stick a piece of white cardboard or cardboard of any other color on it, you can nail plywood and paint it any color. Then take the CDs and cut them with scissors. We cut the CD into triangles, squares and stripes.


Take glue, spread inside disk and stick to the wall. Lay out the pattern randomly.


The top of the discs can also be painted if you don’t really like the mirror surface. If you decorate pieces of old discs with paint, you can imitate a decorative colored mosaic. If you decide to paint the CDs, then varnish them on top so that the surface is easy to clean if necessary.
We will send the material to you by e-mail
Some part with pity once beloved CDs. Men are reluctant to give away rims from automobile wheels. In order not to have to part with your favorite things, the editors of the site found a lot of ideas on how to make simple and beautiful crafts from disks.
Many no longer use CDs or DVDs. But why throw away something that might be useful?
Beauty is near and created with your own hands. It is enough to take a disk, scissors and ... imagination. From this material you can build an excellent designer lamp, panel, Wall Clock. Car rims serve as a kind or harsh men's garages.
DIY crafts from computer disks
For many, the discovery was interesting technique work with CD-blanks. They are easily divided into two halves, each of which is perfectly cut with scissors into small pieces. But with these brilliant mosaics you can already do interesting crafts: decorate any , decorate , veneer .

| Illustration | Action Description |
|---|---|
 | We will prepare three pieces of plywood, a threaded rod, a light bulb with a cartridge, a cord with a switch and a plug, washers and nuts. |
 | We circle the disks on a piece of plywood and cut them out with a jigsaw. |
 | In one circle, drill a hole for the cartridge and insert it inside. |
 | Let's make a hole for the wire. |
 | We connect three circles, the one with the wire will be in the middle. We drill three holes at equal distances from each other. |
 | It remains to make identical holes in the stack of disks. We string them on three pins inserted into the base. |
Frames for photos and mirrors from discs
What else can be done from old CDs for the home? We propose to build beautiful frame for or photos. The work process is simple: glue is applied to the base (ready-made flat mirror frame or cardboard) and pieces from the blank are laid. You can cut them into squares or choose an arbitrary shape.


Do-it-yourself clock from discs
The clock in the house can also be made by hand. To do this, you will need an unnecessary DVD-blank, a decoupage napkin or rice paper, a wide synthetic brush, hands and a clockwork, craquelure varnish.
| Illustration | Action Description |
|---|---|
 | Lubricate the surface with craquelure varnish, after wetting the brush in water and wringing it out. |
 | As soon as the varnish is a little dry, apply acrylic paint. Both layers will be ready for further work In 2 hours. |
 | The drawing is torn out by hand. |
 | We apply PVA to the surface with a brush, lay out the drawing and coat it with glue on top. |
 | After we glued the sequins as numbers, we are assembling the clockwork. |

What can be done for the kitchen from old CDs
Kitchen - special place. Housewives spend a lot of time there. In order to make the time more fun, you can make a few crafts for the kitchen with your own hands. It can be flowers from disks, panels, a lamp, a mosaic on, furniture decoration.


Decor kitchen furniture: original and easy


Related article:
What crafts for children can be made from disks with your own hands
Plunging into the world of childhood is useful for many: to see how a child's eyes sparkle with pleasure and the knowledge that he did everything himself! It is precisely such positive emotions that are easy to get when working with DVD discs: a child can handle the decor with minimal help from adults.


Related article:
This decor is especially popular when creating items in vintage style. In the article we will consider detailed photo instructions decoupage: furniture, on glass from napkins, on a box.
Crafts from disks by May 9
Crafts for the holiday of May 9 are reduced to the design of the disk space with thematic elements and symbols.

As a basis, take a clean blank. Using PVA glue, an application of colored paper, cardboard or satin ribbons will be glued to it. In order for the panel to hang, an awl heated over a gas burner pierces a hole from the edge of the blank. A rope or ribbon is inserted before the creation of the application.

If you use satin ribbons instead of paper, then you should also study the MK for creating flowers from satin ribbons.Touch finished work undesirable until the glue is completely dry.
How can you use old discs to make three-dimensional figures
From blanks you can build amazing three-dimensional figures. This work is more difficult than the previous ones, since many pieces are required, cut into elongated triangles and stripes. All of them are attached to the base with glue for ceiling tiles Titanium. Anything can be taken as a basis, up to plastic bottles or unwanted plastic toys.


DIY crafts from old car rims with instructions for making and photo examples
Here you may need the help of a man - we attract dads, husbands, grandfathers. It's not only decorative items but also practical. Let's try to do original place for a fire and a table.
Crafts from rims for the garden
Instructions for creating a campfire site are shown in the photo below. It will take less than a day to build such a structure.

To create a fire, stamping is ideal: both holes for an air duct, and enough space for both firewood and coals. If desired, two such disks can be welded together by welding 4 legs to them - the design will serve as an excellent brazier for a cauldron.
Article
Nowadays, such information carriers as CDs are gradually fading into the background. Do not rush to throw away the iridescent circles that have become unnecessary, they can be an excellent material for creativity.
The second life of disks?
There are many ways to give a second life to old CDs, in this article you will see some of them. Crafts from CDs can become great solution for interior and summer cottages, or just to help you have an interesting time, while developing creative thinking.

Creative people have long invented a huge number of options beautiful crafts from discs for children and adults, you just have to reproduce their ideas, and maybe come up with your own.
Throw away such a wonderful and interesting stuff- a huge mistake. Using CDs, you can make unique interior items, original and stylish gifts are close, decorations for summer cottages and gardens: everything your heart desires and your imagination and perseverance are enough for.

Check out some ideas unusual application old computer disks and create new wonderful things with your own hands!

LED lamp
If you urgently need a new original lighting fixture- old disks will come to the rescue. This piece can be used as home interior, and in the country.

You will not need special materials for this work: the main condition will only be to apply a little imagination and patience.

Be sure to follow our detailed step-by-step instructions:

You will need 12 scrap discs, a protractor, metal staples or paper clips, a lamp socket, and a thin drill.

To begin with, we divide one of the disks into five identical segments. For these purposes, use a protractor: the angle between the segments should be approximately 72 degrees. This disk will serve as a stencil for the rest.

On the line of segments, about 3-4 millimeters from the edge, we drill five small holes. Next step: put the rest of the disks in a stack and use the first disk (place it on the very top of the stack) to make exactly the same holes in the rest.

In order for the craft to be strong and hold well, support rods will be required. For this, rods from ballpoint pens: insert the rods necessary for the role of guides into the holes just made.
If you've used a really thin, correct drill, you won't even need to fix the holes: they'll fit perfectly.

The lamp is almost ready, now we attach the rest of the disks to the structure with brackets.

Now only work with light remains: the last step is to screw the desired lamp into the cartridge.

Flower
If you've been sorting through old drawers in the country and found a lot of unnecessary disks, there is a great way to use them for the benefit of the beauty of your site. Crafts from disks for the garden look very original and interesting, in addition, they are incredibly easy to make.
In this mini-tutorial, I propose to do small flowers from discs to decorate a garden, vegetable garden or yard in the country.
Note!


The tools for this craft do not require anything unusual: right amount disks (it all depends on how many flowers you are going to make), a candle, scissors and paints to make the flowers more vibrant.

The manufacturing process does not require special skills, it is very fast, but it will captivate you from the first second.

All you need to do is gently melt the discs over the candle (remember the safety precautions: this is best done outdoors and with some water nearby to put out the fire in case of danger), so that the plastic goes in beautiful waves, similar to flower petals.

I offer step by step instructions beautiful rose from disks:
- First you need to cut the disk evenly along the entire length of the radius and heat one edge of the cut over the candle.
- When the plastic is hot and soft, take your pliers and use them to wrap the edge a little to the side.
- Slowly turn the disk over the flame and continue to bend the melted fragments.
- At the end, you should get a small spiral, which will become a rosebud.
- You can paint it in any color, attach a wire stem, cut leaves from other leaves and form a whole flower bed! It all depends on your imagination.

So, today you learned how to make some simple crafts from old CDs. I hope that this lesson was useful for you and you learned a lot from it.
Note!


Photo crafts from disks


Note!


The popularity of CDs is on the decline. Today they are being squeezed out of our lives by miniature flash drives. But do not get rid of old disks. Laser carriers are a fertile material for decorating walls, furniture, creating garden miniatures for summer cottages, as well as for children's creativity.
When starting work, you should be careful and attentive so as not to get hurt. cutting tools should be large and sharply sharpened.
If it becomes necessary to heat the vinyl during the process, do so outdoors or in a well-ventilated area, and keep a container of water handy to extinguish the fire if the materials ignite.
What can be done from CDs
A napkin holder, coasters for stationery and hot dishes, a sparkling ball, a candlestick, New Year's toys - this is just a part of what you can make from discs with your own hands. All these things do not require large investments, and the process of their manufacture will not take much time.
shiny ball
The disco ball is perhaps the most good example Togo,
Tools and materials:
- foam ball;
- unnecessary disks;
- glue;
- scissors.
Manufacturing process:
- Use scissors to cut the media into pieces of arbitrary shape.
- Lubricate the workpiece with glue and cover the surface with sparkling fragments.
- When the glue dries, you can hang the disco ball from the ceiling.
Unforgettable atmosphere at the party is guaranteed!

napkin holder
A napkin holder is not just a serving item, but also stylish decoration a table that you can make yourself.
You will need:
- carriers - 3 pcs;
- large beads;
- glue gun;
- stationery knife;
- breadboard mat or piece of laminate.
Since the base will be a whole disk, you should start by preparing the holders. Cut off ¼ of the disks with a knife as shown in the photo.

Attach the sides to the base with a gun.

Start decorating. Glue a thread of beads along the joint - this will close all the flaws of the glue line. Randomly decorate the napkin holder with beads.

Other decoration options are also possible. For example, in decoupage technique.

You can use floral techniques.

And you can decorate the napkin holder with stickers and miniature figures.

Hot pads
In continuation of the kitchen theme - hot coasters.
Prepare for work:
- floppy disks;
- cardboard;
- scissors;
- PVA glue and "Titan";
- alcohol;
- fine-grained sandpaper;
- napkins with drawings;
- putty;
- acrylic primer and varnish.
How to do
Cut out a circle of the appropriate diameter from cardboard.

Spread all the components with glue.

Assemble them into a "sandwich" as shown below.

Pack in files. If several coasters are made at once, then you need to put them separately.

Send under press. Once everything is dry, putty the hole and the ends of the "sandwiches".


The surface is thoroughly sanded with sandpaper, degreased with alcohol, primed.

Dilute PVA with water in a ratio of 1: 1. Glue a napkin with this solution. Leave to dry.

After drying, walk along the edge of the stand with sandpaper, removing excess napkins.

Varnish. Since hot dishes are placed on the stand, it is advisable to choose a heat-resistant varnish.


Interesting models are obtained from felt, inside of which a DVD-disk is sewn - for rigidity.


Laying mosaics on a flower pot
Flower pots decorated with a mosaic of used CDs look luxurious.
In addition to disks, you will need:
- scissors;
- glue gun;
- stained glass paint.
Cut laser plates into pieces.

Glue mosaic fragments onto the degreased surface of the planter so that the distance between them is minimal. Let the glue dry.

At the end of the work, carefully paint over the seams.

You can cover the entire area of \u200b\u200bthe flowerpot with mosaics.

Watch
It's a great idea to make a clock out of a used CD and keyboard.
For work you will also need:
- Super glue;
- clock mechanism with arrows.
take out function keys, i.e. those labeled F1, F2 and so on. There are 12 of them in total, which is exactly what you need. Put a time indexing scale on the disk. Fix the keys with glue according to the resulting markup.

Install clock mechanism and hands. Insert battery. And the clock is ticking!

Photo frame
original decoration the room will be a photograph framed in a sparkling frame.
To implement the idea, you need:
- cardboard - 2 sheets;
- PVA glue;
- disks;
- scissors;
- glass outline;
- ruler;
- pencil.
On one sheet of cardboard, draw the outlines of the frame. Cut it out.

Use scissors to turn the disks into rainbow fragments.

Lubricate the frame generously with glue.

Lay out the mosaic pieces with tweezers.


Leave to dry for 3-4 hours.

Draw a contour along all joints, not forgetting the edges of the frame.


Let the paint dry. Connect the frame and the heel, leaving one side not glued - the image will be inserted here.

It remains to place a photo and hang it on the wall.

Christmas toys
Create new Year decoration better with kids. This is an opportunity not only to acquire unique toys, but also have fun working together.
It is best to invite the child to make their favorite character from the animated series Smeshariki.
All you need for this:
- colored paper and cardboard;
- glue;
- pattern;
- paints (if necessary);
- scissors;
- unnecessary blanks.
How to make
Find a picture of a character you like on the Internet. From paper, cut out parts of the face, hairstyle, flowers, glasses - everything a cartoon character needs. Then cut out handles, legs, ears from cardboard.

Glue all the elements on the disk. To make facial features more expressive, circle the details with a black felt-tip pen or marker. Glue a loop on the back and you can hang the craft on the Christmas tree.

The principle of manufacturing the next toy is similar.
Prepare:
- a set of New Year's paper decor - snowflakes, stars;
- postcard
- scissors;
- some glue.
Cut out a circle from your favorite postcard. Glue the fragment on the disk, add a frame of snowflakes in a circle.
One row is positioned so as to hide the contours of the cut element. The second is closer to the center. With a hot awl, a puncture is carefully made, a ribbon is threaded, tied with a bow. Christmas toy is ready.

Christmas decorations from old disks will look harmoniously on large tree. If the Christmas tree is miniature, then crafts are used to create a festive atmosphere in the interior.
The installation on the wall in the form of a Christmas tree looks spectacular and unusual.

And if you hang a sparkling owl on the door, then it definitely will not go unnoticed!

Ideas for inspiration
When decorating New Year's crafts, you can use the beading technique or isolate.


Or you can decorate them in an original way using decoupage technique or photos from an album.


Tiebacks for curtains
One more useful change for the home can be made from vinyl circles - pickup for curtains.
For one pickup you will need:
- disk - one piece;
- bamboo stick for rolls - one piece;
- a piece of paper;
- tape 2.5 cm wide - about three meters;
- rhinestones, half beads - three pieces;
- hot glue gun;
- candle or lighter;
- tweezers;
- needle and thread;
- scissors.
Decoration technique
Cut out the inside of the plate so that you get a bagel.


Glue one end of the ribbon to the ring and braid it. The coils are superimposed on each other so that the base does not shine through.

When the entire surface is braided, cut off the excess tape, fixing it from the wrong side.

Go to floral elements. Cut the tape into pieces about 8 cm long. Singe the ends of each so that they do not crumble.

Fold the petal as shown in the pictures.


This is what the front side looks like. There should be 15 such petals in total.

Using a thread and a needle, collect three flowers, five petals each.


Decorate the middle with rhinestones or half beads.


Collect everything in a single composition.


Using the kanzashi technique, you can create a wide variety of curtain holders - just master the basic techniques.


If the ribbon is replaced with jute twine or sequined fabric, then completely different models will come out.


Candlestick
There is something mystical and bewitching in the flame of a candle, you just can’t take your eyes off the flickering light! And the corresponding candlestick will only emphasize the romantic and mysterious atmosphere.
Add to the already known toolkit:
- candle-tablet;
- a can of drinks;
- decorations (cones, shells, pebbles, large beads, artificial flowers and others).
Cut off the bottom of the jar, place a candlestick in the center of it on the plate. Arrange the decor in a circle: cones, beads. Lubricate the cones with glue, sprinkle artificial snow. You can paint over the tips with gold or silver paint, and lay a “rain” around the perimeter of the circle.

By changing the scenery, you can make a candlestick on any subject: marine, for the holiday of March 8, in oriental style and just for a romantic dinner.


Country ideas
The garden must be beautiful. This is a place where the soul and body rest from the bustle of the city. As a rule, all the rubbish accumulated in the apartment moves here, and vinyl rounds are no exception. Crafts from them can be used in the dacha.
You can make an apron for the kitchen using mosaic technology.

It is also possible to transform coffee table.

Rainbow circles make an interesting scarecrow for the garden or curtain holders in the bathroom.


You can make a window curtain.

And if you have talent and patience, then real landscape miniatures.


If 3.5-inch floppy disks are accidentally lying around in the pantry, they can also be used. Only for starters, you need to prepare in a certain way: lower the protective plug and pierce holes in the corners of the floppy with a hot awl.


You will get a blank with holes through which the floppy disks will be connected to each other. Wire, clamps, metal rings are taken as connecting elements; for greater strength of the seams, it is advisable to walk super glue.
You can, for example, make a stand for stationery.

From more three inches will come out a box or chest for small things.

By changing the assembly configuration, you can get a stylish lampshade.

All this is just a part of DIY crafts from CDs. The main thing is not to limit your imagination.
Mini grindstone from an old hard drive
Do not throw away crumbled hard disk ( HDD). It can be given a second life in the form of a sharpener for knives and scissors.
For this, in addition to the hard drive, you will need:
- power supply from a PC (personal computer);
- the connector where the power will be connected;
- sandpaper;
- screwdriver for disassembly hard drive;
- wires;
- soldering iron.
Remove all stickers from the hard drive, unscrew all the bolts, remove the pancakes. Remove all unnecessary components, leaving only the motor, spindle and logic board.

Attach one pancake to the sandpaper, circle it with a pencil, cut along the contour. Lubricate the circle with glue, glue. Pancake put on the spindle, secure. Supply power from a computer PSU (power supply).

The mini grinder is ready for use.

Items made from old car rims
Every car owner eventually has obsolete wheel disks. As a rule, they gather dust in the garage. But from them you can make a solid barbecue with removable supports for country house.
Required Tools and materials:
- car disc;
- metal rods with threaded ends;
- nuts;
- a piece of square mesh - 400 x 400 mm;
- metal sheet 5 mm thick - 250 x 250 mm;
- welding machine.
On lower part disk to weld a sheet. This is necessary so that hot coals do not wake up through its large holes.


Screw on the nuts on the legs (do not completely tighten, so as not to accidentally weld the racks, and they could be removable). Weld to their locations on the structure.


Flip the grill. Overlay the grid on the disk, circle with a marker. Cut off all excess with a grinder.


Install the grid in the place intended for it.


Video
In the video you can see how to make a barbecue oven from old rims.
The following video shows 35 examples of DIY crafts from old DVDs - from simple miniatures to garden sculptures.
Another video review of crafts from old laser plates: 40 simple but original ideas.
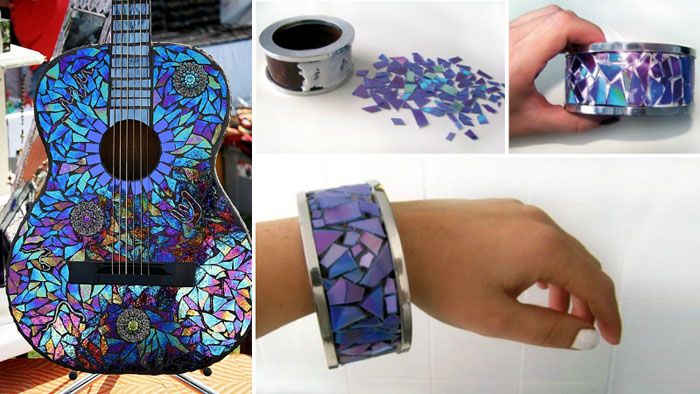
A couple of decades ago, the population the globe enjoyed with might and main vinyl records while enjoying recordings of your favorite songs, operas and children's fairy tales. They were replaced by tape cassettes with tape, video cassettes, diskettes for computers ... Today, CDs are also losing their positions. Surely, in your home, “blanks” are gathering dust in the closets, which can be put into action again. Today we will learn how to turn them into a sparkling mosaic!
Jewelry box decor
There are as many options as you like: from complex “meaningful” drawings to a chaotic combination of details that are more or less suitable in size. The first option is more difficult and requires more detailed instructions. So, for starters, we select the drawing of the future mosaic and divide it into simple fragments. How simpler form, the easier it is to cut. It is difficult to cut very long and thin parts - they break, or rounded concave - they crack. To transfer an image to a disk, you must first cut out each element from paper, then attach it to the shiny side of the disk and circle it with a felt-tip pen.
Finished parts can be immediately glued onto the surface of the box, sparing no glue - so that you do not have to glue the fallen off elements later. When the glue dries, wipe the traces of the marker with acetone or any alcohol solution. Next, we dilute a little grout (putty) desired color and gently rub it into the seams with a spatula or thick cardboard. When the grout begins to dry, wipe off the excess with a damp sponge. To consolidate the result, it is desirable to cover the finished box with varnish.
Frames for mirrors and photos
You can decorate mirror frames, frames for photos and collages with mosaics from disks, and some craftsmen manage to decorate even lamps and chandeliers in this way. As a rule, there is not enough space for creativity on them - however, you can choose from several basic styles. The first option is to cut the old CDs into the correct ones. geometric figures, which are easy to link together (squares, rectangles, triangles and honeycomb-like hexagons). The second option is to break the blanks into fragments of arbitrary shape and different sizes(they also make an interesting mosaic).
Flowerpot
Why is this idea good? First of all, such flower pot it looks very colorful and expensive, as if it was purchased in some designer boutique. But in fact, under the sparkling "scales" there can be any kind of base - and a time-worn planter with chips and scratches, and even a homemade pot from plastic canister or the same boxes from CDs. This is what proper waste disposal means!
Discus thrower
From unnecessary blanks, you can create a delightful disco ball that will decorate any room and come in handy at holidays and parties! It can be based on a light ball cut out of foam - then the discus thrower can be hung on a fishing line with peace of mind, and the stylish suspension will slowly rotate under the ceiling, creating an effect on surrounding objects. starry sky". Cheap and crazy pretty!
Christmas decorations
The manufacturing technology is the same, but much simpler. We will need small fragments of free-form CDs that need to be glued to the base - it can be like an old Christmas tree ball, from which the gilding has already begun to peel off, or a home-made ball made of papier-mâché, polystyrene, rubber (as they say, whatever comes to hand ).
Stylish sneakers
Here great idea for those who want to look original and at the same time not spend a lot of money in expensive stores. The main thing is not to forget that the discs are hard to cut, and it is better to seal the tender fingers with a band-aid in advance at the points of contact with the scissors so as not to rub the calluses. Use only well-sharpened scissors, and you can also try to heat them up to make it easier to cut the discs. By the way, according to the same principle, fashionistas can decorate a handbag, clutch or hair hoop with a mosaic.
Mosaic stickers
Such exclusive "drawings" from CDs can later be pasted on furniture, walls and any other surface. The only difference in manufacturing technology is this: the stencil must be placed in a file, greased with PVA glue and laid out in advance prepared mosaic fragments. Next, we rub it with putty, varnish it, and when it dries, carefully separate it from the file. Ready!

