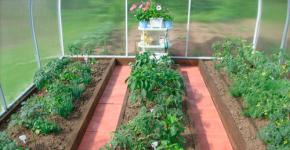
Experiments for children 9 10 years old. Experiments at home in chemistry and physics
Remember the MOST IMPORTANT rule during chemical experiments - never lick a spoon ... :). And now seriously...
1. Homemade phone
Take 2 plastic cups(or empty and clean cans without cover). Make a thick cake out of plasticine a little larger than the bottom and place a glass on it. Make a hole in the bottom with a sharp knife. Do the same with the second glass.
Pull one end of the thread (its length should be about 5 meters) through the hole in the bottom and tie a knot.
Repeat the experiment with the second glass. Voila, the phone is ready!
For it to work, you need to pull the thread and not touch other objects (including fingers). By putting the cup to your ear, the baby will be able to hear what you are saying on the other end of the wire, even if you whisper or talk from different rooms. The cups act as a microphone and speaker in this experiment, and the thread serves as a telephone wire. The sound of your voice travels along a stretched string in the form of longitudinal sound waves. 
2. Magic avocado
The essence of the experiment:
Stick 4 skewers into the fleshy part of the avocado and place this almost alien structure over a transparent container of water - the sticks will serve as a support for the fruit so that it stays half above the water. Put the container in a secluded place, add water every day and watch what happens. After a while, stems will begin to grow from the bottom of the fruit directly into the water.
3. Unusual flowers
Buy a bunch of white carnations/roses.
The essence of the experiment: Place each carnation in a transparent vase, after making a cut on the stem. After that, add food coloring of a different color to each vase - be patient and very soon the white flowers will turn into unusual shades.
What do we do conclusion? A flower, like any plant, drink water, which goes along the stem throughout the flower through special tubes.
4. Colored bubbles
For this experiment, we will need a plastic bottle, sunflower oil, water, food coloring (paints for Easter eggs).
The essence of the experiment: Fill the bottle with water and sunflower oil in equal proportions, leaving a third of the bottle empty. Add some food coloring and close the lid tightly.
You will be surprised to see that the liquids do not mix - the water stays at the bottom and becomes colored, while the oil rises to the top because its structure is less heavy and dense. Now try shaking our magic bottle - in a few seconds everything will return to normal. And now the final trick - we put it in the freezer and we have one more trick in front of us: oil and water have changed places!
5. Dancing grape
For this experiment, we need a glass of sparkling water and a grape.
The essence of the experiment: Throw a berry into the water and watch what happens next. Grapes are slightly heavier than water, so they will sink to the bottom first. But gas bubbles will immediately form on it. Soon there will be so many of them that the grape will pop up. But on the surface, the bubbles will burst and the gas will escape. The berry will again sink to the bottom and again be covered with gas bubbles, and again emerge. This will continue several times.
6
. Sieve - non-spill
Let's do a simple experiment. Take a sieve and grease it with oil. Then shake, pour water into the sieve so that it flows over inside sieves. And, lo and behold, the sieve will be filled!
Conclusion: Why doesn't water flow out? It is held by a surface film, it was formed due to the fact that the cells that were supposed to let the water through did not get wet. If you run your finger along the bottom and break the film, the water will start to flow out.
7. Salt for creativity
We need a cup hot water, salt, thick black paper and a brush.
The essence of the experiment: Add a couple of teaspoons of salt to a cup of hot water and mix the solution with a brush until all the salt is dissolved. Continue adding salt, stirring constantly until crystals form at the bottom of the cup. Paint a picture using the salt solution as paint. Leave the masterpiece overnight in a warm and dry place. When the paper dries, the pattern will appear. The salt molecules did not evaporate and formed crystals, the pattern of which we see.
8. Magic ball
Take plastic bottle and a balloon.
The essence of the experiment: Put it on the neck and place the bottle in hot water- the ball is inflated. This happened because warm air, consisting of molecules, expanded, pressure increased and the balloon inflated.
9. Volcano at home
We will need baking soda, vinegar and a container for experience.
The essence of the experiment: Place a tablespoon of baking soda in a bowl and pour in some vinegar. Baking soda (sodium bicarbonate) is alkaline, while vinegar is acidic. When they are together, they form the sodium salt of acetic acid. At the same time, carbon dioxide and water will be released and you will get a real volcano - the action will impress any kid!
10. Spinning Disc
The materials you will need are the simplest: glue, a plastic bottle cap with a spout, a CD and a balloon.
The essence of the experiment: Glue the bottle cap to the CD so that the center of the hole in the cap aligns with the center of the hole in the CD. Let the glue dry, then proceed to the next step: inflate the balloon, twist its “neck” so that the air does not escape and pull the balloon onto the spout of the lid. Place the disk on a flat table and release the ball. The design will "float" on the table. The invisible air cushion acts as a lubricant and reduces friction between the disc and the table.
11. The magic of scarlet flowers
For the experiment, you should cut out a flower with long petals from paper, then use a pencil to twist the petal to the center - make curls. Now dip your flowers into a container of water (basin, soup bowl). Flowers come to life before your eyes and begin to bloom.
What do we do conclusion? The paper gets wet and becomes heavier.
12. Cloud in the bank.
It will take 3 liter jar, lid, hot water, ice.
The essence of the experiment: Pour hot water into a three-liter jar (level - 3-4 cm), cover the top of the jar with a lid / baking sheet, put pieces of ice on it.
The warm air inside the jar will begin to cool, condense, and rise up as a cloud. Yes, this is how clouds form.
Why is it raining? Drops in the form of heated steam rise up, they get cold there, they reach for each other, become heavy, large and ... return to their homeland again.
13. Can foil dance?
The essence of the experiment: Cut a piece of foil into thin strips. Then take a comb and comb your hair, then bring the comb close to the strips - and they will begin to move.
Conclusion: Particles are flying in the air electric charges, which cannot live without each other, they are attracted to each other, although they are different in character, like “+” and “-”.
14. Where did the smell go?
You will need: a jar with a lid, corn sticks, perfume.
The essence of the experiment: Take a jar, put some perfume on the bottom, put corn sticks on top and close with a tight lid. After 10 minutes, open the jar and smell it. Where has the perfume gone?
Conclusion: The smell was absorbed by the sticks. How did they do it? Due to the porous structure.
15. Dancing Liquid (non-trivial substance)
cook the simplest option of this liquid - a mixture of corn (or ordinary) starch and water in a ratio of 2: 1.
The essence of the experiment: Mix well and start having fun: if you slowly dip your fingers into it, it will be liquid, flowing from your hands, and if you hit it with your fist with all your might, the surface of the liquid will turn into an elastic mass.
Now this mass can be poured onto a baking sheet, put the baking sheet on a subwoofer or speaker and loudly turn on dynamic music (or some kind of vibrating noise).
From the variety of sound waves, the mass will behave differently - somewhere condensed, somewhere not, which is why a lively dancing effect is formed.
Add a few drops of food coloring and you will see how the dancing "worms" are colored in a peculiar way.
16.


17. Smoke without fire

Lay a simple paper napkin on a small saucer, sprinkle it on top small hill potassium permanganate and drop glycerin there. A few seconds later, smoke will appear, and almost immediately you will see a bright blue flash of flame. This occurs when potassium permanganate and glycerin are combined with the release of heat.
18. Can there be fire without matches?

Take a glass and pour some hydrogen peroxide into it. Add a few crystals of potassium permanganate there. Now drop the match in there. With a light pop, the match will burst into a bright flame. This is due to the active release of oxygen. Thus, you can explain to the child in practice why it is impossible to open windows in case of fire. Because of the oxygen, the fire will flare up even more.
19. Potassium permanganate in combination with water from a puddle

Take water from a standing puddle and add a solution of potassium permanganate to it. Instead of the usual purple color - the water will be with yellow tint, this is due to the dead microorganisms in dirty water. In addition, this way the child will more accurately understand why it is necessary to wash hands before eating.
20. Unusual Calcium Gluconate Snakes OR Pharaoh's Serpent

Buy calcium gluconate at the pharmacy. Take the pill carefully with tweezers (attention, the child should never do this on his own!), bring it to the fire. When the decomposition of calcium gluconate begins to occur, the release of calcium oxide will begin, carbon dioxide, carbon and water. And it will look like a black snake will appear from a small white piece.
21. Disappearing Styrofoam in Acetone

Styrofoam refers to gas-filled plastics and many builders who would come into contact at least once with this material know that acetone should not be placed next to the foam. Pour the acetone into a large bowl and start dropping the Styrofoam pieces into it little by little. You can see how the liquid will bubble up and the foam will disappear as if by magic!
22. 


Every child has a desire to learn the world. An excellent tool for this is experiments. They will be of interest to both preschoolers and younger children. school age.
Safety rules for home experiments
1. Cover work surface paper or polyethylene.
2. During the experiment, do not lean close to avoid damage to the eyes and skin.
3. Use gloves if necessary.
Experience number 1. Dancing raisins and corn
You will need: Raisins, corn kernels, soda, plastic bottle.
Course of the experiment: Soda is poured into the bottle. The raisins go down first, then the corn kernels.
Result: The raisins move up and down with the soda bubbles. But when they reach the surface, the bubbles burst and the grains fall to the bottom.
Let's talk? You can chat about what bubbles are and why they go up. Pay attention that the bubbles are small in size, and can carry along raisins and corn, which are several times larger.
Experience number 2. soft glass
You will need: glass rod, gas burner
The course of the experiment: the rod is heated in the middle. Then it is torn into two halves. A half of the rod is heated by a burner in two places, gently bent into a triangle shape. The second half also heats up, one third is bent, then a ready-made triangle is put on it and the half is bent completely.
Result: the glass rod turned into two triangles linked to each other.
Let's talk? As a result of thermal action, solid glass becomes plastic, viscous. And from it you can make different shapes. What causes glass to become soft? Why does the glass no longer bend after cooling?
Experience number 3. Water rises up the napkin
You will need: plastic cup, napkin, water, markers
The course of the experiment: the glass is filled with water by 1/3 part. The napkin is folded vertically several times to form a narrow rectangle. Then a piece of about 5 cm wide is cut off from it. This piece must be unfolded to make a long segment. Then step back from the bottom edge about 5-7 cm and start making large dots with each color of the felt-tip pen. A line of colored dots should form.
Then the napkin is placed in a glass of water so that the lower end with the colored line is about 1.5 cm in the water.
Result: water quickly rises up the napkin, painting the entire long piece of napkin with colored stripes.
Let's talk? Why isn't water colorless? How does she get up? The cellulose fibers that make up tissue paper are porous, and water uses them as a way up.
Liked the experience? Then you will also like our special material for children of different ages.
Experience number 4. Rainbow from the water
You will need: a container filled with water (bath, basin), a flashlight, a mirror, a sheet of white paper.
The course of the experiment: a mirror is placed at the bottom of the container. The light of the flashlight is directed to the mirror. The light from it must be caught on paper.
Result: A rainbow will be visible on paper.
Let's talk? Light is the source of color. There are no paints and felt-tip pens to color the water, a sheet or a flashlight, but suddenly a rainbow appears. This is the spectrum of colors. What colors do you know?
Experience number 5. Sweet and colorful
You will need: sugar, multi-colored food paints, 5 glass cups, a tablespoon.
The course of experience: in each glass is added different amount spoons of sugar. One spoon in the first glass, two in the second, and so on. The fifth glass remains empty. In the glasses, put in order, pour 3 tablespoons of water and mix. Then a few drops of one paint are added to each glass and mixed. The first is red, the second is yellow, the third is green, and the fourth is blue. Into a clean glass clear water start adding the contents of the glasses, starting with red, then yellow and in order. It must be added very carefully.
Result: 4 multi-colored layers are formed in the glass.
Let's talk? Large quantity sugar increases the density of water. Therefore, this layer will be the lowest in the glass. The least sugar is in the red liquid, so it will be on top.
Experience number 6. Figurines made of gelatin
You will need: a glass, a blotter, 10 grams of gelatin, water, animal molds, a plastic bag.
The course of the experiment: pour gelatin into 1/4 cup of water and let it swell. Heat it in a water bath and dissolve (about 50 degrees). Pour the resulting solution onto the bag in an even thin layer and dry. Then cut out animal shapes. Put on a blotter or napkin and breathe on the figures.
Result: The figures will begin to bend.
Let's talk? Breathing moisturizes the gelatin on one side, and because of this, it begins to increase in volume and bend. As an option: take 4-5 grams of gelatin, let it swell and then dissolve, then pour it onto glass and put it in the freezer or take it out to the balcony in winter. After a few days, remove the glass, remove the thawed gelatin. It will have a clear pattern of ice crystals.
Experience number 7. Hairstyle egg
You will need: an egg shell with a conical part, cotton wool, felt-tip pens, water, alfalfa seeds, an empty roll of toilet paper.
The course of the experiment: the shell is installed in the coil in such a way that the conical part is located down. Cotton wool is placed inside, on which alfalfa seeds are poured and watered abundantly. You can draw eyes, nose and mouth on the shell and put it on the sunny side.
Result: after 3 days, the little man will have “hairs”.
Let's talk? Soil is not required for grass to sprout. Sometimes even water is enough for sprouts to appear.
Experience number 8. Draws the sun
You will need: flat small objects (you can cut out figures from foam rubber), a sheet of black paper.
The course of the experiment: in a place where the sun shines brightly, put black paper. Place stencils, figurines, children's molds loosely on the sheets.
Result: When the sun sets, you can remove objects and see the prints of the sun.
Let's talk? Under the influence of sunlight, the black color fades. Why is the paper dark in places of the figures?
Experience number 10. color in milk
You will need: milk, food coloring, cotton swab, dishwashing detergent.
The course of the experiment: a little food coloring is poured into milk. After a short wait, the milk begins to move. Patterns, stripes, swirling lines are obtained. You can add a different color, blow on milk. Then the cotton swab is dipped in dishwashing detergent and lowered into the center of the plate. Dyes begin to move more intensively, mix, forming circles.
Result: various patterns, spirals, circles, spots are formed in the plate.
Let's talk? Milk is made up of fat molecules. When the agent appears, the molecules are broken, which leads to their rapid movement. Therefore, dyes are mixed.
Experience number 10. Waves in a bottle
You will need: sunflower oil, water, a bottle, food coloring.
The course of the experiment: water is poured into the bottle (a little more than half) and mixed with the dye. Then add ¼ cup vegetable oil. The bottle is carefully twisted and placed on its side so that the oil rises to the surface. We begin to swing the bottle back and forth, thereby forming waves.
Result: waves form on an oily surface, like on the sea.
Let's talk? The density of oil is less than the density of water. Therefore, it is on the surface. The waves are upper layer water moving due to the direction of the wind. The lower layers of water remain motionless.
Experience number 11. colored drops
You will need: a container of water, mixing containers, BF glue, toothpicks, acrylic paints.
The course of the experiment: BF glue is squeezed out into a container. A specific dye is added to each container. And then alternately placed in the water.
Result: Colored droplets are attracted to each other, forming multi-colored islands.
Let's talk? Liquids of the same density attract while liquids of different densities repel each other.
Experience number 12. We draw with a magnet
You will need: magnets of various shapes, iron filings, a sheet of paper, a paper cup.
The course of the experiment: place the sawdust in a glass. Put the magnets on the table and cover each with a sheet of paper. A thin layer of sawdust is poured onto the paper.
Result: Lines and patterns form around the magnets.
Let's talk? Every magnet has a magnetic field. This is a space in which metal objects move as the attraction of a magnet dictates. A circle is formed near a round magnet, since its field of attraction is the same everywhere. Why does a rectangular magnet have a different sawdust pattern?
Experience number 13. lava lamp
You will need: Two glasses, two effervescent aspirin tablets, sunflower oil, two types of juice.
The course of the experiment: glasses are filled with juice by about 2/3. Then sunflower oil is added so that three centimeters remain to the edge of the glass. An aspirin tablet is thrown into each glass.
Result: the contents of the glasses will begin to hiss, boil, foam will rise.
Let's talk? What reaction does aspirin cause? Why? Do layers of juice and oil mix? Why?
Experience number 14. The box is rolling
You will need: a shoe box, a ruler, 10 round felt-tip pens, scissors, a ruler, a balloon.
Experience: a square hole is cut in the smaller side of the box. The ball is placed in the box so that its hole can be pulled out of the square a little. You need to inflate the balloon and pinch the hole with your fingers. Then put all the markers under the box and release the ball.
Result: As long as the balloon is deflated, the box will move. When all the air is out, the box will drive a little more and stop.
Let's talk? Objects change the state of rest or, as in our case, uniform motion in a straight line, if a force begins to act on them. And the desire to preserve the previous state, before the impact of force, is inertia. What role does the ball play? What force prevents the box from moving forward? (friction force)
Experience number 15. false mirror
You will need: mirror, pencil, four books, paper.
The course of the experiment: books are stacked, and a mirror is leaning against them. Paper is placed under its edge. Left hand placed in front of a sheet of paper. The chin is placed on the hand so that one can only look in the mirror, but not at the sheet. Looking in the mirror, write your name on the paper. Now look at the paper.
Result: almost all letters are upside down, except for symmetrical ones.
Let's talk? The mirror changes the image. That's why they say "mirror image". So you can come up with your own, unusual cipher.
Experience No. 16. living mirror
You will need: a straight transparent glass, small mirror, scotch
The course of the experiment: the glass is attached to the mirror with adhesive tape. It is filled with water to the brim. You need to bring your face closer to the glass.
Result: The image is reduced. If you tilt your head to the right, you can see in the mirror how it leans to the left.
Let's talk? Water refracts the image, and the mirror slightly distorts.
Experience No. 17. flame imprint
You will need: tin can, candle, sheet of paper.
The course of the experiment: the jar must be tightly wrapped with a piece of paper and kept in a candle flame for several seconds.
Result: removing a sheet of paper, you can see an imprint on it in the form of a candle flame.
Let's talk? The paper is tightly pressed to the bank and does not have access to oxygen, which means it does not burn.
Experience number 18. silver egg
You will need: wire, a container of water, matches, a candle, a boiled egg.
The course of the experiment: a stand is created from the wire. The boiled egg is peeled, mounted on a wire, and a candle is placed under it. The egg is evenly turned until it is smoked. Then it is removed from the wire and lowered into the water.
Result: After a while, the top layer peels off and the egg turns silver.
Let's talk? What changed the color of the egg? What did it become? Let's cut it open and see what it's like inside.
Experience No. 19. saving spoon
You will need: Teaspoon, glass mug with handle, twine.
The course of the experiment: one end of the string is tied to a spoon, the other end to the handle of the mug. The string is thrown over forefinger so that there is a spoon on one side, a mug on the other, and it is released.
Result: The glass will not fall, the spoon, rising up, will remain near the finger.
Let's talk? The momentum of the teaspoon keeps the mug from falling.
Experience number 20. painted flowers
You will need: flowers with white petals, water containers, a knife, water, food coloring.
The course of the experiment: you need to fill the containers with water and add a certain dye to each. One flower should be set aside, and the rest should be cut off the stems with a sharp knife. This should be done in warm water, obliquely at an angle of 45 degrees, by 2 cm. When moving flowers in containers with dyes, you need to pinch the cut with your finger so that air locks. After placing the flowers in containers with dyes, you need to take the postponed flowers. Cut its stem lengthwise into two parts to the center. Place one part of the stem in a red container, and the other in a blue or green container.
Result: water will rise up the stems and color the petals in different colors. This will happen in about a day.
Let's talk? Examine each part of the flower to see how the water rose. Are the stem and leaves painted? How long will the color last?
We wish you an exciting pastime and new knowledge while conducting experiments for children!
Experiments were collected by Tamara Gerasimovich
A chemist is a very interesting and multifaceted profession, uniting many different specialists: chemical scientists, chemical technologists, analytical chemists, petrochemists, chemistry teachers, pharmacists and many others. We decided together with them to celebrate the upcoming Chemist Day 2017, so we chose some interesting and impressive experiments in the field under consideration, which even those who are as far from the profession of a chemist as far as possible can repeat. Best chemical experiments at home - read, watch and memorize!
When is Chemist's Day celebrated?
Before we begin to consider our chemical experiments, let us clarify that the Chemist's Day is traditionally celebrated on the territory of the states of the post-Soviet space at the very end of spring, namely, on the last Sunday of May. This means that the date is not fixed: for example, in 2017 Chemist's Day is celebrated on May 28th. And if you work in the chemical industry, or study a specialty from this area, or are otherwise directly related to chemistry on duty, then you have every right to join the celebration on this day.
Chemical experiments at home
And now let's get down to the main thing, and we begin to perform interesting chemical experiments: it is best to do this together with young children, who will definitely perceive what is happening as a magic trick. And we tried to find such chemical experiments, reagents for which can be easily obtained at a pharmacy or store.
Experience No. 1 - Chemical traffic light
Let's start with a very simple and beautiful experiment, which received such a name by no means in vain, because the liquid participating in the experiment will change its color just to the colors of the traffic light - red, yellow and green.
You will need:
- indigo carmine;
- glucose;
- caustic soda;
- water;
- 2 clear glass containers.
Don't let the names of some of the ingredients scare you - you can easily buy glucose in tablets at a pharmacy, indigo carmine is sold in stores as a food coloring, and you can find caustic soda in a hardware store. It is better to take containers tall, with a wide base and a narrower neck, for example, flasks, so that it is more convenient to shake them.


But what is interesting about chemical experiments - there is an explanation for everything:
- By mixing glucose with caustic soda, i.e. sodium hydroxide, we obtained an alkaline solution of glucose. Then, mixing it with a solution of indigo carmine, we oxidize the liquid with oxygen, with which it was saturated during the transfusion from the flask - this is the reason for the appearance of green color. Further, glucose begins to work as a reducing agent, gradually changing color to yellow. But by shaking the flask, we again saturate the liquid with oxygen, allowing chemical reaction go through this circle again.
How interesting it looks live, you will get an idea from this short video:
Experience No. 2 - A universal indicator of acidity from cabbage
Children love interesting chemical experiments with colorful liquids, it's no secret. But we, as adults, responsibly declare that such chemical experiments look very spectacular and curious. Therefore, we advise you to conduct another "color" experiment at home - a demonstration of the amazing properties of red cabbage. It, like many other vegetables and fruits, contains anthocyanins - natural dyes-indicators that change their color depending on the pH level - i.e. the degree of acidity of the environment. This property of cabbage is useful to us in order to obtain further multi-colored solutions.
What we need:
- 1/4 red cabbage;
- lemon juice;
- baking soda solution;
- vinegar;
- sugar solution;
- drink type "Sprite";
- disinfectant;
- bleach;
- water;
- 8 flasks or glasses.
Many substances on this list are quite dangerous, so be careful when doing simple chemistry experiments at home, wear gloves, goggles if possible. And do not let children get too close - they can knock over the reagents or the final contents of the colored cones, even want to try them, which should not be allowed.

Let's get started:

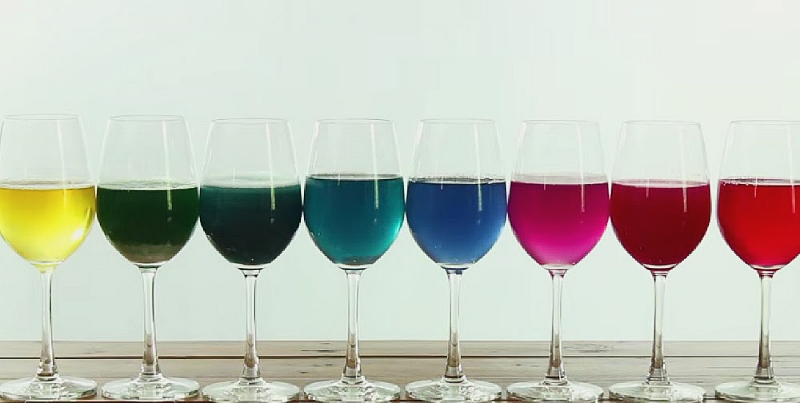
And how do these chemical experiments explain the color changes?
- The fact is that light falls on all objects that we see - and it contains all the colors of the rainbow. Moreover, each color in the spectrum beam has its own wavelength, and the molecules different shapes, in turn, reflect and absorb these waves. The wave that is reflected from the molecule is the one that we see, and this determines what color we perceive - because other waves are simply absorbed. And depending on what substance we add to the indicator, it begins to reflect only rays of a certain color. Nothing complicated!
A slightly different version of this chemical experiment, with fewer reagents, see the video:
Experience number 3 - Dancing jelly worms
We continue to do chemical experiments at home - and we will conduct the third experiment on all our favorite jelly sweets in the form of worms. Even adults will find it funny, and children will be completely delighted.
Take the following ingredients:
- a handful of jelly worms;
- vinegar essence;
- ordinary water;
- baking soda;
- glasses - 2 pcs.

When choosing the right candies, opt for smooth gooey worms, without sugar sprinkles. So that they are not heavy and move more easily, cut each candy lengthwise into two halves. So, we begin interesting chemical experiments:
- Make a solution in one glass warm water and 3 tablespoons of baking soda.
- Put the worms in there and hold them there for about fifteen minutes.
- Fill another deep glass with essence. Now you can slowly throw the jelly into the vinegar, watching how they begin to move up and down, which in some ways looks like a dance:
Why is this happening?
- It's simple: baking soda, in which the worms are soaked for a quarter of an hour, is sodium bicarbonate, and the essence is an 80% solution of acetic acid. When they react, water is formed, carbon dioxide in the form of small bubbles and sodium salt acetic acid. It is carbon dioxide in the form of bubbles that surrounds the worm, rises up, and then falls when they burst. But the process is still going on, causing the candy to rise on the resulting bubbles and descend until it is complete.
And if you are seriously interested in chemistry, and want Chemist's Day to become your professional holiday in the future, then you will probably be curious to watch the following video, which details the typical everyday life of chemistry students and their exciting educational and scientific activities:
Take it, tell your friends!
Read also on our website:
show more
Entertaining physics in our presentation will tell you why in nature there cannot be two identical snowflakes and why the driver of an electric locomotive backs up before starting off, where the largest reserves of water are located and what invention of Pythagoras helps fight alcoholism.
The Ghostbusters remake is coming out very soon, and this is a great excuse to revisit an old movie and explore non-Newtonian fluids. One of the heroes of the film, the silly ghost Lizun, - good image for visualization. This is a character who loves to eat very much, and he also knows how to penetrate walls.
We will need:
- potato,
- tonic.
What do we do
Very finely (can be chopped in a food processor), cut the potatoes and pour hot water. After 10-15 minutes, drain the water through a sieve into a clean bowl and set aside. A sediment will appear at the bottom - starch. Drain the water, the starch will remain in the bowl. In principle, you will already get a non-Newtonian fluid. You can play with it and watch how it hardens under your hands, and becomes liquid by itself. You can also add food coloring for a vibrant color.
Trevor Cox/Flickr.comNow let's add some magic.
The starch needs to be dried (leave for a couple of days). And then add tonic to it and make a kind of dough that is easy to take in your hand. In the palms, it will retain its consistency, and if you stop and stop kneading it, it will begin to spread.
If enable ultraviolet lamp, then you and your child will see how the dough begins to glow. This is due to quinine, which is contained in the tonic. It looks magical: a luminous substance that behaves as if it violates all the laws of physics.
2. Get superpowers
Comic book heroes are especially popular right now, so your child will love feeling like a powerful Magneto who can manipulate metals.
We will need:
- printer toner,
- magnet,
- vegetable oil.
What do we do
From the very beginning, get ready for the fact that after conducting this experiment you will need a lot of napkins or rags - it will be quite dirty.
In not large capacity pour about 50 ml of toner to laser printers. Add two tablespoons of vegetable oil and mix very well. Done - you have a liquid in your hands that will react to the magnet.
 Jerald San Hose/Flickr.com
 You can attach a magnet to the container and watch how the liquid literally sticks to the wall, forming a funny "hedgehog". It will be even more interesting if you find a board on which it is not a pity to pour a little black mixture, and invite the child to use a magnet to control a drop of toner.
3. Turn milk into a cow
Encourage your child to make a liquid solid without resorting to freezing. This is a very simple and impressive experience, although you have to wait a couple of days to get the result. But what an effect!
We will need:
- cup ,
- vinegar.
What do we do
We heat a glass of milk in the microwave or on the stove. We don't boil. Then you need to add a tablespoon of vinegar to it. And now we start to interfere. Actively move the spoon in the glass to see how white clots appear. This is casein, a protein found in milk.
When there are a lot of clots, drain the mixture through a sieve. Whatever remains in the colander must be shaken and then laid out on paper towel and dry a little. Then start kneading the material with your hands. It will look like dough or clay. At this point, you can add food coloring or glitter to make white mass brighter and more interesting for the baby.
Invite the child to mold something from this material - a figurine of an animal (for example, a cow) or some other object. But you can just lay out the mass in plastic mold. Leave to dry for a day or two.
When the mass dries, you will have a figurine made of a very hard hypoallergenic material. Such "homemade plastic" was used until the 1930s. Jewelry, accessories, buttons were made from casein.
4. Manage snakes
Getting a vinegar and soda reaction is just about the most boring experience imaginable. "Volcanoes" and "pops" will not be of interest to modern children. But you can invite the child to become a “master of snakes” and show how acid and alkali still react.
We will need:
- packaging of jelly worms,
- soda,
- vinegar.
What do we do
We take two large transparent glasses. Pour water into one and pour soda. We mix. Open the package of jelly worms. It is better to cut each of them lengthwise, to make thinner. Then the experience will be more spectacular.
Thin worms should be put in a mixture of water and soda and mixed. Set aside for 5 minutes.
Pour vinegar into another glass. And now we add to this vessel the worms that have been in a glass of soda. Because of the soda, bubbles will be visible on their surface. So there is a reaction. The more worms you add to the glass, the more gas will be released. And after some time, the bubbles will raise the worms to the surface. Add more soda - the reaction will be more active and the worms themselves will begin to crawl out of the glass. Cool!
5. Make a hologram like in Star Wars
Of course, it is difficult to create a real hologram at home. But its likeness is quite real and not even very difficult. You will learn how to use the properties of light and turn 2D images into 3D images.
We will need:
- smartphone,
- cd box,
- stationery knife,
- scotch,
- paper,
- pencil.
What do we do
Draw a trapezoid on paper. The drawing can be seen in the photo: the length of the lower side of the trapezoid is 6 cm, the upper side is 1 cm.
 BoredPanda.com
 Carefully cut out a paper trapezoid and take out the CD box. We need a transparent part of it. Attach the pattern to the plastic and use a clerical knife to cut a trapezoid out of the plastic. Repeat three more times - we need four identical transparent elements.
Now they need to be glued together with adhesive tape so that it looks like a funnel or a truncated pyramid.
Take a smartphone and run one of the such videos. Place the plastic pyramid, narrow side down, in the center of the screen. Inside you will see a "hologram".
 Giphy.com
 You can run a video with characters from Star Wars and, for example, recreate famous recording of Princess Leia, or admire own miniature BB-8.
6. Get away with it
Every child can build a sand castle on the seashore. How about building it under water? Along the way, you can learn the concept of "hydrophobic".
We will need:
- colored sand for aquariums (you can take regular sand, but it needs to be washed and dried),
- hydrophobic shoe spray.
What do we do
Carefully pour the sand onto a large plate or baking sheet. We apply a hydrophobic spray on it. We do this very carefully: spray, mix, repeat several times. The task is simple - to make sure that a protective layer envelops each grain of sand.
 University of Exeter/Flickr.com
 When the sand dries, collect it in a bottle or bag. Take a large container for water (for example, a jar with a wide mouth or an aquarium). Show your child how hydrophobic sand "works". If you pour it in a thin stream into water, it will sink to the bottom, but remain dry. This is easy to check: let the baby take some sand from the bottom of the container. As soon as the sand rises from the water, it will crumble in the palm of your hand.
7. Classify information better than James Bond
Write secret messages lemon juice- last century. There is another way to get invisible ink, which also allows you to learn a little more about the reaction of iodine and starch.
We will need:
- paper,
- brush.
What do we do
First we cook rice. Porridge can be eaten later, but we need a decoction - it has a lot of starch. Dip a brush into it and write a secret message on paper, such as "I know who ate all the cookies yesterday." Wait for the paper to dry. The starch letters will be invisible. To decipher the message, you need to moisten another brush or cotton swab in a solution of iodine and water and draw it over what is written. Due to the chemical reaction, blue letters will begin to appear on the paper. Voila!
In order to carry out chemical and physical experiments and try to learn the laws of nature, it is not necessary to wait until it is time to go to school. You can conduct entertaining experiments in the form of a game at home with children preschool age. Of course it will simple experiments that do not require special knowledge and training. They must still be carried out exclusively in the presence of adults in order to avoid unforeseen situations that are life-threatening for children. You can watch some of the experiments listed below and other experiments on the video on our website.
Examples
So, let's see what interesting scientific experiments in the form of a game can be done at home?
First of all, let's decide what substances are fun and safe to conduct home experiments for preschool children.
- First, with water. You can dissolve various substances in it and observe the manifestation of their properties.
- Secondly, with air.
- And, finally, with all the means at hand: soap, soda, salt, rubber, etc.
Water (1 option)
Let's start with a simple experiment with water. To make this experiment, you will need:
- a quarter cup of colored water
- quarter glass sunflower oil
- and a quarter cup of syrup.
As a result, children in the process of playing form the concept of different densities of liquids.
As a result of the experiments, the following picture should be obtained: the syrup, as the densest liquid, will settle to the bottom, water will be in the middle, and the oil will float to the top.
Home experiments with water are the easiest. They consist, as a rule, in mixing various substances with water. With children of preschool and primary school age, one more shocking experiment can be done, which, nevertheless, is no different from the usual boyish game.
Option 2
Fill the vessel with water, add a quarter of an Alka-Seltzer tablet, cover with a lid and step aside. It is very interesting to watch how the lid will fly off to the side under the pressure of carbon dioxide. You can see similar experiments in the photo.

Interesting science experiments can be done at home using various chemicals. Of course, for preschool children, we will not take life-threatening acids or alkalis for play. Entertaining experiments are obtained even if you use things familiar from birth: soap, vinegar, salt, etc.
Inflating balloons
For the following experiments you will need:
- plastic bottle,
- vinegar,
- baking soda,
- balloon,
- funnel.
We begin the experiment by pouring one and a quarter cup of vinegar into a plastic bottle. Fill the balloon with three-quarters of a cup of baking soda and attach the balloon to the top of the bottle. Gently let the soda fall into the bottle and watch how the balloon inflates, but it will not fly. Take a video of a similar experiment and show it to your friends: they will probably want to repeat it.

Video
Oil
Interesting experiments can be done with butter. As a result of such experiments, any child will feel like a real wizard. Take a bag of milk cream, pour it into a container with a tight-fitting lid. Close the lid and start whisking. The experiment lasts quite a long time - about 20 minutes. First, the cream is turned into a thick cream, and then into homemade butter. The child is really surprised at such a transformation. When the cream thickens, drain the rest of the water by straining through cheesecloth.

Related videos
Entertaining home experiments can give a lot for the development of preschool children. Scientific experiments carried out in the form of a game teach children to be inquisitive, attentive to natural phenomena, and develop erudition. As a result, the child good example assimilates those laws of physics and chemistry, which will subsequently be held at school. fun experiments for preschool children they help to reveal their talents and abilities, prepare future scientists.
Plants
During experiments with plants, children can get acquainted with such physical phenomenon like absorption. This is the ability of a material or living being to absorb the constituents of another substance. To conduct an experiment, you will need several stalks of celery and tinted water, such as red. Pour water into a glass and dip the celery stalks into it. Of course, this experience takes time. After a few days, the stems will begin to absorb water and turn red themselves. If the stems then develop leaves, they will also be red. Thus, the rather complex theoretical concept of absorption becomes simple and illustrative through fascinating experiments.

Making jelly
Fun experiments for children can bring not only the benefit of knowledge, but also quite material satisfaction. For example, the result of experiments can be the creation of a delicious dish, which will also be a teaching aid. Such an experiment is convenient to carry out not only for preschool children, but also for school age. We invite you to study with your children the structure of plant and animal cells on ... jelly, which can then be eaten by the whole family. For these experiments, you will need kitchen sets for making jelly and sets of various sweets. small size:
- jellies,
- marshmallow,
- caramel.
We open the jelly preparation kits and do everything according to the instructions on the packages. Pour the jelly into molds, preferably square. This will be the basis for our cells. Plant cells can be made green, and animal cells can be made orange. Accordingly, in stores we choose sets of jellies of these colors. When the jelly hardens, open the sets with sweets and lay out the components of the cells from them. Material about this is easy to find on the Internet or a school textbook. From such sweet crafts you can make a whole tutorial by capturing them on video.


How to make milk jelly?
Milk
Entertaining science experiments for children can be done at home using regular milk creating a true color symphony. For experiments of this kind you will need:
- some milk,
- food colorings different colors,
- bar of soap
- ear sticks
- and a dinner plate.
Pour some milk into a bowl. Add food coloring drop by drop various colors to the center of the plate. Dyes can be purchased in liquid form or purchased in powder form, which must then be diluted with water. Next, dip the ear stick into the middle of the milk. Don't mix colors! On the other end of the ear stick, drip liquid soap. Place the soapy end of the stick in the center of the plate and hold for 10-15 seconds. Look what an explosion of colors and colors!
Experience works very simply. Milk has the consistency of water, but contains fats, minerals, vitamins, and other substances. The secret of the symphony of colors lies in the drop of soap. The fact is that the main property of soap is to eliminate fats. When soap is placed in milk, the soap molecules try to attack the fat molecules, in turn, the fat molecules try to avoid being "attacked". It is this process that reflects the rapid movement of flowers.
Here is what you should get:

So, experiments for children in the form of a game at home is one of the essential conditions development of erudition and further interest in learning. Even if you are not strong in physics or chemistry, on our website you can find many videos and descriptions of instructions for doing it. You don't need expensive kits. chemical substances: you will find everything you need at home. Try, observe, experiment!