How to build a greenhouse with your own hands. How to make a greenhouse with your own hands: selection of materials and manufacturing stages
A high-quality frame and covering material are, of course, the basis of a greenhouse. But what's inside is just as important. To get the expected result from the plants, you need to take care of the arrangement of the greenhouse: prepare the soil, correctly arrange the beds and paths, etc. This largely depends on what and how you are going to grow under the protective layer.
When the greenhouse frame is assembled and fixed to the ground, film, glass or polycarbonate is formed into an airtight coating, ventilation is thought out and implemented, you can begin arranging the greenhouse. The task of a plant grower is to create a favorable and stable atmosphere for crops. The key nuances of this process include:
- support for optimal thermal conditions;
- laying out beds;
- layout, choice of covering and placement of paths in the greenhouse;
- creation of a fertile soil layer with specifications for different crops;
- construction of shelving (if necessary);
- preparation of devices for shading the south wall.
Advice. The equipment of the space inside the building is based on your needs. If you want to grow vegetables, create beds; if you want to grow seedlings and potted flowers, install a shelving structure. The principles for arranging different types of greenhouses differ.
Heating and heat saving in a greenhouse
The main thing in a greenhouse is warmth. Plants may well have enough energy from the sun's rays. The alternative is artificial. Experts recommend arranging greenhouses simultaneously with several types of heating:
- gas;
- wood, peat or coal using a stove;
- electric convectors (an additional fan is required to distribute heated air);
- water system (boiler heated by any type of fuel);
- using a solar collector (a box with a coil covered with glass and a radiator system inside the greenhouse);
- biofuel - burned manure, sawdust, compost.
Attention! In the latter case, the mixture must be burned in a special oven. If there is none, remove the top layer of soil and burn it directly in the garden bed and level the ground. Planting crops will have to wait 4-5 days.
Preserving thermal energy in a greenhouse is no less important than obtaining it. The main part of the work is carried out at the stage of designing and building a greenhouse, installing windows and doors. Some can be set aside while the greenhouse is being built. The simplest examples of natural heat accumulators:
- Water. In metal or plastic containers it will accumulate and slow down the heat transfer. For greater efficiency, paint barrels or cans dark.
- Stone. Cobblestones laid out on a bed at the edge of the greenhouse will heat up intensely on a sunny day, and at night they will release energy to the air. You can additionally install fan heaters to heat the stones.
- The soil. Heating the soil in a greenhouse artificially will increase the overall air temperature in the greenhouse.
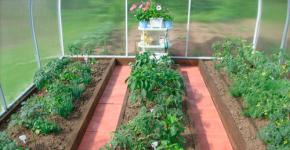
How to mark beds and paths inside a greenhouse
In small or medium-sized greenhouses, the ground is divided into 2-3 beds along the long side. The width of one should not exceed 1.5 m for the central one or 1 m for those located near the walls. You should be able to comfortably reach the edge with the hoe without stepping on the ground. It is not advisable to trample the soil - it becomes compacted.
 Placement of beds
 Also consider the width of the tracks themselves. They shouldn't be too narrow. You may have to carry water in buckets, remove weeds and crops in a wheelbarrow. In this case, you cannot cling to plants. The optimal size of the passage is about 50-70 cm. There is no need to make it wider - you will lose useful space.
Advice. A trick from gardeners: one path can be made wider for the described needs, and the second can be left for movement without loads.
On the central bed you can make 1-2 transverse transitions. Just lay a few bricks or a board directly on the ground. When installing passages, take into account the increased humidity level in the greenhouse. Choose non-slip material.
If you plan to grow plants in pots, install shelving with a height of 95 to 150 cm. It is advisable to make the side low, because such crops will most likely require drip irrigation. The rack may have several floors, but the worker should be at a comfortable height for you. Also reserve an area for a glass enclosed area. A large aquarium is suitable for this. Newly purchased plants should be quarantined in it (in case their soil is contaminated).
How to create a fertile layer
As a rule, delicate and capricious crops are grown in a greenhouse. The composition of the soil is very important for them. This is confirmed by video advice from plant growers. First of all, take care of the safety of the plants.
It is advisable to make the beds raised above the soil level by about 20 cm. To do this, they are framed with a border made of boards:
- select material 25 cm wide;
- place it edgewise;
- drive in supporting pegs from the side of the passage;
- additionally fix the boards in a vertical position: nail them to a support or make another row of stakes from inside the bed;
- Cover the ridge with a 25 cm layer of soil.
It is best to use store-bought substrate as soil. It can be selected for a specific crop that you are going to plant in the greenhouse. Otherwise, the ground should be clear of weed seeds. In addition, it must be disinfected. For example, steam:
- take the iron bucket;
- place an inverted flat plastic container with a large number of holes in the bottom on the bottom;
- pour 2 liters of water;
- fill the bucket with completely prepared substrate;
- put it all on the fire for 1.5 hours.
Advice. It is better to prepare the soil in advance, since the disinfection procedure takes a lot of time.
Homemade soil is also different for each crop. It is prepared based on the individual characteristics of the plants. Due to differences in the growing season, vegetables of different families cannot be planted in a greenhouse. But if this cannot be avoided, separate them with high partitions.
Greenhouse arrangement: video
The long-awaited greenhouse has taken pride of place on your site, but it’s too early to relax. This is only the first step towards obtaining a high yield of agricultural crops. The next step is to properly arrange the inside of the greenhouse. The solution to the problem includes several points: from planning the beds to organizing the optimal temperature regime. The direction of work largely depends on the form of operation of the structure, whether vegetables will be grown there or the purpose of the greenhouse is to grow plants in pots, seedlings, and ornamental shrubs.
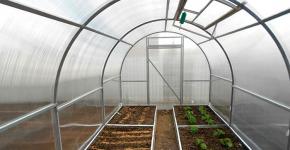
Design of greenhouse space for ground work
Giving preference to working with soil, it is right to start with designing the location of the beds. It is necessary to take into account their size and quantity, what crops are planned to be cultivated.
Marking beds
The number and size of rows directly depends on the area of the greenhouse. It is better to equip small buildings with two parallel beds; wide structures allow you to divide three rows. The width of one bed should be properly arranged in the range from 1.0 to 1.5 meters. It all depends on the physical characteristics of the owner of the greenhouse and the location of the passages near it. The main guideline is the ability to care for plants without stepping on the soil. An excessively wide bed will inevitably force the amateur agronomist to stand on the ground, this is fraught with negative consequences:
- soil compaction provokes a lack of oxygen in the root system of plants due to deterioration of air circulation;
- the amount of work to care for plants increases due to the need for unscheduled loosening.
Designing a small greenhouse makes it possible to arrange one path between two rows of plants. Correctly calculating the width of the passage will allow taking into account all the needs for caring for agricultural products. During the growing process, it becomes necessary to carry buckets of fertilizers, remove weeds, remove crops and not damage your land. Based on the experience of greenhouse owners, it is correct to arrange the minimum width of paths within half a meter. The desire to drive with a wheelbarrow will require an increase of another 20-30 cm. Of course, you can expand the passage up to a meter, but the use of usable space will be sharply reduced.

The spacious greenhouse allows you to arrange three rows of beds. The side strips should be correctly designed to be one meter wide, the central row reaches one and a half meters, since a two-way approach is provided to it. It is irrational to design paths of the same width; it is more correct to arrange one passage wide - for moving with a wheelbarrow, for the second the standard 50 cm will be enough.
Advice ! For ease of movement in the greenhouse, depending on the total length of the structure, properly arrange one or two transverse passages along the central bed. This function can be performed by ordinary flooring in the form of two boards or several bricks.

The geodesic greenhouse has a rather unusual shape. Place the beds inside under the dome correctly along the perimeter, their width reaches 1.2 m. In the center of the greenhouse you can install a reservoir of water that accumulates the energy of the sun's rays during the day and releases heat at night. If there are no technical capabilities or a modest budget, the container inside the greenhouse will successfully replace an ordinary round bed.


Path design
Considering the question of how to properly arrange the inside of a greenhouse, we will separately dwell on the design of the paths. It is impractical to leave the passage between the beds in its original form. Regular watering of plants allows moisture to seep throughout the entire area of the greenhouse, and walking on soggy ground is extremely inconvenient. When choosing covering options, take into account the high humidity in the room, so properly equip the passages with material that ensures safe movement. Bricks or other stone products are organically suitable for these purposes. In addition to their aesthetic appearance, they are easy to clean and facilitate convenient movement.

Preparing the soil layer
It is impossible to equip the inside of a greenhouse correctly without high-quality soil. The soil requirements include the following:
- lightweight structure providing good ventilation;
- absence of harmful bacteria and weed seeds;
- saturation with useful substances;
- ability to absorb moisture at a high level;
- frost resistance.
Advice ! Raised beds can protect the root system of seedlings from frost in a greenhouse.
Experts recommend arranging a planting site with a minimum height of 20 cm from the ground surface. To do this, a board fence is installed along the edges of the passages, exceeding the planned planting level by 5-10 cm. It will serve as borders, prevent soil from crumbling and facilitate the work of caring for plants. The boards are installed edgewise and pegs are used to secure them. Correctly nail the board border to the support or install stakes on both sides of the fence. Finally, the surface is filled with soil that meets all the soil requirements intended for greenhouses. Agricultural crops require different soil compositions, so it is wise to purchase an option designed for a specific plant family or prepare the soil yourself.
If there is swampy or rocky soil, arrange the beds inside the greenhouse correctly in boxes. Their dimensions are similar to traditional rows: width 1.0-1.5 m, length varies depending on the area of the greenhouse, height of the structure - 40 cm. They are filled with specially prepared or purchased soil. The key advantage of the method is rapid heating of the soil; among the disadvantages, there is an increased water consumption for irrigation.

Shelving configuration and arrangement
Greenhouse owners who prefer to breed seedlings or grow seedlings are recommended to equip the structure with shelving. This option allows you to make the most of the usable space with all sorts of shelf variations. The lower space can be conveniently equipped for storing household equipment. If your priority area of work is growing indoor flowers and other plants in pots, properly arrange shelves with low sides. This will facilitate the process of supplying tubes for capillary irrigation. High sides will be required for rooting cuttings and planting seedlings.

Properly selected shelving sizes can ensure ease of work inside the greenhouse. The optimal width of the side shelves does not exceed 95 cm; the central structures can be arranged up to one and a half meters. The height of the racks directly depends on the height of the person involved in growing greenhouse crops. The height of the work surfaces in the kitchen will help you orient yourself correctly. At this level, it is better to arrange a shelf intended for the main area of work on transplanting and picking plants. The number of passages inside the greenhouse depends on its size; their optimal width ranges from 40 to 70 cm. It is also worth taking into account the physical parameters of the greenhouse owner. To germinate seeds, properly arrange an area in one of the corners of the greenhouse, equipping it with lighting and insulating it with glass.

When breeding indoor plants inside a greenhouse, you should worry about organizing a quarantine zone. Purchasing a new plant carries the risk of introducing pests. A small area on the shelf, fenced with glass, will prevent the spread of unwanted microorganisms. An aquarium with a capacity of 100 liters with a tight-fitting lid is optimal for these purposes. Arrange it correctly in a shaded area, protecting plants from overheating.
Note! Quarantined crops require regular ventilation. It is better to carry out the procedure in the fresh air, eliminating the possibility of contamination of the soil inside the greenhouse.

Arrangement of the vestibule
Experts offer the option of modernizing a greenhouse using a vestibule. It performs two functions. First of all, it creates an air gap between the street and greenhouse air, preventing the formation of drafts. The second purpose is to create space for storing equipment. An old cabinet that can be locked with a key will make it possible to isolate all kinds of fertilizers and fertilizers from children or pets. And the appearance inside the greenhouse will not be spoiled by household equipment. If there is no desire to arrange a vestibule, install the cabinet correctly at the beginning of the greenhouse, reducing the time for collecting tools throughout the room.
The correct internal arrangement of a polycarbonate greenhouse should solve several main problems. Firstly, it is the creation of an ideal microclimate for plants, including the optimal combination of humidity, temperature, sunlight and ventilation. Secondly, organizing a convenient place to work. Thirdly, maximum use of all useful internal space of the structure.
How to arrange a polycarbonate greenhouse inside, determine the optimal number of beds and paths, and use shelves and racks correctly? You will find answers to these questions in this article.


Beds and paths
The number and arrangement of beds is selected based on the width of the greenhouse itself. For a 3x6 m construction, 2 beds are considered optimal. The width of one should not exceed 1.2 m, and the width of the paths should not exceed 50-70 cm.

Diagram of how to set up a greenhouse inside; in the photo there is a version of a small width greenhouse with two beds
The width of the bed can vary depending on the length of the gardener's arms. 1-1.3 m is considered optimal, when to care for plants you do not have to step on the soil, compacting the soil. Thus, air circulation is reduced and the top layer has to be further loosened.
For greenhouses with a larger width of 4-4.5 m, the optimal placement of growth zones is the arrangement of three beds. Two narrow up to 1 m on the sides and one up to 1.5 m in the middle. This width is due to the possibility of access to the central bed from both sides.

How to arrange a polycarbonate greenhouse inside, photo of arrangement of three beds
The width of the paths is selected based on ease of use and the presence of an automatic watering system in the greenhouse. To avoid touching plants with buckets or watering cans. In addition, if you plan to use auxiliary equipment such as garden one-wheeled wheelbarrows and other equipment, the path should not only be made wider, but also covered with dense material.
Path covering
The coating material for paths in a greenhouse is subject to not only high demands on strength and wear resistance, but also heat resistance. The material should not be afraid of moisture, and be resistant to biological damage, mold, fungi, and rotting. Modern industry produces a variety of materials suitable in their performance characteristics for covering paths in greenhouses:
- Seamless dense rubber;
- Garden parquet;
- Plastic modules for garden paths;
- Geotextiles and other non-woven materials made from thermally bonded polypropylene fibers.

Arrangement of the greenhouse inside, photo of the rubber track
Despite all the ease of use in a greenhouse, these products are not widely used among gardeners, the reason is their high cost. The track equipment is used with more budget-friendly materials:
- Paving concrete slabs;
- Brick;
- Mulching with sand, gravel, conifer bark;
- Laying boards on a roofing felt lining.
The height of the beds and the material of the sides
When arranging a greenhouse inside, high beds are widely used, which have a number of advantages:
- With a high groundwater horizon on the site, the possibility of wetting the root system of plants is eliminated;
- When arranging at a significant height, up to 1 m, it is much more convenient to care for low-growing plants;
- Possibility of developing agricultural areas on a site with heavily compacted earth or a significant amount of construction debris.
However, there is also a significant drawback. It is difficult to grow moisture-loving and/or perennial crops in such beds. The soil dries out quickly and freezes heavily in winter.

Photo of the arrangement of the greenhouse inside, high soil level, brick sides lined with tiles
The following materials are used for sides when arranging a polycarbonate greenhouse inside:
- Wood - boards, beams, small diameter logs. The disadvantages of its arrangement are the fragility of the material, all 2-3 seasons and replacement is necessary. Using antiseptics to prevent rot can have a detrimental effect on plants.
- Branches of vine or hazel are an even less durable material, used in the form of hand-made wattle fence. Its use is justified only with high aesthetic requirements. It is often used for decorative cladding of more durable, but externally unsightly materials;
- Stone, brick, concrete are durable materials that provide the necessary tightness to the side walls of a raised bed. Their arrangement will require significantly more time, but their service life can be tens of years.
- Polymer products are used mainly for arranging low-level beds of 15-20 cm. They have high resistance to biological damage, but are not strong enough.
Racks and shelves
To increase the area for seedlings, it is often practiced to arrange shelves on which additional soil is placed. Thus, the usable area is significantly increased.

Multi-tier greenhouse, interior arrangement of racks with plants
Minimum set of equipment
Modern manufacturers can provide an impressive list of high-tech equipment for polycarbonate greenhouses and agriculture:
- Equipment for irrigation system;
- Automatic ventilation;
- Lighting and various types of heating equipment.
All this automated greenhouse equipment inside can significantly make life easier for a gardener and significantly increase productivity. The only drawback is the high cost. However, there are budget alternatives for how to equip a polycarbonate greenhouse inside. Any gardener can afford these devices.
Drip irrigation
To set up drip irrigation you do not need complex equipment. A hose and several plastic tees are enough. The irrigation network is placed inside directly on the ground. If desired, you can connect the water supply system to pumping equipment, but if there is no electric pump of the required power, then you can make an ordinary water tower by installing a barrel of water at a height of 1.5-2 m. By connecting power equipment and a controller with a timer to the tap, you can

Schematic diagram of an irrigation system for self-production, in the photo there is an autonomous battery-powered timer equipped with a water supply device
Ventilation equipment
In order to equip an automatic ventilation system, there is no need to buy expensive climate control equipment. It is enough to purchase an autonomous mechanical device - a thermal drive. Such equipment will be able to open ventilation vents in the greenhouse when the threshold temperature is exceeded. Video that describes the principle of operation and shows the operation of thermosetting equipment:
Lighting and heating
Any lamps are suitable as lighting equipment, however, when installing electrical wiring, you should remember that the humidity level in the room is constantly increased. So sockets, switches and other electrical equipment must be housed in a protected housing. It is better to use IR heaters as heating equipment in late autumn and early spring.

Arrangement of a polycarbonate greenhouse inside, photo of IR heating equipment
Ecology of consumption. Estate: With the onset of spring, every summer resident is faced with the task of planting seedlings and their further planting in open ground. The simple and cheap design of a greenhouse made of plastic pipes is suitable for all summer residents and owners of country houses without exception.
Many summer residents strive to provide themselves with self-grown vegetables for the whole year. But due to climatic conditions, it is not always possible to achieve this goal in those areas that are located in the northern regions of our country. An excellent solution to this problem is to build a greenhouse on a garden plot.
True, not all gardeners have the financial ability to purchase a ready-made factory greenhouse. For such people, a way out of the situation may be to build greenhouses from plastic pipes with their own hands.
You can design and build a greenhouse from plastic pipes yourself, without resorting to outside help. And such a greenhouse made of plastic pipes will serve throughout the year, for several seasons in a row. An obvious advantage when building greenhouses from plastic pipes is the prevalence, long service life and low cost of polypropylene products.
CHOOSE A LOCATION FOR CONSTRUCTION
When choosing a future location for building a greenhouse made of plastic pipes, you should take into account a number of factors that affect the quality and quantity of the future harvest.
There are the following options for placing a future greenhouse made of plastic pipes on a garden plot:
- You need to place a greenhouse made of plastic pipes, created with your own hands, in an open space, away from other buildings on the site and large garden trees. This placement option can be combined with the placement of small shrubs and plants around the greenhouse. This will add aesthetic appeal to the building.
- If, due to the small area of the site, it is not possible to use an open space of sufficient area, you can provide for the location of the greenhouse with one side adjoining the wall of an already erected building, house or barn. With this option, an important condition will be the location of the other sides of the greenhouse on the south side in order to receive the maximum amount of sunlight.
SELECTION OF FORMS
The most common form when constructing a greenhouse from plastic pipes is an arched structure. This is primarily due to ease of construction and relative cheapness.
When choosing a form for the construction of a future greenhouse from plastic pipes, it is necessary to take into account the characteristics of the garden plot and the location chosen for the installation of the structure.
If the greenhouse made of plastic pipes will be located in an open area, then it is better to choose a gable model. In the case where the greenhouse will adjoin one side to the wall of an existing building, it is more advisable to choose a lean-to model.
The base of the greenhouse can be made in different geometric shapes, be it square, rectangle, circle, oval or trapezoid. Recently, tent-shaped greenhouses have been gaining popularity.
Attention! Greenhouses of this design have greater light transmission than classic versions.
PROS AND DISADVANTAGES OF BUILDINGS FROM PLASTIC PIPES
Construction of a greenhouse from plastic pipes has a number of advantages over structures made from other materials:

The main and, apparently, only drawback when building a greenhouse from plastic pipes is its lightness. This can cause the entire structure to sway in strong winds. At the same time, this problem can be solved by using additional metal rods driven into the ground to strengthen the structure.
MATERIALS AND TOOLS REQUIRED FOR CONSTRUCTION
Before you make a greenhouse from plastic pipes, you should calculate the necessary materials and tools. It is recommended to do this immediately after determining the location on the site for the future structure. Such measures will help to avoid additional costs already at the construction stage of the structure.
So, for work you will need:
- Timber or boards to form the base of the greenhouse. Before starting construction, it is recommended to treat wooden elements with special protective substances that will protect the wood from rotting.
Advice! To save money, it is recommended to use improvised ones rather than branded professional wood processing products. For example, impregnate wooden beams with resin, coat them with drying oil several times, and treat them with a blowtorch.
- Polypropylene pipes. It is necessary to calculate how many linear meters will be needed to build a greenhouse. For a more accurate calculation when building a greenhouse from plastic pipes with your own hands, it is recommended to make a drawing of the future structure. After obtaining a certain footage of plastic, you can add 10% of the total length for reserve.
- Polyethylene film is used to cover the polypropylene structure. It should be strong enough. High strength will protect it from tearing and allow it to be used for several seasons.
- Several metal rods. The reinforcement must be at least 1 m long.
- Nails and screws.
- Handles with locks and hinges for installing doors and windows in the greenhouse.
- Additional metal loops for fastening individual plastic structural elements.
CONSTRUCTION OF A GREENHOUSE
If, at the stage of calculating the materials used, a detailed drawing of the future structure was drawn up, then you can immediately begin directly building the greenhouse. Otherwise, it is recommended to draw up a detailed diagram of the structure - this will significantly simplify and speed up construction work.
INSTALLATION OF FOUNDATION
Before you make a greenhouse yourself from plastic pipes, you need to create a foundation. For the future foundation of the greenhouse, you need a flat, flat area with a small depression. Therefore, before starting work, you must level the ground and make a small depression of a few centimeters. As a material for the foundation, you can use either boards or wooden beams.
Attention! Before proceeding with the installation of the foundation, the wooden boards must be cleaned with a plane or sandpaper, and also treated with protective substances.
To strengthen the foundation of the future structure, it is recommended to use additional metal brackets or corners. A metal corner is attached to each internal joint of wooden boards. If timber is used as the material for the base of the greenhouse, it is more advisable to use staples that are driven in at each external joint of the structural elements.
The finished foundation should lie tightly on the soil prepared for it. If there are gaps between the foundation and the ground, they must be covered with earth.
FRAME INSTALLATION
After building the foundation, along its outer perimeter, metal reinforcement should be driven into the ground in increments of no more than 100 cm. Pre-prepared and cut sections of plastic pipe of the required length are placed on these metal rods.
To secure plastic pipes, self-tapping screws are used, with the help of which the base of the pipe must be pulled to the wooden foundation. Plastic couplings, corners and crosses are used as connecting elements in the horizontal plane of the structure, which must first be drilled inside. This will allow the pipes to pass through the connectors.
WE CREATE A ROOF
When choosing a material for building a greenhouse roof, you should take into account the features of some of the most common options:
- The optimal and common material for covering a greenhouse is polyethylene film. If financial capabilities allow, you can use a special reinforced polyvinyl chloride film as a covering. This material has good thermal insulation, which will allow you to maintain the desired temperature in the greenhouse even at night. At the same time, this material is highly transparent and transmits up to 95% of sunlight during the daytime.
- A polycarbonate roof has the longest service life, but is more expensive and can present additional difficulties during construction. In addition, such a roof cannot be quickly dismantled, unlike a polyethylene one.
- Textile material for covering such as “agrotex” has low thermal insulation. True, the lightness and simplicity of this material allow installation and dismantling work to be carried out in the shortest possible time.
CONCLUSION
To summarize, we can say that the option of independently building a greenhouse from plastic pipes in a garden plot seems to be the most acceptable option. Such designs have a number of undeniable advantages. These include the lightness and strength of the structure, its durability, ease of installation and dismantling. In addition, such greenhouses are ultimately the cheapest option, and from an aesthetic point of view they are in no way inferior to expensive factory-made counterparts.
We will learn how to build a greenhouse from plastic pipes with our own hands from the video
SUBSCRIBE to OUR YouTube channel Ekonet.ru, which allows you to watch online, download free videos from YouTube about human health and rejuvenation. Love for others and for yourself, how the feeling of high vibrations is an important factor in healing - website
Please LIKE and share with your FRIENDS!
Many summer residents would like to grow fresh vegetables all year round. It is possible to come to the country house even in winter. The building is heated, with all communications. For vegetables, if you want to grow them in winter and spring, you will also need a warm house. A year-round heated greenhouse can be equipped with your own hands.
This is the most important thing to start with – choose the right place. By 30%, the location will determine the efficiency of the greenhouse.

Table. Options for choosing a location for a greenhouse
| Parameter | Description |
|---|---|
| Daylight | Of course, in a stationary year-round greenhouse you will have to provide additional artificial lighting, but why not use nature’s capabilities 100%? Plants should be provided with the maximum amount of daylight. By placing the greenhouse structure in a west to east direction in an open area, you will receive maximum sun for the plants. |
| Wind | Cold winds can not only penetrate into the structure through any even small cracks, but also, acting from the outside, reduce its temperature by 2-5 degrees. For young seedlings, such a difference can be disastrous. Therefore, when installing a greenhouse, take care of its additional protection from the wind. |
| Water | Ideally, a year-round greenhouse has an automatic watering system. But if there is none, hydraulic communications should be located close for convenient and prompt water intake and irrigation. Water temperature, especially in winter, also matters. Watering seedlings with cold water is unacceptable. |
| Approaches | Few people pay attention to this parameter. However, the approach to the greenhouse should be wide and comfortable. This will not only facilitate its construction, but also make its operation comfortable and efficient. |

Selection of materials
What to build from? There are many options. You need to choose a material so that the structure will last a long time, be durable, airtight, and economical. In this regard, the old film and glass classic buildings, equipped with frame structures using wood, are finally a thing of the past.
Why are film, glass and wood not suitable?

Greenhouse made of wood and glass - photo
- Even a heavy-duty film can tear and heat will leak.
- Over time, cracks will inevitably form in the frames and between them, through which heat will also escape.
- Glass breaks and in one layer has low heat transfer.
What materials to choose for a year-round greenhouse?
- The frame structure can be used when installing metal-plastic frames, provided they are double-glazed.
- The walls of the greenhouse can be made of polycarbonate on a metal base.
- For a year-round greenhouse, a brick building is suitable.
Reliability, long service life, protection of growing crops - these are the main parameters by which greenhouse building materials are selected.
Assembling a greenhouse from cellular polycarbonate
Let's look at the polycarbonate structure, the features of its assembly and the tools and additional materials required for this.
Why is polycarbonate good?
This modern material has many positive performance qualities.
- It has excellent thermal insulation properties.
- It has a surprisingly flexible structure - it bends easily without breaking, which allows the installation of even arched structures.
- This new material is 16 times lighter than the thinnest glass.
In polycarbonate buildings, profile pipes act as a frame. In addition to them you will need:
- welding machine;
- polycarbonate sheets;
- bolts and sealant.
Assembly can be completed in a few hours, according to the instructions that come with the finished greenhouse.
Advice! Not all ready-made structures have transoms, but it is better to provide them; the possibility of ventilation will protect the plants from overheating.
The frame is assembled with bolts. The sheets are inserted into the frame. Don't forget to slope the roof (an angle of 35 degrees is enough) to protect against snow accumulation. Places of strips with open honeycombs on polycarbonate are treated with sealant to minimize heat loss.
Features of a metal-plastic greenhouse
Do-it-yourself metal-plastic structures are not the easiest thing to do. It will be the most durable from specialists, so it is better to make a custom-made greenhouse frame in a construction company that specializes in the manufacture of such products. Plus, the frame will need double glazing, which is also best left to specialists.
As a result, the total cost of such a year-round greenhouse will not be cheap. But this is the most realistic opportunity to grow herbs and vegetables all year round.
Advice! When installing a metal-plastic glazed greenhouse, it is recommended to make one wall (northern) not from glass and insulate it.
The roof of such a greenhouse tilts 30 degrees. It is preferable to choose a single-pitch configuration.
Features of a brick greenhouse
A brick greenhouse, or capital greenhouse as it is also called, is a real “home” for plants, where life is possible all year round. This is not even a greenhouse anymore, but a real greenhouse in which you can grow not only vegetables, but also various exotic plants. Until now, despite new modern materials such as metal-plastic and cellular polycarbonate, the brick version of a permanent greenhouse is considered the most reliable, proven, optimal, and effective.
How to build a greenhouse out of brick
You can build it yourself if you have at least minimal skills in bricklaying and other construction work. But even without labor costs, a greenhouse will require substantial financial investment.
You will need:
- brick;
- mineral wool;
- cement, sand;
- roofing material;
- boards, timber for rafters;
- windows, doors, gutters.
The peculiarity of the construction is that, unlike all other types of greenhouses, the brick one is a “two-room apartment” for green pets. The first room is the vestibule. Typically it occupies an area of 2x2 m or 2x2.5 m. Garden supplies, fertilizers, soil and other necessary things are stored in the vestibule, and a heating system (boiler, stove) is installed.
The main greenhouse room can be any size that you are able to master.
The partition between two rooms is made permanent. A door is installed in it. The second door from the vestibule leads outside. In the greenhouse, not only windows are made, but also transoms.
Another feature is that for a permanent greenhouse you will have to pour a foundation, preferably a strip foundation.
Table. The main stages of building a brick greenhouse
Heating system
You can heat a greenhouse in different ways. From the simplest and most ancient - stove, to new and modern infrared equipment and heat guns. Each system has its own disadvantages and advantages.
Table. Characteristics of greenhouse heating systems
| Heating type | Characteristics |
|---|---|
| Used in permanent buildings. The simplest and least expensive method. Does not require complex structures. The stove is installed in the vestibule. The chimney is along the perimeter of the greenhouse room. To install stove heating, ventilation is necessary. The disadvantages are uneven heat supply, the need for constant monitoring, strong heating of the stove surface, fire hazard. The walls of a gas-generating solid fuel stove do not heat up. | |
| Can be installed in a greenhouse made of any material. Considered the safest. You will need a tank with a boiler, a pump, pipes, water, and electricity. The water is heated by electricity, distributed throughout the system using a pump, cools down and returns to the boiler. This method provides not only an optimal, uniform thermal regime, but also the necessary humidity. But only specialists can install such a system. Operation will also require serious material costs. | |
| Alternative to water. You will need gas heaters and burners, as well as pipes evenly distributed throughout the greenhouse. Gas is burned and heat is distributed into the room. There are several disadvantages, the main one being the need for constant monitoring to avoid gas leaks. Additional ventilation will also be required. This option is more economical than water, heating is carried out evenly, the room heats up faster. | |
| The most popular and sought after type. Can be used in all greenhouses. There are many devices, including: convector batteries, cables, guns, heating mats. Most systems are equipped with sensors and it is possible to adjust modes. | |
| You should not even try to install the system yourself - it is installed only by professionals at the time of assembling the greenhouse structure. The heating is excellent, uniform and fast. Condensation does not accumulate (which happens in winter when using all other systems). But there is a possibility of air drying, so it is recommended to install humidifiers in parallel. |
What vegetables are grown in a greenhouse all year round?
In a heated greenhouse you can grow absolutely any vegetables, herbs, berries, flowers and even exotic plants. But if there is only one greenhouse on the site, and you give preference to vegetables, you will have to choose up to three vegetable crops and the same number of green ones.
Vegetables
Traditional vegetables for year-round cultivation are usually chosen:
- cucumbers;
- tomatoes;
- pepper;
- Chinese cabbage;
- radish;
- salads.

Greenery
Spicy green crops are grown:
- dill;
- parsley;
- cilantro;
- basil;
- green onions.
Pepper - can be sown and grown along with any crops.
Tomatoes – grow well with onions and radishes.

Cucumbers - prefer radishes, lettuce and all green crops.
Greens – can grow with all crops.
Advice! It is not advisable to combine cucumbers with tomatoes and cabbage with parsley in neighboring crops.

Planting seedlings in a greenhouse
The time for planting seedlings that have grown in rooms to a permanent place of growth in a capital heated greenhouse depends on the sowing period you choose. There are certain rules for successful planting of seedlings.
- The seedlings are ready for planting when they have at least 7-8 true leaves (pepper has at least 12). The bushes are strong, stable, not elongated; flower buds may begin to form in peppers and tomatoes. Leaf color is intense green.

- Before planting, seedlings need to be hardened two weeks in advance - taken outside for several hours, gradually increasing the time.
- Greenhouse soil is prepared in advance - filled with humus, a 1 m² bucket (not manure!) and minerals (potassium and phosphorus - 40 g each, nitrogen - 30 g/m²). The soil is dug up, loosened, and broken into holes.


- The holes are watered with two liters of water each. The seedlings are also well watered two hours before planting.

- The seedling is carefully removed from the seedling container using a planting scoop, along with the root soil. If a root that is too long sticks out from the soil clod, you can pinch it off by a third.
- The seedling is lowered into the hole, held with one hand, and the space between the walls and the lump is filled with the other.
- The soil is compacted around the stem and watered again. For plants that will be tied up (tomatoes, cucumbers, some varieties of peppers), it is immediately recommended to install pegs or slatted trellises.

Caring for plants in a greenhouse
In a greenhouse, which works all year round to “produce” fresh vegetable products, the plants need especially careful care.
The first important condition is soil preparation. Vegetables grown out of season in a greenhouse will place increased demands, primarily on the soil. It should be light, fertile, with a high concentration of substances needed by plants.
The following components are required in greenhouse soil:
- manure;
- turf;
- peat;
- straw (sawdust);
- sand;
- carbohydrate-containing and nitrogen-containing fertilizers.
The second condition is feeding. Vegetables and herbs must be fed regularly throughout the entire growth and fruiting cycle.
The third important component of care is watering and humidity regime. Drip irrigation or a fine shower (for some crops) is preferable. If it is not possible to install an automatic watering system with regulation of the temperature of the supplied water, make sure that its temperature is not lower than the ambient temperature.

Heating is discussed in detail above. One has only to note that in the conditions of the middle zone, a year-round greenhouse will have to be heated at different rates for at least seven months a year.

An important maintenance measure is weed control and loosening the soil. Earthen crust is dangerous for all garden plants, but it is especially harmful to seedlings and seedlings in a greenhouse, where plants get less air than in open ground.
Loosening greenhouse soil, depending on the composition of the soil, often begins even before the emergence of seedlings (when sowing crops with seeds). If the seeds have not yet sprouted, but a crust has already formed, of course, it must be destroyed to make it easier for the seedlings to reach the surface. Loosening before germination is carried out between the rows, to a depth of no more than 5 cm, with a light ripper.
When the main crops sprout, or after seedlings are planted in the greenhouse, all loosening is combined with weeding and carried out after watering. The soil is loosened closer to the plant stem, but so as not to destroy the lateral roots.
Advice! Vegetable crops, such as tomatoes, peppers, cabbage, cucumbers, are loosened immediately after planting seedlings deeply, up to 7 cm. As the lateral roots grow, the depth of loosening decreases and the distance from the stem increases.


Also, in a year-round greenhouse, it is necessary to pay special attention to the prevention of diseases of vegetable crops, take measures to treat emerging diseases, promptly remove remnants of vegetation, obsolete canes, stems, leaves, and after harvesting, while preparing the greenhouse for a new sowing cycle, carry out its disinfection.


Growing vegetables in a greenhouse will definitely bring excellent results if you follow all the rules for caring for seedlings and planting them in protected soil. The reward will be juicy and healthy fruits, vegetables and herbs from your own plot all year round.
Video - How to build a large winter greenhouse