Large water container by hand. DIY water tank made of pvc
One of the most annoying household problems is the lack of water in the tap. It is easy to survive the absence of light or gas, but water is an indispensable component of human life, and when it is not there or not enough, problems begin. You can constantly keep several containers of water in the house, for example, plastic bottles, but it is much more practical to determine what kind of storage tank for water supply and the system diagram for a private house are needed so as not to lose comfort and continue to use household appliances and a sink with a bathroom, no matter how what never happened.
Why is it needed and how to use it
If for some reason the pump in the autonomous water supply system does not work, or there is no pressure in the centralized city water supply, then it can be supplied to the sink or toilet bowl from a previously collected reserve tank. Simply put, it is better to always have a supply of drinking water in the house and use it in emergency situations.
For the convenience of using the reserve water supply, the storage tank must be integrated into the water supply system so that it is either automatically used in the absence of external pressure, or it can be activated by simply turning the valve.
There are many variations on how to install and connect a storage tank, depending on the type of water source, the possible location of the tank, and even the layout of the house. It is enough to choose the appropriate option and decide on the type of the storage tank itself.
Types
The storage tank can be a tank with a sufficient internal volume, made of a material resistant to corrosion and safe for storing drinking water. The following materials are used:
- polyvinyl chloride;
- cross-linked polyethylene of high or low pressure;
- polypropylene;
- stainless steel;
- steel coated with waterproof varnishes and ceramic coatings.
 plastic tanks
 Although galvanized steel is resistant to corrosion and waterproof, over time the protective layer of zinc can become thinner, especially at the joints and welds.
By design, allocate:
- open containers that have a neck with or without a lid, but with sealed walls and a bottom;
- closed fully sealed containers of membrane type.
In the first case, everything is simple, the entire internal volume is filled with water and, if necessary, drains through a pipe fixed at the lowest point.
In the case of membrane storage tanks, the usable volume is at least a third less than the volume of the entire structure. Part of the volume is allocated under the air chamber, separated from the water by a strong elastic membrane. As the container fills with water, the membrane presses on the air chamber, creating excess pressure. When it is required to receive water back, the valve opens, and it enters the water supply system under the action of the accumulated pressure.
Bottom or top
There are three options for connecting the storage tank and using the water supply:
- Top location of the container. In this case, the water intake is carried out under the action of gravity. The higher the accumulator is located in relation to the consumer, the stronger the water pressure. Every 10 meters of altitude adds 0.1 atmosphere, or about 1 bar.
- The lower location of a simple storage tank. Gravity will no longer help, and a pump is used to supply the water supply, raising the pressure to the optimum level.
- Membrane-type storage tanks themselves create the required pressure for water supply. The lower location at the level of the consumer is optimal for them, since there will be no advantage from installation in an attic or tower.
How to determine the best option?
If the house has several floors and it is possible to place the storage tank in the attic, then this will allow you to do without additional installation of the pump, and you do not need to spend money on an expensive membrane tank. In fact, this is an analogue of a water tower. However, raise the container so high as to provide a comfortable pressure at the level of 2-2.5 atm. it's still difficult. Moreover, the question arises of warming the tank so that in winter the water in it does not freeze.
In the event of an emergency shutdown of the available water pressure of 0.2-0.3 atm. it will be enough to use the mixer in the sink, toilet or even a shower, but it will not be possible to use some household appliances, such as a washing machine or dishwasher, which require more pressure to operate the solenoid valves.
Installing the tank at the level with the consumer is suitable in cases where it is not possible to raise the tank to the attic or at least one floor higher. The same applies to the installation of a storage tank in the apartment. You will need a small pump to supply water to the water supply under pressure. To ensure adequate operation, the pump will require an expansion membrane tank.
A storage tank with a membrane is perfect for storing water both when using a centralized water supply system and in an autonomous system. However, it does not require additional equipment or top location. However, its cost is much higher than any conventional storage tank, even when combined with a simple pump.
Volume of the tank

In the event of problems on the city water supply line and water cuts, repairs are usually completed in a day or two. However, accidents also happen on holidays, and in places where a quick repair is simply impossible, then you have to wait much longer. The optimal supply of water for 2-3 days is based on the use of the toilet, maintaining personal hygiene and cooking.
For a family of three, 100 liters per day is enough when using water in economy mode. For one wash, approximately 80 liters of water are required, you can find out more precisely in the passport for the washing machine. Same for dishwasher.
It turns out that for 2-3 days when using household appliances, you need to look for a storage capacity of at least 500 liters, half a cubic meter.
However, there are a number of limitations:
- The larger the volume of water and the storage tank of an open type, the faster it will begin to overgrow with sediment. It is not recommended to use containers with a volume of more than 200-250 liters in everyday life for long-term storage of water.
- The margin of safety of the ceiling and load-bearing walls should be taken into account. The installation of the tank must be laid at the design stage of the house.
- When using autonomous water supply, the volume of the storage tank, especially of the membrane type, should not exceed the debit of the well. If this rule cannot be observed, then the pump must be protected from idling.
Membrane-type storage tanks are limited in their volume and are not able to give up the entire supply of stored liquid. To form a stock of more than 300 liters, you will have to connect several tanks of a smaller capacity in parallel to each other.
General connection rules
A water tank is installed on a prepared site: a concrete base tied with a foundation, or a reinforced metal frame made of a profiled pipe. The design must withstand one and a half weight of the tank and the water in it when completely filled.
The inlet pipe can be of any suitable diameter, water is supplied under pressure. The outlet pipe and the pipe to the water supply are chosen with a diameter one and a half to two times larger than the cross section of the main line. The optimal size is 32 mm.
Insulation, even of the highest quality, only slows down the decrease in temperature in the tank. To prevent freezing of water when installing the tank in an unheated attic or on the roof, any suitable heating system for pipes and the tank itself should be used.
With centralized water supply
Any type of storage tank connection requires a check valve at the entrance to the house or apartment. It is the valve that will prevent the flow of stored water back into the pipeline, and not to the consumer.
Top connection
The tank is installed under the ceiling of the first floor, the floor above the bathroom and kitchen or in the attic. The tank should have a fitting at the top for water supply, another one a little higher for discharge into the sewer when overflowing, and a fitting at the very bottom for water intake.
After entering the coarse filter of the shut-off valve, the meter and the check valve, a tee is installed, from which the pipe goes to the tank inlet, a shut-off valve or a controlled valve is installed in front of the fitting.
A shut-off valve is connected to the outlet fitting and the pipe is lowered back to the water supply, to which it is connected by means of a tee.
The excess discharge hose is lowered into the sewer or led out of the house into the front garden or drainage system.
To control the filling, a mechanical valve with a float is used, similar to those used in the toilet bowl.
To use the stored water, it is enough to open the outlet valve.
Bottom connection
Connection is identical to the first option. However, a pump must be installed at the outlet to create additional pressure in the water supply. Before each use of water, you will have to turn on the pump first.
A ready-made pumping station or the addition of a pump with a membrane-type expansion tank and a pressure switch will help simplify life.
Bottom connection of storage tank with membrane
To connect the tank, only one pipe is used, connected to the water supply through a tee with a valve. The insert is also carried out after the filter, counter and check valve.
Before use, the pressure in the air chamber must be adjusted. This must be done strictly in accordance with the instructions for the selected model. The normal pressure in the water supply is preliminarily studied, moreover, taking into account fluctuations during the day. As a result, the average value is taken, which is used to adjust the tank. This is the only way to use the maximum useful volume of the tank.
For autonomous water supply
As in the case of centralized water supply, there are several connection options.
Water tower
The storage tank is installed at a level of 15-20 meters above ground level on a reinforced tower or attic. Water from a borehole pump or pumping station is supplied directly to the tank, and from there it is distributed to the bathroom and kitchen in the house. The pressure in the system is provided by the height difference between the water level in the tank and the mixer tap in the house.

The disadvantage is the constant passage of water through the tank, which will cause sediment to accumulate over time, even if a filter system is pre-installed.
The advantage is the simplicity of the design and the minimum of expensive elements, with the exception of the tower structure itself and the obligatory insulation of the tank to protect it from freezing even when it is placed in the attic.
Bottom tank connection
The tank is installed flush with the pumping station or on the ground floor in the house. It is filled during normal operation of the pump due to water from the well. The limiter is a float switch.
This option saves with excessive water consumption and a decrease in the water level in a well or well. However, it is useless when the electricity is turned off, since a pump is required to supply the end user with water from the reserve.

Membrane storage tank
A membrane tank for storing water is installed after the pumping station and the check valve, with a bottom connection. If the pumping station for some reason does not work and does not maintain pressure in the system, then water comes from the storage tank.
Installing a water tank in the bath opens up a number of amenities and advantages for the owner. Firstly, it becomes possible to prepare hot water in the process of heating the furnace, which allows you to save energy resources and spend them as expediently as possible. Secondly, the use of such a unit in most cases makes it possible to abandon the installation of an electric water heater, which also benefits the budget allocated for the arrangement of the bath.
There are several basic requirements for water tanks: they must be capacious, durable, warm up in the shortest possible time and retain heat for as long as the needs of the steam room visitors dictate. Among the options available to the average user, products made of stainless steel meet the listed criteria to the greatest extent.


Scheme - an example of installing a remote water tank
The modern market offers a wide range of water tanks made of cast iron, stainless steel and enamelled material. As practice shows, it is stainless steel that is most popular among bathhouse owners, which is due to a competent and acceptable ratio of operational and technical characteristics and cost indicators.
Stainless steel is characterized by excellent thermal conductivity, normally tolerates temperature fluctuations and objectively lasts longer than various ferrous metals.


Here a logical question arises: which of the existing brands of stainless steel is better suited for the manufacture of the container in question, intended for use in a bathhouse? Firstly, it is brand 08X17 (430), secondly, 8-12X18H10 (304). The mentioned materials are, among other things, used for the production of tableware and are characterized by high resistance to high temperatures, are completely hygienic, do not rust or deform during use. In addition, such materials are unpretentious and extremely easy to maintain.

Summing up the above, we can distinguish 3 main advantages of water tanks made of stainless steel:
- products do not require the arrangement of additional protection against high humidity and normally tolerate operation in conditions typical for a bath steam room;
- stainless steel is characterized by high thermal conductivity, which makes it possible to obtain hot water in the shortest possible time;
- stainless steel tanks do not deform due to sudden temperature changes, or these deformations are insignificant.
Prices for stainless steel sheets
stainless steel sheets
Design options for water tanks for a bath
Water tanks designed for use in a bath can have a different design. There are 3 main options: built-in tank, remote tank and pipe-mounted unit. You can find the features of each type of construction in the following table.
Table. Stainless steel water tanks
| Construction type | Description |
|---|---|
| The installation of representatives of this category is carried out in the process of building a sauna stove, as a result of which the stove and tank become a single structure. The heating of water in a built-in stainless steel tank is carried out by the forces of fire, due to which the efficiency of the water tank itself is kept at a rather impressive level. The key disadvantage of this design is the fact that a significant part of the heat is spent on heating the water in the tank, as a result of which the heat transfer from the sauna stove itself drops noticeably. Helpful note! Much easier to manufacture and use is a top-mounted/hinged tank mounted on top of the heater. |
|
| A more convenient and practical option compared to the previous model, especially if the tank is designed and installed for permanent use. If desired, a ready-made stainless steel water tank can be installed in the washing room of the bath, connecting it with a pipe system to the furnace heat exchanger. The optimal pipe material is copper or brass. The only significant drawback of an external water tank is the likelihood of burns in case of careless handling - the situation is especially relevant if children go to the bathhouse. |
|
| The tubular water tank can be installed either directly above the sauna stove or in the attic space. In such structures, water is heated in the shortest possible time. At the same time, the heat transfer indicators of the furnace unit do not decrease. The undoubted advantage of installing a water tank in the attic is the ability to “unload” the steam room, excluding the container from its environment and providing more free space. |
The table does not include another possible option for installing the tank - on the side of the stove.

 Stove with a side tank - photo
The method is neglected for the simple reason that it is the worst. Water in such a tank will boil very quickly. If the soaring process drags on, the atmosphere in the steam room will become simply unbearable due to the constantly boiling water. Yes, and with the maintenance of such a tank there are continuous inconveniences: in order to save space, the capacity is made high, but very narrow.
Having dealt with the features of stainless steel water tanks and choosing the most acceptable design option, it remains only to determine the optimal volume of the container, after which you can proceed directly to the stage of its manufacture.
When choosing the required volume of a stainless steel water tank, it is necessary, first of all, to focus on the planned number of visitors who will go to the bathhouse at the same time. For example, if the steam room is not capable of accommodating more than 2-3 people due to its physical dimensions, you can safely put a tank of 50-80 liters, at the rate of 25-30 liters of water for each attendant.

Tanks come in different sizes - choose the right one
Using the above recommendation, you can calculate the required volume of the water tank, taking into account the attendance of the equipped bath. For greater convenience, it is recommended to add at least 10-20 liters on top of the calculated value - each person has different needs and ideas about comfortable washing.

DIY stainless steel water tank
Most factory models of water tanks are made of 1 mm thick stainless steel. For self-production, it is recommended to use thicker sheets - about 1.2-1.8 mm (a specific indicator is selected in accordance with the volume of the container). The cost of manufacturing the structure in this case will be higher, but for many years you will not have to think about the need for repair, painting, coating with various special compounds and other similar maintenance of the tank.
As an example, you can use the following drawing - this is the easiest for self-assembly and one of the most popular design options.

You can proportionally change the dimensions in accordance with the required volume of the container. The calculation of the volume is carried out according to the standard formula, i.e. indicators of length, width and height of the product are successively multiplied. For example, the volume of the container presented as an example will be about 25 liters.
Useful advice! An even simpler version of a water tank is a product made from a piece of seamless stainless steel pipe. By giving preference to such a solution, you get a number of advantages. Firstly, you don’t have to waste time and effort on cutting sheet metal, calculating allowances, stocks and other points, i.e. the possibility of errors is reduced to a minimum. Secondly, the manufacture of a water tank for water from a pipe requires the use of welding in a minimum amount.
Stainless steel pipes with a diameter of up to 1020 mm and even more are available for sale, which makes it possible to purchase a product for the manufacture of a container of the required volume without any problems. To determine the volume of the cylinder (namely, this is the shape that the storage tank will have in the end), use the following formula.

Helpful note! If you wish, no one will forbid you to make a tank from a profiled stainless pipe, and then the tank will have a rectangular shape.
The further procedure for self-manufacturing a water tank will be considered precisely on the example of using a pipe segment as a blank.
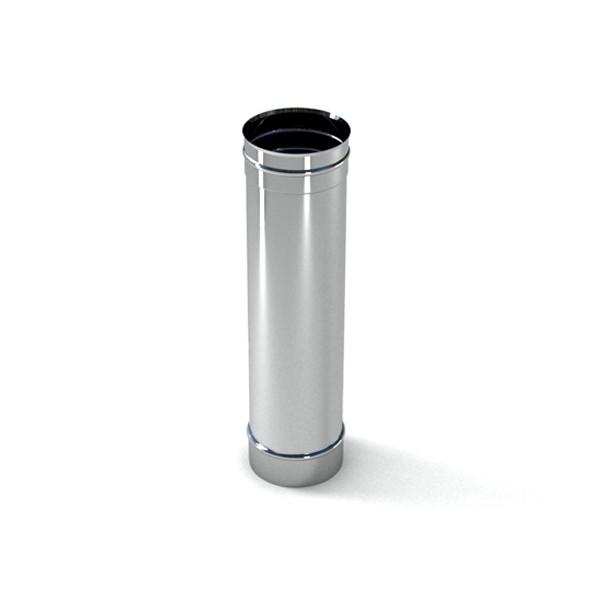
Pipe - billet
Important! If an on-pipe water tank is planned, it is better to use a shorter but wider blank for its manufacture so that the chimney can be passed through the internal cavity of the tank. It will look something like this.


The procedure for manufacturing a water tank from a pipe is presented in the following table.
Table. Making a water tank for a bath
| Stage of work | Description |
|---|---|
| Previously, a formula was given to calculate the volume of a cylinder. With its help, we find the required height of the water tank. For example, we want to get a tank with a volume of 30 liters and use a pipe with a diameter of 1020 mm to make it. By simple arithmetic manipulations at the level of grade 5, we transform the formula into the following form: H \u003d 30 / (3.14 * 0.512) \u003d 37 cm - this is the length that a pipe cut should have to obtain a water tank of the specified volume. To cut a piece of pipe, use a grinder. For working with stainless steel, discs with a thickness of 1 mm and a diameter of 11.5 or 12.5 cm are suitable. |
|
| In order for the finished water tank to look beautiful, you need to properly process the cut areas. In the future, similar actions will be performed when boring holes for connecting nozzles with taps. The most convenient tool that allows you to quickly and effectively deal with the solution of the above tasks is a manual drill. Such devices are equipped with a wide variety of abrasive nozzles, allowing you to achieve the maximum quality of processing a particular material. In the absence of a manual drill, the seams will have to be put in order with improvised means: a file, sandpaper, etc., which is definitely a longer and more laborious undertaking. |
|
| At this stage, we need a stainless steel sheet. The lid, and especially the bottom, is recommended to be made of a material that has a greater thickness than the walls of the pipe chosen for the manufacture of the body. The work is carried out in several stages: - a circle is drawn on a sheet of stainless steel according to the diameter of the holes that it will close. You can simply put the pipe on a sheet of metal and draw a circle by circling the product along the contour; - in accordance with the markup, 2 blanks are cut. For cutting and subsequent grinding of the edges, you can use the previously mentioned grinder and manual drill. If a tubular method of installing a water tank is assumed, at the same stage, holes can be prepared in the bottom and lid according to the diameter of the chimney pipe (it is better to 1 mm more so that the chimney can pass through them, in the future the gap will be leveled by welding). Also at this stage, it is possible to prepare holes for further connection of branch pipes with taps, if they are mounted in the bottom (relevant for remote structures installed away from the furnace, in the case of over-furnace / built-in and tube tanks, it is more expedient to cut the pipes into the wall of the tank body). In more detail, the nuances of drilling and welding stainless steel will be discussed in the relevant sections of the instructions. |
|
| The photo shows a profiled pipe, but the welding process for this case and working with a round billet remains the same. Products from the material in question can be connected in different ways: - by soldering using lead-free or high-temperature solders; - manual or automatic welding (in the case of stainless steel, work is carried out exclusively in a protective gas environment). The most preferred is the second option, the easiest to learn - manual arc welding. Argon is used as the shielding gas. Welding is carried out using a non-consumable electrode for working with stainless steel. In the international classification, devices designed for such welding are marked with the abbreviation TIG. When buying or renting a welding machine, do not forget to purchase / rent an argon tank and a reducer. The function of the latter is to reduce the pressure of the protective gas at the outlet. Seams should be as neat and uniform as possible. After completion, it is recommended to clean them up. Recommendations for a suitable tool for this have been given previously. Useful advice! If desired, the tank cover can not be welded, but attached with bolts and lugs, or simply made removable. The option is relevant for cases where water will be added manually by the user, and not supplied through the water supply. The container is ready. We proceed to the preparation of holes for further insertion of pipes. |
|
| The structures under consideration are equipped with two branch pipes with taps. Cold water is traditionally supplied to the container through the upper pipe, and the heated liquid goes to the consumer through the lower pipe. The diameters of the plumbing pipes correspond to the diameters of the water pipes used in combination with them. Most often, pipes with a diameter of ½ or 1 inch are used. For drilling stainless steel, an ordinary electric drill is suitable. The main thing is that the work is done at low speeds - no more than 100 rpm. In a drill with an electronic regulator, setting the required mode is not a problem. If there is no such regulator, you simply need to activate the start button with short presses - within a second the tool will not have time to accelerate to operating power. Holes are best made with a P18 drill. An even more convenient option is a special stepped drill (shown in the image). Such a tool does not lift the edges of the hole, so that it gets a perfectly round shape. Along with this, for drilling holes with a diameter of more than 14 mm, it is more convenient to use special nozzles - the so-called. "crowns". |
|
| The presented diameters of such crowns correspond to both inch and metric graduations of plumbing pipes. With the help of appropriate drill bits, you can also prepare holes in the bottom and lid of the tank if it is intended to be installed on a pipe. |
|
| Branch pipes with taps are available for sale to shut off the flow of water. In combination with a stainless steel tank, it is preferable to use components made of the same material. In order not to waste extra time on arranging the thread, the pipes are simply welded to the previously prepared holes. Recommendations for tools and welding modes remain the same. After installing the water tank in accordance with the selected scheme (to be discussed later), water pipes are connected to the nozzles (it was previously noted that it is best to use copper or brass products) of a suitable diameter. The connection of the branch pipe to the pipe is carried out in any suitable way, for example, using a threaded adapter. |
So, the water tank is ready, and even the pipe fittings have already been installed. It remains only to connect the finished device for its subsequent use for its intended purpose.
How to connect a stainless steel water tank
Important notes before you start
It was previously noted that the following options for mounting the tank are most common: inside the furnace, away from it and on the chimney. We propose to replace the first option with a method in which the installation of the tank is carried out above the stove heater. This method is easier to implement, at the same time, you can resort to using it even if the stove has already been built - suddenly you thought at first that you would not need such a heater, and after studying the material presented, you understood all the advantages of using it and wanted to install it in your bath .
Important! It will be possible to implement the mentioned replacement only in the case of a collapsible chimney. The proposed method involves the combined installation of the tank - it will be simultaneously placed above the stones and around the chimney, which will make the efficiency of water heating as high as possible. Otherwise, you will either have to give preference to the built-in tank model (if the furnace is just being built), or install the unit at a distance from the stove.
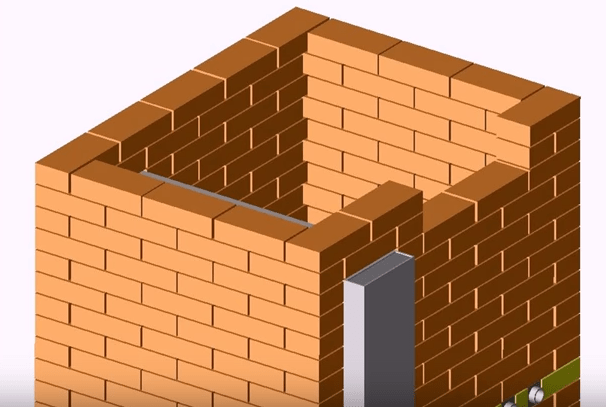
If the oven is brick, the preparation of the place for the tank and its direct installation are carried out during the masonry process (the specific stage depends on the chosen design of the oven and the size of the furnace, most often it is the 10th row). When laying a row, an opening is left to accommodate the tank. The size of the opening should exceed the dimensions of the structure to be installed by several millimeters to compensate for thermal expansion.

On the diagram - an opening for installing a tank
Note! Pipes are laid between the marked quarters of bricks, the presence of which will increase the heating efficiency - these are the design features of this particular furnace unit, these pipes may not be available in the project you have chosen.
The oven with the tank installed looks like this.

A sanitary faucet is embedded into the wall of the tank from below. It is assumed that the user will collect hot water directly in the steam room. If desired, the design can be improved by inserting the previously mentioned branch pipe instead of a tap, connecting a water pipe to it and leading it into the washing room.
When the masonry is brought to the upper edge of the tank, 2 metal strips are laid on it, the presence of which will allow you to safely cover the storage tank with a brick.

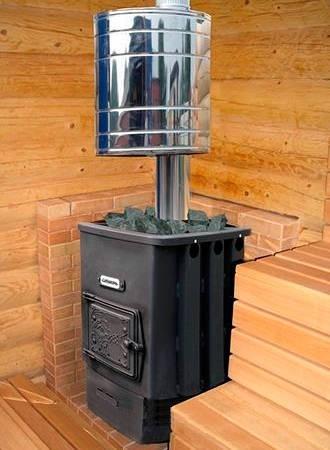
In the case of metal sauna stoves, the water tank is welded over the firebox (recommendations regarding welding were given earlier). As a result, the heating of the container is carried out by the forces of the flame, which ensures the fastest possible preparation of water. The design looks like this.

Important! If a built-in tank design is preferred, metal with a thickness of more than 1 mm should be used for its manufacture and, at the same time, ensure that the quality of the welds is as high as possible. Otherwise, the tank will either burn out quickly or leak through poor-quality seams.
Useful advice! In the case of a brick oven, you can go the simpler way by laying the water tank on the body of the oven above the firebox. The structure looks something like this.

Installing a water tank above the heater
This method, as noted, involves combining the options for installing the tank above the heater and on the chimney. The distance between the heater and the bottom of the tank is usually maintained in the range of 20-35 cm with the possibility of changing in both directions: the smaller this indicator, the faster the water will heat up, but the tank will last less, and vice versa.
It makes no sense to give detailed step-by-step instructions - you already have all the necessary knowledge. Previously, it was described how to prepare holes in the bottom and lid of the tank for passing a chimney pipe through them. Do it.
Next, you need to pass an element of the smoke exhaust system through the internal cavity of the tank and connect the pipe to the tank at the entry and exit points (in the bottom and lid) by welding. You also know how to do it.
Stainless steel water tanks are relatively lightweight (for example, cast iron is much heavier and a tank made of it would require fixing to the ceiling with chains or other suitable method) and do not require additional fastening. Further installation of the chimney is carried out according to the standard scheme, depending on the type of construction chosen.
Ideally, the finished system will look like this.

In the image shown as an example, pipes and taps are not visible. The next design is not so beautiful in appearance, but the connection of the water outlet is clearly demonstrated here.

As for the supply of cold water, it can be organized in several ways, depending on the particular situation:
- filling the tank is carried out manually;
- water is supplied from a well / well;
- Water is supplied from a centralized water supply system.
We will not consider in detail each of the listed options, because. these are topics for separate voluminous instructions.
Installing an external water tank
The arrangement of such a system is also not overly complicated. The only thing is that the scheme is supplemented with a new device - a heat exchanger. It can be built-in or external. For self-production, it is better to choose the second option - it is more convenient and easy to implement.
A diagram of a system with an external water tank is shown in the following image.
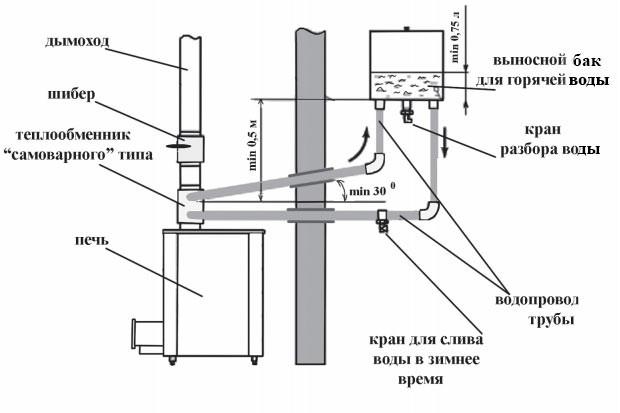
Here we see that the external heat exchanger is installed on the chimney. The water in the heat exchanger is heated by the heat of the flue gases transferred through the pipe walls. If an open heater is located under the heat exchanger, additional heating will be carried out by the heat of hot stones.
Heated in the heat exchanger, the water goes into the external tank, from there, cooling down, back to the heat exchanger. Water circulation will be ensured by the slopes created and the pressure difference in the tanks with hot and cooled liquid.


Remote tank with hot water for 60 l
You can make a heat exchanger yourself. In fact, this is the same water tank, the manufacturing instructions for which you have already studied, only of a smaller volume (usually up to 5 liters). The installation of the heat exchanger is carried out in the same way as the tank in the previous instructions (on the flue pipe).


Register - heat exchanger for sauna stoves

Prices for heat exchangers
heat exchanger
You already know how to make the necessary holes, install pipes, taps and pipes. Where to do it - look at the diagram. It remains only to prepare all the required elements and assemble them into a single system, maintaining the necessary distances and slopes in accordance with the above scheme.
In this example, a remote water tank is installed in the wash room and is equipped with a standard plumbing tap to drain the water. Pipes, like the mentioned tap, are cut into the bottom of the tank. Holes for laying pipes through the partition can be made using a suitable tool, such as a puncher.
In accordance with the current provisions of the current standards, pipelines for cold and hot water supply, if they are laid through a partition wall, must be laid through a sleeve. The diameter of the latter is selected so that it exceeds the outer diameter of the pipe being mounted by 0.5-1 cm. To seal the gap between the sleeve and the pipe, a non-combustible soft material is used, so that, as a result, it is possible to move the pipe along the longitudinal axis in the event of thermal expansion. This is shown schematically in the following image.

The gaps in the partition can be masked in any suitable way, for example, by filling the mentioned soft fireproof material and closing it with an exterior trim element (lining, etc.).
It remains only to figure out how to fix the water tank on the wall. The easiest option is to install on metal corners, the power of which would be enough to support the weight of the water tank.
Fastening is carried out as follows. Having attached the corners to the wall, you put marks on the surface, drill holes according to the marks and mount dowels in them. Next, screw the corners to the wall with bolts 8-10 cm long and 1-1.2 cm in diameter.

You can install your water tank on the corners. The method is extremely simple to implement, but not the most reliable (they made a mistake when choosing the corners - they caved in - the tank fell), and it is objectively suitable only for rectangular structures of small volume. More reliable is the fastening method used when installing domestic water heaters. To implement it, you will have to work with the welding machine again. You already have all the necessary knowledge, so no further explanation is required. The procedure is as follows:
- a strip of metal is cut off (the same stainless steel is suitable) with a thickness of 1.5-2 mm, a width of 5-10 cm and a length so that it protrudes beyond the side walls of the heater by several centimeters on each side;
- holes are drilled in the strip according to the diameter of the mounting bolts (you will understand by looking at the image below);
- the finished mounting plate is welded to the rear wall of the tank.
Further actions are similar to the previous instructions, with the only difference that the water tank is not installed on the corners, but is attached to the wall through them by means of a welded bar. It looks like this.

Buck installed. You can test and, if everything is fine (no leaks, excessive heating and other adverse phenomena), take the structure into permanent operation.
If desired, the system can be improved almost indefinitely, completing with a variety of automation, measuring instruments, etc. The possibility of installing additional wiring in order to connect the tank to the shower cabin in the washroom is also not ruled out - this will allow you to wash with maximum comfort. An example of the implementation of such an idea is shown in the following image.

Useful advice! Install the tank in such a way that it is as far away from both the sauna stove and the hot water intake as possible.
Having sufficiently mastered the art of stainless steel welding, if you wish, you can make a tank not from a pipe, but from sheet material - this is a more responsible job compared to the considered option. An example of its implementation is detailed in the attached video.
Successful work!
Video - How to make a stainless steel water tank for a bath
A pond in the country is not only a beautiful element of garden design, but also a serious structure that will require some skills and abilities from the owner of the site to build it. At first glance, it seems that the process of creating an artificial reservoir can be simplified if you purchase a ready-made container. Like it or not, let's try to figure it out.
Features of creating a reservoir in the country
If natural reservoirs are formed by mother nature herself, then when creating an artificial pond, in any case, significant efforts will be required:
- you need to dig a pit, the shape of which will depend either on the contours of the tank, or on the planned "coastline" of an artificial reservoir;
- walls should be stepped and reinforced;
- when creating a pond, it is better to avoid strict, straight lines - this way it will look more natural. Finished containers are mainly made in the form of multi-level bowls with smooth, rounded outlines of irregular shape;
Advantages and disadvantages of a pond from ready-made forms
Artificial bowls have long been used in the construction of reservoirs on the site. They have a lot of advantages.
- Availability- on sale there is a wide variety of any shapes, colors, and the containers themselves are made of different materials, from expensive and durable to cheap and light.
- Fast installation- the finished container is lowered into a pre-prepared pit, and then follow the work of filling the pond with water and decorating it.
- Long service life- With proper care, plastic molds can last more than 20 years.
- Ease of installation- this is the easiest option for organizing a reservoir on a personal plot, it will require minimal effort.
- Easy operation- ready-made containers are easier to clean, and even there you can easily organize lighting or otherwise give originality to the reservoir.
Disadvantages of finished containers are also present.
- You can't change the shape of the pond- if it is still theoretically possible to fill up part of the pond, then it will not work to expand the static form.
- Dependence on weather factors-cheap plastic can crack in severe frost or become unusable in bright sun, and indeed due to temperature changes.
- Plastic is easier to damage during installation and during operation. Although modern forms are quite durable, no one is immune from troubles.
- In similar containers more difficult to breed fish and plants.
- Price. Large containers are quite expensive, the same applies to molds for reservoirs from fiberglass or butyl rubber.
Advantages and disadvantages of a reservoir dug independently
It is not easy to build such a reservoir. But it does have a lot of advantages.
- Can dig a pond of any shape and depth. There are no barriers for you, except, perhaps, the size of the site. Absolute creative freedom, which will allow you to create your own work of design art.
- Creation costs film reservoir lower than when buying a ready-made container.
- Film-based reservoirs also resistant to temperature extremes, sun and frost.
- Concrete ponds have absolute strength and reliability.
- It is possible to pick up non-toxic materials and keep in the pond alive organisms.
When creating an artificial reservoir with your own hands, difficulties often arise. Here are the most typical ones.
- All work has to be done from scratch- mark out the outlines of the future pond, dig a hole, strengthen the walls, decorate the pond and "revive" it.
- Materials and tools will need to be purchased separately. Worst of all, if by the beginning of construction you will not have anything at all.
Reservoirs from finished materials can have a wide variety of shapes:
- square;
- oval;
- rectangular;
- round;
- arbitrary.
Materials from which the finished molds are made:
- butyl rubber;
- plastic;
- fiberglass;
- cast iron or steel (if, for example, an old bathtub becomes the basis of the pond).
Ready-made plastic reservoirs
For the production of plastic reservoirs are used polyethylene, compressed under high pressure, or PVC. Plastic pools can have any length, width, depth, color and configuration. The volume of artificial reservoirs made of plastic ranges from 150 to 2500 liters.
They are installed in small areas and in cases where they do not want to pay special attention to decor.
Main benefits reservoirs made of plastic are:
- lightness and strength;
- ease of installation;
- sufficient service life (10-15 years);
- unpretentiousness in care.
Among shortcomings plastic containers, we note the following:
- cheap plastic cracks from the sun and frost;
- small volumes and the inability to expand the reservoir;
- high cost of quality containers;
- unnatural appearance.
Features of the installation of plastic reservoirs
The first step is to choose a suitable location that receives only a few hours of sunlight per day. Otherwise, the pond will quickly "bloom". Nearby there should be no trees, shrubs and other sources of additional debris.
For reliable installation of the finished reservoir, you need to perform a number of simple steps:
- Draw the contours of the future pond on the soil. The easiest way is to turn the shape over and circle it along the outline;
- After that, remove the bowl and draw a line 20-25 cm from the one already drawn;
- Dig a hole along the contour of the second line and 20-30 cm more than the depth of the container;
- Remove roots and stones from the pit and carefully tamp the walls;
- Fill the bottom of the pit with sand for 20-30 cm (which we left "in reserve") and tamp it down. The edge of the form must exactly match the ground level, and the base must be strictly horizontal. Use a level to measure accurately;
- Fill the remaining space between the container and the walls of the pit with sand. Do this gradually, thoroughly rinsing with water every 20-30 cm of the layer;
- In parallel, start filling the container with water, as it is flexible and easily deformed. Continue the filling procedure until the bowl is stable and level in the hole;
- Fill your makeshift pond with fresh water to the brim and decorate it with stones and other decorative elements.
Do not forget to periodically change the water in the plastic pond, as it is stagnant and begins to "bloom" quickly.
This video demonstrates the simplest scheme for installing a pond from a finished form. Particular attention was paid to the choice of location, marking the contours, digging a foundation pit and filling it with water.
Differences of reservoirs from fiberglass
Fiberglass containers come in a variety of volumes (up to 6,000 liters). Their distinguishing features are:
- increased strength and ability to serve up to 30 years;
- environmentally friendly material, in such containers you can even breed fish;
- maintainability;
- resistance to UV radiation and resistance to severe frosts.
The installation technology of fiberglass ponds does not differ from the installation of conventional plastic containers.
Bath pond
Baths, produced back in Soviet times, were made of cast iron - a material resistant to high and low temperatures. Therefore, an old bath may well become the basis for your future pond. In addition to the fact that it will cost you completely free of charge, it has several advantages:
- cast iron baths are very durable and last almost forever;
- the enamel of such a bath is durable and resistant to aggressive liquids, not to mention plain water;
- the cast-iron bath does not rattle when taking in water;
- turning it into a pond is easier than using any other option.
At the same time, it is not always preferable to use a bathtub as the base of a pond:
- it is rather problematic to transport a bathtub weighing 50-150 kg to the dacha;
- the enamel coating of the bath is very fragile, if you drop a heavy object, corrosion and destruction of the enamel will occur over time at the site of the crack;
- bathtubs, as a rule, have the same type of rectangular shape, so the pond will not look quite natural.
The subtleties of installing a bath as a reservoir
First of all, tightly seal the drain hole of the bath - you will no longer need it. The further algorithm of actions looks like this:
- dig a pit according to the shape of the available container with a margin of 10-15 cm;
- lower the bath into the pit and, using a level, determine that it is strictly horizontal;
- carefully fill the pit and carefully tamp the surface and close the cracks;
- the inner sides must be treated with adhesive for ceramic tiles. Then you need to wait until the glue dries, covering the bathroom from moisture and debris;
- after the glue dries, lay a chain-link mesh around the perimeter of the bathroom;
- then apply a cement-sand mixture to the mesh;
- the process ends with the inlay of decorative stones, tiles or gravel.
The glue is applied in order to give the surface the natural color of the bottom of the reservoir, so it is even good if it is applied in an uneven layer.
Film based pond
Among the reservoirs that are being built with their own hands, the film-based pond is considered the first in popularity. His Benefits obvious:
- thanks to the film "bottom" of the reservoir, you can give absolutely any shape and depth;
- over time, the outlines of the reservoir can be corrected;
- the material is subject to restoration and restoration, damage is eliminated without special costs;
- the film is frost-resistant.
However, film reservoirs also have limitations:
- the film is easy to damage (cut, tear) during cleaning and styling;
- the edges of the film that lie on the surface can "melt" from the hot sun;
- folded film bottom requires additional "camouflage";
- if a large reservoir is conceived, then the film will have to be glued in several places.
The secrets of creating a pond from a film
With a competent approach, a film reservoir can last more than 10 years. In addition to the film itself, a shovel and marking tools, you will need geotextiles or felt, film repair tools and some artificial materials for the "coastal" zone. The process of creating a pond from a film consists of seven simple steps.
- First of all, mark the contours of the future reservoir on the ground, giving it any shape and depth.
- When digging a pit, alternate ledges and "thresholds" - this gives strength to the banks, the earth will not crumble. The width of the "threshold" is about 30 cm, the slope is 45-50 degrees.
- Dig a pit 15-20 cm deeper than the estimated depth of the reservoir - this stock is needed for compacting crushed stone (5 cm layer) and sand (10 cm).
- Clean the bottom of roots and stones and line it with geotextile or special felt. Tamp the bottom constantly.
- Hold the film for 2 hours in direct sunlight and begin to overlap the bottom with it. It is desirable that the pit be covered with a single piece of film. If the whole piece is not enough, glue the individual parts with a special PVC adhesive for the film.
- Lay out the film as evenly as possible. Fill the pond with water by a third, after 2-3 hours - by another third, and after another 3 hours, completely fill the pond with water. This is necessary so that the film stretches under the weight of water gradually.
- Cut off the excess pieces of film around the edges and start decorating - lay stones along the coastline, let in representatives of flora and fauna and enjoy the beautiful view.
The video shows the steps for creating and strengthening a simple film-based pond.
concrete pond
A concrete pond belongs to the category of structures that are built "for centuries." This is due to a number of reasons:
- concrete has incredible strength and durability;
- the reservoir can be given any shape;
- concrete pond is easy to maintain;
- concrete structures are compatible with any engineering equipment;
- low cost of cement.
However, concrete ponds also have certain limitations:
- building a concrete bowl is quite difficult;
- additional treatment with a frost-resistant agent and liquid glass is needed;
Concrete pond construction algorithm
If you are ready to surprise the world with an in-ground concrete pool, then the preparatory work should look like this:
- dig a pit with a margin of 20-25 cm necessary to seal the bottom (make the walls of the pit with a slope of 20-30 degrees);
- do not forget to make ledges (thresholds) to enhance the strength of the structure;
- remove the remnants of the roots and small stones;
- fill the bottom with crushed stone with a layer of 15 cm and tamp;
- Lay the waterproofing sheet starting from the center of the excavation to the surface of the ground.
- mix the composition in a ratio of 3: 1 (three parts of sand to one part of cement);
- the quantity should be enough to completely fill the pit in at least one layer (6-7 cm thick);
- make a mesh of wire and reinforcement with a mesh diameter (7-10 cm);
- press the mesh into the uncured concrete so that its edges protrude slightly above the coating;
- after the concrete layer reinforced with reinforcement dries, prepare a new solution;
- moisten the walls of the pit with water and pour a second layer of concrete 5-6 cm thick;
- level the bottom and walls of the concrete bowl;
- let the concrete harden, and then apply a layer of liquid glass.
As you can see, each type of reservoir has its advantages and disadvantages. Which one to choose is up to you.
specials.usadbaonline.ru
Advantages and disadvantages
The advantages of such a pit (or a septic tank for a sewer) are many, and all of them are of great importance for the profitability and safety of the sewer.
The plastic container is: 
- absolute tightness;
- safety for nature and man (the soil remains clean);
- independence from power supply;
- the ability to choose any, convenient for the owners, volume;
- light weight - the blank for the septic tank can be easily lifted and installed;
- material resistance to aggressive media and corrosion;
- ease of installation (the walls of the tank are easy to saw through to connect pipes);
low cost.
The disadvantages of the owners include:
- the probability of the tank floating up during periods of spring floods;
- risk of crushing, deformation and cracking in winter when the soil freezes:
- the need for regular sanitation activities;
- the appearance of an unpleasant odor - waste decomposes in the process of natural decay.
However, with a reasonable approach and care in operation, the owners can avoid any trouble with a plastic container. In fact, the advantages of plastic cover all its possible disadvantages. This is a cheap and quite practical facility that helps solve the problem of sewage waste.
What to choose?
Deciding on the choice of a suitable container made of plastic or polymers is quite simple. The main parameters of choice are the working volume and strength.
 For a family of three to four people, a container with a capacity of 2,500-3,000 liters is enough. It will allow not only to wash the dishes and take a shower, but also to install a washing machine, dishwasher, bathtub.
As for strength, preference should be given to products with a wall and bottom thickness of at least 1.2-1.5 centimeters. The margin of safety will allow the tank to resist ground pressure. And enough weight will keep it in the soil. True, for greater reliability, the capacity is still better to further strengthen.
For the needs of the owners, two options are suitable.
plastic barrels
Ordinary plastic barrels with a capacity of 200 liters. To increase the working volume, it is necessary to connect two or three barrels in series using overflow pipes. The total volume of sewage should be three times less than the working volume of these storage wells! On average, one person consumes 200-400 liters of water per day.
eurocubes
For large families and cottages, the Eurocube will be the best choice. Now you can find  waste containers of this type and purchase them at a very affordable price. Sectional storage septic tanks are also assembled from eurocubes. Resourceful owners complicate the design, supplementing it with a compressor and aerator. The result is a full-fledged treatment plant at a budget price, but with good functionality and efficiency. The main advantage of any eurocube is its shape and sufficient capacity. Rectangular corners allow owners to save on earthworks. After all, when installing barrels or tanks, you have to remove the "extra" soil in large volumes.
Principle of operation
 Any plastic container functions simply. Waste accumulates in it and gradually settles. In the silt that has settled to the bottom, natural decay processes begin - anaerobic bacteria begin to work. As a result, a characteristic smell appears near the sewer - this is one of the obvious disadvantages of such a system.
As it fills, the liquid and bottom sludge are pumped out using sewage equipment. To save on calling specialists, you can install a structure with several sections that allow the water to settle several times and be cleaned as much as possible. From the last tank, the liquid flows by gravity to the filtration field or to a filter well with a reliable natural filter at the bottom (sand, crushed stone, peat, etc.).
Filtration into the ground is prohibited if there are harmful chemical impurities or fecal matter in the drains. The ingress of hazardous substances into the soil can provoke infectious diseases or poisoning in the residents of the house.
Construction device
Tanks are placed in the pit in steps - the first is always higher than the next. That  The same principle applies to overflow pipes. The inlet pipe is located 20 centimeters higher than the outlet pipe. This design ensures high-quality movement of fluids by gravity. The liquid that enters the sewer naturally fills the first container, and then overflows into the second, and so on.
Tanks are installed on a sand cushion with a thickness of at least 20 centimeters. During installation, backfilling is used using a mixture of sand and cement. Above is a ceiling with hatches and ventilation pipes (for each individual section with a diameter of 11 centimeters).
How to choose materials?
When choosing a building material, you must first pay attention to its quality.
The container must be solid, not have chips or cracks. The optimal wall thickness is from 1.2 centimeters. But the main attention is paid, of course, to the calculation of the working volume. So for a family of three, you can install three Eurocubes, with a total capacity of 3,000 liters. Three cubic meters of volume will make the life of the owners as comfortable as possible.
It is allowed to use used containers without signs of wear.
Their purchase will save the family budget.
How to install?
For installation work, a minimum of tools is required:
- shovel and bayonet shovel;
- grinder and drill for making technical holes.
The list of basic components and materials is much wider. You will need:
- adhesive suitable for working with plastic;
- sealant;
- clamps for connecting pipes;
- sand and cement;
- cables for fastening containers;
- the containers themselves;
- flanges and couplings;
- plastic pipes (diameter 11 cm);
- pipes for arranging ventilation (sewer pipes may also be suitable).
Installation work includes the following steps: 
- Containers are being prepared. Holes for pipes are cut. The input is placed 20 cm from the top edge, and the output is 40 centimeters - this provides the height difference necessary for proper operation. Holes for ventilation pipes are also prepared.
- A pit of suitable size is dug. Sand is poured on its bottom. If additional fastening of tanks is planned, the bottom is poured with concrete. At the same time, metal loops are installed for fastening the cables.
- The containers are lowered into the prepared pit and fixed at the bottom. Pipes are connected and ventilation is installed. All joints are carefully treated with sealant.
- Backfilling is being done. You can use sand, but it is better to backfill with a mixture of sand and cement (five to one ratio). The containers must be partially filled with water to equalize the external pressure from the soil!
- The roof of the building is insulated with mineral wool, which will ensure uninterrupted operation of the sewerage system in the cold season.
Common Mistakes when performing installation work is:
- lack of pipe slope towards septic tanks;
- the presence of multiple bends and turns, which increases the risk of clogging the system.
Issue price
Eurocubes are widely used in industry for the transportation of various liquids. Therefore, you can purchase used products at a price of only 3,000-5,000 rubles. There are also cheaper options. At such a budget price, the owners will receive roomy and durable containers with a reliable galvanized steel frame.
Installation of the installation of several eurocubes is quite simple. If for some reason the owners cannot cope with the task on their own, you can seek help from specialists. Installation work usually includes excavation, installation and connection. It will cost about a third of the cost of Eurocubes (from 5,000 rubles, depending on the region).
Proper operation
Homemade septic tanks need regular inspection and maintenance in the same way as industrial models of sewage treatment plants. 
Repair work may be needed in case of clogging of the sewer. It will be necessary to clean the overflow and sewer pipes. For such work, it is better to involve a professional plumber. To avoid problems with clogging, it is necessary to periodically add biological preparations containing special cultures of bacteria to the storage tank, which can break down fatty plugs and deposits.
Maintenance includes:
- Regular pumping of the contents of the tank. The frequency depends on the intensity of use of the sewer system and the volume of septic tanks. Usually this is from one to three pumpings per year with the involvement of special equipment.
- Insulation of the lid during the cold season, which allows you to speed up the processes of decay and wastewater treatment.
- And, of course, it is necessary to follow the simplest rules - do not dump large mechanical debris and hygiene items into the sewer.
greenologia.ru
Building a rainwater cistern with your own hands
“Fresh water is a very important element of nutrition, about 150 liters per person are consumed daily in Germany, of which only 3 liters are used for cooking.
Yes, water is (still) relatively cheap. With us, 1000 liters of tap water cost about 6 euros, including the cost of sewerage. And here is the first problem! When I water my garden with tap water, I don't have any sewerage at all, which I have to pay for, however! Another community-created problem is that I have to pay for storm drains from my property even though I don't use them.
But what if you try to collect rainwater in a special tank and water the garden with it, and also use it for cleaning, flushing the toilet or even washing, while saving quality tap water? In addition, rainwater has its own advantages:
- It's better for washing.
- Does not form limescale in the washing machine
- Better tolerated by plants, etc.
Cisterns for collecting rainwater are sold in construction markets, but the smallest of them (1500 liters) costs 2000 euros. It's so expensive that it will never pay for the work done. Barrels for water can be bought much cheaper. But in the hot season, the water in them quickly deteriorates, begins to smell disgusting, and all kinds of insects start up in it. It is also not suitable for an underground reservoir. In my temperature, starting from the middle of summer, as in winter, fluctuates in the range of 5-10 degrees above zero.
Whoever has hands growing from the right place and who is not afraid of physical work, he may well build such a tank on his own and quite cheaply. Here is my progress report.
Experience with a septic tank
14 days of cold with a temperature of -20 ° C, my tank survived without any problems, although the water reached almost to the very hatch. The thickness of the ice was about 15 cm.
More than 5 years have passed since the start of construction, and at the time of 2013, no damage has yet been noticed.
- Water intake in 2008 - 4000 liters
- Water intake in 2009 - 7000 liters
- Water intake in 2010 - 8000 liters (Construction costs paid off)
- Water intake in 2011 - 8000 liters
- Water intake in 2012 - 5400 liters
- Water intake in 2013 - 1000 liters
Water tank. Instructions with pictures

Construction began in September 2007.

In mid-October 2007, I was already at a depth of 2.20 m in a hole with a diameter of 1.40 m.

At this depth, I poured 10 cm thick concrete. For the walls, I took a 100x25x5 cm curbstone made of concrete for 1.40 euros / piece at a nearby construction market. Of these, I laid out a round wall 15 stones in height directly on a concrete pad. It was in the first week of November, then my construction was slowed down due to weather conditions. In April 2008, construction continued. The pit lined with stone had an inner diameter of 120 cm and an outer diameter of 130 cm. Its height was 201 cm. In the end, I cleaned the grooves between the stones using the same concrete.
I treated the inner surface, including the base, with a hydro-binder sealing solution so that water would not seep through. This solution is diluted with water and becomes like a yogurt mass, which is very convenient to apply with a regular wallpaper brush. I left each layer for a day to dry completely. 5-6 layers are usually enough, in any case, you can always process the inner surface again.
I made small holes between the hatch and the wall. I did not treat this transition with a hydro-solution, it remained water-permeable. That's enough. At least I have never had a flood.
Hydro-mortar (25 kg bags in the construction markets) is a cement-synthetic mixture that serves to protect surfaces from water penetration (as well as from water loss from the inside). The hydro-solution fills all the pores and is applied several times after the first layer has dried.
I filled the space behind the curbstone with rubble and concrete.

At the height of the top three rows of stones, I made several holes - two for the filling pipes and one for the pump pipe.

The cistern is open. The hatch is large enough to fit a ladder.
I made the manhole cover in my own garden. I dug a hole 10 cm deep and 140 cm in diameter, placed an old zinc tub upside down and poured a concrete pad around it. But first I laid a film on the ground. When the concrete hardened, I removed the bathtub, put a film in its place and filled everything up to the top edge with concrete. Now I have a top cover with a hatch. To make it easier to lift such a cover (50 kg), I mounted two handles in it.
Both covers, as well as the base of the tank, later had to be reinforced with steel.

Here the cistern is closed. Both lids close tightly to prevent dirt, animals and children from getting inside. To make the design look prettier, you can scatter gravel around. On the left and right side of the building you can see pipes for collecting rainwater.

In the lower third of the pipes, I installed a homemade filter for coarse dirt.

The filter, of course, is very simple, but effective. It consists of a funnel-shaped PVC pipe that is simply inserted into the collection pipe and a round tea strainer. Cleaning such a filter takes only 10 seconds.
To pump out the water, I installed a special pump. I already had the hose. For the pump, I built a separate booth without any frills. In it, he serves me faithfully, protected from wind and bad weather.

The top cover can only be opened when the door is open.

Which is locked with a key.
Results

The volume of my tank is 2300 liters, which is enough for a whole garden.
The pH of the water is 7.1 and it contains no nitrates at all.
Four stage filtration system
- In the gutter
- In rainwater collection pipes
- in the hose
- Built-in filter in the pump
Such a tank must be cleaned every 5-10 years. After about 3 months, a silty sediment, the so-called sediment, forms at the bottom. This layer consists of "good" bacteria that purify the water.
It is therefore very important that the pump hose does not touch the bottom of the tank.
The time spent on construction was about 300 hours, the cost without a pump was about 100 euros. I think that cheaper and better is simply impossible. Let me be just an amateur.”
We hope that this guide to action will help you make your site more comfortable and cost-effective.
 On our site, the topic of water in the country was raised quite often. The fact that water is the source of life is not so much a beautiful phrase or metaphor as a harsh reality, everyone who, in the summer heat, finds himself without water in the central water supply (if such is made at all in the country) will have to make sure. No washing, no watering the garden - and in general, nothing can be done without water.
Here is one of the options that allows you to get out of this situation. The water tank, raised by the author to a height, will supply you with water under natural pressure in the event of such force majeure situations. For those who could not find water on the site, build a well or make, for example, a well for some reason, a water tank mounted at a height with their own hands, this is the simplest and cheapest solution in its financial terms. For example, it can be easily used for building a summer shower with your own hands at the dacha (for more details, follow the link).
We use the cottage only in the summer (from April to September), so we placed a reserve water tank outside the house. The obvious advantages of this solution include the absence of additional loads on building structures, as well as an almost complete guarantee against leakage and flooding of premises in any emergency situations with a storage tank. The only thing I would like to mention right away is that we do not use water from the main water supply for drinking due to the high content of iron in it (brown water).
As a water pressure storage tank, we took a plastic barrel with a volume of about 190 liters. Previously, it served as a container for storing concentrated pineapple juice. This choice was dictated by the fact that a plastic barrel is much lighter than a metal tank and does not need additional corrosion protection. Serious improvements to the barrel for the supply of water were also not required. I only had to cut out the top bottom, since the hatch in it was too small and inconvenient.
To install a water barrel outside the building, I had to make a so-called overpass, on the upper platform of which a water tank was installed with our own hands. The material for the construction of the overpass was water pipes with a cross section of 50 mm. Threaded plumbing couplings, tees and elbows were used to connect structural elements. The height of the flyover is approximately 3 m. To climb to its upper platform, a ladder was mounted on the back side of the flyover. The rungs of the stairs are made of steel plates, which are attached to the uprights with bolts and nuts.
After assembling the overpass, the tank was connected to the main pipeline, which runs in the ground next to the overpass. To do this, a valve was installed on the outlet from the pipeline at ground level, from which pipes with a cross section of 15 mm were launched upwards and an entry was made into the upper part of the tank. At a distance of about 1.5 m from the valve, branches for the shower were made.
A float valve from the toilet bowl was installed on the pipe of the upper part of the tank. The valve allows you to automatically fill the tank to the maximum level and always have the necessary supply of water. To prevent leaves and other debris from falling into the pressure tank, we cover it with a round metal lid on top.
The water supply to the house was made directly from the pressure storage tank. To do this, a hole was drilled in the lower part of the tank, a pipe with a cross section of 15 mm was pulled from it towards the house and brought inside through a hole in the upper part of the wall. All pipe connections are threaded. In the house, the pipe was stretched to the tap in the kitchen.
To drain the water for the winter, a hole was drilled in the bottom of the barrel, into which a short pipe with a stopcock was inserted. To quickly empty the pressure tank, just open the tap and drain all the water.

To collect polluted effluents, a filtering septic tank with a depth of 2 and a diameter of 1.5 meters was made right under the overpass in the ground. Since we need to remove only domestic wastewater that does not contain feces, such a simple water treatment scheme is fully justified and completely safe from an environmental point of view.
Below are other entries on the topic "How to do it yourself - to the householder!"
Subscribe to updates in our groups.


People, plants, animals need water. Without it, they cannot develop and exist. And therefore it is important to have a stock of it on your site. Of course, almost everywhere there is running water, wells, wells. But there are circumstances when the water disappears. This happens most often in hot, dry summers. And then all your labors invested in flowers, vegetables, fruit trees and shrubs will be lost. It will be painful to watch your plants wither.
To avoid such sad situations, it is recommended to install a storage tank for water on your site.
According to the materials of manufacture, they are:
- metal;
- plastic.
According to the manufacturing method to be done on:
- industrial;
- homemade.
Depending on what the water will be used for, choose what material the metal container should be made of.
If the water is drinking, for cooking, washing, then the water tank must be made of high-quality, stainless, gost steel. Such a tank should have a ventilated hole with a tight-fitting lid. It is a good idea to install a protective grid on this hole. A water faucet is embedded in a stainless steel container.
Twice a year, it must be washed with disinfectants so that the quality of drinking water does not deteriorate. Therefore, in the side part there is a hatch through which it is possible to wash the stainless steel barrel.
If you will use water for technical needs:
- glaze;
- household purposes;
- rainwater collection,
then you can purchase a tank from any metal.
In order not to increase the consumption of drinking water, it is best to install a rainwater collection tank in the country. It can be either a simple fifty-liter metal barrel or special storage tanks with filters for water purification.

And if the barrel is inexpensive, besides, you can use a used one, the main thing is that chemicals are not stored there before, then special containers for collecting rainwater are quite expensive. True, the water collected in them can be used for washing and for watering. But in barrels you can leave water for the winter.
plastic container for water
These containers are the most popular. The advantages of these containers:
- cheaper than similar ones made of stainless steel;
- a large selection of different volumes;
- tightness;
- do not require additional care (painting, primer);
- do not rust;
- long service life;
- not afraid of temperature changes;
- withstand 30 degree frosts.
The plastic container can be made of both food-grade plastic and technical plastic.
Plastic food barrels are made of high-strength, frost-resistant plastic. It does not transmit ultraviolet rays, so drinking water in them does not deteriorate for a long time.
Most of these barrels are equipped with threaded holes with a stopper, the diameter of these holes allows you to install taps in the tank.
Each plastic container has a quality certificate.

Plastic containers can be vertical and horizontal.
Eurocubes are in great demand, which they willingly purchase for the dacha. They are made of polymeric materials; for greater stability, the cube is placed in a metal crate. It has a neck at the top and a drain cock at the bottom.
Cube containers are widely used in private households. They can be used as a storage tank for:
- glaze;
- soul;
- household needs.
It is worth mentioning that eurocubes are used to transport various liquids; they cannot be used as containers for drinking water.
If you have enough money, you can buy a factory-made water tank for your summer cottage.
But, having spent a little time, you can make a water tank with your own hands, and it will be no worse than the factory one.
How to design a container yourself
It is very easy to make an unusual storage water tank from old tractor tires with your own hands. To do this, you just need to purchase decommissioned tires of large diameter and install them on your site.

The container can be easily installed with your own hands, for this:
- Align the place where the container will be located well.
- Cut out the upper inner part of the tire.
- Place the tire on the prepared surface.
- We take three parts of sand, one part of cement, diluted with water to a state of thick sour cream. We mix everything well.
- Pour the bottom of the tire with the resulting solutions, level the surface.
- We cover the tire with cellophane so that water does not get in in case of rain. We wait a week until the solution hardens.
- Remove the film and fill the tank with water.
The water that will be stored here is, of course, unsuitable for drinking and washing. But on the other hand, it will heat up quickly, and it will be possible to water the plants in the greenhouse with it. In addition, the tank will serve as an excellent reservoir for rainwater. The advantage of the tank is reliability and durability.
Such containers are suitable as a fallback for a small amount of water. If you need a large volume, then it is worth making storage tanks more solid.
To make a container that can hold 7 m3 of water, you will need:
- three beams three meters long;
- sixteen bricks wrapped in polyethylene for waterproofing;

- ten boards with a length of at least 3.5 meters and a thickness of 0.5 centimeters;
- six OSB boards 2.5x1.25 meters;
- geotextile insulation;
- black polyethylene film.
- self-tapping screws.
Manufacturing steps:
- Along the perimeter of the leveled area, we lay out the bricks at the same distance.
- We lay three beams on the bricks.
- We fasten five boards to the beam with screws.
- We attach 2 OSB boards from above with self-tapping screws.
- We make a frame from boards, fasten it to the base.
- We fasten the remaining OSB sheets along the frame.
- We tighten the container from the inside with a geotextile attached from above with brackets.
- Then we lay the film, hanging freely over the edges of the box.
- We fill the container with water.
- For reliability, we fasten the film from the outside with a stapler.
- On top of the container we nail two boards with a cross.
Advantages of this container:
- low cost;
- just do it yourself;
- easy to disassemble, move to another place.
True, to use such a container, a pump is needed, and the water in it will not be potable.
On a hot summer day, after working in the garden, you want to take a warm shower. But in order for the water to be hot, you need to heat it. You can buy an electric heater for the dacha, but it's not economical.

It is easier to install a storage tank in which water will be heated by the sun. Any barrel can serve as such a container - galvanized, stainless steel or metal, plastic.
To do this, just set the container at a height and fill it with water.
The easiest way to install plastic containers.
A stainless steel container will not rust, the water in it will not bloom, it will be drinkable. But stainless steel products are expensive.
An alternative may be a galvanized barrel, of course, it is not so durable, but if the galvanization is not broken, it will not rust either.
The most economical option is a metal water tank, but it must be painted to prevent corrosion.

