The main work on making a pond with your own hands. Sketch
Decided to do it on our own personal plot do-it-yourself artificial pond Then you need to learn a few secrets that allow you to create not just a reservoir, but a real work of landscape art.
To create a beautiful artificial pond, first of all, you need to decide what exactly you want to see on your site:
- recessed reservoir of arbitrary shape made of PVC film,
- a pond made of a rigid container made of fiberglass or plastic,
- artificial reservoir of large volume with a reinforced concrete bowl.
Having chosen the option of a reservoir, you should outline a place for it on your personal plot. The area under the trees will create some difficulties in caring for the reservoir - you will have to clean up the foliage that has fallen into it more often. Fully exposed sunny areas can cause water to bloom too quickly. If you are planning to install a small fountain in a reservoir or, for example, an oxygen compressor, think in advance about the supply of an electric cable to the future reservoir.
- If you plan to arrange a buried reservoir, you need to dig a foundation pit on the selected piece of land suitable form. Initially, the curvilinear shape of the reservoir can be outlined using metal studs and rope.
- Don't make sudden descents. It is better when there are several steps-terraces in the reservoir, located 25-30 below each other. The optimal width of such a terrace is 30-35 cm. The recommended depth of an artificial reservoir is at least 60 centimeters.
- The slopes between the terraces are made at an angle of 45 degrees. When digging a pit, remove all plant roots and stones that are in the area of \u200b\u200bthe future reservoir.

- If you decide to make a reservoir with a raised outer edge above ground level, then after you have completely dug the pit, lay it out of stones on cement-sand mortar along the perimeter of the reservoir, a side of the required height. Be sure to wait for the solution to completely harden before proceeding with the next step in creating an artificial reservoir.
- Now we take clean sand and lay it in an even layer over the entire inner surface of the reservoir with a layer of 3-4 centimeters. Sand must be carefully leveled and compacted.
- The next step is laying out the bowl of the reservoir from the film. For temporary reservoirs designed for 2-3 years, polyethylene (in two layers) is suitable. If you need a pond with a service life of at least 10 years - use PVC film, for "long-lived" ponds (20-25 years) a butyl rubber film is suitable. Spread the film freely along the bottom of the reservoir so that its edges protrude beyond the boundaries of the pit by at least 50 centimeters. If necessary, glue two sheets of film together using special glue and tape.


with hard capacitance

- Get a container made of plastic or fiberglass of the desired shape.
- Put it on the ground in the place where you are going to make an artificial pond.
- With a shovel, mark the outline of the bowl.
- Remove the container and dig a pit of the required shape and depth. Do not forget to make the pit deeper than the bowl by about 3-4 centimeters.
- Pour sand along the bottom of the pit with a thickness of 3-4 centimeters, level and compact it.
- Place the container back in place, gently press it down and make sure there are no voids under the bowl.
- Fill the container with water so that it finally sinks. Make sure the top edges of the bowl are level.
- Lay a blind area around a bowl of stones or tiles on a cement-sand mortar.
With reinforced concrete bowl

A large artificial reservoir is best made of reinforced concrete:

In the future, the bowl of such a reservoir must be treated with a waterproofing compound and tiled.
Video
Video instruction for arranging a pond from PVC film:
Photo


After the bustling city, your own suburban area seems like a piece of heaven on earth. Flowers are planted here, paths are paved and the lawn is arranged. And, of course, I want to see a reservoir on my own site. In this article we will tell you how to make a pond with your own hands at their summer cottage.
Types of reservoirs
Reservoirs on the site can be as for various purposes, different forms, and different sizes. In addition, they are reservoirs of the following types:
- A body of water organized with a plastic mold.
- Pond, the bottom of which is made of PVC film.

- Pond with reinforced concrete bowl.
The rigid plastic form is ideal for the construction of small ponds located in the immediate vicinity of flower beds or paths on the site. Such reservoirs are easy to mount and can be moved from place to place at will, decorating them with plants or stones in various styles.
Ponds, large in size, can be equipped with pvc film or concrete with reinforcement. Such artificial reservoirs are usually mounted once and are no longer transferred. Therefore, when planning a large reservoir on the site, you need to carefully consider its location, as well as the plants surrounding it.
Where can you place a reservoir on the site

Small ponds organically look anywhere - next to the house, near the flower garden, near the paths. They can be decorated with various plants, stones, small garden figurines, as well as fountains. The great advantage of small reservoirs is the ability to quickly transfer them from place to place. Thus, you can easily change the appearance of your own site.

Large ponds need to be placed thoughtfully: firstly, they cannot be moved from place to place as easily as small ponds, the basis of which is a plastic form. Secondly, they need to fit correctly into the surrounding landscape. The organization of a large reservoir requires a long preliminary planning and thinking, it takes a lot of time and effort, but the result can exceed all expectations and allow you to create a unique recreation area on the site.
Suitable building materials

What choice to make - PVC film or concrete? Concrete or plastic mold?
The plastic form is a convenient blank, it will not be difficult to put it. It does not need additional waterproofing.
PVC film allows you to create reservoirs with the most unimaginable edges. However, its service life, although long, is not as long as we would like. Under influence low temperatures PVC film may lose its properties. Typically, the service life of such a film is not more than a few years.

Concrete is the most difficult material to work with. It requires considerable preparation and construction works: preparation, reinforcement, waterproofing. However, if the construction of a large reservoir with a bridge is required, a building material better than concrete with reinforcement cannot be found.
Pond with hard plastic bowl

- At the selected location, a hole in the ground is prepared to fit the size of the bowl. To dig a pit of a suitable shape, turn the bowl over and transfer the outline of the bowl to the ground. Do not forget to make allowances along the edges of the pit of about 15 cm and leave a small margin of depth for sand bedding of about 5 cm.
- You can line the prepared pit with a dense PVC film. The soil is compacted, after which the hard plastic mold placed in place so that the edges of the bowl are at ground level.
- The bowl is leveled, filled with water by about a third, and then the voids between the bowl and the walls of the pit are filled up. You can use previously excavated soil for these purposes, but sand is better.
- As the voids are filled, it is necessary to spill the soil with water to avoid strong shrinkage.
- The edges of the bowl are decorated with stones or planted in the immediate vicinity of water-loving host plants.

pond with pvc bowl

- First you need to mark the boundaries of the reservoir with a cord and wooden stakes, giving it desired shape. The edges of the pit should be at the same level.
- Then, along the contour, they dig a hole in the soil of the desired depth.
- Be sure to remove all stones and roots, they can damage the film.
- The bottom is covered with sand by 10 cm, spilled and compacted.
- Now you need to cover the bottom of the future reservoir with geotextiles.
- The turn of the film has come. The film must be spread out in the sun in advance so that it becomes more elastic. If the pit cannot be covered in a single piece, you need to weld the edges of the parts right size. The film is laid in such a way that it extends beyond the edges of the reservoir, where it will be pressed by stones. The perimeter of the reservoir can be decorated with stones or the protruding film can be covered with earth and moisture-loving plants can be planted.
Photo


Pond with reinforced concrete bowl
- Such a reservoir requires careful preparation. This means that a drawing is required here, as well as calculations regarding the determination of the approximate flow rate.
- According to the measurements made, a pit is prepared, on the bottom of which at least 5 cm of sand must be poured. The sand must be carefully compacted. Reinforcement is installed in it, which will support the vertical walls of the reservoir; metal rods are also laid on the bottom, giving the reinforced concrete bowl rigidity and strength.
- The bottom of the reservoir is poured with concrete. For vertical reinforced walls, formwork must be prepared. Then pour it concrete mortar and leave until completely dry.
- Arrangement of a reservoir with a reinforced concrete bowl is impossible without good waterproofing. Therefore, you need to process the resulting bottom and walls of the reservoir with a waterproofing compound, and then think about finishing - PVC film or tile.
Photo


In addition, for such stationary reservoirs made of PVC film or reinforced concrete, it is necessary to think over a system for filtering and water purification. This means bringing electricity to the reservoir and installing special equipment.

Additional accessories in the form of fountains or mini-waterfalls also need both electricity and lighting.
Photo


It is believed that an artificial reservoir serves only as a decoration of the site and a place for bathing kids so that they do not get bored when leaving the city. However, a well-equipped pond also helps to humidify the air in the country, therefore, it is useful both to a person (especially asthmatics) and garden plantings.
If everything is thought out and organized correctly, then the work, from beginning to end, is carried out without the involvement of specialists, with their own hands. The proposed article will tell about the specifics of carrying out the main technological operations, which can be considered as a step-by-step instruction for the construction of a pond in the country. Naturally, making a certain adjustment for local nuances.
It depends little on the desired shape of the reservoir. By the way, there is no standard for it. If the main purpose of the pond is decorative, then it is enough to “turn on” your own imagination in order to understand how its bowl will fit into the general landscape of a particular segment of the territory. But the fancier its configuration, the more difficult the work will be, and the time and money costs will be more impressive.
Therefore, when arranging a pond, you need to focus on fairly simple shapes - a circle, an oval, a square, giving them some asymmetry so that the pond looks natural.
What to consider when choosing a location for a pond:
- Location fruit trees and shrubs with a powerful root system (for example, barberry). If they are far away, then for the design of the bowl the choice of options is quite large, and the installation itself can be carried out according to a simplified scheme. If there is a risk of damage to it by the roots, you will have to buy either the appropriate plastic “dishes” (ready-made container), or engage in concreting, laying a foundation pit under the pond with a stone. And the leaves falling into it from nearby plantations will have to be removed constantly.
- Possibility of supply water pipe. The shorter the route, the less the load on the pump. In addition, the cost of laying the line will be reduced. PGS for the "cushion", geotextiles, the same pipes and a number of other materials - all this will have to be bought.
- Drain. Water will have to be updated periodically. And the more lighted the place, the more often. Otherwise, the appearance of duckweed, intensive reproduction of microorganisms and accompanying odors during stagnant water. Therefore, it is necessary to mount a "thread" of drainage.
- Experts recommend focusing on its acceptable area for any dacha. The reservoir should not occupy more than 5% of its territory. Considering that a certain proportion of acres is already occupied by a house, garden buildings are quite rational advice.
- Illumination of this part of the suburban area. Optimally - no more than 6 hours a day. With an excess of light, the water will quickly turn green, as already mentioned.
Material selection
Finished industrial container

All this leads to an increase in the cost of work and, in addition, such events are a separate and large topic that requires detailed consideration. Unfortunately, it is quite difficult to fulfill all the ideas.
External design of the coast
Some options are shown in the photo. And which one to choose is up to you, dear reader.
On a note
Meet on the Internet step by step instructions, in which it is rather colorfully painted how to decorate a pond in the country with the help of ornamental vegetation and fish. But for some reason, one moment is missed - what to do with all this when cold weather sets in? Before planning just such an “artistic” design of a reservoir in a country house, it is useful to think about this very difficult question.
When planning the dimensions of the future pond, if the bowl is mounted from a film, you should focus on the parameters of the canvases. Their spike is not the most The best decision, since it is unlikely that it will be possible to fasten the strips with high quality without skills and appropriate equipment. And the risk of leaks is quite high.
The best option is to purchase a waterproofing membrane with the expectation that it completely covers the entire pit. Therefore, before planning a pond in the country, you need to ask what sizes of PVC products are on sale in this locality. It's over correct solution than trying to glue (solder) canvases.
If the pond is being built for the first time, a miniature pond is enough for a start. Then, already with knowledge of the matter, having gained experience in hydraulic engineering work, you can arrange a larger reservoir in the country.
I really want to relax after summer heat and physical labor near a picturesque place. Perhaps the first thing that comes to mind is water. Unfortunately, not all land owners are lucky to have a pond in their country house. Therefore, many summer residents equip a mini pond in the country with their own hands. We will talk about this in this article.
Perhaps at first you will have questions: how to do it? what material? where to place? But believe me, you can build a pond with your own hands. Especially we are talking about a small pond in the country - mini copies of reservoirs from 0.5 to 1.5 m3.
Design of the future pond
Thanks to today's technologies, the owner can build a pond of any complexity. For example, there are three possible options For small pond: wrap a recess in the ground with a film and fill it with water; use a ready-made container that may be right at hand; fill the walls of the recess in the ground with concrete and fill with water.
Option 1
To get started, create a project for the future pond on paper. Consider the width, depth, and sills for planting. Start drawing contours on the ground. This can be done with paint or sand.
 If several tiers are planned in the pond, then mark them out and dig them out one by one
 Purchase a film for your pond with a calculation of +0.5 m on the sides on the sides of the pit bowl. More purchases will be needed: geofabric is a material that is laid on the bottom and walls of the bowl to protect the film from damage. Although you can use something from the bins: an unnecessary carpet, old linoleum.
 Geofabric for reservoirs
 You can fix the film with rubble, laying it in trenches dug along the edges of the thresholds. Fill the pond with water gradually, taking breaks. Lay out the shore line with stones and cover the bottom of the pond with small pebbles.
Option 2
First, decide on the shape of the container in which the water will be. Then dig a pit under it, retreating 30 cm from the sides. Tamp the bottom so that it is even. If you have chosen a multi-tiered plastic form, then pour water gradually, and fill the space between the form and the pit bowl with sand.
There are many other options for little pond in the country. Can be used:
- Unnecessary bath. Mark the area with the dimensions of the bathroom, adding 10 cm on the sides. Dig the pit 20 cm deeper. Under the drain hole of the bathtub, make a drain with stones for draining. Pour crushed stone with sand at the bottom of the pit and tamp it down.
- Taz. We follow the path of least resistance and use the most a budget option, because even a leaky basin can be used by covering the hole with a film. Leave the edges of the basin above the ground. Under the bottom and between the walls of the basin and the pit, lay a layer of a solution of clay and sand. Fill the bottom of the basin with soil to plant the duckweed and bury it, or whatever you choose. Such a pond will be miniature and beautiful.
 Bathroom pond
 And more tires, a barrel, a boat, or even old wardrobe! It is convenient that some of these containers can be brought into the house for the winter. Indeed, making a pond with your own hands is not difficult!
How to make a pond from the bathroom (video tutorial)
Option 3
I think many will agree that to build a pond according to the third option, some, at least basic builder skills are needed. But at the same time, do not let this scare you, because any summer resident or owner of a plot in the private sector is already a bit of a builder. And as a reward for your work, you will have almost eternal paradise in my yard.
Stages of construction of a reservoir in the country (video)
Seriously approach the choice of the location of the pond, because it will be impossible to move it. Now you can start.
If you decide to make a reservoir without thresholds, then this will greatly simplify the task. Dig a pit with slopes at 45 degrees. Tamp the hole and fill it with sand.
Place PET on the bottom or pvc film without pulling it too hard. Start pouring concrete from the walls, and then go to the bottom.
Try to do this part of the work in one day to avoid cracks at the joints.
Press in reinforced mesh. Pour the second layer of concrete as soon as the first one dries. Constantly check the level of the horizon. Pour in water when the concrete is completely cured.
 concrete pond
 Before deciding on the option of building a pond, decide which design idea will look especially organic on your site. If the house, paths and flower beds are designed in a strict style, feel free to break a clear-cut pond. If you like everything natural, then any arbitrary shape fit.
Decide on a place
How to make all the inhabitants of the pond feel comfortable? If you have a large plot of land, then carefully study the area so as not to make a mistake with the choice. There are several secrets that we will share with you.
- The roots of old trees can interfere with the work, and over time, even the walls of the reservoir. Also, falling leaves and fruits will make you clean your pond often.
- Choose a place with the expectation that the pond will be in the shade for some time so that algae and microorganisms do not develop too actively in it.
- At the same time, the sun is needed for plants along the bank. So you have to search best option considering these nuances.
- If your pond is small but deep, then make sure that it is always in sight when children play nearby. And why hide such beauty from the eyes?
- Best of all, the reservoir will look in the hollow. They almost always go down to the lake, river, sea.
 Mini pond for a summer residence
 Consider a possible ecosystem
If you want fish to live in your pond and flowers to bloom, then a few rules from this section will help you.
Plant selection
Decorative flowers in the pond do not suffer from temperature changes and can even tolerate frost (of course, except for the southern varieties of plants that will need to be hidden for the winter). But still, make sure that the water in the pond will be heated by the sun for at least five hours during the day.
The less light, the faster the mini pond in the country will turn into a small swamp. Then it will look completely unattractive, a characteristic smell and flowering will appear.
In nature, an amazing process of self-purification has been launched, and at home, the owner should take care of the cleanliness of the reservoir.
As in a natural pond, plants in a home pond are divided into the following types:
- those that grow on the shore;
- those that grow in a humid zone on the border with water;
- floating on the surface;
- shallow water and those that grow at depth.
Although the air humidity will be higher on the shore along the pond than in other places, simple garden plants they can live there. But still, consider that they do not look ridiculous or casual next to other inhabitants of the pond. Begonias, aquilegia, balsam and many other perennial plants that are used to decorate landscapes will harmoniously combine.
A zone with constant humidity, but without stagnant water is the best place for moisture-loving perennials. Among such stars are meadowsweet (meadowsweet), lysichiton, darmer, iris and many others.
 Irises also successfully get along in shallow water. They compete with susak, pontederia, tail
 A water lily can rightfully be called a deep-sea queen. She copes well with harsh winters. Water lilies are not only beautiful, but also useful. It is they who can create the shadow necessary for the pond. Among other deep-sea beauties, the lotus (however, it needs to be dug up for the winter, because in most of the territory former USSR for almost 8 months the water does not warm up, as it is necessary for the flowering of such varieties), water paint, oronium, water chestnut and many other bizarre inhabitants of the depths.
Rivals of deep-sea plants are algae, which saturate pond water with oxygen and support the vital activity of other organisms. Among them are the swamp, hornwort, etc.
Animal inhabitants
Insects, microorganisms and protozoa will start up in your pond on their own. You will have to take care of the fish yourself.
 Fish in the pond in the country
 But don't think that you can't get them. In fact, there is nothing supernatural here. Check the depth of your pond - it should be at least 90 cm deep. This is necessary for the fish, because this way they can overwinter. And in summer the water does not warm up too much. Smaller ponds are suitable only for growing ornamental plants.
By the way, in ponds with fish, a third of the surface of the water should be covered with greenery.
Let the dacha be a place where work first goes on, and then rest, we do not forget about the beauty that helps us not to lose heart and enjoy every day spent there. Therefore, today we invite you to feel like landscape designers and build a pond in the country with your own hands.
Do-it-yourself pond creation rules and material requirements
A pond in the country is not a luxury, but in some way even a necessity. As the saying goes ancient philosophy feng shui - water near the house brings financial well-being and soothes.

In addition, it allows you to maintain relative humidity in a particular area, pleases the eye and allows you to create original solution in the allotted area. Therefore, more and more often summer residents create ponds and ponds with their own hands, as in the photo.


Not everyone on the territory has a reservoir that can be put in order, surrounded by stone and made into an element of the landscape. More often, we create a pond in the country with our own hands from scratch, faced with many issues that have to be addressed during construction.
Let's start with the fact that it is necessary to determine the location of the reservoir. For this the following factors should be taken into account:
- relief of the territory;
- the location of trees and other plants with a powerful root system, as well as foliage;
- illumination of the selected area.
Study the terrain carefully. You may already have well-placed indentations, pits, or ruts that you made earlier. All of them will simplify the process of digging the pond itself.
In addition, do not forget that plants tend to grow and take up more and more space underground. Over time, the roots can spoil or even destroy the bottom of your pond, and the foliage, seasonally falling into the water, will rot and exude bad smell. Which will require you to pay more attention to the care of the pond, but not the joy of having it. Therefore, before digging, it is worth considering how far trees and bushes are located.
Most landscape designers recommend placing a pond near your home. This will make it easier for you to illuminate it without requiring separate lights and lamps for yourself. In addition, there is always enough free space near the house with natural light, because. there are no tall trees and dense vegetation nearby, blocking the light.

If you have found a place that meets the above requirements, then you can start work.
But first you need to stock up on materials and exemplary project its future artificial reservoir.
Exists several ways to create a pond with their own hands in the suburban area:
- from the finished bowl;
- PVC film, polyethylene or rubber;
- with the help of available materials.
Besides in addition to materials for the bottom device, you will need:
- shovel,
- measuring tools,
- finishing and decorative materials,
- water.
After creating a pond, you can launch fish into it. But then the depth of your artificial reservoir should be at least a meter so that the fish do not freeze in winter.

The order of work on the arrangement of the pond
If you decide to arrange the landscape, choose a place and think about the appearance of your future pond, then first decide main question- what will it be? Will you choose a ready-made bowl or cover the excavated pit with foil? It's up to you to decide. And we will help you create it according to all the rules.
We dig in the finished bowl
The prefabricated mold, cast at the factory, is an excellent and simple solution for those who want to enjoy a charming and calm view of the pond after a busy summer day.


Now in specialized stores they offer bowls of different sizes, types and contents. They may be:
- simple plastic baths;
- containers with several levels of depth;
- bowls with complex contours of the coast.
Therefore, everyone will be able to choose the shape that best suits the territory and landscape without extra costs by time.
In addition, there are other advantages of ready-made bowls:
- the plastic form is durable and not exposed to ultraviolet radiation;
- the bowl is non-toxic and easy to install;
- the average shelf life of this form is calculated in tens of years, which makes the pond durable and of high quality.
The main thing is not to damage the bowl during its installation in the future pond. The form is not subject to repair and restoration. However, if you are building to last, you can pick up a fiberglass bowl, it is famous for its strength and lasts 2-3 times longer.


So you've chosen the cup, found appropriate place, cleared it and are ready to create a pond with their own hands in the country. What's next?
First you need to transfer the contours of the bowl to the ground so that it fits exactly into the dug pit. For this you will need:
- bowl;
- pegs;
- shovel;
- rope.
To make the contour as similar as possible to the shape of a bowl, you need to install it on the ground and step back 10-20 cm from its edge. Repeating the shape of the bowl, stick the pegs into the ground and pull the rope along them.
So you will get the outlines of your future pond, under which you need to dig a foundation pit 20-30 cm more than the height of the bowl.
Don't forget to follow top level. It is very important that the surface of your pit is even, otherwise the ground around the pond will always be wet and viscous, spoiling appearance coast.
When you achieve the desired depth and shape, be sure to sprinkle everything with sand and carefully tamp it down. This sand cushion become the foundation for your pond. After that, you can set the mold and fill the free space between the side of the bowl and the ground with sand.
When your future pond becomes stable, you can start filling and decorating it.
You can overlay the shore decorative stone, plant water lilies or other water-loving plants along it. Install small figurines of swans or others created by yourself.


Making a film pond
If for some reason you do not want or cannot buy a finished bowl, then you can always make a pond with your own hands without it.


Enough to stock up:
- shovel;
- a rope or hose to outline the contour of the future pond;
- thick film.
The rest (water, decorative elements and figurines) you will need later when it is finished main stage- creation of a pit for a pond.
As with creating a pond with a finished bowl, first you need to decide on the size of the future reservoir and its contour. Then apply its borders to the ground with a rope or hose, which can simply be laid along the lined border, or can be wrapped around driven pegs.
When you are sure that you like the shape and approximate view future pond, you can start digging. Here the process will always be the same, because we just need a foundation pit.
The level of the pond should be the same. Therefore, check the evenness of the banks with building level or timber laid on both sides of the pit.

When you reach the desired depth, fill the bottom with sand, compact it well, and then lay it with geotextile so that the film does not tear over time. To do this, you can use special material sold in hardware stores, or you can do it on your own. Take, for example, old carpets, rugs, roofing material or linoleum, suitable for the area of \u200b\u200bthe dug pit.
Now that the bottom is ready, measure your future pond and calculate the size of the film you need to create it. Usually, it is enough to know the area of \u200b\u200bthe pit and its depth. After that, add an allowance of 50 cm on each side to strengthen the film along the shore. And you can go shopping.
The film must be very strong and dense in order to withstand the weight of the water that we eventually pour into the pond. Therefore, do not save on this primary material and choose it wisely - the film thickness must be at least 300 microns so as not to tear under constant pressure.

So, as soon as the film is laid out on the bottom:
- Flatten it so that there are no folds and swelling.
- Line the shore with stones so that when filling it does not gather at the bottom.
- Prepare the plants if you want the pond to be with water lilies or other living decor.
The trick of how to arrange plants and flowers in a film pond will be shared with us Maxim Maximov in my master class:
The film pond is quite economical and allows us to create it in any shape and depth, which is impossible to do with finished form cast at the factory. That is why many choose this option to create their own reservoir in the country with their own hands.


But do not forget that the deeper you want to make the pond, the more likely it is that the shore may crumble. That is why we recommend that you, after the pit is dug, strengthen its walls. Depending on their height, you can use tiles or slate. And how best to do it, he will tell us Talla Khukhrianskaia in my master class:
When all technical issues are resolved, the pit can be filled with water. To do this, just throw a hose connected to the water supply into it.
In addition to the stone, which has an important function and holds the film on the shore, you can put decorative figurines, flower pots and handicrafts that you have made for giving your own hands. Decorate the pond so that it reflects your creative nature and is pleasing to the eye.
Do not get carried away with decor, because periodically the pond needs to be cleaned so that the water does not fade in it and does not turn a beautiful country pond into a large puddle. And for this, be sure to leave a place on the shore so that you can go to the pond. Better yet, provide a stream that will drain the water.

We create a pond in the country from improvised materials
Unfortunately, it is not always possible to find the right and high-quality Construction Materials, but if the desire to create a pond with your own hands does not go anywhere - do not despair. Simple improvised materials will also come to the rescue, which any summer resident has enough of.
A pond can be made from a variety of things:
- from an old car tire;
- from old bath remaining after repair;
- from a barrel, basin or bucket.

Bathtub pond...

... from old tires ...

...and from an old barrel
If you really want to create an unusual and original pond, then the lack of capacity will not stop you.
Using old containers
As we have said, a pond can even be made from an old bathtub. After all, in fact, it is no worse than the finished form.


The process of creating such a pond will be similar to the previous ones:
- dig a pit under the form;
- fill it with sand and make a cement screed;
- insert bath;
- fill with water.
Due to its weight, the bathtub will sag heavily in the pit, which is why it is recommended to tighten its bottom with cement - to strengthen it. So that over time the pond does not go deeper.
Also, do not spare sand and earth to stabilize the tub inside the pit. For a snug fit of our handy bowl to the shores, fill in all the voids.
And do not leave the side of the bathtub open, it will not look aesthetically pleasing and will spoil the appearance of the future artificial reservoir.

And how to dig a bath and arrange it in a pond with your own hands will clearly show and tell Vitaly KIY in your video tutorial:
However, if your country cottage area not so large as to place a full-fledged pond on it, do not be discouraged - you can also make a pond with your own hands in the country from small containers, as in the photo.

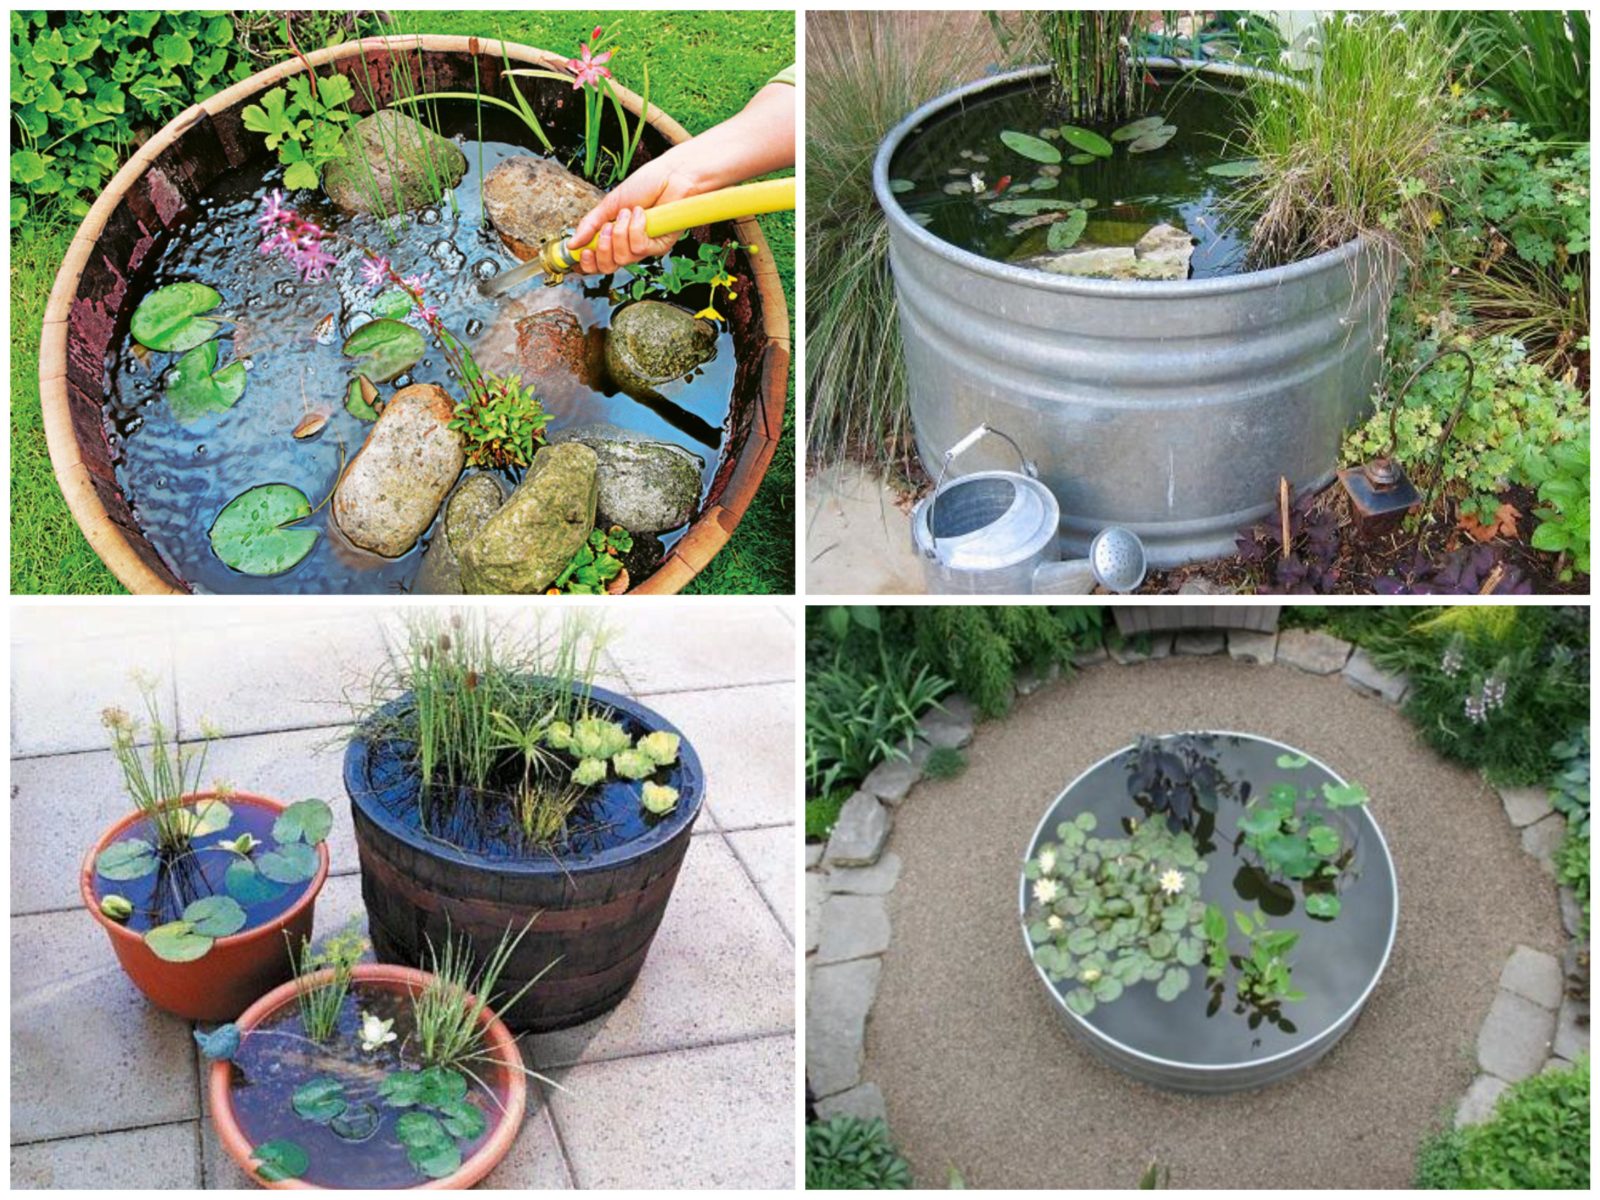
Take an old metal or wooden basin, a small barrel or tub. All of them can become an original decorative reservoir, which does not even have to be submerged below ground level.
At the little pond from an old basin there are many benefits, so do not deny yourself the joy of creating a modest artificial reservoir, if the area of \u200b\u200bthe site does not allow more:
- does not require excessive costs - everything you need for its device is at hand;
- it will take a little time to arrange it - from several minutes to a couple of hours, but not a day or more;
- it can be placed anywhere;
- if you installed the pond on the surface, and did not dig it in, then you can always rearrange it to another place by simply pouring out the water and refilling it after being carried;
- he does not require special attention to care - it is enough to change the water from time to time and wash it from the inside so that the bottom is clean.
Ponds from a basin or a small barrel can be installed on a reinforced, flat surface, filled with water and decorated with decorative figurines or flowers.


But if your pelvis has long lost its decent appearance and there is no way to restore its former gloss, then simply dig a small pit to fit its size, install it there according to the principle of an old bath and overlay it with pebbles along the shore.

As you can see, old containers allow us to fantasize and create incredible ponds with our own hands in a country house of any size. And it helps us realize our creative potential.
Pond to the cottage from the tire
However, if repairs are not planned in the apartment, and the old basins have long been worn out or turned into flower beds, do not despair, you still have a chance to get your own pond.
And for this you will need the most indispensable and affordable material - car tire. Tires in modern dacha society have long become a universal substitute for building materials.

And no wonder - the strength and shape of the tire allows you to make anything out of it, including a pond. And the size of the future reservoir will depend only on the size of the tire you choose.
First you need to prepare your future container - cut it off along the top edge so that only the sides remain. To do this, you will need a jigsaw or a sharp knife (if you chose a tire from a car).
After you can go to the pond itself.
Installation steps:
- Outline the tire and dig a pit along the height of the prepared bowl.
- Fill the pit with sand and tamp the bottom.
- Insert the cover inside.
- Cover the tire and the bottom of the future pond with a thick film.
- Fill the edges of the film with sand, and then decorate with turf, stone or embankment so that the film is well fixed.
- Fill the pond with water and decorate with pre-designed decor.
Your tire pond is ready. And it will not yield in beauty to either ready-made bowls or large film ponds located in large spaces.

In addition, it is easier to care for and keep clean, and it does not require a lot of water or effort to arrange it.

As you can see, if you have long wanted to feel like a landscape designer in order to turn your dacha into a beautiful vacation spot where you can not only work, but also enjoy nature away from the noisy city, you can always create a pond with your own hands at no special cost.
If you like our ideas, check out the other articles in the series!