How to make beautiful and useful shelves from pvc pipes with your own hands. Making furniture from pvc pipes, how to do it yourself Shelves from pipes in a loft style
After repairs or construction works there is a lot of material left. Fans of handmade items will no doubt find their use. After repair work in the bathroom, you can easily make furniture from pvc pipes with your own hands, using the leftover materials for this.
Depending on the type of furniture that is planned to be made, the set of materials and tools may vary. But basically, you will need the following tools to work:
- perforator;
- screwdriver;
- hacksaw;
- scissors or knife.
Materials needed for work:
- pipe cutting;
- glue;
- connecting elements of various shapes;
- plugs.
To make the furniture look more beautiful, paint is useful. Beds, tables, shelving can be painted in the color you like. For beds in the children's room, a delicate pink, blue, bright orange, yellow shade is selected.

PVC materials

Soldering iron for welding plastic pipes

Variety of types of plastic pipes

Types of plastic pipe connections

Stages of the plastic pipe welding process
Manufacturing and assembly process
Below are the diagrams, drawings necessary for the manufacture of furniture from pipes. With their help, you can make armchairs, chairs, beds, racks, tables, a huge number of decorative elements. Products are interesting, durable and safe.
Armchair
The original way to use plastic pipes is to make a chair out of them. There are many options for its manufacture. It all depends on the desire, capabilities and imagination of the master. Plastic pipelines can become a material for the manufacture of a chair. You can make it with pvc pipes, a knife and glue.
To get an unusual chair, you need to do the following:
- First, cut pieces of different lengths. The main thing is that the longest segments should be the same length. They will act as supports;
- long will be needed for the back, armrests;
- then the segments are glued together so that the surface of the armrests and the backrest is on the same level. To the bottom, the length of the segments changes.
Thus, it turns out an interesting chair that will decorate any room in the house. To make it even more comfortable, pillows are placed on it or sheathed with foam rubber. In such an armchair it is pleasant to spend time, read a book, watch TV.

Details under the letter "A" determine the width and depth of the seat. The length of the pipes "B" determines the height of the seat from the ground. Details under the number "C" are the height of the armrests, and under the number "D" are the height of the backrest.


The above method makes a table, a bed. Different segments are glued together - it turns out the base of the bed. On top of it you need to put a comfortable mattress, pillows, blanket. It's quite appropriate place for sleep and relaxation.
In addition, cribs are made from this material. To do this, you need to study the diagrams and drawings. Then prepare right size segments. They are connected with fittings. If you fasten the parts together with glue, they will be very strong and durable. Without the use of glue, the structure will turn out to be collapsible and can be removed at any time. The bed for the kid will be unusual, reliable and strong. If there is more than one child in the family, several beds can be made.
Another option bed for two children from pvc pipes - bunk bed from polyvinyl chloride, photo. It is not difficult to make it, you only need a drawing, a diagram. Following the instructions, you can create variety of options beds: single or double, bunk beds.


Table
It is possible to make such furniture from polypropylene pipes with your own hands, like a table. Its frame will be made of pipes, and the countertop will be made of any other material. At the same time, it must be remembered that PVC pipes are not suitable for heavy loads. The lighter the table top, the better.
The size of the countertop in this case will be equal to 91.5 x 203 cm. the following materials, tools:
- door leaf as a tabletop;
- fasteners for connecting parts;
- drill;
- saw.
You will also need segments of the size:
- 30 cm - 10 pcs;
- 7.5 cm - 5 pcs;
- 50 cm - 4 pcs;
- 75 cm - 4 pcs.
To assemble the frame, prepare:
- t-shaped fittings - 4 pcs;
- plugs for pipes, fittings - 10 pcs;
- 4-way fitting - 4 pcs;
- cross fitting - 2 pcs.
According to the scheme, first assemble the side elements. Then proceed to the back of the table. Pay attention to the stability of the structure. All details must be the same.
The last step is to collect all the elements in one design. Inspect the product for irregularities, sharp parts. Carefully process everything, glue the connections. A table is made in such a simple way.

Tool

materials

Preparing parts of the right size


Connecting Fragments


Rack
Armchairs, beds, tables - not the whole list of products that can be made from this material. One more useful item interior - shelving. Design parameters can be very different. It all depends on the size of the room where it will be installed, and the desire of the master.
First of all, it is recommended to make a drawing, a diagram of the future product. Next, prepare for them required amount certain size parts. Connect everything together. Plywood or other material can act as the base of the shelves. The only thing to keep in mind is that the materials are not suitable for heavy loads.
Such racks are used for flowers, toys in the children's room. Shelving can be installed in the garage. There products will be a great place to store tools and other things. Can be placed on shelves garden tools: pots, tools. PVC products look unusual, neat, do not require additional decoration. Plastic shelves, racks do not harm the health of others, they are durable and environmentally friendly.


The nuances of working with the material
Models from water pipes are unusual, original. They decorate the room garden plot. Do-it-yourself plastic furniture will bring zest to the interior and attract the attention of guests.
Furniture is made from plastic pipes. Two types of material are used in production: polypropylene (PP) and polyvinyl chloride (PVC). Each of them has its own characteristics and is suitable for the production of different products. Polyvinyl chloride is a cheaper material. It is more often used for sewer pipes. Its advantages include:
- strength and durability;
- ease of installation;
- low cost.
The disadvantage of PVC is that when exposed to high temperatures, the pipes begin to deform. Unlike them, products made of polypropylene are not subject to shape change during high temperature water. They are able to withstand liquid heating up to 60 degrees, and if the pipe is reinforced, even more.
Both materials are equally suitable for making furniture. In addition, there are a huge variety of items that are made from scraps. These are shelves, coasters, a frame for a mirror and more. Furniture is easy to assemble. The design consists of pipes and fittings, the elements are also glued together. Even a beginner can make pieces of furniture from pvc pipes with his own hands.


How to bend a pipe
Products made from this material look unusual. They will look even more interesting if they consist of curved parts. For example, a table with curved legs. In addition, pipes are made various elements decor, which come in different shapes. In such cases, bending the pipe is simply necessary.
For this you will need:
- funnel;
- sand;
- scotch;
- plate;
- metal container;
- gloves;
- saw (hacksaw);
- knife (scissors);
- sandpaper;
- a device for bending pipes (it can be different, mostly improvised materials are used).
The process looks like this:
- cut a piece of the required length;
- seal one end with tape;
- using a funnel, pour in as much sand as will go in;
- heat the measured amount of sand in a metal container;
- put on protective gloves for safety, carefully pour sand into the pipe through a funnel;
- seal the other end with adhesive tape, then the sand will not spill out during the bending process;
- leave for a while, it will warm up from the inside;
- when it warms up, start bending;
- give the pipe the desired shape;
- at the end of the work, tear off the adhesive tape, pour out the sand;
- when the pipe cools down, it will be the required shape.

One end of the pipe is sealed with tape

Using a funnel, pour sand into the pipe

Having measured the required amount of sand, pour it into a metal bowl and warm it up well

Using the same funnel, pour the prepared sand back into the pipe.

Cover the other end of the pipe with tape. This is necessary so that the sand does not spill out during work.

Leave the pipe like this for a couple of minutes. During this time, it will warm up from the inside. The material will become soft and pliable.

While the sand is still hot, you can shape the cut piece of pipe into the desired curve or shape. After that, remove the tape and pour the sand back.
decoration
One of the options for decorating furniture made of pipes is to use different colors of the material. Table with legs of blue color will become a bright element in the room. Products are different colors: white, black, blue, blue, yellow. Connecting elements also come in different shades. Thus, the pipes will be one color, and the fasteners will be another. Combinations of white with blue or black with red look beautiful.
If we are talking about armchairs, chairs, they are decorated with decorative pillows. The foam lining on the back and seat is sheathed with a beautiful bright fabric. Decorative pillows decorate the product, make it cozy, comfortable, original. They come with embroidery, buttons or tassels. The color range of pillows is varied. When choosing it, it is necessary to take into account overall design the entire room.
Children's furniture should be interesting, colorful. It is recommended to cover the chair, high chair with a durable fabric with a bright pattern. It could be a cartoon character toy cars, dolls, stars and much more. Pay Special attention on furniture made of pvc pipes for children, it must be safe, without sharp elements. Otherwise, babies may get hurt.
It is not difficult to make furniture from pvc pipes. It will become a highlight in the room, will attract the attention of guests. plastic pipes are inexpensive, so you can save a lot cash, because New furniture it's expensive.
With PVC pipes. But greenhouses and sheds are far from all that can be made from PVC and aluminum pipes with different diameter. Furniture, home decor items, organizers, shelving, even weapons are beautiful bows. different forms. People's fantasy is constantly being embodied in new PVC forms, and we have compiled a selection of the most interesting DIY projects for you.
Let's start with homemade furniture from aluminum and PVC pipes connected by fittings. There are children's furniture, and options for adults, cute designs that will fit into any interior, and racks with many shelves.
DIY pipe furniture
1. Low table made of pipes and wood
Table made of pipes and woodHere is a detailed video tutorial on how to make it.
2. Dining table
 Dinner table
This table of three boards and metal pipes can be used as lunch. A note of industrial style in the design of the room. you can see the manufacturing technology.
3. Large rack made of pipes and wood
 Storage rack
 Shelving for a spacious pantry or garage - perfect solution to store all sorts of things. And durable and looks great. Read the assembly guide.
4. Shelving for the room
 hall rack
 TV, sound system, souvenirs and books - on this makeshift shelving everything will fit. Let's see how to make it.
5. Another rack
 Shelving made of metal and wood
 The shape of this rack is somewhat unusual, as if it was planned for specific items. Looks cool with paintings, figurines and other content. there is a list of building materials and a story about the manufacture.
6. Coffee table with glass top
 Coffee table
The legs of this table are made of bent and painted PVC pipes. As for the countertop, you don't have to make it out of glass, but it certainly looks cooler that way. you will find the manufacturing manual.
7. Aluminum tube bed
 Bed with aluminum tube frame
 Large bed frame with canopy made of aluminum pipes and fittings. Manufacturing guide.
8. A simpler bed made of pipes and wood
 Bed made of pipes and wood
 This bed looks simpler, and it's easier to make it. You will need pipes, fittings, wooden "ribs" and a fabrication manual.
9. Canopy over the crib
 Canopy over the bed
 Anyone can make this simple PVC pipe canopy. It turns out a children's bed with a canopy of tulle.
10. Simple towel rack
 Towel dryer
 A few PVC pipes and fittings, and the towel dryer is ready.
11. Cute chairs for kids
 Chairs for children
 These cute chairs are quite possible to make yourself. Frame made of PVC pipes and seat woven from threads. How to braid chairs, you can see.
12. Simple chairs for hiking
 Outdoor chairs
 Small comfortable chairs patio or hiking in nature. Bright furniture will surely appeal to children. How to make such chairs, see.
13. Place to play
 Place for games
 For kids, you can organize a place to play with a PVC frame.
14. Bar counter in the style of a beach holiday
 bar counter
 PVC pipes painted to look like bamboo, various attributes like exotic masks and a thatched roof - this bar counter will be a great reminder of exotic hot countries and beach holidays. Read detailed instructions for manufacturing.
15. Simple and convenient drawing tablet
 PVC tablet
 This lightweight drawing tablet is great for homework. You do not need to attach paper to it - the album is placed on a special stand along the bottom edge of the tablet. How to make it, read.
Organizers and shelves
16. Desk Organizer
 Simple Desk Organizer
 20. Creative wine shelf
 wine stand
 If you need a stand for a maximum of four or five bottles, you can make such a PVC creative. And it's easy to do and looks great.
21. Laptop stand
 Notebook Stand
 Simple and comfortable stand for working with a laptop.
Decorative interior elements and gifts
22. Cornice for curtains
 Curtain rod
 Nice cornice made of painted PVC pipes and decorative elements. More about manufacturing.
23. Dresser decoration
 dresser decoration
 PVC pipes, cut into thin rings, can serve as decoration for furniture.
24. Creative mirror frame
 mirror frame
 And again PVC pipes, cut into thin rings. Cut, compose right order, glue together and admire the new frame.
25. Piggy bank
 Piggy bank
 This funny pig with a PVC pipe base can be given as a gift or kept at home as a souvenir. Here
From gadgets.masterkit.ru we write about amazing inventions, useful gadgets, interesting ideas, which may change the world, as well as publishing instructions on how to do something unusual and useful. Today we invite readers of our blog to update their interior.
“Could you play the nocturne on the flute of the drainpipes?” (with)
You can hold books, or shoes!
A water pipe shelf is a stylish project that can be done by anyone with their hands growing out of the right place. But by the way, the project is so simple that even if it comes from the wrong one, it will still work out. You just need to want to add something new to your interior.
The shelf is quick and easy to install, and its rugged, chic scuffed look makes this a useful piece of furniture. design solution for any room.
All pipes are threaded at the ends, which makes it possible to change the configuration of the shelf when the previous one is already tired.
Step 1. Materials
 Flanges and screws

Pipes and corner

Drill and drills
materials
Flanges for installing pipes on the wall - 2 pcs.
Screws 12×2″ - 8 pcs.
Dowels - 8 pcs.
Water pipes threaded (12×1″) - 8 pcs.
Threaded water pipes (5×1″) - 2 pcs.
Corners of the "pipe-pipe" type (diameter 1 ″) - 9 pcs.
Tools
Drill driver
Drill
Pencil
Yardstick
Step 2 Mounting the flange on the wall
 We try on the flange and outline the holes
 Drilling holes
 We fix the flange with screws
Search for crates
If you have concrete or brick walls without internal lining, then we drill the holes with a 6 mm drill bit, and use the appropriate dowels for the screws.
If your room is lined from the inside gypsum boards, then for attaching the shelf it is better to choose the places where it passes wooden crate. You can find it behind the wallpaper with a magnet, because the plates are attached to the crate with iron pins or nails.
Flange mounting
After the location of the shelf is planned, we determine where the first flange will be located and mark with a pencil the locations of the holes for the screws.
We drill pilot holes with a drill, the diameter of which should be slightly smaller than the diameter of the screw (in the case of plasterboard walls).
Screw the flange to the wall.
Step 3. Attaching the Pipe
 Screwing the 5″ pipe into the flange
 We screw the corner onto the pipe
 We attach a piece of pipe 12 "
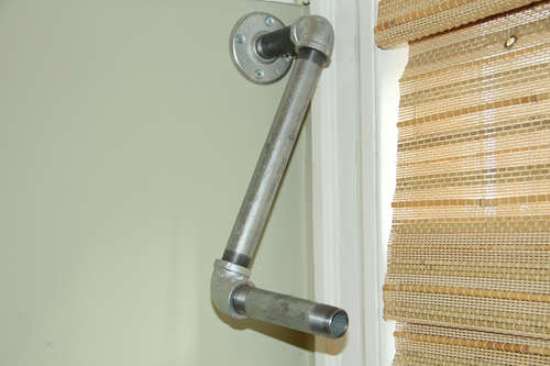 Using a piece of 5″ pipe as a lever
 We mount the second corner

Let's dwell on these shelf sizes for now.
Let's start installing the pipes. We screw a 5-inch pipe to the flange. We screw a corner onto it, and attach a 12-inch piece to it.
Trick: To tighten the joint, use the 5" pipe as leverage.
Step 4 Mounting the Second Flange
 We assemble this node before joining the rest of the structure
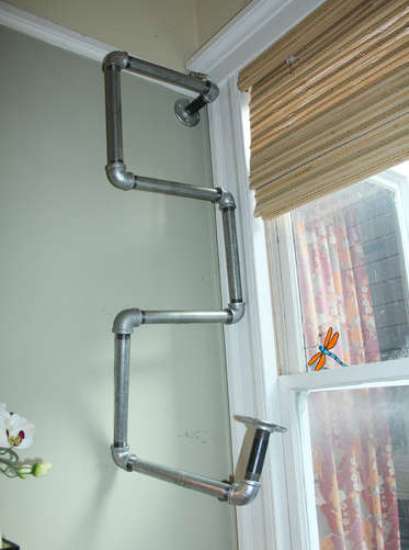
We screw the last corner with a flange

Drilling holes for the second flange

We fix the flange to the wall, and the design is ready
Screw the second 5" pipe into the second flange and attach the elbow to the other end of the 5" pipe before attaching to the rest of the structure.
We determine the place where the flange is attached to the wall and mark the holes for the screws. We drill holes and screw the flange.
Step 5. Bookshelf
 The bookshelf looks like it was here
We put our books on pipes vertically or lay them flat. In the latter case, it is better to balance the bottom books, this will guarantee stability for the entire stack.
Step 6 Shoe Rack
 The shoe rack also fits perfectly into the interior.
Any girl will agree how amazing this shoe rack looks! Many people just like to look at their shoes, but on ordinary wooden shelf shoes look awkward and take up a lot of space. Now that you have our amazing kickstand, your favorite shoes can always be pleasing to the eye.
But the story doesn't end there.
The craftsmen continued the project and screwed on the light bulbs - and, indeed, the wires can be run inside the pipe. Agree, stylish!
 Paradoxical as it may seem, but harmony is evident!
By the way, a competition is announced for the method of attaching the base to such a structure. The most graceful engineering solution we will publish in one of our issues. Write to us at email address [email protected]
Also in the new edition.:
Our gadgets: expense calculator, penguin voice note, video glasses.
Text messaging by hand using ... a pen (concept) - the possibilities of communication are expanding dramatically!
But this is already history! How much did the first mobile phone weigh and what did it look like?
Subscribe to the mini-magazine by email, get updates from our blog on Lifehacker by RSS.
Share the article with your friends through the social network buttons, it's so convenient!
In this publication, the idea of \u200b\u200bmaking a table that differs in its design from standard products is from metal water pipes.

In this video, the master showed how he made the table. I used ordinary steel pipes.
Let's start in order. 4 adapters. Tees. Flanges. I had to buy a vice to fix the pipe in them and cut the thread. In order not to make holes in the table, clamps were used. Before starting cutting, I smeared the beginning of the pipe with a small piece of lard to make it easier to carve. Unfortunately, the plumbing wrench failed to make a thread. So I had to buy a ratchet. It is much easier to wind the thread with it than with a plumbing tool. The end result is a good cut.
I had to cut off part of the pipe. Before that, I dripped a little liquid soap.

This makes cutting much easier.
In the process of work, an emergency happened - the vise cracked. I wanted to fix the pipe, I started to twist ... Even one day
didn't work, had to be replaced under warranty. I had to go to a friend and have him do the carving.
As a countertop, I decided to use two wooden shields made of pine. Wiped them from dust. I glued the two parts together with glue. In order for the glue to take better, put all kinds of loads on it. The next day he removed the goods. I was pleasantly surprised, the glue perfectly connected the two surfaces. It was necessary to measure the distance from the legs of the table. Fixed the legs on the screws. Used soap to tighten screws. Not bad idea! The master also did
Interesting fact:
The sconce style originated in the 17th century as a replacement for chandeliers in small spaces and as a means of highlighting other decorative objects.
Necessary materials
- Construction drawing (provided below, you can also use your own)
- Wire (plug on one end, lamp socket on the other)
- Threaded water pipes
- Sandpaper
- Valves
- Wrench
- Manometer
- Corner mounts
- brush
- Decorative paints(dark grey, red) for metal


Manufacturing
According to the drawing, pipes should be taken from 250 to 760 mm. The length of the entire structure is 1 m. And such pipes are fixed with the help of corner fasteners. This design uses two valves. The pressure gauge is connected next to the lamp. All you need is to assemble a diagram according to this drawing, or come up with your own, the flight of your imagination is not limited.


1. Before starting work, clean the pipes sandpaper for a smoother surface.
2. Then apply a layer of dark gray paint. You can paint unevenly and carelessly. Thus, we will achieve the effect of antiquity. If your hands are used to uniform coloring, then just make small strokes (6-7 cm each), or ask your child to color the pipes. Also, don't forget to paint the screws and corner mounts.


3. After a layer of dark gray paint. We apply red paint in the area of \u200b\u200bthe valves, and a little through the pipes. This will give your shelf a rusty look. Again, we make careless strokes.


4. We pass the wire through the pipes so that it has an outlet to the outlet. In this drawing, the wire was passed from the lowest horizontal pipe (diameter 600 mm), to the end of the left vertical pipe (diameter 760 mm).


5. Then we insert the pressure gauge and the lamp holder, and the bulb itself into the lamp holder. This is necessary for illumination dark time days. This lamp can be made above the bed, that is, in this drawing, the pipe for the pressure gauge was larger (not 100 mm, but 400-500), and there would be a lamp in its place. Under this lamp was the bed. This design would allow reading at night, interesting detective stories. (the design of the described system is given below).

