DIY Garden decor - do it yourself bee hive. Beehive and bees as garden decoration Common types of bee hives
Beekeeping is a painstaking but very interesting occupation. The hive is an indispensable attribute of the apiary, but usually it is just a house for bees and about no decorative effect we are not talking. However, there are hives that will definitely decorate a house adjoining or country cottage area, while performing its main function.
This is how a beehive usually looks - just an unsightly wooden box with honeycomb frames inside. The bees, in fact, are happy, but the beekeeper does not need more, especially since you can build and repair such a hive yourself.

Just a thatched roof and a DIY bee from plastic bottle... The decor is minimal, and the small beehive has already changed and began to attract the attention of guests. Illustrative example realization of the imagination of the owner of the apiary, who decided to put in a little more effort.
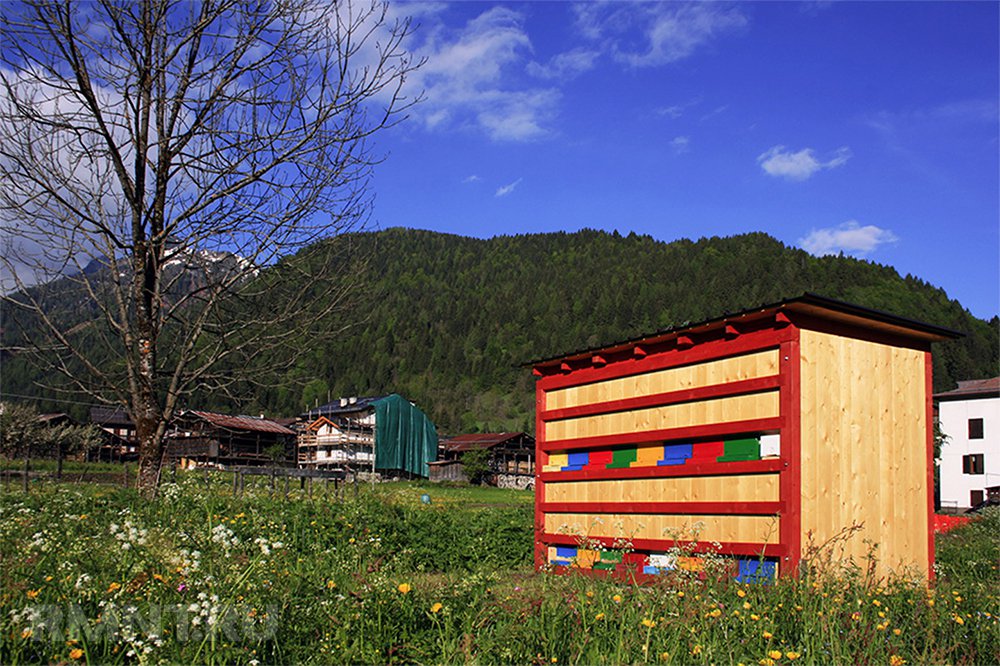

This colorful beehive was invented and assembled by designer Massimiliano del Olivo. The structure was named Bienenhaus ("House for bees" in German) and is now widely used in the Alps, where bees collect honey in mountain meadows. The area of each such hive is 6.5 square meters.

Generally an ordinary beehive, but neat, colored in an attractive turquoise, and even with a real roof. And the bees are warm and comfortable, and the site has become more attractive. The roof must be removable, because the beekeeper will have to look in and watch quite often how his pets are doing there, how much honey has already been collected.

Bright wooden bee houses look especially attractive against the background green lawn... One hive even received carved balconies and windows. In such an apiary, you can sit for hours, observing the activities of the tireless toilers-melliferous plants.

Of course, the hives are always made of wood, a natural material that provides maximum comfort to the bees. If you are fond of wood carving, nothing will stop you from creating such attractive and functional masterpieces - carved beehives.

It is advisable to hang such small houses for bees on fruit trees and near lush flower beds to attract insects and increase yields, such as apples, which will be actively pollinated. An unusual option, but experts insist that there are less and less bees on the planet, people should think about their comfort and help find shelter for the night.

Beehive mill. The option is not new, but always very attractive. Homemade mini mills are often used as decorative elements in household plots... In this case, they simply decided to combine beauty with a practical function by creating a small apiary.

A tall house for bees and other insects that collect and carry pollen. Such houses are assembled from scrap materials, the main thing is that there are enough holes where wild bees can settle. Of course, such structures should be installed away from recreation areas so that insects do not bother people.

Do you think this is just an abstract installation from natural materials suspended on wooden wall? Meanwhile, it is a very unusual hive designed by Urban Hedgerow and handcrafted.

Beehive Temple. Someone will say that this is too much, why spend so much effort and wood on creating a decor that the bees themselves will definitely not appreciate. But how beautiful and unusual! It is also worth noting the skill of the creator of this unusual hive.

And finally, every beekeeper's dream. It is a modern beehive equipped with a system that allows you to collect honey without pulling out the frames and without exerting any effort. We are sure that it will be very pleasant to watch how day after day the jars are filled with fragrant, fresh and very healthy honey.
After you've decided to become a beekeeper and bought a couple of families, it's time for new hives to be needed. Families grow and swarm and need to be moved into new houses. You can, of course, buy ready-made ones, but it is dangerous to buy used ones. It is not known what diseases can be bought with them, but they bite at new prices. There remains one thing - to make bee hives with your own hands according to the drawings. If you know all the manufacturing rules, then it is not difficult at all.
In this article, we will just talk about making beehives with our own hands, correct sizes and drawings for them. We will find out what a beehive lounger is and how to make it.
In ancient times, beekeepers mined honey in the hollows of trees, then they began to hollow out logs for bees. With the development of beekeeping, they began to make do-it-yourself evidence for bees. different designs, and the material for them is different.
Wood
The classic version for making bee hives. In such houses, bees feel in natural conditions, close to natural ones. The best kind of wood for making will be cedar, although linden and aspen are also possible. These hives breathe better, smell good and are dry.
Aspen and linden hives require additional insulation in winter. And these are expensive materials.
Some beekeepers make their own beehives from cheaper materials. These are pine, spruce, fir. But in such evidence, the bees are not comfortable. They collect moisture and resins, especially in new ones.... Coniferous smell. There is only one good thing in them, they are warm and require minimal insulation for the winter.
Plywood
Durable and environmentally friendly material. A house made of it must be covered with paints and insulated from the inside with expanded polystyrene, then it will be dry and warm in it. But plywood is afraid of moisture and requires constant and proper care.
Expanded polystyrene
A modern material used by beekeepers to make beehives. It has a low cost and does not require additional insulation in winter time.
The disadvantage of this material is fragility and fragility. If the selected quality is of poor quality, the honey may deteriorate.
Styrofoam
The most economical option. It is possible to use packaging from household appliances... The advantage of this material is its lightness even with filled frames. Excellent thermal insulation. The downside of this material is its fragility and constant color, so that it does not crumble from exposure to sunlight.
Polyurethane
Excellent thermal insulation properties... Does not rot, does not decompose. Fungus and bacteria do not develop in it. It does not allow moisture to pass through and it does not accumulate inside. Bees, mice and birds do not like to gnaw him.
A small drawback is its flammability and ventilation is required, because it does not allow air to pass through.
Having carefully studied the characteristics of the material, you can start building the hive. Consider the options for the construction of wooden and foam houses.
Types and designs of hives
Bee houses are divided by design:
- collapsible;
- non-separable.
The latter, due to the difficulty in leaving, almost no one uses... All beekeepers use frame hives, where the number of frames can vary. A popular do-it-yourself hive is a 24-frame sunbed. However, there are options for 16 and 20 frames.

In turn, frame hives are divided into:
- horizontal;
- vertical.
The horizontal or "lounger" consists of one body. Expansion goes sideways. It is easy to work with such evidence, to change the number of frames, but they have a drawback - they are cumbersome and heavy.
Vertical ones consist of several buildings. This form is lightweight and mobile.
Both forms use multiple sections. They are separated by partitions, which allows the volume to be changed in any direction.
Popular designs
Dadanovsky
Used in almost all apiaries. Made of wood (cedar, spruce, pine, linden, aspen). Differs in simplicity and spaciousness. Consists of 12 frames and can be added, as the family grows, shops or buildings. In winter, bees are kept in the nesting compartment. With the onset of warmth and the increase in the family, they are supervised with buildings.

Alpine
Multi-hive hive. The creator is the French beekeeper Roger Delon. Made according to the hollow principle. That is, created and accounted for natural conditions residence of bees.
Compact design is convenient for confined spaces... It has no partitions or ventilation holes. Air flows naturally through the taphole.

Ruta
This DIY bee house intended for keeping bees in southern regions, because due to the constant rearrangements of the buildings, hypothermia of the house occurs. Consists of 6 buildings with 10 frames.

Cassette
In connection with the increase in the incidence of bees among beekeepers, cassette hives have become popular. Such evidence have thin partitions, therefore, bees create a microclimate on their own.
Made only of wood and impregnated with wax, so the bees in them are less susceptible to disease.

Ukrainian lounger
This design of the beehive in size most of all suitable for beginners... They are easy to maintain. Easy to build, which will allow you to master the skills of beekeeping. Usually these hives are 20 frames. The sides of the house are insulated, so the bees hibernate in them.

There are many designs of evidence, but let us dwell in more detail on the classic, lounger with different amounts frames and multi-case folding. In this case, there are beehives sun beds for 16, 20 and 24 frames.
How to build a classic beehive step by step
Due to the ease of manufacture, classic version the Dadanovsky hive is considered.
For making beehives, it is better to use natural materials.
The classic beehive construction consists of:
- One or more buildings.
- One or two shops.
- Roof cover.
- The bottom of the hive.
- Ceiling.
- Roofs.
- Framework.
- Feeders.
- Plug-in boards.

Bee house instruction with drawings
Now let's talk about how to make a do-it-yourself hive step by step. The sizes of the bee hive can be very different, but we will focus on one option. To do this, you will need:

A 15mm thick board is required for the lid and sub-roof. Collect and cover with tin to prevent water ingress. Paint. Make ventilation holes 1.4 cm in diameter.

- back and front shield (cm): width 53, height 32, thickness 4.
- side shield (cm): width 48, height 32, thickness 4.
- inner (cm): width 45, height 45, thickness 32.
In order to place the frames in the body, you need to make folds.
Dimensions 1.1 * 2 cm.
If there is a multi-body bee hive, then the dimensions will be different: 1 * 1.4 cm.


The frame in the nest is 43.5 * 30 cm;
Shop frame - 43.5 * 14.5 cm;
The distance from the walls of the case to the side strips is 0.07 cm;
Space under the frame - 2.5 cm;
Frame side width - 3.7 cm.
Beehive lounger for 16, 20 and 24 frames: drawings and dimensions
 Beehive lounger for 16, 20 and 24 frames
 What tools and material will you need?
- Wood, plywood, polystyrene.
- Rulers, or tape measures.
- Squares;
- Hacksaws.
- Hammers.
- Drill, drill, self-tapping screws.
- Chisels.
- Glue.
- Carrying handles.
- Galvanized sheet metal for the roof.
- Frames in the amount of 24 pieces.
Hive dimensions:
- frames 30 * 43.5 cm;
- body (cm): length 87, width 56.5, height 63.5;
- roof length (cm): outside 93.5, inside 81;
- bottom thickness 3.5 cm;
- lower notch - 1.2 * 14 cm;
- the upper notch is 2.5 cm in diameter.
Instructions for making a beehive for 24 frames
- Cut out the details from the prepared material according to the drawings.
Exactly observe the dimensions so that the design of the evidence for the bees with your own hands is even and without large gaps.
 Instructions for making a beehive lounger
 - Collect the bottom. Connect the two battens and the deck with soil and nails.
- Connect the side walls and attach to the bottom. Make a ledge beyond the 2 cm bars.
- Make grooves for frames on the front and rear walls. Size 1.8 * 1.1 cm.
- Cut the entrances from below.
- Attach a latch and an arrival board.
- Make a roof. Fasten the boards with nails into a thorn.
- Attach the opening hinges to the roof.
- Cover the roof with tin.
- Make a ventilation hole 20 * 0.03 cm on the rear side of the roof.
- On the front wall we drill a hole with a diameter of 2.5 cm.
- Cover them with a net.
- Strong legs to the bottom.
- Prolify and paint.
- Attach handles to make it easy to carry.
It should be painted white. This color is better remembered by bees. White color repels the sun's rays.
How to make evidence lounger for 20 and 16 frames
It is made according to the same principle with a difference in size.


Multi-hull foldless hive: dimensions and drawings.

Over the years, this hive has not lost its popularity in use. Its user-friendly design allows it to be used anywhere. And it is simple to manufacture.
In order to build a hive correctly, you need to know what the structure consists of:
- Lid.
- Roof or ceiling.
- The shops.
- Housings.
- Stand.
- Framework.
- Separating lattice.

The case looks like a box. Its size from the inside (cm): 37.5 wide; length 45; height 24.
It includes 10 - 12 frames measuring 43.5 * 23 cm.
Such sizes are more suitable for regions with a warm climate, and for the Russian climate, the width is made half a centimeter larger.
Reducing the size leads to inconvenience in working with frames. They cannot be reached when they are heavily propolised or swollen with moisture. Therefore, some increase the width of the body to 38 cm.
For the manufacture of cases, you need to take carefully dried boards. They should dry out within a year. When cutting out parts, the boards should be with a small margin (3-5 mm). The stock is left for further fitting of parts. For trimming, it is recommended to leave a gap of 1 cm.
Make folds on the front and back parts of the case in order to put frames on them. Sizes 1.1 and 1.7 cm. This depth allows the upper body to be placed freely.
Handles or small recesses need to be attached to the side walls.
A 25 mm hole is drilled from the end of the hive under the roof for ventilation of the house.
Boxes with frames are tightly connected to each other. In this case, folds are not used. Such constructive solution more convenient to operate and easier to build.
In housings with the use of folds during transportation or movement, bees are most often hammered into the lower part and hide in the folded grooves, and subsequently die. Most often, the uterus dies in them and beekeepers abandoned such hives in favor of a foldless design.
For the manufacture of the roof, a plate with a thickness of 2 cm is taken. A shield is knocked off from it, which is covered with galvanized sheet.
It is better to make the bottom removable, bilateral.
- three bars 57 * 6.5 * 3.5 cm - side;
- one 44.5 * 6.5 * 3. cm installed at the back.
Make grooves in them. Width 3.5 and depth 1 cm. Assemble the U-shaped structure. The grooves are intended for the installation of the floor plate.

It is necessary to provide for a protrusion of the front of 50 mm. It serves as an arrival board.
The roof cover (ceiling) is a solid flap, assembled from dies, measuring 52 * 44 cm. Around it is a rim made of slats. They are 3.5 cm wide and 1.5 cm thick. A hole is made in the center. It is needed for ventilation between the buildings or a feeder is placed on it.
The liner is placed on the body with the smooth side without a rim, which allows the bees to move freely. It can also serve as a dividing grid, in this case a mesh is stuffed onto the hole.
Stand. It is made of bars according to the size of the bottom. In the front part, a wide plate is nailed at an angle of 45 °. This will be the arrival board.

A 2.5 * 9 cm recess is cut out in the side bars. They are designed for convenience when you need to raise the hive or fix it when moving.
To increase the life of the blocks, saturate them with liquid bitumen. Dissolve it with gasoline. This procedure will make the wood waterproof.
Dimensions of the dividing grid. Designed to isolate the temporary isolation of the uterus. For separating the brood body from the honey ones.
The size of the grille must match the size of the inner case. It is placed on the bars. Made from wire mesh.
Frame sizes. Body and shop frames can also be made by hand. They must match the drawings.

Drawings of multi-hive hives.


Frames in a beehive: sizes and descriptions of how to do it yourself
Frames are an important part of hives and most of the work is done with them. From constant use, they become unusable and need to be added. Therefore, the beekeeper should always have a large supply. To save money, it is better to make them yourself than to constantly purchase.

To make the frames, we will use the following tools:
- hammer;
- pliers;
- with an awl;
- boot nails;
- with a skein of thin wire.


Use natural materials for manufacturing. It is better if these are boards dried during the year. To make a frame, you should know what parts it consists of:
Top bar.
Grooved or uniform.
Bottom bar.
Plain, grooved or through.
Side bars.
They have holes for pulling the wire under the foundation.
The dimensions of the frames depend on the design of your hive. Standard sizes are considered:
- the width of the top and side boards is 2.5 cm;
- the height of the upper block is 2 cm;
- bottom width 1.5 - 2.5 cm;
- height 1 cm;
- external dimensions vary from the design of the hive, but usually 43.5 * 30 cm.
After we have chosen the material and decided on the dimensions, we proceed to the direct manufacture of the frame.
- Cut out details from dry boards according to the dimensions of the drawing.
- Connect all the parts using shoe nails.
- Drill 4 holes and two double holes on the side strips for attaching the wire. The distance between the holes must be equal.
- Stretch the wire. Start at the top hole and pull it out with a snake. Make sure that the wire does not cross anywhere. Fasten it securely so that heavy combs do not accidentally break off. As a result, you should have 4 lines.
On the frames prepared in this way, the foundation is fixed.
Now you know how to make your own bee hives with your own hands with drawings. Using the drawings and dimensions, you can easily build it yourself, thereby saving your budget and providing the bees comfortable conditions residence.
I don’t remember when I started to love bees, but over time they kind of became my personal feature. I know it’s a little quirky, but he didn’t understand you, who can’t say ever that it’s not the cutest thing ?!
Lately I've really fallen in love with these large decorative bee hives,
which can be placed on the porch or in the garden.

Here's what you need:
Metal bowl (I used the bowl of my kitchen mixer)
Hot gun and hot glue
Marker black

Start by wrapping the string around the base of your metal bowl and hot glue where the two pieces meet. Make sure to let this part cool completely before proceeding.

Apply hot glue around the bowl while twisting the string. Watch out for the joint - you want the connection to be reliable. Continue until you reach the top.

At the end of the top, leave enough rope to form a loop at the top, and tuck in 2 to 3 cm before ending. To remove your hive from a metal bowl, place it in the freezer for 20 minutes and then gently wiggle it in any shape. Leave the hive on the table to become room temperature before moving on to the next step. Hot glue the tip of your rope from the inside top of the bee hive, leaving excess rope on the outside to form a loop on the outside.


I would like to make a hole, but I decided to just paint with a marker instead of making a real hole. Hot glue your ends together and then glue your entrance to the face of the hive.
Beekeeping is the most important industry Agriculture different countries... The importance of beekeeping is determined not only by the most valuable products obtained from the apiary, but also by the role of honey bees in cross-pollination of plants and, as a result, in increasing the productivity of various crops.
The work of a beekeeper is hard work that requires year-round attention and care from the beekeeper. First of all, high-quality bee hives are important, which must meet certain criteria. When choosing a house, the climatic and honey-collecting conditions of the region are taken into account, but there are a number of conditions that any of them must meet. So, what types are there, how to assemble hives for bees with your own hands and how to place them correctly in an apiary - you will find all this in our article.
General requirements for bee houses
Regardless of the design, each bee hive (a house where one or several families live) must meet fairly stringent conditions:
- dryness at any time of the year and with any amount of precipitation;
- high-quality thermal insulation, due to which a comfortable temperature is maintained inside in winter;
- good ventilation;
- space and potential for expansion as the family grows;
- relatively low weight of the structure;
- quality of finishing - wooden house, painted over and putty, serves for at least 15 years.
A house for bees of any design must also correspond to certain dimensions:
- between the wall and the side strips of the frames - at least 8 mm;
- between the central of the adjacent frames - 38 mm;
- frame thickness - 25 mm.
As practice shows, it is more convenient to use hives with store extensions in apiaries - they are lighter than nest boxes.

Wooden parts that are used to make beehives are harvested from aspen, linden or pine. Maximum humidity 15%. There should be no cracks or fallen out knots. If this is found, the holes are putty.
The cracks in the houses are unacceptable - heat will escape through them and, accordingly, the consumption of honey will increase. To replenish energy, the family will have to take more feed.
Since you need to build a hive accurately and correctly, this will allow you to combine their individual parts with each other. If we are talking about how to build a hive for bees with our own hands, then the walls of the hulls are assembled from 2-3 boards using the thorn-groove method and additionally glued with waterproof non-toxic glue.
The outer side is treated with linseed oil and painted in 2 layers of blue, yellow or white paint. The roof is made from a sheet of stainless steel.
Construction (components) of hives for a bee colony
Since it is rather troublesome to make a hive for bees on your own, let's decide on its main components:
- frame;
- store extensions;
- roof liner;
- ceiling boards;
- roof;
- arrival board;
- plug-in board (diaphragm);
- nesting / store frames.

The shop frame is easier to get rid of the honeycomb, it is easier to print the honeycomb in them and, accordingly, to pump out the honey.
- Frame
Outwardly, it is a box made of planks. Depending on the size and type of the hive, where there are more than 10 nesting or about 20 store hives, since they are smaller in size, frames. The latter are fixed by the hangers on the seam.

On the front side, a notch is made through which insects enter. In some buildings there are 2 entrances - an upper and a lower one, in others - one each, in the third (multi-hull) also several, each of which serves a specific family.

Hammered from 3-4 boards or one flat. It can be retractable or stationary. A ledge is made so that the loops for the arrival can be screwed on.

For fixing, hinges are used so that this board can be removed at any time. Remove it for the winter so that rodents do not get inside, or during the move for convenience. Needed by bees for departure and landing.
- Store extension

A ready-made sample that is needed to artificially increase the bee colony. As a rule, standard frames are smaller than nest frames, but the same in width and height. If evidence for bees typical size, shop frames are fully consistent with them.

Used to fix the ceiling insulation, resulting in a warm hive. It can also be used to separate a family in order to form a layer with a fetal uterus.
- Ceiling

The ceiling trim is a bar as thick as a body. The bottom of the board is 20mm. Then a reflector insulation. Then - 20mm foam
A standard piece that is assembled from individual planks or made from solid wood. The temperature inside depends on the thickness and integrity.
- Roof

Needed by hives for protection from rain and snow, wind and debris. The shape can be different - single or multi-slope, sloping, acute-angled, etc.
For high-quality ventilation ventilation holes or small cuts are made in the sidewalls through which air will flow.
It is used to reduce the space inside the house for various purposes. So, with a sharp cold snap behind such boards, you can put insulation (polyurethane foam, moss, etc.). In a multi-hive hive, the insert board is usually smaller than that of the lounger and other designs.

The diaphragm shield is made from a board 45x32 cm, length - 47.2 cm, width - 2 cm. It is assembled from boards 1.4 cm thick, which are assembled at ¼.
For the most snug fit, the ends are pasted over rubber seal, usually used for insulating entrance doors.

Required for the formation of combs by workers. Consists of the following elements:
- upper and lower planks (hangers are made on the upper for fixing on the seam);
- 2 spacer bars.
The standard size is 43.5x30 cm.In a lounger - 30x43.5 cm, in a multi-hull, on the contrary, 43.5x30 cm.
The sizes of the frames differ among themselves by the type of beehives:
- in a lounger - 30x43.5 cm;
- multihull - 43.5x23 cm.
To assemble the frames, use standard nails 3 cm Ø 1.4 mm.
- Sectional frame

It is used to obtain honey in small quantities, for which it is divided into sections measuring 11x11 cm. Such sectional frames are made from chips 45x35x0.2 cm, after which they are placed in the store. On average, 380-400 grams of honey is removed from one section.
Varieties of cases
In total, the following types are distinguished:
- multihull;
- double-case for 24 frames;
- single-hull with two magazines;
- lounger for 20 frames;
- sunbed for 16 nesting frames;
- sunbed for 16 store frames.
In this article, we will show you how to make bee hives for 20 frames and multi-frame. These are the most popular types that can be found in most apiaries in Russia. Let's note right away that the sizes of the hives are standard.
Multi-case (TP No. 808 5 1)
Consists of 4 buildings, in each of which you can install 10 nesting frames measuring 43.5x23 cm. This is a prototype of a stationary and nomadic modern bee hive.

What you need for construction:
- boards - 0.3 cubic meters;
- galvanized - 2 kg;
- investment steel - 0.2 kg;
- galvanized mesh - 0.2 sq.m .;
- nails - 1.5 kg;
- galvanized nails - 0.1 kg;
- screws - 10-12 pcs.;
- loops for the arrival board - 10 pcs.;
- wooden inlay for the taphole - 4 pcs .;
- holder for ventilation frames - 2 pcs.;
- drying oil - 0.5 l;
- whitewash - 0.3 l;
- paints - 0.3 l.
- The box is assembled from boards 3.5 cm thick. The internal dimensions of the house are 45x37.5x25 cm.The walls can be made from a solid array or assembled from several planks, but be sure to glue it non-toxic waterproof glue to avoid cracks and holes.
For nomadic houses, folds of 1.8x0.5 cm are hollowed out on the walls above and below to insert one into the other during transportation.
- Folds are hollowed out inside for attaching the frames. Their dimensions are 1.1x2 cm.
- A hole with a diameter of 2.5 cm is cut out on the front part at a height of 12.5 cm - this is the future entrance. Immediately, a sleeve is prepared for him, which will fit tightly, but so that it can be removed without significant effort.
- The length of the sides is 49.6 cm, the height is 25 cm, the length of the walls is 44.5 cm, the height is 25 cm.
To make it convenient to carry structures from place to place, you can make a recess on the upper part as a holder for hands.
- The bottom is removable. It is a sloping 23 ° flap that runs from back to front. It is usually made from 2-3 boards with a thickness of 3.5 cm. Be sure to make edging from the ends, and from the side of the arrival board they make projections, where loops are screwed in the future.
- The lower part of the bottom is sheathed with boards 5x3.5 cm, which will avoid rotting of the bottom and contact of the hive with the ground.
- The ceiling is knocked together already from 5 boards, which are fixed across the top with planks. Ceiling dimensions 496x40x1 cm.
- Sizes of the roof liner with outside 52x44.5 cm, from the inside - 45x37.5 cm.
- The roof is made completely flat so that the hives can be made up during transport. Tied with boards 10.5x2.4 cm, connected by the thorn-groove method and additionally fixed with non-toxic waterproof glue.
- The dimensions of the frames are 43.5x23 cm with stationary slats.
- The parameters of the upper bar are 47x2.5x2 cm.
- Side plank - 22x1 cm.
- Bottom bar 41.5x2x1 cm.
- The ventilation frame is used to transport insects or to isolate them during the processing of the house and prevention.
- side bar length - 47 cm;
- walls - 37.5 cm;
- thickness - 2 cm.
A metal mesh with holes up to 3 mm is attached to the vent frame.
Everything wooden parts smooth and protected with fine sandpaper. The dimensions of the hives are kept exactly.
As the experience of beekeepers shows, such a construction is not very complicated and, at the same time, it is the most convenient construction. First, it strengthens the family and increases productivity. Secondly, it allows you to combine enclosures with each other. Thirdly, such convenient boxes are easier to transport and carry, including on stationary apiaries to and from the winter house.
VIDEO: How to make a multi-body hive with your own hands
How to make a hive-lounger for 20 frames
Drawings of these varieties are made according to typical project 179 60. Convenience lies in the fact that at the same time you can keep 2 families at once - provided that the building is divided into two independent compartments and each is equipped with its own entrance.

The maximum benefit can be seen in winter - 2 families, although separated by a bar, spend in total less energy and feed. It is always warmer in such evidence than in multi-hull, even by several bee colonies.
What you need:
- boards - 0.2 cubic meters;
- galvanized sheet - 3 kg;
- galvanized mesh with a mesh of 3 mm - 015 sq. m;
- round washers - 0.02 kg;
- screws - 0.2 kg;
- nails - 0.25 kg;
- galvanized roofing nails - 0.1 kg;
- staples - 2 pcs.;
- metal clips - 2 pcs.;
- arrival board inserts - 4 pcs .;
- drying oil - 0.5 l;
- whitewash - 0.3 l;
- paints - 0.3 l.
- crushed chalk - 0.4 kg.
The main difference between the Ukrainian model and the Belarusian and Russian ones is the insulation of the front and rear walls.
- The body is hammered together from the boards. The dimensions of the finished box on the outside are 83x44x60 cm.The thickness of the outer walls is 1.5 cm, the inner ones are 2.5 cm.The length of the walls is 83 cm.
- The sides are assembled from 5 planks, a hollow is made on top in the form of a shell under the pressure board, at the bottom - for inserting the bottom. The size of the walls is 42x3.5 cm.
- Make 2 lower entrances 20x1.2 cm - one on the front part, the other on the side. The two upper ones are also made, but already with different dimensions - 10x1.2 cm. Be sure to observe an equal distance from the bottom of 34 cm, from the edge - 16 cm.
- The arrival board is attached to the bottom with loops.
- The bottom is hammered together from 3 planks. Be sure to provide a clamping bar, with which the frames are fixed during the transportation of the apiary.
- The frames are made high, but narrower than the standard - 30x43.5 cm.
VIDEO: Most detailed description loungers for 20 frames
It is important to understand not only how to make hives for future families. But also in how to correctly display them in the apiary, so as not to lose them in the first year.

An ideal place for an apiary - moderately sunny, moderately shaded. Near melliferous plants
The location is chosen depending on the conditions and relief. If you put them on an open area, then at noon the workers stop working, everyone leaves the house and hides in the shade under the boarding board or even crawls under it.
In hives standing on unshaded areas, the swarming rate is more than 70%. And productivity is 45% lower.
The consequences of direct sunlight during transportation are very serious - the next shake-up on the road bump leads to the fact that the newly softened honeycomb breaks off. This leads to the death of not only the workers, but also the brood, and in some cases the uterus may also die.
There are certain requirements for setting up hives in an apiary:
- The hives are exposed to the south. This will provide excellent lighting during daylight hours, and back wall facing north will save the family from strong gusts of wind.
- It is advisable that large shrubs or trees grow behind the houses to serve as an additional obstacle to the winds.
- Before making your own bee hive, make sure there is a source of water in the place where they will be standing. But even if it is not there, the problem can be solved through collective or individual drinking bowls.

There must be a source of water nearby - for a bee it is no less important than for a person
- Do not allow direct sunlight to hit the roof and the house itself, but you should not overshadow it too much. This arrangement will limit ventilation and artificially increase the length of the day for bees - they will fly out earlier and return later. This will accelerate their wear and tear and lead to earlier death.
- The place for the apiary is chosen so that melliferous plants grow nearby. This will enable female workers to prepare food faster. The maximum distance should not exceed 1.8-2 km.
- It is necessary to make the hives so that they can be insulated for the winter with moss or polyurethane foam.
When insulating, avoid direct contact of insects with polyurethane foam. For this, it is laid with canvas.
- All the grass is pulled out in front of the already displayed and only displayed houses - the beekeeper should be able to control the type and quality of the garbage thrown out daily by the minke whales. On the one hand, the quality of the garbage will show the state of the family. On the other hand, the absence of grass will make it possible to notice the prolapsed uterus in time - this happens quite often.
- Attach planks to the landing boards - this will allow loaded bees to get into the house faster. Such a device is especially important during the wind.
So, we told how to make a hive for bees ourselves, what materials are needed for this and how to put houses in an apiary correctly. If you still have questions or want to clarify some of the nuances, ask questions in the comments - our specialists will be happy to help you!
VIDEO: Roaming the apiary, fixing the hives, transporting bees

I will tell you how you can decorate your garden plot, namely, let's talk about a decorative beehive.
Many dream about their own own home... A house, a garden, a lawn or a meadow, flowers around, beehives, bees are buzzing over the flowers, birds are singing in the air ... An ideal rural picture.
In this idyll there is one very serious and difficult to access factor - bees, they need to be looked after, and not everyone is given this. In addition, these insects do not tolerate loud sounds. A lawn mower is often questionable, because bees are far from unambiguously responding to this super-useful device. Bee stings cause allergies in many. And if you have small children, then they and bees are two incompatible elements.
But you really want the perfect picture. And there is a way out! If you want to create a fabulously pastoral garden on your site, a beehive will come to the rescue, but without bees.
It is not difficult to buy a decorative beehive, both ordinary and stylized, since today there is no shortage of offers. Even finding a beehive that looks like a log that has a thatched roof is not difficult. But if you want to show your creativity, then feel free to buy the most ordinary one and decorate it yourself.
As the first decor option, the hive can be painted with bright paint, it is possible with patterns, it's all about your imagination, and you can decorate the roof with the same straw. But this option is not suitable for every site, although it will be an attractive center of the overall composition.
The second option for decorating the hive is to glue small sticks around its perimeter. In the same way, you can decorate the roof, and instead of the standard wooden box a real beehive will come out, which seems to belong to a fabulous bear.
As soon as I have my own house, I will definitely install a decorative beehive in the garden! How do you like this idea?
Live
Ingredients:
- salt;
- a little flour;
- seasonings for meat;
- 3 cloves of garlic;
- 2 eggs;
- refined oil.
Preparation:
There is one recipe for delicious pork chops in an egg. Prepares in about an hour and a half.
Ingredients:
- 500 g of pork tenderloin or loin;
- salt;
- a little flour;
- seasonings for meat;
- 3 cloves of garlic;
- 2 eggs;
- refined oil.
Preparation:
1. Cut the meat across the grain into slices or strips. We beat each piece well and rub it with a mixture of salt and spices.
2. Break the eggs into a bowl and mix them with the minced garlic. Beat a little with a regular fork or whisk.
3. Pour flour into any container.
4. Heat the pan well with oil.
5. Take one chop. Dip it completely in flour, then dip it in an egg with garlic and immediately put it in the pan.
6. Fry over medium heat for about 3 minutes on each side.
For those who are just learning, it will be interesting to know how to make the face of a nylon toy.
The most important part in the process of work is sewing the face of the future doll. It depends on him how good the finished craft will look. Naturally, this process must be approached as responsibly as possible.
What is needed: tights; synthetic winterizer; needle; threads. The most important part in the process of work is sewing the face of the future doll
Work progress: Insert the synthetic winterizer into the prepared nylon. Pull on top and pin with a pin. Roll a small piece of synthetic winterizer with a strip, while making it thinner in the upper part, and tuck it in the bottom. Place the formed nose in the center of the face being made. Form the eye sockets, a little Pressing these areas with your fingers. With pins, pin the places where the tightening will be done (the area of the bridge of the nose and the middle of the nose). Insert the needle with the thread folded in half where the first of the pins is fixed and bring it out at the second mark. Go back and repeat the same steps, Pull the thread through the loop that has formed. Pass each segment at least three times. In the nose area, make the nostrils, initially marking these places with pins. Pull the lower edge of the workpiece at the base, stretch the needle through the entire head and bring it out at the back of the head. Grabbing a little padding polyester with a thread to form lips. Sew an additional nose bridge. Chip off the upper edge and add a little more synthetic winterizer to the workpiece. a. Form the cheeks. Twist small rollers and form eyebrows from them. Pull out the ears. Bend the workpiece from above and sew.
My favorite porridge is pea, I recently found a recipe with meat. so yummy, be sure to try.
You will need:
dry peas - 2 cups;
water - 4 glasses;
bow - 2 large heads;
meat (pork) - 300 g;
Preparation
Boil the peas over low heat until tender.
Season with salt, stir until puree is obtained. If it's patchy, crush with a potato pusher.
Cut the meat into slices.
Peel the onion, chop into half rings.
Fry the onion until tender, place the pork pieces on top, cover.
Put out on low heat, add spices, salt.
Put the frying on mashed potatoes, pour over the juice.
Preheat the oven to 180 °, put the dish on for 10 minutes.

