Small fire and melt in. Methods of producing fire without matches and lighters - choose an option for yourself
You will need:
The oldest and most difficult method is the production of fire by friction. Exists various techniques this process, but the most important thing is to choose the right type of wood for the plank and rod. For this role, poplar, juniper, aspen, cedar, willow or walnut will do. Of course, we need dry wood for efficient ignition.
The rod is placed in a small hollowed out recess in the plate and clamped between the palms. You need to quickly twist the stick around the axis, creating friction. In this case, the tree will begin to smolder, a spark will appear, and the resulting coals are already used to further kindle the fire.
Hand drill
Another primitive and rather difficult method.
In addition to a stick and a board, we need a tinder. Gather dry leaves, grass, bark in a pile, build something like a bird's nest - this material will help us get fire from coals.
You need to cut a v-shaped hole in the board, and make a small depression next to it, under which you place pieces of bark.
Mark a rod about 60 cm long in the groove and start rotating it between your hands until signs of smoldering appear in the hole. Fan the fire gently until red coals, then transfer them to the tinder and, adding dry twigs, cones, try to ignite a full flame.
Let's say right away: the two options described above are a long, laborious process that requires a lot of patience. But it may happen that you don't have anything else at hand. In this case, the forest will help out and this knowledge.
The method is similar to the previous one, but much more efficient and simpler. If you do everything right, then you will very quickly reach the required speed and pressure, allowing you to get the coveted coals and make a fire even in a wet forest.
Your task is to make a bow drill. To do this, prepare planks, a rod, a deck and a bow. Now let's talk about everything in order.  Look for the deck or stone we need to apply pressure to the rod. The wood must be harder than the core.
For the bow, use a strong and resilient vine, about the length of your hand. A string, string, leather belt and other durable material that is resistant to tearing are suitable as a bowstring. Pull the string over the rod.
Next, prepare the ignition board. Make a funnel and place the tinder underneath. Then pull the string over the rod so that you end up with a loop. Place one end of it into the cavity on the board, and press the other with a block.
Now, in fact, the very process that will help us make fire. Move the bow back and forth as if you were sawing. Rotate the rod quickly until embers appear. Drain the embers onto the tinder and blow gently.
Going on your next trip, take flint with you. If you don't have one, make it yourself - quartzite and a steel-bladed knife will be enough! 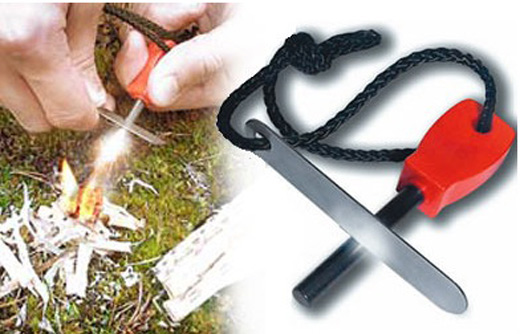 Also look for charcoal. Its main purpose is smoldering when a spark hits. But for this purpose, any fabric and even moss, capable of smoldering for a long time without fire, will do.
How to use a flint? Squeeze the flint between your fingers so that its tip protrudes 6-8 cm forward. Hold the ignition material between the flint and thumb. Now take a knife and hit the stone with it a couple of times. As a result of your actions, sparks will fall on the coal or fabric and begin to smolder. Place them in a tinder nest and blow. Then you can lightly light your fire.
Jar and chocolate
Everything is extremely simple here. Run the chocolate bar along the bottom of an aluminum beverage or canned food can. Then wipe the bottom with a regular cloth. Chocolate is the perfect polish and your jar will shine like glass. You can use toothpaste instead of chocolate.
Once you've completely polished the bottom of the can, the sun's rays can bounce off it and create a focal point.
This principle resembles the process of a telescope. Again, turn the surface towards the sun's rays and point them at the made tinder, located 3-4 cm from the focal point. Flames will appear soon.
True, the downside is that an aluminum can is not always at hand. And we certainly eat a bar of chocolate before the fire appears!
This is the easiest way to get fire, but it will only work in sunny weather. Many of you probably melted soldiers or set fire to a newspaper with its help as a child. Now, using a lens, a magnifying glass, a magnifying glass, glasses or binoculars, we will try to make a fire.
Moisten the surface with water to speed up the process.
Place the lens at the angle of the sunlight, focusing the beam at one point. Put the tinder in this place and wait literally a few minutes. 
As we have already understood, the easiest way to get fire is with a lens. Unfortunately, it may not always be at hand, but a condom may well be lying around in the inner pocket of a real man. The same method can be taught to a child using an inflatable ball.
Fill the condom with water so that it fits easily in your hand and resembles a sphere. Remember to tie the garment tightly.  Then squeeze the ball so that a direct beam of light passes through it. As a result, you get two small diameter lenses. The focal length will be shorter than that of real lenses, so you need to keep them at a distance of 5-7 cm from dry objects that should catch fire.
With ice
Water and fire are seemingly two completely opposite elements. However, it is quite possible to make a fire from a piece of ice. This method is especially relevant in winter weather.
It is advisable to use clean water to keep the ice clear. If it contains specks, then you simply will not succeed.
An icicle or a piece will do pure ice from the river. You can also take water from a reservoir or pre-melt snow in your hands.  Let the liquid freeze in a container. The size of the resulting piece of ice should be about 5 cm. Then cut out the lens in the center of the ice, polish and shape it. Point the lens at sunlight and wait for the result.
- For the first method, you will need a piece of foil - from gum, chocolates, a pack of cigarettes, etc. Cut a short and narrow strip of about 1-1.5 cm from the foil. Then give it a crescent shape so that the wide ends are only at the edges of the ribbon.
The lower the battery power, the narrower the strip should be!
In a battery close to the pressing area, scrape a little of the surface down to the adhesive layer and fix one end of the foil to it. Place your hands over the tinder, and place the other end of the strip against the contact - the paper will flash instantly.
- Another method will require a piece of animal hair. Form a strip of it about 1 cm wide and about 15 cm long and rub it with the battery on the side where the contacts are. Ignition will happen quickly, so prepare the tinder and wood for the fire beforehand.
Spoon and toilet paper
For sure, any tourist can find these items, namely: a spoon, a pot and toilet paper.
Twist the paper into a tight rope 3-4 mm thick and roll it between your palms to make something that looks like a cigarette. Then coat one end with soot from the pot.
Now let's move on to the spoon. You need to bend it a little inward towards the handle, and flatten the stock a little so that your reflection inside does not have strong distortions.
Catch a ray of light with a spoon and place the paper over it on the soot side. After a few seconds, the tourniquet will start to smoke. Wait until intense smoldering begins and start making a fire.
The essence of starting a fire by friction is that when rubbing against each other, any objects (including wood) heats up. In this case, wood acts as a rubbing surface. Heating up from friction, it is able to reach a temperature sufficient to form a smoldering tinder, which is often the dust of the same wood.
In theory, this method is simple, in practice it requires enormous implementation effort and certain skills.
There are several known methods of producing fire by friction, but not all of them are applicable in real conditions, taking into account the peculiarities of the temperate latitudes of the northern hemisphere (the corresponding wood and its moisture content).
The main options for making fire by friction
Most often, to produce fire by friction, the following methods are used:
- Fiery plow. Here, the smoldering tinder is formed by rubbing a peg against a groove cut in a wooden plank.
- Hand drill. In this case, embers appear as a result of drilling a wooden plank prepared in a special way.
- Fire bow. Here everything is the same as in the case of a hand drill, only the drill is set in motion by reciprocating movements of the beam.
- Fiery bamboo. In this case, the pre-prepared kindling begins to smolder, clamped in the half of the bamboo trunk, with which the other half is “sawed”.
All methods of starting a fire by friction have their own specifics and are quite difficult to implement. To confidently build a fire with their help, preliminary training is required.
Fiery plow
This is one of the most difficult ways making fire by friction. Nevertheless, in the absence of a rope, which is needed, for example, for a fire bow, it becomes acceptable for making a fire even in the steppe and forest-steppe.

The essence of the method lies in the fact that when rubbing with a sharp stick on a chute in a log, the walls of the log are heated, hot dust is scraped off from them, which will then swell.
Dry (but not rotten) softwood is suitable for the fire plow. Conifers should not be used for friction fire because of the presence of resin in them, which can prevent the appearance of smoldering tinder. However, if deciduous trees was not nearby, you can try, for example, using pine sticks.
Some believe that bark can be used as a base to start a friction fire. But this is not true: fire cannot be obtained in this way. If you really use bark, then birch bark and then only as kindling.
In order to get fire with a fiery plow, you need to follow the following algorithm:
- A plank is made, or a flat platform up to half a meter long is made on a horizontally lying trunk.
- A shallow groove is cut into the plank for almost the entire length of the plank.
- A peg up to 30 cm long is cut from the same tree, which is sharpened on one side.
- The sharp side of the peg is lowered into the groove.
- The peg is pressed into the bottom of the groove and thus is driven along its entire length to one side and the other.
- A kindling is placed on the glowing coals formed as a result of friction, or the coals are carefully poured into a kindling kindling rolled up in a nest, after which they are inflated until a fire appears.
Our distant ancestors made fire in exactly this way - by rubbing one piece of dry wood against another using the technology of a fiery plow.
If the peg is made longer (a little more than two meters), the fire plow can be used by two people, which greatly simplifies the work of the person producing the fire. In this case, the person sitting by the piece of wood guides and presses the peg to the groove, and the person who is standing presses and moves it in one direction or the other. The video shows how this is organized:
Hand drill
This method of friction fire extraction is mainly used in tropical and equatorial areas where suitable timber is available.
Algorithm of actions:
- A piece of a small branch is peeled from the bark and split lengthwise into two parts.
- In one half, a “V” -shaped slot is cut out on the side, in the narrowest part of which, on the outside of the branch, a recess is made for the future drill.
- A drill is made of the same wood, which is a thin stick sharpened on one side with a length of at least half a meter (with a shorter one it will not be so convenient to work).
- A stick with a cut out slot is placed flat side on the ground on a pre-prepared kindling.
- The sharp side of the drill rests against a recess in a stick lying on the ground.
- The upper part of the drill is clamped between the palms and rotates with pressure in a movement reminiscent of rubbing the palms in cold weather. When the palms slide down, without lifting the drills from the lower stick, they must be returned to their original place and continued to rotate.
- The glowing coals formed as a result of friction inside the crack are carefully dumped on the kindling and inflated until a fire appears.
This method of producing fire by friction was used by ancient people living in hot countries. In modern conditions, it can be simplified by using potassium permanganate, which ignites faster than a rod.
If there is potassium permanganate in the tourist's first-aid kit, there will be no problems with making a fire. In a hole made in a log, you need to pour a little of this powder, press it with the end of a small stick, overlapping it with tinder, and make several rotational movements. Friction will cause the tinder to flash and ignite.
An example of such a fire in the taiga in winter is shown in the video:
In our latitudes, it is somewhat difficult to get fire with a hand drill: it will take a lot of time, effort, and wounds can form on the hands, which can get an infection. Therefore, this method did not receive widespread, in contrast to the following method.
The video shows how a fire is made in this way in Kenya:
Fire bow and its variation
This method of making a fire by friction has become known as the Indian violin, although it has long been used not only in America, but also on other continents.
In fact, this method is the same hand drill, only in this case, the rotation is carried out not with the palms, but with the bowstring of the bow, which provides greater speed and, accordingly, higher temperatures. Therefore, it is sometimes called a bow drill.

Outwardly, the device for making such a fire looks like a bow, the string of which is wrapped around a stick.
The wood used is the same as for the fire plow, that is, dry soft hardwood such as alder or aspen. Trees lying on the ground are not suitable for these purposes, as they are likely to be damp or rotten and rotten.
Also, this method requires a rope, which is often used as laces removed from one shoe. The main requirement for a rope is that it must be strong (tourist ropes are very good for this).
To get fire with your own hands using a fiery bow, the following is done:
- Sushina is cut down.
- A plank is made, or, as in the previous case, the branch is split in half along the fibers.
- By analogy with the previous method, a "V" -shaped slit and a depression are made at its narrowed end.
- A drill about 30 cm long is cut from a separate piece of wood, sharpened on both sides.
- Onions are made. To do this, you can take a curved rather stiff stick up to a meter long and tie a rope to both sides of it. A resilient branch will work as well, but it will make it harder to pull the rope as you move the bow forward, which can cause the rope to slip along the drill.
- Take the second part of the split stick and pick out a small hole in the center of it on the inside. The top of the drill will be inserted into this hole.
- The bowstring is wrapped around the drill once, the drill is inserted at one end into the lower plank and pressed with the second plank from the top. Both pointed ends of the drill should fit into the corresponding holes. It turns out a bow drill.
- The person stands on his right knee, and with his left foot presses the lower plate to prevent it from shifting. The bow is in his right hand, and with his left hand he holds the top board, with which he presses the drill.
- The bow is driven in a reciprocating motion, as in drilling, this causes the drill to rotate in the support. As the "V" -shaped gap is filled with tinder, the speed of the bow should be gradually increased, bringing the temperature at the point of contact of the drill with the support plate to a maximum.
- The smoldering tinder formed as a result of overcoming the frictional force is removed along with the kindling and inflated until a fire appears. The tinder should be in the form of small black needles: only in this case, you can hope for a good result.
I once observed this picture: a young man attached a wooden drill to a drill and drilled a wooden board in the center - there was a lot of smoke, but it did not work out to make a fire. A similar situation can be traced in some books that illustrate images with a similar scheme. It is easy to guess that such a method is doomed to failure, because there is no place for tinder to accumulate in it, which, among other things, simply flies to the sides.
This method of making fire, as described above, is based on physical phenomenon increase internal energy by doing work to overcome frictional forces.
In our latitudes, it is the most preferable, but it still remains one of the most difficult and energy-consuming (mainly due to the high complexity of bow manufacturing) and requires preliminary processing.
There is also a "relative" of the fire bow, called the pump (pump) drill, but this device is quite difficult to manufacture in conditions of survival and therefore will not be considered in this article. The video shows this option:
Fire bamboo
For obvious reasons, this method of making fire with your own hands is used only in regions where bamboo grows. Only the dried stems of this plant are suitable for him.
Fire is obtained as follows:
- A dry meter long bamboo trunk is split into two parts.
- One part (hereinafter referred to as the first part) is shortened to half a meter and a small through hole is made in it in the middle with a knife.
- From the outside, a transverse groove is made directly along the hole.
- From the second piece (hereinafter referred to as the second part) of the split bamboo trunk, a wide splinter about 40 cm long is cut off and broken in the middle.
- The side of the second part of the trunk is made even and its edge is sharpened with a knife - a kind of bamboo blade is obtained.
- From the second part of the barrel, a knife is scraped off shavings in the form of thin twisted ribbons. For this, the knife blade is held at right angles to the barrel and is positioned across it.
- The shavings are rolled into a dense ball, divided into two equal parts and placed inside the first part of the barrel directly above the hole (the hole is between them), after which they are pressed from above by a broken chip.
- The second part of the trunk rests against the stomach with one end, and against the ground with the other. The weight of the body presses it to the ground so as to eliminate displacement during operation.
- The first part of the trunk with kindling and a chip is taken by two hands at opposite ends and leaned against the flat side surface ("blade") of the second part with a groove.
- The reciprocating movement due to friction provides heating sufficient for the formation of smoldering in the pressed wood kindling.
- The smoldering kindling is transferred to dry grass and blown up until a fire appears.
I have seen another implementation of this method of starting a fire by friction. In it, half of the bamboo trunk with kindling lay on the ground (kindling down), and the other half was sawing. But this method, in my opinion, is less universal, since it requires at least two people (one to hold the lower part, the second for sawing movements), the soil must be dry so as not to wet the kindling, and you can injure your hands on those lying on ground stones or thorns.
Like other methods of making fire by friction, this one requires prior training. Without such training, a person who finds himself in an emergency situation risks spending a lot of time and effort, while remaining without fire.
As for me, in our latitudes the most acceptable option for making a fire under conditions of survival has been and remains the method of a fiery bow. Although it requires a strong rope, it is it that allows, in comparison with other methods, to spend less effort, which in an emergency there is always where to apply.
Interesting video: bow drill at work
The Polynesian Fire Plow:
The ability to make fire without matches or a lighter is invaluable, especially when faced with extreme survival conditions. Various circumstances can contribute to the fact that matches become damp, and the lighter is lost or it runs out of gasoline. In this case, it is able to save from cold and hunger the production of fire by friction, despite the fact that this process is very laborious and time-consuming. They knew how to make fire without matches (by friction) even in ancient times, since there were no other ways to keep warm, to protect oneself from animals at night and cook the food obtained.
Friction fire
There are two main ways you can start a fire by friction:
- Method using hand drill.
To do this, you will need: a base and a rod made of dry wood, tinder, ignition material. At the base, you need to make a groove where friction with a wooden rod will be performed. Another groove is removed from this groove, coals and other friction products will come out of it. After that, a rod made of durable wood is installed in the groove. The friction of the rod against the base is carried out by rotating it by hand around its axis, as a result of which coals are obtained. After that, the coals need to be moved to the previously prepared tinder, and when the flame starts up, move to another material for lighting the fire (logs, branches, etc.).
- Using a bow drill.
The principle of operation is similar to the previous ignition, with the only difference that a retainer is attached to the top of the rod, which allows it to rotate more quickly without injuring your hands, the danger of which arises when using a hand drill. This is a more efficient way.
Making fire by friction: process technology
Before starting a fire, you need to prepare tinder, collect firewood, prepare a nest for coal, make a bow with a drill and prepare a wooden base.
Dry fibrous material is used as tinder: moss, lint from clothes, bird feathers and down, wood shavings. For firewood, you need to collect thin dry twigs, which can be found in the dry, lower tier of trees. The branches lying on the ground are most likely damp and wet, it will be difficult for them to flare up. Green wood should be avoided as it does not burn well. The tinder bundle should be wrapped in a denser material such as leaves or dry grass. In this case, you need to leave a recess for coal and openings for air ventilation.
The next step is to make the bow, for which you need to choose strong, resilient wood. After suitable material found, made a bow 30-60 cm long. It should be a thin, light rod, not too curved and at the same time rigid enough not to bend during rotation. To make a bowstring, a string, rope, twine is used, which is attached to the bow in such a way that it is slightly sagging.
For the base, you need to prepare a dry wooden board. For its manufacture, you need to choose light and soft wood. Its length should be 30 -32 cm, width 5-8 cm, thickness 2.5 cm. Further, a drill with a length of at least 20 cm is made, the diameter of which should be 2-4 cm. The lower end of the drill should be rounded, and the upper end should be sharpened with a knife ...
For the spindle, you need to make the upper support of stone or wood. The stone should fit comfortably in your hand, not too small. It should have a notch and smooth edges. Wood can be made into a support block using hardwood by drilling a hole to about the middle of the block with a knife.
The support should be such that the spindle rotates freely around its axis, while maintaining a stable position of the narrow end. To reduce the wear on the top end, you can lubricate the hole in the block with resin.
Lighting a fire

On the base, you need to make a mark where the wooden drill will turn. Then drill a recess in this place with a diameter equal to the diameter of the spindle and a depth of about 5 mm. A hole for the tinder is cut under it.
After that, you need to burn a hole:
- The wooden base is placed on a flat piece of ground.
- With your left foot, you need to stand on the base at a distance of 2-3 cm from the funnel. The second leg is bent at the knee behind.
- Hold the spindle with your left hand, you need to hold a bow in your right hand.
- The bowstring must be looped at the upper, pointed end of the rod so that too much tension is not created. If it is difficult to tighten, loosen the string.
- With the rounded end, the spindle is inserted into the hole in the base, a support block is held above it from above.
- You need to take one end of the bow, and begin to rotate the spindle around its axis, pressing its lower end to the base.
- If done correctly, a black charcoal will form around the drill and smoke will appear.
Then you need to make a chimney: from the edge of the newly formed burnt funnel, you need to saw through a V-shaped hole, not reaching the middle of the funnel. When the spindle rotates, coals are formed, which will fall out through this hole. Below it you need to put flat base for collecting coals, a flat chip is suitable for this.
After that, they start laying out the firewood as follows: they are laid at right angles with gaps between the rods for air circulation in the order of tinder - kindling - fuel. In this case, the kindling is not placed on the surface of the ground, but on a litter of leaves or dry branches. You should also leave a hole for placing the coals inside.
Now again you need to twist the drill on the base to get charcoal, gradually increasing the rotation speed. The coals through the hole will fall on the tinder, which will soon smoke. An indicator that they have formed will be darkening, redness, or lightening of the tinder. Then you need to carefully remove the board, support the embers with air (with a wave or a gentle breath), gradually surrounding them with tinder. When the first tongues of flame appear, the burning tinder must be placed in the hole of the prepared kindling, fan the fire.
The main mistake in the method of producing friction fire with a bow is that inexperienced tourists place the ignition material in the immediate vicinity of the friction point, relying on the fact that it will ignite on its own. They do not take into account the fact that in this case only smoke will arise, and for the emergence of fire, it is necessary to place coals in the starting material, fanning it.
Starting a fire by friction: other methods
 Fire with stones
 In addition to using a hand or bow drill, there are several other methods of extracting fire by friction:
- You will need a regular nail and a die, which you need to drive in. This should be done for several minutes, while rotating the nail around its axis. It will heat up enough to ignite the tinder.
- A small base with a split should be made of pine. The tinder is placed there so that there is little space left under the board. Next, you need to find a rope, it is better if it is made of natural fiber. It is necessary to take it by both ends and start with quick movements "sawing" the wooden plank from below. When smoke appears, it needs to be fanned, having received fire.
- The easiest way: a piece of cotton wool is placed between two dry wooden planks, and they begin to rub against each other. After a few minutes, the cotton wool will smoke.
The ability to make fire is perhaps the most useful skill in survival conditions. Fire is a source of heat and light, you can cook food on fire, boil water, making it drinkable. Therefore, survivalists pay so much attention to all kinds of devices for making a fire. The ability to light a fire without matches and a lighter can help out great in Hard time, for example, when the matches are wet or lost.
The most important thing in starting a fire is good tinder. Many of the techniques described below will be simply useless if you do not have a good tinder, because the fire should kindle from a tiny spark. Good tinder must be dry. Dry grass, leaves, shavings, bark, and also a tinder fungus are usually used as tinder. Of course, tinder can be prepared in advance by taking, for example, a piece of burnt cotton cloth or cotton balls soaked in petroleum jelly. Finally, you can buy travel shop special synthetic tinder.
Here are some of the most popular ways to start a fire without matches or a lighter:
Fire and magnesium
Flame is a metal rod made of ferrocerium - an alloy of iron and mischmetal, which strikes sparks when it hits the metal. When a metal armchair strikes a metal rod - "flint" - small particles of metal are cut off, which creates a high temperature and the formation of a spark. By gently inflating the smoldering tinder, you thus provide an oxygen supply and, as a result, ignite the tinder. Some flints may come with a magnesium bar. In this case, carefully comb a few small particles of magnesium onto your tinder before setting the wheel in motion, then it will ignite faster.
Friction

Friction is perhaps the most ancient method of making fire, invented by our distant ancestors. This technique is based on creating heat by rubbing two pieces of wood together. There are many variations of this method, but the simplest is the bow drill method.
The bow spindle consists of wooden board, a spindle, a support block and, in fact, a bow. It is desirable that all elements are made of dry soft wood, especially a board, the wood for it should be as soft as possible. Cut a round indentation in the board to fit your spindle. Then cut from the edge of the board to the spindle notch.
From a curved branch, make a bow by tying a piece of rope, strings, or even a string to both ends of the bow. Roll the spindle around the string so that it wraps around the spindle. Place the board on the ground, with the notch on top of a small pile of tinder. Place your foot on one side of the board and place the spindle in the circular notch. Place the support block on top of the spindle and secure.
Now move the bow back and forth opposite the slot in the board. As a result of friction, smoke will begin to appear - continue rotating the spindle until you see that ash has appeared and smokes in the recess. Take the ash tinder and blow gently until a flame appears.
Magnifying glass

There are several different ways to increase the sun's rays. Using a magnifying glass is the most common, but far from the only technique. Sunlight can be magnified through any clear liquid, such as water, in any curved vessel whose sphere will act as a lens. A clear plastic bag will work as well. The main secret is to increase the sunbeam through glass or water and concentrate it on one point of your tinder. For this, the water must be clear, and the weather is clear. It is best to choose an afternoon when the sun is at its brightest.
Flint and steel

You can strike a spark by striking a soft steel rod - for example, with the butt of a pocket knife, on hard stone, preferably flint. To do this, you need to hold in one hand a flint with a flammable tinder, for example, from burnt fabric. The impact surface of the flint must have a sharp edge, so you may need to split your flint or quartz beforehand to get a sharp edge. Use your other hand to strike the edge of the flint against the steel surface of the knife and, if you're lucky, a spark on the tinder will ignite it.
There are many ways to make fire without matches or a lighter. Some of these methods are very laborious and difficult to execute, but there are also those with which it will be a little more difficult to start a fire than using the same box of matches.
In particular, in addition to matches, there are others special means for . So, for example, you can kindle a fire without matches and a lighter using a flint or a fiery piston. However, if you have these means at hand, you cannot talk about an emergency, since it is no more difficult to start a fire with them than with matches. Therefore, below we will consider non-standard ways when even these tools were not available.
Lighting fire with a lens is the easiest and fastest alternative to matches and a lighter.
These methods include lighting a fire without matches:
- Kresal and flint;
- An empty silicon lighter without gas;
- Lens;
- Concave mirror;
- By rubbing wood against wood;
- Rubbing a tinder fungus on a tree;
- By rubbing the wire against wood;
- With a nail and hammer;
- Rolling cotton wool;
- Electricity;
- Using chemical reagents;
- Shot from a gun.
Some of these methods of making fire were used thousands of years ago, when ancient people did not have special equipment. Let's take a look at all these methods of producing fire in more detail.
Making a fire with kresel and flint
In this method, the tinder is ignited by a spark made by sharp flint from high-carbon steel (kresala). So, when the sharp edge of a flint or other strong stone collides with a smooth steel surface, small particles are scraped off the steel and heated by the impact are ignited in air, forming sparks.

Kresalo and flint can be found almost everywhere, even in the wild.
In the wild, finding flint or other durable stone is usually not a problem. Many people use cleavers, knives and other steel tools as a chair.
This method requires a first-class tinder that can ignite with the slightest spark. Pharmacy cotton wool, paper and many other options that are suitable for other methods will not work here, because a spark carved from steel is much colder than sparks carved, for example, from modern flames.
I know of five options for making first-class tinder suitable for this method:
- The first tinder is made from two tinder fungi. A tinder fungus is torn off from the birch, from which the tubular part is cut off, and the "velvet" is left. Chaga (a type of tinder fungus growing on a birch tree) is found and its brown part is crushed into dust. "Velvet" is rubbed with chaga dust - tinder is ready. Such tinder is quickly harvested, but it takes a long time to catch the spark.
- The second tinder is made from tinder fungus by boiling. To do this, "velvet" is cut off from the tinder fungus and placed in an ash solution (1 part of ash from a fire, 2 parts of water). The tinder is boiled in ash for 2 hours, after which it is removed and beaten off with a smooth stick until it becomes a rag. After that, the tinder is well dried and kneaded. To kindle such a tinder, part of it is torn off and a spark is struck on the fibrous surface from the side of the fracture. This option can be used in cases where it is necessary to save other means of ignition: once spending one match on cooking tinder over a fire, you can save a full box in the future.
- The third tinder is made from birch. For this, there is a birch lying on the ground: it is these trunks that rot faster with the formation of the so-called rotten wood (rotten wood). The rot is removed and, if necessary, dried in the sun. Such rotten wood, though not easy, catches the spark and begins to smolder. The method is convenient in that the preparation of this tinder almost does not require time and effort, as well as preliminary making a fire.
- The fourth tinder can be obtained by burning cotton cloth without oxygen. This is the so-called scorch. The fabric is rolled up and pushed into, for example, tin can... The jar is closed and put into the fire. When smoke and flames stop appearing from the cracks in the jar, the jar together with the tinder is removed from the fire and remains to cool in the air. The resulting tinder very easily catches a spark, but for its preparation you need a cloth and a fire made in a different way, as in the case of boiling tinder fungus.
- The fifth tinder is the recently-extinguished embers of a campfire. Only those that still have a layer of white ash are suitable. Having caught a spark, such a coal begins to smolder, a second coal is brought to it and a fire is blown up, from which a kindling is ignited. Such coals easily catch sparks, but require preliminary preparation. Nevertheless, like other options, this one is quite suitable for saving other means of ignition.
Any of these tinder should be protected from moisture. It would be ideal to put it in an airtight container, for example, a plastic jar for vitamins or a PET bottle with a wide neck for easy removal.

Tinder fungus, or tinder fungus, in fact, got its name for the fact that good tinder has been made from it for a long time.
Now that you have the right tinder available, you can start lighting a fire with flint and krasal. For this:
- By hitting flint on flint, a sharp chip is made on one of the stones. A sharp edge will allow you to strike more sparks and increase your chances of success sooner.
- Chipped flint with tinder is clamped in one hand, the chair is taken in the other. The tinder is placed on top of the chip (this is where the sparks will fly) and pressed with the thumb.
- By striking the flint on the flint, sparks are struck, which should ignite the tinder. If a burnt log is ignited, then the chisel rests against it, and sparks are struck by a blow of the flint from top to bottom.
- The tinder that has caught the spark is put into a kindling and swells up until a fire appears.
In the acclaimed 2016 film The Survivor, based on real events, main character played by Leonardo DiCaprio puts the tinder under the flint instead of using correct option with tinder over flint. In this way, of course, you can try to set fire to the tinder, but why complicate your life, which is not sugar anyway?
This method is quite whimsical, as it requires a specially prepared tinder, which should be protected from moisture. However, if such a tinder is still available, then it will be easy and quick to kindle a fire with this method: it is not for nothing that in the old days, when matches and lighters had not yet appeared, it supplanted other more complicated methods and became the main one for producing fire.
Lighting a fire with a silicon lighter without gas
This method is similar in principle to the method of kindling a fire with a modern flint: a spark ignites a prepared flammable powder scraped onto tinder from the mischmetal that is part of the lighter. The ignited powder ignites the tinder.
It is clear that this method requires a silicon lighter.
If there is a tinder described in the previous method, or cotton wool (usually in a tourist first-aid kit), or fluff from an old cattail growing along freshwater reservoirs, then the spark of a lighter will be enough to ignite them. But we will consider two options when such a flammable tinder is not available.
In the first method, toilet paper will be taken as tinder. On hikes, we use it as a direct appointment and for wiping dishes, when it is necessary to save water, and there is no suitable grass nearby. It is also good as a kindling, especially if you moisten it with oil (even hygienic lipstick can help) or another flammable liquid or wrap a piece of paraffin from a candle in it.
So, to kindle a fire in the first way, you need to do the following:
- The protective cover is removed from the lighter.
- Toilet paper folds several times and tears. All pieces are stacked with the torn part in one direction.
- The resulting stack is pressed against the lighter in the place from where sparks fly out when the wheel rotates. The torn loose parts should be directed towards the sparks.
- Rolling blow of the palm on the wheel of the lighter on the stack toilet paper sparks are struck. Sparking is repeated until the paper begins to smolder.
- The paper is inflated until a fire appears.
This method requires good dry toilet paper (preferably soft and loose, not thick like Whatman paper). I can say that not all toilet paper is equally well suited for setting fire in this way: paper that has lain in a pocket of your trousers and is damp from this ignites badly.

Even without fuel, a silicon lighter produces enough sparks to ignite dry tinder.
Many people recommend putting the kindling fire in a pocket to dry, but from my own experience I was convinced that the paper in the pocket of my pants does not dry, but is moistened. This is most likely due to perspiration and high humidity air between the body and clothing.
The second method is less capricious and is able to light not only toilet paper, but also ordinary paper, for example, torn from a notebook. It is more versatile: I, for example, without any problems managed to achieve the beginning of smoldering of the tinder fungus (its tubular part) plucked from the tree with this method. It's not hard to guess that in the wild, instead of paper, the same birch bark can be used (the upper thinnest part of it).
So, to implement the second method, you must follow the following instructions:
- The lid is removed from the lighter.
- The center of the paper sheet is loosened by rubbing or any other method suitable for this purpose and bent so that a funnel forms in the center of the sheet. If this is not done, fire can also be obtained, but more powder is needed, scraped off the mischmetal of the lighter rod.
- The lighter is initially positioned horizontally above the paper so that sparks cannot ignite the paper.
- The lighter wheel is scrolled slowly until it collects on paper the right amount powder scraped off the lighter rod. When turning the wheel, you should try to avoid sparks.
- The powder collects in the center of the paper where it is loosened.
- A spark is extracted onto the powder from the lighter by rotating the wheel - the flash sets fire to the paper.
This method works well with an empty lighter. But, as my experience has shown, if the lighter was used until there was no gas left in it, there would be little sense from it: already at the stage of scraping off the mishmetal shavings, the rod can fly out and get lost, depriving a person of the opportunity to complete the matter.
On the other hand, although such a lighter allows you to make fire even without gas, I would still dare to recommend carrying a piezo lighter with you: it is more convenient to use, especially when you have to use it in the cold with frozen hands.
Attention!
In the cold, many cheap lighters work very poorly due to cooling and a decrease in gas pressure inside them. Therefore, it is recommended to carry them in an inner pocket and remove them immediately before use. It is also helpful to have at least two lighters and matches or flint in case one of them breaks.
If finances allow you to spend money on something more "powerful", then it is better to buy a turbo lighter: it will not go out in the wind, and it is easier to light a fire with it, although it also runs out of fuel faster.
Lighting a fire with a lens from the sun
This method is based on the properties of a lens to concentrate all the sun's rays passing through its surface at one point. This is where the temperature will be sufficient to ignite the tinder.
When hiking, the lens can be removed from glasses, a camera, binoculars and other devices that may include it. Sometimes they take a small magnifying glass on a hike to examine the map. A magnifying glass is included on some tablet compasses.
If ready-made options was not found, the lens can be made from improvised means, for example, carved out of ice, made from the bottoms found along the road, among other garbage glass bottles(It is not recommended to carry a glass container with you on a hike, due to its fragility). A condom or PET bottle filled with water also works well as a lens for lighting a fire.
Video: Making a fire with a condom
These and other methods of making a fire using the sun were considered in more detail in a separate article, so now we will focus on an option that can be used in a city or village, namely, creating a lens from an electric light bulb.
To do this, you need an incandescent lamp, which can be found both at home or in the entrance, and among the garbage.
The bigger the lamp, the better. The shape of the lamp should be round.
- The ceramic insulator is broken with a hard object. It is more convenient to do this with a nail.
- The inner part is gently knocked out through the resulting hole.
- All "insides" are removed from the flask.
- Poured into the flask pure water- the lens is ready.
Such a lens, in comparison with many others made from improvised means, is very effective remedy for making a fire.
The method of lighting fire from the lens and the sun is simple and effective, especially when a finished lens is available. I use it myself and recommend it to others as a primary method for starting a fire in sunny weather, thus saving matches and fuel in lighters.
There is an opinion that this method is good only in the warm season, however, as practice has shown, they can make a fire even in winter time year at sub-zero temperatures, but clear weather. The main thing is to have the sun.
This method has one drawback - it is impossible for them to make a fire in cloudy weather and at night.
Lighting a fire with a concave mirror
This method is based on the same principle as the previous one, only in this case the sun's rays are collected in a beam not by a curved glass, but by a concave mirror, and the kindling is located between the mirror and the sun.
On a hike, you can get some semblance of a concave mirror by removing the reflector from a flashlight or car headlight. It is also a good idea to light a fire with a gas cylinder, or rather with its concave shiny bottom (such cylinders are taken on a trip to prepare food on gas and multi-fuel burners).
In urban settings, a concave mirror can be bought at a store that sells all sorts of small things.
For this purpose, for example, I used a mirror taken from an old microscope: despite its small size, it did an excellent job of lighting fire from the sun.
Interesting and very unusual option is lighting the fire with a tablespoon. Of course, in order to simplify the task of kindling a fire in the future, the ladle of this very spoon must be deformed to the shape of a concave mirror. However, even without deformation, such a spoon on a hot summer day is capable of kindling sensitive tinder, for example, burnt.
Many times I have come across recommendations for the manufacture of a concave mirror for these purposes from a beer can. It was suggested to polish the bottom of the can with a piece of chocolate. After Les Stroud (Canada's Science of Survival TV host) demonstrated this technique in his video, I decided to try this technique. But, as I expected, nothing good came of this idea: the bottom of the can, instead of becoming mirrored, became dull. Rubbing the bottom of the can with campfire ash and toothpaste didn't add any shine either. The method actually suitable for polishing turned out to be simple, but tedious: it turned out that the bottom of the can can be polished with a piece of cloth.
Compared to the method of obtaining fire with a lens, this method is less convenient, since it is necessary to hold the tinder in a canopy between the sun and the mirror, which is not always convenient. In addition, the tinder itself, in most cases, partially obscures the sun's rays falling on the mirror with its shadow, thereby reducing the effectiveness of the method. In general, this method has the same advantages and disadvantages as the method of producing fire with a lens.
Building a fire by rubbing wood against wood
The principle of making a fire in this way is based on the fact that friction heats up the wood, and the dust formed as a result of friction begins to smolder. This smoldering dust is carried into the kindling fire, igniting it.
These methods are very difficult to implement and time consuming. Without preliminary training, it will be difficult to build a fire in this way, especially in our latitudes. In addition, the method is sensitive to wood: not all wood heats up well by friction and, if you make a mistake in choosing it, the chances of success are sharply reduced.
Nevertheless, I personally consider this method basic, that is, one that will allow you to start a fire without anything at all, when a person in the wild has no equipment at all, and besides trees, there are no more stones and metal in the area. Therefore, it makes sense to spend time and effort on its development, especially since fire in a campaign or in conditions of survival is one of the main things for a comfortable and safe stay in the wild.
Building a fire by rubbing a polypore on wood
The principle of this method is similar to the previous one, only in this case friction occurs between the wood and the tinder fungus, namely chaga.
For reference: chaga is a type of tinder fungus, also called a birch mushroom. As the name implies, such a mushroom grows on birches. Chaga is used not only for making a fire, but also for making tea, kvass, as well as for medical purposes.
To start a fire in this way, follow these steps:
- In the trunk of a dry tree in its upper part, two edges are cut longitudinally with an ax, located at right angles to each other. Top part cross section the trunk at the same time resembles a gable hut.
- Chaga is cut into two parts.
- One part of the chaga is pressed with a cut with both hands to the edge formed by the edges, and they begin to move. These movements should be reciprocating, directed along the trunk, and performed before the beginning of decay of the chaga.
- The smoldering chaga is transferred to a kindling and fanned until fire appears.
This method is somewhat similar to the fiery plow method, it requires a lot of effort and time for its implementation. In addition, this method requires an ax or other tool that allows the felling and processing of wood.
The disadvantages of this method can also be attributed to the chaga itself, which does not grow in all regions. In any case, I have never found it in the south of Ukraine, including due to the small number of birches growing in this region.
Nevertheless, in a birch grove of all friction methods, this is perhaps the most effective, since using birch for the same method of making fire with the help of an "Indian violin" is not best idea due to the hardness of birch wood.
Building a fire by rubbing a wire on wood
In this method, the tinder ignites from a wire heated by friction against a tree.
The tourist usually has the wire in the repair kit: here it lies in case of breakage of the equipment, which can be repaired with its help. In addition, wire can be used instead of rope to fasten elements together when building a shelter or raft. Traps can be made from wire, in particular, snares, and much more.
Certain types of traps, such as snares and traps, may be illegal in some regions. Therefore, before catching certain representatives of the fauna, you should always ask what the local legislation says about this. So, in one region, the use of a particular tackle may be allowed, while in another it is prohibited by law. It is clear that in conditions of survival, no one will pay attention to these things, but for a peaceful tourist who wants to practice survival skills in the wild, they should still be taken into account in order to avoid a fine and damage to nature.
The wire for this method should not be thinner than 2 mm in thickness, so as not to break prematurely as a result of heating.

On a hike, the wire is generally very useful - dishes are hung on it over the fire, various devices are made from it, and it can also be used to start a fire.
To start a fire in this way, you must do the following:
- A piece of wire with a length of at least 80 cm is taken.It will be inconvenient to work with a smaller piece.
- Two small sticks are screwed to the ends of the wire as handles.
- A thin dry log is taken, at one end of which a small area is cut down on one side (about 20-30 cm).
- The log is placed on a dry platform and, in order to prevent rolling from side to side, is fixed in any convenient way.
- The wire is passed under the chipped area and the “sawing” process begins. They work in a similar way when sawing wood with a chain saw.
- After the wire has rubbed a little against the tree and a small groove is formed, a tinder is placed on the hewn area so that it touches the wire tightly. As tinder, you can take an old dry stalk of cattail with fluff. If one is not available, another tinder is wound on the stick.
- A stick with tinder is pressed with a foot against a platform hewn on a log.
- The handles of the "saw" are crossed once so that the wire forms the number "8" with the broken upper ring.
- Sawing begins, heating the wire and igniting the tinder. The smoldering tinder moves into the kindling and swells until it ignites.
Like other methods of starting a fire by friction, this method is laborious, however, in the presence of wire and a suitable tinder, it can be implemented in the shortest possible time and does not depend on the type of wood. And given the fact that many people take wire with them on a hike (and sometimes it can be found among the garbage along the way), this method can be recommended not only in urban areas, but also in the wild.
Building a fire with a nail and hammer
This method is based on the ability of the metal to heat up during sharp deformation and, by transferring heat to the tinder, set it on fire.
For this method, you will need nails 10 or 20 cm long, a hammer, an anvil and, for example, paper as tinder. Smokers, on the other hand, can try to light a cigarette in this way, from which, among other things, you can kindle a kindling.
For obvious reasons, this method refers to the urban: hardly anyone would come up with the idea to put a hammer and anvil in a backpack, however, in the wild, you can also dodge by finding a replacement. For example, instead of a nail, you can take another metal object, instead of a hammer and an anvil, two stones. But in this case it will be much more difficult to get fire.
So, in order to light a fire in this way, you must follow the following instructions:
- The newspaper is rolled up into a tube and pressed with some object so that it does not unwind. To do this, you can put the same anvil on the newspaper or step on the newspaper with your foot.
- A nail is placed on the anvil and a series of hammer blows are applied to it.
- The heated nail leans against the newspaper until it begins to smolder.
- If smoldering does not start within a few seconds, the newspaper is removed, and a few more blows are applied to the nail. If the newspaper begins to smolder, it is fanned until a fire appears.
As I said earlier, this method is advisable at home. To test your fate in the wild, trying to light a fire in this way, wasting precious energy and time, I would not recommend. However, if fire is still vital, and other methods for some reason cannot be realized, you can use it as well. As they say, in the absence of fish ...
Making a fire by rolling cotton wool with chalk, ash and without them
In this method, a smoldering ember appears inside a cotton roll, which is vigorously rolled with a board along flat floor... Raw cotton wool, which can be removed from, for example, old mattresses and children's toys, is suitable for this method. The principle here is that when the cotton wool is rolled, its fibers rub against each other as the temperature rises. With due diligence, the cotton wool heats up so much that it catches fire.
Instead of cotton wool, you can use cattail fluff or fibers removed from the stems of dried nettles.
The production of fire occurs according to the following scheme:
- A piece of cotton wool is spread out in a rectangular plate and rolled into a dense roller. To get a denser roller at the final stage, you can wet your hands with water (or spit) and roll the roller between your palms. Most often, chalk is used to fasten the roller (in an old country house it is applied to the walls, which makes them dirty if you lean against them) or ash (you can take it from the oven), crushing cotton wool on both sides with them before rolling.
- Then the roller is turned over and a little more cotton wool is also tightly wound over it in the opposite direction. This is necessary so that the inner roller does not unwind when the board rolls it across the floor. This step can be skipped if chalk or ash is used.
- The roller is placed on a flat floor or board, pressed on top with another board and rolled for even greater density. The denser the roller is, the more chances you have to make a fire.
- The roller pressed by the board begins to roll intensively on the floor in one direction and the other. The pressure on him should not be excessive. As a result of such rolling, the inner layers of cotton wool heats up and begins to smolder.
- The smoldering cotton swells, is transferred to the kindling, which ignites as a result of these actions.
This method is realizable only in a settlement or, for example, in a forest house, where you can find even smooth boards. In addition, this method requires a special tinder, from which you can roll a roller.
And yet, despite its shortcomings, this method has a right to exist and can be used in a situation where simpler methods are not available. In particular, it can be implemented in an abandoned village or in an old hut in the forest.
Electrocution of a fire
Fire with electric current is obtained through one of two mechanisms. In one case, due to the high resistance, the conductor heats up and ignites the tinder, in the other, the spark ignites the tinder when the contacts are closed.
This method requires a source of electrical current. On a hike, the current source for usually is a battery taken from a flashlight, or a rechargeable battery cell phone or navigator.
The poles of the battery are closed with a conductor, for example, foil (you can take it from chocolate - one of the recommended products for hiking in the cold season) or steel wool (it is used to wash pots from soot and food debris), which, when electric current passes through them, ignite.
Recently, metal scourers for dishes have been massively produced and sold, which outwardly look like steel wool, but cannot be used to produce fire. An experiment carried out by me showed that such sponges not only do not light up when in contact with a battery, but also do not give a spark. In addition, an attempt to close the battery contacts with a thread extracted from such a sponge ended in failure: the battery did not even heat up (heating occurs when short circuit, for example, when the battery is closed with foil), which indicates the possible electrical insulating properties of the material of which these sponges are composed. The experiment with the foil carried out afterwards gave a positive result: this suggests that the matter was not in the battery.
We have already talked in detail about the methods of starting a fire using a battery or accumulator in
There is an opinion that steel wool can be set on fire with the help of a lemon, if you stick a series of steel and copper nails into it, connected with wires in a certain sequence. But the sequence of connecting nails inside one lemon, which is suggested in most videos, does not make any sense, since it does not increase either the current or voltage. And, as it seems to me, the current arising from the "fruit battery" (and this is, according to different sources, 0.2-0.9 V) will not be enough to implement this idea, unless there are a dozen or two of these lemons.
On the other hand, this method can still be implemented even in the mid-latitude wilderness, where lemons do not grow. So instead of a dozen lemons, you can take almost any fruits or vegetables that are found in our area (for example, wild apples), since they also contain an electrolyte necessary for generating electricity. The only thing left to do is to get copper and zinc elements that will be used as electrodes.
There is, however, a fundamental point: if a person in the wild can get apples and even more so lemons, then he does not have an urgent need for fire. These fruits ripen in the warm season and can serve as food without a fire. So the method of producing fire with their help should be attributed, rather, to hypothetically possible, practically not useful.
Details about the main methods of starting a fire using a battery or accumulator can be found on the website in a separate article, here we will consider an option implemented in a settlement using a 220 V outlet.
Attention!
Getting fire with high voltage currents can be life-threatening: electrical shock and fire caused by short circuits.
Consider two ways to start a fire using a high voltage electric current.
For the first way:
- From any electrical appliance(preferably damaged) a plug with a piece of wire is cut off. You can take a piece of ordinary insulated wire without a plug, but then you have to make it yourself and using such a wire will not be so convenient.
- The wire at the end is divided into two contacts and stripped of insulation. This creates two forks on either side.
- A piece of foil or steel wool is taken as tinder. For the same purposes, a piece of paper is suitable, on which a square is drawn and painted in the center with a simple pencil: a layer of graphite on paper has electrical conductivity and high resistance, so such paper can be effectively used to start a fire using this method.
- The plug is plugged into an outlet.
- If exposed wires come into contact with foil, steel wool, or graphite-lined paper, they will catch fire.
For the second way:
- A cigarette is taken. Instead of a cigarette, you can make a roll-up: put another tinder into a small piece of toilet paper.
- As in the previous method, a plug with bare wires is made.
- The edge of the cigarette is slightly wetted with saliva.
- The plug is plugged into an outlet.
- Touching the bare wires to the damp part of the cigarette causes sparking, which, by pulling from the cigarette (like lighting a cigarette), helps the tinder to ignite.
- The smoldering tinder is transferred to the kindling and fanned until a flame appears.
On the basis of the principle implemented in the second method, in my childhood I managed to ignite a fire from a dynamo (by the way, many people use “dynamos” on bicycles, including cycling trips).
It all happened by accident and became the reason for the subsequent replacement of the oilcloth covering kitchen table, which was successfully burned by me. For this I poured a small hill magnesium shavings obtained by filing a magnesium plate. He brought the wires from the dynamo to her. At the moment the dynamo rotated, the wires, due to the shaking, either came into contact with the magnesium, then disconnected from it, as a result of which small green sparks appeared, which actually attracted my attention. As a result of these actions, at some point, magnesium flared up and burned the oilcloth.
After this incident, repeated tests of the method were carried out, but already on a non-combustible foundation. In all experiments, sooner or later, magnesium ignited.
Magnesium gives a dazzling flash the moment it burns. This is why its mixture is used to make magnesium light bombs, which are used to blind the enemy.
For many who use modern flint to light a fire, a magnesium bar in a backpack pocket is commonplace. It is from it that the shavings are scraped off onto the tinder, which is ignited by the spark carved by the flint. Magnesium can also be extracted from the remains of an aircraft (here it is used because of its lightness), for example, after an emergency or military action, if there is still something left of the aircraft. Magnesium alloys, containing more than 90% magnesium, are used to manufacture vehicle housings, binoculars and much more. In general, the main problem is not where to find it, but how to distinguish it from other metals.
Summarizing the methods of producing fire using electric current, I can say that they are very easy to use, although they do not always guarantee success. Some of them are feasible in the wild with a battery or accumulator, while others require more civilized conditions.

In conditions of survival, you always need to decide which is more important - fire, or a charged battery.
The methods where you have to use high voltage current should be resorted to only as a last resort for the reasons indicated earlier.
In general, these methods can be recommended when there are no matches left, the sun is hidden by clouds or is behind the horizon, and other methods are too complicated to implement. Nevertheless, you always need to watch and assess the situation: sometimes getting fire is not as important as staying in touch, for example, with a rescue group, because often for getting fire using this method and working mobile phone the same batteries are used, the charge of which, as you know, is not unlimited. Being in the wild without a navigator or phone is sometimes more dangerous than without fire.
Building a fire with chemicals
Some chemical reactions proceed violently with the release of such an amount of heat, which is enough to ignite the mixture. This method is based on this principle.
Two methods are most applicable in the conditions of a hike - rubbing potassium permanganate with sugar (or without it) between two wooden surfaces and moistening potassium permanganate with anhydrous glycerin, which can be found in the medicine cabinet. In urban conditions, to obtain fire, you can also use cotton wool soaked in alcohol, which must be put on a potassium permanganate soaked in concentrated sulfuric acid.
These and other chemical methods of obtaining fire without matches have been analyzed in detail in, so I will not repeat here, but will only draw a conclusion on them.
This method is simple and allows you to quickly produce fire, but its big drawback is the high cost and rarity of some of the reagents involved in the reaction. Potassium permanganate, for example, is generally included in the list of precursors, and getting it today is not an easy task. In view of this, this method is rational only with a critical need for a fire and the availability of appropriate reagents in humans.
Making a fire with a shot from a gun
In this method, the tinder is set on fire from the gunpowder of the cartridge, which flares up when the weapon is fired.
Attention!
This method is very unsafe, so you should only use it as a last resort.
As you know, almost every modern hunter has a gun, at least in our country, so this method is primarily for those who like to shoot in the wild, as well as for the military who have the appropriate weapon at their disposal.
In order to light a fire with a shot from a gun, the following instructions should be followed:
- There is a small depression in the dry ground, although you can dig it yourself.
- A piece of dry cotton cloth is cut off.
- Gaskets, wads and all shot are removed from the hunting cartridge. If the cartridge is live, a bullet is removed from it.
- Half of the gunpowder in the cartridge is poured out: firstly, there will be plenty of remaining gunpowder in the cartridge (excess gunpowder can even harm), and secondly, the sprinkled gunpowder can be useful for starting a fire in the future.
- A piece of cloth is cut off and pushed into the cartridge over the powder so that fragments of this tissue do not go beyond the cartridge body.
- The cartridge is inserted into the weapon.
- A shot is fired into the previously found recess in the ground - the fabric ejected from the trunk ignites.
Due to the high cost of cartridges, this method is advisable only when other simple methods of starting a fire are not available, and it is still necessary to organize a fire. For many tourists and city residents, it has no practical meaning due to the lack of weapons.
As you can see, the number of methods for obtaining fire is quite large and you can always choose the one that turns out to be optimal in a given situation. The main popularity, according to my observations, was gained by the methods of producing fire with a battery with foil, a fiery bow, a lens from the sun, as well as potassium permanganate with glycerin.
Nevertheless, ideally, you need to know and be able to use all possible methods for starting a fire, because the production of fire in a situation of emergency survival is one of the primary tasks. Another thing is that it is not always possible to practice in all known methods, since some methods require large monetary costs (for example, the method with a gun), others are difficult to obtain (for example, the fire bamboo method, although if you so desire, the bamboo trunk can be obtained even in an area where it does not grow, for example, by purchasing it through Internet), and still others are simply life-threatening (for example, some methods of producing fire with electricity).
In addition, in conditions of survival, you always need to be able to correctly prioritize. For example, if the weather is not too cold, instead of starting a fire, it is more useful to build a shelter from the rain, or simply comfortable spot for an overnight stay, which will require less effort and time, but will allow you to sleep well without having to get up and throw firewood into the fire. If you are at a distance of 100-150 km from a settlement or the nearest road and you have a navigator or a phone with a charged battery, it is wiser not to stop for the night at all, and even more so not to waste battery power on starting a fire. You can sleep during the day, warmed up in the sun, and the rest of the time you can confidently go to civilization using the navigator. Finally, the expenditure of energy for making a fire by friction can be greater than the energy value of food cooked over the fire. In this case, it may be advisable to eat the prey raw.
And not always at modern man there is time to practice these skills, because besides them there are others, for example, the construction of a temporary shelter, orienteering, overcoming different terrain in different weather conditions and much, much more that may be needed not only in survival conditions, but also for the usual hike of the first category of complexity.
That is why here I have selected the methods that I recommend mastering in the first place. These include:
- Getting fire from sunlight and lens, namely pre-made lens, condom and water bottle options. These methods are easy to learn and can be used in clear weather as an alternative to matches. Personally, I almost always use this method to start a fire.
- The chemical method, namely, making a fire with potassium permanganate. This method is simple but expensive. However, in the absence of standard means of ignition in inclement weather, it can help a person save time and energy to obtain fire, for example, by friction.
- Getting fire by friction, namely with the help of a fiery bow (also known as an Indian violin). This method is the most "harsh", but it allows a person to make fire in nature from scrap materials. You can also try to master the fire plow, so as not to be dependent on the reliability of the bowstring of the bow that rotates the wooden drill.
These are the main ways to start a fire and need to be mastered first. Other options can be studied afterwards, if desired, with the availability of time and the possibility of their implementation.
Interesting video: Making a fire by rolling cotton wool

