Heated floors in your own home. Warm water floors: types, features, and also how to make a water heated floor in an apartment with your own hands, step by step actions
Today, many owners of private houses install a warm water floor for additional or main heating. They have a lot of advantages: they evenly heat the room, increase comfort, do not require additional energy costs, since they work from one boiler with radiators. In this article, we will consider the question of how to install a warm floor in a private house with a water heater, even without experience in carrying out such work.
Preparation and calculation of materials
Such responsible work should begin with the planning and preparation of all necessary materials. Strictly speaking, accurate calculations can only be carried out by specialists who have information about the level of heat leakage in a particular room. But for individual needs, as a rule, approximate calculations are used that fully satisfy the requirements.
To begin with, you should draw a plan for the location of pipes for underfloor heating in a private house. The clearest and most understandable thing will be a diagram drawn on a sheet in a cage, on which the system can be calculated based on the quadrature of the room. Each cell will correspond to one step, that is, the distance between the pipes of the system. For a temperate zone:
- With sufficiently good insulation of windows and the house, the distance between adjacent turns of the pipe can be made approximately 15-20 cm.
- If the walls are well insulated - 10-15 cm.
- In spacious rooms, where some of the walls are cold and some are warm, a variable step is taken: near the cold walls, the distance between adjacent turns of pipes is not too large, and as it approaches warm walls, it increases.
The choice of flooring for underfloor heating:
- A serious mistake is made by those who are going to lay a thick wooden floor or parquet on a warm water floor. Wood is a poor conductor of heat, which is why it will greatly hinder the heating of the room. The efficiency of such heating may turn out to be even worse than that of a radiator, in turn, heating costs are quite large.
- The ideal flooring for underfloor heating is ceramic, stone or porcelain tiles. When heated, it will hold heat wonderfully, and this is the best option for a bathroom or kitchen. In rooms where a warm floor is made, children love to play very much, and just walking barefoot is much more pleasant than on wooden parquet.
- A slightly worse option for flooring, more appropriate for a bedroom or guest room, is laminate or linoleum. Such materials transmit heat well without lowering the efficiency of water heating. In this case, the laminate must be chosen with a minimum thickness, and linoleum - without a substrate with insulation.
Important! When heated, many artificial materials can release harmful fumes into the air. That is why floor coverings with chemical additives must be marked by the manufacturer of the product on the possibility of their use in residential premises on warm floors.
Underfloor heating base
If we are talking about housing with concrete floors, then the best option for the foundation for a warm water floor with your own hands in a private house is a concrete screed with water heating.
Important! The same method is applied to the first floors (basement) of private cottages, if the base of the floor is on a sand cushion, which is located directly on the ground.
In houses where there are wooden floors, this option is not suitable. Wooden floor beams simply cannot withstand the heavy weight of a concrete screed, no matter how thin it is. In this case, a lightweight version of underfloor heating is used, which we will talk about a little later.
Do-it-yourself installation of underfloor heating begins with careful preparation of the base, which must be even, without any depressions and protrusions. The maximum allowable difference can be 5 mm.
Important! If the depth of surface defects is 1-2 cm, then you will have to pour and then level a thin layer of fine gravel (granite screenings) with a grain size of up to 5 mm. It will be necessary to lay a film on top of the leveling layer and, in the process of laying thermal insulation, walk on wooden boards. Otherwise, the leveling layer itself will serve as a source of irregularities.
Schemes for laying water heated floors
The most common schemes for laying water-heated floors are a spiral and a snail:
- The snail evenly heats the entire floor area.
- But with a spiral, you can provide a greater level of heating in the coldest zone of the room. To do this, the first pipe branches through which hot water will be supplied are laid there.
According to a pre-prepared plan, the exact length of the pipe is determined.
Important! For underfloor heating, only a single piece of pipe should be used. If the area of \u200b\u200bthe room is large, then several heating circuits should be planned. Moreover, the length of the pipe of each of these circuits should not exceed 100 m. Otherwise, too much pressure will be required, which is necessary for the normal flow rate of hot water. In terms of area, this approximately corresponds to 15 square meters.
Do-it-yourself warm water floor in a private house is best made from a metal-plastic pipe, the diameter of which is 16 mm. It bends easily with a fairly small radius, and it is much more convenient to work with it than with a XLPE pipe. It is undesirable to use pipes with a diameter of 20 mm, because a large diameter will require an increase in the thickness of the concrete, which will negatively affect the efficiency of the heating system.
As a rule, the pipe consumption per 1 square meter of area is:
- 10 meters at a step of 10 cm.
- 6.75 meters at a step of 15 cm.
Choice of insulation and fasteners
So that the heat does not go down, a layer of dense foam must be laid on the base.
Important! The density of the insulation should be chosen at least 25, and preferably 35 kg / m3. Lighter types of foam will simply collapse under the weight of the concrete layer.
Insulation and heat reflector
The optimal thickness of the insulation is 5 cm. When laying on the ground or if higher protection from the cold is required, when the floor below is poorly or unheated, the thickness of the heat-insulating layer can be increased to 10 cm.
To reduce heat loss, it is recommended to lay a heat-reflecting screen consisting of a metallized film over the insulation. It could be:
- Reflective screen made of foam rubber, which is glued behind the radiators.
- Penofol (metallized polyethylene foam).
- Plain food grade aluminum foil.
The metallized layer quickly becomes unusable due to the aggressive effects of concrete, so the screen itself also needs to be protected. Such a protective layer will serve as a polyethylene film, which is often used for greenhouses in greenhouses. The thickness of this film should be approximately 75-100 microns.
Moreover, it provides the necessary moisture for the maturing concrete screed throughout the entire period of its solidification. Pieces of the film should be overlapped, and the joints should be carefully glued with adhesive tape.

Fastening connections for pipes
Fasteners for pipes are installed on top of the thermal insulation. Their purpose is to fix adjacent pipe branches and place it on the floor in strict accordance with the preliminary scheme. Fasteners hold the pipe until the concrete screed acquires the required degree of hardness. The use of fasteners facilitates the installation of a warm water floor with your own hands in a private house and ensures the correct location of the pipe in the thickness of the concrete pad.
Fasteners can serve as special metal strips, welded metal mesh, plastic brackets that fix the pipe to the foam base:
- Metal strips are used with an increased thickness of the concrete pad. They slightly raise the pipe in relation to the thermal insulation, due to which it is a little closer to the top surface of the concrete pad. The pipe simply snaps into the curly notches of the slats.
- The metal mesh not only secures the pipe, but also reinforces the concrete cushion layer. The pipe is fixed to the grid using pieces of wire or plastic clamps. In this case, the consumption of fasteners is 2 pieces per 1 linear meter. In places of rounding, additional fasteners can be used.
- Plastic brackets are mounted manually. They pin the pipe to the foam as it is laid. Semi-industrial warm floors are made using a special stapler. However, its purchase is justified only with intensive professional use.
Recently, manufacturers of underfloor heating systems have begun to offer another fairly convenient solution - special sheets of dense polystyrene foam with a profiled surface. As a rule, the surface of such sheets is the intersection of grooves or rows of protruding elements, between which heating pipes are laid.
The surface of such sheets is smooth, extruded, all pores are closed, and an additional waterproofing film is not needed for it. Having a special thermal cutter at your disposal, you can make grooves in polystyrene foam yourself. However, at least minimal experience is required to carry out such work.
Important! Metal-plastic pipes are supplied in bays. In the process of laying, the bay is rolled out along the trajectory of the pipe. It is impossible to pull pipes from a lying bay, as this will cause it to twist and can lead to heating of the inner layers.
Preparation and pouring of concrete
It is possible to fill the pipes with concrete when installing a water-heated floor with your own hands in a private house in stages only after they are completely laid, correctly connected to the manifolds, and also filled with coolant under a pressure of 4 bar.
Important! Before pouring, it is necessary to withstand the pipe under pressure for at least a couple of days. If a leak is found, it must be repaired immediately. If the system itself has not yet been installed, then instead of water, air should be pumped into the pipes using a compressor and the pressure should be fixed with ball valves.
Immediately after the injection, the pressure may decrease slightly due to the straightening of the pipes. During the pouring and curing of the concrete, the pressure is monitored by a connected pressure gauge.
In order to compensate for thermal expansion, a damper tape is attached along the walls. The temperature expansion of the concrete pillow should be 0.5 mm per linear meter, with an increase in temperature by 40 degrees. In the event that the heating is only 20 degrees, then the expansion will accordingly be half as much. It is necessary to multiply the expansion by the length of the longest section of the concrete floor and compare the resulting value with the thickness of the damper tape.
As a rule, for ordinary houses, it is enough to lay the tape only along the walls and at the doorway. Also, the damper tape plays the role of thermal insulation of the warm floor and walls. In this way, cold bridges that cause unnecessary heat leakage are eliminated.
In some cases, expansion joints are additionally made:
- If the length of any side of the room is more than 8 meters.
- The floor area exceeds 30 square meters.
- The length and width of the room differ by more than two times.
- The shape of the room has several curves.
For an extended warm floor, an expansion joint with a damper tape is arranged every ten meters. So that the movement of concrete pillows in these places does not break through the pipe, a rigid plastic corrugation or a large diameter pipe should be put on it. The entry of the protective pipe into the concrete pads is at least 0.5 m from each side.
If, according to the layout plan, there is an accumulation of warm pipes in one place, for example, near the collector, then a heat insulator sleeve must be put on part of the pipes. This will make it possible to avoid local overheating, as well as better retain heat for the desired areas of the floor.
Concreting of a warm water floor
If concrete for pouring a warm floor is not brought in, but is done on site, then the following components will be required:
- Washed river sand - 1.9 in. h.
- Cement brand 300 (400) - 1 weight part.
- Crushed stone 5-20 mm in size - 3.7 in. h.
Important! This is a composition of heavy concrete, the weight of which is 2.5 tons per 1 cubic meter. m of finished material.
But many refuse sand in concrete for underfloor heating. This is due to its low thermal conductivity. Therefore, in practice, cement-gravel mixtures are often used, the composition of which is as follows:
- Cement - 1 bucket.
- Granite crushed stone - 5-20 mm - 2 buckets.
- Water - 7 liters (if the solution is very thick, you can add another 1 liter).
- Small granite screenings - 4 buckets.
Granite conducts heat remarkably, and such concrete has a significantly lower thermal resistance. In addition, it is worth introducing a reinforcing fiber into the composition, which is a small plastic fiber.
Important! The composition of any self-leveling floor must necessarily include a plasticizer. Its amount depends on the brand and purpose of this drug. Moreover, the plasticizer should not be any, but intended specifically for a warm floor.

General fill rules:
- If the pipe is fixed on strips or brackets, then a reinforcing mesh must be laid on top of it. And the height of the concrete screed should be chosen 5-10 cm.
- At the same time, it is necessary to provide at least 3 cm of concrete above the pipe. A smaller layer can lead to cracking, and too thick a pad of concrete will increase heat transfer losses.
- With the right choice of concrete and an acceptable temperature, it begins to set after 4 hours. To maintain normal humidity, it must be covered with a waterproof film, and in the process of drying the surface, water it with water.
- Already after 12 hours, the hardened concrete will be able to withstand the weight of one person. However, its full maturation occurs no earlier than 28 days later. All this time, it is necessary to take care of its humidity, as well as to maintain a sufficiently high pressure in the laid pipes. Only after the specified time has elapsed can the first thermal tests of such a floor be carried out.
Important! Both during the first test of a warm water floor with your own hands in a private house, and subsequently, you cannot quickly heat it up to high temperatures.
Flooring
On the finished, completely dried concrete base, you can glue ceramic tiles or some other types of floor coverings. In this case, glue that is intended for underfloor heating should be used.
Important! If the tile falls just on the expansion joint, then one part of it should be glued, and the other part should be put on silicone glue. The silicone dampens the thermal movements of the base, so that the tile will not crack from overvoltage.
Lightweight version of underfloor heating for wooden floors
As mentioned above, for wooden floors it is necessary to make a light warm floor without a concrete pad. In this case, the sequence of work may differ slightly, depending on the design of the ceiling and the condition of the old floor:
- To prevent heat from going down, insulation must be laid under the pipes. It can be placed between the floor lags, and then it is better to use mineral wool. Or it can be laid on an old draft floor - here you will already need polystyrene foam with a density of 25-35 kg / m3.
Important! To prevent the formation of condensate, it is worth laying a vapor barrier membrane under the mineral wool, and filling the first draft floor on top of the logs.
- As well as for a concrete floor, it is recommended to lay a heat-reflecting screen made of penofol or foil on the insulation. At the same time, all seams and joints must be carefully taped with adhesive tape.
- It is necessary to lay logs directly on the polystyrene foam, to which the subfloor boards are nailed. In this case, there should be gaps of approximately 2 cm between the boards for laying the pipe.
Important! The same gaps should be provided at the ends of the floor boards. Otherwise, you will have to choose transverse grooves for the pipe, and this can cause the boards to break.
- In order for the heat to be more evenly distributed over the floor, the pipe must be laid not just in grooves, but in specially designed metal gutters that are designed for this purpose. The metal transfers heat well over the entire surface and evenly warms the finish coat. Advice on choosing it was given a little higher - it can be a laminate that can work with heating, or a hard polymer coating. Thick parquet for underfloor heating is the least suitable.
Important! Compared to concrete underfloor heating, lightweight construction is much faster and cheaper. Another advantage is the possibility of repairing pipes in case of an accident. Problems with a pipe in a concrete floor can only be eliminated by completely replacing it. But the wooden floor also has a drawback - this is a significantly lower thermal power.
A well-arranged step-by-step do-it-yourself water-heated floor in a private house is another step towards convenient and comfortable living conditions for the whole family. But, even if for some reason you cannot perform these works on your own and are forced to invite specialists, the knowledge gained will help you take an active part in this process and control the quality of the system being assembled.
Warm floors are considered in our understanding to be a more modern heating system than radiator heating. However, this is far from the case - they appeared much earlier. Stubborn historical facts indicate that underfloor heating was successfully used in the days of Ancient Rome, in Korea, and in Russia too. True, only stove heating was used at that time, since the system for transporting hydrocarbons through pipes did not yet exist. In the modern world, the most economically successful countries widely use underfloor heating, and this is done not only for reasons of obvious comfort, but also takes into account the fact that such heating saves energy resources, the demand for which is growing every year.
This type of heating is not cheap. Parts and labor are very expensive. That is why any zealous owner may have the idea of making a warm water floor with his own hands. Why not? Moreover, the experience of both successful and unsuccessful implementations has already been accumulated enough to give specific recommendations. The purpose of our article is to give specific advice to those owners who are going to make a warm water floor, but at the same time so that they save their money and in the end get what they wanted - comfortable and economical heating.
Why underfloor heating?
Of course, they are easier to implement, they are easier to manage, but the cost of energy carriers makes its own adjustments - this type of heating is much more expensive to operate than a water heated floor. It will take only 4-5 years and a warm water floor will pay off with interest, but only on condition that it is done correctly and correctly. This is what the authors of the article want to tell our readers. Sweeping aside colorful catalogs with expensive equipment, but based only on the experience of people who were able to implement a warm water floor in their home.
Most heating systems currently use natural gas as a heat source - and this is completely logical, since this type of fuel is cheaper than others. And this trend will continue for at least a few more decades. Therefore, warm floors are best implemented with water, the coolant in which is heated by the energy of natural gas combustion. But for this, a number of conditions must be met.
Water floor heating device
A warm water floor is a complex multicomponent system, each part of which performs its own function. Consider its device in the following figure.
 Typical design of the "pie" of a warm water floor
 This type of underfloor heating is called “wet” because “wet” construction processes are used in its arrangement, namely, pouring a cement-sand screed. There are also so-called dry warm floors, but they are made mainly. Within the framework of this article, we will consider exactly “wet” warm water floors, since they are much better, although their installation is more difficult.
A warm water floor is mounted on a stable and solid base, which can be a concrete slab or soil. A vapor barrier made of a polyethylene film with a thickness of at least 0.1 mm is laid on the base. The next layer of the "pie" is a heater, as it is best to use extruded, which has a very low thermal conductivity, high mechanical strength and reasonable cost. A cement-sand screed is equipped on top of the insulation, to which a plasticizer is necessarily added - for the mobility of the mixture, ease of installation and reduction of the water-cement ratio. It is desirable to reinforce the screed with a metal wire mesh with a cell pitch of 50 * 50 mm or 100 * 100 mm. In the same place, inside the screed, pipes of a warm floor pass with a coolant circulating in them. It is recommended to make the screed height above the pipes at least 3 cm, however, practice suggests that 5 cm is better, so the strength will be higher and the heat distribution across the floor will be more uniform.
At the junction of the walls to the screed, as well as at the boundaries of the warm water heating circuits, a damper tape is laid, which compensates for the thermal expansion of the screed when it is heated. The floor covering must be specifically designed to work with underfloor heating. The best way out is ceramic or porcelain stoneware, but some other types of coating - laminate, carpet or can also be used with underfloor heating, but there should be a special icon in their marking.

Such coatings, however, require strict adherence to the thermal regime of the floor, which is achieved by using automation - special mixing units.
Requirements for premises where heating with warm water floors will be implemented
The smartest move in construction is when the underfloor heating pipeline is laid even at the stage of construction of floors. This is very successfully used in Germany, Sweden, Norway, Canada, yes, and in other economically successful countries where energy resources are very expensive and therefore they use floor heating, which is 30-40% more economical than radiator heating. It is quite possible already in the finished room, but it must meet certain requirements. Let's list them.
 The most correct underfloor heating pipeline is the one that was laid at the stage of building a house
 - Given the significant thickness of the warm water floor - from 8 to 20 cm, the height of the ceilings in the room should allow the installation of such a heating system. It is also necessary to take into account the size of doorways, which must be at least 210 cm high.
- The subfloor must be strong enough to support a heavy cement-sand screed.
- The base for the underfloor heating must be clean and level. Irregularities should not exceed 5 mm, since drops greatly affect the flow of the coolant in the pipes, they can lead to airing of the circuits and an increase in hydraulic resistance.
- In the room where a warm water floor is planned, all plaster work must be completed and windows inserted.
- Heat loss in the premises should not be more than 100 W / m 2. If they are larger, then it is worth thinking about warming, and not heating the environment.
How to choose a good pipe for underfloor heating
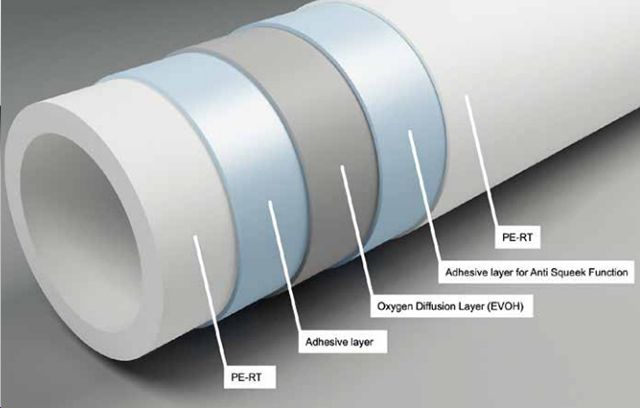
About the pipes of a warm water floor it is written in sufficient detail on our portal. Obviously, for underfloor heating it is better to choose pipes made of cross-linked polyethylene - PEX or PERT. Among PEX pipes, preference should be given to PE-Xa pipes, as they have a maximum crosslink density of about 85% and therefore have a better “memory effect”, that is, pipes after stretching always tend to return to their original position. This allows the use of axial fittings with a sliding ring, which can be embedded in building structures without fear. In addition, when a pipe is broken, its shape can be restored by heating the problem area with a building hair dryer.

PERT pipes do not have a memory effect, so only push-in fittings are used with them, which must not be walled up. But if all the contours of the warm floor are made with solid pipe sections, then all connections will be only on the collector and it is quite possible to use PERT pipes.
In addition, manufacturers produce pipes of a composite structure, when aluminum foil is placed between two layers of cross-linked polyethylene, which is a reliable oxygen barrier. But the heterogeneity of the material, the difference in the coefficients of thermal expansion of aluminum and polyethylene can provoke pipe delamination. Therefore, it is better to choose PE-Xa or PERT pipes with a polyvinylethylene (EVOH) barrier, which significantly reduces the diffusion of oxygen into the coolant through the pipe wall. This barrier can be located in the outer layer of the pipe, or inside, surrounded by layers of PE-Xa or PERT. Of course, that pipe is better, in which the EVOH layer is located inside.
For underfloor heating circuits, there are three main pipe sizes: 16 * 2 mm, 17 * 2 mm and 20 * 2 mm. Most often, 16 * 2 and 20 * 2 mm are used. How to choose exactly the “right” pipe.
- Firstly, the brand in this matter matters and you need to pay attention to it. The most famous manufacturers: Rehau, Tece, KAN, Uponor, Valtec.
- Secondly, pipe marking can “tell” a lot, it should be carefully studied and you should not be shy to ask more questions to the sales assistant.
- Thirdly, the qualification of the sales assistant is very helpful when choosing a pipe. Do not forget to require certificates of conformity, inquire about the availability and price of fittings, mixing units, manifolds and other equipment. It is necessary to find out in which bays the pipe is sold, by how many meters, in order to take this into account in future calculations.
- And finally, if a PE-Xa pipe is chosen, then a small test can be carried out. To do this, a small section of the pipe must be broken, and then warm this place with a building hair dryer. High-quality PE-Xa, and PE-Xb pipes should also restore their original shape. If this does not happen, then whatever is written on the label is simply not a PEX pipe.

Underfloor heating design principles
One of the most important stages in the arrangement of warm water floors is their competent calculation. Of course, it is best to entrust this to specialists, but already enough accumulated experience suggests that this can be done on your own. On the Internet you can find a lot of free programs and online calculators. Most well-known manufacturers provide their software for free.
water heated floor

First you need to decide on what temperature the warm floor should be.
- In residential areas where people spend most of their time standing, the floor temperature should be between 21 and 27°C. This temperature is the most comfortable for the feet.
- For working premises - offices, as well as living rooms, the temperature should be maintained around 29 ° C.
- In hallways, lobbies and corridors, the optimum temperature is 30°C.
- For bathrooms and pools, the floor temperature should be higher - about 31-33°C.
Heating with warm water floors is low-temperature, therefore, the coolant must also be supplied at lower temperatures than in radiators. If water can be supplied to the radiators at a temperature of 80-90 ° C, then no more than 60 ° C can be supplied to the warm floor. In thermal engineering, there is such an important concept as temperature drop in the heating circuit . This is nothing but the difference in temperature between the supply pipe and the return pipe. In underfloor heating systems, 55/45°C, 50/40°C, 45/35°C and 40/30°C are considered optimal.
A very important indicator is (loops) of a warm water floor. Ideally, they should all be the same length, then there will be no problem with balancing, but in practice this is unlikely to be achieved, therefore it is accepted:
- For a pipe with a diameter of 16 mm, the maximum length is 70-90 m.
- For a pipe with a diameter of 17 mm - 90-100 m.
- For a pipe with a diameter of 20 mm - 120 m.
Moreover, it is desirable to focus not on the upper boundary, but on the lower one. It is better to divide the room into more loops than to try to achieve circulation with a more powerful pump. Naturally, all loops must be made with pipes of the same diameter.
Laying step (laying) of underfloor heating pipes - another important indicator, which is made from 100 mm to 600 mm, depending on the heat load on the warm floor, the purpose of the room, the length of the circuit and other indicators. It is almost impossible to make a pitch of less than 100 mm with PEX pipes, there is a high probability of simply breaking the pipe. If the warm floor is equipped only for comfort or additional heating, then a minimum step of 150 mm can be made. So, what layout step should be applied?

- In rooms where there are external walls, so-called edge zones where the pipes are laid in increments of 100-150 mm. In this case, the number of rows of pipes in these zones should be 5-6.
- In the centers of the premises, as well as in those where there are no external walls, the laying step is 200-300 mm.
- Bathrooms, baths, paths near the pools are laid with a pipe with a pitch of 150 mm over the entire area.
Ways of laying the contours of the warm floor
The contours of a water-heated floor can be laid in different ways. And each method has its advantages and disadvantages. Let's consider them.
- Laying a pipe for underfloor heating "snake" easier to install, but its significant drawback is that there will be a noticeable temperature difference on the floor at the beginning of the circuit and at the end - up to 5-10 ° C. The coolant, passing from the supply manifold to the return one in the underfloor heating structure, cools down. Therefore, there is such a temperature gradient, well felt by the feet. It is justified to use this laying method in boundary zones, where the floor temperature should decrease from the outer wall to the center of the room.

- Laying a pipe for underfloor heating "snail" more difficult to implement, but with this method, the temperature of the entire floor will be approximately equal, since the supply and return pass inside each other, and the difference is leveled by a massive floor screed when the design requirements of the laying step are met. In 90% of cases, this method is used.

- Combined methods of laying underfloor heating pipes are also used very frequently. For example, the edge zones are laid with a snake, and the main area with a snail. This can help to correctly divide the room into contours, distribute the pipe bay with a minimum of residues and provide the desired mode.
Each method can be used variable paving pitch when in the edge zones it is 100-150 mm, and in the room itself 200-300 mm. Then it is possible to meet the requirements for more intense heating of the edge zones in one room without using other laying methods. Experienced installers often do just that.
 Layout of the heating circuit with a "snail" with a constant step (left) and with a variable bare (right)
 To calculate the contours, it is best to use special and very easy-to-learn software. For example, the well-known manufacturer Valtec, which distributes its program for free. There are also simpler programs for calculating the layout of the contours, which calculate the length of the loops, which is very convenient. For example, the program "Snail", which is also distributed free of charge. For those who are not very friendly with a computer, you can do the calculation of the contours on your own, using millimeter paper, on which you can draw a plan of the room on a scale and “lay out” the contours on this sheet with a pencil and calculate their length.

When dividing the premises into contours of a water-heated floor, the following requirements must be met:
- The contours should not move from room to room - all rooms should be regulated separately. An exception may be bathrooms if they are located nearby. For example, a bathroom next to a toilet.
- One heating circuit must not heat a room larger than 40 m2. If necessary, the room is divided into several circuits. The maximum length of any side of the loop must not exceed 8 meters.
- Along the perimeter of the room, between rooms, as well as between individual circuits, a special damper tape should be laid, which, after pouring the screed, will compensate for its thermal expansion.

Choosing the type of insulation for underfloor heating and its thickness
Insulation for a warm water floor is mandatory, because no one would like to spend their money on heating the earth, the atmosphere or unnecessary building structures, but the floor is exactly the right one, which should take the lion's share of the heat from the heating circuit. For this, a heater is used. What types should be used? Among all their diversity, the authors of the article recommend that you should pay attention to only two of them.
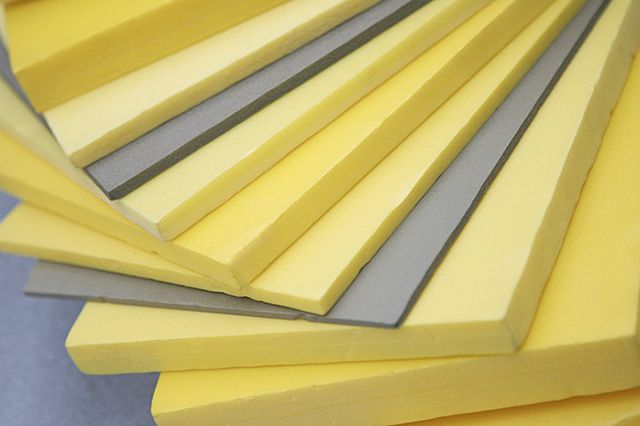
- Extruded polystyrene foam (EPS). This material has low thermal conductivity and high mechanical strength. EPPS is not afraid of moisture, it practically does not absorb it. Its price is quite affordable. This insulation is produced in the form of plates of standard sizes 500 * 1000 mm or 600 * 1250 mm and a thickness of 20, 30, 50. 80 or 100 mm. For good joining of the plates on the side surfaces there are special grooves.
- Profile heat-insulating from expanded polystyrene of high density. On their surface there are special round or rectangular bosses, between which it is very convenient to lay the pipe without additional fixation. The pipe fastening pitch is usually 50 mm. This is very convenient during installation, but at a price they are much higher than XPS boards, especially from famous brands. They are produced with a thickness of 1 to 3 cm and dimensions of 500 * 1000 mm or 60 * 1200 mm - it depends on the manufacturer.

XPS boards can have an additional foil layer with additional markings. Marking the plates is, of course, useful, but the presence of foil only increases the cost of the insulation, and there will be no sense in it for two reasons.
- The reflectivity declared by the manufacturers will not work in an opaque medium, such as a screed.
- Cement slurry is a strong alkaline environment, which perfectly “eats” an insignificant (several tens of microns) aluminum layer even before it hardens. We must realize that foil plates are a marketing ploy and nothing more.
The authors of the article recommend using XPS boards for insulation. Savings compared to profile mats will be obvious. The difference in cost is enough for fasteners, and there is still a lot of money left. Let's remember folk wisdom that money saved is akin to earned money.
What thickness should be the insulation in the design of the warm water floor cake? There are special and complex calculations, but you can do without them. If you learn a few simple rules.
- If warm floors will be made on the ground, then the thickness of the insulation must be at least 100 mm. It is best to make two layers of 50 mm and lay them in mutually perpendicular directions.
- If warm floors are planned in rooms above the basement floor, then the thickness of the insulation is at least 50 mm.
- If warm floors are planned above rooms heated from below, then the thickness of the insulation is at least 30 mm.
Additionally, it is necessary to provide for the fastening of XPS boards to the base material, since when pouring the screed, they will tend to float. Dish-shaped dowels are ideal for this. They need to fasten all the plates at the joints and in the center.

To fasten the pipe to the EPS, special harpoon-brackets are used, which securely fix the pipe. They are fastened at intervals of 30-50 cm, and in the places where the PEX pipe turns, the pitch should be 10 cm. It is usually calculated that 500 pieces of harpoon-staples are required for a 200-meter pipe bay. When purchasing them, you do not have to chase the brand, as it will cost several times more. There are very high-quality and inexpensive staples of Russian manufacturers.

The choice of the collector-mixing node of the warm floor
The water floor collector is the most important element that receives the coolant from the main, distributes it along the circuits, regulates the flow and temperature, balances the circuit loops, and helps to remove air. Not a single warm water floor can do without it.

It is better to entrust the choice of a collector, and more correctly, a collector-mixing unit, to specialists who will select the necessary components. In principle, it can be assembled independently, but this is a topic for a separate article. Let's just list which elements should be included in order not to make a mistake in choosing.
- Firstly, these are the collectors themselves, which can be equipped with various fittings. They must be equipped with adjusting (balancing) valves with or without flow meters, which are located on the supply manifold, and on the return manifold there may be thermostatic valves or simply shut-off valves.

- Secondly, any collector for removing air from the system must be equipped with an automatic air vent.
- Thirdly, both the supply and return manifolds must have drain valves to drain the coolant from the manifold and remove air when the system is filled.
- Fourthly, fittings must be used to connect the pipe to the manifold, which are selected individually in each case.

- Fifthly, special brackets are used to fasten the collectors and ensure the required center distance.

- Sixthly, if the boiler room is not equipped with a separate riser for underfloor heating, then a mixing unit, including a pump, a thermostatic valve, a bypass, should be responsible for the preparation of the coolant. The design of this node has many implementations, so this issue will be discussed in a separate article.

- And, finally, the entire manifold-mixing unit should be located in a manifold cabinet, which is installed either in a niche or openly.

The collector-mixing unit is located in such a place that all the lengths of the lines from it to the underfloor heating loops are approximately equal and the main pipes are in close proximity. The collector cabinet is often hidden in a niche, then it can be placed not only in change houses and boiler rooms, but in dressing rooms, corridors and even living rooms.
Video: What calculations are needed before installing a warm floor
Do-it-yourself installation of a water-heated floor
After calculations and the purchase of all the necessary components, you can gradually implement a warm water floor. First, it is necessary to outline the places where manifold cabinets will be placed, hollow out, if necessary, niches, and also make passages through building structures. All grooving and drilling work must be completed before the next step.
Insulation installation
Before this stage, it is necessary to prepare the premises for this - take out everything unnecessary, remove all construction debris, sweep and vacuum the floors. The room must be absolutely clean. When installing the plates, wear flat-soled shoes, as heels can damage the surface. We list the sequence of actions during the installation of insulation.
- First of all, the level of the clean floor is beaten off on the walls with the help of laser or water. All the irregularities of the base are measured using a long rule and a level.
- If the irregularities exceed 10 mm, then they can be completely leveled with clean and dry sand, which should subsequently be leveled.

- If a warm floor is made on the ground or above the basement floor, then a waterproofing film is spread with an overlap of adjacent strips of at least 10 cm and with entry to the wall. The joints are sealed with adhesive tape. As a waterproofing, a polyethylene film of 150-200 microns is quite suitable.
- Starting from the far corner of the room, the process of laying XPS boards begins. They are laid close to the walls with the marked surface up.
- XPS boards must be tightly joined to each other using the grooves that are on their side surfaces. When laying each slab, it should fit snugly against the base and be in a horizontal plane, which is checked by the building level. If necessary, sand is poured under the slab.

- If obstacles in the form of protrusions, columns and other elements are encountered along the laying path, then after preliminary marking, the slab is cut with a construction knife along a metal ruler. In this case, the EPS must be placed on some kind of unstable base so that the knife does not become dull, for example, a piece of plywood or OSB.
- When laying the next row, it should be borne in mind that the joints of the plates should not coincide, but go apart, like brickwork. In order, if a part of at least 1/3 of its length remains with the remaining XPS slab in the row, then laying the next row should begin with it.
- If it is planned to lay the second layer of XPS, then it should be carried out in a mutually perpendicular direction with the first layer.
- After laying the thermal insulation, use a perforator with a long drill and a hammer to fix the dish-shaped dowels at each joint - at each joint and in the center of each XPS board. The joints between the EPPS are sealed with construction tape.

- If cavities or gaps remain after the installation of the insulation, then they can be clogged with EPS scraps and blown out with mounting foam, but this can be done later, after the pipes have been installed.
After that, we can say that the installation of insulation is completed. Although XPS boards are dense enough to support the weight of an adult, you still need to take precautions when moving on them. It is best to use wide boards or pieces of plywood or OSB.
Installation of a pipe of a warm water floor
The most crucial and difficult moment has come - the installation of floor heating pipes. At this stage, you need to be especially careful and accurate, and here you can’t do without an assistant. It is also desirable to have a special device for unwinding the pipe, since it is strictly forbidden to remove the pipe from the coil with rings, since then there will be very strong stresses in it, which will complicate or make installation impossible. The main rule is that the coil must be twisted, and not removed from the fixed coil. In principle, this can be done manually, but with a device it is much easier.

If there are markings on the upper side of the XPS boards, then this is just great, then pipe laying will be greatly simplified. And if not, then you should not “be led” to purchase a thin foil insulation made of polyethylene foam with applied markings. There will be no sense from him. You can also mark up yourself. To do this, marks are made on the upper side of the plates with a marker at the distance of the required contour step, and then lines are beaten off with a paint thread - this way you can make markings in a short time. After that, you can draw the paths of the contours of the warm floor.
screed for underfloor heating

In the intended place, a collector cabinet is attached and a collector is mounted in it, while without a pumping and mixing group, it will be needed later. At the entrance to the collector, at the exit from it, as well as at the entrance to, each pipe must be protected by a special corrugation. However, corrugation from eminent manufacturers costs mind-boggling money, so it is quite acceptable to replace it with thermal insulation of the appropriate diameter. Pipes must also be protected when passing from room to room and from circuit to circuit.
The installation of the underfloor heating pipe should be started from the areas most remote from the collectors, and all transit pipes should be insulated with polyethylene foam, which will ensure maximum energy conservation to the destination point and will not “lose” heat along the way. Further, the pipe “emerges” from the EPS boards, already “naked” bypasses its entire heating circuit and “dives” back and already in thermal insulation follows to the collector. The transit pipes themselves are placed inside the XPS slabs; for this, passage routes are pre-cut into them with a knife.

If the thermal insulation consists of two layers of XPS boards, then the first layer is laid first, then all communications are laid, including transit pipes for underfloor heating, and then the second layer is adjusted and cut on the spot.
In addition, pipes to radiators, as well as hot and cold water supply lines, can go in the area of \u200b\u200bthe warm floor. If there are several pipes, then they can be fixed in a bundle either with dish-shaped dowels, or with a perforated metal strip and dowels. In any case, they should not protrude beyond the upper surface of the XPS boards, so that the contour of the warm floor can be easily laid from above. All cavities are blown out with mounting foam, which, after hardening, is cut flush from the surface of the insulation boards.
Along the perimeter of the room where there will be warm floors, a damper tape is glued to the walls, which is designed to compensate for the thermal expansion of the screed. Tape comes with or without adhesive. When acquiring it, you do not have to chase the brand and overpay several times more. Now a Russian-made damper tape worthy in every sense is being produced. If there is no tape at all, then this is also not a problem - it can be replaced by foam plastic 1 or 2 cm thick, glued to the wall with liquid nails or mounting foam.

The damper tape must also be installed between rooms and different circuits. For this, a special tape with a T-shaped profile is produced. And in this case, it can be replaced by thin foam glued with mounting foam or glue.

Pipe installation is done as follows:
- 10-15 m of pipe is unwound from the coil, thermal insulation and a corresponding fitting are put on its end for connection to the collector.
- The pipe is connected to the supply of the corresponding outlet of the collector.
- A pipe is laid along the previously marked routes and fastened with harpoon-brackets in straight sections after 30-40 cm, and on turns after 10-15 cm. The pipe should be bent carefully, without creases.

- When laying, do not try to fasten the pipe immediately, but you should first lay it out approximately along the tracks for 5-10 m, and only then fasten it with brackets. The pipe should lie on the insulation without tension, there should be no effort that tries to pull the staples out of the EPS.
- If for some reason the bracket flew out of its place, then it is mounted in another, at a distance of at least 5 cm.
- After bypassing the entire circuit of the warm floor, the return pipe returns to its supply pipe and follows it next to the collector. If necessary, thermal insulation is put on it.
- Upon arrival at the collector, the pipe is connected to it with an appropriate fitting.

- Near the corresponding loop of the warm floor on the wall, as well as on paper, the length of the contour is necessarily recorded. This data is necessary for further balancing.
All contours are laid in the same way. At first it will be difficult, but then, after one laid “snail”, everything will already be clear and the work will go without problems. When moving along already laid contours, it is necessary to lay boards, plywood or OSB under the legs or knees.
 Walking in shoes through pipes is not recommended. It is better to organize such "paths"
 Video: Laying a floor heating pipe
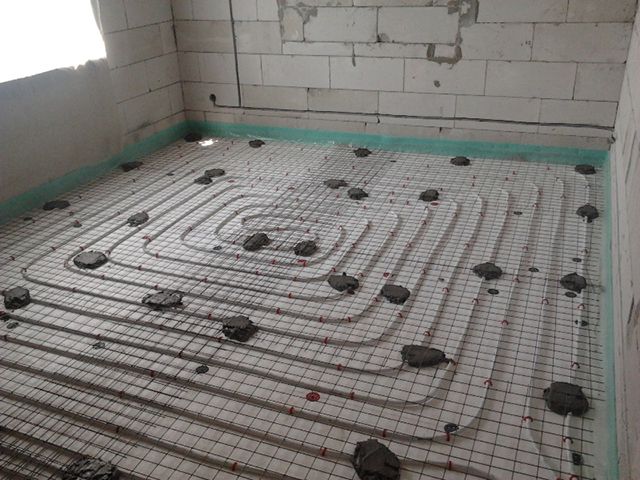
Reinforcing mesh installation
Disputes about the appropriateness of reinforcing mesh are ongoing. Someone says that it is needed, others say the opposite. There are many examples of successful implementation of underfloor heating without reinforcing mesh and, at the same time, there are examples of unsuccessful implementation of underfloor heating with reinforcement. The authors of the article argue that reinforcement will never be superfluous, but only correctly performed.
The Internet is replete with examples when a metal mesh is laid and fixed on the insulation, and only then a warm floor pipe is attached to it with plastic ties. It seems to be convenient, but this is not reinforcement, but simply putting an absolutely useless mesh under the screed, on which money was spent. Reinforcement is when the mesh is inside the screed, and not under it. That is why the authors recommend placing the grid on top of the pipe.

For reinforcing the screed, a metal mesh made of wire with a diameter of 3 mm with a cell size of 100 * 100 mm is suitable - this is quite enough. It is not recommended to use reinforcement meshes due to the fact that the reinforcement has a corrugated surface and during installation can damage the smooth surface of the pipe. Yes, and you should not spend extra money on excessive strength of the screed, because it is assumed that the warm floor is already mounted on a fairly solid foundation. The mesh is laid with an overlap on one cell and is connected either with a knitting wire or plastic clamps. Sharp protruding ends must be bitten off so that they do not damage the pipe. Additionally, the mesh is attached to the pipe in several places with plastic clamps.
Instead of a metal mesh, a plastic mesh may well be used, which will perfectly reinforce the screed and save it from cracking. It is more convenient to lay a plastic mesh, as it comes in rolls. The use of plastic mesh virtually eliminates damage to pipes, and its cost is significantly lower.

After laying the mesh, the question of protecting the pipes again arises, because, moving in shoes along a metal mesh, you can easily damage both it and the pipe. Therefore, it is again recommended to move only on boards, plywood or OSB. But there is still a very competent solution that will avoid damage to the pipes when pouring the screed.
A cement mortar is prepared - the same as it will be when laying the screed (1 part of M400 cement and 3 parts of sand) and during the laying process, “blobs” are made from the mortar, which protrude slightly beyond the surface of the mesh - 2 cm is enough. These "blobs" are made at such intervals (30-50 cm), which will allow you to put boards or plywood on them in the future and move completely safely. Another plus of this approach is the fixation of the mesh, because when walking on it, it tends to bend, and this can damage the welds.
 "Foots" from the solution will fix the grid and help you move safely
 Filling in contours. Hydraulic tests
This operation should definitely be carried out even before the screed is poured, since with a hidden malfunction it is easier to fix it immediately than after the floors are filled. To do this, a hose is connected to the drain pipe on the collector and discharged into the sewer, since a lot of water will be spilled through the heating circuits. It is best if the hose is transparent - it will be easy to track the exit of air bubbles.
To the inlet of the supply manifold, which must be equipped with a shut-off ball valve, tap water is connected through a hose or pipe. If the quality of tap water is low, then it is worth filling the system through a mechanical filter. A pressure test pump is connected to any other output connected to the underfloor heating circuits. This may be a free outlet of the supply manifold, a return outlet from the manifold and other places - it all depends on the specific implementation of the collector unit. In the end, a tee can be screwed into the ball shut-off valve of the supply manifold and both filling the system and pressure testing can be done through it. After testing, the tee can be removed and the manifold connected to the supply line.
Filling the system is done as follows:
- On the collector, all the contours of the warm floor are blocked, except for one. Automatic air vents must be open.
- Water is supplied and its purity and air outlet are controlled through the drain hose. Process grease and chips may remain on the inner surface of the pipes during production, which must be washed off with running water.
- After all the air has escaped and the water flows absolutely clean, the drain valve is closed, and then the already washed and filled circuit is closed.
- All these operations are done with all contours.
- After flushing, removing air and filling all circuits, the water supply valve is closed.
If leaks are detected even at the filling stage, they are eliminated immediately after the pressure is released. As a result, you should get a system of warm water floors filled with a clean coolant and airless.
To test the system, you will need a special tool - a pressure test pump, which can be rented or invited by an experienced craftsman who has such a device. Let us describe the sequence of actions during crimping.

- All contours of a heat-insulated floor connected to a collector open completely.
- Pure water is poured into the capacity of the pressure test pump, the pump supply valve is opened.
- The pump builds up pressure in the system twice as much as the working one - 6 atmospheres, it is controlled by the pump pressure gauge and on the manifold (if it has a pressure gauge).
- After raising the pressure, a visual inspection of all pipes and connections is carried out, which, in principle, should only be on the collector. The pressure is also controlled by a manometer.
- After 30 minutes, the pressure is again raised to 6 bar and all pipes and connections are again inspected. Then, after 30 minutes, these steps are repeated. If leaks are found, they are immediately eliminated after the pressure is released.
- If no leaks are detected, then the pressure is again raised to 6 bar and the system is left for a day.
- If after a day the pressure in the system dropped by no more than 1.5 bar and no leaks were detected, then the underfloor heating system can be considered properly installed and sealed.
When the pressure in the system rises, the pipe, according to all the laws of physics, will try to straighten up, therefore, it is possible to “shoot” some brackets in those places where they were “greedy” with them. Therefore, the "blobs" from the solution will greatly help to keep the pipe in place. In the future, when the screed is poured, the pipe will be securely fixed, but during pressure tests, a poorly fixed pipe can bring unpleasant surprises.
Video: Filling the system with coolant
Video: Crimping underfloor heating system
Installation of beacons
The underfloor heating screed must be poured through pipes under operating pressure. Given that in most closed heating systems, the operating pressure should be in the range of 1-3 bar, you can take an average value and leave a pressure of 2 bar in the circuits.
As beacons, it is best to use guide plasterboard profiles PN 28 * 27 / UD 28 * 27. They have sufficient rigidity and a smooth top surface, which is very useful when leveling the screed.

Lighthouses should be installed at the level of the finished floor minus the thickness of the finishing floor covering. To fix them, very often they simply use mortar pads, on which a guide profile is laid, and then it is sunk in level. But this approach has a disadvantage in that if the beacon fell below the required level, it has to be taken out, put in a fresh solution and set up again.
It is best if the beacons from the guide profile will have a rigid support under them and dowels for concrete and a screw of the appropriate length can serve as it. It is preferable to use special screws for concrete - dowels, which do not require the installation of a dowel, which means that the drilling diameter will be smaller. If you need to drill a hole with a diameter of 10-12 mm for the dowel, then 6 mm is enough for the dowel. The upper surface of the screw head should be at the level of the surface of the future screed.
 Screws for concrete - pins
 Beacons should be located at a distance of no more than 30 cm from the walls. There should not be a large distance between the beacons, since the mortar tends to settle and a hole may form on the already finished screed. Optimally - 1.5 m, then the building rule of 2 m is used to level the screed. When installing beacons, do the following:
- From the walls to the left and right of the entrance, two lines are drawn at a distance of 30 cm - this will be the position of the extreme lighthouses.
- The distance between these two lines is divided into equal parts so that it does not exceed 150 cm. It is desirable that one of the strips falls directly at the entrance to the room. If necessary, the strip attributable to the input can be smaller.
- Position lines for future lighthouses are drawn on the floor. Marks are made on them for the location of the dowels in increments of 40-50 cm.
- Holes are drilled to a predetermined depth with a perforator with a drill corresponding to the dowel.
To set the dowel caps in the same plane, it is best to use a laser level. If it is not in the arsenal of the home master, then it does not matter, now this very useful tool can be rented, especially since it will only be needed for one day.
 The laser level is an indispensable tool for marking and installing beacons
 The position of the beacons is marked on the wall. To do this, the thickness of the finishing floor covering is subtracted from the level of the clean floor previously drawn on the wall. The laser level is set at this mark, and then, screwing or unscrewing the dowels, their caps are set at the same level. If you use the usual building level for this operation, it will take much longer, and the error will be higher.
Further, guide profiles are laid on the caps of the dowels, the correct installation is checked by the building level. To fix the beacons in their places, use a cement mortar of the same formulation as for floor screed (1 part cement + 3 parts sand).
The beacons are removed from the caps of the dowels, and then slides are made from the prepared solution slightly higher than the height of the screed. It is enough to make them after 1 meter, since the lighthouse will already be securely fixed on the caps of the dowels. Further, the profile is laid and pressed into the solution, and its excess from above is immediately removed with a spatula. In conclusion, the level checks the correct installation of all beacons.
At the same time, you can check the correct installation of all damper tapes separating rooms and circuits and, if necessary, strengthen their position with mortar.
water heated floor
Video: Installation of beacons for underfloor heating screed
Underfloor heating screed
Increased requirements are imposed on the screed of a warm water floor, because in addition to the mechanical loads it carries, it also experiences temperature deformations. And usually a cement-sand mortar will not work here, the concrete mixture must be modified with a plasticizer and fiber.
The plasticizer is designed to reduce the water-cement ratio, increase the mobility of the mixture and increase its drying strength. Mobility when laying a warm floor screed is extremely important, since the mortar must tightly “grasp” the pipes and easily release air bubbles out. Without the use of a plasticizer, the only way to increase the mobility of the mixture is to add water to it. But then only part of the water will react with the cement, and the rest will evaporate for a long time, which will increase the setting and solidification time and reduce the strength of the screed. The water/cement ratio should be just enough to allow the screed to set. Usually, 0.45-0.55 kg of water is needed for 1 kg of cement.

The plasticizer is available in liquid and dry form. It must be used exactly as the manufacturer recommends, and nothing else. Any "substitutes" in the form of liquid soap, washing powder, PVA glue are unacceptable.
The fiber is designed for dispersed reinforcement of the concrete mixture, which allows to significantly reduce or virtually eliminate the formation of cracks, increase strength and abrasion resistance, increase bending and compressive strength. This is achieved by the fact that the microfibers of the fiber are distributed and fasten the screed throughout the volume of the concrete mixture.

Fiber is metal, polypropylene and basalt. For underfloor heating screed, it is recommended to use polypropylene or basalt fiber. It is added according to the manufacturer's recommendations, but it is recommended to use at least 500 grams of polypropylene fiber per 1 m 3 of the finished solution. To obtain a mixture with the best properties, add 800 or more grams per 1 m 3.
On sale you can find ready-made mixtures for pouring underfloor heating screeds from well-known and not very manufacturers. The composition of these mixtures already includes a plasticizer, and fiber, and other components. With the undoubted convenience of their use and high quality, the cost of the finished screed will be significantly higher than the self-prepared solution.
Before pouring the screed, it is necessary to remove all unnecessary objects from the floor, if necessary, vacuum the surfaces. It is also necessary to prepare all the tools and utensils for mixing and transporting the solution. All work on pouring the underfloor heating screed in the room should be done at a time, so it is advisable to have two assistants: one prepares the solution, the second wears it, and the main performer lays and levels the screed. All windows in the room must be closed, the screed must be limited from exposure to drafts and direct sunlight.
Self-preparation of a mortar for a warm floor screed should be carried out only in a mechanized way - the quality of the solution should be high. A concrete mixer or a construction mixer can be used as auxiliary mechanisms. No attachments for a drill or a hammer drill will work here, no matter what various “true” sources say.

The basis of the solution is Portland cement grade not lower than M400, which must be dry and with a storage time of no more than 6 months after the date of issue. The sand must also be dry, washed and sieved. River sand will not work - it has too regular shape. For a screed, the ratio of cement to sand should be 1:3 by weight, but in practice, few people weigh sand and cement, but a universal measurement method is taken - a bucket. Given that the density of building sand is in the range of 1.3-1.8 t / m 3, and cement during transportation is 1.5-1.6 t / m 3, then you can not be afraid to measure cement and sand in buckets, since the quality mixture will be perfectly acceptable.
The water in the composition of the solution should be approximately one third of the mass of cement, that is, for 1 bag of 50 kg of cement, approximately 15 liters of water are needed. However, the use of a plasticizer reduces the water-cement ratio, therefore, when preparing a solution with water, you need to be very careful - it is better to underfill a little and then add than to overfill.
The technology for preparing the solution with a mixer and a concrete mixer is slightly different. With a mixer, it is necessary to stir dry cement, sand and fluffy polypropylene or basalt fiber at low speeds and then gradually add water with a plasticizer dissolved in it. In gravity-type concrete mixers, which are the vast majority, it is difficult to mix dry cement and sand (dry cement sticks to wet blades and drum), so first pour some water with a plasticizer into it, and then gradually add cement first, then sand, then another portion of cement and the rest of the water. Fiber is added gradually. One part with water, the other with sand. At the same time, the fiber cannot be thrown into the concrete mixer drum in a lump, but it must be divided into portions and fluffed before laying.

The preparation time of the mortar in a concrete mixer is usually 3-4 minutes, and with a mixer a little more - 5-7 minutes. The readiness of the solution is determined by a uniform color and consistency. If you take a lump of solution in your hands and squeeze it, then no water should be released from it, but at the same time the solution should be plastic. If you place the solution in a slide on the floor, then it should not spread much, but only settle a little under its own weight. If you make cuts in it with a spatula, they should not blur, but should keep their shape.
The laying of the screed starts from the far corners of the room and is carried out in stripes along the lighthouses. Only after the completion of one strip, the next one is laid and leveled, the process should end at the entrance to the room. In the process of leveling, it is not necessary to immediately try to perfectly level the surface of the screed along the beacons. The main thing is that there are no dips in the screed, and small influxes and traces of the rule are easily corrected later.

After 1-2 days (it all depends on external conditions), when it is already possible to walk on the screed, it is necessary to clean its surface. First, it is cut with a construction knife and the damper tape protruding from the screed is removed, and then the construction rule is taken and pressed with a sharp end to the plane of the lighthouses. In the direction away from oneself, with short but energetic movements, cleaning is carried out until the beacons are completely exposed. Then the resulting debris is removed, the screed is moistened from the sprayer and covered with plastic wrap.

The next day, the beacons are carefully removed, and the dowels can be unscrewed, and the resulting grooves are rubbed with mortar or tile adhesive. The screed is moistened and covered again, it is recommended to do this daily for the first 10 days after pouring.
Balancing the contours of the warm floor. Commissioning
After the full maturation of the screed, and this is at least 28 days, you can begin to balance the contours of the warm floor. And in this process, flow meters on the manifold will be very helpful. That is why it is necessary to purchase a manifold with balancing valves and flow meters.
The fact is that the loops of the warm floor have different lengths, respectively, they have different hydraulic resistance. Obviously, the "lion's share" of the coolant will always follow the path of least resistance - that is, along the shortest circuit, while others will get much less. At the same time, in the longest circuit, the circulation will be so sluggish that there can be no talk of any heat removal. A well-designed underfloor heating project always indicates the flow rate in each circuit and the position of the control valves, but if the underfloor heating is done on its own, then a simplified but effective technique will do.

- If the pumping and mixing unit is not yet connected, then it is being installed. The underfloor heating collector is connected to the supply and return lines.
- All circuits of the warm floor open completely, the collectors of the ball valves for supply and return open at the inlet. Automatic air vent valves must be open.
- The circulation is turned on. The maximum temperature is set on the head of the mixing unit, but the boiler does not turn on yet, the coolant must circulate at room temperature.
- The pressure in the entire heating system is brought to the working one (1-3 bar).
- All contours of the warm floor are closed, except for the longest one. The position of the flow meter on this circuit is noted and recorded.
- The second longest circuit is fully opened. If the flow in it is greater, then the balancing valve is twisted until the flow is equal to the longest one.

- Further, all circuits are sequentially opened in descending order of their length, the flow is regulated by balancing valves.
- As a result, the flow rate in all circuits should be the same. If this is not the case, then you can correct the adjustment on the contours without touching the longest loop.
All of the above operations are performed correctly and the flow meters show that circulation occurs in the circuits, then you can start testing the underfloor heating with a heated coolant. It is necessary to start from low temperatures - from 25 ° C, and then every day gradually increase the temperature by 5 ° C, until the coolant is supplied to the circuits with its operating temperature. What is the sequence of actions at this stage.
- A temperature of 25 ° C is set on the thermostatic valve of the mixing unit, the circulation pump is turned on at the first speed and in this mode the system is allowed to work for a day. At the same time, the circulation through the flow meters is controlled and corrected.
- After a day, the temperature rises to 30°C, and the system of warm floors is left again for a day. The flow and temperature of the supply and return are controlled.
- The next day, the temperature rises by another 5°C, up to 35°C. This is already much closer to the operating mode of the underfloor heating, so it is already worth adjusting the temperature difference between the supply and return collectors. If it is in the range of 5-10°C, then this is normal, and if more, then the speed of the circulation pump should be increased by one step.
- The maximum temperature to which you can raise the temperature in the floor heating supply manifold is 50 ° C, but it is better not to do this, but check it in operating modes - 45 ° C or 40 ° C. Similarly, the temperature difference between the supply and return is checked. The pump must run at the lowest possible speed so that the temperature difference is up to 10°C.
The correctness of the adjustment of the warm floor cannot be assessed immediately, since such a heating system is very inertial. It should take several hours to feel the change in temperature. Therefore, everyone who made their own underfloor heating should arm themselves with patience and gradually bring the system to a mode that would provide the desired floor temperature, taking into account the coating. To do this, you will need to “play around” with the settings of the balancing valves, thermal heads (if the collector is equipped with them) and the speed of the circulation pump. The main thing is that the do-it-yourself water-heated floor system works.
Find out how by studying the instructions with a photo in a special article on our portal.
Conclusion
Stubborn statistics suggests that the system of warm water floors, in addition to the obvious comfort, also provides significant energy savings. The same statistics indicate that the number of successful independent implementations of such heating is growing every year. All technologies have already been worked out, the market is flooded with any components, for every taste, color and budget. The necessary information is always in open sources, you can always ask experts for advice. The team of authors hopes that this article has dispelled the initial fear and made it clear to readers that it is quite possible to make a water heated floor with your own hands.
Video: How to calculate and make a do-it-yourself water-heated floor
One of the options for heating a private house is to equip underfloor heating. The key advantage of such a heating system is the heating of residential premises from the lowest level, as a result of which the most comfortable microclimate is created in the house. The design of a warm floor cannot be called complicated, but its installation has certain nuances that you need to know about. This article will answer the question of how to make a warm floor in a private house with your own hands.
Advantages and disadvantages
Warm floors are quite popular today and are used by many owners of private houses. Heat transfer in these systems is carried out by pipes located under the floor covering, through which the heated coolant circulates, or by means of electric heating elements.
As a result, the floor heats up and becomes warm to the touch, which in itself significantly increases the level of comfort in the house.
Among the positive qualities of a warm floor, the following stand out most clearly:
- High level of comfort. The floor heated to a certain temperature allows you to walk on it barefoot, without fear of any discomfort.
- economy. Savings when using underfloor heating is achieved due to the efficient distribution of energy - it moves from the bottom up and heats only the volume of the room in which heat is needed, i.e. there are no extra expenses.
- Possibility to set the temperature. Underfloor heating is strongly recommended to be equipped with an electronic control unit, which will allow the system to track the current temperature in the room and keep it within user-defined limits.
- Ease of installation. Arranging underfloor heating is a fairly simple task, especially when it comes to the electrical version of the system. It is more difficult to lay a water circuit, but even if desired, it is quite possible to install it yourself.

There are also disadvantages:
- High cost. To install a warm floor, you will need a lot of materials, and you will have to fork out for some tools. There is only one way to reduce the level of costs - to do all the work on arranging heating yourself.
- Reducing the volume of the room. The thickness of the warm floor can vary from 7 to 12 cm - and it is to this height that the entire floor rises. If the ceilings are high, then there will be no special problems because of this (unless you have to redo the thresholds).
- Requirements for flooring. It is possible to cover a warm floor only with those coatings that transmit heat well. It is best to purchase specialized materials designed for use in combination with underfloor heating. Improper coating will not allow the system to work effectively, and in the case of electric heaters, there is also the possibility of their failure due to overheating.
The advantages of underfloor heating are significant, and the disadvantages are not critical, so such heating systems can be used for heating, both as the main and as an additional source of heat.
Substrate preparation for all types and variants of underfloor heating
One of the most important elements is the basis for a warm floor in a private house, which must be prepared even before the arrangement of the heating system itself. A number of requirements are imposed on the base - it must be strong enough, even and not conductive to heat. Each requirement is important, but it is thermal insulation that requires special attention - without it, the generated heat will simply go under the floor. Various pipe insulation is used, which must be selected for specific conditions.
The technology for preparing the base with expanded clay insulation includes the following steps:
- Dismantling. The first step is to remove the old coating, under which there may be concrete, soil or wooden supports. All dirt and unnecessary elements must be removed.
- markup. Using the building level along the entire perimeter of the walls, it is necessary to mark the line along which the base will be leveled. In the case of expanded clay, more free space must be left so that the thickness of the heat-insulating layer is sufficient to effectively retain heat.
- bedding. The base is covered with a layer of sand, the thickness of which should be about 10 cm. The sand cushion must be compacted after backfilling.
- Waterproofing. A waterproofing material is laid on the compacted sand layer (polyethylene is the cheapest, but a waterproofing membrane is a more reliable option).
- Arrangement of beacons. Now you need to install the supports along which the beacon profiles will be located. Beacons must be very accurately leveled.
- Laying thermal insulation. All free space between the beacons is covered with expanded clay. For greater reliability and efficiency, it is worth mixing expanded clay with liquid cement mortar.
- Filling the screed. Actually, after laying the heat-insulating layer, you can start pouring the screed, which should reach the previously measured level. The screed is leveled along the profiles.
- alignment. When the screed grabs a little, the beacons need to be removed and the resulting holes should be sealed. The seams are rubbed, after which the floor must be left until the solution has completely solidified.

In addition to expanded clay, a number of other materials can be used as thermal insulation:
- Polystyrene boards, which are usually reinforced with reinforcing mesh and attached to the base with anchors to increase strength;
- Rolled foil materials, excellent for use in combination with electric heating elements;
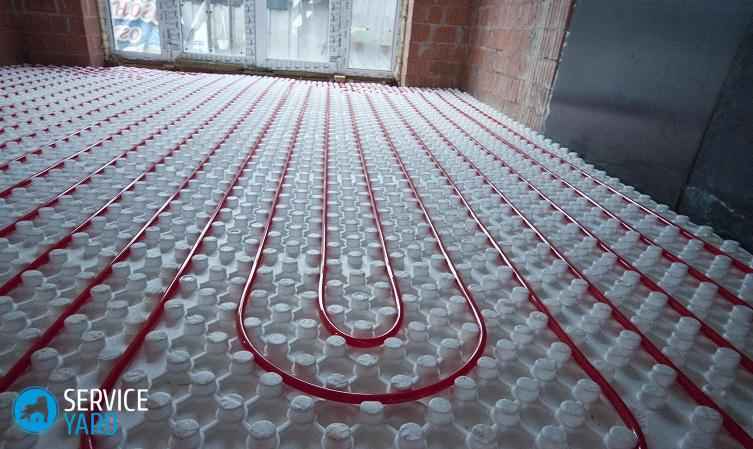
- Polymer mats designed specifically for laying a water-heated floor, for which there are special protrusions in the material, between which pipes are laid.
Do-it-yourself water heated floor device
There are different options for underfloor heating in a private house, but the most popular type is water. Structurally, such heating is a system of pipelines laid under the floor covering, through which a hot coolant passes. Pipes are connected either to an existing heating system, or directly to a heat source.

Water heated floor includes the following elements:
- Pipes. For the arrangement of a warm floor, metal-plastic or polyethylene pipes are most often used. Both materials are characterized by good thermal conductivity and a small coefficient of thermal expansion.
- Collector. This element is necessary for the formation of proper wiring - each heating circuit must have separate outputs. Inexpensive collectors have only shut-off ball valves, while good devices are equipped with a valve that allows you to regulate the temperature in each individual circuit.
- Circulation pump. The pump ensures the normal circulation of the coolant in the warm floors. If the heating equipment has a built-in circulation pump, then there is no need for a separate device.
- damper tape. Such a tape is laid around the entire perimeter of the room and allows you to compensate for the expansion of the screed when heated. Standard damper tapes are made from foamed polymers.
- Fasteners. If laying is carried out on mats, then they will perform the function of fastening for pipes. In all other cases, special brackets equipped with locks and anchoring will be required.
Laying pipes in a private house
In order for a water-heated floor to work efficiently and be sufficiently reliable, pipes must be laid at a certain distance from each other. Typically, the step value varies from 15 to 35 cm and is determined depending on the required heat transfer - for more efficient heating, the step must be reduced. It is not worth saving on pipes - too large a step will lead to uneven heating of floor areas, which will lead to a noticeable decrease in comfort.

The total length of pipes for one room is calculated using the following formula:
- D = S / M * k, where
- D is the total length of the pipes,
- S is the area of the room,
- M - laying step,
- k - safety factor, varies from 1.1 to 1.4.
Usually for 1 sq.m. the area of the room requires about 1.5-3.5 m of pipes.

An important point is the layout of the pipeline, which can be performed according to one of the following schemes:
- "Snake". A good option for small spaces. Since the area is small, the temperature in the pipes practically does not decrease throughout the entire circuit.
- "Snail" and "double snake". These layout options are suitable for medium-sized rooms. Due to the close location of the supply and return circuits, the floor will warm up evenly.
- A scheme that includes several circuits. For full and efficient heating of large rooms, it is best to equip several separate circuits that will provide good heat transfer and be quite reliable.
Installation of a water heated floor
Water heated floor in a private house is laid according to the following technology:
- Manifold installation. The collector is installed in a collector cabinet or a niche in the wall intended for it, after which it is connected to the heating equipment.
- Installing the damper tape. The tape is laid around the entire perimeter of the building or around the area where the heating circuit will be located. The presence of the tape not only compensates for thermal expansion, but also reduces heat loss.
- Reinforcement. A reinforcing mesh must be laid on the thermal insulation layer, which is fixed with anchors and interconnected with ordinary wire.
- Pipe installation. The pipes of the water circuit are unwound, and care must be taken that they do not unscrew along their axis. The pipeline is laid in accordance with the selected scheme and fixed with brackets or clamps.
- Manifold connection. All circuits are connected to the appropriate terminals, after which the system can be filled with coolant. The water circuit must be left in working condition for two days to check for leaks.
- Filling the screed. An ordinary cement screed is poured over the water-filled system, which must be left until completely solidified (usually it takes about a month). When the solution is completely dry, it will be possible to start heating in operating mode. Starting the system prematurely will most likely result in damage to the concrete layer.
Device and types of electric underfloor heating
If it is necessary to lay a warm floor in a separate room, then an electric heating system will be more relevant. Most often, electric underfloor heating is used as auxiliary or local heating. Such a system must be connected to a thermostat, which turns the system on and off as needed.

There are the following types of electric underfloor heating:
- Film. The most popular type of heaters, the main advantage of which is a small thickness. Structurally, film heaters are carbon fiber plates fastened to each other by conductive paths and insulated with a polymer material.
- Cable. This type of heater is based on a cable with a high resistance, due to which, when current passes, the product generates thermal energy. The step of laying cable heaters can be varied, thereby affecting the intensity of heating the room.
- Rod. The main structural element is carbon rods connected by wires into a one-piece structure. The most powerful and reliable, but very expensive type of electric heaters. See also: "How to make an electric underfloor heating with your own hands - types of underfloor heating, laying rules".
Installation of film underfloor heating
Film underfloor heating is the most common system, which is largely due to the simplicity of its installation.
An electric underfloor heating in a private house is equipped from scratch using the following technology:
- Laying reflective material. It is strongly recommended to install a heat-reflecting foil material under the underfloor heating film, which will prevent the passage of heat into the underground space.
- Film cutting. It is desirable to cut the film as small as possible in order to reduce the number of wires used. Film cutting can be carried out only along the cut lines drawn on it - this avoids damage to the internal elements of the material.
- Film laying. Prepared heating elements are laid out on the base and aligned. You can fasten the film strips with adhesive tape, but it is better not to fasten the edges to make it easier to connect them to the network.
- Connecting strips. In areas where the conductive path is located, you need to open the film and attach a clip to it.
- Contact isolation. Each contact and area where the strips were cut must be carefully insulated. A good option for insulation are butyl plates, usually included with the rest of the underfloor heating elements. With such plates, the contacts are simply crimped.
- Connecting a thermostat. The film leads must be connected to the thermostat, following the instructions on its case or in the instructions. The system must be turned on and make sure that all bands are working.
- Floor covering installation. If the heating elements are functioning normally, then you can safely cover them with the selected floor covering.

Conclusion
It is very easy to equip a warm floor - all types of warm floors in a private house are assembled by hand without any problems. The finished system will provide full heating of the room and the proper degree of comfort.
As an additional or main source of heating for a private house, water-heated floors are often used to effectively heat the building. However, there are some features associated with the installation of the heating circuit and the subsequent operation of the system.
The device of a water heated floor in a private house has both its positive and negative sides, which are important to consider.
Is it possible to heat a country house with a water floor
Water floor heating in a private house can be used as the main or additional source of heating. A feature of the system is the heating of the room from the bottom up. This method is the most effective, as it allows you to achieve the complete absence of cold unheated zones. The advantage of water floors also lies in the fact that the heating of the room is carried out faster and with less energy consumption.
There are certain restrictions associated with the use of underfloor heating. So, for example, the maximum intensity of heating depends on the selected floor covering.
Laminate and parquet boards can be heated to a temperature of 30°C, after which the material begins to emit harmful and toxic fumes. It would be optimal to install heating systems in country houses using ceramic tiles as a finishing coating. Ceramic is resistant to temperature extremes, heats up well and retains heat on the surface for a long time.
There is a collector for automatic floor control. The mixing unit allows you to turn on the heating system in the absence of the owners, as well as control the degree and intensity of heating the room.
How to make a water floor
The design of the system is so simple that it is allowed to lay water floors in a private house with your own hands. At the same time, it is extremely important to observe certain nuances associated with the phased installation and operation of heating.Work is performed in the following order:
- A rough base is being made- if it is planned to lay on the ground, they first carry out powdering, using sand and gravel, tamping them with a vibrating plate. After laying the waterproofing, a rough reinforced screed is poured.
The device of water floor heating in a private house cannot be carried out without the use of waterproofing material. For use welded materials or mastics. Bituminous material at the joints is treated with a building hair dryer or blowtorch. A vapor barrier must be laid on top of the screed. - Insulation - the efficiency of heating a private house with water-heated floors largely depends on a well-made heat-insulating layer. Thus, a screen is created that reduces heat losses and prevents pipes from defrosting. You can use extruded polystyrene or foam. Mineral heaters in this case are ineffective.
- Pipeline laying- a scheme for laying a water-heated floor in a private house is being worked out in advance. You can make a plan yourself or turn to professionals. When calculating the heating, the number of heating zones, the length of each water circuit and the type of pipeline laying are taken into account.
Self-installation of warm water floors in a private house is carried out as follows. A reinforcing mesh is laid, a pipe is laid out along it and fixed with clamps. If a polystyrene system is used, then the pipeline is laid in special grooves located in mats, or in openings located on heat-reflecting plates.
- Filling the finished floor- laying a water-heated floor in a country house with your own hands is nearing completion. At this stage, it is extremely important to make the most even base possible. Lighthouses are exposed. A plasticizer and additives for concrete strength are added to the solution.
It is strictly forbidden to use the usual cement composition. If a polystyrene system is used, plywood or gypsum fiber board is laid on top. - Circuits are connected- initially attached, water circuits are connected to it. During installation, the following installation rules must be observed. The coolant supply to the radiators is connected to the lower outlet of the collector, the return to the upper one. Water circuits are connected the other way around, supply at the top, return at the bottom. With the help of the collector, the floor temperature is controlled and the flow rate of the coolant is controlled.
- Laying the finish coat- a warm water floor in the country house is lined with any of the recommended finishing materials: parquet board, linoleum. Recently, self-leveling floors have also become popular.
- The first start - heating the cottage with water-heated floors can be carried out no earlier than 28 days after pouring the screed. Before starting the system for the first time, the circuits must be serviced: filling with water and.
The installation technology is largely influenced by the chosen method of laying the floors. The polystyrene system is more expensive, but installation takes less time. Mounting with a concrete screed is less expensive, but it can take about 1.5 months from the start of repair work to commissioning.


What is the best way to connect the floor heating system (coolant heating source)
According to the operating instructions, the optimum temperature for continuous operation of floor heating is the temperature range from 25-30°C.Water in the radiator type heating system is heated up to 60-70°С. Accordingly, it is possible, but not effective, to simply connect the heating of the cottage with the help of warm water floors directly from the boiler. It is enough to simply try to hold your hand under a stream of hot water with a temperature of 60 ° C. On the floor with such an intensity of heating, it will simply be impossible to walk barefoot.
Therefore, the design of a heating system using water floors includes the possibility of connecting to the following sources of heating:
- Boiler with provided circuit for underfloor heating.
- Boiler in conjunction with a mixing unit.
- Boiler of indirect heating.
- Flowing water heater.
When connecting, it is important to strictly follow the installation instructions provided by the manufacturer. Often, the documentation provides recommendations on how to connect.


Pros and cons of using water floors
Like any heating system, underfloor heating has its advantages and disadvantages. The advantages include:- No heatsinks required- water floor heating in a private house can fully meet the heat demand for a residential building. With sufficient thermal insulation of a frame country house or any country house, energy costs are even lower than those of traditional heating using radiators.
- System automation- the principle of operation of a water heated floor allows the use of programmers and control units that allow you to control the operation of the system remotely.
- No need for additional permits.
- Cost - compared to a heating system through radiators, water floor heating for suburban construction will cost a little more. So, according to preliminary calculations for 1 m², to perform all repair and finishing work, it will take about 1000 rubles, including the cost of work.
- Versatility- various options for the design of the water floor are possible, allowing to take into account all the features of the structure of the house. Additionally, it can be noted that not only the traditional coolant (water), but also special antifreezes can be used.
Sometimes it is the only solution to ensure a comfortable and cozy stay in a private house, especially in the northern regions. In the autumn-spring and winter periods, the base under your feet can cool down quite quickly, and you have to walk in warm socks, otherwise your feet get very cold. It can also be considered a plus in some way additional heating of the building itself from the inside. In objects of individual residential construction, water-heated floors are often made. Wiring diagrams in a private house can be very different, but the essence is the same - such a heating system has been and remains the most frequently equipped in the house. Let's see what are the features of water floors, how you can make them yourself.
Warm floors are not new for a long time. For several decades, they have been used to create comfort and coziness in the house and are especially popular in private homes where there are no neighbors from below, but only a basement or foundation. And, of course, in the cold seasons of the year, the floor under your feet will be cool, if not icy (much depends on how well the floors themselves were insulated).

A water-based warm floor is often recommended for use for underfloor heating in any private house, although there are also electric and. The latter are often installed in apartments, as they do not pose a risk of flooding of the premises, and are also easier to install - in particular, they do not require the construction of a cement screed. But water floors are, perhaps, an ideal option for a private house, especially if it has a heating boiler.

On a note! The water heating system cannot be regarded as the only heating system in the house. It can only act as an additional one together with heating radiators and other heaters. But to make life in the house comfortable is just her task.

It is easy to understand that, unlike the electrical system, the role of the heater in the water heater is performed by water that enters the pipes laid and filled with screed. The coolant is supplied through a special collector, which is connected to the heating system (central, heating boiler, etc.). The heat comes from the heated water circulating through the pipes to the concrete screed, heats it up, and it, in turn, gives off heat to the room and warms up the flooring. Therefore, it will be pleasant to walk on such a floor.

Attention! Water systems are used, as a rule, in private dwellings. In an apartment, it is rarely possible to connect the system to central heating, and it is also possible to flood the neighbors living below in the event of a system breakdown.
Advantages
A water-based heating system has many advantages. These include:
- achieving the desired level of comfort, since the floors will always be warm, and the air in the room will be warmed up evenly;

- safety but only in a private house. Such floors will not shock, and the worst thing that can happen is a leak. But in a private house, it is not as critical as in an apartment building. Moreover, even if a leak occurs, the maximum property of the owner will suffer, but not he himself, since there is simply no risk of getting burned with hot water;
- savings- is also one of the advantages. Water floors will save a lot of natural and financial resources, since the water will be used as the same heat carrier. You can also warm up the room faster using water floors if the ceiling height is very high;
- compatible with all floor coverings- also a plus. Indeed, only in rare cases it is impossible to lay any certain coatings on top of the heating system. And then, if everything is done correctly, then any coatings can be laid on top of the water system;

- the cost of the water system is low which will save some money during installation.
But such a system also has disadvantages. So, for example, during installation you can not do without, and this is quite hard work that requires certain skills. Plus, the screed will have to be dried before operation, and this is plus 28 days to the duration of the repair. And during this period, nothing can be done in the repaired premises. Another drawback is the difficulty of repairing the system itself if necessary. So it is important to do everything with high quality initially, in order to avoid trouble later for a long time.

Types of water floors and device features
The main element of the system of such floor heating is the pipes through which the coolant-water circulates. They can be both metal and made of polymeric materials. The former are distinguished by a high price and the complexity of the connections, while the latter are much easier to lay, and they are cheaper. In addition to pipes, other elements of this system will be needed. This is a base in the form of a concrete slab or polystyrene, a waterproofing layer, a thermal insulation layer, a concrete screed. On top of this cake, the finishing coating is laid directly. In general, the thickness of the entire structure will be about 7-15 cm.

Depending on how the arrangement of underfloor heating is carried out, there are several basic types of construction.
Table. Types of water floors.
| A type | Description |
|---|---|
| heavy | This is the most common option, characterized by high reliability. Here it is important to carefully prepare the rough surface (rough floor or floors), then lay the heat and waterproofing layers, and then the reinforcing mesh layer, to which the heating circuit itself from the pipes will be attached with clamps. After that, it remains to fill everything with a screed, dry it, and the warm floor is ready for use. Heavy water floors are also called concrete or wet floors. The latter is due to the fact that it is required to carry out work on pouring the screed. It is important to understand that the screed layer above the pipes themselves should not be less than 3 cm. |
| Lungs | In this case, a special polystyrene foam plate is used as the basis for the pipes. It is sold ready-made. During installation, it must be laid on the subfloor and laid along it in accordance with the scheme of the underfloor heating pipe. They will not need additional fixation, since there are special protrusions on the plate itself that allow you to securely fix the pipes. Then, special heat-distributing plates are placed on top, on top of which the finishing coating is mounted. This is a good option for arranging a water floor in conditions where it is impossible to install it according to the standard scheme due to the heavy weight of the standard screed. |

There is also another option for arranging a floor heating system - along wooden slats. That is, a tree will be used as the basis for such a floor, to which the pipes are attached, and from above they are covered with gypsum fiber and a finish coating. This option is used extremely rarely and it is not reliable.
Wiring diagrams
It has already been mentioned above that laying schemes for underfloor heating can be different. Depending on the scheme and compliance with the installation rules, the distribution of thermal energy in the room will also occur. There are three main pipe layout schemes, but they are all united by the fact that the installation of pipes is mandatory from the walls towards the central part.
Table. Schemes of installation of a water floor.
| Circuit Type | Characteristic |
|---|---|
| In this case, the pipes are laid in a spiral from the wall to the center, and then return to the starting point. Moreover, the design gradually narrows towards the center of the room. When calculating the circuit and laying it, you must not forget to leave free space between the pipes so that you can “lead” them back to the power source. It is noted that such a scheme will achieve the most uniform heating of the floors, and thanks to it the hydraulic resistance can be reduced. The number of pipes is also used less than in other cases. The main disadvantage is the difficult installation. |
| In this case, the pipes are laid along the walls with loops in one direction, and then in the opposite direction. When looking at such a scheme, one can note the waviness of the final figure. It is easy to lay pipes in this way, but due to the frequent step of laying pipes, it is unlikely that it will be possible to achieve uniform floor heating without temperature jumps. |
| In this case, both pipe laying schemes are combined. The option is used if the walls in the room are cold enough. The pipes are laid in such a way that in some places they lie in the form of loops, and in other places they lie at right angles. |


Mounting Features
Before we talk directly about the process of installing a water floor, it is worth talking about some of the features of this process. So, it is important to consider that in many respects the thermal load of any room will directly depend on what materials the walls are made of, how everything is insulated, how large the window openings are, and also on a number of other factors. We'll have to try to calculate the heat transfer. If it is more than 100 W / m 2, then water floors cannot be used as the main heating system, but only as floor heating directly.

The length of the pipes also cannot be any. It will depend on the size of the room and the installation scheme. You may have to lay two or even more circuits in one large room. This applies to rooms larger than 30 m2 in the first place. And each circuit will heat up independently of the other, although all circuits can be connected to the same manifold. However, the diameter of the pipes, the laying pitch between them and the length must be the same if the lines are connected to the same system. And the length and pitch of the contour, in turn, depend on the diameter of the pipes. The larger it is, the longer the outline can be.

Advice! If the room has built-in furniture, then the floor area under it does not need to be taken into account in the calculations. There will still be no sense from the warm floor, and pipes can not be laid there.
From each wall you need to make a small indent (about 10-15 cm from the outer and up to 30 cm for the inner walls). The pitch between the pipes can vary within 20-30 cm if they are used as an additional option for space heating.

A water floor is an ideal heating option for large rooms with an area of \u200b\u200bmore than 20 m 2. But in a small room it is better to choose some other option, since laying water lines will be very inconvenient. It is also worth stopping at the heavy version of the warm floor if possible, that is, mount it using a concrete screed. This is the most reliable, albeit the longest option, but it is ideal for a private home. By the way, the screed itself protects the circuit pipes very well from the risk of damage and by itself is able to retain heat for a long time, which means it will help save money.


