Cover the seams between the logs. How to seal the seams between logs
When building a bath, each owner thinks about the question of how to cover up the seams in an already built bath, which are very visible. After all, no matter how tightly the timber is laid during construction, the seams still remain. And through them precious heat will go away, which will create uncomfortable conditions for the visitors of the bath.
Therefore, in winter period heat in a log bath can only be preserved if all joints, cracks and seams between the crowns are sealed. Moreover, the sealing of the joints in the bath should be carried out with great care.
By itself, wood, due to its natural characteristics, can change its volume and size. And in the bathhouse, due to constant temperature changes, this is especially noticeable, since cracks appear on the logs themselves, and gaps can form between the blocks. This leads to the fact that the bath building becomes unprotected from wind and cold. But this problem is completely solvable, and the insulation does not require large material costs. But the insulation begins even during the construction of the bath, when the initial sealing and sealing of the joints of the bath is carried out.
And then a completely natural question arises: "How can you cover the seams in the bath and ensure its thermal insulation?" As sealants, you can use traditional materials, which are usually used when the crowns are laid: tow, moss. And also sealing joints in the bath are suitable modern materials providing thermal insulation in wooden structures.
Modern hermetic materials
Modern thermal insulation materials elastic and elastic, therefore they are used quite widely, solving the question: how to close up the seams in the bath.
Their feature is that it is easy to work with such sealants, they dry quickly, it is possible to apply several layers if necessary. And it is convenient and profitable.
 In addition, modern hermetic materials are highly adhesive, which significantly increases thermal insulation properties, are not afraid of lowering and drops in air temperature and humid environment. But, perhaps, the most important thing is that they do not interfere with the ventilation of the room and are safe for health. Sealants are used not only to seal the joints of the bath, but also to any splits and cracks that form on the wood over time.
Among the latest materials to keep the heat in the bath, special sealing tapes should be noted. They need to be distributed in the space between the timber. They are almost non-caking, which means that you do not need to use other sealed materials, which creates additional savings. In addition, such a sealant can change its shape when the logs begin to move during the natural shrinkage of the bath.
Old traditional hermetic materials won't let you down
If, when deciding how to close up the seams in a bath, you settled on original Russian materials: moss, tow, jute, then the process itself will be more laborious, and special skills will be required. Natural sealants have a lot of advantages over artificial ones:
- They include 100% natural materials, to which ecologists cannot make any claims.
- Moss and jute keep warm air out of the room and keep cold out.
- They have excellent absorbent qualities, which is very important in constantly damp bath rooms. Therefore, there is no need to worry about the walls starting to rot.
But there is one inconvenience in the use of such materials: it will be necessary to monitor the tightness of the seams during the entire operation of the structure, and not only after the end of shrinkage.
Methods for eliminating gaps between the crowns of a log house, cracks and gaps between logs in wooden houses.
Cracks in logs, gaps between the crown of a log house and gaps in the cups are a fairly common problem in many wooden houses.
Over time, due to the slow evaporation of moisture from the structure of the wood, the logs in the wall of the house shrink, dry out and form cracks between themselves. These gaps cause the house to lose heat and increase energy costs for heating it. They contribute to the accumulation of moisture between the logs and increase the likelihood of putrefactive formations, and can also be a zone of penetration and reproduction of harmful insects and woodworms.
And just being in a cold house is unpleasant!
Cracks, cracks and gaps can and should be repaired. We will not consider such drastic measures as internal and outer cladding log house. Indeed, for true connoisseurs wooden house building this is simply unacceptable, since aesthetics log house will be completely lost. At the same time, dreaming of living in a log house made of logs and spending a lot of money on the construction of this log house, not everyone will have the desire to “bury” their dream and financial resources behind walls sheathed with siding, clapboard or just a board. Moreover, to pay for this "funeral" again is serious money.
The first way is to caulk the cracks and gaps between the crowns of the log house.
Our grandfathers, for example, caulked them with tow and moss. In this case, this procedure was carried out repeatedly, due to the constant movement of the log house. In Russia they said: "A good caulker will raise a log house to the crown."
Nowadays this way is also relevant. The main disadvantage is that the cost of performing these works is very high, and it is difficult to find real professionals who will perform them with full responsibility, and not just fill the tow anyhow. It is also necessary to take into account that the log house will have to be caulked at least twice.
The second method is sealing and warming the gaps using the "warm seam" technology.
Today construction market offers a wide range of insulating materials to choose from. However, most of them, having proven themselves well in static joints, are of little use for movable wooden structures.
Our Team is ready to offer you the service of eliminating cracks, cracks and gaps between logs in wooden houses, using new technologies and materials. They fully take into account the peculiarities of wood and are specially designed for this purpose. The elasticity and flexibility of the materials we use, unique for inanimate nature, allow us to easily eliminate cracks in wood and gaps between logs, no matter how long the house shrinks. They have good adhesion to wood, vapor permeability (breathe), but at the same time they effectively resist moisture, high and low temperatures, UV radiation without losing its properties for many years.
Thanks to the technologies we offer, your wooden house will significantly increase its energy-saving functions and become much warmer. We will eliminate the paths of moisture and cold penetration, as well as insects. The house will become more efficient in conserving your heat, but at the same time it will continue to "breathe" as before. Its aesthetic characteristics will also improve.
Non-destructible technology of house insulation, due to gentle methods of introducing sealant - an important feature of our service. Not only wood is not disturbed, but also your usual way of life!
The very principle of warming the gaps between joints is widely used in the West. Distinctive feature our company is that in our work we use materials domestic production, which are not inferior in their characteristics to imported counterparts, but at the same time they are much cheaper. At your request, the color of the material can be matched to the tone of the wood or with another shade. A description of the material is presented on our website in the section useful articles.
All materials we offer have certificates of compliance with sanitary-epidemiological, hygienic and fire requirements normative documents operating on the territory of the Russian Federation.
This technology can be used both on a "freshly cut" house, to eliminate possible defects and mistakes made during construction, and on a house in which the above deficiencies appeared after some time.
The third way is to decorate the seams between the crowns with cords made of natural materials.
Decorating the seams between logs with cords is a great way not only to hide large gaps between them, but also an opportunity to greatly improve the appearance of the walls and individual elements, enhance the overall aesthetics of the home.
Our masters are ready to offer you this service in full. In our work, we use only natural and environmentally friendly materials. Such as, for example, natural hemp, jute, sesal ropes (cords). Detailed description You can find characteristics of materials on our website in the section useful articles.
If you are tired of looking at shriveled logs with large slits between the crowns, call us.
Living in your home involves taking care of it all the time. You can hire specially trained people for this, or you can do all or part of the work yourself.
For example, I love working with wood. Therefore, I do some of the housework myself. Because I like it.
I'll tell you how you can simply and cheaply seal seams in log house... No special skills required
Problem: cold penetrates through the seams between the beams. This is especially noticeable when it is minus 20-30 degrees outside. The second problem is that as the house dries up, cracks form in the timber that do not look aesthetically pleasing.
The main problem areas- the corners of the house, as well as the floor of the first floor. This is in my case. You may have it differently
Before working with the sealant, it is better to bore the house. The idea is to close the seams on both sides. In my case, this is impossible because from the street everything is sewn up with siding.
For work you will need:
1. Sealant for wood.
2. Sealant gun.
3. Knife.
4. Scissors.
5. Tow (linen or jute insulation).
6. Hammer.
7. Screwdriver.
8. Stepladder.
9. Masking tape (thin). It is inconvenient to work with a thick one.
10. Head
Step 1. We insulate the seams.
Insert tow into the space between the crowns. If it goes badly, then we use a screwdriver and a hammer. This is the so-called caulk. It is not necessary to stick the tow too deeply. Here it serves us in order not to fill the entire gap with a sealant.
Step 2. Glue masking tape around the seams.
It should be glued with an indent of 3-5 millimeters from the seam. Otherwise, later, cracks may appear in the seam sealed with a sealant when you remove the tape.
Step 1 and 2 are the most time consuming, especially if there are many cracks in the wall.
Step 3. Apply the sealant.
We open the bottle with sealant. We put it in the pistol.
Apply it along the seam with a thick layer. Then align the sealant with your finger. I tried to do it with a spatula, but because the seam is quite thin 2-10 mm, then a finger is better. The seam is smoother and more beautiful.
Step 4. Remove the tape.
Let the sealant dry a little (1-2 hours). Remove the tape carefully and smoothly. We get more or less even seams.
On a wall with an area of 6 square meters leaves 2 cylinders of sealant (about 660 grams). And about 3 hours of working time. I'll tell you about the economic effect when I insulate the whole house in this way. While I insulated the 3rd floor. At 0 degrees outside the window and there is no heating, now there is +18. Warm air comes from the 2nd floor.
It is better to take a sealant from Den Braven. First, it is matte. Secondly, it does not crack after drying. Thirdly, it is quite elastic and cheap. I bought a can in OBI for 50 rubles.
There are also sealants in 25 liter buckets. But they need a special pistol. In general, if you take 330 gram cans for a pistol, then the money comes out the same.
One of the few disadvantages of wood is its shrinkage and gradual drying. As a result, quite often the question of how the best way to close the gaps in the log in the bath, formed during these extremely unpleasant processes. Given the popularity of wooden housing construction, this problem has acquired in recent times wide use.
How to close the gaps between the logs in the bath
The presence of a huge number of advantages inherent in wood when used as the main building material, makes the owners put up with some shortcomings. It is a consequence of these disadvantages of the material that there is a periodically arising need to close up the cracks in the bath between the logs. Obviously, it is not worth delaying the implementation of such work, as drafts can form, which will lead not only to a decrease in the level of comfort from visiting the bathhouse, but also to the appearance of colds and other diseases.
Today, several options are used to close up the cracks in the log house of the bath. The most popular are the following:
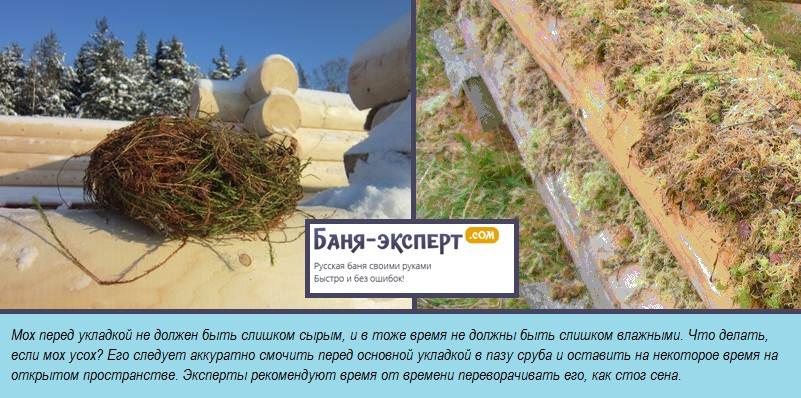
- natural moss. The traditional way of protecting joints and seams between logs. This material is considered one of the best when used as a mezhventsovy heater;
- tow. No less classic way solutions to the problem under consideration. To increase adhesion, the material is often impregnated with liquid gypsum or cement mortar;
- hemp. Another natural method that allows you to effectively and reliably seal the cracks that have formed between the logs. The only drawback of this option is its higher cost when compared with the methods of performing work described above;
- modern sealants and gaskets. The most popular are synthetic compounds that are applied using special sprayers. This significantly increases the productivity of the work. The main requirement for using synthetic sealants is complete shrinkage at home. Usually the material is used in combination with a special assembly tape.
In no case is it recommended to use silicone and polyurethane compounds or ordinary polyurethane foam. These materials do not have sufficient resistance to sunlight, and, moreover, do not prevent wood from rotting. That is why it is recommended to use or classic options fillings involving the use of moss, tow or hemp, or modern and equally effective synthetic sealants.
How to fill up the gaps between the boards
In the process of shrinkage and drying of wood, deformations often occur in some building structures where this material is used. One of the frequently encountered questions is how to close up the cracks in the bath between the boards. It can with equal probability apply to both the ceiling and the floor of the building.
Currently, three types of embedding are most often used - with the help of sealants, putty intended for wood and construction polyurethane foam... Of course, with large size slots can be used to replace a damaged or deformed board, however, in this case it comes not about termination, but a full-fledged repair with the replacement of faulty elements or structural parts. Another way to get rid of the problem under consideration is the preparation of homemade mixtures, which are usually contained in the composition binder(paint, glue) and filler in the form of plaster or sawdust.

It is up to the owner of the building to decide how to fill up the cracks in the bath. If you do not want to independently engage in the preparation of any repair compounds, it is enough to purchase any ready-made sealant from a large number of those on the market today. The most popular are silicone pigmented and acrylic colored compounds. The main requirement for their use is careful observance of the instructions for use.
An effective solution to the problem, than to close up the cracks in the ceiling of the bathhouse, is a gypsum tinted putty. This material is easy to use and affordable. It is perfect for small crevices and can be simply sanded for a more aesthetically pleasing look. sandpaper... The main disadvantage of the material is the need to repeat the sealing procedure every 2-2.5 years, which is explained by the insufficient durability of the putty.
19/09/2017Caulking a log house is a painstaking process that requires patience and a lot of effort. Everything here matters: the tool, the quality of the material, the sequence of work. Without the appropriate experience, not everyone succeeds in properly caulking a log house, so you first need to familiarize yourself with the technology, study the methods of caulking, and choose the right insulation for mezhventsovy.
The caulking of a log house is carried out in two stages - immediately after erection and after a while, when shrinkage occurs. Primary (or rough) caulking can be carried out in two ways: with the installation of insulation in the process of assembling the walls or a one-time execution of work on completion of construction.

1 way
The bottom row of logs are laid on the base.

Then the insulation is spread from above so that the ends of the material hang evenly on both sides. Next, the second crown is laid, and again a layer of insulation. This is repeated until the very top of the log house. After all the work on the construction of the log house has been completed and the roof has been installed, the protruding ends of the seal are hammered into the gaps between the beams using caulkers.

2 way
Caulking begins after the installation of the roofing system on the log house. Insulation (best of all, tape) is applied to the seam of the lower row and with the help of a tool is pushed into the gaps between the logs along the entire length, leaving hanging edges 5-7 cm wide. Then these edges are folded up, a roller is formed from them and hammered into the seam. Repeat the procedure in the next row and so on to the top of the structure.


The second stage of caulking is performed after the log shrinkage - after 1-2 years. The selected insulation is applied to the gaps between the crowns and tightly hammered inside. You should always start work from the bottom row, and be sure to do it around the perimeter of the log house.

You cannot caulk one wall first, then the second, and so on. In addition, each row is caulked with both the outer and inside to avoid distortions of the structure. The insulation raises the blockhouse by 5-10 cm, and its uneven distribution contributes to the vertical deflection of the walls. In some cases, the blockhouse is caulked for the third time - 5-6 years after construction. During this time, the wood shrinks completely, and new gaps are formed.

There are two methods of caulking - "in a set" and "in a stretch". The first is used to eliminate wide gaps between logs, the second is usually used for primary caulking, when the gaps are still narrow.
To work, you need tools - a set of caulkers, a road builder and a mallet. As a rule, metal cauldrons are used, although many craftsmen independently make them from hard wood.

| Name | Description | What is it used for |
|---|---|---|
| A flat metal or wooden spatula. Blade width 100 mm, thickness 5-6 mm | The main tool for sealing gaps between rims | |
| Flat chisel with a blade width of 50-60 mm and a thickness of up to 5 mm | It is used for sealing seams in corners and rounded sections of a log house |
| Triangular caulk with a longitudinal groove along the blade. Width - 170 mm, thickness 8-15 mm | Tool for the formation of even rollers from twisted strands of sealant | |
| Thick and narrow wedge up to 35 mm wide | Expands narrow gaps for easier filling with insulation | |
| Wooden hammer | Used for stuffing the seal with wooden caulks |

The caulking blades must not be sharp, otherwise they will cut the material when they clog it. Pay special attention to the surface of the blades: if it is rough, the fibers of the insulation will cling and pull back from the seams.
Caulking materials

As mezhventsovy heaters use the following materials:
- red and white moss;
- tow;
- felt;
- jute;
- flax
| Type of material | Description |
|---|---|
| Environmentally friendly material with antiseptic properties. At self-preparation raw materials costs for the insulation of the log house will be minimal. Collect it, as a rule, late autumn when there are no snails and fewer insects. Immediately after collection, the moss is sorted out, clods of earth and debris are removed, and slightly dried. It is not necessary to dry too much, otherwise the stems become too brittle and unusable. Purchased moss should be soaked before caulking to facilitate styling. Pros: durability, low thermal conductivity, resistance to temperature extremes, environmental friendliness, antimicrobial properties, low cost. Cons: difficult to find on the free market, protection from birds is required, requires preliminary treatment before laying |
|
| Oakum is suitable for the initial caulking of a log house and for sealing the crowns after shrinkage. It is made from flax fibers, and, depending on their quality, is divided into bale and roll (tape). The roll consists of shorter and stiffer fibers, which makes it difficult to drive between the crowns. Tape tow is better in quality, softer and more comfortable for caulking. Pros: has low thermal conductivity, does not electrify, is highly absorbent and dries quickly, has bactericidal properties. Cons: complexity of styling, not aesthetic appearance seams after caulking. |
|
| Until recently, natural felt was widely used in the insulation of log cabins. Now its composition is supplemented with synthetic and plant fibers, which significantly improve its individual properties. And yet, felt insulation without additives has a number of advantages: it has high vapor permeability, does not allow odors to pass through, provides good noise insulation, has low thermal conductivity, is easy to use, and is environmentally friendly. Cons: prone to rotting, easily damaged by moths |
|
| Traditional insulation materials are increasingly being replaced by materials such as jute. It is available in the form of fibers, ropes of any thickness, as well as in the form of a tape. Tape jute is soft and pliable, evenly compacted, used for both primary and secondary caulking. It is more convenient to use jute fibers and ropes after the frame has shrunk. Pros: it is durable, not damaged by moths and other insects, does not rot, provides a favorable microclimate in the structure. Cons: material cakes quickly, short service life. |
Tow prices

Stretching primary caulking
The whole process is divided into two stages - the laying of insulation between the logs during the construction of a log house and the caulking itself. Insulation is laid after the installation of each crown. If moss is used, it should be slightly damp.
They take a large bunch of moss and lay it with fibers across the log so that the ends of the fibers hang on both sides by 5-7 cm. The next bunch lies close to each other.

The fibers must be evenly distributed over the surface, forming a layer of uniform thickness. The wood should not show through the moss, so make the insulation layer thicker. It is better to put too much than not to report, because a thin layer will not be able to effectively protect the seams from blowing.

If tape insulation is used, laying is much easier and faster: the tape is rolled along the crown and fixed with staples construction stapler... When the tape ends, a new section is laid with an overlap of 5 cm so that there are no gaps at the joints. After the entire row around the perimeter is covered with insulation, the installation of the second crown is performed.

So, the blockhouse is erected, the roof is installed, the walls can be caulked.


Caulking and sealing cracks after log shrinkage
It is more convenient if the insulation is tape, then it turns out to form a roller from it much faster. When twisting the material, it must be slightly stretched along the seam, which contributes to greater compaction and even distribution insulation. Sometimes the thickness of the roller turns out to be insufficient to fill the gap, then they take additional strands and wrap them in the hanging ends of the material. After that, the thickened roller is driven into the gap.

If during the construction process the insulation was not laid between the logs, caulking is performed as described above, only more material is needed. It is necessary to apply it to the seams with the fibers across. The longitudinal arrangement of the fibers will not provide the required density, the material will not be able to firmly anchor and will constantly crawl out of the grooves. When choosing a tape seal, make sure that the width of the tape is several centimeters wider than the thickness of the log. Edges that are too short are difficult to fold, and therefore the caulking quality will be poor.
- The edge of the tape is laid on the ground near the corner of the log house and retreat along the wall, unwinding the roll. You cannot stretch the material, it should just lie in an even strip on the ground. It is very important that the tape does not twist during unwinding. Having reached the second corner, the roll is also left to lie, nothing is cut off yet.

- They return to the beginning of the tape, take it by the edge and apply it over the seam. With a caulking blade, press the tape in the middle, leaving the edges protruding by 5-7 cm. In this way, the entire inter-crown seam passes.

We insert insulation into the seam
- Measure another 25-30 cm of tape and only then cut it off the roll. This margin will allow you to more tightly hammer the grooves without adding insulation.
- Now, little by little, straightening and tucking the edges of the material, they begin to caulk the seam. The tape should be completely hidden in the gap between the logs along with the stock.

- As a rule, one layer of tape is not enough for high-quality filling, so everything will have to be repeated two or even three more times.
- The finished seam should protrude from the grooves by no more than 3-4 mm and be of uniform thickness.

Caulking prices
caulk
If the gaps between the crowns are very wide, apply caulking "in a set". For these purposes, tow, hemp ropes or jute cords are used. Long strands are formed from tow, which are wound into a ball. Ready-made cords or ropes are also wound into balls for convenience.

They start from the edge of the lower crown:
- clearing the gap by removing chipped chips and debris;
- unwind a small amount of the cord, fold it in the form of loops and push it with a caulk into the gap;
- seal the hinges first at the top of the gap, then at the bottom;
- impose one more strand on top, now without loops, and align with the road builder.

Further along the seam, the strands are laid in one layer until the next gap. The denser the voids are clogged, the better the insulation. Try not to leave hanging fibers: firstly, they spoil appearance walls, and secondly, birds can pull apart the seal. Having finished caulking the first row, they move on to the second, and everyone repeats in the same way.
For decorative purposes, a jute cord can be hammered along the entire length of the seams.

Caulking corners
The corners are caulked separately, after the work on the walls is completed. It is also more convenient to use tape insulation here.

Since at the corners the seams between the logs are semicircular in shape, you will need a curved caulk.

Step 1. The ribbon is positioned vertically. Take it by the edge, apply it to the fillet seam and press inward with a caulk. They step back a little and again drive the material into the gap.
Step 2. As soon as the insulation is slightly fixed, they begin to tuck the protruding edges and hammer them deeper into the cracks.
Step 3. After filling and leveling the top seam, proceed to the second. The material must be constantly straightened, and stretched a little so that it lays down more evenly.
This is how the entire corner is sequentially compacted. The seams should not protrude more than 5 mm, otherwise the look will be sloppy.

Video - How to caulk a log corner
Caulking a log house with sealants
The caulking of a log house is gaining popularity with special sealants that are easy to apply, give the seams a very aesthetic appearance and reliably protect against blowing. If the blockhouse is made of rounded logs or glued beams, and jute is laid as a heater between the crowns, you can use only a sealant and a bundle of foamed polyethylene. Sealing of the seams is carried out no earlier than the shrinkage of the log house.
Step 1. The joints between the logs are cleaned of dust and clogged debris, wiped dry with a rag.
Step 2. A primer-primer is applied along the perimeter of the seams with a brush or spray. If the work is carried out in winter, the primer must be chosen on a rubber basis, in the summer - on a water basis.
Step 3... After the primer has dried, a bundle of expanded polyethylene is inserted into the seams, the diameter of which is selected according to the width of the gap.


Step 4. Apply sealant. The composition is used in tubes, which is applied with an assembly gun, in buckets and in the form of a tape. The last option is very easy to use: from one side of the tape is removed protective film, applied to the seam, pressed by hand and rolled with a roller.


Step 5. After sealing all the joints between the joints, they are removed outer layer foil to cure the sealant. At the end, the joints are covered with a colorless varnish or a tinting compound is applied, depending on the color of the sealant.

When applying the composition with a spatula or from a tube, the sealant should be smoothed out and the excess should be removed with a damp cloth.
If the logs were harvested by hand, more uneven gaps are formed during shrinkage. Here, one sealant and a polyethylene cord will not be enough. In such cases, caulking is performed the traditional way, after which the seams are closed with a sealant. After such processing, there is no need for subsequent caulking.
Video - How to caulk a log house

