How to smear paper-backed vinyl wallpaper. How to properly glue paper-backed vinyl wallpaper - tips and tricks
Nowadays, such a coating is increasingly used for walls and ceilings. The bottom layer or base of the wallpaper is paper, the top is vinyl, which has protective functions and giving to the walls beautiful view... How to glue vinyl wallpaper on paper backing, is discussed in the proposed article.
Vinyl wallpapers there are:


In the manufacture of the material, a vinyl layer is applied to the substrate by spraying or applying a film.
- Embossing is done.
- The drawing is printed.
- It can be foamed.

The coating can be hot stamped. In this case, after foaming, the top layer is rolled in two rolls: one presses the material, the other applies embossing, which allows you to get the desired texture on the surface.
This could be:
- Silkscreen or light wallpaper... On a paper base, a thin layer of PVC is applied, and different textures are created by hot stamping. The canvases are thin and smooth, reminiscent of beautiful silk fabrics, of various designs.

- Is a heavier material. In it, the vinyl layer can imitate natural stone, different kinds fabrics, plasters.

- has the thickest top layer with high strength and high relief. This creates the effects of volumetric embroidery, crinkled leather. The relief allows you to hide small irregularities in the walls.

There are chemically embossed webs with a smooth, usually glossy surface obtained by inhibition. At the same time, inhibitors are applied to the vinyl layer with a printed pattern - compounds that prevent foaming.
They differ:
- Increased durability.
- High resistance to light and moisture.
- Easy to clean with detergents.
The choice of material depends on the quality of the walls, the purpose of the room and its style.
Tip: To hide visually slight irregularities you should use embossed and matte panels, and for even and smooth surfaces - smooth glossy canvases.
The advantages and disadvantages of wallpaper are presented in the table:
| Advantages | disadvantages |
|
|
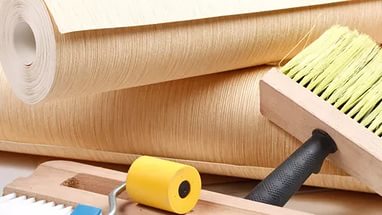
Tools for the job

An approximate list of tools for performing work is presented in the table:
| Tool | Appointment |
| For marking a vertical line on the wall. |
| For applying glue to the wall and wallpaper. |
|
|
| Rubber rollers: large and small. | For smoothing canvases on the wall. |
| Stepladder or sturdy table | For the convenience of work |
| Rags or thick foam | To remove excess glue that comes out through the joints |
This is the optimal set of tools. Some of them can be replaced, but at the same time it is necessary that the quality of wallpapering does not suffer.
For example:
- Rubber rollers can be replaced with a regular rag, but then there is a risk of damage to the vinyl layer or wallpaper breakthrough.
- Replace the maklovitsa with a small brush and smear the walls and canvases with it, but this increases the duration of work and labor intensity
- Replacing a ladder or table with a stool may result in injury from falling.
Features of gluing vinyl wallpaper
Before gluing the canvases, you should get acquainted with the features of the work:
- Who does not know how to stick vinyl wallpaper on a paper basis, has never done this before, it is better to invite a person who is already "in the know."
- It is very important, especially for large-width embossed vinyls, that the wallpaper is glued only to a dry, flat surface. For this, the old covering is removed from the walls (see). All cracks are putty, the surface is leveled and completely dried.
- The dryness of the walls can be easily checked with masking tape and a piece of cellophane, which will stick to the surface. The material is left overnight. The presence of a drop of water on its inside means that the walls are not dry enough to stick vinyl wallpaper on them.
- Plain tape is used to check the strength of the coating. To do this, a piece of material is glued to the wall and pulled back sharply. If particles remain on the inside of the tape old paint or plaster, which means that the surface needs to be prepared: remove the existing coating, overcoat, level.
- There should be no drafts in the room. A terrible taboo: air conditioners, fans, wide open windows. This can only be allowed after the wallpaper is completely dry.
- You cannot glue new canvases onto old wallpapers. They must be completely removed from the walls. To do this, the canvases need to be wetted with water, wait a little, and then remove with a spatula.
Before gluing vinyl wallpaper on a paper basis, you need to carry out preparatory work.
For this:
- The old wallpaper is being removed.
- Areas and sagging from the existing plaster are scraped off (see).

- The wall is carefully putty in several layers.
- Polished sandpaper to keep the surface clean and even.
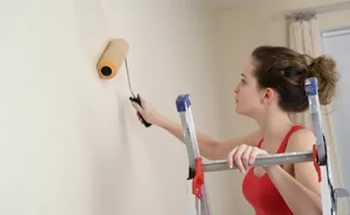
- The walls are primed, this improves the adhesion of the coating on the wall and helps to protect the surfaces from mold and mildew.
Tip: In order for the coating to hold stronger, before gluing the vinyl wallpaper on a paper basis, you need to grease the walls and ceiling with an adhesive composition on which the canvases will be placed. Let the primer dry for 24 hours.
- After the glue dries, a vertical line is drawn on the wall using a thread with a weight. This will be the guideline for the first wallpaper strip.
- The electricity goes out.
- All sockets and switches are removed.
Selection of glue and preparation of canvases
Adhesive for gluing vinyl wallpaper on a paper backing requires a special one that has greater strength than conventional paper wallpaper In addition, it is better to use glue with additives against mold and mildew for vinyl.
Tip: When purchasing glue, you need to make sure that it is suitable for gluing this material. When using PVA glue, it should be borne in mind that it is very durable, so much so that if it is necessary to remove the wallpaper from the wall, it will be very difficult to do this.
Before starting the sticker, it is more convenient to cut several canvases of the required length at once.

If you need to use wallpaper with a repeating pattern, or with embossing, you will need to align the patterns at the joints. For this, it is more convenient to number the pieces, which will allow you not to confuse them in the process.
When working with paper-based wallpaper, the glue is applied to the canvas itself, and not to the wall surface. After applying the adhesive, the wallpaper is folded with the smeared side inward, and remains so for several minutes, which will allow the material to be soaked better.

Before proceeding with wallpapering, it is worth watching the video. It will help to take into account all the nuances of the work.
Pasting wallpaper on the wall

Instructions for pasting vinyl wallpaper on the walls:
- On the wall, before gluing the canvases with a plumb line or level, a line is marked strictly vertically along which the first panel is aligned.
- Vinyl wallpaper should be glued back to back.
Tip: Foam vinyl on a paper basis stretches slightly when wet, and shrinks when dry, which makes it difficult to align the joints so that after final drying there is no overlap or they do not diverge. When spreading and leveling the panel on the wall, it must not be strongly stretched or deformed in any other way.
To get a high-quality and even joint for wallpaper without rapport, you can:
- Stick the canvases with a small overlap.
- Wait until they dry a little so that the sheets can move away from the wall when they are pulled.
- A vertical cut is made with a sharp knife in the middle of the overlap strip along the entire height of the wall.
- The trimmed edges are removed.
- The joints are smoothed out.
- The aligned panels are rolled against the wall, smoothed, air bubbles are squeezed out from under it with a roller or a special soft spatula. In this case, the movements should go from top to bottom, from the middle of the canvas to its edges.
- Excess glue squeezed out at the edges is removed with a spatula or soft cloth.
- Extra pieces of wallpaper are cut off at the top and bottom.

Gluing corners
The most problematic area when gluing any wallpaper with your own hands is the corners. They require special care. The order of work is shown in the photo.

The main thing you need to know, if paper-based vinyl wallpaper is used to cover the walls, is how to glue them in the corners. In this case, one of the joints must be cut through.
For this:
- When the distance to the corner is approximately one roll or less in width, this distance is measured and about 4 centimeters is added to it.
- A canvas of this width is glued to the wall, so that these 4 centimeters are on the second wall.
- On the second wall, a vertical line is marked at a distance equal to the width of the canvas from the corner.
- The next sheet is glued along this line.
- There is an overlap of wallpaper in the corner.
- With a sharp knife, two canvases are cut neatly along a ruler in this place, and scraps of material are removed.
- This is the joint.
- The joint is well coated with glue and gently smoothed out.
- Most often, this will shift the picture. Of course, you can try to reduce it.
Pasting wallpaper on the ceiling

Using lightweight paper-backed vinyl wallpaper will reduce the adhesion stress of the glue and wallpaper.
Tip: There is not much difference when wallpapering on a wall or ceiling. The only thing is that you always have to keep your hands on weight, which makes your back quite tired. To facilitate the process, you should take more breaks.
Despite one technology for performing work, there are several points that should be taken into account (see).
These include:
- Even if you have a starting line, which is a wall, you should make your own markings on the ceiling.
- A straight line is drawn on the ceiling along the wall, departing from it the distance is less than the width of the roll by 10 centimeters.
- The first roll is glued by aligning it along this line, making a neat overlap on the wall so as not to stain the wallpaper on the wall with glue.
- For safety net, it is better to glue paper or film on the wall with masking tape, which will protect the wallpaper from glue, and at the end of the work, this protection is removed without traces. But you need to use masking tape, stationery will leave traces.
Vinyl wallpaper on a paper basis looks great. How to glue them is briefly described in the article. Observing these recommendations, performing all the work, carefully without hurrying, you can not be afraid that the canvases will disappear the next day.
We will send the material to you by e-mail
Wallpapering is an important part of any renovation. This process differs in laboriousness and complexity. Many people wonder: how to glue vinyl wallpaper on a paper basis. In this case, it is important to choose high-quality glue, since when using a low-quality composition, everything will need to be finished again. Features of gluing depend on the selected material. Vinyl panels are popular, which are characterized by reliability, wear resistance and UV resistance. Before purchasing the material, it is worth knowing the features of working with this material.
Finishing with vinyl-based canvases provides an opportunity to apply unusual design techniques
Sticking consists of the following steps:
- walls are being prepared;

- a primer is applied, with the help of which flaws are closed and miniature irregularities are hidden;

- glue is diluted in the container. You should get a solution without lumps and clots;

- using a level, a line is drawn for gluing the first sheet;

- the electricity must be turned off in the room, and all switches and sockets must be removed from the walls;
- each roll is cut into strips;
- applied to the workpiece adhesive composition, while it is impossible to leave dry places;

- mortar is also applied to the wall surface;
- sheets are glued end-to-end, without an allowance;

- excess glue is removed with foam rubber or a soft cloth;

- the edges are trimmed with a clerical knife.
Useful information! There should be no drafts in the room. The canvases will dry within two days.
Related article:
Secrets of the correct gluing of the ceiling
The ceiling surface must be glued before pasting the walls. In this case, it is worth choosing lighter materials.When processing the ceiling, it is worth taking out all the objects and carpets... If items cannot be taken out, cover them with plastic wrap.
For your information! Vinyl conducts electricity very well, so it's important to remove any exposed wires.

How to glue the material in the corners?
The corners require special care. When the distance to the corner zone is less than the canvas, then the sheet is cut off with an overlap. This part will slide to the perpendicular wall surface. Then the second layer is overlapped. The sheets are passed by a special roller.

How long does paper backed vinyl wallpaper dry?
Drying time of canvases depends on dryness work surface and temperature values. If the humidity is exceeded, and the temperature is slightly reduced, then the finish will dry for a long time.

Also, the drying time depends on the type of glue, the amount of solution used and the microclimate in a particular room.

Non-woven surfaces can dry within a day, and paper surfaces in a shorter time period.
Useful information! When dry, the paper-backed fabric can shrink significantly, so you need to make sure that the seams do not slide out.

With vinyl wallpaper, you can create a stylish and original interior... When choosing a texture and pattern, you should use the original design solutions and various combinations.

Save time: select articles by mail every week
/ Paper backed vinyl wallpaper - how to glue it correctly?
Paper backed vinyl wallpaper - how to glue it correctly?
During any renovation works, everyone strives to get the highest quality and most beautiful result. One of suitable options finishing that meets all the requirements for beauty and quality - gluing.
Pros of the solution
Unlike wallpaper, the base of which is made of non-woven, they will be cheaper. This is due to a simple point - in our country such material is not made and all coatings made on its basis are more expensive due to the fact that we have to purchase it in other countries.
It is not difficult to figure out how to glue vinyl wallpaper on a paper base. Everything can be done with your own hands and without resorting to the help of outside specialists. The result will please if you follow the basic rules for handling this type of coating.
The vinyl surface is highly impact resistant. This means that you can apply this finish in the most different rooms, including those with the most difficult operating conditions requiring increased surface durability. For example - in the corridors.
The front surface of vinyl is distinguished by the brightness of colors and a huge number of possible patterns or ornaments. There are also plain options. Certain varieties of such coatings can be painted, giving them the shade that you want.
Peculiarities
Even before getting on a paper basis, you need to understand some of the features of the upcoming work. It is better to know some of the nuances and techniques in advance and take them into account in subsequent work.
You only need to glue adjacent strips end-to-end. At the same time, it is important to control the spreading of the adhesive solution - there should not be much of it, since with an excess of solution, the wallpaper can begin to stretch. This will lead to the fact that after the moisture evaporates, they will shrink, forming gaps at the joints.

Another feature is that when smoothing, they cannot be stretched from the center to the edges. The joints will inevitably come apart after drying. In order to prevent such a situation, when leveling the canvas on the wall, it is necessary to use not the usual spatula in this matter, but a special roller made of rubber. The strips roll tightly against the wall and are not smoothed out with a trowel. The glue protruding at the joints must be removed without rubbing. After complete polymerization, it forms an ugly film.

Drafts are the worst enemies of such coatings and therefore, it is necessary to strictly monitor the formation of such a phenomenon. You can also ventilate the room no earlier than the entire surface is completely dry. You can find out how long paper-based vinyl wallpaper dries from the instructions on the roll. The average time required for this is about a day.
The gluing process
It all starts with the usual preparation of the wall or ceiling. All traces of old finishes must be carefully removed. If necessary, the plane is leveled with plaster or putty. After that, priming is carried out.
It is very important to wait for the primer to dry. You can start work only on completely dry surfaces. Second the most important moment there will be a choice of glue. The result will depend on what kind of glue the vinyl wallpaper on a paper backing will be glued to.
You can only use the special adhesive solution, which is designed specifically for this type of finish. You should not save on this point, since the poor quality of the adhesive usually leads to a rework of the entire work - the wallpaper can fall off the walls.

Moreover, with good glue arises less problems when gluing panels to walls. They are less deformed and easier to work with.
The greatest difficulty in the gluing process is always the adjustment of the patterns. To avoid mistakes, it is better to cut in advance the right amount strips with an allowance of 10 - 20 centimeters. The size of the allowance depends on the complexity of the ornament.
Having spread them out on the floor, you need to achieve maximum convergence and number the stripes in the order of gluing. So, mistakes will not happen and the drawing will match as accurately as possible.
To find out what size strips are needed, you need to measure all the corners in the room and add another ten centimeters to the largest value. This will be the desired value for the length of one strip.
Unlike non-woven types of wallpaper, the paper base involves spreading the adhesive on the strip itself, and not on the wall. When the cloth is smeared, it is folded with the edges to the middle and left for 10 minutes so that they are completely saturated with glue. This is important - without impregnation, such wallpaper will not adhere well to the plane on which it is glued.

Otherwise, the nick process is no different from gluing any other type of such coatings. The pasting begins from one of the corners and the first strip is positioned so that it slightly goes into the corner and the adjacent wall. This will allow you to make the joint with the adjacent strip vertical. For a reference point, they often draw a vertical line, using a level or an ordinary plumb line for this.
When choosing wallpaper for a room, you should adhere to some rules and do not forget that for small spaces unsuitable bright wallpaper with large pattern... They will visually further reduce its area. It is best to choose for such a room light wallpaper... If you need to visually increase the height of the ceiling, then the most appropriate would be to use wallpaper in a narrow vertical strip. V
in this article we will look at.
In this article, you will learn:
We glue the vinyl wallpaper on a paper backing correctly, a few steps.
Preparatory work |
|
| Before proceeding with the sticker paper backed vinyl wallpaper, surface preparation is required. It must be leveled in order to get rid of defects with putty and cleaned of old wallpaper with a spatula and ordinary water. In this case, the wall should not only be absolutely flat, but also dry. During operation, there should be no drafts, the windows are closed, and the air conditioner is turned off. To prevent fungus from appearing under the wallpaper later, it is recommended to treat the wall with a special substance. | |
| The first step is to prepare the glue. It is diluted with water in the amount indicated on the package. |  |
| While the glue is preparing, you can start cutting the roll of wallpaper into strips with an allowance of at least 10 centimeters. |   |
|
This is important, this must be remembered! The adhesive is applied to the vinyl wallpaper, not the wall! Then the canvas is folded in half for 5-10 minutes. Now you know, . |
 |
| Now the wallpaper needs some time to swell. At the same time, the fibrous parts of the paper are impregnated, and the wallpaper material becomes more pliable and stretches. |  |
|
The technology of gluing vinyl wallpaper on a paper basis practically does not differ from other technologies. Work starts from one of the corners. In this case, the canvases of wallpaper should be on top of each other by no more than 3 centimeters. It is much more convenient to do this together with an assistant, when one is standing on a stepladder, and the other aligns the edges of the wallpaper end-to-end, holding the bottom of the strip. If glue gets on the wallpaper, wipe it off immediately with a dry soft cloth. |
|
| By leaving an allowance when cutting wallpaper, a surplus of them is formed under the ceiling, which must be carefully cut off. For this, a sharp wallpaper knife is used. |
|
|
Before you start gluing the wallpaper, the sockets and switches in the room are removed, and the electricity is turned off. Wallpaper is glued directly to the holes, and then, after drying, cut around them, and the sockets and switches return to their place. You may need to remove air from under the wallpaper. This is done easily by means of a special rubber spatula or with a dry cloth or large soft roller. |


Practically everyone in his life wondered how to quickly change the design of his apartment? Perhaps the simplest and most accessible material for this is wallpaper. Now the market of materials for wall decoration is represented by all kinds of wallpapers: classic paper, various vinyl, practical non-woven, unusual photo wallpapers.
The most commonly used paper-backed vinyl wallpaper. They are made by applying polyvinyl chloride to a paper base. As a rule, this composition is applied in several layers, which makes the coating sufficiently strong and durable. At the end of everything, the finished canvases are impregnated special composition, thanks to which the pasted surface can be washed.
In order to glue high-quality vinyl wallpaper on a paper basis, you need to carefully prepare everything. So, let's begin.
Required tools
Please note that this list is for informational purposes only. Everyone can decide for himself which tool it will be more convenient for him to work with. For example, you can use a plastic spatula or a regular short-haired roller instead of a wallpaper brush. It may be more convenient to apply the primer with a spray gun, and use a pen instead of a simple pencil.
Surface preparation
Surface preparation includes:

On a note! If you decide to glue paper backed vinyl wallpaper onto paper backed wallpaper, make sure the paper backs are firmly in place. And only after making sure that the old ones hold "tightly", you can start gluing. However, the pattern from the previously pasted paper wallpaper may show through on new vinyl. In addition, there is a risk that the old coating will swell or even come off. Therefore, it is still better to carefully prepare the base before gluing new wallpaper.
Important! It is imperative to prime the surface. This can be done not only with a special primer, but also with a liquid wallpaper glue... As a result of priming, a film forms on the surface of the wall, which contributes to better adhesion of the wallpaper panels to the wall.
Preparation of materials
Before proceeding with pasting, you need to prepare the canvases
Roll out the roll and cut the sheet 10 centimeters more than the height of the room. If the wallpaper is glued with the selection of the pattern, this must be taken into account when cutting. In this case, the stock may be larger. We recommend that you mark on each sheet of wallpaper where the top is. This is especially true for panels with a small, monochromatic pattern.
When buying vinyl wallpaper with a pattern, do not forget about the selection. So, for canvases with a small pattern, 5 - 10% of the wall area is allocated to the stock. For wallpapers with large prints - 10-15%.
Note! Only buy paper backed vinyl wallpaper with the same batch numbers. Wallpaper rolls with different numbers on the glued surface may differ by several shades.
Glue preparation. It is better to use glue specifically for vinyl wallpaper, dilute it according to the instructions. A universal type of glue can also be used, but you need to be prepared for the fact that it may be a little worse, since it is designed for both simple paper and heavy non-woven materials. You should not economize and make the glue very liquid, as it may not withstand the weight of the sheets. At the same time, too thick glue will be applied unevenly, which can lead to deformation.
Advice! Use wallpaper glue with color indicator. Its use allows you to eliminate gaps, as well as to apply the adhesive more evenly.

Important! During the pasting of wallpaper sheets, as well as during the period of drying, drafts must be completely excluded. All windows, doors must be closed, air conditioners and fans off. It is also not allowed to use heaters to dry wallpaper.
Pasting process
You need to start pasting the room with a wall marking. Using a tape measure, measure the width of the canvas from a window or corner, make a mark. Next, you need to attach a plumb line to the mark and lower it to the floor. If you do not have a plumb line, make it from the available means: ropes and heavy bolt... Now it remains to connect the marks on the wall with one solid line, using a level or ruler. Thus, a guideline was obtained for gluing the first vinyl sheet on a paper base.

Do not neglect the actions for marking the surface, because without this, the wallpaper can be glued at a slight angle. Immediately, on one page, you may not notice this, but on a large plane, such a marriage will immediately catch your eye.
Advice! You need to start glueing the wallpaper from the window and move to the opposite side of the room. In a room where there are no windows, work begins from the corner.
When gluing with vinyl wallpaper with a paper base, the glue is applied directly to the sheet. The oiled canvas is folded from the edges to the center and left to soak for a couple of minutes. It is important not to overexpose the wallpaper, as it can get wet and stretch, and after drying, shrink back, forming a gap on the wall. However, it is not worth glueing the newly smeared canvases, since the glue will be absorbed into the wall and the wallpaper may lag behind it.
You can learn more about pasting paper-backed vinyl wallpaper in this video:
Before starting work, it is better to remove the baseboards, sockets and switches. This will speed up the gluing process, and the work done will look neater.

The process of gluing itself is best done by several people. One of them will do the work at the top, the second at the bottom. The first sheet of wallpaper is applied to the previously drawn reference point - vertical marking. Focusing on which, we glue the canvas. It is necessary to smooth paper-backed wallpaper from the center to the edges, in order to remove all excess air between the wallpaper and the wall. If this is done poorly, swelling may appear after drying. The following is glued end-to-end with the pattern aligned if necessary. The seams are rolled with a special rubber roller. Any excess glue must be wiped off immediately with a clean cloth.

In the corners, near the floor and ceiling, cut off the excess wallpaper with a spatula and a paint knife. Instead of a spatula, you can use a regular ruler. The spatula is applied to the wall and the wallpaper is cut through it with sufficient pressure. It is better to change the blades more often, as a dull knife does not cut, but tears the material. As a result, all the work will not look very good.
The process of gluing paper-backed vinyl wallpaper may seem daunting, but correct selection tools, careful preparation surfaces and good mood, everything will definitely work out!

