How to remove the handle from the door: interior or entrance. Installing and disassembling the door handle with integrated latch
Long and thick eyelashes are everyone's dream. But, unfortunately, not all women have such wealth. That is why all kinds of mascaras, false eyelashes are in such great demand. After all, for a holiday or just for an important life event, you want to look perfect. But the events end and the time comes from a princess to turn into an ordinary one. How to remove false eyelashes at home so as not to harm the health of your eyes and preserve the eyelashes themselves?
Types of fake eyelashes
Indeed, false fake eyelashes are the quickest and easiest way to brighten your eyes and give them rich framing. Moreover, it is not always possible to make the required volume of natural eyelashes with the help of even the most voluminous and expensive, but ordinary mascara. And such eyelashes in this case are very helpful - they are inexpensive, quickly stick, they can have different color and shape.

Attention! Artificial eyelashes should not be used for those who often suffer from conjunctivitis or blepharitis. It is also important to familiarize yourself with the composition of the glue before use to make sure that it does not contain substances that may cause an allergic reaction.

The fixation of artificial eyelashes is done using a special glue, which, by the way, can be different, and how the eyelashes will hold during the entire event and how they will then be removed will directly depend on its quality. The glue contains cyanoacrylate and a special adhesive that resembles superglue, so it will not be so easy to remove the jewelry.
Table. Types of false eyelashes.
| Type of | Description |
|---|---|
| The easiest to use option, they are glued over the eyelashes on the upper eyelid. Even a beginner can handle the task. The eyelashes are a tape fitted with multiple fluffy tufts of individual eyelashes. Glued with one tape. The main drawback is that such eyelashes can make you look like a doll. |
| This type of eyelashes are small tufts of single eyelashes that are connected at the base to each other. The look with them turns out to be more natural than when using tape. But gluing them is more difficult. |
| These lashes will allow you to achieve the maximum natural look. But attaching them yourself will not be easy without the proper skill. At home, few people do it on their own. |


When choosing eyelashes, you need to look at the brand, choose the right manufacturer, evaluate the quality, the possibility of reusability. And if they can be reused, then you need to know how to remove them.

Can I delete it myself?
You can definitely remove such eyelashes glued in the salon on your own. But everything needs to be done delicately and very carefully. It is required to use only means either intended for this, or those that will not harm the eyes. It will be easier to remove eyelashes in the salon, but you will have to pay a certain amount of money for this, because many girls remove them at home themselves.

Eyelash removal methods
You can remove such eyelashes different ways, often the choice of method depends on what types of overlays were used. For example, to remove the bundles, you can use cotton pads soaked in water... In order to remove tape eyelashes, a fat cream or cosmetic oil is often used. Solitary ones are also usually removed with oil, only castor oil.

What not to do
Before you start removing eyelashes yourself, you need to know what you can and cannot do during this procedure. So, for example, you cannot forcibly tear off the eyelashes from the eyelids - you can damage your own eyelashes and your eyes. Steam treatment of false eyelashes is also not worth it - there will be no sense from this, and hot steam can harm your eyes.
Attention! It is forbidden to use any sharp objects to remove eyelashes. The hand is likely to tremble, and it is not far from the injury of the eye. Although, of course, the eyelashes themselves will not suffer from this.

In no case should you use substances such as acetone and solvents containing it to dissolve the eyelash glue. This can lead to eye burns. There are also special means for removing eyelashes, but they should be used only in accordance with the instructions.
How to shoot correctly?
Let us consider in detail several methods of removal that can be used at home. Among them are oils, makeup removers and special preparations.
Using a special tool
Step 1. First you need to buy suitable remedy... It is rarely included with the eyelashes and glue themselves. However, you can buy such a drug at any store that sells cosmetics. The main thing is to choose what suits both the skin type and the type of eyelashes. It is important to familiarize yourself with the composition and make sure that there will be no allergies to the components of the product.

Step 2. Next, you need to remove all makeup products from the eyelid area. This will make the eyelash removal process easier. Makeup removal can be done by any means, using a cotton pad. You do not need to erase ink, just remove the shadows. Doing so could ruin your false eyelashes.


Attention! Some products may smell like acetone but do not contain it. Such drugs can be used without fear of damaging the eyes.
Step 4. After that, a cotton swab or swab should be carried out over the entire area of the glued eyelashes, from outer corner eyes to the inner. The procedure is repeated several times so that the glue is completely removed. Next, you need to wait about 20-30 seconds until the glue dissolves. The procedure is repeated for the second eye.

Step 5. Next, you need to carefully remove the eyelashes themselves. If they will not be used a second time, you can simply remove them with your fingers. If the eyelashes are reusable, it is recommended to use plastic tweezers, with which they are picked up as close to the eyelid as possible. Removal is performed from the inner corner of the eye to the outer one. If the eyelashes are difficult to remove, then it is better to wait a little more time - perhaps the glue has not yet dissolved.


Removal with make-up remover
Step 1. In this case, use a conventional eye makeup remover. If the eyelashes are reusable, then it is better to take a liquid preparation, if disposable, then absolutely any product will do. It is important to take the composition that does not cause allergies.


Step 3. A cotton swab or stick will need to be moistened with makeup remover. It is best to sit in front of the mirror.

Step 4. The glue is removed. To do this, you need to wipe the area of attachment of the eyelashes with a swab with movements directed from the outer corner of the eye to the inner one.


Step 6. At the end of the procedure, you need to wash warm water using a cleanser and face wash.

Remove eyelashes using oil
Step 1. Some people use oil to remove their eyelashes. It dissolves glue well, but it is important to remember that you will not be able to use eyelashes a second time - they will be damaged. The best options are coconut oil, almond oil, or baby oil.

Step 2. You need to pour a little oil on your hands and then gently rub your eyelids. It is not necessary to remove makeup beforehand, as oils do a good job of this task. Thus, it will be possible to immediately remove eyelashes and remove makeup. Next, you need to wash and apply the oil directly to the eyelashes themselves.

Step 3. Use tweezers or fingers to gently pick up and remove eyelashes. The procedure is carried out, as in previous cases, in the direction from the inner to the outer corner of the eye.

Step 4. It is necessary to remove the remnants of the glue from the eyelids. You can also remove them with oil, which is moistened with a cotton swab.

Step 5. The procedure ends with washing with warm water using cleansers.

Video - How to put on and take off your eyelashes
Storing and cleaning eyelashes
Some types of eyelashes can be used multiple times. The main thing is to properly remove and store them. After removal, they need to be cleaned of glue, and then rinsed clean water and dry by spreading out on a paper towel. It is best to use the box in which they were purchased for storage.
On a note! If behind the eyelashes is proper care, then you can use them at least 10-15 times. Truth, it comes about tape eyelashes. Beam, as well as single, as a rule, are used only once.

You can use different products and formulations to remove glue from eyelashes.
- Remover or cream paste... It is good because it does not get dirty. The product is applied to the eyelashes, kept for a while, and then cotton pad removed.
- Is also a good tool to help remove the glue. However, it smells quite strong and is not suitable for those with vision problems, as it greatly irritates the skin.
- Gel based remover... It has a thick consistency, due to which it is convenient to use. But it smells pretty strong too.
- From home remedies you can use fat cream, any oils.
You can also use a liquid makeup remover. Pour it into a container, and then lower your eyelashes there. They remain in solution for 5-10 minutes, after which they are washed and dried.

False eyelashes are a real godsend for those who need to add showiness to their makeup in a short time. However, it is important to remember that they must be glued carefully so that adhesive composition did not hit the eyeball. Doing so can damage your eyes.
Nowadays, almost any interior door is equipped with such a thing as a doorknob. Moreover, we are not talking about an ordinary handle, for example, a round one, which you can simply grab, but about a mechanism that allows you to open and close the door and, if necessary, keep it in a closed position, despite the efforts made to open it. Such a mechanism is, for example, a latch with a latch. As the operation progresses, the door hardware wears out, and any handle simply breaks.
Today we will talk about how to disassemble and dismantle it.

Features of various designs
First, let's talk about the designs of door handles and their features.
- The first category we will look at is - stationary models ... These are the most common solutions for interior doors. Such fittings are practically not used now. Is that on the doors installed back in the days Soviet Union which have not been modernized since then. And it is usually not used in residential premises. Outwardly looks like a bracket. There are two types of this model. The difference between them is that they can be one-sided or end-to-end.
If we talk about the latter, then on long screws fixation of 2 handles is carried out, which are placed with different sides door leaves - one against the other.
Such a handle can be removed very easily - just unscrew the bolts that hold this structure. Such accessories can literally be called penny, since they have a minimal price. And it is pointless to repair it, because it does not understand.


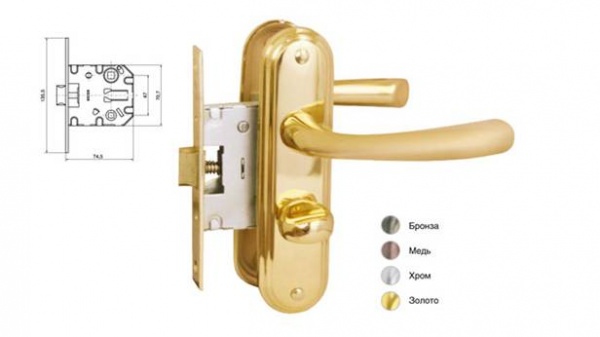
- The next option – push design... Such a structural decision will be a little more complicated. The handle is a lever-type product: thanks to the axis, the working elements are tied to the lock mechanism. Some variants of this type are additionally equipped with a retainer that locks the obturator.
Such a handle can be dismantled using a screwdriver with a narrow blade. By the way, such a handle can have a lock with a metal core.

- Another construct that should be mentioned is swivel model... It has a lot of differences from the above options, which are in the form and design features. General principle the work is the same as for other models.
- The next version of the considered devices for interior door – rosette handle... Such handles are round and, depending on the design, can be disassembled according to different algorithms. They also differ in the method of fixing the decorative element. The spherical shape is very easy to use. Such models are also called knobs.


In general, as you can see, there are a large number of door handles for interior doors. Each type has its own advantages and disadvantages, at the same time, the algorithm for disassembling them will be approximately the same.

Required tools
To disassemble the door handle, you will need to have a certain tool on hand. Regardless of its type, there may be some hidden elements and parts in it that cannot always be pulled out using ordinary devices.
For this reason, the following list of tools should be handy:
- hammer;
- screwdriver;
- drill and a set of drills with a crown;
- pencil;
- awl;
- square.

How to disassemble and remove?
Dismantle doorknob quite simply with the aforementioned tools, as well as a little knowledge of the theoretical plan for the structure of this mechanism.
To do this, you need to follow these steps.
- Support and fix the door well so that it is stationary.
- Now you need to pry on the decorative type flange and pull it out a little. Under it are fasteners that should be unscrewed.
- On the mentioned flange of the pressure part there is a special pin, which is a locking and spring-loaded. It should be pressed in using a screwdriver. In rotary versions, it is usually located in the body. To get there, you must insert a key or an awl. If it was not possible to feel it, then the flange should be rotated until it touches the pin.


- Now you should press the pin and at the same moment pull back the handle structure.
- Now we unscrew the fastener bolts.
- We separate the inner part of the element from the outer one, take out the handle and decorative flange.
- If there is a need to remove the latch for replacement or repair, then you should unscrew the screws that fix it to the side of the door block, then remove the strip, and then the mechanism itself.

When installing fittings in a different position, it is better not to disassemble it for parts. It attaches easily to door structure but in reverse order.
Now let's talk directly about the disassembly of each category of handles.
- Let's start with the stationary, which does not have a push headset, and is also not equipped with a mortise-type lock. In order to unscrew such a handle, you will need a Phillips or flathead screwdriver. Alternatively, you can use a screwdriver. Dismantling must begin by loosening the screws that secure the mechanism.
If there is decorative elements, then they must be removed first. As you unscrew the bolts, keep the counterparts on the back of the blade. If this is not done, then the structure may simply fall out of the canvas and deform.
It should be noted that the mount can be single or double-sided, respectively, the structure can be disassembled in different ways, which means that you need to take care of this in advance. When all the bolts have been unscrewed, it is necessary to carefully remove the handle from the door leaf using a flat-tipped screwdriver. To place old pen a different mechanism is installed or the same design, but with new spare parts.

- If lead talking about disassembling a round handle with a rosette, then it is required to clarify that the word "socket" is usually understood as a mechanism that allows the lock to be locked using a small key on one side, which is not used on the other side. There is a special lamb on the second side. In this situation, the disassembly of the mechanism will be carried out according to the following algorithm:
- first, the screws that hold the trims that perform the decorative function on both sides are loosened;
- the screws connecting the mechanism on both sides are unscrewed;
- the handle structure is pulled out and the rest of it is removed;
- the locking mechanism is pulled out.
If the handle needs repair or any part of it needs to be replaced, then it should be completely disassembled. individual elements and determine the cause of the malfunction. It is necessary to carefully monitor the safety of all small structural elements, otherwise, if they are lost, it will simply not be possible to assemble the mechanism back.


- Now let's talk about disassembling the round knob handle... To dismantle this element from the door leaf, the following actions are usually performed.
- Unscrew the fastening bolts on one side of the door.
- The mechanism is dismantled through special holes.
- The disassembly of the additional counter-type bar is carried out. To dismantle this element, you just need to pull it in your direction.


The non-separable round handle is fixed using the simplest screws for fastening. This mechanism is made with the expectation that later any repair work will not be carried out, but a new spare part will simply be purchased, which will take the place of the old handle.
- Push options... Usually they are used instead of rotary solutions. This is due to the fact that they are durable and very easy to use and repair. Disassembly is carried out as follows:
- first, the screws are unscrewed that hold the decorative canvas of the overhead type, which performs the function of a stuck;
- after this, the overhead canvases located on both sides are carefully removed;
- the bolts of the fasteners are unscrewed and the structural elements of a round shape located on both sides of the door leaf are pulled out;
- all that remains is to open the strike plate and the lock itself, and then pull them out of the fittings grooves.

How to fix it?
Often, door handle repairs are carried out in the following situations:
- the handle is sticky and difficult to turn;
- the handle does not return to its normal position after pressing;
- the handle falls out, and the base is not damaged;
- the tongue does not move when pressed.


Interior doors are sold without fittings, the delivery set includes only the door leaf and racks from which to assemble door frame... There are no factory-made holes in the canvas for the installation of locks and handles. This is due to the fact that the handles, being standardized, have various designs and sizes. In addition, the choice of fittings depends entirely on the preferences of the buyer. Therefore, a person who has started a renovation with the replacement of interior doors is faced with the problem of choosing - to invite a master or install the handles on his own. It should be noted that, having decided to install doors with your own hands, you will definitely cope with the installation of door handles.
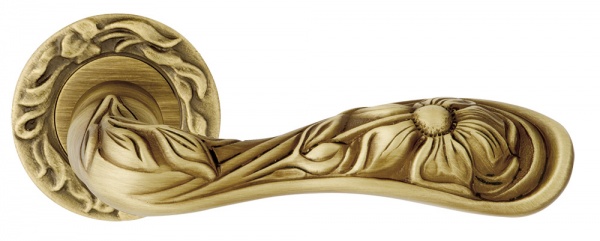
Types of handles for interior doors
Door handles for interior doors can be classified according to installation method, method of operation, shape, material, and the presence of a lock.
According to the installation method, stationary (overhead) and mortise models are distinguished. Overheads are attached to door leaf, and for mortise it is required to drill holes in it.
By the way of work there are:
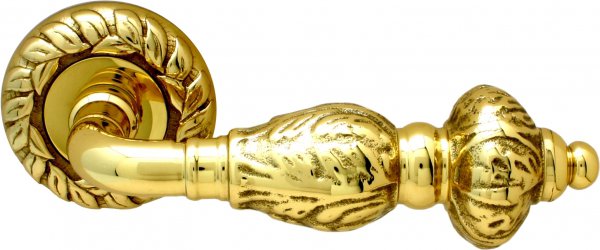
One of the most popular materials for the manufacture of doorknobs is brass. In addition to its excellent aesthetic properties, brass is practical and durable.
As a rule, complex doors are not installed on interior doors. lock systems... The exception is the plumbing lock installed in bathrooms and toilets.
Installing a handle on an interior door
Consider the installation features of the most popular model for interior doors - knob handles. Handles are usually installed on a hinged door, but many experts recommend removing the canvas for installation. True, this can not always be done easily.


Advice. If the curtain cannot be removed from the hinges and the installation is carried out in the hinged position of the door, move a chair or some object to it so that the door is motionless during your work.
Installation tool
The tool will need the most common one, which is in every home:

A marking scheme is attached to the door latch, but it is easy to mark the holes without it. From the bottom edge of the canvas, 1.0 meter is measured on both sides. Measure 6 cm from each edge of the door and make a mark. With the help of a square, a strictly horizontal line is drawn that will connect these two points. At the end of the canvas, a mark with a pencil and an awl is placed on this line in the center. A latch strip is applied and the veneer is cut with a sharp knife. Remember that the strip must be recessed into the door leaf so that it forms a single surface with the door leaf.
Some experts advise starting drilling from the end of the blade with a pen drill. With this order of work, when drilling with a crown, the chips will fly out into the already made hole, and not clog the teeth of the crown.

The drill bit should go to the depth of the blade, no more. The drill is pressed against a point on the end of the blade and a hole is drilled. Then, with the help of a crown, holes are drilled alternately on each side of the canvas, they do not need to be made through. As soon as the tip of the crown appears on the opposite side, the drill must be stopped and start drilling from the other side. So the veneer will not be damaged when the crown comes out.
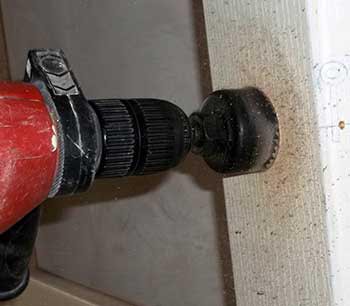
After the holes are ready, using a chisel and a hammer, we make a selection along the line cut with a knife under the latch bar. Install the latch and tighten with two self-tapping screws. It is better to take self-tapping screws not "regular" ones, which are attached to the latch (they have ordinary soft metal), but high-quality ones.

Using the key included in the kit, we disassemble the handle into two parts so that it can be installed. For this, one fastening screw must be loosened, the other must be unscrewed. The center rod is inserted into the hole and on one side the fixing screw is tightened tightly. Then the second half of the knob is put on the rod, and the second screw is tightened. Self-tapping screws are twisted on both sides, which will cover the decorative overlays and the screws will not be visible.

After installing the knob handle, it remains to install the "return" on the box. The door is closed, but not completely, and the upper and lower edges of the tongue are marked with a pencil. Using a square, the distance from the edge of the leaf to the center of the latch strip is determined, and this dimension is transferred to the door frame. Then a "return" strip is applied to the box, a veneer is cut with a knife, and a chisel is used to cut under the strip and tongue. The door is closed and the operation of the latch is checked.

Then a strap is installed on the box. Special "pockets" are sold for grooves under the tongue, they are made of plastic or metal. The self-tapping screws that fix the "return" bar can be closed with self-adhesive plugs. The installation is then complete.
How to disassemble and assemble an interior door handle?
An installed knob can be disassembled in two ways, depending on its design. Unfortunately, most of these models are of rather low quality and often fail.
Dismantling one structure begins with the fact that you need to carefully pry off and remove the decorative strip. The lining has a special groove, usually it looks down. The ball-shaped handle will interfere with unscrewing the screws, so you need to squeeze the locking pin and, at the same time, with a little effort, remove the handle from the central rod. Once the ball of the handle is removed, it will be very easy to unscrew the screws.

To disassemble the second design, which does not have a locking pin, it is necessary to press the spring pin through the technological hole using the supplied key and remove the handle ball. If the length of the key is not enough (it happens), use a simple nail. Then the decorative strip and self-tapping screws are unscrewed. If you cannot find the spring pin through the technological hole, it means that the knob was assembled incorrectly. Rotate the decorative strip 180 ° and the problem is solved.
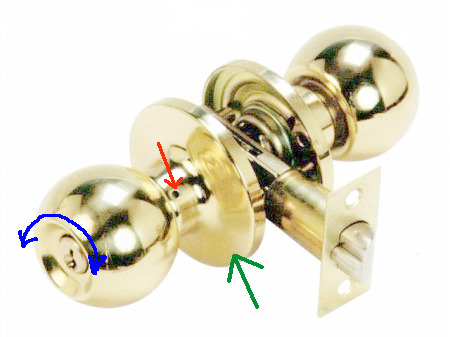

The handle is assembled in the reverse order.

In all premises without exception, it will be a house, an apartment or an office. doors... And this means that when arranging them, it will not be possible to pass by the moment of selecting for them such accessories as door handles. You need to dwell in detail on their types and selection parameters, but before proceeding with the selection, it makes sense to find out how to remove the handle from doors: internal or input.
Learning to remove the pen
Quality
The main criterion when choosing a handle for doors is its quality. After all, it is in operation regularly, since with its help, any doors... In addition, she plays an important artistic role in the interior of each room. In any hardware store you can find a wide selection of door fittings, among which everyone will find what he needs. Internal and entrance handles doors distinctive not only in cost and design, but also in the material of manufacture.

If there are often drafts in the room, we recommend purchasing a handle with a latch lock. This will help doors stay closed so you don't have to shut it down regularly. When choosing such a device, it is worthwhile to carefully check the mechanism for serviceability and softness in operation.
Device types
- Press. The mechanism forces the lock latch to work when influencing it. The tongue moves to the inside and the opening occurs. It is easy to open a lock of this type, thanks to this, if safety is important to you, then it is a great option to take a closer look at another option;
- Immobile. A common fixture with no moving parts. The role of such handles is decorative and they are great for interior doors as seen in the photo;
- Swivel. It is like a push-button model, which is very often used for the bathroom.

Important milestones
Before proceeding with the dismantling of the handle, install its structure. It can be the most common or with a snap-on mechanism. The former, for their part, are also divided into several options:
- fixed on both sides with screws;
- having a rod going through the entire panel.
- If a pen fixed on ordinary self-tapping screws, you can use a screwdriver. Having removed it, you can easily understand what the breakdown is and whether everything can be fixed;
- You will need to tinker with a handle with a rod. Try to scroll the part while holding the second part of the part to prevent it from scrolling. Having removed the part from one of the sides, you can easily remove the second and take out the rod;
- To remove the handle with a latch, you need to free yourself from the screws holding the fittings, after which you will see how it is fixed. Very often, a structure of this kind has a rod and a tongue movement structure. Remove the not very large rod with a cap and it will be easily removed.

Round designs
Begin the process of removing the handle from the side where the closing key is not present:
- Get rid of the decorative overlays, for which press the stopper with a screwdriver and it can be easily removed, as shown in the video;
- Unscrew the two screws that hold the parts of the handle and remove them;
- Now you can unscrew the screws holding the latch and get it out.

Interdoor
If the problem is serious, then you do not need to save money and buy a new one. Let's start the replacement process:
- Remove the fittings, taking into account its design and the rules described above;
- Clean the removed handle with sandpaper and you can go with it to the supermarket, where you will be helped to choose a similar model;
- Very often, handles with latches and a lock are purchased for replacement.

Front door
It is very important to determine the breakdown, and then change the handle to input doors... To do this, heed our recommendations:
- Using a screwdriver, remove the structure. To do this, unscrew the screws holding the lever on both sides of the door leaf, while not touching the inner lock;
- You need to take a wrench open-end wrench to help unscrew the fixture or lever. Continue twisting until you remove the swing-type mechanism as shown in the photo;
- After pulling out the handle, you can easily remove the spring and swing mechanism.
- Look carefully at all the details, the hard work depends on them. If for example a pen loosened, then all these details you can easily notice, without even disassembling it;
- You need to unscrew the retaining ring that holds the torsion spring and washer together;
- If you did everything correctly, then you can easily get out the upper washer located under the retaining ring;
- The problem may be caused by the torsion spring. To check this, take it out and look at it with great attention. If the reason is actually in it, then get a new one and replace;
- The torsion spring should also be checked. To do this, unscrew it with a screwdriver. If it unscrews with great difficulty, then this is excellent and suggests that it is rather tight and there is no need to change it.
Let's summarize
Replacing the handle is needed in both cases: malfunction and installation of a new one doors... If you listen to our recommendations, then you will not have any problems in any of the cases. The main thing is to be careful and take your time, and you will definitely succeed.
Today there are a huge number of all kinds of door handles. All of them are quite reliable, but sometimes they still have to be changed or repaired. However, a problem arises here - not everyone knows how to disassemble  This is the most necessary piece of furniture in everyday life.
How to properly remove the door handle installed on the interior door on your own? Read about it below.
Reasons for dismantling
For the most part, disassembling the handle is required if:
- she blabbed;
- has fallen into disrepair;
- it is necessary to replace the lock itself.
In the first case, there is usually no need to remove it. It is enough just to tighten the screws that hold it, or replace them with thicker ones (if the wood is worn out).
Unfortunately, budget options handles, in principle, cannot serve for a long time, and besides, they are made completely unsuitable for repair. The coating on them is usually quite unstable and will quickly peel off during operation. Therefore, if they fail, they are simply changed to a new one.
 Often, during repairs, the owners decide to put new handles instead of old ones, which are more suitable for created design ooze just look more modern.
When buying a new kit, try to choose those that are made of good metal with a minimum amount constituent elements... Reliable push-on models, for example, must be equipped with bearings - they can serve you for several decades. By the way, quality is very easy to define: the heavier the hardware, the higher it is.
The most common types of door handles
Most often, three types of handles are installed on interior doors:
- stationary;
- nobs (round);
- push.
The latter variety is considered universal, since it can be equally often seen both on the entrance and on the interior doors. In the normal position, this mechanism has an extended locking tab, and when it becomes necessary to enter the room, the handle is pressed and it leaves the grooves. In this case, a lock is usually cut into the canvas, protected by special overlays... In order not to damage the latter, disassembly must be carried out as carefully as possible.
A round, latch-equipped handle in our country is used only on interior doors. Abroad (for example, in the USA) they are often put on  input. WITH outside there is a keyhole in it, and a lock button on the inside.
Stationary models are installed mainly on swing doors... This design is convenient, but not very functional. In fact, it is an oblong bar on which a U-shaped bracket is attached. In the simplest versions, no locking mechanisms are provided - the door closes with a separate bolt. The more advanced models have a roller latch also installed independently.
Prepare the following tools for dismantling:
- flat and Phillips screwdrivers;
- persistent wrench (included with the product).
If the model is without bolts (that is, with secret mountings), then proceed in the following order:
- flat screwdriver (being careful not to damage decorative coating doors) flip off the cover located at the base;
- unscrew the screws hidden under it;
- with a persistent wrench, press directly on the stopper;
- remove the handle by gently pulling it towards you;
- after dismantling, unscrew the screws holding the locking mechanism.
In simpler round models disassembly is much easier - just unscrew the two long bolts located at back side on the sides of the latch.
 In this case, you just need to unscrew the screws or screws securing the strip to the door leaf.
It should be understood here that the replacement of this type of handle must be made with a similar one in size. Otherwise, the traces of the screws cannot be hidden. They are especially visible on varnished surfaces.
Some models are bolted through the door - this method of fastening is convenient for both the manufacturer and the consumer. In this case, you just need to unscrew them from the back and both handles will be removed.
Push handle
All that is required is to remove the trim (in most models it is connected with the handle). In more simple options you just need to unscrew two screws from the door leaf.
In advanced ones, all fasteners are hidden behind a decorative cap - it either snaps off or is screwed onto the thread. By removing it, you will gain access to 3-4 screws that need to be removed with a screwdriver. Do not forget to also remove the clamping screw, which is located directly on the handle - it fixes the square pivot bar. After that, the disassembly can be considered complete.
Assembly nuances
Before putting the handle in its intended place, fix the locking mechanism - turn its oblique surface towards the door closing.
It is important to tighten all screws and screws as tightly as possible - the better you do this, the longer they will not come loose.
After assembly, check how the mechanism works - the latch should freely enter the groove and ensure reliable fixation.

