Installing a router in an apartment or house. Where to install a Wi-Fi router in an apartment or house
Good day!
Many users are scared self-configuration A Wi-Fi router and when buying it, they also order a service for connecting and configuring it.
Purely in my opinion, the price for this service in many stores is too high (sometimes it reaches half the cost of the router) - especially since many people can handle this operation on their own (you just need to figure it out a little).
I also want to add right away that if you later need to change your password, parameters for accessing the Internet (or something else) - you still have to go into the router settings and figure it out yourself ...
That is why I sketched out this small article-instruction, with pictures and explanations of each step. I hope the step-by-step presentation of the material will help you figure out how and what to do.
And so, let's go in order ☺ ...
Addition! You can also read another article of mine on how to connect and configure the Tenda FH456 (N301, F3) router from scratch. -
Step-by-step instructions: connecting and setting up a Wi-Fi router
Site selection and placement of the router
Many users make one mistake - namely, they put the router next to the computer (for example, on the system unit). No, for testing and initial setup - this is acceptable, but for the permanent operation of the device - this is not good in all cases.
The fact is that depending on where you will have a Wi-Fi router located, the level of network reception in different corners your house. Significantly reduce the Wi-Fi signal: load-bearing thick walls, mirrors, metal doors etc.
Therefore, you need to position the router so that it is approximately equidistant from all devices that will connect to its network (and also so that there are a minimum of obstacles to the network signal). An example of unsuccessful and successful placement of the router to 2 room apartment shown in the layout below.

To the question of the choice and location of the router in the apartment
An article on how to strengthen wifi signal -
In general, I think that the message is clear: depending on the location of the router, the quality of the network signal, speed, errors, etc. will depend.
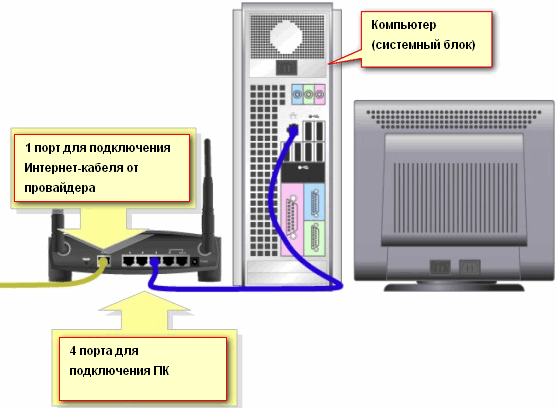
Connecting the router to a computer
A typical delivery of a router consists of (example in the picture below):
- the router itself;
- power supply;
- network cable (usually 1-2 m long). Used to connect the router to a PC (laptop) and configure;
- operating instructions;
- antennas (there may not be an antenna - in some routers it is built into the device case).
Those. has everything you need to start connecting and setting up the device.

Direct connection is as follows:
- connect the router with a network cable (which comes with the router) to a computer or laptop. By the way, please note that on the router, as a rule, there are 4 LAN ports for this (they are marked, most often, yellow). On some routers, the marking instead of LAN may be Ethernet;
- disconnect the internet cable (coming from the ISP) from system block computer and connect it to the router: to the WAN or Internet port (usually marked in blue);
- connect power to the router and turn on the device;
- if everything is done correctly, various LEDs will start flashing on the device...

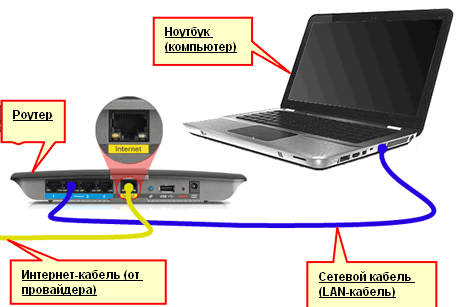
If you show it schematically, then the Wi-Fi router becomes, as it were, an intermediary between your computer and the Internet cable from the provider (see the picture below).
Important! Connecting the router to a PC (laptop) using a network cable is necessary for the initial configuration of the device. Later, the cable can be disconnected and the router placed in a more convenient place.
Configuring Network Card Settings
Before entering the Wi-Fi settings of the router, you need to correctly configure the network card (especially if you previously had different settings from the default).
First you need to open a tab in the control panel - Control Panel\Network and Internet\Network Connections . The easiest way to do this is to press the Win + R key combination, enter the ncpa.cpl command and click OK.

How to open network connections || ncpa.cpl

Then you need to open select "Internet Protocol Version 4 (TCP/IPv4)" and open its properties.

In the "General" tab, set the receipt of the IP address and DNS server automatically. Save settings.

Get IP address and DNS server automatically
Such settings are suitable in 99.9% of cases, because. your Wi-Fi router has an active DHCP server looking into the local network - which will give a free IP address to your computer / laptop.
Entering the router settings (device IP address)
To enter the Wi-Fi router settings, you need to know its IP address (which you just need to enter into the address bar of your browser and follow it).
Each router has its own settings IP address. In most cases, he 192.168.1.1 , but there are exceptions:
- address for D-Link and NetGear routers: 192.168.0.1 ;
- address for TrendNet routers: 192.168.10.1
Important! Also pay attention to the stickers on the body of your Wi-Fi router - these stickers almost always contain an IP address. By the way, on the same stickers you can find the login password for accessing the web interface.

After you enter correct IP address to enter the router settings and press Enter - you will see a window prompting you to enter your login and password (example in the figure below).

As a rule, in most cases both login and password will be admin. If you can't log in, try leaving the password field blank.
For more information on how to enter the router settings, what passwords and logins, IP addresses, and what to do if you can’t log in, I reviewed in this article:
Setting up a router (router)
If the password and login were entered correctly, then you should get into the web interface (with a bunch of different settings, links, etc.). For each manufacturer and for different models of routers, the interface is different.
But there is one thing in common: the menu is usually located on the side or top. The main settings in the menu are also identical, and are set in a similar way. So, after looking at how one router is configured, you can, by analogy, configure another ...
As an example, I will take such a popular brand of routers as TP-LINK (with "green" firmware in Russian).
Cloning the MAC address of an old network card
The fact is that many providers have an extra. security that checks the MAC address. And if the MAC address does not match (or has been replaced) - access to the network is blocked.
To clone a MAC address, in TP-LINK routers, you need to open the "Clone MAC address" link (in the "Network" section). If you have an English version of the firmware - then look for a link like "MAC Clone".
Addition! Not so long ago, I posted a separate instruction on cloning a MAC address on my blog. -

MAC address cloning
Setting up Internet access
Setting up Internet access mainly depends on the network design of your ISP. The necessary parameters for accessing the network, you must be given in the contract for the provision of Internet connection services. Most often, PPPoE is used in Russia (note: a dynamic IP address is issued when connecting. To access, you must enter a login and password).
In the router, it is impassable to open the WAN (Internet) tab and first specify the connection type (for example, PPPoE, see "2" in the figure below). It is also necessary to specify username and password (see "3" in the figure below, the data can be taken from the contract with the Internet provider).

It remains only to save the settings. In most cases, nothing else needs to be entered. Now the router can access the Internet - and on the computer that is connected to it with a network cable, the Internet should now appear.
It remains only to configure the wireless network ...
Setting up a Wi-Fi network
To set up a Wi-Fi network, first you need to open the "Wireless Settings" tab (or in English "Wireless Settings"). In this tab, you need to set the network name - i.e. the name of the network that you will look for to connect on your gadgets: tablets, phones, etc. (In some cases, if there is a bad signal, it makes sense to select a channel. ).

Then you need to open the "Wireless Network Security" tab (or in English "Wireless Security") and select the type of protection. To date, one of best types encryption is WPA2-PSK, which is the first in the list (we select it).
The PSK password is the password that you will need to enter when connecting to a Wi-Fi network.

Actually, after saving the settings, the router will go to reboot, and then you can connect to a Wi-Fi network and use the Internet.
That's the whole setup...
I understand that in this article I did not consider many subtleties that, in particular cases, can have a great impact on the operation of the network. But, probably, all of them cannot be foreseen within the framework of one article.
As I work on the site, I will touch on this issue again, and more than once ...
Setting up a router is not very difficult, contrary to popular belief. Everyone can cope with this task, you just need to follow these instructions.
1. Wire connection
First you need to connect an internet cable to the wifi router. It plugs into the WAN port, which is also often referred to as the Internet.
Then you need to connect the router (router) to the computer. One of the ends of the Internet cable is inserted into one of the holes of the wi-fi router itself, and the other end must be connected to the network card on the personal computer itself. If there is no cable, you can resort to a wireless connection, but it is best to use a wired connection at this stage.
Now you should connect the router to the outlet. The router should turn on, as indicated by a glowing light on it, but some models of routers may come with a power button that will need to be turned on. After that, you need to give the router a few minutes so that it has time to fully boot.
2. Checking the correct operation of the Internet
If the Wi-Fi router was bought not in a regular store, but through an Internet provider, then it is likely that it could already be configured for you. In this case, after the first step, the router will automatically load the settings previously set for it and the Internet will be ready for use after half a minute.
To check if the Internet is working, it is enough to launch any browser on your computer and drive the names of several sites into the search box. If all the pages of the sites load as they should, then you can safely skip the next paragraph of the article and proceed to the fourth step.
5. Setting up your home Wi-Fi network

To protect your home Wi-Fi network, it is important to choose high-quality security parameters. Being in the settings menu of the router, you need to go to the section that is responsible for setting up the wireless network (the section name may be in English or slightly different, but the essence is the same in any router). In this menu, you need to set the most complex password. It will be used in order to be able to connect other devices other than PCs to the Internet via Wi-Fi, for example, tablets, laptops and smartphones. As a means of protection, it is better to choose WPA2-PSK encryption, where you will be required to have a password of 8 characters or more. After that, it is important to save all the changes, as well as write down a new password somewhere on a piece of paper so as not to forget it.
6. Changing the password responsible for accessing the router settings
It will also be best of all to restrict access to the settings of your router from outsiders. Usually, the router is left protected by the standard login and password, but it would be best to change them to your own.
![]() Set up Wi-Fi at home often - a big problem. Do not want to cut off the phone to your provider - follow simple instructions and everything should work out. V best case, setting up the router out of the box will take 15 minutes.
Set up Wi-Fi at home often - a big problem. Do not want to cut off the phone to your provider - follow simple instructions and everything should work out. V best case, setting up the router out of the box will take 15 minutes.
Important!For example, we took a router TP-LINK TL-WR840N . Program interfaces for setting up different models TP-LINK routers may differ slightly (not to mention routers from other manufacturers). Look for the menu items you need, and don't be scared if yours is not the same as in the photo instructions.
Most fast way for settings WiFi router - not the one with the disk. Although an installation disk is included with every router, this installation is not for everyone. We will go the other way - let's see how to configure the router manually.

In order to successfully connect the router, you need to know the type and parameters of the Internet connection:
- IP address;
- subnet mask;
- login;
- password.
This information must be contained in the contract for the provision of Internet services. Is there no contract or in the contract in a strange way there is none of the above items? Call tech support and find out.
Connecting a router
- We connect the router to the network (the power cord is included in the kit - is there one?).
- Click the ON button. on the router (many routers also turn on directly from the outlet, but in vain). In our case, both the power adapter and the button are in place.
- In the box we find the network cable. At one end we connect it to the router (there are a lot of ports on the router, you need the one under which “LAN” is signed,requiredthe port is also usually highlighted in a different color). Others - to the PC network card.
- You need to enable automatic obtaining of an IP address. You can do it like this:

Router Administration
- On the PC, open any browser (we used Google Chrome).
- We write the address of the router in the address bar (for TP-LINK Wi-Fi routers, this is 192.168.0.1 or 192.168.1.1).
- In the window that appears, enter your username and password. Unless otherwise indicated in the technical documentation or at the bottom of your router, the following are used as standard on routers:
- login: admin
- password: admin

If you did everything right, this page is in front of you. The menu is always in English. On the left is the menu, in the center is the content of the selected item on the left, and on the right is the explanation and the most important setting items.
How to set up a Wi-Fi router at home
Do not rush to get scared: you do not need to fumble through each section with an English-Russian dictionary at hand. It is enough to put a tick in 3 points.
Chapter network, paragraph WAN. Select your connection type from the list - Dynamic IP, Static IP, PPPoE or PPTP (see contract). In our case, this is PPPoE. Each type of connection requires tuning. Follow the prompts below to complete the settings on your router and clickSave(at the bottom of the page).
PPPoE

Dynamic IP

static IP

PPTP

Important!The provider is sometimes tied to the MAC address of the network card (a typical phenomenon for Dynamic and Static IP), so we additionally go to MAC Clone and press Clone MAC Address. This is in case you did everything as mentioned above, but for some reason nothing worked.
Setting up a Wi-Fi network
We almost figured out how to connect Wi-Fi - it remains to set up a Wi-Fi network. Therefore we go toWireless- Settings.
We find our location in the list, come up with a name for this network (it’s better not to be smart with the name, but you can’t leave it “as is” - if it matches the name of the neighbor’s Wi-Fi, problems may arise).

Among other things that are on this page, the following menu items may come in handy:
- Enable Wireless Router Radio - enable / disable Wi-Fi;
- Enable SSID Broadcast - enable/disable the visibility of the Wi-Fi network, if you disable this item, this network will not be displayed in the general search for Wi-Fi networks (only through the SSID).
The latter is not a way to hide from neighbors, so do not rush to be smart with stealth.
Setting up Wi-Fi network security
Stay in sectionWireless, go to the submenusecurity. Optimal choice parameters from the list - in the photo below. Behind you - only the password for Wi-Fi. We recommend that you write it down in the contract for the provision of Internet services (so that you certainly don’t get lost).

Connection and operation
You can, of course, still set up a local network and change administrator passwords (those that are admin / admin by default on all routers). But these are bonus points. The majority of users can start working after rebooting the router. You can do this by clickingREBOOTon the pop-up message at the bottom of the settings page.
Now we connect the cable from the provider to the port highlighted in color and signed INTERNET (through which the Internet enters your apartment). Other ports are for wired connection of PCs and laptops that have problems with wireless.
Now you know how to connect a router in 15 minutes. How many, by the way, did you have ticked on the timer?

P.S. Indicators
Not all routers are the same, but keep in mind:
- indicator Systemshould blink, not burn;
- power- just burn;
- blinking of the middle indicators - data is being exchanged, the indicators are on - there is no network activity, off - there is no connection;
- Internet- lights up when there is a connection, blinks - data is being exchanged, off - check the cable connection.
If you need a signal booster or, say, a Wi-Fi adapter, the link below will let you choose the wireless equipment for data transmission for any occasion:http://price.ua/catalog454.html.

If the power of the router is not enough to provide a stable Wi-Fi coverage of an apartment, house or office, there is a need for additional devices. There are three ways to amplify the weak signal of the main router: install an additional antenna, a repeater, or another router. Each method has its advantages and disadvantages, let us dwell on the third option in more detail.
How to set up a router
To configure the router, connect a computer or other device with an installed web browser to it:
- you can connect a computer with a cable by connecting the PC network card to a free LAN port of the router;
- You can connect via a Wi-Fi wireless network to the router using a laptop, tablet or smartphone.
By default, the wireless network is assigned a name (SSID) identical to the name of the router model, and access to the distributed Wi-Fi network is not protected by a password.
After establishing a connection with the router, open a web browser on a computer or a connected wireless device and type the IP address of the router in the address bar. For example, for a TP-LINK router, the address would be: http://192.168.0.1
Entering the IP address of the router in the address bar of the browser will open access to the control panelThe illustrations are taken from the settings of the TP-LINK TL-WR 1045 router, the control panel looks different from other manufacturers, but general principles, abbreviations and terms will be the same.
The correct IP address, login and password required to enter the control panel are indicated on the plate attached to the bottom of the router.
 The IP address, login and password of the control panel are indicated on the nameplate on the bottom of the router
 The login and password indicated on the plate refer only to the control panel, and not to the wireless network distributed by the router. After entering your username and password, you will see main screen, which displays information about the status of the device and provides access to menu items for setting modes.
Unless necessary, do not change the factory settings in the router settings. After making changes to the router settings, restart the device.
Video: setting up a Wi-Fi router
Two ways to connect routers
Routers are connected to one local network either by cable or wirelessly. It is recommended to use devices from the same manufacturer.
Cable connection
A twisted-pair cable (UTP cable) is laid between the main and additional routers. In the main router, the cable is connected to the LAN socket, and in the additional router, to the WAN socket (this socket is highlighted in color and is sometimes called the Internet). With this connection, the additional router will be for the main network device, and the main one for the additional one will act as a provider, distributing the Internet and providing a dynamic IP address.
Before installing an additional router, consider how the cable will be laid and carefully measure the length of the future cable channel. When purchasing a cable, buy one meter longer than the measured cable duct, and ask the seller to immediately crimp the ends of the cable into connectors. If the cable channel runs outside the premises and is exposed to natural influences, then purchase a cable with a reinforced sheath.
Advantages of the method:
- reliability and stability of the cable connection;
- ease of configuration of both routers;
- the installation location of the additional router is not limited to the wireless coverage area of the main router.
Disadvantages of the method:
- the need to purchase and lay a cable;
- when transferring the router, the cable will have to be shifted to a new location.
Configuring routers when connected by cable
If the main router is already configured to work with the provider and there are no complaints about the work, then you do not need to change anything in the settings.
Make sure the DHCP function in the main router is enabled to automatically distribute IP addresses in local network. The start and end IP addresses do not need to be changed.
Setting up an additional router
It is recommended to immediately reset the possible changes made to the router settings to the factory-preset ones. To do this, turn on the router, find the Reset button on the back panel, press and hold it for 5–7 seconds. To protect against accidental resetting, the button is hidden inside the case and you can press it through the hole with a needle or a bent paper clip.
 An example of the location of the reset button on the rear panel of the router: the button is hidden inside, only the hole for pressing is visible
 In the additional router, two settings are checked and set:

 Making changes to the additional router's own IP address avoids conflicts of the same addresses on the same network
After changing the IP address of the router, enter the new address in the address bar of the browser to re-access the control panel.
There is a cable connection option in which the cable is connected to the LAN port of an additional router. This option requires complex configuration and does not provide any advantages over connecting through the WAN port.
Wi-Fi connection
Advantages of the method:
- does not require physical connection of routers with a cable;
- allows you to easily move an additional router if necessary.
Disadvantages of the method:
- relative complexity of customization;
- slow down the speed of the wireless network.
 The main router receives the Internet from the provider and distributes it via the LAN1 wireless network; an additional router receives the Internet wirelessly from the main router and distributes it via a wireless LAN2 network
Configuring routers when connecting via Wi-Fi
When combining two routers in a local network via a wireless channel, a “bridge” connection is used, in English Wireless Distribution System (WDS), designed specifically to expand the Wi-Fi coverage area.
Understanding the Bridge Connection (WDS)
When this type of connection is established, the main router operates in standard mode, and the additional one acts as a Wi-Fi amplifier, receiving and distributing the signal further.
To connect routers in the "bridge" mode, you must establish a permanent (fixed) communication channel between them and specify the physical addresses of the connected devices in the settings. To set up the “bridge”, both routers are turned on, the main router is configured in advance for the provider, receives and distributes the Internet, and the settings of the additional one are preliminarily brought to the factory settings by pressing the Reset button.
Configuring the main router for WDS mode
We change the automatic channel selection mode to a fixed channel mode (for example, to the 11th channel).
Setting a fixed channel number prevents the router from automatically scanning the air and choosing the least loaded channel. Therefore, if outsiders work nearby wireless networks, you may have to manually experimentally select the least loaded channel or use a special program to search for a free channel. The channel number must be changed simultaneously on both routers - the main and additional.
Configuring an additional router for WDS mode

On the home page on the control panel of the router, the line “WDS Status” should display “working”. This means that an additional router has connected to the main router and distributes the Internet.
Video: how to make a Wi-Fi network between routers (WDS)
Creating a complex network requires knowledge and experience. If you are confident in your abilities, use our instructions. If you doubt your abilities, it is better to seek help.
It is more convenient to use the Internet on a laptop through a wireless access point. Before connecting, you need to learn how to set up a Wi-Fi adapter on a laptop. We will talk about methods for turning on and configuring the device in the most popular versions of Windows. Ways to update drivers will be considered.
How to find out if a Wi-Fi module is installed on a laptop
Almost every mobile gadget is equipped with a Wi-Fi module, but you should definitely check its availability. Be sure to check your laptop's technical manual first. In the characteristics, opposite the “Wireless” column, there should be Wi-Fi or IEEE 802.11 lines. Their presence indicates that required component installed on the laptop.
An alternative option is to look for the presence of the component in the list of devices. To do this, go to the properties of the computer and click on the "Task Manager" link. In the window that opens, among all the hardware, open the Network adapters tab, and then find the line with the previously described words or the word Wireless (Wi-Fi).
If it's not there
The best option is to upgrade your laptop. Most likely, you have a very "ancient" model with low performance and a missing module wireless communication. When funds do not allow to buy new technology, order the USB module. It looks like a flash drive, while serving as an external Wi-Fi module. There are hundreds of models on the market with different characteristics. To work, you must install the driver.

How to turn on the Wi-Fi adapter
To use on laptops and selected computers wireless Internet , you should activate the Wi-Fi module, and then connect to the required network. There are several hardware and software methods turning on Wi-Fi, which will be discussed in detail below.
switch on the body
For the convenience of users, many manufacturers made the switch a separate button on the gadget's body. It may be located on front panel(on the side of Esc or near the number keys Num).

We also recommend that you inspect the side panels on both sides for the presence of a switch. It has an antenna icon with diverging waves. Often there are light indicators on the case that inform about the performance of specific components.

In the presence of such a switch and the correct operation of the component itself, of course, the whole inclusion is reduced to one simple action.
Keyboard Shortcuts
Another way is to activate the module with a keyboard shortcut. On laptops additional settings placed on the functional buttons F1-F12. Also on the keyboard you can find a key with the letters Fn. It is used to enable additional features(including wifi). You need to hold down Fn, click the button with the image of the corporate icon (on different models they will be F2, F3 or F12). The action will activate the indicator (if any) and the connection icon will appear in the start panel on the right side.

Alternatives
If the previous manipulations do not work, the problem is in the drivers or settings operating system. A rare exception is marriage. As a last resort, after all attempts at resuscitation, contact service center, especially if the laptop is under warranty. Also make sure with a dot WiFi access everything is fine. The problem may lie in the incorrect operation of the Wi-Fi router (you need to re-configure or update the firmware). Try to connect to it mobile phone or tablet to test.
Installing or updating drivers
The inoperability of Wi-Fi is often associated with the driver. The latter is a specialized software that ensures the correct operation of a physical device in the operating system shell. There are three main ways to install a new driver:
- independently through the downloaded installer;
- through standard features windows;
- through specialized software.
The first way is the most reliable option, as it excludes interference "from outside". The owner of the laptop should go to the manufacturer's website, and then find the category of software downloads. Next, in the search, write the full name of your model and OS version. Be sure to find out the bit depth (32 or 64 bits). At your request, a list of all drivers will be published. Download the file for the Wireless network adapter.

The second method involves downloading the required driver through Microsoft databases. You should right-click on the Wi-Fi adapter in the device manager and select "Update Drivers". Please note that the update tool does not always find the latest version.

The latter method is extremely convenient, since the program takes over all the "dirty work" of searching and installing. An effective tool is Driver Genius. Follow the steps below to update the driver:

"Driver Jenius" has a huge database, while regularly updating it, so the software can be used to update the software of any laptop hardware.
Necessary actions and settings in the operating system
The wireless adapter can be activated using OS tools. The user should enable it separately in the network settings. Next, we will tell you how to set up Wi-Fi on a laptop for the most common Windows systems.
Windows XP
Full setup on Windows XP consists of the following steps:

Wi-Fi setup under Windows XP will be completed after completing the described steps.
Windows 7
The user should perform similar settings in the "seven". The difference from the previously given instruction is minimal:

Often the provider issues a static IP. In such situations, it is necessary to set the parameters according to the requirements of the service provider. In other cases, automatically obtaining parameters allows you to use Wi-Fi without problems.
Windows 8/10
These OS versions have similar interfaces, so the procedure for them will be almost identical. You need to follow the steps similar to those given earlier for other Windows systems:

Additionally, if there are problems with access, run the diagnostic center. The system may detect errors due to which you are unable to connect to the Wi-Fi hotspot.

