Create a bootable flash drive with multiple Windows installation images. Multi-boot flash drive with multiple operating systems - how to format, create and burn
Hello.
Quite often, many users, due to various system errors and failures, have to reinstall Windows (and this applies to all versions of Windows: be it XP, 7, 8, etc.). By the way, I also belong to such users ...
Carrying a pack of disks or several flash drives with an OS is not very convenient, but one flash drive with all the necessary versions of Windows is a nice thing! This article will show you how to create such a multi-boot flash drive with multiple versions of Windows.
Many authors of similar instructions for creating such flash drives greatly complicate their manuals (dozens of screenshots, you need to complete huge number actions, most users simply do not understand what to press). In this article, I would like to simplify everything to a minimum!
So, let's begin…
What do you need to create a multiboot flash drive?
1. Of course, the flash drive itself, it is better to take at least 8GB.
2. The winsetupfromusb program (you can download it on the official website: http://www.winsetupfromusb.com/downloads/).
3. Windows OS images in ISO format (either download them or create them yourself from disks).
4. A program (virtual emulator) for opening ISO images. Recommend .
Step by step creation bootable flash drive with Windows: XP, 7, 8
1. Insert the flash drive into USB 2.0 (USB 3.0 - blue port) and format it. The best way to do this is to go to "my computer", right-click on the flash drive and select " format" in the context menu (see screenshot below).
Attention: when formatting, all data from the flash drive will be deleted, copy everything you need from it before this operation!
2. Open the ISO image with Windows 2000 or XP (unless, of course, you plan to add this OS to a USB flash drive) in the program Daemon Tools(or in any other disks).
My computer. pay attention to drive letter virtual emulator in which an image with Windows 2000/XP was opened (in this screenshot, the letter F:).
3. Last step.
Run the WinSetupFromUSB program and set the parameters ( see the red arrows in the screenshot below):
- - select the desired flash drive first;
- - then in the "Add to USB disk" section, specify the letter of the drive in which we have an image with Windows 2000/XP;
- - specify the location of the ISO image with Windows 7 or 8 (in my example, I indicated the image with Windows 7);
(It is important to note: those who want to burn several different Windows 7 or Windows 8, or maybe both, you need: for now, specify only one image and press the GO record button. Then, when one image is recorded, specify the next image and press the GO button again and so on until all the desired images are recorded. For information on how to add another OS to a multiboot flash drive, see later in the article.)
- - press the GO button (you do not need to put any more checkmarks).
Your multiboot flash drive will be ready in about 15-30 minutes. The time depends on the speed of your USB ports, the general loading of the PC (it is advisable to disable all heavy programs: torrents, games, movies, etc.). When the flash drive is written, you will see the "Job Done" window (job done).
How to add another Windows OS to a multiboot flash drive?
1. Insert the flash drive into USB port and run the WinSetupFromUSB program.
2. Specify the desired flash drive (which we have previously recorded using the same Windows 7 and Windows XP utility). If the flash drive is not the one with which the WinSetupFromUSB program previously worked, it will need to be formatted, otherwise nothing will work.
Testing a multiboot flash drive
1. To start the installation of Windows OS from a USB flash drive, you need:
- insert a bootable USB flash drive into a USB port;
- set BIOS to boot from flash drive (This is described in great detail in the article "" (see Chapter 2));
- to restart a computer.
2. After restarting the PC, you need to press some key, such as "arrows" or space. This is necessary so that the computer does not automatically start loading the OS installed on the hard drive. The fact is that the boot menu on the flash drive will be displayed for only a few seconds, and then immediately transfer control to the installed OS.
3. This is how the main menu looks like when loading such a flash drive. In my example above, I recorded Windows 7 and Windows XP ( actually they are on this list).
Flash drive boot menu. There are 3 operating systems to choose from: Windows 2000, XP and Windows 7.
4. When choosing the first item " Windows 2000/XP/2003 Setup The boot menu prompts us to select the OS to install. Next, select " First part of Windows XP…” and press Enter.

In my previous article, I talked about how to burn various kinds of information on CD / DVD discs, for example: music in MP3 format, any boot program (for example, a Windows installation disc or antivirus), a movie in DVD format and, of course, just a set of any files and folders.
Fortunately, CDs and DVDs are becoming more and more obsolete these days. Many laptops no longer have disk drives, and for stationary home computers it often simply does not make sense to buy a disk drive (if only for reading and writing Blu-ray discs).
And fortunately, because conventional flash drives are replacing disks, i.e. flash drives. Progress does not stand still and now most music players, video players and TVs support the ability to play information directly from a flash drive! Moreover, you can make a USB flash drive bootable, and, for example, install Windows from it or run any program for computer maintenance (antiviruses, partition managers, LiveCD and much more)!
In this article, I will share with you in a simple way creating a bootable and using one simple program.
But how convenient it is now to use flash drives and not carry these discs with you in special boxes? :) I threw a lot of any films, music on one flash drive, after which you can listen to listen to music in the car by inserting a flash drive, watch movies simply by connecting it to a TV or DVD. Also, at the same time, the flash drive can be bootable and simply store your numerous documents and various kinds of files. In general, everything in one bottle :)
In the article about burning discs, I talked separately about burning music, movies, boot images and mixed data. And for flash drives, such a manual is not required, because to record both movies, music, and just a set of files, you just need to copy all this to a USB flash drive and that's it! For convenience, you can also sort into different folders. That is, it is clear that a separate program for writing data to a USB flash drive is not required :)
For example, copying music:
Everything is simple!
And now not only flash drives are very relevant, but USB external hard drives, which can contain a huge amount of information, for example, 2 TB (2000 GB.). And they are used in the same way as flash drives: connected to USB, copied everything you need and you're done! And no CDs are needed.
But how to make it so that on a USB drive (whether it be a flash drive or external hard disk) could be burned, for example, a Windows installer, so that you can then insert a USB flash drive into the desired computer and install Windows on it directly from the USB flash drive? Or we want to write a bootable antivirus to a USB flash drive to check the computer even before the system starts. And someone may need a boot program to reset Windows passwords. I wrote about this program in an article:
Or maybe someone wants to have several different boot programs on a USB flash drive with a choice through a special menu? It is very comfortable! But in this case, simply copying the images of the necessary programs to a USB flash drive, unfortunately, is not enough ... You will need a separate program in order to make the USB flash drive bootable and stuff it with the necessary boot programs. I have seen several programs that perform the same function. All of them are free! He personally settled on one and so far did not even have to resort to the help of other programs.
The program is called "WinSetupFromUSB". It, like many others, is in English, but don't let that scare you, because you have this article at hand :)
Consider how to make a bootable USB flash drive using it.
Download and unpack the WinSetupFromUSB program.
First we need to download the program. As I mentioned in many of my articles, you need to download programs from official sites, and not from anywhere! Otherwise, you can also download viruses in addition to the program :)
winsetupfromusb.com
This is just the official website of the program. At the top of the window, you will see links to download the latest Beta versions of the program, but I do not recommend downloading them, since such versions of the programs are at the testing stage and may have various glitches. It is better to always download the latest released stable versions so that there is no “beta” or “b” postscript.
As you can see in the example from the image above, the latest stable version today is 1.5. Here I download it for an example in the form of an unpacked .exe archive. There is another option in the 7z archive, but there is no difference.
In the next window, just click "Download" and the program will immediately start downloading to your computer:
After downloading the program, run the downloaded file for unpacking:
A window will appear in which you need to specify a folder on your computer to unpack the archive:
I extract directly to my desktop. In this case, the program will still be unpacked into a separate folder "WinSetupFromUSB", which will be created independently. To start unpacking, you need to click "Extract".
After unpacking, we see a folder with the name of the program:
It is in it that the program itself will be.
Now let's start creating a bootable USB flash drive ...
We create a flash drive with any boot programs using WinSetupFromUSB!
So, we unpacked the program and now in the folder we see 2 files to run to choose from:
One is designed to run on 32-bit Windows systems, and the other (which is labeled "x64") is designed to run on 64-bit systems. Run the appropriate file depending on the bitness of your Windows. At the same time, there will be no difference in the program itself and the speed of its work! I recommend running the program as Administrator. To do this, right-click on the file and select "Run as administrator" (see image above).
The program will start and we will see the following window:
Using the program is very easy!
To begin with, you should know that during the first recording, the program will format the USB flash drive, which means deleting all the data on it. Therefore, either use any empty flash drive for these purposes, or copy everything that is stored on the flash drive somewhere to your computer so as not to lose data!
After running the program, connect the USB flash drive (or USB HDD) that you want to make bootable on your computer. This can be done before starting the program.
In the topmost section "USBdiskselectionandformattools", the first thing to do is select the USB disk to which the recording will be made. I have on this moment Only one flash drive is connected to the computer, so the program automatically indicated it:
If you have multiple devices connected, be sure to select the one you need from the top selection list (see image above). And, look, make no mistake, because the program, as mentioned above, will destroy all data! It will be best if you have one single USB drive connected to your computer, on which you are just going to write programs.
Below we put a checkmark "AutoformatitwithFBinst" in order to format the USB flash drive and make it bootable. Next, you need to select the file system into which the flash drive will be formatted (point 3 in the image above): FAT32 or NTFS. NTFS will be supported today in most cases, so it's best to choose it. At the same time, FAT32 does not support writing files larger than 4GB, which may interfere with you in the future.
Now go to the "AddtoUSBdisk" section:
In this section, we will just add boot programs that will be written to the USB flash drive. We see the following options:
Windows 2000/XP/2003 Setup.
You should choose if you are going to burn the installer of one of the listed Windows systems to a USB disk. All of them have long been outdated and, I think, few people will need this item today.
Windows Vista / 7 / 8 / Server 2008 / 2012 / Based ISO.
This choice will allow you to burn the installer of more modern Windows systems, for example 7 or 8, to a USB disk. This is already relevant today and I think it will come in handy for many!
UBCD4Win / WinBuilder / Windows FLPC setup / Bart PE.
This item is needed if you want to write a boot program based on WinPE to a USB disk. But most bootable software is based on Linux, so many will never need this feature at all, or very rarely.
Linux ISO / Other Grub4dos compatible ISO.
Current feature! Allows you to burn a Linux-based boot program to your USB drive. Now most programs are created in this way. For example, bootable versions of anti-virus products, bootable version of the famous program for creating backups and recovery - Acronis, a program for resetting the password of Windows users.
SysLinuxbootsector / Linux Distribution using SysLinux / ISO Linux.
This item is likely to be of little use to anyone. The option allows you to write to a USB drive the program with the Syslinux bootloader. If there is a Syslinux folder in the program image, then most likely you will need to use this option to write it to USB.
So, now that you at least roughly know the purpose of each of the items in the program, you can start adding programs.
Suppose we want to write the Windows 8.1 installer, the Acronis backup and restore program, and the password reset program to a USB flash drive. Let this be an example.
So we mark the item “WindowsVista / 7 / 8 / Server 2008 / 2012 / BasedISO” and press the “…” button to the right to select the image with the desired Windows:
Click "OK" in the next window:
The standard Windows Explorer will open, where you need to select the ISO file (image) of the system you need and click "Open". In my example, I choose Windows 8.1:
Now I add the Acronis program. I select the item "LinuxISO / OtherGrub4doscompatibleISO" and in the same way by clicking "..." I select the image of the bootable version of Acronis in the form of an ISO file:
After selecting the program image, you will be prompted to specify the name of the menu item by clicking on which you will open the added program:
You can mentally ask the question: “how did I know that the bootable version of Acronis is based on Linux, on the basis of which I chose the “LinuxISO / OtherGrub4doscompatibleISO” option?”. Actually, nothing, purely intuitively and relying on the fact that now most of the boot programs are built on Linux-like systems. However, you can try to find out on the official websites of the programs themselves. But it’s even easier to take and burn the program right away through the item “LinuxISO / OtherGrub4doscompatibleISO” and if it suddenly doesn’t work, then rewrite the flash drive again, choosing another option :) Fortunately, all this is not done for long.
So, I prepared 2 programs for writing to a USB flash drive: Windows 8.1 and Acronis installer:
And here, since there is only one choice of each type of program to be recorded, another question arises: “How then can I add 2-3 or more boot programs of the same type (for example, based on Linux) or 2-3 installation Windows?”.
The question is correct! The program allows you to record as many programs as you like on a USB flash drive. Everything is limited only by its volume :) But this must be done in several approaches.
At the moment, I have already listed 1 Linux-based Acronis program, and I need to write another one - password reset, which is also built on Linux. So the password reset program will have to be added to the USB flash drive on the second run.
But first, let's write down the 2 programs that I added. To do this, it remains to click the "Go" button at the very bottom of the window:
The program will make 2 warnings that the data will be 100% deleted, the disk will be repartitioned and recovery will probably be impossible. I already warned about deleting data before starting to work with the program, so I hope you understood all this and made a copy of the files on your USB storage if needed :)
Click "Yes" in each warning window:
The process of writing the specified programs to the USB flash drive will begin. The duration of the recording depends on the amount of data and the speed of the flash drive. The recording process is shown at the bottom of the window:
For example, for this example I burned Windows 8.1 3.85 GB and Acronis 355 MB to an 8 GB USB 2.0 stick and it took me about 15 minutes. If the flash drive was USB 3.0, the process would most likely be reduced to 5 minutes or even less. Now flash drives and external USB hard drives are mainly USB 3.0 format, which gives a very high speed of information transfer.
The end of the recording will be indicated by a window with the inscription "Jobdone", where you just need to click "OK":
After the first 2 programs are written, we can run WinSetupFromUSB again and add more programs to the USB flash drive, without having to format it again!
When you run WinSetupFromUSB a second time to add new programs, don't check "AutoformatitwithFBinst"! It remains only to select new programs and press the "Go" button again to record:
As a result, new programs will be added to the flash drive. If you need to add more, then do, respectively, the 3rd launch of the program and again add what you need :)
That's actually the whole recording process. Now our USB drive is ready and it remains to boot from it!
To set up your computer to boot from USB disk(it doesn’t matter if it’s a flash drive or an external USB hard drive), most often you have to go into the BIOS and make some settings there. Describe important BIOS features, including how to boot from various devices, I'm going in a separate article:
Now I will briefly show how to do this using the example of one of the BIOS versions - AmiBios:

There are many versions of the BIOS and each of them is slightly different in interface and capabilities, but still the principle is the same and each has a device priority menu similar to the one described above.
After saving the settings, the computer will reboot and boot from the USB flash drive will begin, since it was set as the first boot device.
It will be necessary to wait a few seconds and the boot menu will appear, where all the programs we recorded via “WinSetupFromUSB” will be listed:
Selecting the desired program with the arrows on the keyboard (because the mouse will not work in such boot programs) and pressing the "Enter" key, its launch will begin.
That's it, that's all!
I think that the article will be useful for those who want to have installation files on a USB flash drive. Windows versions and various utilities for recovery, hard disk partitioning, password reset, and various other purposes.
As you can see, such multiboot flash drives are written very easily!
Have a nice day and good luck! Till;)
Multiboot flash drive - a bootable USB flash drive with several operating systems and utilities located on a single USB drive. By booting from an external USB device, the user can use various Windows or Linux operating systems, boot disks from antivirus manufacturers, boot disks for programs such as Acronis, Windows PE boot disk, utilities, etc.
It is convenient to have several systems on one USB drive at once or create a special flash drive with a set of necessary software (USB flash drive - resuscitator). A bootable flash drive with multiple operating systems can be created in different combinations: a multiboot flash drive with several operating systems and additional utilities, with one operating system and a set of software, with different boot disks, etc.
A multiboot flash drive is used on a computer in the following cases:
- operating room setup Windows systems or Linux;
- reinstalling the operating system;
- System Restore;
- computer virus treatment;
- holding necessary work in the operating system using special utilities.
All this can be done using a regular bootable flash drive, with the exception of the possibility of using several operating systems at once. The user can independently create a multiboot flash drive using programs that support the creation of such USB media.
In this article, to create a multiboot flash drive will be used free program WinSetupFromUSB, which does not require installation on the computer. We have already created in WinSetupFromUSB , and the Windows operating system.
Download the program from the official website. Unpack the self-extracting archive with the program on your computer. The application is launched from a folder, after double-clicking on a file, separate for 32-bit or 64-bit versions of the Windows operating system (read how to find out the bit depth of the system).
Multiboot Windows flash drive in WinSetupFromUSB
Let's create a multi-boot flash drive with multiple Windows operating systems and boot drives.
Typically, modern computers use the UEFI interface (instead of BIOS) with a GPT partition table (instead of MBR). For such computers, the choice of the file system for the flash drive is important. To boot into UEFI from a flash drive, the FAT32 file system is required, because the computer will not see a flash drive formatted with the NTFS file system.
In flash drives formatted in FAT32, the file size should not exceed 4 GB. Therefore, you will have to use images that are less than 4 GB in size. If you are using images larger than 4 GB, format the flash drive to the NTFS file system. In this case, you will not depend on the size of the files, on most computers the flash drive will boot.
The WinSetupFromUSB program supports images larger than 4 GB in the FAT32 file system. When creating a bootable flash drive, a large file is split into parts.
Plug the USB flash drive into the computer's USB port. The USB flash drive should be large enough to add multiple operating system or utility images to the flash drive.
- Run the WinSetupFromUSB program.
- Check the box in the "Auto format it with FBinst" settings item to format the flash drive. Select FAT file system
- In the "Add to USB disk" section, select the appropriate item, in our case, I chose "Windows Vista / 7 / 8 / 10 / Server 2008/2012 based ISO". You need to check the box, and then specify the path to the operating system image. I chose the image of the Windows operating system
- To start writing the image to a USB flash drive, you need to click on the "GO" button.
- In two windows that open in turn with warnings about deleting files on a flash drive, and about choosing a file system, click on the "Yes" button.
- After the end of the recording process, a message about the completion of the work will appear in the window: "Job done".
The operating system Windows 7 is written on a USB flash drive.
Attention! When writing the following systems, boot disks or utilities to a USB flash drive, you do not need to check the "Auto format it with FBinst" item, because there is no longer a need to format the flash drive.
In the "Windows Vista / 7 / 8 / 10 / Server 2008/2012 based ISO" item, I added an image of the Windows 10 operating system, more than 4 GB in size.
Be aware that WinSetupFromUSB does not support 2-in-1 collaborative images that consist of both 32-bit and 64-bit versions of Windows in the same image. Separately, 32-bit or 64-bit operating system images are supported, which may include several editions of Windows of the same bitness.
After that, a window opened with a warning that the file will be split into parts for use in the FAT32 file system. You have to agree with this.

Then click on the "GO" button.

Once the file copy process is complete, add the following image.
I activated the "Linux ISO/Other ISO Grub4dos compatible ISO" option and then added the Acronis True Image boot disk image based on the Linux operating system.
In the window that opens, edit the name (if necessary) that will be displayed in the boot menu.

Press the "GO" button, wait for the copy to finish.
Finally, I will add a bootable rescue disk of Kaspersky Anti-Virus - Kaspersky Rescue Disk, created on the basis of Linux, to the USB disk.
First, check the box "Linux ISO/Other ISO Grub4dos compatible ISO" and then select the Kaspersky Rescue Disk image on your computer.
The name of the image can be edited. Start copying the image to the USB drive.
This is where we finish adding files to the disk, I think that this is enough for the example. A multi-boot flash drive with several Windows and utilities is ready to use.
Checking the bootable USB flash drive in WinSetupFromUSB
In the WinSetupFromUSB program, you can check the bootable USB disk directly from the program window.
First, make sure that the application has correctly selected the USB flash drive if there are several connected to the computer. USB drives.
Check the box "Test in QEMU", and then click on the "GO" button.

After that, the QEMU virtual machine will start, which will display (or not, if the flash drive was created unsuccessfully) the boot process from the flash drive.
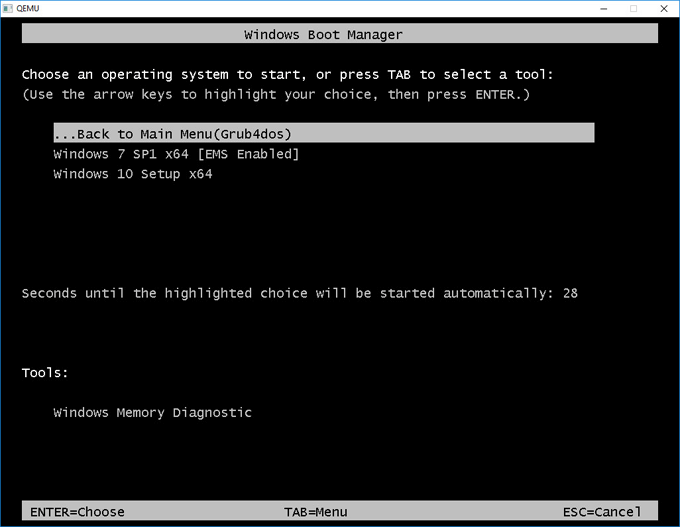
If the flash drive boots, the "GRUB4DOS" window will open. First you need to choose what exactly should be downloaded on the computer.
In our case, by default, the boot from Windows is selected first, then the boot from the hard disk is selected, followed by Acronis True Image and Kaspersky Rescue Disk (in the order in which we wrote them to the USB flash drive).
Use the "" and "↓" keys on the keyboard to select the appropriate boot menu item, and then press the "Enter" button.

When you select "Windows NT6 (Vista/7 and above) Setup", a window will open asking you to select Windows 7 or Windows 10 operating systems for installation.
After choosing to boot from Acronis True Image, the backup and restore utility window will open.

If Kaspersky Rescue Disk is selected, the anti-virus disk window will open.

It does not hurt if you check the operation of the bootable USB flash drive directly on the computer.
Article Conclusions
The WinSetupFromUSB program supports the creation of a multiboot flash drive with several operating systems and additional utilities. If necessary, the user can boot from a bootable USB flash drive to install Windows or Linux operating systems on a computer, to carry out the necessary work on a PC using the utilities stored on a USB flash drive.
Program Name: Multiboot Flash Drive Creation Kit
Software version: 2.0 (04.2016)
Release Date: April 2016
Assembly author: OVGorskiy®
Interface language: Russian (Russia)
To create a multiboot flash drive you will need:
- this package for creating a multiboot flash drive;
- a flash drive with a size of at least 4 GB ( right size depends on your needs)
- iso images operating systems Windows vista/7/8/8.1/10... (how many and which depends on your needs);
- a computer with a recommended RAM size of 1 GB or more;
- a display device with a resolution of 800x600 or more.
This collection for creating a multiboot flash drive was developed for "himself" in order to create a flash drive with which you can check and, if you need to fix errors in the operating system and computer equipment, install OSes of different editions and bitness from it, and all this, being able to easily and just place the OS images on a flash drive and, if you need to replace them and update them, delete and add them. The collection is designed to be loaded from under the BIOS. On computers with UEFI, it is proposed to disable this mode or boot in BIOS compatibility mode.
This package contains
- a set of utilities for preparing a bootable flash drive;
- a set of files to copy to a flash drive;
- a set of additional programs and utilities.
Note: you can put as many OS images on a USB flash drive as its capacity allows. You can download operating system images yourself from this resource or from any other available resources.
List of programs and utilities that will be integrated on the flash drive
- Active Boot Disk Suite 9.1.0 Ru - a huge package of utilities for working with the OS and computer;
- AntiWinBlock 3.1 FINAL Win8.1PE Upd 03.2016 - a software package designed to treat an infected Windows system from all kinds of viruses. It will help in restoring the system, both for a novice and an advanced user. In the disk best programs to fight viruses: AntiSMS, AntlWInLocker, uVS, Dr.Web, ResetWindowsPassword, TotalCommander....
- Paragon Hard Disk Manager 15 Pro 10.1.25.813 ru - a well-known set of utilities for working with hard drives;
- Acronis Media 2016 (Acronis True Image 2016 and Disk Director 12.3270) - a new set of utilities for working with hard drives;
- Win7 Live CD x86-x64 by Xemom1 - a mini OS that runs from a flash drive based on Win7;
- Kaspersky Rescue Disk 10 Upd 03.2016 - Kaspersky antivirus for checking the OS for viruses;
- AntiSMS 8.3 PE4 - unlocking the OS after infection with trojans, blockers, etc.;
- AntiWinLocker LiveCD 4.1.5 WinPE4 - unlocking the OS after infection with trojans, blockers, etc.;
- Reset Windows Password 5.1.5.567 - reset user passwords for the forgetful;
- Active Password Changer 6.0 DOS program will help you quickly and easily reset your Windows password!
- HWINFO-AIDA - getting complete information about the PC (DOS);
-Victoria 3.52- best utility to work with a hard disk (DOS);
- Memtest86+ 5.01 - the best utility for testing RAM (DOS);
- GoldMemory 7.85 - utility for checking RAM (DOS);
- MHDD 4.6 - HDD testing and recovery (DOS);
- Volkov Commander (NTFS+) - file manager for DOS;
- FixNTLDR - restore Windows bootloader (NTLDR is missing Press...);
- Kon-Boot 2.1 Commercial - password bypass utility when logging in (for specialists!);
Note: if you are not satisfied with the set of programs and OS, as well as the design of the menu, you can painlessly replace everything with your own, of course, having little skills in this.
Description of the process of creating a bootable USB flash drive
Introduction. I think we all have a few favorite CD/DVDs with operating systems, programs, utilities for restoring and checking OS and hardware, etc., which we carry with us all the time - just in case. But CD/DVD is a bulky and unreliable medium. If you are tired of carrying a bunch of CD / DVD with you, I suggest burning it all on a USB flash drive. And why not make a bootable USB flash drive with distributions of the necessary OS out of them? This can be very useful when installing / reinstalling operating systems on netbooks where there are no optical media drives. And it can also speed up the installation process and make it much quieter and easier on a computer that has a drive. A bit of theory. Initially, the bulk of flash drives do not have the ability to boot from it, and Computer BIOS doesn't even have that feature. You won’t find it in BootMenu, there are a lot there, and usb-floppy, and usb-cd, and usb-hdd, but there is no pure flash drive. It is necessary to deceive the computer and present our flash drive as a supported device. Usually, the boot area of the USB HDD is taken as a basis, i.e. we present the flash drive as a bootable hard drive. How to do it? We use specialized utilities for this. So, we apply a simple and intuitive way that works on most flash drives .....
Warning: all data on the flash drive will be deleted, take care of saving the necessary data from it on another medium!
Instruction. Part 1.
- Unpack the archive of this assembly to your hard drive.
- Insert flash drive.
- Open the "Tools" folder.
- Run HP USB Disk.EXE to format the flash drive (see Fig. 1).
- Using the BOOTICE program, install the bootloader (see Fig. 2, 3, 4).
After this procedure, a bootable USB flash drive will be created, now we need to place the files we need on it. Open the "Files_for_flash" folder, select all the files and copy them to the root of the flash drive. To check that everything was done correctly, you need to run the "Moba LiveUSB 0.2" program from the USB flash drive. This is a miniature virtual machine emulator designed specifically for checking bootable flash drives. After launch, a boot menu should appear with working commands for launching programs. True, not all programs are launched from under the emulator, but you can evaluate the performance of the menu. Also, a flash drive can and should be checked during a real boot from it by restarting the computer. Now the flash drive is ready for use as a resuscitation and test drive.
Differences from previous versions
- discontinued support for integration on a USB flash drive WinXP;
- updated almost all programs and utilities for the flash drive;
- Changed the method of integrating the OS on a USB flash drive;
- completely changed the interface of the boot menu;
- now you can integrate as many OS images on a flash drive as it will fit on it, without combining them in advance into one image.
Additional material on a flash drive
FiraDisk_integrator - utility for integrating FiraDisk into OS images;
GFX-Boot Customizer - a program for creating your own boot menus;
Moba_LiveUSB_0.2, MobaLiveCD_v2.1 - virtual machine emulators for checking the boot menu;
WContig is a program for defragmenting files on a flash drive.
Brief description of programs
Multifunctional multiboot flash drive.
Editorial staff OVGorskiy.
Active Boot Disk Suite 9.1.0 Ru
Active Boot Disk Suite is a real operating system on a CD/DVD/USB drive. To download this rescue disk, which contains many tools for working with disks, you only need to burn the image to a disk or USB flash drive and restart your computer. To disk distribution [email protected] Boot Disk includes tools for data recovery, resetting Windows passwords, creating system backups, safe removal information, etc. [email protected] Boot Disk Suite allows you to create images in Windows (based on Windows 7) and DOS shells, you can also add additional files to the image using the Boot Disk Builder. After that, the program will write the created image directly to a disk, USB flash drive, or create an ISO image file of a boot disk.
AntiWinBlock 3.1 FINAL Win8.1PE Upd 03.2016 - a software package designed to cure an infected Windows system from all kinds of viruses. It will help in restoring the system, both for a novice and an advanced user. The disk contains the best anti-virus programs: AntiSMS, AntlWInLocker, uVS, Dr.Web, ResetWindowsPassword, TotalCommander....
Paragon Hard Disk Manager 15 Pro 10.1.25.813 en - Everything you need for professional hard drive maintenance! Unique protection and recovery tools for physical and virtual machines. Market leading partitioning technology for HDDs, SSDs and USB drives. Support for all types of migration scenarios for physical and virtual environments. Agentless protection of MS Hyper-V guest machines. Full support for Windows 10!
Why not have the best? Hard Disk Manager 15 Professional contains everything you need to manage your data and storage devices like a pro. Never before has the home user had such powerful tools at their disposal: comprehensive data exclusion filters to optimize backup and recovery operations, the fastest and most secure storage partitioning technologies on the market, agentless protection of Hyper-V guest machines.
Acronis Media 2016 (Acronis True Image 2016 and Disk Director 12.3270)
Acronis Rescue Media Full - All-suitable boot disk containing a full backup software package that allows you to create accurate images of a hard disk and its individual partitions, manage partitions - create, move, merge, divide. There are two versions of the disc in the distribution: Russian and British. The disks are complete collections of the most popular Acronis utilities. The "native" boot menu is used.
Win7 Live CD x86&x64 by Xemom1
Win7Live by Xemom1 is a special edition of Win7Live with classic interface and support for network and SCSI/SATA devices. There is no multimedia support. ERD-Commander 6.5 is built into the kernel to recover the fallen 7-ki, there is also a regular W7 recovery function. It is possible to install 7-ki in the classical way (from a CD or from the SOURCES folder on any disk), i.e., W7PE can completely replace the PE-installer of the seven. You can also install any version of Windows from 2000 to 2008 from any media/folder using the WinNtsetup2 program.
Kaspersky Rescue Disk 10 with updated databases for March 2016.
Kaspersky Rescue Disk 10 is a special program designed to scan and disinfect infected x86 and x64-compatible computers. The application is used when the degree of infection is such that it is not possible to cure the computer using anti-virus programs or disinfection utilities (for example, Kaspersky Virus Removal Tool) launched under the operating system. At the same time, the effectiveness of treatment is increased due to the fact that malicious programs that are in the system do not receive control during the loading of the operating system. In disaster recovery mode, only the tasks of scanning objects and updating databases, as well as rolling back updates and viewing statistics are available.
AntiSMS 8.3 PE4
The AntiSMS Boot Disk is designed to automatically treat ransomware, blockers and Trojan.Winlock Trojans that block Windows, requiring the user to send SMS to unlock the system. Allows even inexperienced users to unlock Windows if the system is infected with blockers (ransomware, adware and porn banners) or Trojan.Winlock trojans. When starting the computer from the boot disk, the AntiSMS program automatically performs all necessary actions to disinfect the infected system. AT manual mode The Windows Registry Editor is available.
AntiWinLocker LiveCD 4.1.5 WinPE4
AntiWinLocker LiveCD is designed to unlock and to treat an already infected (blocked) Windows OS, in case of infection with a winlocker (Trojan.Winlock.), which is a banner that blocks the system: launching the Task Manager, Windows boot in safe mode and after that, the attackers extort money, for example, by demanding to send an SMS message to a paid number to unlock Windows OS.
Reset Windows Password 5.1.5.567
Reset Windows Password is the best professional program to reset, change or recover passwords for all types of accounts Windows records. The utility supports all versions of Windows, works with local and domain accounts, almost instantly recovers passwords for accounts, in addition, there is a Russian interface and Russian-language tech. support. Reset Windows Password is necessary if the Administrator password is lost, if the password to enter Windows is forgotten, it is not possible to activate the account. The program is loaded from a bootable CD or USB drive. The application interface is made in the form of a wizard. Therefore, the operation process does not seem complicated even to an inexperienced user. Unlike other similar utilities, Reset Windows Password is the ONLY program that CORRECTLY works with all types of Windows accounts.
Active Password Changer 6.0 DOS program will help you quickly and easily reset your Windows password!
ASTRA 5.52
ASTRA - Advanced Sysinfo Tool 5.52 Program for analyzing computer configuration. It is very undemanding to resources and works even on very old computers, including those that cannot even dream of Windows
Victoria 3.52
Victoria is a program for testing, diagnosing and minor repairs of hard drives with IDE or SATA interfaces. The program is free and is intended mainly for employees of specialized service centers. At the same time, Victoria is very popular among a wide range of computer users, as it allows at home: to identify bad areas of the hard disk surface; determine the average access time; manage the noise level; delete information from the hard drive, without the possibility of recovery; set User and Master passwords.
Memtest86+ 5.01
A key update to Memtest86+, the trusted RAM test. The first beta version added support for all modern platforms and introduced a number of major internal changes, including multi-threading support, increased crash detection speed, and display of processor temperature.
GoldMemory 7.85
The program is a comprehensive test to check the RAM for errors. Supports almost any type of modules, as well as any PC-compatible platform in various configurations. Allows you to scan all available modules and determine the presence of errors, which, as a rule, affect the instability of the system as a whole. The utility is designed to work under DOS-compatible operating systems, there are a number of command parameters for batch work and a function for creating reports on the results of testing.
MHDD 4.6
MHDD is a software package for accurate diagnostics and minor repairs of hard drives (HDD). Allows you to work with drives at a low level, directly through the controller's IDE ports. Performs very fast and accurate diagnostics of the entire surface of the drive (unlike programs such as NDD, ScanDisk, which address only logical partitions), regardless of the data that is on the drive being diagnosed. Allows you to get rid of the so-called "soft"-bad sectors as quickly as possible.
Volkov Commander (NTFS+)
The famous shell for DOS. VC allows you to mark, copy, move and delete directories with all their nested subdirectories just like regular files. When copying, you can split and glue files. The functionality is extremely rich.
FixNTLDR
The Fix NTLDR is missing utility restores the Windows bootloader, correcting the situation when the message "NTLDR is missing" is displayed on the screen when booting the computer Press CTRL+ALT+DEL to restart...
Kon Boot 2.1 Commercial
Kon-Boot is an application that modifies the contents of the Windows kernel on the fly/during boot, bypassing the Windows authentication system and allowing you to log in to a password-protected account without entering a password. Your favorite password is not overwritten, and when you restart Windows, the original contents of its kernel and the authorization procedure are restored.