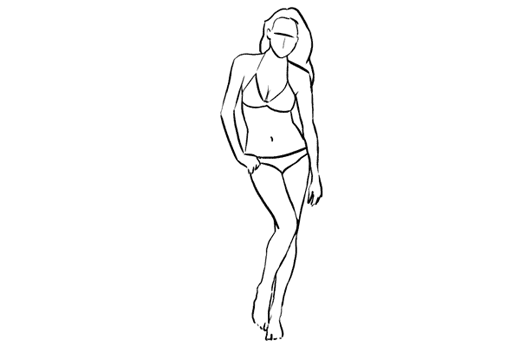
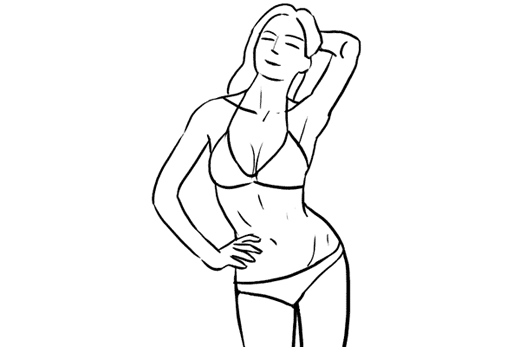
Model poses for a photo shoot. Poses for good photography
Many aspiring photographers are confused when it comes to actual photography. Due to their lack of experience, most of them get stuck when they need to come up with a couple of unpretentious poses for photo shoots. To make life easier for beginners and prepare future models for photography, we bring to your attention schematic poses for photography. The options in this collection are designed for shooting girls.
The article presents 40 successful poses that are suitable for girls and women of different sizes. Later we will also post poses for group photoshoots, poses for, and for.
Pose for a portrait of a girl. The model turns her head towards the photographer, while her chin is slightly lowered to create a more romantic and exciting image. Open pose for shooting. You can shoot both full-length and portrait.
  One of the options for shooting a portrait. Looks great when photographing near a window, door, tree and other support. The model can look into the frame, or into the distance, creating interest in what is happening outside the frame.
  An active pose in which the girl turns her head sharply to create beautiful effect developing hair. You need to shoot with a fast shutter speed and catch the moment when the face is open
  A very “cozy” pose, suitable for photography at home or outdoors. Instead of a cup, the model can have a book, a flower, or any other object that matches the image.
  An uncomplicated pose that is perfect for photographing at home and outdoors. Sitting in this position, the model feels comfortable and confident, which allows the photographer to experiment with the angle.
  Pose for shooting a portrait from the waist up. You can play with the position of the hands - try to put your hand under your head or put it on your shoulder.
  Not a bad option for shooting outdoors. Suitable for more relaxed girls, as it requires relaxation and confidence from the model.
  Pose for a full-length portrait. Well suited for individual shooting and photographing models for online stores.
  Romantic pose, you can also ask the girl to stand on tiptoe and / or spin around
  The pose is great for creating a cute, spontaneous look. You can try different variations from the perspective.
  A pose demonstrating a woman's confidence and efficiency. Suitable for city or studio photography
  Another "strong" pose, which in its various variations can be used for shooting outdoors and in the studio.
  An excellent option for shooting a full-length portrait. The pose is perfect for photographing a well-fed woman, since the hand and the rotation of the body will allow you to hide flaws and emphasize advantages.
  An interesting pose for photographing a girl in a city where there is a support. A romantic look can be complemented by soft lighting. You can try variations with hand position and head tilt.
  A beautiful pose for a photo shoot in the city and in nature. If the girl has a good command of her body, then ask her to pose beautifully, playing with the position of the hands and arching of the back and body.
  Another option for a pose for photographing a girl who has good control over her body.
  A good pose for shooting on a bridge, which hides body flaws by rotating the body
  A fairly comfortable posture that emphasizes the length and slenderness of the model's legs.
  Pose for shooting a waist-length or full-length portrait, which, due to the position of the legs, makes the silhouette more slender and elongated.
  Pose for a portrait of a girl. The model looks as if looking back at the photographer. Try to call the girl so that she really turns on you. This will make the picture look more natural, and the look will be sincere.
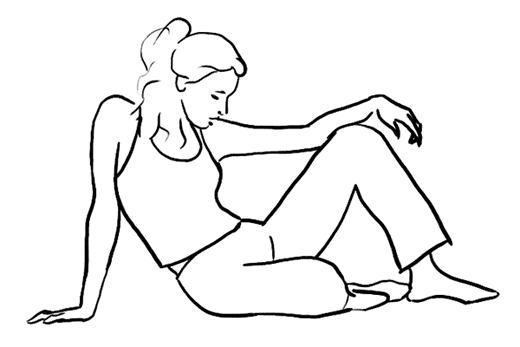
  Quite a difficult pose. The difficulty is to do it with ease. If you see that the model is behaving quite playful and relaxed, ask her to flirt in front of the camera.
  Good pose for a photo shoot full girl... The model is, as it were, hidden behind the support.
  An excellent pose for a photo shoot of a full girl. Shooting from above allows you to hide figure flaws, and the hands covering the body make the fullness even more invisible. An open smile will make the image kind, gentle and expressive.
  No losing position for portrait or full-length photography.
  A romantic pose that also hides figure flaws. You can also try different variants with a look, position and angle.
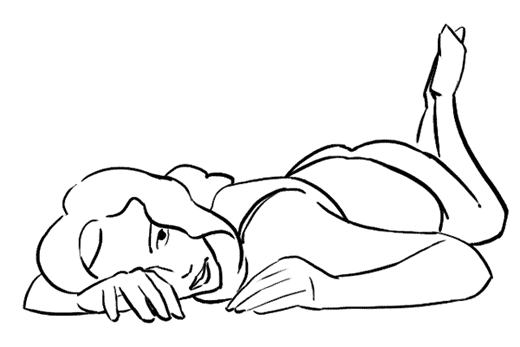
  Expressive pose for taking pictures of nude or photographing on fresh air... You can call the model to look back at the photographer, so that the look is lively and natural.
  A great option for a photo shoot at home or outdoors.
  A great pose for a nude photo shoot. You can try different hand positions and head rotation.
  An open pose for athletic girls. When photographing, try not to cut off the arm on which the torso rests, as the image will turn out to be cut off and not aesthetic.
  A simple but effective pose for a girl's photo shoot. It is better to photograph a little from the side, so that the leg that is closer to the frame does not seem large.
  A striking pose for slender models. It should be used when photographing plastic and liberated girls. It is important that she pulls the socks, so the legs will look slimmer and longer.
  A flirty pose for a waist-length portrait. It is important that the girl behaves at ease in front of the camera.
  Another option for shooting waist-high. The model's gaze can be directed into the frame or above it, in the direction of the head
  A beautiful pose suitable for slender girls. For implementation, you must use a support - a wall or a tree. If possible, you can beat different angles and head positions.
  A good pose that demonstrates the slimness of the model.
  A classic pose for a photo shoot. Good for outdoor photography. It is important that the girl pulls the sock, otherwise the image will be rude and unfeminine.
  A spectacular and striking pose that is suitable only for confident girls. If you feel that the model is embarrassed by the camera, do not load it.
  A romantic and touching pose. The back option also looks impressive when shooting with soft light.
  A very simple but effective pose for a girl's photo shoot. It is important that the model does not slouch and behave confidently.
 The main goal of this tutorial is to show you some basic poses for standing photography. They can serve as some starting points for different variations when shooting women. Previously published articles create imagery as a guide for a photo shoot. After a series of articles, we would like to describe the process in more detail and show real photos created using these tutorials.
Standing Photography Poses - Pose 1
It's best to start with the easiest photography pose. It is very easy to describe and understand how to take this pose. This pose can be called a "side portrait". Just tell your model to stand sideways to you, turn her head and look over her shoulder into the camera lens. Let him straighten his shoulders, and his arms hang down freely.
Photo 1... By following the above guidelines, you should end up with a snapshot that looks a lot like this one. Next, you should choose the appropriate facial expression. You can start with a subtle smirk and experiment until a big smile or even laughter. Once you've found it, tell or even show your model how it should be and ask her to portray that expression.
Photo 2... After getting good shots in the original pose, you can change it a little. In this case, the model was asked to look into the camera lens, turning her head slightly backwards, as if over her shoulder. This is practically the same pose, but from a different angle, but the differences between the shots are already noticeable.
Photo 3... Different gaze directions and head tilts are quite acceptable. In this shot, the model was asked to look back and look down along her body. This pose is good in many situations, but, in fact, it is not much different from the original pose.
Second pose for standing photography
Having looked at the illustration, you should remember the main thing - it will be a portrait in which hands have covered the head. This is all you need to know to create the initial pose. Over time, you may well develop your own successful combinations faces and hands in the pictures.
Photo 4... Before using your arms, ask the model in front of the lens to shift their weight on one leg. In this position, her body will bend slightly, and the line of the shoulders will become uneven. After that, have her gently run her hands around her face and touch her hair. In this case, the hands should not be on the same level - there are many options for their setting.
Photo 5... This image differs from the previous one in that the head is slightly tilted and one hand is behind the hair.
Photo 6... For a change, you can ask the model to look down and press her hands harder against her hair. As you can see, with three small changes to the same pose, you can get three completely different shots.
Another pose for photography that gives room for creativity is the pose with the arms on the chest. Please note that the arms are not crossed, but simply lie just below the chest line. Also ask the model not to grip them too tightly or press down on them. upper arm to the body. Keep it simple and natural.
Photo 7... Before you start shooting, show the model the drawing and give the opportunity to try to get into this position. A little rehearsal won't hurt.
Photo 8... In this photo, when shooting directly, the contours of the body did not stand out well, so it was taken from a slight elevation at an angle from top to bottom.
Photo 9... Another way to transform this pose is to rotate the model 180 degrees. To make the shot look more different from the original, ask the model to rest against the wall. Further, taking this picture, the photographer approached the model and took only the face.
This pose does not require any special explanation - the model stands half-turned, resting her hand on her waist.
Photo 10... In this shot, the model is facing away from the pose shown in the picture, as it was a better angle for her. Remember that there is always a better angle for every person. If you are unsure, take shots from both sides and ask the model which angle she likes best.
Photo 11... Taking this picture, the photographer turned to the model 45 degrees and asked her to look directly into the lens.
Photo 12... From the same angle, the photographer stepped back from the model to capture her almost full-length in the frame. As you can see minor changes when shooting in the same position, they help to take completely different pictures from each other.
The concept for this simple yet elegant pose is that the model is standing against a wall with her hands behind her back.
Photo 13... Ask the model to rest their back against the wall. After that, have her transfer her body weight to one leg, and cross the other with her. Even if the legs are not visible in the picture, it is very important in order to give the body the shape of the letter S. Then ask her to move her hands behind her back, keeping them on different heights... Finally, she should bend her upper body forward slightly.
Photo 14... Here the photographer changed the angle at which he was in relation to the model and took a picture.
Photo 15... The photographer continued to experiment and slightly changed the position of the arms and head tilt. The shot looks similar to the previous one, but the model looks more graceful.
Another pose near the wall, but this time the model is facing the wall. Both hands lightly touch the wall just below the chest line.
Photo 16... The model should follow the guidelines in Photo 13 with the difference that she is now facing the wall. The photographer turned it 180 degrees again, i.e. removed not as shown in the picture.
Photo 17... The photographer changed the angle of the shot, placing himself almost parallel to the wall, and took a portrait-type shot.
Photo 18... The model changed the position of her arms to slightly alter the shot.
A more difficult pose against the wall than the previous ones, so the model needs additional clarification.
Photo 19... The difficulty of this pose for the model lies in the fact that she stands at a short distance from the wall, leaning into it with her shoulder, which is slightly pushed forward. The hand touching the wall is relaxed. The model's body weight is transferred to the leg that is away from the wall, and the legs are crossed. The other hand rests on the hip. The elbow is pulled behind the back.
Photo 20... After the model is shot in the original pose, you can experiment a little and take pictures with some variation. Here, for example, the photographer asked the model to lean forward slightly along the wall and photographed her at a closer distance.
Photos 21... In taking this shot, the photographer asked the model to turn, put two shoulders against the wall and look down.
Thus, based on seven basic poses, more than 20 different photographs were taken. In fact, by making certain changes and variations to the basic poses, you can make an almost uncountable number of them.
It's no secret that it is usually more difficult for men to relax. Especially in front of the camera. In the pictures, men often either stand at attention, or, conversely, are pretended to be relaxed, which gives out even more tightness.
In order to become more photogenic, you don't have to strain all your muscles or pretend to be brutal. It is enough to look confident.
To do this, take a natural pose with a calm expression on your face. Even if you are smiling, the smile should not be tense. Sometimes it is enough to smile only with your eyes.
A couple more tricks:
- To emphasize the masculinity of the figure, the shoulders should be turned towards the camera, and the hips, on the contrary, should be slightly turned away (we are talking about a few degrees, the wasp waist is not your goal).
- To make the look more confident, it should be directed in the same direction as the face.
Photo standing
Take a "closed" pose with your arms crossed on your chest. She will give you confidence. Just do not forget about posture: the shoulders should be straightened, and the stomach should be pulled in. The pose is good for both portraits and full-length shots.
Gladkov / Depositphotos.comLean your side or back against a wall, for example. Hands can be folded over your chest or stowed away in pockets. It is not necessary to look into the lens, you can turn your head to the side.
 feedough / Depositphotos.com
Standing facing or half-turned to the camera, transfer your body weight to one leg. Either set the second aside, or cross with the first. Hands can be stowed away in pockets or folded over your chest.
 Manowar1973 / Depositphotos.com
 At work
It may not be in line with the rules of etiquette, but it often looks good. Of course, you shouldn't climb on the table with your feet - just sit on the edge. Fold your arms over your chest, put them in your pockets, or rest them on the countertop.
 .shock / Depositphotos.com
You can lean forward slightly or turn half-turn. Place your hands in front of you or touch your chin with one. If there is an additional object in the photo, pay attention to it - it will be more natural.
 Lenets_Tatsiana / Depositphotos.com
Sitting freely in a chair, put one leg on the other. You can place your hand on the armrest, on your knee, or bring it up to your chin. Just don't support your head.
 furtaev / Depositphotos.com
 Sitting on the ground
Without support
Sit down slightly forward. But do not bend in an arc - straighten your shoulders. You can put your feet in front of you and put your hands on your knees. You can cross your legs with your arms in the center.
 photo_oles /Depositphotos.com
 With support on hands
Cross your legs. Lean on one hand, put the other on your raised knee. An even more natural pose is with support on both hands. This pose looks great when the angle is right.
 depositedhar / Depositphotos.com
Lean against a wall or tree. Extend the leg closest to the camera, and bend the other at the knee, placing your hand on it. Or cross your legs in front of you. Relax your back using the support, but do not spread out.
 Wavebreakmedia / Depositphotos.com
 Close-up
This is the simplest, any pose can be.
Take a lot of pictures with different angles, with different emotions. If the portrait is full-face, look into the lens. If the head is turned, look to the side. You can tilt your head slightly. You can bring your hands to your face. Smile or make a serious face - just don't overdo it.
Be sure to try converting the photo to b / w - it will almost certainly turn out cool.
 curaphotography / Depositphotos.com
 Of course it is not strict rules... But by following these tips, you can find 2-3 good angles. Then you will feel more confident in front of the camera and can experiment in search of more interesting pictures.
This memo of the 20 best poses for photographing girls can help you out in difficult situation... Many photographers use similar techniques both during the photo shoot itself and during preparation for it.
In the previous articles from the "" series, we wrote about successful poses for shooting men, girls and couples.
The poses described in this article are provided as guidelines. I personally would recommend discussing these poses with your model, especially if she has little experience in photography. It is also useful to suggest to the model the most successful poses for her. This communication gives great results and both of you will feel more confident.
So let's start in order.

1.
A very simple pose to start your portrait photography. Have the model look over her shoulder. Pay attention to how unusual and interesting a portrait can look if you just shoot it from an unusual angle.
 

2. V portrait photography little attention is paid to the position of the hands. However, you can add a certain mood to your shots if you ask the model to experiment a bit with the position of the arms around the head and face. Do not forget that there should be no unfolded palms in the frame, only shoot your palms from the side!


3.
You may already be familiar with this rule of composition, usually the rule of thirds. You can not only position the subject in certain points, but also use diagonal lines or tilt the camera. This way you will achieve interesting and unusual angles.

4. Very cute pose for shooting a seated model. Keep your knees together.


5.
Another open and attractive pose for the reclining model. You will need to go down and take a low-angle shot.
 

6.
Pose option for a lying model. Hands can also be placed on the ground. Very suitable for outdoor photography such as grass or flowery meadow.
 
7. A versatile, simple pose that nonetheless looks gorgeous. You will need to get down and shoot practically from ground level. Then move around the model taking a series of shots. Also ask the model to change the position of the head and arms.


8.
Another simple yet effective pose for women of any shape. Try experimenting with the position of your arms and legs. And don't forget to focus on the model's eyes!


9.
Very cute pose. Equally good for different places Shooting: the model can sit both on the bed and on the ground in the grass or on a sandy beach. Shoot from a low height and focus on your eyes.

10.
A gorgeous yet simple pose for a seated model.

11.
Another simple and supportive pose for a model sitting on the floor. Try to shoot from different angles.


12.
A great way to showcase your model's good figure. Perfectly accentuates the silhouette when shooting against a bright background.


13.
A simple and relaxed pose. Many variations are possible. Ask the model to turn and experiment with hand positions and head rotation.

14. Another very simple and elegant pose. The body of the model is slightly turned to the side, hands are in pockets.

15. Leaning slightly forward can give you a very attractive angle. This is a great way to emphasize the shape of your model.
 

16. A very sensual pose. The model holds her arms behind her head, which emphasizes the curves of her body. Suitable for all body types.


17.
There are endless options available for full-length photography. This pose is just the starting point... Ask the model to turn a little, change the position of the head, the direction of sight, etc.


18.
Relaxed pose of a model standing upright and leaning against a wall. Remember that the model can not only lean against the wall, but also lean on it with her hands or feet.


19.
Please note that full-length shots are quite specific and are best suited for slender models. The secret of the pose is simple: the body should be bent like the letter S, the arms should be relaxed, the weight is distributed only on one leg.

20.
A graceful pose for a slim model. Various options are possible. To find the best pose, ask the model to slowly move their arms and bend. When will you notice a good option, ask the model to freeze and take a few shots. Repeat until you have taken as many frames as needed.

21.
A very gentle and romantic pose. Any fabric can be used. Please note that the back does not have to be completely naked. Sometimes it's enough to just bare your shoulders.
So here are a few poses to get you started. I hope that at least a couple of them will be useful for photo shoots of a wide variety of topics. Don't forget that every versatile pose is just a foundation. Each of them has an endless number of options! Just be creative and change every pose as needed (for example, try different angles or have the model change the position of her arms, head, or legs).
How to pose correctly for a photo shoot is a question that I have never asked until I was forty. I was not photographed often, sometimes it turned out well, sometimes it was monstrous. But I managed to perceive successful photos as a gift of fate, and unsuccessful ones… just not. And never think about it, but what am i doing wrong in these unfortunate photos.
Now, when I run a fashion blog and take pictures a lot and often, I had to delve into the process of photography much deeper. It turned out (that is, I theoretically knew this before, but I felt it all the way only now) that lighting is critically important for good photo... At the right light the most ordinary woman can look like a fairy nymph in a photograph. And bad light will make Baba Yaga even out of beauty on vacation.
Of course, the quality of the camera is also important, and even more important is the skill of the person holding the camera. But! If you are standing in front of a genius photographer in the pose of a pregnant porcupine, the best thing he can do is to lower the camera and not shoot.
How to make a photo successful - the model should know first of all
To build the body correctly, take a winning pose, "hide" figure flaws and show advantages - these tasks are solved on this side of the camera, not on the other. Professional models are taught this, no one teaches us mere mortals. And for us this is perhaps even more relevant, because we have something to hide, and for us, not every pose will be advantageous.
In two years of filming for my blog, I have filled so many bumps that there is enough for everyone. I spoiled hundreds of frames - it's good that now they are digital, otherwise it would have been kilometers of photographic film wasted. But now I know exactly how to pose NO NEED to pose)))
It would seem that the network is full of materials on the topic "How to take a good photo" and "How to pose correctly"
But there are nuances that are very important for an adult woman significant advantages, and which I did not come across in any of these articles, I had to reach them myself. You will save a lot of time and nerves if you just use my experience and remember ten simple rules good photo. Believe me, the quality of your photos will change critically!
All the photos below were taken under the same lighting, with the same camera settings, almost simultaneously. One photographer, one model, the same clothes. Often these are just two adjacent frames. And the result ... Judge for yourself.
Rule # 1. Half-Turn Pose
You automatically look one size smaller if you are not facing the camera, but half-turned, slightly moving one hip back, and turning your chest and face into the lens. Plus, if there is a hint of a tummy, then in a full face position, the directly incident light makes an elephant out of this fly. And half a turn - everything is not so critical.
If the light falls from the side, then turn a little back that thigh, which is less illuminated. Then the hip and stomach will seem to go into the shadows and the whole silhouette will seem narrower.
Rule # 2. When posing in profile, shift your weight back
Everyone advises to be photographed half-turned or almost in profile, this is one of the most popular poses for a photo. But no one says that the weight must necessarily be located on the leg that is farther from the camera. And the leg in front should be free, without weight.
 On the left is the weight on the leg in front. And on the right, the leg in front is free
 If you lean on the front leg, the thigh seems two sizes larger, and the butt is simply immense. Lean on the back leg and take your butt back - this will immediately make you at least one size smaller.
Rule # 3. Do not protrude that hip that is closer to the camera and to the light.
As mentioned above, if you take one hip back into " dark side"- the whole silhouette seems smaller. But if you put your weight on the thigh that is lit and closer to the camera, it automatically appears to be larger than it really is.
 Here the light falls from the left and therefore the difference is very clearly visible.
 The photographer who is photographing you can determine where the light is coming from. But you should keep this in mind all the time!
Rule number 4. Butt back !!!
Is always! Although on the catwalks and in glossy magazines which year we see fashion trend- walk and pose for a photo with a belly protruding forward. Even the mannequins in the shop windows are in this position.
But the models and mannequins, no matter how much they stick out - they simply have nothing to stick out, they have no bellies. And such a pose is absolutely not suitable for a woman with forms!
 On the left, the belly went forward a little. And on the right, everything is in place
 Regardless of whether you are posing full-face or half-turned, always try to straighten your chest as much as possible, straighten your back and take your ass back - it will pull your stomach and back along with it. And, of course, don't forget about the press 😉
Rule # 5. Don't slouch!
Continuing the previous point. Don't slouch, straighten your shoulders - it's so obvious, without it Good photo will never work. But how often do we forget about it! Meanwhile, a stooped back, shoulders twisted forward are a guaranteed kill of a good shot. A stooped back not only makes you shorter, it also nullifies your neck, steals your waist, lowers your chest, automatically brings your stomach forward - in short, it does everything that you absolutely don't need to do!
 A crooked back - a shot for a smark!
 When taking pictures, repeat to yourself all the time: “Your back is straighter! Smoother back! " No matter how it is already equal, there is no limit to perfection.
Rule number 6. Don't hide your waist!
The waistline, the narrowest part of your body - must be visible in the photo. Therefore, models often place their hands on their hips, lift them up, or somehow remove them from the torso. If you pressed your hands to the body, the sleeves visually merged with the torso - the lines of the body died, no one sees them.
 There is no figure at all on the left. On the right is another matter!
 Always ensure that there is at least a minimum clearance between the waist and the elbow.
Rule # 8. Don't hide your neck!
Especially if your neck is not very long anyway. In attempts to create a "relaxed", "live" pose, we often lower our head to the shoulder - and only memories remain from the neck.
 The way on the right is also not necessary, this is an exaggerated example.
 Keep your head higher - so the second chin will not appear in the photo, out of nowhere, and the neck will be longer.
Rule # 9. Get your hands off!
Not really, of course)) The insidiousness of the "half-turn" pose is that the forearm and hand are in the foreground, closer to the camera. And what is closer to the camera, it seems more, is a property of optics. Do not forget to take your arms back a little - both arms and shoulders look more graceful.
 In the photo on the right, the forearm looks smaller and the whole silhouette is lighter.
 Plus, by pulling your arm back a little, you provide the necessary clearance between the waist and elbow.
Rule number 9. Take your bare hands all the more!
Everything that is said in clause 8 is even more relevant if you are taking pictures in the summer and with with bare hands... Everything closer to the camera seems larger, and if it is something else and light, it looks one and a half times wider. Bare hands can look like some kind of sausages without a skin, if not taken away from the camera.
 The hands are the same. Another view
 Rule # 10. Lift your chin.
You can write a separate article and even a book about the rules for shooting portraits, there are a lot of their own nuances. I can only say one thing general rule: All other things being equal, a head tilted up slightly looks better than a head tilted down. As mentioned above, lowering your head, you create a double chin, even if you do not have one.

And here it also works general principle: closer to the camera, it seems larger. When you tilt your head forward, your forehead appears more. When you tilt your head back a little, your lips seem more 😉
You will say: how can a living person remember all this the first time?
And I will answer you: of course not! But, if you systematically dislike your photos, then maybe it's time to do something about it? Today everyone has a phone with a camera in their pockets. Practice in front of the mirror, ask a friend to take a picture of you. Look at my cheat sheet, try different poses, and you'll see what works for you.
A little training, and you will learn to automatically take a good pose and you will turn out in the photo, at least, not worse than you are. And maybe a little better)) Still, photography is not only a technique, but also a bit of magic 😉
Tags: ,