Bouquet of maple leaves. How to make beautiful maple leaf roses
Well, here comes the new autumn. And that means our golden autumn bouquet becomes relevant again. Well, another retrospective. But for some, it will surely be a revelation.
Just a miracle! The reality of unreality! Make a maple leaf rose!
Virtual lesson from Natalia. The whole sequence of making such a wonderful bouquet is in the photos and comments.
Naturally, first things first, we collect the leaves. Too small, dry, diseased, torn leaves are NOT suitable for us. We will use different colors.

For one flower, it is better to choose leaves of the same color.
We fold the first sheet in half across the central vein so that the front side is outside.


And now we turn this folded sheet into a tight roll.


This roll will be the core of the future rose.

Now around this core we begin to lay the "petals.
To begin with, we take a sheet and place a core in its center. Note that the front side of the leaf is inside the flower!

Fold this sheet in half. The edge of the inflection is located above the core by a centimeter and a half.


And now we also bend this protruding edge outward. But the fold is no longer smoothed ...

And we wrap the side edges of this double-folded sheet on both sides around the core.


We pinch the lower edges of the leaf at the very base of the flower.

We take a new sheet for the next "petal" and repeat the operation just performed, only this petal is located on the opposite side of the first sheet.


Here, several stages of the same type, shown above, are skipped, when the petals are collected in a bud. Add them until you feel enough.

When the bud is ready, we tie its base with threads to secure the flower.


How many flowers will be in your bouquet - you decide. For this "photo shoot" we had three.

Now let's go green. The most colorful leaves will do here.
In order for these leaves not to curl up into a tube the next day when dried, it is better to iron them beforehand between sheets of newspaper. They will become more fragile, but careful handling will not damage them.
We evenly put these leaves in a circle under the buds and fix the now ready-made bouquet at the base with the same threads.
On top of the threads, by the way, it will be possible to wrap this knot with yellow paper tape (painting tape), this will hide the threads and make it look neater and more finished (there is no paper tape in the photographs).


Here is the autumn bouquet and ready.

I'll tell you a secret, I folded one of these three roses. I think it's easy to recognize.
P.S. And here is some advice received from users of the forum on www.EVA.RU:
“In order to stand longer, it is necessary to smear the already twisted roses with vegetable oil (with a brush). It is absorbed in two days, the leaves become soft, do not dry out, do not lose color and do not shrink. "
, natural leather and other improvised materials for making crafts, from which we learned to make beautiful artificial flowers.Autumn has long come into its own and painted the world around us with bright multi-colored colors. Autumn gave us wonderful natural materials for making unique DIY crafts - fallen from trees
autumn leaves different sizes and with bizarre shapes, as well as numerous flowers and inflorescences that we will use to make beautiful flowers, cute lamps , graceful bouquets with artificial roses, original compositions of vegetables and fruits for interior decoration.And children will be happy to help their parents create amazing crafts from improvised, absolutely waste natural material . Such joint leisure is very useful for the development of imagination, fine motor skills of hands, sensory abilities of small children and elementary school students.
From autumn natural materials, you can make not only simple crafts, children's educational toys, applications and herbaria. Interior designers have long adopted the unique beauty and indescribable sophistication of autumn gifts. The walls of the rooms can decorate with exquisite panels and paintings with compositions in the form of flowers from autumn fallen leaves (maple, oak, chestnut), folded with their own hands in a special way. In order to use the fallen leaves of trees and dry flowers for making crafts , bouquets and compositions with your own hands, it is important to properly prepare these natural materials before work. You probably already know that autumn leaves can be laid between the sheets of albums (books, magazines, newspapers) and a load can be placed on top. This harvesting method is suitable for forming a herbarium, children's appliqué or collage.from dried leaves.
But for making voluminous crafts and bouquets of flowers from autumn leaves fallen from trees, this method is not suitable. Before you start twisting such flowers from fallen leaves from trees (for example, roses from red maple leaves), it is important to process them correctly in order to crafts retained their original appearance long time. We will tell you about this in detail later in this article. In addition to advice and useful ideas for creating bouquets and compositions from natural materials, you will find here video lessons , as well as master classes, with the help of which you can quickly make simple compositions with your own hands (children's crafts from leaves, applications, figures, collages), as well as complex bouquets and objects for interior decoration in the form of bouquets with flowers from autumn leaves topiary ) or compositions of dried flowers (see photo).
You will learn how to properly process and preserve maple leaves and autumn flowers so that they are made from them. beautiful crafts did not turn into brittle, shapeless and twisted objects. And you can make any of these natural autumn gifts of a wide variety of colors and with surprisingly different bizarre shapes. artificial flowers - big roses , small cornflowers, graceful chrysanthemums, cute daisies, chic water lilies . The color of these homemade flowers can be very different (not only yellow or red) - after all, dried autumn leaves can be painted with an acrylic primer with the addition of a color scheme of the desired color (and then coated with a colorless varnish). With helium pens, you can apply different drawings and geometric figures on the surface artificial flowers autumn theme.
Ideas for creativity:
- Application.
Great idea for spending time with a child! Have you already collected a lot of beautiful fallen leaves and autumn flowers in the yard, dried them, made a colorful herbarium? Let's not stop there! We spread a large sheet of thick paper or cardboard on the table, spread out our "harvest" on it and fold original composition by combining colors and different shapes of natural materials . You can glue the details of the autumn composition on the base with PVA glue (but it is better to use photo glue or gum arabic);
- Collage.
You can fold together with your child a multi-layered bright collage under the frame. The bottom layer is large dark and brown leaves, then greenish, the upper layers are small bright contrasting leaves of red and yellow flowers. We add dry autumn flowers to the collage, adding different shapes from them and we get a beautiful three-dimensional composition.
Or you can add letters or words (as well as figures) to the collage - press a sheet of cardboard with cut out letters tightly to the glued composition and carefully cut it out according to the letter pattern with a clerical knife (of course, with the hands of the parents, not the child);
- Educational game for the child.
Great idea that your little one will love. school age! Glue a half of a fallen leaf onto a paper sheet (pre-cut the sheet vertically). The task of the child is to draw the missing half of the sheet with a pencil (felt-tip pen). Advise your child to choose the appropriate color of the pencil and carefully look at the shape of the half in order to accurately reproduce the mirror part of the composition. The most difficult option is a maple leaf, leave it for later and help the kid draw a little;
- Painted autumn leaves.
You can decorate both flat and voluminous crafts made of leaves with painting. For this work, use helium pens and felt-tip pens (with silver, gold, white and other colors). Bouquets with decorated artificial flowers will be fine and other interior objects;
- Bouquet of autumn leaves and dried flowers.
You will find information below on how to fold flowers from maple leaves with your own hands and collect a bouquet from them. If you decorate such a bouquet with dried flowers and put it in a small wide vase, you will get an excellent compositional center for your room; 
- Tree or topiary from autumn materials.
Another great option for decorating the interior. From fallen branches, you can fold a small tree and decorate it with homemade flowers made from leaves. Or make your own topiary (see photo), attaching a lot of such flowers to a floristic ball (option: on a foam ball); 
Tree (photo):

- Volumetric picture of the gifts of autumn.
As a base, you can use a large photo frame or wooden frame for pictures. background can be made from cardboard painted in the right color . We make interesting compositions with our own hands from maple leaves, dried flowers, fallen pine needles and other natural materials, attaching them to the base with a wire.
Helpful Hints:
How to prepare autumn leaves for making crafts and applications at home.
- for voluminous crafts in the form of flowers and bouquets.
We will not be able to fold voluminous crafts from dried leaves, as they are too brittle. Therefore, we will specially process the collected leaves. We divide the solution - 200 ml. glycerin per 400 ml. pure water. In a tight plastic bag, carefully put the leaves that have fallen from the trees and level them, then fill them with the prepared solution. The package with the contents must be hermetically sealed (with a heated knife) or sealed with adhesive tape. Leave this bag in a dark closet for 3-4 days, and then spread the leaves on paper towel dry out. From these flexible leaves that retain their original appearance for a long time, you can fold the most different flowers(below - MK: how to make beautiful roses from maple leaves with your own hands);
- for flat autumn compositions(applications, collages).
Leaves and flowers collected in autumn are best dried in massive magazines and reference books. The collected natural materials must be thoroughly pressed with a weighty load placed on top of the reference book.
How to dry autumn flowers for crafts and compositions:
- iron drying.
Autumn leaves and many small flowers can be dried with an iron. To do this, lay out natural materials on thick cardboard. , cover with a thin paper sheet on top and iron with a not very hot iron until all moisture has evaporated;
- natural drying.
Great for drying fall flowers. Tighten the rope in a dry room with good air circulation. We put the collected flowers in bunches and hang them on a rope with inflorescences down;
- drying in the oven.
a wonderful way to dry large single flowers (roses, tulips, peonies) for making arrangements. The temperature in the oven should not be very high - about 50-60 ° C. Carefully monitor the process so that the flowers do not turn brown during drying and do not lose their shape;
- bulk drying of flowers.
According to many seasoned florists, this method of drying autumn flowers preserves their natural shape and color. The cut flower is placed in calcined dry sand for 4 weeks. As a container, you can use a box with a fine mesh at the bottom and a retractable bottom. Flowers with terry and voluminous inflorescences (lilies, dahlias, roses) are placed in the sand with stems down, and with flat inflorescences-baskets (buttercups, daisies, asters, forget-me-nots) - with stems up.
What tools and materials can be useful for making autumn crafts:
- Scissors.
Small scissors with blunt ends for a child and sharp long ones for an adult;
Stationery knife and stacks.
With the help of a clerical knife, it is convenient to cut multi-layered parts of crafts. Plastic stacks are great tools for a child to cut individual leaves for appliqué;
- Shilo.
For convenience, choose a tool with a wide wooden handle(length - 5-6 cm) and not very thick stabbing part;
- Long tweezers and tweezers.
Easy to move with tweezers small parts crafts. Tweezers with a flattened twisted front can be borrowed from a manicure set. It is very convenient to twist individual parts of the product and wire with such tweezers;
- Thin wire.
It is often used to form the frame of crafts and toys made from natural materials. For fastening individual parts, it is desirable to use a flexible and durable copper wire with a diameter of 0.35 mm;
- Foil and foil paper.
For decorating autumn crafts, for applications and collages;
- Sewing needle and thread.
For connection individual parts crafts, for the formation of bouquets of leaves and dried flowers;
- Paper.
The more different types paper (different in color, density, thickness), the better. For the manufacture of crafts, applications, bouquets, panels and wall compositions from natural materials, you can use corrugated, wallpaper, velvet, parchment, landscape, wrapping, copy and other types of paper;
- Plasticine and plastic (polymer clay).
For fastening, as well as for sculpting individual parts that complement products from leaves, dry flowers. Working with plasticine polymer clay your child can do;
- Glue.
A variety of brands of glue can be useful in the work. Often use PVA, BF, "Mars". The safest options for a child to use are PVA and glue stick.
For gluing individual parts of the craft, brushes with a hard bristle will come in handy;
- Paints and brushes.
To create applications and collages - watercolor and gouache paints. For coloring voluminous crafts from autumn leaves and dried flowers - acrylic paints. It is most convenient to draw with squirrel soft brushes.
2. HOW TO MAKE A BEAUTIFUL ROSE FROM FALLEN AUTUMN LEAVES WITH YOUR HANDS
Such artificial flower DIY is very easy! For work, prepare autumn maple leaves, strong threads, golden paints and sunflower oil. You can treat the leaves with a solution of glycerin (see the recipe above) for the durability of the assembled craft.
For the manufacture of a single flower, it is best to choose plain maple leaves. The rosettes from the leaves will turn out to be quite large. 5-7 such crafts are enough to fold beautiful bouquet. As leaves for this bouquet with artificial homemade flowers, you can use all the same maple leaves. Make roses red and yellow.
So, let's get to work:
- take a maple leaf and bend it in half (front side outward);
We bend the very tip and twist the leaf into a roll;
We take the second maple leaf of the same color, put the already twisted bud at its base (see photo);
We form a maple rose petal by bending the leaf and wrapping it tightly around the bud;
We wrap the third maple leaf in the same way. The more such rose petals there are, the more voluminous and bigger the rose will turn out. Move a little down each subsequent row so that the flower looks like it has blossomed;
A little above the petioles of the leaves we fix the craft with a thread;
Similarly, we will make 5-7 more of the same roses (yellow, red, greenish);
Lubricate maple roses with sunflower oil so that the bouquet retains its original appearance for a long time. Now you can cover the crafts with golden paint;
It remains to lower a few maple leaves into a small vase, and then form a beautiful bouquet of artificial roses.
3. MASTER CLASSES. LEARNING TO MAKE CRAFTS IN THE FORM OF FLOWERS FROM AUTUMN LEAVES AND A COMPOSITION FROM DRIED FLOWERS
Master class number 1:
STAGES OF STEP-BY-STEP PRODUCTION OF GORGEOUS VOLUME ROSES FROM RED MAPLE LEAVES FALLEN FROM TREES (PHOTO) .
Master class number 2:
HOW TO MAKE A FLOWER FROM AUTUMN LEAVES. ANOTHER OPTION OF FOLDING A BIG ROSE FROM MAPLE LEAVES WITH YOUR HANDS. STEP-BY-STEP PHOTO MK.
Master class number 3:
MAKE CRAFTS FROM LEAVES
You can make a chic bouquet from such natural material as maple leaves. They have a beautiful soft color and are able to easily take a given shape.
For those who love roses and crafts from natural materials useful tips on creating artificial maple leaf bouquets. Their shape and structure lend themselves perfectly to work. In addition, the leaves are completely free of charge. collect in the park together with children is interesting and useful for spending time together.
Suitable for work, as fallen yellowed, and still green leaves. Of these, you can twist such a beautiful bouquet that with its beauty it can outshine the real roses. Moreover, a bouquet of leaves is durable. We can safely say that such a craft breathes a "second life" into dry foliage.
maple leaves - perfect material to create bouquets
Work step by step:
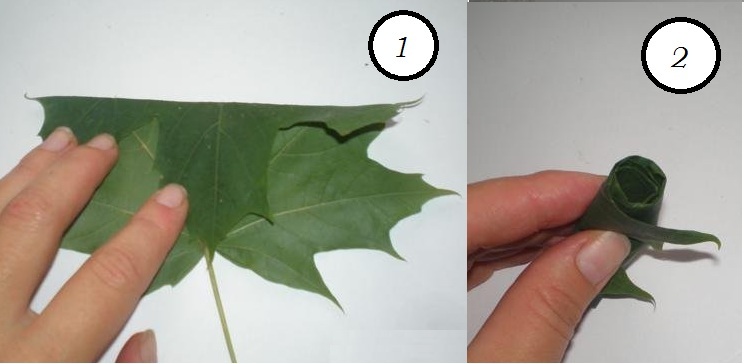
- Take a beautiful, even and clean sheet of paper, put it in front of you and fold it in half. (see photo #1)
- Roll half of the sheet into a tube. This should not be done too tightly, because the flower needs to be lush and voluminous. (see photo #2)

After the core of the flower is ready, you need to start creating petals from other leaves.
Work step by step:
- Take the second maple leaf
- Put the core inside the sheet
- Alternately wrap the sharp edges of the leaf so that when folded, petals are obtained (see photo No. 1)
- After you completely fold the sheet, you can secure it with a thread. (see photo #2)
- In order for you to get a voluminous and lush rose, you will need to roll about five or six maple leaves into one flower. (see photo #3)
- Fasten each new twisted sheet with ordinary sewing thread, make several flowers for the bouquet. (see photo #4)
 Step by step folding roses from maple leaves
 To make flower wrapping, wrap the bouquet in a few maple leaves so that their sharp edges stick out in a circle.

 Tube (wrapper) for a bouquet of roses from maple leaves
  Bouquet with three maple leaf roses
 How to make a bouquet of roses from maple leaves with your own hands?
maple leaves in autumn time years are distinguished by a variety of rich color shades:
- green
- yellow
- orange
- brick
- burgundy
- red
- brown
- brown
The more multi-colored foliage you use in creating a bouquet, the brighter and more beautiful your bouquet will turn out.
You can stick with one shade of foliage to get. For example, only yellow or red roses. But, it is much more interesting to work with completely different leaves marble color.
Yellow roses from maple leaves:
- Take a small piece of paper and fold it in half
- Gently roll the sheet into a tight tube
- Take a large maple leaf, put a twisted leaf in its center.
- Turn the big sheet back
- Start folding the sheet so that voluminous petals grow around the core.
- Fasten the product with a thread
- Roll up a large number of roses into a bouquet
- Wrap wedge foliage around the entire bouquet for splendor.
 Step 1: Folding the Center of the Bud
  Step 2: Folding the sheets around the core
 Step 3: Folding the Petals
  Step 4: Add Volume to the Flower
 Step 5: Stringing the Rose
 Step 6: Making Roses for the Bouquet
 Step 7: Making the bouquet pop
 How to make flowers from maple leaves with your own hands?
Soft maple leaf lends itself perfectly to folding. From it you can make a lush rose or a thin bud.
Ideas for creativity, folding flowers from maple leaves:
 Roses from maple leaves, option number 1
  Large round roses from maple leaves, option number 2
  Red roses with a green stem made of maple leaves, option number 3
 Multicolored roses from colorful maple leaves
 How to make a bouquet of flowers from maple leaves with your own hands?
The secret of the resilient maple leaf flower is soft sheets , which have not yet dried so much to break and burst. The fresh green leaf also rolls up very well.
For crafts, those maple leaves that are collected in November are good - high humidity air and frequent precipitation do not allow the leaf to dry out.
Each leaf you roll to make rose petals should be fix. This is done with the usual thin sewing thread or tape. Just pull tight without tying a knot. How to save maple leaves for crafts?
Everyone known way saving the maple leaf by putting it in a book, unfortunately, is not suitable for preparing material for creating flowers. In this way, the sheet dries out and makes it quite brittle.
There are other ways to save maple leaves:
- Leaves can wax. To do this, melt the wax of one candle on the stove or in the microwave. After that, the sheet is alternately dipped into hot wax from both sides.
- The paraffin sheet should be left on newsprint to dry and absorb excess wax.
- The sheet may darken, but retain its softness, which is very useful for crafts.
- The sheet can also "bathe" in a solution of glycerin. To do this, dissolve half a glass of glycerin in a glass of water.
- The leaves are completely dipped and then tied and hung to dry. Dry the sheet should be about four days.
Video: "Master class: roses from leaves"
Master class on the theme "Autumn roses"
Author: Fahrieva Lyailya Anasovna, MBDOU " Kindergarten No. 10 "The Little Prince" Republic of Tatarstan, Naberezhnye ChelnyThe master class is presented for teachers and children of preschool and school age.
Target: Learn to create beautiful things with your own hands, interesting crafts and jewelry made from natural materials.
Tasks: develop fantasy, Creative skills. Inculcate aesthetic taste. Develop fine motor skills hands
Starting material: we need maple leaves, scissors, threads, rowan for decoration.


For one flower, it is better to choose leaves of the same color.
We fold the first sheet in half across the central vein so that the front side is outside.

After we turn the folded sheet into a roll, then it will serve as the core of our rose.

Now around this core we begin to impose petals.
First, we take a sheet and place the core in its center. Pay attention, the front side of the leaf is inside the flower!
Fold this sheet in half. The edge of the inflection is located above the core by cm.

Next, the protruding edge is also bent outward. But the fold is no longer smoothed out and the side edges of this double-folded sheet are wrapped on both sides around the core.
We pinch the lower edges of the leaf at the very base of the flower.
We take a new sheet for the next "petal" and repeat the operation just performed, only this petal is located on the opposite side of the first sheet.
Here, several stages of the same type, shown above, are omitted, when the petals are collected in a bud. Add them until you feel enough.
When the bud is ready, we tie its base with threads to secure the flower.

How many flowers will be in your bouquet - you decide. For this "photo shoot" nine roses were enough for us. The result is a chic, beautiful bouquet of yellow roses))) you can choose red leaves, everything is up to you.

A new autumn has come, and our golden autumn bouquet of roses made from leaves is becoming relevant again. This is just some kind of miracle! The reality of unreality - fold rose petals from a maple leaf!
The author of the idea of making roses from autumn leaves is my colleague, a teacher elementary school Natalya Yakubova. Unfortunately, her lesson - how to make a rose from maple leaves - was copied from us by many sites without attribution to these materials ...
We are happy to share this art with the readers of the site site.
So, a virtual lesson from Natalia: the sequence of making such a wonderful bouquet of roses from leaves, with my photos and comments.
At the end of the article - advice from our readers who have learned how to make a bouquet of roses from leaves.
How to make a maple leaf rose step by step
We collect suitable leaves (too small, dry, diseased, torn leaves are NOT suitable for us) of various colors. For the manufacture of one flower, it is better to choose leaves of the same color.
We fold the first sheet in half, across the central vein - so that the front side of the sheet is outside.
And now we turn this folded sheet into a tight roll. This roll will be the "core" of the rose.

Now, around this "core" of the flower, we begin to lay the "petals". To begin with, we take a sheet, and in its center we place a “core” (note that the front side of the sheet is inside the future flower!).
Fold this sheet in half. The edge of the inflection of the "petal" is located above the "core" by a centimeter and a half. Smooth out the fold of the sheet.
And now this protruding edge of the sheet is also bent outward, but the fold is no longer smoothed ...

We wrap the side edges of this double-folded sheet on both sides around the “core”.
We pinch the lower edges of the leaf at the very base of the flower.
We take a new sheet for the next "petal" and repeat the operation just performed. Only this petal is now located on the opposite side of the first sheet.

Next, we perform several similar operations, adding new leaves - now the petals are going into a bud. Add leaves until you feel it is enough to complete the flower.
When the bud is ready, we tie its base with threads to secure the flower.
How many flowers will be in your bouquet - you decide. For this "photo shoot" we had three ...

Making a bouquet
Now let's deal with the "greenery" of the bouquet framing our roses. The most beautiful and colorful leaves are suitable here.
So that these leaves do not curl up into a tube the next day when they dry, it is better to iron them beforehand between sheets of newspaper. After this procedure, they will become more fragile, but with careful handling they will not be damaged.
We evenly arrange the prepared leaves in a circle, placing them under the buds in the hand. Then we fix the now ready-made bouquet at its base with the same threads.
By the way, on top of the threads, it will be possible to wrap this knot with yellow paper tape (painting tape). The tape will hide the threads and make the bouquet look neater and more complete.
Here is our autumn bouquet of maple leaf roses and ready!
I'll tell you a secret that I folded one of the three roses of this bouquet :)

But what advice did we get from the users of the forum site www.eva.ru:
“In order for a bouquet of roses from leaves to stand longer, it is necessary to smear the already twisted roses with vegetable oil (with a brush). The oil is absorbed in two days. The leaves become soft, do not dry out, do not lose color and do not shrink.
Tips from our readers:
“Indeed, flowers from the leaves lubricated with sunflower oil last much longer. Checked: our rosette has been standing for a year, and still the same beauty :)
By the way, you can add a couple of drops to sunflower oil essential oil. I added pine - I really liked the result. And you can take orange - it has been proven that it improves mood. Experiment!".
“Sunflower oil will eventually dry out and turn into a sticky drying oil.
Florists for use.
If you put twigs or leaves in a mixture of glycerin with water (3: 1, hot water), they will not dry out, but remain soft. The only thing is that an unpredictable change in the color of the leaves is possible.
Probably, you can grease the autumn leaves with pure glycerin for softness. Or liquid silicone.
“You can go to the flower department and ask to douse all this beauty with a special varnish, which cut flowers are treated when necessary and when not necessary.”
“You can process a ready-made bouquet of roses with ordinary hairspray :)))
I watched how they make a passe-partout from autumn leaves - they are covered with some kind of special glue that makes the entire texture of the leaf clear. Then all his veins become very distinct, and the color of the sheet plays.
“At home I have a can of varnish for flowers (well, for glossy leaves indoor plants shine better). So we covered our bouquet of 11 roses with this varnish, and it turned out really cool!
“I was able to secure such a stunning bouquet of autumn leaves with melted wax. Roses and individual leaves have not lost their color after such treatment and have been delighting us for the second year!”.
“We also sprinkled our roses with sparkles, and it turned out generally gorgeous!”.
“Last fall, I painted roses made from rose leaves with gold paint, and in winter I decorated the Christmas tree with them.”
Here's what happened:

“And we in Israel made roses from plane tree leaves.”
“We don’t have red-leafed maples in the area. I had to use wonderful crimson-red leaves both to make miniature roses and to frame the bouquet.
“Maple leaves for making roses must be large. Moreover, if the size of the leaves is different, then you need to start with smaller ones, because. for the growing volume of the rose, each time a larger leaf is needed.
Yuri Raud, labor teacher (Narva, Estonia)
www.lobzik.pri.ee
On site site
on site site
|
|
Weekly Free Website Digest website
Every week, for 10 years, for our 100,000 subscribers, a wonderful selection relevant materials about flowers and the garden, as well as other useful information.
Subscribe and receive!

